1
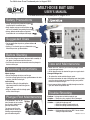
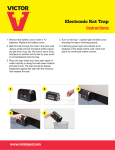
For Multi-Dose Guns purchased after August 2012
MULTI-DOSE BAIT GUN
USER’S MANUAL
Safety Precautions
• Always wear personal protection equipment required
by the insecticide label.
• Keep cap on bait tubes not in use and while
transporting the bait gun.
• Always follow label directions on gel bait
insecticides for use and disposal of empty syringes.
Suggested Uses
• For the application of paste or gel formulations of
insecticides.
• Setting 1-4 are calibrated for syringes with paste
or gel formulations.
Before Starting
• Be sure the plunger rod moves smoothly and is not bent.
• Push the rod release lever forward to move the plunger to
the base of the gun.
Operating Instructions
Attach Syringe
• Retract the plunger to the base of the gun.
• Place the syringe between the locking tabs and twist to the
right.
Select Setting
• Select the setting (1-4) by pulling the
adjustment knob out and turning to the
right or left.
• Align number with the triangle point on
the side of the gun.
Plunger Rod Maintenance
• The Plunger Rod does not
need oil or any lubrication.
• The addition of oil to the
Plunger Rod will result in
dirt sticking to it and blocking movement.
Operation
Setting #1 – This setting will deliver
the 1/4 inch or the 0.25 gram placement recommended by all the major
gel-bait products, including Advance,
Advion, Alpine, Invicta, Maxforce, and
Vendetta.
Setting #2, 3 - This setting typically delivers 0.35 grams of
bait, depending on the product.
Settings #4 – This setting will
deliver the 0.50 gram placement recommended by the
label on Advance, Advion,
Alpine, and Vendetta. Two
(1 gram) or three (1.5 grams)
trigger pulls will deliver the
large placements for Maxforce.
Care and Maintenance
• When not in use, store the gun so that the plunger rod will
not be damaged or bent.
Note: Always start with a fresh bait tube each day. Over
time, when exposed to air, some baits tend to solidify and
make the gun difficult to operate.
Damaged Plunger Rod
• To replace the rod, do not take the gun apart.
• Unscrew and remove the end of the plunger rod, then lightly
press the release knob and pull the rod out of the back of
the gun
• Insert new rod carefully through back of the gun, then attach the tip of the rod.
Trouble Shooting
Problem: Syringe does not hold securely to gun
Solution: • Check for o-ring, replace if missing.
Problem: No bait delivered with trigger pull
Solution: • Check the tip of the syringe for dry bait plug;
check the position of the plunger rod against the
back of the syringe.
Problem: Bait continues to drip after trigger pull
Solution: • Select a lower setting.
24020200 Rev 7/12
For Multi-dose Guns Purchased prior to August 2012
MULTI-DOSE BAIT GUN
USER’S MANUAL
For Multi-dose Guns Purchased prior to August 2012
Safety Precautions
Operation
• Always wear personal protection equipment
required by the insecticide label.
• Keep stopper and caps on all bait tubes while
not in use and while transporting the bait gun.
• Always follow label directions on gel bait
insecticides for use and disposal of empty syringes.
Suggested Uses
• For the application of paste or gel formulations of
insecticides
• Setting 1-7 on the bait gun are calibrated for syringes
filled with paste or gel formulations.
Setting #4 = 1/4 gram
Before Starting
• Be sure the plunger rod moves back and forth smoothly; if
not, place a small amount of oil on the rod.
• Push the rod release lever forward to move the plunger to
the base of the gun.
Operating Instructions
Attach Syringe
• Retract the plunger to the base of the gun
• Push the syringe against the large gasket between the locking tabs, and twist to the right.
Select Setting
• Select the setting (1-6) by pulling the
adjustment knob out and turning to the
right or left.
• Align the number with the triangle point
on the side of the gun.
Plunger Rod Maintenance
In dry conditions, such as the
hot or heated cab of a vehicle,
the oil used to lubricate the
gun may become dry.
The absence of oil on the
plunger rod can result in it
sticking and preventing the
gun from delivering bait.
Setting #6 = 1/2 gramFf
Care and Maintenance
• When not in use, store the gun so that the plunger rod will
not be damaged or bent.
• Oil the plunger rod at the back of the gun on a regular basis.
Damaged Plunger Rod
• To replace the rod, do not take the gun apart.
• Unscrew and remove the end of the plunger rod, then lightly
press the release knob (on the top of the gun) and pull the
rod out of the back of the gun
• Insert new rod (twist slightly) carefully through back of the
gun, then attach the tip of the rod.
Trouble Shooting
Problem: Syringe does not hold securely to gun
Solution: • Check for o-ring, replace if lost or damaged
Problem: No bait is delivered with trigger pull
Solution: • Lightly oil the plunger rod
• Check the setting it should not be a 0
• Check the syringe, the bait may be dry
Problem: Bait continues to drip after trigger pull
Solution: • Bait formation may be too “wet,” select a lower
setting on adjustment knob
24020200 Rev 6/10