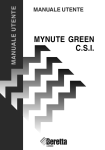
1
Balcony Boiler HE
High efficiency combi boiler
Users
Instructions
0694
0694BR1207
THESE INSTRUCTIONS
TO BE RETAINED
BY USER
G.C. NUMBER
UNICA 32 BHE N° 47-094-99
Vokèra is a licensed member of the Benchmark scheme
which aims to improve the standards of installation and
commissioning of domestic hot water systems in the UK.
Contents
Introduction
Dear customer
Do’s and don’t’s
Things you should know
1.1
1.2
1.3
1.4
1.5
1.6
1.7
1.8
1.9
1.10
Gas appliances
Electrical supply
Guarantee registration card
Appliance log book (UK only)
How does it work?
Dimensions
Clearances required
Frost protection system
Status indicators
Digital display
Getting started
2.1
2.2
2.3
2.4
2.5
Before switching on
Appliance controls
Lighting the boiler
Adjusting the CH temperature
Adjusting the DHW temperature
Page
2
2
Page
3
3
3
3
3
3
3
3
3
4
How to...
3.1
3.2
3.3
3.4
3.5
Top-up the system
Reset the appliance
Shut down the system for short periods
Shut down the system for long periods
Care for the appliance
What if...
4.1
4.2
4.3
4.4
4.5
I suspect a gas leak
I have to frequently to top-up the system
The RED fault light is on
The appliance is due its annual service
I need to call an engineer
Setting the Vokera…
5.1 Mechanical clock
Page
6
6
6
6
6
Page
7
7
7
7
7
Page
7
Page
5
5
5
5
5
INTRODUCTION
Dear Customer
Your Vokera Unica BHE boiler has been designed to meet and exceed the very latest standards in gas central heating
technology, and if cared for, will give years of reliable use and efficiency.
Please therefore take some time to read these instructions carefully.
Do’s and Don’t’s
● Do ensure that the system pressure is periodically checked
● Do ensure that you know how to isolate the appliance in an emergency
● Do ensure that you are familiar with the appliance controls
● Do ensure that your installer has completed the appliance log book section
● Do not attempt to remove the appliance casing or gain internal access
● Do not hang clothes etc. over the appliance
● Do not forget to have the appliance serviced annually.
This booklet is an integral part of the appliance. It is therefore necessary to ensure that the booklet is handed to the
person responsible for the property in which the appliance is located/installed. A replacement copy can be obtained
from Vokera customer services.
2
UNICA BHE
THINGS YOU SHOULD KNOW
1.1
1.2
GAS APPLIANCES
Gas Safety (Installations and Use) Regulations
(UK).
In the interests of your safety and that of others it
is a legal requirement that all gas appliances are
installed and correctly maintained by a competent
person and in accordance with the latest regulations.
ELECTRICAL SUPPLY
Please ensure that this appliance has been properly connected to the electrical supply by means
of a double pole isolator or un-switched socket,
and that the correct size of fuse (3 AMP) has been
fitted.
Warning: this appliance must be earthed!
1.3
GUARANTEE REGISTRATION CARD
Please take the time to fill out your guarantee
registration card. The completed warranty card
should be posted within 30 days of installation.
1.4
APPLIANCE LOG BOOK (UK only)
A logbook section can be found at the rear of the
appliance installation booklet. This important
document must be completed during the installation/
commissioning of your boiler. All CORGI registered
installers carry a CORGI ID card, and have a
registration number. These details should be
recorded in the Benchmark logbook section within
the installation booklet. You can check your
installers details by calling CORGI direct on 01256
372300. Failure to install and commission the
appliance in accordance with the manufacturers
instructions may invalidate the warranty. This
does not affect your statutory rights.
1.5
HOW DOES IT WORK?
Your Unica BHE boiler supplies heated water to
your radiators and hot water to your hot water taps.
The central heating is controlled via a time clock
and any thermostats that your installer may have
fitted. The boiler will light when it receives a
request from the time clock via any thermostat
that may be installed, or whenever a hot water
outlet (tap) is opened.
Your Unica BHE boiler lights electronically and
does not have a pilot light.
In the unlikely event of a fault developing with your
boiler, the supply of gas to the burner will be
terminated automatically.
1.6
Unica 28HE
HEIGHT
WIDTH
DEPTH
780mm
400mm
358mm
Unica 32 BHE
HEIGHT
WIDTH
DEPTH
785mm
553mm
268mm
1.7
CLEARANCES REQUIRED
ABOVE
BELOW
LEFT SIDE
RIGHT SIDE
FRONT
1.8
150 mm
150 mm
12 mm
25 mm
600 mm
FROST PROTECTION SYSTEM
The Unica BHE is equipped with a built-in frost
protection system, this enables the boiler to override the time controls – even if switched off – and
operate the burner and/or pump, should the
temperature drop below 60C for the main and below
4°C for the DHW line. In particular the burner will
be in ON status until the main temperature reaches
35°C for CH appliance and 55°C for DHW appliance.
Please note that the frost protection system is
designed to protect the appliance only, should frost
protection be required for the heating system,
additional controls may be required.
When the frost protection system has been
activated, ‘AF’ is displayed on the appliance LED
display (see below).
NOTE
The frost protection system is reliant on the appliance having a permanent electrical supply, and
being in a non-fault condition.
1.9
UNICA BHE
DIMENSIONS
APPLIANCE STATUS INDICATORS
Your boiler is equipped with 2 status LED
indicators, the Green LED indicates that the flame
is present, whilst the Red LED indicates the
appliance has detected a fault.
3
1.10
DIGITAL DISPLAY
The 2-digit digital display will normally show the
current working (outlet) temperature of the boiler,
however in certain circumstances a fault code or
specific characters will be displayed to indicate
that the appliance is performing a specific function.
GREEN LED
2-digit LED
display
RED LED
DHW
TEMPERATURE
SELECTOR
HEATING
TEMPERATURE
SELECTOR
MODE SELECTOR
SWITCH
Fig. 1
4
UNICA BHE
GETTING STARTED
2.1
2.2
BEFORE SWITCHING ON
Before switching the appliance on please familiarise yourself with:
● how to isolate the appliance from the gas, water,
and electricity supplies;
● how to check and top-up – if necessary – the
system water pressure;
● the time clock or programmer;
● any external thermostats and their functions;
● the appliance controls.
APPLIANCE CONTROLS (see fig. 1)
The appliance controls are situated on the lower
front of the appliance. The appliance controls
include:
● pressure gauge;
● appliance mode selector;
● temperature selector;
● 2-digit LED display;
● burner ON mode (green);
● fault indicator (red);
● optional integral time clock/programmer (if fitted).
The pressure gauge shows the current pressure
of your heating system, the gauge should be set
between 1 and 1.5 BAR. When the appliance is
operating the gauge may rise or fall slightly, this is
quite normal. The minimum permissible level for
the safe and efficient operation of the appliance is
0.5 BAR. Should the pressure fall below 0.5 BAR,
the boiler may lockout.
The appliance mode selector is used to switch
the boiler to the various operating modes:
● OFF/RESET “
”
●
DHW MODE ”
”
●
CH MODE “
●
CH with PREHEATING MODE “
”
”
NOTE
The appliance frost protection is active in all of
the above modes.
The temperature selectors can be used to vary
the temperature of the water that circulates around
your radiators and the water that flows from your
hot water taps. The temperature range is adjustable
between 40oC and 80oC for the central heating, and
between 35oC and 60oC for the hot water. Moreover
if floor heating mode is selected (by using the
relative jumper), the temperature range for CH
mode can be modified between 20°C and 45°C.
When the status indicator (Green) is lit it indicates
that the flame is present and the burner is ON.
When the fault indicator (Red) is lit it indicates
that the appliance has identified a possible fault
and performed a safety lockout.
The integral time clock (when fitted) can be
used to switch the heating on and off at predetermined intervals. The integral time clock or
programmer (when fitted) can be used to switch
the heating and/or hot water on and off at predetermined intervals.
2.3
LIGHTING THE BOILER
Ensure the gas and electrical supply to the
boiler are turned on.
Turn the mode selector switch to the ON position.
When there is a request for heating or hot water via
the time clock or programmer, the boiler will begin
an ignition sequence. When the appliance reaches
the set temperature, the burner will go off for a
minimum period of approximately 3 minutes.
When the programmer/time clock or external
thermostats heating request has been satisfied,
the appliance will switch off automatically.
2.4
ADJUSTING THE HEATING TEMPERATURE
Rotate the temperature selector – clockwise to
increase, counter-clockwise to decrease – to the
desired temperature setting. The temperature can
be set from a minimum of 40OC to a maximum of
80OC (if standard CH mode is selected).
2.5
ADJUSTING THE HOT WATER TEMPERATURE
Rotate the temperature selector – clockwise to
increase, counter-clockwise to decrease – to the
desired temperature setting. The temperature can
be set from a minimum of 35OC to a maximum of
60OC. If the temperature at the outlet is still not
sufficiently hot enough, it may be necessary to
reduce the flow of water at the hot water outlet
(tap).
NOTE
If the appliance fails to ignite during the ignition
sequence, it will enter a lockout condition. Should
this occur, please allow a period of at least two
minutes before re-setting the appliance.
The 2-digit LED display normally shows the
operating temperature of the appliance, however it
can also display additional characters or flashing
numbers to signify specific operating modes or
fault codes.
UNICA BHE
5
HOW TO...
3.1
HOW TO TOP-UP THE SYSTEM PRESSURE
(fig. 2 & 3)
The system pressure must be checked periodically to ensure the correct operation of the boiler.
The needle on the gauge should be reading between 1 and 1.5 BAR when the boiler is in an off
position and has cooled to room temperature. If
the pressure requires ‘topping-up’ use the following instructions as a guide.
● Locate the filling valve connections (usually
beneath the boiler, see fig. 2).
● Attach the filling loop to both connections.
● Open the filling valve slowly until you hear water
entering the system.
● Close the filling valve when the pressure gauge
(on the boiler) reads between 1 and 1.5 BAR.
● Remove the filling loop from the connections.
control
valve
temporary
connection
flow/return
pipe
Fig. 2
double
check valve
control
valve
supply
pipe
Fig. 3
6
CODE
ACTION REQUIRED
AL10
Reset appliance. Call engineer if fault re-occurs
AL20
Reset appliance. Call engineer if fault re-occurs
AL21
Reset appliance. Call engineer if fault re-occurs
AL26
Reset appliance. Call engineer if fault re-occurs
AL28
Reset appliance. Call engineer if fault re-occurs
AL34
Reset appliance. Call engineer if fault re-occurs
AL40
Check system pressure and refill if necessary.
Reset appliance. Call engineer if fault re-occurs
AL41
Check system pressure and refill if necessary.
Call engineer if fault re-occurs
AL52
Call engineer
AL55
Call engineer
AL60
Reset appliance. Call engineer if fault re-occurs
AL71
Call engineer if fault re-occurs
AL73
Call engineer if fault re-occurs
AL74
Reset appliance. Call engineer if fault re-occurs
AL79
Reset appliance. Call engineer if fault re-occurs
IMPORTANT
If the appliance requires to be reset frequently, it
may be indicative of a fault, please contact your
installer or Vokera Customer Services for further
advice.
correct
pressure
value
3.2
APPLIANCE FAULT CODES
3.3
HOW TO SHUT DOWN THE SYSTEM FOR
SHORT PERIODS
The system and boiler can be shut down for short
periods by simply turning the time clock to the off
position. It is also advisable to turn off the main
water supply to the house.
3.4
HOW TO SHUT DOWN THE SYSTEM FOR LONG
PERIODS
If the house is to be left unoccupied for any length
of time – especially during the winter – the system
should be thoroughly drained of all water. The gas,
water, and electricity supply to the house should
also be turned off. For more detailed advice
contact your installer.
3.5
HOW TO CARE FOR THE APPLIANCE
To clean the outer casing use only a clean damp
cloth. Do not use any scourers or abrasive
cleaners.
HOW TO RESET THE APPLIANCE
When the red fault LED is illuminated, the appliance will require to be reset manually. Before
resetting the boiler, check what action is required
to be taken, using the information on the fault
code table below. Allow a period of two minutes
to elapse before rotate the mode selector knob
across the OFF/RESET position.
UNICA BHE
WHAT IF...
4.1
WHAT IF I SUSPECT A GAS LEAK
If you suspect a gas leak, turn off the gas supply
at the gas meter and contact your installer or local
gas supplier. If you require further advice please
contact your nearest Vokera office.
4.2
WHAT IF I HAVE FREQUENTLY TO TOP-UP
THE SYSTEM
If the system regularly requires topping-up, it may
be indicative of a leak. Please contact your installer and ask him to inspect the system.
4.3
WHAT IF THE RESET LIGHT IS ON
If the Red LED light is illuminated, it indicates that
the boiler has failed to ignite or has detected a
possible fault. When this happens the boiler automatically shuts down and requires to be reset
manually (see 3.2).
4.4
WHAT IF THE APPLIANCE IS DUE ITS ANNUAL
SERVICE
Advice for tenants only
Your landlord should arrange for servicing.
Advice for homeowners
Please contact Vokera Customer Service (0870
333 0220 (UK) or 05655057 (ROI) if you would
prefer a Vokera service engineer or agent to
service your appliance. Alternatively your local
CORGI registered engineer may be able to service
the appliance for you.
4.5
WHAT IF I NEED TO CALL AN ENGINEER
If you think your boiler may have developed a fault,
please contact your installer or Vokera Customer
Services (0870 333 0220 (UK) or 05655057 (ROI)
have all your details to hand including full address
and postcode, relevant contact numbers, and your
completed appliance log book.
SETTING THE VOKERA...
5.1
SETTING THE VOKERA MECHANICAL CLOCK
If your boiler has been installed with the Vokera
mechanical clock, it can be used and adjusted as
follows:
OFF
AUTO
ON
Setting the time
The time of day can be set by grasping the outer edge of the
black dial and turning it in a clockwise direction until the correct time is in line with the white pointer.
Setting the “switching times”
The “ON” periods are set by sliding the black tappets, adjacent to the time periods required, to the outer edge of the dial.
The tappets that remain at the centre of the dial will be the
“OFF” periods.
The smallest switching time (ON or OFF) is 15 minutes.
To select “AUTO” mode move the selector switch in central
position.
To select “ON” mode move the selector switch in the bottom
position.
To select “OFF” mode move the selector switch in the upper
position.
UNICA BHE
7
Registered address:
Vokèra Ltd
Borderlake House
Unit 7 Riverside Industrial Estate
London Colney
Herts AL2 1HG
[email protected]
www.vokera.co.uk
www.vokera.ie
Vokèra Ireland
West Court, Callan
Co Kilkenny
T 056 7755057
F 056 7755060
Vokèra Limited reserve the right to change
specification without prior notice
Consumers statutory rights are not affected.
A Riello Group Company.
Company Reg No: 1047779
Cod. 20001097 - 04/09 - Ed. 0
Sales, General Enquires
T 0844 391 099
F 0844 391 0998