1
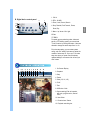
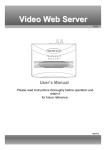
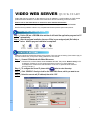
VIDEO WEB SERVER
QUICK START
Video Web Server connects to the Internet via an IP address. It could enable our DVR series
products and all cameras to connect to the Internet for remote monitoring or remote control.
Please refer to the Video Server’s manual for more detailed information.
Before operating this video server, please apply a static IP address from your Internet Service Provider.
English
Note:The following installation software is only compatible with Windows operation system series products.
SOFTWARE INSTALLATION
Step 1:Put the CD into a CD-ROM drive and then it will install the application program into PC
automatically.
Step 2:After the program installation, there are 5 files in your assigned path (file folder) as
below. And the program installation is completed.
STATIC IP SETTING
Please set up the server IP before first execution of the program. Follow every step as following. (Users needs to apply for
one static IP address first.) For Dynamic IP setting, please refer to user’s manual.
Step 1:Connect PC/Notebook with Video Web server.
Connect the PC and Video Web Server with Crossover LAN cable. Then process “Network setting” for PC.
In setting the IP Address of your PC, please let the domain as same as your Video Web Server.
For example, the IP address for the Video Web Server is 192.168.1.10, please set the IP address for
your PC to 192.168.1.1.
Step 2:To configure the Server IP, please click
twice to enter the setup.
Step 3:Click “SEARCH” directly to look for the Video Web Server, which you want to use.
Step 4:Select the correct unit (IP address) then click “OK”.
732S
V1.2
1
Step 5:Key in User Name & Password (User Name and Password are defaulted to “admin”
; IP address is defaulted to 192.168.1.10.). Then click OK to connect.
SYSTEM CONFIG
English
When you see the above on screen, you have been successfully
logged in the program of Video Web Server. Then please click
System Config to set up “Network Setting” & “Account”.
219 .
84 .
21 . 166
219 .
84 .
21 . 254
255 . 255 . 255 .
0
1.Please get the IP address from your
Internet Service Provider. Here we
assume it is 219.84.21.166 and the
user name and password is “admin”.
168 .
1
2.After the setup, please click “APPLY”
to renew the information.
95 .
1 .
To add a new User & user’s level
SUPERVISOR-control all the functions
HIGH LEVEL-control advanced functions
NORMAL -control basic functions only
GUEST LEVEL –watch the image only
Step 6:Connect the Video Web Server by ADSL or Cable modem through RJ-45 PORT, and
then it can be operated from the Internet.
ADSL/CABLE MODEM
INTERNET
RJ-45
PC
2
SOFTWARE OPERATION
twice to enter Login setup. (You can refer to “software installation”)
Step 1:Click
Step 2:Key in “User Name” and “ Password” (e.g. “User Name” and “Password” are “admin”
and the IP address is 219.84.21.166). Then click “OK” to start the connection.
the Video Web Server successfully.
OPERATION INTRODUCTION
A. Video Web Server control panel
1
2
3
4 5 6 7 8 9 10 11
1. Image transmission rate per second
2. Video CHs
3. Data transmission rate
4. Connection/Disconnection
2004-DEC-23 [ THU ] 10:42:32 Aa 001.9 GB O/W
5. Resolution : D1、CIF
6. Image quality : High、Middle、Low
7. Image adjusting : Brightness/ Contrast/ Saturation
CAMERA01
CAMERA02
8. Snapshot : press this button, the image will be
automatically saved in the PC.
9. Record : press this button, the recording file will be
saved in the PC automatically.
CAMERA03
CAMERA04
10. System config
11. Number of online users
3
English
When you see the window below with your video, it means you have connected to
1. CH1-4
B. Digital device control panel
7
6
2. PIP/+, QUAD/3. Zoom, Lock, Record, Search
1
2
4. Stop, Rewind, Fast Forward , Pause,
English
3
Slow, Play
4
5. Menu / up / down / left / right
5
6.Enter
7.TURBO*
To speed up menu selecting under video web
server or PTZ shifting speed, you can activate
"Turbo" function by clicking this button. Users are
allowed to change the turbo steps from 1 to 10.
For turbo step setting, you can enter system
config, and click "toolbox" submenu to select the
number of turbo step. Ex. If you set "3" for turbo
step, then when you press one of the button
up/down/left/right, one mouse click will as if you
click 3 times.
PLAYBACK OPERATION
1
2 3
4
5
6 7
8 9 10
11
12
1. On Screen Display
2. Snapshot
3. Stop
4. Pause
5. Slow (1/2, 1/4, 1/8)
6. PLAY
7. Fast
8. OSD show / hide
9. System setting (Path of snapshot,
text color, progress color, channel
color)
192.168.1.169
10. Next Video
11. Duration time / Status
12. Playback controlling bar
4