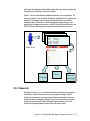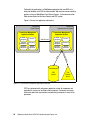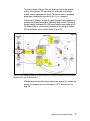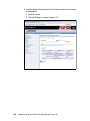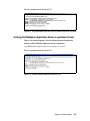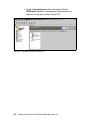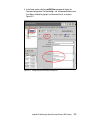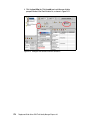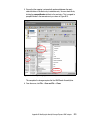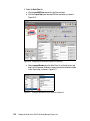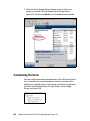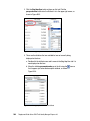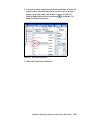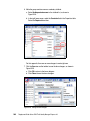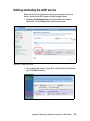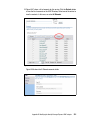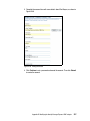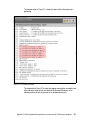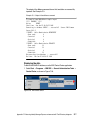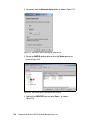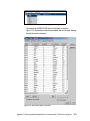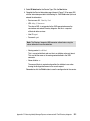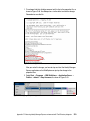
1
Front cover Deployment Guide Series IBM Tivoli Identity Manager Express 4.6 Architecture and overview of logical and physical components Planning and deploying a customer scenario Best practices and troubleshooting Axel Buecker Guilherme Monteiro Patricia Saunders Rick Weinberg ibm.com/redbooks International Technical Support Organization Deployment Guide Series: IBM Tivoli Identity Manager Express 4.6 October 2006 SG24-7233-00 Note: Before using this information and the product it supports, read the information in “Notices” on page ix. First Edition (October 2006) This edition applies to IBM Tivoli Identity Manager Express Version 4.6. © Copyright International Business Machines Corporation 2006. All rights reserved. Note to U.S. Government Users Restricted Rights -- Use, duplication or disclosure restricted by GSA ADP Schedule Contract with IBM Corp. Contents Notices . . . . . . . . . . . . . . . . . . . . . . . . . . . . . . . . . . . . . . . . . . . . . . . . . . . . . . . ix Trademarks . . . . . . . . . . . . . . . . . . . . . . . . . . . . . . . . . . . . . . . . . . . . . . . . . . . . x Preface . . . . . . . . . . . . . . . . . . . . . . . . . . . . . . . . . . . . . . . . . . . . . . . . . . . . . . . xi The team that wrote this redbook. . . . . . . . . . . . . . . . . . . . . . . . . . . . . . . . . . . xii Become a published author . . . . . . . . . . . . . . . . . . . . . . . . . . . . . . . . . . . . . . . xiv Comments welcome. . . . . . . . . . . . . . . . . . . . . . . . . . . . . . . . . . . . . . . . . . . . . xiv Part 1. Architecture and design . . . . . . . . . . . . . . . . . . . . . . . . . . . . . . . . . . . . . . . . . . . . . . . . 1 Chapter 1. Business context for identity management . . . . . . . . . . . . . . . . 3 1.1 Introduction to identity management . . . . . . . . . . . . . . . . . . . . . . . . . . . . . . 4 1.2 Benefits of identity management . . . . . . . . . . . . . . . . . . . . . . . . . . . . . . . . . 5 1.2.1 Reducing costs . . . . . . . . . . . . . . . . . . . . . . . . . . . . . . . . . . . . . . . . . . 5 1.2.2 Driving compliance . . . . . . . . . . . . . . . . . . . . . . . . . . . . . . . . . . . . . . . 5 1.2.3 Increasing productivity . . . . . . . . . . . . . . . . . . . . . . . . . . . . . . . . . . . . 6 1.3 Influencing factors for identity management . . . . . . . . . . . . . . . . . . . . . . . . 6 1.4 General challenges . . . . . . . . . . . . . . . . . . . . . . . . . . . . . . . . . . . . . . . . . . . 8 1.5 Conclusion. . . . . . . . . . . . . . . . . . . . . . . . . . . . . . . . . . . . . . . . . . . . . . . . . . 8 Chapter 2. Tivoli Identity Manager Express: Design and structure . . . . . . 9 2.1 Overview of user lifecycle . . . . . . . . . . . . . . . . . . . . . . . . . . . . . . . . . . . . . 10 2.1.1 Registration or creation . . . . . . . . . . . . . . . . . . . . . . . . . . . . . . . . . . . 11 2.1.2 Provisioning. . . . . . . . . . . . . . . . . . . . . . . . . . . . . . . . . . . . . . . . . . . . 11 2.1.3 Modification . . . . . . . . . . . . . . . . . . . . . . . . . . . . . . . . . . . . . . . . . . . . 12 2.1.4 Termination . . . . . . . . . . . . . . . . . . . . . . . . . . . . . . . . . . . . . . . . . . . . 13 2.2 Provisioning strategies for identity management. . . . . . . . . . . . . . . . . . . . 13 2.2.1 Policy-based provisioning . . . . . . . . . . . . . . . . . . . . . . . . . . . . . . . . . 13 2.2.2 Requests-based provisioning . . . . . . . . . . . . . . . . . . . . . . . . . . . . . . 14 2.2.3 Combining policy-based and request-based provisioning. . . . . . . . . 14 2.2.4 Features of IBM Tivoli Identity Manager Express 4.6 . . . . . . . . . . . . 15 2.3 Logical component architecture . . . . . . . . . . . . . . . . . . . . . . . . . . . . . . . . 15 2.3.1 People, person, and user . . . . . . . . . . . . . . . . . . . . . . . . . . . . . . . . . 15 2.3.2 Accounts . . . . . . . . . . . . . . . . . . . . . . . . . . . . . . . . . . . . . . . . . . . . . . 16 2.3.3 Identity feed. . . . . . . . . . . . . . . . . . . . . . . . . . . . . . . . . . . . . . . . . . . . 16 2.3.4 Passwords. . . . . . . . . . . . . . . . . . . . . . . . . . . . . . . . . . . . . . . . . . . . . 17 2.3.5 Services . . . . . . . . . . . . . . . . . . . . . . . . . . . . . . . . . . . . . . . . . . . . . . 20 2.3.6 Setting policies in Identity Manager Express . . . . . . . . . . . . . . . . . . 21 2.3.7 User categories . . . . . . . . . . . . . . . . . . . . . . . . . . . . . . . . . . . . . . . . . 22 © Copyright IBM Corp. 2006. All rights reserved. iii 2.3.8 Access control. . . . . . . . . . . . . . . . . . . . . . . . . . . . . . . . . . . . . . . . . . 23 2.3.9 Workflow . . . . . . . . . . . . . . . . . . . . . . . . . . . . . . . . . . . . . . . . . . . . . . 25 2.4 Physical component architecture . . . . . . . . . . . . . . . . . . . . . . . . . . . . . . . 26 2.5 Securing the Identity Manager Express environment . . . . . . . . . . . . . . . . 30 2.6 Conclusion. . . . . . . . . . . . . . . . . . . . . . . . . . . . . . . . . . . . . . . . . . . . . . . . . 38 Chapter 3. Building an Identity Manager Express solution. . . . . . . . . . . . 39 3.1 Gathering the business requirements . . . . . . . . . . . . . . . . . . . . . . . . . . . . 40 3.2 Analyzing the business requirements . . . . . . . . . . . . . . . . . . . . . . . . . . . . 42 3.3 Defining the solution architecture . . . . . . . . . . . . . . . . . . . . . . . . . . . . . . . 42 3.3.1 People planning: Defining users . . . . . . . . . . . . . . . . . . . . . . . . . . . . 42 3.3.2 Resource planning: Defining managed resources . . . . . . . . . . . . . . 46 3.3.3 Authorization planning: Determining how to control access . . . . . . . 50 3.4 Conclusion. . . . . . . . . . . . . . . . . . . . . . . . . . . . . . . . . . . . . . . . . . . . . . . . . 51 Part 2. Customer environment . . . . . . . . . . . . . . . . . . . . . . . . . . . . . . . . . . . . . . . . . . . . . . . . 53 Chapter 4. Smart Commercial Construction: Company profile . . . . . . . . 55 4.1 Company profile . . . . . . . . . . . . . . . . . . . . . . . . . . . . . . . . . . . . . . . . . . . . 56 4.2 Current IT architecture . . . . . . . . . . . . . . . . . . . . . . . . . . . . . . . . . . . . . . . 56 4.2.1 Overview of the SCC network . . . . . . . . . . . . . . . . . . . . . . . . . . . . . . 56 4.2.2 The construction-specific business application . . . . . . . . . . . . . . . . . 57 4.2.3 Identity management and emerging problems . . . . . . . . . . . . . . . . . 59 4.3 Corporate business vision and objectives . . . . . . . . . . . . . . . . . . . . . . . . . 60 4.4 Conclusion. . . . . . . . . . . . . . . . . . . . . . . . . . . . . . . . . . . . . . . . . . . . . . . . . 60 Chapter 5. Identity management solution design . . . . . . . . . . . . . . . . . . . 61 5.1 Business requirements . . . . . . . . . . . . . . . . . . . . . . . . . . . . . . . . . . . . . . . 62 5.2 Functional requirements . . . . . . . . . . . . . . . . . . . . . . . . . . . . . . . . . . . . . . 63 5.3 Design approach . . . . . . . . . . . . . . . . . . . . . . . . . . . . . . . . . . . . . . . . . . . . 69 5.4 Overview of the implementation . . . . . . . . . . . . . . . . . . . . . . . . . . . . . . . . 70 5.5 Conclusion. . . . . . . . . . . . . . . . . . . . . . . . . . . . . . . . . . . . . . . . . . . . . . . . . 71 Chapter 6. Technical implementation . . . . . . . . . . . . . . . . . . . . . . . . . . . . . 73 6.1 Installing the base components. . . . . . . . . . . . . . . . . . . . . . . . . . . . . . . . . 74 6.1.1 Design considerations . . . . . . . . . . . . . . . . . . . . . . . . . . . . . . . . . . . . 74 6.1.2 Implementation at SCC . . . . . . . . . . . . . . . . . . . . . . . . . . . . . . . . . . . 75 6.1.3 Installing Identity Manager Express . . . . . . . . . . . . . . . . . . . . . . . . . 79 6.1.4 Installing IBM HTTP Server. . . . . . . . . . . . . . . . . . . . . . . . . . . . . . . . 83 6.1.5 Installing Identity Manager Express adapters . . . . . . . . . . . . . . . . . 110 6.1.6 Security hardening of Identity Manager Express components . . . . 133 6.2 Deploying the solution . . . . . . . . . . . . . . . . . . . . . . . . . . . . . . . . . . . . . . . 146 6.2.1 Creating an identity feed for employee and customer data. . . . . . . 146 6.2.2 Setting up password self-reset using challenge-response . . . . . . . 161 iv Deployment Guide Series: IBM Tivoli Identity Manager Express 4.6 6.2.3 Defining an identity policy . . . . . . . . . . . . . . . . . . . . . . . . . . . . . . . . 165 6.2.4 Defining a password strength rule. . . . . . . . . . . . . . . . . . . . . . . . . . 170 6.2.5 Setting up account defaults. . . . . . . . . . . . . . . . . . . . . . . . . . . . . . . 178 6.2.6 Setting up workflows for account requests . . . . . . . . . . . . . . . . . . . 182 6.2.7 Defining access control . . . . . . . . . . . . . . . . . . . . . . . . . . . . . . . . . . 192 6.2.8 Defining help desk and account management procedures . . . . . . . 201 6.2.9 Enabling language support . . . . . . . . . . . . . . . . . . . . . . . . . . . . . . . 201 6.2.10 Educating the involved personnel . . . . . . . . . . . . . . . . . . . . . . . . . 205 6.2.11 Running the identity feed . . . . . . . . . . . . . . . . . . . . . . . . . . . . . . . 206 6.2.12 Running reconciliations for each installed adapter . . . . . . . . . . . . 206 6.3 Managing the solution . . . . . . . . . . . . . . . . . . . . . . . . . . . . . . . . . . . . . . . 206 6.3.1 Cleaning up orphan accounts . . . . . . . . . . . . . . . . . . . . . . . . . . . . . 206 6.3.2 Account management using the Web user interface . . . . . . . . . . . 207 6.3.3 Setting up recertification of existing accounts . . . . . . . . . . . . . . . . . 207 6.3.4 Reports . . . . . . . . . . . . . . . . . . . . . . . . . . . . . . . . . . . . . . . . . . . . . . 214 6.3.5 Conclusion . . . . . . . . . . . . . . . . . . . . . . . . . . . . . . . . . . . . . . . . . . . 220 Appendix A. Troubleshooting . . . . . . . . . . . . . . . . . . . . . . . . . . . . . . . . . . 221 General troubleshooting . . . . . . . . . . . . . . . . . . . . . . . . . . . . . . . . . . . . . . . . . 222 Verifying that DB2 is operational (Windows 2003 Server) . . . . . . . . . . . . 223 Verifying that DB2 is operational (Linux) . . . . . . . . . . . . . . . . . . . . . . . . . . 224 Verifying that Identity Manager Express connects to DB2 (Windows 2003 Server) . . . . . . . . . . . . . . . . . . . . . . . . . . . . . . . . . . . 224 Verifying that Identity Manager Express connects to DB2 (Linux) . . . . . . 225 Verifying that Directory Server is operational (Windows 2003 Server) . . . 226 Verifying that Directory Server is operational (Linux) . . . . . . . . . . . . . . . . 227 Verifying that Identity Manager Express connects to LDAP (Windows 2003 Server) . . . . . . . . . . . . . . . . . . . . . . . . . . . . . . . . . . . 227 Verifying that Identity Manager Express connects to LDAP (Linux) . . . . . 228 Verifying that Directory Integrator is operational (Windows 2003 Server) 229 Verifying that Directory Integrator is operational (Linux) . . . . . . . . . . . . . . 230 Verifying that WebSphere Application Server is operational (Windows 2003 Server) . . . . . . . . . . . . . . . . . . . . . . . . . . . . . . . . . . . 230 Verifying that WebSphere Application Server is operational (Linux). . . . . 231 Verifying that the Identity Manager application is operational . . . . . . . . . . 232 Installation troubleshooting. . . . . . . . . . . . . . . . . . . . . . . . . . . . . . . . . . . . . . . 234 Operational troubleshooting . . . . . . . . . . . . . . . . . . . . . . . . . . . . . . . . . . . . . . 239 Identity Manager Express messages . . . . . . . . . . . . . . . . . . . . . . . . . . . . 240 Identity Manager Express requests. . . . . . . . . . . . . . . . . . . . . . . . . . . . . . 242 Identity Manager Express logs . . . . . . . . . . . . . . . . . . . . . . . . . . . . . . . . . 243 First Failure Data Capture support . . . . . . . . . . . . . . . . . . . . . . . . . . . . . . 250 Logging options. . . . . . . . . . . . . . . . . . . . . . . . . . . . . . . . . . . . . . . . . . . . . 252 Password expiration for administrative users . . . . . . . . . . . . . . . . . . . . . . 255 Contents v Appendix B. Modifying the Identity Manager Express LDAP adapter . . 257 Directory Integrator LDAP adapter description. . . . . . . . . . . . . . . . . . . . . . . . 258 Directory Integrator adapter architecture . . . . . . . . . . . . . . . . . . . . . . . . . . . . 259 Customizing the LDAP adapter . . . . . . . . . . . . . . . . . . . . . . . . . . . . . . . . . . . 260 Setting up the scenario. . . . . . . . . . . . . . . . . . . . . . . . . . . . . . . . . . . . . . . . . . 261 Making the directory changes for the example . . . . . . . . . . . . . . . . . . . . . 261 Loading the LDIF file for the example . . . . . . . . . . . . . . . . . . . . . . . . . . . . 265 Scenario assumptions . . . . . . . . . . . . . . . . . . . . . . . . . . . . . . . . . . . . . . . . . . 267 Customizing the LDAP adapter . . . . . . . . . . . . . . . . . . . . . . . . . . . . . . . . . . . 267 Extracting the adapter configuration jar file . . . . . . . . . . . . . . . . . . . . . . . . 267 Customizing the schema files . . . . . . . . . . . . . . . . . . . . . . . . . . . . . . . . . . 268 Configuring the AssemblyLines. . . . . . . . . . . . . . . . . . . . . . . . . . . . . . . . . 270 Repackaging the adapter bundle . . . . . . . . . . . . . . . . . . . . . . . . . . . . . . . . . . 280 Customizing the forms . . . . . . . . . . . . . . . . . . . . . . . . . . . . . . . . . . . . . . . . . . 282 Defining and testing the LDAP service. . . . . . . . . . . . . . . . . . . . . . . . . . . . . . 287 Defining an identity policy. . . . . . . . . . . . . . . . . . . . . . . . . . . . . . . . . . . . . . . . 292 Setting account defaults for LDAP service . . . . . . . . . . . . . . . . . . . . . . . . . . . 294 Test adding a new LDAP account . . . . . . . . . . . . . . . . . . . . . . . . . . . . . . . . . 296 Appendix C. Enhancing Identity Manager Express environment with Tivoli Directory Integrator . . . . . . . . . . . . . . . . . . . . . . . . . . . . . . . 299 Populating the password dictionary . . . . . . . . . . . . . . . . . . . . . . . . . . . . . . . . 300 Password dictionary . . . . . . . . . . . . . . . . . . . . . . . . . . . . . . . . . . . . . . . . . 300 Building the AssemblyLine . . . . . . . . . . . . . . . . . . . . . . . . . . . . . . . . . . . . 301 Running the AssemblyLine . . . . . . . . . . . . . . . . . . . . . . . . . . . . . . . . . . . . 310 Testing the password policy dictionary . . . . . . . . . . . . . . . . . . . . . . . . . . . 312 Creating a custom identity feed . . . . . . . . . . . . . . . . . . . . . . . . . . . . . . . . . . . 314 The scenario setup in this book . . . . . . . . . . . . . . . . . . . . . . . . . . . . . . . . 315 Scenario one: Adding users to Identity Manager Express . . . . . . . . . . . . 320 Scenario two: Updating users with an identity feed . . . . . . . . . . . . . . . . . 336 Appendix D. Additional material . . . . . . . . . . . . . . . . . . . . . . . . . . . . . . . . 343 Locating the Web material . . . . . . . . . . . . . . . . . . . . . . . . . . . . . . . . . . . . . . . 343 Using the Web material . . . . . . . . . . . . . . . . . . . . . . . . . . . . . . . . . . . . . . . . . 344 How to use the Web material . . . . . . . . . . . . . . . . . . . . . . . . . . . . . . . . . . 344 Glossary . . . . . . . . . . . . . . . . . . . . . . . . . . . . . . . . . . . . . . . . . . . . . . . . . . . . 345 Related publications . . . . . . . . . . . . . . . . . . . . . . . . . . . . . . . . . . . . . . . . . . 351 IBM Redbooks . . . . . . . . . . . . . . . . . . . . . . . . . . . . . . . . . . . . . . . . . . . . . . . . 351 Other publications . . . . . . . . . . . . . . . . . . . . . . . . . . . . . . . . . . . . . . . . . . . . . 351 Online resources . . . . . . . . . . . . . . . . . . . . . . . . . . . . . . . . . . . . . . . . . . . . . . 351 How to get IBM Redbooks . . . . . . . . . . . . . . . . . . . . . . . . . . . . . . . . . . . . . . . 353 Help from IBM . . . . . . . . . . . . . . . . . . . . . . . . . . . . . . . . . . . . . . . . . . . . . . . . 353 vi Deployment Guide Series: IBM Tivoli Identity Manager Express 4.6 Index . . . . . . . . . . . . . . . . . . . . . . . . . . . . . . . . . . . . . . . . . . . . . . . . . . . . . . . 355 Contents vii viii Deployment Guide Series: IBM Tivoli Identity Manager Express 4.6 Notices This information was developed for products and services offered in the U.S.A. IBM may not offer the products, services, or features discussed in this document in other countries. Consult your local IBM representative for information on the products and services currently available in your area. Any reference to an IBM product, program, or service is not intended to state or imply that only that IBM product, program, or service may be used. Any functionally equivalent product, program, or service that does not infringe any IBM intellectual property right may be used instead. However, it is the user's responsibility to evaluate and verify the operation of any non-IBM product, program, or service. IBM may have patents or pending patent applications covering subject matter described in this document. The furnishing of this document does not give you any license to these patents. You can send license inquiries, in writing, to: IBM Director of Licensing, IBM Corporation, North Castle Drive Armonk, NY 10504-1785 U.S.A. The following paragraph does not apply to the United Kingdom or any other country where such provisions are inconsistent with local law: INTERNATIONAL BUSINESS MACHINES CORPORATION PROVIDES THIS PUBLICATION "AS IS" WITHOUT WARRANTY OF ANY KIND, EITHER EXPRESS OR IMPLIED, INCLUDING, BUT NOT LIMITED TO, THE IMPLIED WARRANTIES OF NON-INFRINGEMENT, MERCHANTABILITY OR FITNESS FOR A PARTICULAR PURPOSE. Some states do not allow disclaimer of express or implied warranties in certain transactions, therefore, this statement may not apply to you. This information could include technical inaccuracies or typographical errors. Changes are periodically made to the information herein; these changes will be incorporated in new editions of the publication. IBM may make improvements and/or changes in the product(s) and/or the program(s) described in this publication at any time without notice. Any references in this information to non-IBM Web sites are provided for convenience only and do not in any manner serve as an endorsement of those Web sites. The materials at those Web sites are not part of the materials for this IBM product and use of those Web sites is at your own risk. IBM may use or distribute any of the information you supply in any way it believes appropriate without incurring any obligation to you. Information concerning non-IBM products was obtained from the suppliers of those products, their published announcements or other publicly available sources. IBM has not tested those products and cannot confirm the accuracy of performance, compatibility or any other claims related to non-IBM products. Questions on the capabilities of non-IBM products should be addressed to the suppliers of those products. This information contains examples of data and reports used in daily business operations. To illustrate them as completely as possible, the examples include the names of individuals, companies, brands, and products. All of these names are fictitious and any similarity to the names and addresses used by an actual business enterprise is entirely coincidental. COPYRIGHT LICENSE: This information contains sample application programs in source language, which illustrates programming techniques on various operating platforms. You may copy, modify, and distribute these sample programs in any form without payment to IBM, for the purposes of developing, using, marketing or distributing application programs conforming to the application programming interface for the operating platform for which the sample programs are written. These examples have not been thoroughly tested under all conditions. IBM, therefore, cannot guarantee or imply reliability, serviceability, or function of these programs. You may copy, modify, and distribute these sample programs in any form without payment to IBM for the purposes of developing, using, marketing, or distributing application programs conforming to IBM's application programming interfaces. © Copyright IBM Corp. 2006. All rights reserved. ix Trademarks The following terms are trademarks of the International Business Machines Corporation in the United States, other countries, or both: AIX® AS/400® DB2 Universal Database™ DB2® Domino® Express Portfolio™ IBM® Lotus Notes® Lotus® Notes® Passport Advantage® RACF® RDN™ Redbooks (logo) Redbooks™ Tivoli® WebSphere® ™ The following terms are trademarks of other companies: Enterprise JavaBeans, EJB, Java, Java Naming and Directory Interface, JavaBeans, JavaScript, JDBC, JRE, JVM, J2EE, Solaris, Sun, and all Java-based trademarks are trademarks of Sun Microsystems, Inc. in the United States, other countries, or both. Active Directory, Microsoft, Windows Server, Windows, and the Windows logo are trademarks of Microsoft Corporation in the United States, other countries, or both. Intel, Pentium, Xeon, Intel logo, Intel Inside logo, and Intel Centrino logo are trademarks or registered trademarks of Intel Corporation or its subsidiaries in the United States, other countries, or both. UNIX is a registered trademark of The Open Group in the United States and other countries. Linux is a trademark of Linus Torvalds in the United States, other countries, or both. Other company, product, or service names may be trademarks or service marks of others. x Deployment Guide Series: IBM Tivoli Identity Manager Express 4.6 Preface IBM® Tivoli® Identity Manager Express is the first identity-management solution designed specifically for mid-market customers. For customers or departments that have to manage passwords, user accounts, and access permissions in heterogeneous IT environments, Identity Manager Express provides quick time-to-value. Its security and compliance capabilities address areas that have heightened awareness in many companies today. IT administrators are increasingly spending a majority of their time acting as the help desk or performing repetitive manual processes. Identity Manager Express helps to free up their time and improves their productivity. Its self-care capabilities improve IT productivity and reduce the help desk costs. For line of business or financial personnel who are responsible for ensuring that their company complies with governmental regulations, Identity Manager Express provides the capability to control, monitor, and audit user access throughout a user’s lifecycle. The centralized user tracking function not only helps with compliance, but also enhances IT security. Users have a simplified experience by using self-care management. When they have to reset a password or require access to a database, these requests are user driven and still adhere to proper security guidelines. This IBM Redbook takes a step-by-step approach to implementing an identity management solution based on IBM Tivoli Identity Manager Express Version 4.6. We discuss the business context, and the logical and physical components of the solution. We walk you through an example company profile with existing business policies and guidelines, and build an identity management solution design for its particular environment. We describe how to integrate the new identity management components into the existing environment. We also focus on the detailed configuration of identity management integration tasks that you have to implement to create a fully functional end-to-end solution. This book is a valuable resource for security officers, administrators, and architects who want to understand and implement an identity management solution in a medium-scale environment. © Copyright IBM Corp. 2006. All rights reserved. xi The team that wrote this redbook This redbook was produced by a team of specialists from around the world working at the International Technical Support Organization (ITSO), Poughkeepsie Center. Axel Buecker is a Certified Consulting Software IT Specialist at the ITSO, Austin Center. He writes extensively and teaches IBM classes worldwide on areas of software security architecture and network computing technologies. He holds a degree in computer science from the University of Bremen, Germany. He has 19 years of experience in a variety of areas related to workstation and systems management, network computing, and e-business solutions. Before joining the ITSO in March 2000, Axel worked for IBM in Germany as a Senior IT Specialist in software security architecture. Guilherme Monteiro is an IT Security Architect with Companhia de Sistemas, an IBM Business Partner in Brazil, with a strong focus on security solutions. He has been involved with IBM security solutions since 1999, implementing directories, access management, identity management, directory integration, risk management, and developing custom solutions for key Brazilian private companies. His company also has a strong position in Linux® security solutions, with several successful implementations on this platform. Patricia Saunders is an IT Specialist for the Tivoli Security Worldwide Sales enablement team based in Dallas, Texas. In this role, she supports IBM field personnel and Business Partners providing skills transfer for IBM Tivoli security products. She has 10 years of experience working with IBM Tivoli and has spent the last three years focusing on the IBM Tivoli Identity Management family of products. She holds a masters degree in computing systems management from Houston Baptist University. She has contributed to other IBM Redbook topics such as security architecture, Tivoli Identity Management, and Tivoli Directory Integrator. Rick Weinberg is a Market Manager for Tivoli Security in the United States. He has four years of experience in IT security. He has worked at IBM for one year. His areas of expertise include user provisioning, and data management and synchronization. xii Deployment Guide Series: IBM Tivoli Identity Manager Express 4.6 From left to right: Axel Buecker, Patricia Saunders, and Guilherme Monteiro Thanks to the following people for their contributions to this project: Rugmony N. ITSO, Bangalore, India Alexander Amies David Palmieri Rick Russell Elizabeth Purzer Andrew R. Jones Mark L. North Joo Y. Lee Donna Venditti Gary Forghetti IBM US Preface xiii We would like to thank the Solutions Builder IBM Express Portfolio™ team for creating the Tivoli Identity Manager Express solution and its documentations, which you can find at the following Web site: https://www-304.ibm.com/jct09002c/partnerworld/mem/support/trs_sbe_infr a_muaiyii.html Be aware that you require an IBM Partner World user ID to access this information. Become a published author Join us for a two- to six-week residency program! Help write an IBM Redbook dealing with specific products or solutions, while getting hands-on experience with leading-edge technologies. You'll team with IBM technical professionals, Business Partners and/or customers. Your efforts will help increase product acceptance and customer satisfaction. As a bonus, you'll develop a network of contacts in IBM development labs, and increase your productivity and marketability. Find out more about the residency program, browse the residency index, and apply online at: ibm.com/redbooks/residencies.html Comments welcome Your comments are important to us! We want our IBM Redbooks™ to be as helpful as possible. Send us your comments about this or other IBM Redbooks in one of the following ways: Use the online Contact us review redbook form found at: ibm.com/redbooks Send your comments in an email to: [email protected] Mail your comments to: IBM Corporation, International Technical Support Organization Dept. HYTD Mail Station P099 2455 South Road Poughkeepsie, NY 12601-5400 xiv Deployment Guide Series: IBM Tivoli Identity Manager Express 4.6 Part 1 Part 1 Architecture and design In this part, we discuss the overall business context of IBM Tivoli Identity Manager Express. We then describe how to technically structure an overall solution into an existing environment, and introduce the logical and physical components. © Copyright IBM Corp. 2006. All rights reserved. 1 2 Deployment Guide Series: IBM Tivoli Identity Manager Express 4.6 1 Chapter 1. Business context for identity management In this chapter, we discuss the business context for identity management. After a short definition of identity management, we describe the factors that influence why and how identity management must be conducted in a given business context. Additionally, we discuss the common challenges that businesses face when incorporating an identity management solution into their company. © Copyright IBM Corp. 2006. All rights reserved. 3 1.1 Introduction to identity management The term identity management describes the process that enables and maintains user access to company resources. Company resources can be a variety of applications such as e-mail systems, databases, computer systems, and applications systems including Web-based applications. Users can be a variety of people who have some relationship with the company such as employees, contractors, business partners, vendors, and customers. An identity management solution provides a centralized capability to create, modify, and remove user accounts on these resources. This capability is also known as provisioning and deprovisioning. It facilitates the management of user passwords and access permissions for each user on a managed resource or managed system. The identity management process can best be described through the concept of user lifecycle management. When new employees or contractors start their job they require access to certain resources to perform their job. Examples of such resources include e-mail, voice mail, company intranet access, customer relationship management (CRM) applications, and so on. When employees or contractors are promoted or change jobs within the company, often new access rights are required. This might require new accounts to be created or existing access rights to resources to be modified. At the same time, when employees or contractors change jobs within the company some access rights might have to be removed. If they leave the company altogether, their access to all data sources that they have accounts on has to be revoked, otherwise this can result in a significant security exposure. The users’ accessibility requirements change throughout their tenure with a company. Consequently, a company has to respond to this change by providing their employees or contractors with prompt access. The company must do this in a systematic fashion that enforces appropriate security measures and compliance with the corporate policy. Identity management also has to manage accounts that do not have an owner, that is, accounts that do not belong to an existing real person. These accounts are called orphan accounts. They are found on every platform, and are typically test accounts that are forgotten, or are accounts from former employees. These accounts can also lead to a significant exposure. 4 Deployment Guide Series: IBM Tivoli Identity Manager Express 4.6 Many companies have a provisioning process in place that is expensive, inefficient, and might use many manual processes. Failing to deprovision resources in a timely manner is one of the top security problems in many companies. 1.2 Benefits of identity management An IT-driven identity management system provides a better way to handle the process of user lifecycle management. Many organizations today spend a significant amount of time and resources on the administration of their existing IT infrastructure. They face increasing pressure to support a growing number of employees, contractors, partners, and customers who require access to resources throughout the organization. Consequently, these organizations are in a constant battle trying to support and maintain existing business services. At the same time, they have to scale their business and IT infrastructure so that it can sense and respond to future business opportunities. An identity management solution provides tangible business benefits to help organizations win this battle. 1.2.1 Reducing costs An identity management solution helps to significantly reduce IT administration costs. The use of self-care password management decreases calls to the IT help desk. A streamlined user provisioning process reduces the administrative overhead. Additionally, the time spent aggregating user data to support audit requirements can be considerably reduced. These factors are often hidden in day-to-day business but when managed effectively, they can have a significant impact. 1.2.2 Driving compliance Compliance requires accountability. An identity management solution can address compliance requirements and enhance the security of an organization's IT infrastructure by providing a centralized system for controlling, monitoring, and auditing user access permissions. A recertification process validates that each user account is still necessary for a business purpose. Data is quickly aggregated to produce reports that help the response to internal audits and regulatory mandates. Orphan accounts are centrally managed to achieve compliance. Chapter 1. Business context for identity management 5 1.2.3 Increasing productivity The efficiency and productivity of the user and the IT department are improved through identity management. The turn-on time for user accounts can be greatly reduced. Users are also relieved of common interruptions, such as forgotten passwords, by enabling the user to reset and synchronize passwords. Together these factors facilitate quick productivity in each user's job. Furthermore, IT administrators do not have to perform tedious, multiplatform manual entry tasks, such as individual account creation at each platform using a specific tool at each one. As a result, they can spend more time on strategic business goals rather than administration. 1.3 Influencing factors for identity management Overall, using an identity management solution is a good security and administration practice. However, several factors impact if and how an identity management solution is integrated into a specific IT infrastructure. Let us consider the major dimensions of identity management. Password management How are passwords managed today? It includes evaluation of the impact on a variety of stakeholders such as users, IT administrators, application or resource owners, and help desk personnel. User provisioning How are users granted access to the resources they require to perform their job? How is user access modified or removed? An assessment of the entire user lifecycle, new employee, promoted employee, exiting employee, is essential for both productivity and security purposes. Auditing How accurately and how quickly does your organization collect user and account data that is required for audit purposes? Information about who has access to what, where, and when is imperative in today's marketplace. These dimensions define the factors that determine how identity management is influenced by the external environment that companies face. 6 Deployment Guide Series: IBM Tivoli Identity Manager Express 4.6 The following list is a summary of the external factors. – Compliance What are the countries and what are the industries that your organization operates in? Many regulatory mandates exist today that have a direct influence on the security operations within a company. What data is required? Are mechanisms in place to quickly and accurately produce the data in a presentable format? – Security An increasingly mobile global workforce has caused many companies to offer remote access to their employees or contractors. This, along with the increase in wireless technologies, has forced companies to open their network perimeter. These shifts in access, mobile workforce, and wireless technologies, place more strain on securing a company's internal infrastructure. Let us now review the internal factors that companies face. – Change The value of an identity management solution becomes more pronounced in companies that face frequent change. Change in this case can be defined as a growing or contracting workforce, the frequency of change in employee access requirements, or a combination of both these factors. Companies must respond to the change they face by quickly facilitating access requests and suspensions. – Sensitive data The amount of sensitive data, proprietary data, or both these types of data that is stored within a company's IT infrastructure positively correlates to the need for an identity management solution. More emphasis is placed on controlling, monitoring, and auditing access permissions. – Complexity of the IT infrastructure As the number of resources, applications, databases, computer systems, and so on increases, the need for an identity management solution too increases. It becomes more critical to manage passwords, user access, and access permissions in a centralized manner. Chapter 1. Business context for identity management 7 1.4 General challenges Although the need for an identity management solution might seem to be clear, challenges do exist. Complex environments The abundance of custom, traditional, or both these applications can increase the likelihood that adapters to manage these resources do not exist. To accommodate such an environment custom adapters are often built, but they require some more time and effort. Time to value Given the previously mentioned complexity and underlying nature of an identity management solution that ties together a plethora of resources, the time to value can still be quick. The first steps in deploying an identity management solution must always focus on base systems that can be managed with standard adapters. For a general approach on how to deploy an identity management solution, refer to Chapter 3, “Building an Identity Manager Express solution” on page 39. 1.5 Conclusion As a result of the influencing factors discussed in the previous sections, an identity management solution must offer a centralized framework that can be easily configured to the specific business in question. It has to centrally manage the user lifecycle management tasks and enable users to manage personal data, such as passwords, through a self-care interface. It has to ease the tasks for help desk and administrative personnel and provide easy access to auditing functions to satisfy compliance and regulatory demands. By providing these functionalities, Identity Manager Express can provide a fast time to value. 8 Deployment Guide Series: IBM Tivoli Identity Manager Express 4.6 2 Chapter 2. Tivoli Identity Manager Express: Design and structure This chapter describes the logical and physical architecture of an identity management system as it relates to IBM Tivoli Identity Manager Express 4.6. We review the concept of user lifecycle management and how it maps to logical components in the identity management system. We also describe the differences between request-based provisioning, which is the foundation of IBM Tivoli Identity Manager Express 4.6, and policy-based provisioning, which is the foundation of IBM Tivoli Identity Manager. We discuss the logical components of IBM Tivoli Identity Manager Express. The physical architecture refers to the actual software components that make up the Identity Manager Express solution. The Identity Manager Express application deployment wizard installs all the required components for you; you do not have to be an expert in installing any of these components. But it is beneficial if you understand where they reside and how they are used in the Identity Manager Express environment. © Copyright IBM Corp. 2006. All rights reserved. 9 2.1 Overview of user lifecycle Lifecycle management introduces the concept that a person’s use of an IT asset changes over time due to external events such as transfers, promotions, leaves of absence, temporary assignments, or management assignments. There might also be a need to routinely verify that the account is still required by the user and is compliant with security policies. A lifecycle is a term used to describe how accounts for a person are created, managed, and terminated based on certain events or a time-based paradigm. Figure 2-1 represents a closed-loop process where a person is registered to use an IT asset, an account is created, and access provisioning occurs to give this person’s account access to system resources. Over time, modifications occur where access to some resources are granted, but access to other resources might be revoked. The cycle ends when the person separates from the business and the termination process removes access to resources, suspends all accounts, and eventually deletes the accounts and the person from the systems. Registration/ Creation Provisioning Termination Modification Figure 2-1 Lifecycle management tasks The amount of time and complexity involved in each of these processes can affect an organization’s ability to: Increase user and IT efficiency Reduce administration costs Address compliance requirement 10 Deployment Guide Series: IBM Tivoli Identity Manager Express 4.6 The following sections examine each of these processes in more detail. 2.1.1 Registration or creation Registration or creation is the first step in any identity management system. The personal identity of the user must be created or registered with the identity management system. When a new user joins the organization, some authoritative source, such as a human resources (HR) system, keeps track of the specific details of the user. This system contains many attributes about the person. The identity management system might use some of these attributes to determine account values. Therefore, it is important that this data is up to date. Some of the attributes contain information about the type of job the person has in the company or the type of users they are such as an employee or contractor. This can determine account access requirements. Other attributes contain information about reporting relationships such as manager or supervisor. Note: Identity information is not limited to the employees of an organization. Depending on the business requirements, the organization also has to manage identities for external users such as business partners, vendors, and customers. Creating or registering the user is either a manual or an automated process. When the process is automated, is it usually accomplished through an identity feed. Manual creation is good for ad hoc situations, but usually the system is populated initially through a data feed. You can learn more about identity feeds in “Identity Manager Express components” on page 27. This initial identity feed process is important because the identity must exist before accounts can be assigned to the user’s identity. Having a defined process facilitates the next important step, provisioning. 2.1.2 Provisioning After the user’s identity is established, accounts on IT system resources are provisioned to the user. Provisioning is the process of creating one or more accounts for the user. This is typically initiated by the hiring of a new employee or contractor. Note: In the case of client, business partner, or vendor identities, the provisioning process takes place after the business relationship is established. Chapter 2. Tivoli Identity Manager Express: Design and structure 11 The accounts that are created allow the users to perform the work or task they are required to do. The user is not productive without access to key resources. This costs the organization time and money. In some cases where an identity management system is not used, it can take up to two weeks before employees have all the accounts and accesses they require to do the job. Provisioning is also not limited to IT resources. A new user might require a telephone, computer, or an access badge. The provisioning of these types of resources require physical or manual steps to complete. Identity Manager Express provides facilities to manage the provisioning of these manual services. You can find more details about manual services in “Identity Manager Express components” on page 27. 2.1.3 Modification After the accounts for users are set up, they have to be managed. Organizations are dynamic entities and personnel changes are constant. Table 2-1 describes some of the events that happen to the users during their tenure with a company. Table 2-1 User lifecycle events and impact Event Impact User changes jobs New accounts might be required Existing accounts might no longer be required Existing account privileges can change (more privileges or less privileges) User is promoted New accounts might be required Existing accounts might no longer be required Existing account privileges can change (more privileges or less privileges) User takes leave of absence Existing accounts are suspended User returns from leave of absence Suspended accounts are restored User changes employment status Existing account privileges might change Current accounts might no longer be required User is transferred to a new location Accounts might have to be relocated The list in Table 2-1 represents some of the more common events in the life of an employee. Other situations can exist that require changes to accounts or account access rights. In addition to individual events, organizational events such as mergers, acquisitions, and downsizing affect the user population and account setup and 12 Deployment Guide Series: IBM Tivoli Identity Manager Express 4.6 accesses. You have to understand the impact of these events in relation to the identity management system to help you prepare for implementing a solution to facilitate compliance in the IT environment. 2.1.4 Termination The termination process in the lifecycle management of users typically encompasses the deprovisioning of all accounts and accesses that the users have accumulated in their life span. This overall process usually requires multiple steps. The first task is to appropriately flag the identity in the HR system so that accounts can be disabled in the identity management system. This has to be done quickly and reliably so that security risks are mitigated. After a period of time and review, the accounts can be deleted. It is important that when the user identity is removed, the accounts are also removed. If the accounts are not removed, then the owner and account relationship are lost and these accounts can be subject to misuse. The way in which you implement the user lifecycle processes has a direct impact on the efficiency, cost, and security of the resources in your IT environment and the overall business. 2.2 Provisioning strategies for identity management Identity management systems today approach the provisioning process in different ways. In this section, we describe two of these approaches: policy-based provisioning and request-based provisioning. Each approach has its own advantages and challenges. A number of factors determine which approach is best suited for your implementation. We discuss these factors in this section. The best solution is the one that fits your organization’s needs and provides you with quick time to value. 2.2.1 Policy-based provisioning On one end of the spectrum, you have policy-based or role-based user provisioning. A popular term behind this principle is Role-Based Access Control (RBAC). RBAC is the process of granting access privileges to the users based on the work that they do within an organization. This allows an administrator to assign the users to one or more roles according to the job they do. Each role enables access to specific resources based on a provisioning policy. Accounts or access Chapter 2. Tivoli Identity Manager Express: Design and structure 13 rights are granted to the role rather than to the user. A user has to be a member of the role to be granted that account or access privilege. Roles can be defined roughly covering a broad range of users, or they can be finely tuned to cover many types of account and access rights. An example of a rough classification of roles is employees versus contractors. In the case of role-based provisioning, a significant amount of effort is spent in the initial policy and role design to automate the provisioning processes. However, when the policy design and roles are implemented, a high degree of automation can occur in the management of the identity lifecycle. Benefits – High degree of automation – Quickly add and revoke privileges based on role changes Challenges – Role engineering can be complex – Might not scale if too many user requirements are unique; too many roles have to be defined 2.2.2 Requests-based provisioning On the other end of the spectrum, you have request-based user provisioning. This method uses centralized management but decentralized administration. That is, the users are responsible for requesting the account access they want to receive. More operational labor is required because no automation of the provisioning processes exists with request-based provisioning. Most systems implement a workflow component to provide approvals for access rights. Benefits – Easier, less expensive, and faster to implement – Managers, application owners, and administrators control access rights through approval process Challenges – Users might not always know what they require – Might not scale in large environments based on the manual effort required 2.2.3 Combining policy-based and request-based provisioning A composite approach is a hybrid of the two approaches. An example is where temporary employees can be provisioned a set of services based on their roles, and permanent employees request what services they want to receive. Some 14 Deployment Guide Series: IBM Tivoli Identity Manager Express 4.6 elements of the roles are necessary as you move from manual to automated provisioning. An organization might want to start realizing the benefits of an identity management system by implementing a request-based provisioning system first, and then move to a policy-based systems in a phased approach as the processes and requirements become more well defined. 2.2.4 Features of IBM Tivoli Identity Manager Express 4.6 Identity Manager Express provides a request-based provisioning approach to grant, modify, and remove access to resources throughout a business or business unit, and to establish an effective audit trail using automated reports. Users, or their managers, can request access to new accounts. Additionally, managers or other administrators are alerted to unused accounts and given the option to delete the accounts through a recertification process. This recertification process ensures that over time users do not accumulate more access rights than they require. Identity Manager Express is designed for small-to-medium sized businesses and decentralized departmental usage in large companies with 100 to 5000 users. In the next section, we describe the logical components of an identity management system and those that are specific to Identity Manager Express. 2.3 Logical component architecture In this section, we describe some of the basic components of any identity management system. We also introduce the terminology that is used in the Identity Manager Express product. 2.3.1 People, person, and user People in an organization, such as employees and contractors, have to use the computing resources that the organization uses to run the business. Therefore, a person is a resource user. And these users, whether an employee, contractor, or business partner, require different degrees of access to computing resources to do their job. A user is a person whose identity is defined to Identity Manager Express. The creation of the users defines their personal identity. For example, an identity might be represented by a unique combination of the person’s first, last, and full name, and employee number. The identity might also contain additional information such as phone numbers, manager, department, and e-mail address. Chapter 2. Tivoli Identity Manager Express: Design and structure 15 The personal information that is defined in Identity Manager Express corresponds to the inetOrgPerson objectclass schema and attributes as defined by Request for Comment (RFC) 27981. The administrator of the identity management system creates users either by importing identity records using an identity feed process, or by creating the user manually using the Identity Manager Express application. Both these methods automatically create a unique user ID and password, which allows the user to log on to the Identity Manager Express system and use its features. The features include requesting accounts and managing passwords. When persons are defined as users in Identity Manager Express, they can own one or more accounts. 2.3.2 Accounts An account represents a person's access to a managed resource. It contains the set of parameters for a managed resource that defines the user’s identity, user profile, and credentials. An account defines a user’s login information (for example, user ID and password) and access rights to the managed resource with which it is associated. In Identity Manager Express, accounts are created on services such as Microsoft® Active Directory®, Solaris™, SAP, and so on. Every account must be owned by a person or user defined to Identity Manager Express. An orphan account is an account that has no ownership, for example, it cannot be associated with an Identity Manager Express user. Accounts are either active or inactive. Accounts must be active for the account owner to use the system or application resource. An account becomes inactive when it is suspended. Suspended accounts still exist on the managed resources, but they cannot be used by the owner to access the target system. The action of suspending and restoring accounts from a central system is one of the benefits of using an identity management system. 2.3.3 Identity feed Identity Manager Express users are created either by importing identity records with the use of an identity feed or by manually creating each user. An identity feed is the process of synchronizing the data between an authoritative data source, such as an HR system, and Identity Manager Express. The initial reconciliation populates Identity Manager Express with new users, including their 1 You can find more information about RFC2798 at: http://rfc.net/rfc2798.html 16 Deployment Guide Series: IBM Tivoli Identity Manager Express 4.6 profile data. A subsequent reconciliation creates new users and also updates the user profile of any duplicate users that are found. Figure 2-2 shows the relationship between the person, user, and accounts. For example, a person, or an employee, Jane Doe is defined in the HR system of the company. The company uses an identity feed to create the user in Identity Manager Express. When Jane is defined to Identity Manager Express, user accounts on managed resources such as UNIX®, Microsoft Active Directory, and IBM Tivoli Access Manager can be requested and provisioned for her use. H R S y s te m N am e: Jane D oe D e p t: A c c o u n tin g M a n a g e r: J o h n S m ith A d d re s s : 1 0 M a in S t. T e l. N o : 5 5 5 -1 2 1 2 Jane D oe U n ix W in d o w s Access M anager Figure 2-2 Person, user, and account relationship 2.3.4 Passwords All accounts have passwords. Account passwords can be centrally managed by their owners or other administrative users using Identity Manager Express. Password management is an important topic. Because passwords represent authorized access to company resources, they have to be securely managed during their entire lifecycle. Identity Manager Express provides a full set of features to manage passwords by both users and administrators. Chapter 2. Tivoli Identity Manager Express: Design and structure 17 There are two options for user account passwords managed by Identity Manager Express: Passwords can either be synchronized or not synchronized. We define password synchronization as a process that helps users to maintain a single password that is subject to a single password policy across all accounts that they own and are managed by Identity Manager Express. Password synchronization is the process of assigning and maintaining one password for all the accounts that a user owns. This reduces the number of passwords that a user must remember. This facilitates in the reduction of calls to the help desk for password resets, which results in cost savings for the company. Identity Manager Express enables password synchronization by default. Enabling password synchronization affects the password management for the following user or administrator actions: Creating a new account Changing a password for an existing account Provisioning an account Resetting an expired or forgotten password for an existing account Restoring an account that was suspended The password that is selected must meet the password strength rules (password policy) that are configured in your Identity Manager Express system. When the password synchronization property is enabled, there is only one global password for all the accounts managed by Identity Manager Express. For most passwords, this is a one-way synchronization. 18 Deployment Guide Series: IBM Tivoli Identity Manager Express 4.6 Note: Some managed resource adapters have the ability to capture a password as it is being changed directly on the managed resource and then pass it on to Identity Manager Express for password synchronization. This requires the installation of a plug-in on the managed resource. This process is know as reverse password synchronization. Only one instance of reverse password synchronization can be enabled for a deployment of Identity Manager Express. The following Identity Manager Express adapters enable reverse password synchronization: Tivoli Access Manager Microsoft Windows® Server Active Directory IBM AIX® IBM AS/400® Changing a password in the master password store changes all the passwords on accounts on other resources that Identity Manager Express manages for the same user. The synchronization occurs irrespective of whether the Identity Manager Express password synchronization is off or on. If you have enabled the password synchronization properly, a user cannot change the password of only one account. All the accounts receive the password change. If you have not enabled the password synchronization option, users can select which account or accounts are to be changed. Identity Manager Express has an option that generates a random password for users upon account creation or password change. This is displayed to an administrator or mailed to the users. Identity Manager Express also has an option where it generates a password for an account, and sends a URL to the users. The users can use this URL to get the password using the shared secret attribute that is set in their personal identity information for password pickup. Identity Manager Express uses a challenge-response function to verify the users’ identity if they have forgotten their Identity Manager Express personal password. The challenge questions can be picked from a standard list or defined by the users. When the users log on to Identity Manager Express for the first time, they enter or select the challenge questions (if configured) and responses. On subsequent logins to Identity Manager Express, they can select a forgot password option and a subset of the challenge-responses that are used to verify the users’ identity. Chapter 2. Tivoli Identity Manager Express: Design and structure 19 2.3.5 Services A service represents a managed resource, such as an operating system, a database application, or another application that Identity Manager Express manages. For example, the managed resource might be an IBM Lotus® Notes® application. Users access these services by using an account on the service. Services are created from service types, which represent a set of managed resources that share similar attributes. For example, there is a default service type that represents Linux machines. These service types are either installed by default when Identity Manager Express is installed, or they are installed when you import the service definition files for the adapters for these managed resources. A service owner identifies the person who owns and maintains a particular service in Identity Manager Express. Service types A service type is a category of related services that share the same schemas. It defines the schema attributes that are common across a set of similar managed resources. Service types are used to create services for specific instances of managed resources. For example, you might have several IBM Lotus Domino® servers that users require access to. You can create one service for each Lotus Domino server using the Lotus Domino service type. Service prerequisite If a service has another service defined as a service prerequisite, users can only receive a new account if they have an existing account on the service prerequisite. For example, Service B has a service prerequisite, Service A. If a user requests an account on Service B, to receive an account, the user must first have an account on Service A. Service definition file When you have to provision to a resource using one of the supported adapter programs, you must obtain the appropriate service definition file. A service definition file, which is also known as an adapter profile, defines the type of managed resource that Identity Manager Express can manage. The service definition file creates the service types on the Identity Manager Express server. 20 Deployment Guide Series: IBM Tivoli Identity Manager Express 4.6 The service definition file is a Java™ archive (jar) file that contains the following information: Service information This includes definitions of the user provisioning operations that can be performed for the service, such as add, delete, suspend, or restore Service provider information This defines the underlying implementation of how the Identity Manager Express server communicates with the managed resource Schema information This includes the Lightweight Directory Access Protocol (LDAP) classes and attributes Account forms and service forms Manual services A manual service is a type of service that requires manual intervention to complete the request. For example, a manual service might be defined for requesting a Personal Digital Assistant (PDA) device for a user. Manual services generate a work order activity that defines the manual intervention that is required. A work order is a form of approval in that it shows up in the service owner’s to-do list. When the activity is completed, it is to indicate that the work request has been performed. When you create a manual service, you add new schema classes and attributes to the LDAP directory for the manual service. An input form for the service and manual service account is automatically generated. You can use the forms designer to further customize the generated forms. 2.3.6 Setting policies in Identity Manager Express Identity Manager Express provides for the definition of an identity policy and a password policy. These policies can be defined at a system level (global) or at a service-specific level. Password policy A password policy defines the rules that are used to determine whether a new password is acceptable. It sets the rules that passwords for a service must meet, such as length and type of characters allowed. Additionally, the password policy might specify that an entry is disallowed if the term is in a dictionary of unwanted terms. To select this choice in the user interface, you must first load a dictionary.ldif file into the Identity Manager Express server. Chapter 2. Tivoli Identity Manager Express: Design and structure 21 A password strength rule is a rule to which a password must conform. For example, password strength rules might specify that the minimum number of characters of a password must be five and the maximum number of characters must be ten. You can specify these and other rules for passwords: Minimum and maximum length Character restrictions Frequency of password reuse Disallowed user names or user IDs Identity policy An identity policy defines how a user's ID is created. Identity Manager Express automatically generates account user IDs from the identity policy. Identity policies can be set as a global policy for all accounts or as a service-specific policy. For example, if all the user IDs for all accounts must be composed of the user's first initial and last name, a global identity policy must be created for the organization. If all user IDs for a specific service must contain a certain number, a service-specific identity policy must be created for the service. 2.3.7 User categories Identity Manager Express provides different categories of users, which are used to define the default permissions and operations, and the views of the Identity Manager Express application that the user can access. For each category of user, Identity Manager Express defines default access control items (ACI) and default views that the users can access. Identity Manager Express provides the following categories of users: User Manager Help desk assistant Service owner System administrator Each category, except for user, has a corresponding group defined. All Identity Manager Express users are automatically part of the user category and are granted the base level of permissions and access to the base set of views. For each category of user, except the system administrator category, you can customize the views that are available to the users and create customized groups based on that category of user. The users in the default system administrator group always have access to all the views and can perform all operations in Identity Manager Express. You cannot modify a category. 22 Deployment Guide Series: IBM Tivoli Identity Manager Express 4.6 Categories have relationships with groups, access control items, and workflows, which are defined in Table 2-2. Table 2-2 User category relationships Category Description Manager Members of the manager group are users who manage the accounts, identity profiles, and passwords of their direct subordinates, unless the person form is customized to exclude some of the attributes for which the manager has permission to read or write. Managers can manage and delegate activities on their to-do lists. Service owner Members of the service owner group manage a service, including the user accounts and requests for that service. Additionally, on services they own, service owners can view others’ requests, such as authorizing an account, unless the person form is customized to exclude some of the attributes for which the service owner has permission to read or write. Service owners can manage and delegate activities on their to-do lists. Help desk Members of the help desk assistant group can change or reset others’ passwords, profiles, and accounts, unless the person form is customized to exclude some of the attributes for which the help desk assistant has permission to read or write. Additionally, help desk assistants can restore accounts, and also view others’ requests, and both manage and delegate to-do lists. User Users have basic privileges on their own identity and account information. They can request accounts and change passwords. System administrator The system administrator performs both security and system administration tasks. An Identity Manager Express administrator has access to the complete portfolio of functions and tasks. 2.3.8 Access control Access control topics include views, groups, and ACIs. Views A view is a set of tasks that users can perform. The view defines what tasks are available and visible when they use Identity Manager Express. Groups A group is a collection of users. Users can belong to one or more groups. Groups are used to control user access to functions and data in Identity Manager Express. Users can belong to default groups that Identity Manager Express provides or you can also create additional, customized groups. Chapter 2. Tivoli Identity Manager Express: Design and structure 23 Groups grant specific access to functions and resources within Identity Manager Express. For example, one group might have members who work directly with data defined in a business application. Another group might have members who provide a subset of the help desk group functions. A user with no group membership sees a user interface that has tasks only for the user category. A user with membership in a group can see an expanded user interface that has tasks for the user and additional group tasks. Using the groups An ACI is defined to specify a set of operations and permissions, and then identify which groups are governed by the ACI. A workflow is defined to specify an approval cycle for account requests, and then identify one or more groups as participants. Access control item An ACI is data that identifies the permissions that users have for a given type of resource. You create an ACI that allows you to specify a set of operations and permissions, and then identify which groups use the ACI. An ACI defines the following items: The entity types to which the ACI applies Operations that users can perform on entity types Attributes of the entity types that users can read or write The set of users that is governed by the ACI For example, you can create an ACI that prevents the help desk group from creating or deleting users. 24 Deployment Guide Series: IBM Tivoli Identity Manager Express 4.6 2.3.9 Workflow A workflow defines the sequence of activities that represent a business process. Workflows are used to provision accounts according to your specific business practices. They generate to-do items that appear in the users activity list. Identity Manager Express supports two types of workflows: account request workflows and recertification workflows or policies. Account request workflows An account request workflow defines the activities for managing requests for accounts. The workflow can consist of activities that route a request for approval, provide e-mail notifications, or cause requests for information to occur. Recertification policies Identity Manager Express recertification simplifies and automates the process of periodically revalidating user accounts and ensuring that users still have the appropriate privileges. The recertification process automates the validating process that each user account is still required for a valid business purpose. The process sends recertification notification and approval events to the participants who are specified in the policy. The following actions can be taken on an account recertification activity. After a recertification request occurs, an account can be: Active If the recipient takes no action and the approval times out, the account remains active. Suspended A recipient declines recertification; the workflow suspends the account and issues suspension notifications. Deleted A recipient declines recertification; the workflow deletes the account and issues deletion notifications. Chapter 2. Tivoli Identity Manager Express: Design and structure 25 2.4 Physical component architecture The Identity Manager Express solution includes the Identity Manager Express server, its required middleware components, and resource adapters. Deploying Identity Manager Express requires a single-server configuration that includes all the middleware components described in this section. Figure 2-3 presents all the components of a typical Identity Manager Express implementation. External Resources User Browser Identity Authoritative Source Tivoli Identity Manager Express Server WebSphere Express Tivoli Directory Integrator Identity DataFeed Tivoli Identity Manager Express Application Person management Service Manual Service Service TDI-based Adapter Service Ac pro count visi oni ng Notification t un ng co ioni c A vis o pr Tivoli Directory Server ADK-based Adapter DB2 Express Managed Resource API’s or Admin Client External Resources Managed Resource SMTP Server Figure 2-3 Identity Manager Express architecture overview 26 Deployment Guide Series: IBM Tivoli Identity Manager Express 4.6 Managed Resource Identity Manager Express components This section examines the single components in more detail. IBM Tivoli Identity Manager Express Server The IBM Tivoli Identity Manager Express 4.6 Server and its adapters enable you to provision accounts to a set of computing resources, which can be operating systems, data stores, or other applications. The Identity Manager Express application is a Java 2 Platform, Enterprise Edition (J2EE™) application that runs on the IBM WebSphere® Application Server Express. IBM WebSphere Application Server Express WebSphere Application Server is the primary component of the WebSphere environment. It runs a Java Virtual Machine (JVM™) providing the runtime environment for the enterprise application code, communication security, logging, messaging, and Web services. IBM DB2 Express database Identity Manager Express stores transactional and historical data in the IBM DB2® Universal Database™ Express Edition Server, a relational database that maintains the current and historical states of data. Every transaction done is placed here and is used for the transactional purpose of current processes and historic data for auditing purposes. IBM Tivoli Directory Server Identity Manager Express stores the current state of the managed identities in IBM Tivoli Directory Server, an LDAP directory. This includes user account and Identity Manager Express application configuration data such as policies and its own access control mechanism. IBM Tivoli Directory Integrator IBM Tivoli Directory Integrator can synchronize data in directories, databases, and other repositories. This eliminates the need for a central data store and provides flexible connection of data from repositories throughout an enterprise. IBM Tivoli Directory Integrator is installed to run as a service on the Identity Manager Express server to provide adapter communications. Adapters that are created using Directory Integrator are implemented as Directory Integrator AssemblyLines. Each of these lines is a single path of data transfer and transformation. The following section on adapters contains more information about Directory Integrator based adapters, called Tivoli Directory Integrator (TDI) adapters. Chapter 2. Tivoli Identity Manager Express: Design and structure 27 Directory Integrator is also used for integration of one or multiple identity data sources. Most implementations have at least an integration with the human resources system. Adapters An adapter is a software component that provides an interface between a managed resource and the Identity Manager Express server. It functions as a trusted virtual administrator for the managed resource, performing such tasks as creating accounts, suspending accounts, and other functions that administrators typically perform. An adapter consists of the service definition file and the executable code for managing accounts. Adapters are deployed in one of two ways. Adapter Development Kit based adapter Adapter Development Kit (ADK) based adapters are pre-built adapters made by Tivoli for popular platforms. After some initial configuration, they are ready to use. Each adapter runs as a separate service and typically uses application programming interface (API) to properly communicate with the managed resource. For example, the Microsoft Active Directory adapter uses Windows-specific APIs to manage Active Directory accounts. The Lotus Notes adapter requires the Lotus Notes Administrator Client installed locally for Notes account management. The SAP adapter requires the SAP client installed and some transport files loaded to manage SAP accounts, and so on. Most adapters are considered agentless. This means that they only require code installed together with the Identity Manager Express server. Some of the adapters require some code that is deployed and running on the managed resource. One example is the IBM Resource Access Control Facility (RACF®) adapter, which requires code installed on the managed host. 28 Deployment Guide Series: IBM Tivoli Identity Manager Express 4.6 Figure 2-4 shows an ADK-based agentless adapter. WebSphere Express Tivoli Identity Manager Express Application Service Lotus Notes Adapter Lotus Notes API calls Lotus Notes Administration Client Tivoli Identity Manager Express server Lotus Notes protocol Lotus Domino Server Figure 2-4 Lotus Notes ADK-based agentless adapter example TDI adapter TDI adapters can be pre-built by Tivoli or custom made. Most (if not all) custom adapters are built with IBM Tivoli Directory Integrator, which provides connectors for several platforms. It can easily be extended to manage other platforms by creating a connector interface using a third-party Java API. Most TDI adapters are also agentless. An LDAP Connector, provided with Directory Integrator, can be used to manage accounts on any server supporting the LDAP standard when using the standard inetOrgPerson objectclass. If a company has to manage other objectclasses, the provided adapter can be easily changed for this specific requirement. Another example of an agentless adapter is the UNIX or Linux adapter. This adapter runs account operation commands on each managed server using the Secure Shell (SSH) protocol. Therefore, no code has to be installed on the UNIX or Linux servers at all. One of the most common custom-built adapters is the Java Database Connectivity (JDBC™) adapter. It is common to have several applications in a company, each one with its own database account table. Chapter 2. Tivoli Identity Manager Express: Design and structure 29 Figure 2-5 shows a TDI-based agentless adapter. WebSphere Express Tivoli Directory Integrator Tivoli Identity Manager Express Application TDI-based UNIX Adapter Service Tivoli Identity Manager Express server ssh UNIX Server ssh Linux Server ssh Linux Server Figure 2-5 UNIX or Linux agentless TDI-adapter example Several Directory Integrator based agentless adapters are automatically installed when you install Identity Manager Express. You can install additional agentless or agent-based adapters that are either Directory Integrator based or ADK-based. 2.5 Securing the Identity Manager Express environment The Identity Manager Express environment can be secured at every component level. Although it is a single server identity management solution, it provides the following benefits: Manage several distinct managed resources – Use of encryption between Tivoli Identity Manager adapters and managed resources where necessary – If remote adapters are in use, you can configure adapter access control Because the Identity Manager Express environment is potentially accessed by different types of users from different places, sometimes from insecure networks, configure the following two mechanisms: – Encryption – Another layer of Web access security 30 Deployment Guide Series: IBM Tivoli Identity Manager Express 4.6 The Identity Manager Express environment requires near exclusive access to the managed resources To use most of its value as a single point of management and auditing solution, enforce its use as the only identity management solution. In the following sections, we discuss each one of these points and also internal components security and Identity Manager Express server access security. Identity Manager Express server access security All the components and installed adapters are typically located in a single server configuration. When there are many components talking to each other through TCP/IP, enabling encryption between them seems logical. However, because all communications between components occur on the same physical machine and are not transmitted over any kind of network, you can have good security with a simple setup. It is possible to have a fully working Identity Manager Express implementation with only the Web server port open for incoming connections. The communications between Identity Manager Express and managed resources always originate from the Identity Manager Express server. Therefore, we can accomplish Identity Manager Express server security by following these simple rules: Secure Identity Manager Express server physical access Prevent easy access by non-authorized personnel. Block all incoming connections to the Identity Manager Express server, with the following exceptions: – Web server plug-in or reverse proxy connections – Push components such as password synchronization plug-ins or Directory Services Markup Language v2.0 (DSMLv2) data feed This allows users to gain access to the Identity Manager Express application, but no other type of access is allowed, specifically to the LDAP and DB2 components, which are the components safeguarding all data. Security for managed resources Because we use TCP/IP communications between Identity Manager Express and its adapters, and because all managed resources are remote, we have to enable security between all types of adapters, TDI-based or ADK-based. Chapter 2. Tivoli Identity Manager Express: Design and structure 31 Figure 2-6 shows a typical communication pattern between the Identity Manager Express application and the managed resources. For each adapter implemented, apply the managed resource specific security configurations. WebSphere Express Tivoli Directory Integrator ssh TDI-based UNIX Adapter Tivoli Identity Manager Express Application Service TDI-based LDAP Adapter Service Lotus Notes Adapter Service Linux Server ldaps LDAP Server Lotus Notes protocol Domino Server Lotus Notes API calls Lotus Notes Administration Client Tivoli Identity Manager Express server Managed resource-specific security Figure 2-6 Typical communication between Identity Manager Express and its resources In this case, we have Linux, LDAP, and Lotus Notes or Domino adapters deployed. Apply the following managed resource specific configurations: Linux adapter The Linux adapter uses the SSH protocol, which is already a secure protocol. LDAP adapter Configure the LDAP server and LDAP adapter to use LDAP with Secure Sockets Layer (SSL) or Transport Layer Security (TLS) protocol, which is called LDAPS. It is also best practice to use an exclusive LDAP account for the LDAP adapter. Lotus Notes adapter The Lotus Notes adapter issues API calls to the locally installed Notes Administration Client. To enable security, the Lotus Notes Administration Client must have encryption enabled so that all communications from the adapter to the Domino server are secured. The same applies to other adapters. However, there are some cases where encryption is not available, or the nature of the managed resource requires some local code running. 32 Deployment Guide Series: IBM Tivoli Identity Manager Express 4.6 Figure 2-7 shows two common examples, where accounts are stored in file-based databases and files. WebSphere Express Tivoli Directory Integrator Tivoli Identity Manager Express Application TDI-based Custom Database Adapter DSMLv2 over https Service DB Remote Server Service Tivoli Directory Integrator DSMLv2 over https Tivoli Identity Manager Express server TDI-based Custom File Adapter Accounts File Remote Server Figure 2-7 Remote communications with TDI-based adapters In these cases, there are no possible remote communications or the available ones are insecure. Therefore, the custom developed TDI-based adapter has to be deployed together with the managed resource. Identity Manager Express uses DSMLv2 over Hypertext Transfer Protocol-Secure (HTTPS) to communicate with the remote TDI-based custom adapter. To have the highest possible security in this scenario, ensure the following prerequisites: Ensure managed resource server access. The custom adapter is an Extensible Markup Language (XML) file and it is a best practice to protect it. Enable password authentication at the custom adapter so that it requires a corresponding user name and password at the Identity Manager Express service configuration. Set firewall rules so that only the Identity Manager Express server can connect to the DSMLv2 Hypertext Transfer Protocol (HTTP) port configured for the custom adapter. Enable SSL security at the custom adapter. The same prerequisites are valid for remote ADK-based adapters. Chapter 2. Tivoli Identity Manager Express: Design and structure 33 Identity Manager Express Web security WebSphere Application Server Express Edition uses its own Web server. However, add another HTTPS security layer so that browsers do not have direct access to the Identity Manager Express Web server port. There are two options: Deploy a remote Web server and configure it with the WebSphere Application Server plug-in. Deploy a reverse Web-proxy such as Tivoli Access Manager for e-business WebSEAL. Figure 2-8 shows a typical scenario using an IBM HTTP Server as a middle tier between browsers and Tivoli Identity Manager Express. Firewall DMZ Firewall tls IBM HTTP Server + WebSphere Application Server Plugin HTTP Server User Browser Production Zone Tivoli Identity Manager Express Server tls WebSphere Application Server Express Figure 2-8 Three-tier Web access using IBM HTTP Server Identity Manager Express framework security “Identity Manager Express server access security” on page 31 shows that it is possible to have good middleware security locking the Identity Manager Express server machine itself. However, it is possible to implement this by enabling security at each one of the middleware components. WebSphere Application Server security The WebSphere Application Server installation program selects OFF as the default value for WebSphere Application Server global security. However, your environment might require that you provide WebSphere Application Server global security. When enabled, WebSphere Application Server global security ensures that authenticated users have the necessary permissions to access Tivoli Identity Manager Express Enterprise JavaBeans™ (EJB™) components. 34 Deployment Guide Series: IBM Tivoli Identity Manager Express 4.6 Configuring this security component involves configuring an authentication mechanism, a user registry, and optionally, Java 2 security. There are two types of security to consider: WebSphere Application Server global security Global security is primarily concerned with application security and enforces authentication and role-based authorization. When global security is enabled, you cannot log on to the WebSphere Application Server administration console without a user ID and password. Enabling global security introduces two important IDs to the WebSphere Application Server environment: – The server user ID Basically this is a user in a user registry such as an LDAP or local operating system user. The user is a member of the chosen user registry, but also has special privileges in WebSphere Application Server. The privileges for this ID and the privileges associated with the administrative role ID are the same. The server user ID can access all protected administrative methods. On Windows systems, the ID must not be the same name as the machine name of your system, because the registry sometimes returns machine-specific information when querying a user of the same name. In LDAP user registries, verify that the server user ID is a member of the registry and not just the LDAP administrative role ID. The entry must be searchable. – The process ID The WebSphere Application Server processes are run by the process ID rather than the server user ID. The process ID is determined by the way the process starts. For example, if you use a command line to start processes, the user ID that is logged into the system is the process ID. If running as a service, the user ID that is logged into the system is the user ID running the service. If you choose the local operating system registry, the process ID requires special privileges to call the operating system APIs. Specifically, the process ID must have the Act as Part of Operating System and administrator privileges on Windows systems or root privileges on a UNIX system. WebSphere Application Server Java 2 security Java 2 security can optionally be turned on or off when global security is enabled. It addresses the use of system resources such as writing to the file system, listening on a socket, and calls to APIs. Java 2 security is configured in a was.policy file. Chapter 2. Tivoli Identity Manager Express: Design and structure 35 Enabling Java 2 security for the Tivoli Identity Manager Express application causes Java 2 security to be enforced on all applications that are running on the WebSphere Application Server. If you enable Java 2 security for the Tivoli Identity Manager Express application, you must also appropriately configure all other applications running on the WebSphere Application Server to support Java 2 security. The Java 2 security policy that Tivoli Identity Manager Express provides grants Tivoli Identity Manager Express all permissions on the system. It does not bring any security benefit for Identity Manager Express deployments mainly because Identity Manager Express is always a single and dedicated WebSphere deployment scenario. Enabling Java 2 security can also cause some reduction in performance of the WebSphere Application Server between 10% - 20%. If you have to configure Java 2 security, refer to the IBM Tivoli Identity Manager Express Installation Guide V4.6, SC32-22622. If the chosen scenario follows the recommendations given in “Identity Manager Express Web security” on page 34, and there are no open communications to the Identity Manager Express server other than Identity Manager Express’ own components, you can choose to not enable security at all for WebSphere Application Server. WebSphere Application Server Web server security Block all incoming traffic to the Web server except from the WebSphere Application Server plug-in deployed together with the HTTP server. Directory Server security You can easily make the Tivoli Directory Server that comes with Identity Manager Express secure, if it is not used by any other applications, by performing these steps: 1. Block all incoming connections to LDAP ports. The default ports are: – 389 for plain LDAP connections – 636 for LDAP over SSL/TLS connections – 3538 for the Tivoli Directory Server administration daemon 2. Disallow anonymous binds. 2 The following Information Center provides access to the IBM Tivoli Identity Manager Express Installation and Configuration Guide online manual: http://publib.boulder.ibm.com/infocenter/tivihelp/v5r1/index.jsp 36 Deployment Guide Series: IBM Tivoli Identity Manager Express 4.6 However, if this LDAP server is also used by external applications, perform the following steps to make it secure: 1. Block all incoming connections to the Tivoli Directory Server administration daemon on port 3538. 2. Enable and enforce SSL connection to it. 3. If not necessary, disallow anonymous connections. 4. Create Tivoli Directory Server access control lists (ACLs) to prevent someone from reading Identity Manager Express data. DB2 security The DB2 database that comes with Identity Manager Express must not be used by any other applications. You can easily make it secure by blocking all incoming connections to DB2 listening ports. The default ports are: 3700 for the DB2 instance used by Tivoli Directory Server 50000 for the DB2 instance user by Tivoli Identity Manager Express Administrative passwords security Identity Manager Express has full administrator access to all managed resources. Getting access to Identity Manager Express as an administrator grants access to any type of account creation on any platform. Therefore, it is important to choose and maintain good and secure passwords for Identity Manager Express administrators. Managed resource security If deployed and in production, Identity Manager Express is considered to be the only system to manage accounts. To take advantage of its capabilities and security features, such as central auditing, disable all access at managed platforms for account operations. For example, if you have help desk users with account operator rights when implementing Identity Manager Express, you can provide them access to the Identity Manager Express help desk group and revoke their special privileges on individual managed resources. This improves performance and ensures that nobody manages accounts directly on the managed resources. Chapter 2. Tivoli Identity Manager Express: Design and structure 37 Adapter security The Tivoli Identity Manager Express Server uses either SSL or SSH communication to communicate securely with supported adapters. The following measures protect adapters from misuse: Ensure that only the Identity Manager Express host can connect to the adapter listening TCP port. Configure each remote adapter to use SSL. Refer to instructions about each adapter to enable it. On ADK adapters, choose a good password for: – Adapter configuration tool access (agentCfg) – Directory Access Markup Language (DAML) protocol users and passwords 2.6 Conclusion This concludes the discussion on the Identity Manager Express design and structure. You now understand the full user lifecycle approach of the solution and how to provision accounts and people to managed resources. You have learned about the logical and physical component architecture of the Identity Manager Express environment and how to secure this infrastructure within your own deployment. In Chapter 3, “Building an Identity Manager Express solution” on page 39, we discuss how to generally approach a deployment for Identity Manager Express. 38 Deployment Guide Series: IBM Tivoli Identity Manager Express 4.6 3 Chapter 3. Building an Identity Manager Express solution In this chapter, we discuss the important topics that you must consider when designing the solution for an Identity Manager Express implementation. The topics covered can serve as a checklist to follow during your project planning and implementation phases. Designing the solution involves the following processes: Gathering the business requirements Analyzing these requirements Defining the solution architecture We examine each of these processes in more detail. © Copyright IBM Corp. 2006. All rights reserved. 39 3.1 Gathering the business requirements What are the goals? What are the business and functional requirements that you want to meet using the identity management system? Do you need to address compliance requirements? Is reducing costs a major driver for the project? Has the IT environment become too complex and you are looking for ways to streamline operation? Use the following questions to help you determine the answers. Why do you require or want an identity management solution? The answer or the priority of answers to this question might vary from situation to situation. You might find yourself in a situation where you have to comply with certain internal or external regulations, or you might be trying to reduce the time to provision new users or reduce help desk costs. Understanding the motivations behind creating an identity management solution helps you to identify areas where you have to look for additional requirements (for example, standards the solution has to comply to). What services have to be provisioned by the solution? Identification of services that have to be provisioned allows you to get the details you require regarding who the service owners are, and what their requirements are for each service that is covered in the solution. It also allows you to better estimate the time required to develop and deploy the solution. If there are a large number of services that have to be covered, you might want to consider a phased approach to deploying the solution, which addresses a small set of services to begin with and adds new ones over time. This approach may be less disruptive to the users. After you identify all of the service owners, you have to spend time with each one to gather requirements related to policies and workflows that might be specific to their service. It is important to understand the current process for provisioning accounts and determine whether you can implement the current design or whether a process change is required. Develop use cases around each of the services. This can be a beneficial approach to take to aid in the requirements gathering and design of the service. What existing policies are affected by this new solution? The solution that you develop might impact many aspects of the security and operational policies that you practice today. Examples of these include password policies, identity revalidation policies, help desk policies, human resources (HR) hiring and firing policies, and many others. If these policies are documented, you might want to get copies of these because they help to further define the requirements of the solution. In addition, you can rewrite some of your policies. If so, you have to understand the impact of the 40 Deployment Guide Series: IBM Tivoli Identity Manager Express 4.6 changes and plan any required education that has to be delivered about the effect of the changes. The operational policies can affect the workflows that you create for services that the identity management solution is provisioning. What additional functional requirements exist? When you deploy any solution, you have to identify as many of the functional requirements as possible that affect your design. These might include language, licensing issues, auditing, reporting, security, and system management requirements. You have to address each of these topics during your requirements gathering process and identify the ones that you have to address. What are the usability expectations? The product used in this solution comes with a standard set of Web pages, forms, e-mails, and templates. Although these components are functional, they might not meet your individual requirements. If you have to customize them, gather requirements relating to the usability of these components. Information is available in the product documentation about how to further customize them. What are the requirements about the reliability and performance of the system that you are deploying? You might have specific requirements about the availability and performance of the system that you deploy to manage user identification. You have to understand these requirements and plan accordingly. If there is a need for redundancy, you have to design this into your implementation. Different stakeholders in the project might require a service level agreement (SLAs) that you or the company’s IT group has to comply with. You must validate that your design is capable of meeting all of the SLA requirements. What are the support requirements of the system that is deployed? These requirements might directly affect the design you come up with, or they might affect the team that runs the systems after they are deployed. The implications of these requirements affect the education that you create for support personnel as part of your solution. Understanding the expectations around the support of the system benefits your planning during the architecture and development phases of the solution. Consider worst-case scenarios to make sure that you have considered all of the eventualities (for example, what happens if the entire system fails). Chapter 3. Building an Identity Manager Express solution 41 What type of education do you have to develop and deliver after the solution is complete? These requirements are often overlooked, but they are critical to the success of your project and the initial impact of the solutions deployment. You must understand your preferred method for deploying new solutions and education to support, help desk, and users. 3.2 Analyzing the business requirements After you gather the requirements, analyze them as you begin to look at the following three areas of defining the solution architecture. The following sections discuss the product-specific capabilities that you have to define and the decisions that you have to make when you implement the solution. In this step, you must also document the security considerations and choices and how you implement them for the environment. 3.3 Defining the solution architecture Before you start installing and configuring the product, obtain the planning information and make organizational decisions in the following three areas: People This area covers the planning steps to define identity feeds and password management features. Resources This topic covers the planning steps to identify and configure managed resources, forms requirements, adoption rules, and workflows. Authorizations This area covers the planning steps to establish access control for users and determine whether additional groups and access rights, through the definition of access control items (ACIs), are required. 3.3.1 People planning: Defining users For the people in the organization who are the users of Identity Manager Express, you have plan how to import their identity information into Identity Manager Express and how to provide their initial login ID and password. 42 Deployment Guide Series: IBM Tivoli Identity Manager Express 4.6 Table 3-1 presents some of the questions and planning steps for the people planning process. Table 3-1 People planning Topic Questions Planning steps Identities Which users have to be users of Identity Manager Express? Which users have to be administrators, service owners, help desk assistants, or managers? At a minimum, create one user of each type for testing purposes. Import of identity records Where is the identity data coming from and what format is it in? What attributes are required in Identity Manager Express to identify the user? Determine which sources to use for the data and what attributes are required. Password policy What are the organization’s requirements for a standard password policy? Determine whether your organization has a single password policy or does it have multiple policies for different systems or applications. This helps to determine whether to use a global policy or whether service-specific policies are required. Password synchronization The system default is that password synchronization is enabled. Are managed resource password plug-ins going to be used for reverse password synchronization? Can the environment initially support password synchronization as services are added? Do all services have similar password policies? Identity policy The default identity policy used when creating a new user is to use a first initial plus the last name if a user ID (UID) is not specified. Services can have a specific identity policy or you can use a global policy. What identity policy meets the requirements of your environment for both users and their accounts? Identity feed planning One of the first steps of planning is to populate Identity Manager Express with users using an identity feed. The process flow shown in Figure 3-1 on page 45 shows how to build the process step by step. The basic tasks in an identity feed are: 1. Prepare the person data for the initial identity feed. Determine the authoritative data source, such as the HR repository. Determine what information to use as the required attributes of a person. For Chapter 3. Building an Identity Manager Express solution 43 example, you might require data that indicates a person's title to correctly assign a group to that person as an Identity Manager Express user. At a minimum, Identity Manager Express requires that you define the common name (Lightweight Directory Access Protocol (LDAP) common name) and last name (LDAP surname) for every user. Your planning also has to anticipate the impact of missing information in the user record. For example, if the record that you feed into Identity Manager Express has no e-mail address for the user, the user does not receive a password for a new account in an e-mail message, and must call the help desk, or contact the manager. 2. Determine which format to use to load the data. You can populate the Identity Manager Express people registry by reconciling using one of the following formats: – – – – – – Tivoli Directory Integrator Directory Services Markup Language v2 (DSMLv21) Comma Separated Value (CSV) Directory Access Markup Language (DAML2) Microsoft Windows Server® Active Directory LDAP inetOrgPerson 3. Create a service for the selected data format using the graphical user interface (GUI). 4. Reconcile the service to load the identity information. After the initial identity feed is completed, verify that all the identities are loaded correctly. There might be inconsistencies in person and account data. The amount of cleanup that is required depends on how well your organization prepares the identity data for the initial load. 5. When the initial reconciliation completes successfully, perform the next steps to create accounts on the resources that your organization wants to manage using Identity Manager Express. 1 2 44 DSML is an application of the Extensible Markup Language (XML) that enables different computer network directory formats to be expressed in a common format and shared by different directory systems. DAML is an XML specification that extends the functions of DSML 1.0 to represent directory operations. In Tivoli Identity Manager, DAML was mainly used for server to agent communications before DSMLv2 became available. It is still supported today. Deployment Guide Series: IBM Tivoli Identity Manager Express 4.6 Figure 3-1 Identity feed process Password policy and password synchronization planning In this step, you have to determine the unique requirements for the rules that passwords for a managed service must meet. For example, the length and type of characters allowed and disallowed, and whether to keep password synchronization, which is enabled by default. Password synchronization allows a user to change one password that is synchronized with the passwords for all the accounts that the user has on other resources that Identity Manager Express manages. If you use password synchronization, plan whether to use a single password policy, or use several password policies. A single password policy enforces the policy on all accounts that a user owns. If there are several password policies, each policy might apply to a subset of accounts that a user owns. Chapter 3. Building an Identity Manager Express solution 45 3.3.2 Resource planning: Defining managed resources Identify all the resources in your organization that you have to manage. If there are many, prioritize the order in which to implement them.There might be technical or business requirements that dictate the order to work with the managed resources. Adapters for managed resources Obtain the appropriate adapters for your environment. Some adapters (UNIX, Linux, and LDAP) are automatically installed with the Identity Manager Express server. Some adapters are provided on the installation media. You might have to download some adapters from the following IBM Passport Advantage® Web site: http://www.lotus.com/services/passport.nsf/WebDocs/Passport_Advantage_H ome If an adapter does not exist for a resource that you have to manage, consider developing a custom adapter using IBM Tivoli Directory Integrator. For more information about custom adapter development with IBM Tivoli Directory Integrator, refer to IBM Tivoli Identity Manager, Version 4.6 Custom Adapter Developer’s Guide3. Table 3-2 presents some of the questions and implementation steps for different adapter topics. Table 3-2 Adapter questions and implementation steps Topic Questions Implementation steps Adapter types List the resources to be managed (operating systems, applications, directories). Adapter configuration What information is required to configure the adapter? Refer to the each adapter’s installation and configuration guide. Obtain the user IDs, passwords, server information, and other parameters required for configuration. Test the configuration in a non-secure mode initially, and then determine security requirements. Determine security requirements for adapters. What are the requirements in your organization for securing data links? Some adapters might require the use of Secure Sockets Layer (SSL) depending on the sensitivity of data. If you use SSL, do you have to obtain certificates or are self-signed certificates adequate? 3 46 Obtain the adapter code. Install the adapter code. This guide is included with the documentation for the UNIX or Linux adapter, which you can download from the IBM Passport Advantage Web site. Deployment Guide Series: IBM Tivoli Identity Manager Express 4.6 Identity Manager Express provides the following types of adapters: Installed adapters: The adapter code of an installed adapter is automatically installed with the Identity Manager Express server. The adapters use a Directory Integrator based connector to communicate with managed computers. Non-installed adapters: The adapter code for a bundled adapter is provided in the Identity Manager Express server product media, but the adapter code is not automatically installed with the Identity Manager Express server. Other adapters: You can download additional adapters that are not bundled with the Identity Manager Express server from the IBM Passport Advantage Web site cited previously. For a list of the adapters that are installed or bundled with the Identity Manager Express server media, refer to the IBM Tivoli Identity Manager Express Release Notes Guide V4.6, SC32-2264. After you install and configure the adapters with the right communications parameters and security, start considering the provisioning requirements. Adapter account defaults The adapter instance account form represents the attributes and values required by the managed resource. To make the provisioning process easier, you can set account defaults for one or more attributes of the service. For each service instance, review the required attributes and determine what attributes you can and must set defaults for. For example, you might want to automatically set the home directory for a Linux user to /home/userid, where userid is the account ID generated by the identity policy. Service owners Each service must have a service owner, or person responsible for the service. This facilitates delegation of administration for the service. Service owners are defined when defining the service instance. Identity policy An identity policy defines the characteristics of a user ID that is used when users request new accounts. The identity policy specifies how a user's attributes are combined to create the user ID. The rule also allows you to specify the length and the case sensitivity of the each user attribute. When you plan your managed resources, determine whether you can use the global identity policy for generating the user ID or whether you have to create a service-specific identity policy. Chapter 3. Building an Identity Manager Express solution 47 Forms You might have to customize a default set of forms that Identity Manager Express provides. Three types of forms are provided: User Account Service You can customize a specific form using the Form Designer applet to modify an account, person, or service display. The Identity Manager Express Form Designer uses applets that require the Java plug-in, provided by the Java 2 Runtime Environment (JRE™), Standard Edition. As part of customizing the user interface for a service, account, or person, remove information that users do not require. For example, you might want to remove certain attributes from an account form that are not populated in your environment. Account implementation After you establish the services, you are ready to begin provisioning accounts to Identity Manager Express users. You must now plan the how to process those accounts in terms of account adoption rules, reconciliation, and workflows. Reconciliation Reconciliation is the process of synchronizing accounts between the managed resource and the Identity Manager Express server. Reconciliation can be used to monitor accesses granted outside of Identity Manager Express. During reconciliation, records of all accesses granted outside of Identity Manager Express are inserted into the Identity Manager Express directory. You can view a report of the accounts that were added or changed on the managed resource since the last reconciliation was performed. When you set up a reconciliation, plan how often the reconciliations are to be run and generate the required reports to compare accesses since the last reconciliation was run. Adoption rules To determine an ownership relationship, reconciliation compares account information with existing user data stored on the Identity Manager Express server. It first looks for the existing ownership within the Identity Manager Express server and then applies the adoption rules that are configured for the reconciliation. You have to plan on how adoption rules have to be applied. Is there one global adoption rule or does each service require its own adoption rule? What are the matching criteria for the adoption rule? 48 Deployment Guide Series: IBM Tivoli Identity Manager Express 4.6 Figure 3-2 shows the process flow of the administrator tasks to determine account adoption. Figure 3-2 Administrator tasks to determine account adoption Workflow Workflow planning involves determining what approvals are necessary in the lifecycle management of accounts. Consider the following questions: Who needs to approve account-related tasks? Do certain account types require recertification after a period of time? Before provisioning an account, do you have to gather certain information from a service owner or manager? Are e-mail notifications required? Chapter 3. Building an Identity Manager Express solution 49 What are the time frames for escalation to occur if the approvals or requests for information (RFIs) are not acted on? Who must receive the escalations? Are workflows defined at the global level for the system? Are service-specific workflows required? 3.3.3 Authorization planning: Determining how to control access For the people in your organization who will use Identity Manager Express, you have to plan on how to grant and manage user access to resources. Not all users require the same level of access. The authorization features in Identity Manager Express allow you to control access. Table 3-3 summarizes the planning information. It includes examples of initial conditions and the first implementation steps that system administrators have to perform. Table 3-3 Authorization planning Topic Initial conditions and questions Example implementation steps Groups All predefined groups have only the system administrator and itim manager as members. Specify at least one additional administrator for accountability and protection against loss of access to the system. Which individuals in your organization will be members of one or more of the default groups: Manager Service owner Help desk User 1. Identify which users are managers. Check whether the information about their subordinates can be easily populated with an identity feed. Are additional groups required to provide either more access or less access than the default groups definitions? Model the access and then create the required groups and configure the ACI. What are the organization’s requirements to expand or restrict access control beyond the default implementation? ACIs 50 2. Identify which users are to be service owners (system administrators and data owners). 3. Identify which users have a support function in your organization and require help desk access. Design ACIs that restrict or expand access. Define additional groups. To preserve the original definition, define additional groups rather than modify the default ACIs. Deployment Guide Series: IBM Tivoli Identity Manager Express 4.6 Topic Initial conditions and questions Example implementation steps Views Each of the defined access groups has a default view of task that can be performed. Does your organization want to modify these views? You can modify the views for manager, help desk, service owner, and user groups. However, modifying the views impacts all groups that are based on the default group. Group and access control planning To provide appropriate membership in default and customized groups, plan which groups and activities are available to selected members of your organization. The system administrator group has no limits set by default views or access control items. Other default groups have ACI and view defaults. Access control item planning You must plan to examine the default ACIs that define permissions to the user and to members in other groups. For example, you can customize an additional ACI to grant more or fewer rights on accounts that some users own. Identity Manager Express provides default ACIs for the following groups: User Manager Help desk assistant Service owner Additional groups are generally defined to provide further access control that expands or reduces access rights and preserves the default definitions. Creating a new ACI requires that you focus its permissions and membership, and also consider the effect of existing ACIs. 3.4 Conclusion This chapter provided you with information about how to generally plan for the deployment of Identity Manager Express. We reviewed the topics of identity feed planning, authorization planning, and resource planning. Take the time to review the questions and make initial assessments. This saves you time and effort in your IBM Tivoli Identity Manager Express deployment. In Part 2, “Customer environment” on page 53, we take a look at a particular sample client scenario with project planning and implementation. Chapter 3. Building an Identity Manager Express solution 51 52 Deployment Guide Series: IBM Tivoli Identity Manager Express 4.6 Part 2 Part 2 Customer environment In Part 2, we discuss how to use IBM Tivoli Identity Manager Express in a particular customer situation. © Copyright IBM Corp. 2006. All rights reserved. 53 54 Deployment Guide Series: IBM Tivoli Identity Manager Express 4.6 4 Chapter 4. Smart Commercial Construction: Company profile In this chapter, we provide an introduction to the overall structure of the Smart Commercial Construction (SCC) company, including its business profile, its current IT architecture and infrastructure, and its medium-term business vision and objectives. Note: All names and references to the company and other business institutions used in this chapter are fictional. Any match with a real company or institution is coincidental. © Copyright IBM Corp. 2006. All rights reserved. 55 4.1 Company profile SCC is a medium-sized commercial construction company, which builds all types of commercial buildings within the continental United States. It has been in business for 12 years. It has 800 employees, and the IT staff is composed of five people plus three who work in the help desk department. 4.2 Current IT architecture In this section, we describe the current IT architecture at SCC. We cover the following topics: An overview of the SCC network and network services The construction-specific business application 4.2.1 Overview of the SCC network SCC has deployed a central IT data center composed of the following network and middleware services: Firewall The firewall implementation uses Linux built-in firewall and IPSec for virtual private networks (VPNs) between the central office and the construction offices. Active directory for file and print sharing, Domain Name System (DNS), and Dynamic Host Configuration Protocol (DHCP) services All workstations at the central office are Windows-based or Linux-based, and all file and print sharing services are supplied by an active directory domain. The Windows workstations are part of this domain, but the Linux workstations are not. DB2 Express database SCC uses a single database server for all its applications. WebSphere Portal Express The company’s latest project was about implementing a company portal aggregating all Web application access. Tivoli Directory Server The Tivoli Directory Server is used as a Lightweight Directory Access Protocol (LDAP) directory for applications. All authentications for these applications are performed at this service. 56 Deployment Guide Series: IBM Tivoli Identity Manager Express 4.6 Lotus Domino SCC uses Lotus Domino mainly for e-mail and groupware functions. Custom application for construction management All construction management is performed with this application. It is portal-based, and uses LDAP authentication, DB2 as its database, and also Lotus Domino workflows. Enterprise Resource Planning (ERP) system The ERP system is a Web-based system using DB2 as its database and LDAP authentication. Figure 4-1 shows the high-level network diagram of SCC’s network. Construction Office Main Office Production Zone Aplication Server Clients Construction Office Lotus Domino DMZ Internet Web Server Database Server Portal Server Intranet File and Print Server Clients Clients Construction Office LDAP ERP System Clients Clients Figure 4-1 The SCC network All external access to the SCC network is channeled through VPN. Construction sites have a firewall connected to the Internet with a VPN setup to the main office. 4.2.2 The construction-specific business application SCC’s most important application is the construction management application. It is a modern Web-based application well-suited for its business and fully integrated with its portal, Domino, and ERP systems. This application is a mark for SCC because it implements all new business processes and quality, which improve its profits and market image. Chapter 4. Smart Commercial Construction: Company profile 57 Technically the application is a WebSphere application that uses DB2 as its back-end database and LDAP for authentication. Web services are consumed by portlets running on WebSphere Portal Server Express. It also consumes other Web services based on the Lotus Domino and ERP system. Figure 4-2 shows this application architecture. WebSphere Portal Express WebSphere Application Server Express Construction Management Application Portlets Project Management Personnel Equipment Management Operations Management Construction Management Application Services Project Management Personnel Accounting Equipment Management Accounting Specialty Applications Operations Management Specialty Applications Web Services tion tica Da en ta th Au DB2 Express Tivoli Directory Server Figure 4-2 Construction management application architecture SCC has implemented its e-business application system for employees and expanded its services on the Web to their customers. Customers can access information about their constructions and effectively participate in some of the processes. 58 Deployment Guide Series: IBM Tivoli Identity Manager Express 4.6 4.2.3 Identity management and emerging problems After losing a bidding auction because of information leakage, the company conducts a short security study and quickly finds that its user management process is the main source of the security problems. It finds that the information is leaked by the usage of VPN and portal test accounts. Although it has segmented networks, well-configured firewalls, updated and hardened systems, its user management process is vulnerable and another security event can lead to the company losing crucial market share. Current user management At this time, SCC has no official user management process defined. Its resource-limited IT staff do what they can do. Applications are implemented, new platforms arrive, and security is clearly left behind to avoid impact on business requirements. Because the IT staff cannot handle user creation and the help desk is at its limit just managing password resets, some key members of the staff are granted full resource access, mostly managers. To avoid impact on timelines, the managers provide the account information to people who they think require it. After some months, they have no control on who is using what account. Therefore, they stop changing passwords for these accounts. The IT staff know about the situation, but do not have the tools or manpower to fix the situation. Currently, every user has an account for every platform, even though they do not require it. Each one of these accounts has one distinct ID and password. There is no account template definition and most of the help desk calls are because the password policies are distinct at every platform. Emerging problems SCC is selling a strong image on compliance and the president has asked the IT manager to solve these problems that current month. The IT staff find that implementing and enforcing a security policy quickly will lead them to collapse the help desk and support team. A different approach is necessary. For the IT staff, a solution that meets the business requirements and also reduces manage efforts is the only option. As mentioned previously, all employees have several types of accounts and they have to maintain multiple sets of user IDs and passwords. If employees forget their passwords, they have to call the help desk to reset the password. The management interfaces for the various types of accounts on the different platforms are not the same. Administrators have to use specific interfaces along with account types. There are many complex operations and more time is required for an administrator to learn how to properly use them. Chapter 4. Smart Commercial Construction: Company profile 59 Furthermore, because accounts have only the user ID attributes, it is difficult to verify whether the user who calls the help desk for a password reset is the account owner. The company finds that any person with an SCC help desk phone number can access it and reset any password, even customer passwords. Finally, there is no way to perform a real audit for account operations and it has to be fixed. SCC decides to implement a centralized, policy-driven identity management solution. The main objective in this case study scenario is to use the Tivoli Identity Manager Express solution. 4.3 Corporate business vision and objectives To increase the employees’ productivity and prevent dissatisfied customers, SCC has to streamline the user management processes for all the involved platforms and reduce the possibility of human errors as much as possible. The SCC short-term vision is as follows: The company wants to deploy a corporate-wide user management system to be operated efficiently and correctly, following a single security policy. To lessen administrative cost, it is necessary to centralize management operations wherever possible. The company wants to implement an identity management system with minimum development cost, making full use of the existing resources. 4.4 Conclusion SCC has a common set of IT security requirements that leads to an identity management system. Until now, identity management solutions were too complex for companies such as SCC. Tivoli Identity Manager Express, with its objective and simple vision helps small-to-medium businesses achieve security with low effort and fast implementation. In Chapter 5, “Identity management solution design” on page 61, and Chapter 6, “Technical implementation” on page 73, we demonstrate how to implement Tivoli Identity Manager Express for the current SCC IT scenario. 60 Deployment Guide Series: IBM Tivoli Identity Manager Express 4.6 5 Chapter 5. Identity management solution design In this chapter, we describe the business requirements and functional requirements for an identity management foundation based on Tivoli Identity Manager Express. Most of the Tivoli Identity Manager Express implementations are performed in phases. The content of each phase is decided by analyzing the priorities of the business requirements, and mapping these through their functional requirements to Identity Manager Express capabilities. The earlier phases are dedicated to satisfying those requirements associated with high-priority business requirements and low-cost implementation. © Copyright IBM Corp. 2006. All rights reserved. 61 5.1 Business requirements From the vision and objectives presented in 4.3, “Corporate business vision and objectives” on page 60, the Smart Commercial Construction (SCC) company Chief Executive Officer (CEO) emphasizes the following eight business requirements for the project. All accounts must have an identifiable owner. Run all administrative operations related to user and account management, including creation, modification, suspension, and password reset, correctly and in a timely manner. – Operations that do not require approvals must run momentarily. – Operations that require approvals must not wait for a long period of time for a response. Stalled requests must be escalated. It must be possible to share the burden of approvals. Reduce the costs of administering users and their accounts. The CEO is keen to gain cost savings by reducing the amount of work that the administrators have to do. The areas where savings can be made include: – The effort required to reset passwords for users who have forgotten their passwords – The effort required to create accounts at multiple distinct platforms when a person joins the company – Reduce reliance on help desk Ensure that the password policy is unique for all user accounts and the passwords is unique for all user accounts. Allow business to scale without increasing head count Make the user and account management historical data available from a corporate-wide perspective to verify whether the system works according to the guidelines and policies. These logs can help understand shortcomings and implement future improvements. Improve compliance in the following areas: – Many employees have access to systems that they must not have access to – People have left the company, but their accounts are not deleted – There is no reporting available to verify security compliance – There is no periodic recertification of users’ required accounts – Separation of duties must be applied wherever possible 62 Deployment Guide Series: IBM Tivoli Identity Manager Express 4.6 Implement the identity management solution in a secure manner. It must ensure that: – Sensitive data is protected from unauthorized access – Audit data is protected from unauthorized alteration – The system is protected from unauthorized users 5.2 Functional requirements We extract functional requirements by mapping business requirements to their underlying reasons. We expand the reasons in increasing detail until we find problems that can be solved using the capabilities of Identity Manager Express. Our functional requirements tie these low-level reasons for a business requirement to the Identity Manager capability that fulfills that business requirement. In this section, we examine all the business requirements, and search for reasons and the functional requirements. Business requirement 1: All accounts must have an identifiable owner. If an account does not have an owner, it must be disabled. If an account has an owner who is a former employee or a customer without an active contract, this also must be disabled. The functional requirements for account ownership are shown in Table 5-1. Table 5-1 Functional requirements for account ownership Requirement Description A A regular feed of identity data from authoritative SCC identity sources into Identity Manager has to be established B Accounts are disabled or removed when the identity feed shows that an employee or customer has become inactive C Orphan accounts are disabled or removed Business requirement 2: Run identity management quickly and correctly. There are two main problems in this area: System administrators are unable to keep up with the volume of requests, and approvals are not being processed in a timely manner. The biggest burden on the administrators is the increasing number of password reset requests. After implementing a central security solution for access control and applying a new security policy for passwords, users have to change passwords more frequently than before. This leads to users forgetting their passwords more often, which results in many password reset Chapter 5. Identity management solution design 63 requests. Users are less likely to forget their passwords if they use the same password for all of their accounts. If they do forget their password, the burden on system administrators can be reduced by delegating the ability to do password resets. This can be done by users’ managers, or possibly by the users themselves. This leads to the following two functional requirements shown in Table 5-2. Table 5-2 Functional requirements for timely password management Requirement Description D Users have a single password for all of their accounts E Password resets are delegated to users other than the system administrators, possibly to the users Another reason why system administrators have trouble keeping up with the rate of requests is that user and account management operations are time consuming and skill intensive. Administrators waste time manually entering data, which can be calculated automatically at the account creation process. Manually entering data is not only time consuming, it is also error prone. This leads to administrators taking more time to repeat requests that are done incorrectly. Administrators must also learn different management interfaces for each type of account. Administrative productivity can be enhanced by using a common interface to manage different types of accounts centrally. This leads to the set of functional requirements shown in Table 5-3. Table 5-3 Functional requirements for timely account management Requirement Description F Common values are entered automatically G Provide a common user interface for administration The other major cause of delays in user and account management is the request approval process. SCC has identified three primary causes for delays in granting approvals: – An approver might not be available at the time of a request. Requests must not be delayed because an approver is out of the office. Approvers must be able to delegate their responsibilities if they know they will be unavailable. – Approvers might be too busy or receive too many requests to respond quickly. Approvals must be assigned to teams instead of to individuals. It must be possible for the team members to assign and take ownership of individual approval requests. 64 Deployment Guide Series: IBM Tivoli Identity Manager Express 4.6 – Approvers might forget that they are responsible for a request. An approver who does not act on a request must be periodically reminded that the request is waiting. If they still do not respond, the request must be escalated to a different approver. These issues are addressed by the set of functional requirements shown in Table 5-4. Table 5-4 Functional requirements for timely request approval Requirement Description H Allow delegation of approval responsibilities I Support collaboration by multiple approvers J Remind approvers of waiting requests K Escalate ignored requests Business requirement 3: Reduce administrative costs. SCC has identified two main areas in which they want to reduce the costs associated with user and account administration: Password resets and account creation for new employees. Administrators can focus on higher value projects, if these tasks can be automated or delegated to other users. We have already discussed password resets in the context of business requirement 2 (run requests quickly and correctly). Functional requirement E (delegation of password resets) also satisfies the cost reduction business requirement. The system administrators are also responsible for creating new accounts. Therefore, some kind of account template can relieve the administrators from repetitive tasks. The business impact of a busy help desk must be minimized through the usage of self-service. Finally, users can request some types of access themselves, but this request must be properly approved. The functional requirements for cost reduction are shown in Table 5-5. Table 5-5 Functional requirements for cost reduction Requirement Description E Password resets are delegated to users other than the system administrators, possibly to the users F Common values are entered automatically G1 Users can request account creations but they must follow an approval workflow Chapter 5. Identity management solution design 65 Business requirement 4: The password policy must be unique for all user accounts and the passwords must be unique for all user accounts. The functional requirements for password policy are shown in Table 5-6. Table 5-6 Functional requirements for compliance with password policies Requirement Description L The password policy is unique across all platforms D Users have a single password for all of their accounts Business requirement 5: Allow the business to scale without increasing head count. Having a central identity management solution that can reduce, distribute, and facilitate the workload makes it possible to scale with less effort. This allows administrators to manage more accounts with less effort. The functional requirements for allowing business to scale without increasing head count are listed in Table 5-7. Table 5-7 Functional requirements for business to scale without increased head count Requirement Description E Password resets are delegated to users other than the system administrators, possibly to the users B Accounts are disabled or removed when the identity feed shows that an employee or customer has become inactive F Common values are entered automatically G Provide a common user interface for administration Business requirement 6: Make user and account management historical data available for verification and future improvements. In the current system, account information is scattered all over the corporate systems. It is not easy to understand how many user accounts are being used in the enterprise, at what rate they are growing, and when the system must be expanded due to increasing account numbers, and so on. This information is indispensable for verifying the current system and for making future plans to expand it. A central logging system can provide this information. The functional requirement for availability of historical data is shown in Table 5-8. Table 5-8 Functional requirements for availability of historical data 66 Requirement Description M A central logging system is necessary Deployment Guide Series: IBM Tivoli Identity Manager Express 4.6 Business requirement 7: Improve compliance. SCC wants to improve their compliance in three areas: – Requiring users or their managers to periodically certify the users’ continuing need for their accounts – Removal of accounts that are no longer needed. This can be divided into two populations of accounts: • • Accounts belonging to users who have left the company Accounts that are not certified as still needed – Reporting capabilities for finding orphan accounts Requiring certification of need for accesses is the best way to prevent temporary accesses from becoming forgotten accesses. SCC is concerned that users who are given temporary access to an application or some data will keep that access even when the access is no longer necessary. It is reasonable for people to do this if they are not certain that they are finished with their work that requires the access. The problem is that people eventually forget that they have the access, and never request that it must be removed. At worst, their unused accounts or access rights can be misused. At best, determining who had access to some data or an application becomes more difficult. Removing obsolete accounts and access rights has obvious benefits for audit compliance. Removing accounts belonging to people who leave the company requires that Identity Manager receives regular updates from one or more authoritative sources of identity data. This data must be updated in a timely manner so that Identity Manager can disable the accounts of former employees without excessive delays. Separation of duties can be applied to account creation, requiring approval of the employee manager and platform owner. Chapter 5. Identity management solution design 67 The functional requirements for improved compliance are listed in Table 5-9. Table 5-9 Functional requirements for improved audit compliance Requirement Description N Account owners or their managers are periodically asked to certify their continuing need for their accounts O Accounts that are not certified are disabled or removed A A regular feed of identity data from authoritative identity sources into Identity Manager is established B An employee’s accounts are disabled or removed when the identity feed shows that an employee has become inactive P A reporting mechanism is available that identifies orphan accounts Q Workflows requiring approvals have more than one approver Business requirement 8: The identity management solution must be secure. A poorly designed identity management solution poses a security risk. There are three primary areas of concern: – Confidentiality of sensitive data Identity Manager Express stores sensitive data in its data stores. It also transmits sensitive data between its individual components. The stored data and the data in transit must be protected from unauthorized access. – Integrity of audit data Identity Manager Express administrators have a great deal of power. They can create accounts with almost any rights they want on any platform controlled by Identity Manager Express. Because it is difficult to prevent administrators from misusing their powers, it is important that an audit trail be maintained of the administrators’ actions. The administrators who are monitored with this audit data must not have the ability to manipulate the audit data. – Authentication of system users and components Identity Manager must be protected from access by unauthenticated or unauthorized users. Each Identity Manager component must also authenticate the other components with which it communicates. 68 Deployment Guide Series: IBM Tivoli Identity Manager Express 4.6 The functional requirements for the security of the identity management solution are shown in Table 5-10. Table 5-10 Functional requirements for application security Requirement Description R Stored sensitive data is protected from unauthorized access S Transmitted sensitive data is protected from unauthorized access T The actions of Identity Manager users and administrators are tracked in an audit trail U Identity Manager administrators are not able to manipulate the audit data or settings V Identity Manager components are protected from access by unauthenticated or unauthorized users 5.3 Design approach In this section, we consider how to realize the security design objectives using Tivoli Identity Manager Express. Our objective is to produce a plan containing a set of smaller implementation steps where the end result satisfies the functional requirements, and therefore also satisfies the original business requirements. Although business and functional requirements are the main parts of the security design objectives, we also have to consider other nonfunctional requirements and constraints. These include objectives that are necessary to meet general business requirements, or practical constraints on constructing security subsystems. The implementation of Tivoli Identity Manager Express often involves nonfunctional requirements relating to: Backup and recovery Performance and capacity Change management Budget and staffing Because we focus on the security architecture of identity management with Identity Manager Express software in this book, we do not discuss these nonfunctional requirements in detail. Chapter 5. Identity management solution design 69 The steps involved in producing an implementation plan are: 1. Prioritize the requirements. 2. Map the requirements to Identity Manager Express features. 3. Define the tasks involved in using these features to satisfy the requirements, and estimate the effort required for each task. After mapping the requirements to Identity Manager features and creating a list of implementation tasks, it is possible that some task requires a longer implementation time. It is typical to have Tivoli Identity Manager Express deployed in a week. However, it is also common to have some specific custom adapter that has to be built from scratch and with some kind of technical complexity, which is translated to a development phase of three weeks just for this adapter. Even if this happens, it is possible to have Tivoli Identity Manager Express in production, helping the company to meet its goals, while lower priority and more difficult tasks are still being run. 5.4 Overview of the implementation This section applies the design approach described in 5.3, “Design approach” on page 69, to SCC’s specific requirements. We do not describe the details of the implementation tasks in this section. For a detailed description, see Chapter 6, “Technical implementation” on page 73. The following tasks are necessary to create an operational Identity Manager Express solution that meets SCC feature requirements: Installation of Identity Manager Express and its required middleware components Creation of an identity feed importing employee and customer data Installation of Identity Manager Express adapters Setting up password self-reset using challenge-response questions Installation of Identity Manager Express plug-in for password synchronization Security hardening of the Identity Manager servers and components Creation of help desk and account management procedures Setting up account defaults Setting up workflows for account creation Communication to approvers about their tasks and responsibilities 70 Deployment Guide Series: IBM Tivoli Identity Manager Express 4.6 Communication to all users about: – – – – New password policy How to log on to Tivoli Identity Manager Express How to manage passwords How to set up and use challenge-response for password reset self-service. Execution of the identity feed Execution of reconciliations of each installed adapter to create a list of accounts and mapping to the owners Enabling the password sync plug-in Cleanup of any orphan accounts produced by the reconciliations Starting to use account management using the Identity Manager Express Web user interface Setting up recertification of existing accounts Communication to users about new account management process availability – Supervised users account management Users are able to request the creation, modification, and deletion of accounts owned by persons whom they supervise. Account creation and modification requires approval by a member of an administration team for the account’s service. – User self-account management Users are able to request the creation, modification, and deletion of accounts for their own use. Account creation and modification requires approval by a member of an administration team for the account’s service plus its own supervisor. 5.5 Conclusion This concludes the discussion about the business and functional requirements for SCC and also the design approach. With the implementation overview, we proceed to Chapter 6, “Technical implementation” on page 73, which describes the actual implementation. Chapter 5. Identity management solution design 71 72 Deployment Guide Series: IBM Tivoli Identity Manager Express 4.6 6 Chapter 6. Technical implementation In this chapter, we describe the technical implementation of the Tivoli Identity Manager environment. We explain how to install the necessary components. After the technical prerequisites are taken care of, we begin to deploy the identity management setup. We also describe how to manage and maintain the deployed solution. © Copyright IBM Corp. 2006. All rights reserved. 73 6.1 Installing the base components We have to build the foundation of the solution for further work to take place. This section focuses on the initial building of the software components required in an Identity Manager Express deployment. 6.1.1 Design considerations Install and configure the Identity Manager middleware and application components to allow for the implementation of the design. Verify the design considerations for the software components and the physical architecture. Software components Identity Manager Express conveniently installs all the middleware software that it requires on a single machine. Although there are several adapters available, only the Tivoli Directory Integrator (TDI) based adapters are installed by the base installer. To get started, you require at least: A supported Web server In “Identity Manager Express Web security” on page 34, we explained that you must use a separate Web server. As explained in “Identity Manager Express components” on page 27, Identity Manager Express is a Java application running on WebSphere Application Server Express. Basically any Web server supported by WebSphere Express is supported, but IBM HTTP Server based on Apache is the preferred choice. The prerequisites are listed at: http://www.ibm.com/software/webservers/httpservers/prereq.html You can get the code at: http://www.ibm.com/software/webservers/httpservers/ Identity Manager Express base code The base code is available at the IBM Passport Advantage1 download site. If you do not have access to this site, contact your IBM software representative or an IBM Business Partner. A CD version of the software is also available. 1 To access the following IBM Passport Advantage Web site, you require proper user access based on your IBM contract: http://www.ibm.com/software/howtobuy/passportadvantage/index.html 74 Deployment Guide Series: IBM Tivoli Identity Manager Express 4.6 Identity Manager Express base code latest fix pack Tivoli fix packs are available at the following Identity Manager Express support site: http://www.ibm.com/software/sysmgmt/products/support/IBMTivoliIdenti tyManagerExpress.html The latest versions of the Identity Manager Express adapters The latest adapters are also available at the IBM Passport Advantage download site. For a successful implementation, it is important that you read IBM Tivoli Identity Manager Express Release Notes Guide V4.6, SC32-2264, and follow IBM Tivoli Identity Manager Express Installation Guide V4.6, SC32-2262. If you have to install additional adapters, it is also imperative that you read the adequate adapter release notes and installation instructions before the deployment. Physical architecture There are nonfunctional requirements that you have to consider when you design the physical architecture of any solution. Consider the following issues: Operating system (OS) required Server sizing Additional software to be placed on the Identity Manager Express Server, if any Software to be placed on existing servers, if any Placement of the servers within the network 6.1.2 Implementation at SCC Based on the design considerations that we outlined previously, SCC has made the following decisions. Physical architecture Based on the requirements and Identity Manager Express deployment best practices, the design team has examined the production architecture for both Windows and Linux as operating system for Identity Manager Express Server options. The Windows option is shown in Figure 6-1 on page 76, and two options for the Linux-based deployment are shown in Figure 6-2 on page 76 and Figure 6-3 on page 77. These do not contain an exhaustive list of all the machines in the SCC environment. They only list the ones related to or affected by the Identity Manager implementation. Chapter 6. Technical implementation 75 Figure 6-1 SCC Identity Manager Express production physical architecture running on Windows Note that running Identity Manager Express on Windows provides the opportunity to put all Windows-based adapters together on the Identity Manager Express Server. However, the Linux option can have only Linux-based and TDI-based adapters locally. Figure 6-2 shows one deployment option where the Lotus Notes Adapter and Active Directory Adapter are installed together with their respective applications. Figure 6-2 SCC Identity Manager Express production physical architecture running on Linux and adapters deployed at managed resources 76 Deployment Guide Series: IBM Tivoli Identity Manager Express 4.6 The scenario shown in Figure 6-3 has the advantage of not having to deploy another server. However, SCC policy does not recommend the installation different software deployments on servers. This leads to another Linux-based option where a dedicated server called Adapter Server is deployed. As discussed in “Adapters” on page 28, Identity Manager Express adapters are available using different technologies. Additionally, because most Tivoli Identity Manager Adapter Development Kit (ADK) based adapters are available only on the Windows platform, you must have the adapter server running on Windows. SCC has decided to use this scenario shown in Figure 6-3. Figure 6-3 SCC Identity Manager Express production physical architecture running on Linux and adapters deployed within a specific Windows server When building a scenario where remote adapters are deployed, it is necessary to properly set up adapter security, as described in “HTTP Server security” on page 139. Chapter 6. Technical implementation 77 Software SCC has decided to use the following software: Red Hat Enterprise Linux ES release 4 as the operating system for Identity Manager Express Server Tivoli Identity Manager Adapter for Active Directory installed on the Adapter Server running Windows 2000 Professional The prerequisite is that this Windows 2000 Professional host must be a part of the existing Active Directory Domain. Tivoli Identity Manager Adapter for Lotus Notes installed on the Adapter Server running Windows 2000 Professional The prerequisite is to have the Lotus Notes Administration Client installed. The SCC installation is based on the basic installation and deploying the following components: Tivoli Identity Manager Adapter for Active Directory Lotus Notes Administration Client Tivoli Identity Manager Adapter for Lotus Domino WebSphere plug-in at the DMZ Web server for external access The Linux adapter uses the Secure Shell (SSH) protocol, and all of the Linux distributions come with it by default, including Red Hat Enterprise Linux 4, which is used by SCC. The Lightweight Directory Access Protocol (LDAP) adapter uses the LDAPS protocol, therefore, no extra installation is necessary. Server sizing Being a single-server installation with multiple concurring software components, use at least the server specification that is described in the release notes document. This includes: x86-based architecture Two central processing units (CPUs) Intel® Pentium®-Xeon 3.2 Ghz or equivalent 4 GB of random access memory (RAM) 10 GB of available hard disk space This is a common configuration today, therefore, SCC has acquired a new server with the following specifications: 2 CPUs Intel Xeon® Dual-Core 4 GB of RAM Redundant Array of Independent Disks 1 (RAID 1) 160 GB (2 x 160 GB) 78 Deployment Guide Series: IBM Tivoli Identity Manager Express 4.6 Because small disks are not available anymore, this space enables a large amount of online audit data. 6.1.3 Installing Identity Manager Express In this section, we cover the installation of Identity Manager Express and its required middleware components. We cover only the important aspects of the SCC Identity Manager Express installation, based on the chosen architecture shown in Figure 6-3 on page 77. Tivoli Identity Manager Express The first component that we deploy is the Identity Manager Express Server itself. The prerequisite software installed by the Identity Manager Express deployment wizard are: IBM DB2 Universal Database Express Edition WebSphere Application Server Express Edition Tivoli Directory Server IBM Global Security Kit (GSKit) The installation wizard guides you through the configuration of Transmission Control Protocol (TCP) ports, passwords, and installation paths. Tip: To save your time: Note all of the defined settings. Choose strong passwords at the installation time. For the SCC Identity Manager Express deployment, we change the Hypertext Transfer Protocol (HTTP) default port from 80 to 9080. You must do the same if you plan to deploy an additional HTTP server in front of Identity Manager Express on the same machine. Chapter 6. Technical implementation 79 Figure 6-4 and Figure 6-5 on page 81 show the chosen WebSphere Application Server ports. Figure 6-4 WebSphere Application Server communication ports 80 Deployment Guide Series: IBM Tivoli Identity Manager Express 4.6 Figure 6-5 WebSphere Application Server communication ports Importing Certification Authority into WebSphere JVM default keystore The WebSphere Application Server is preconfigured with a list of well-known Certification Authorities (CAs) in the default truststore file in WAS_HOME/java/jre/lib/security/cacerts file. SCC uses its own CA based on OpenSSL, and this CA is used for all certificate signing. We use the IBM Key Management tool to import this CA into the cacerts file. Perform the following steps to launch it: 1. Issue the following command: . /opt/IBM/WebSphere/AppServer/profiles/default/bin/setupCmdLine.sh /opt/IBM/WebSphere/AppServer/java/jre/bin/ikeyman 2. The IBM Key Management tool opens. Click Key Database File → Open. Choose the following options: – JKS as the Key Database Type – cacerts as the File Name – /opt/IBM/WebSphere/AppServer/java/jre/lib/security as Location Chapter 6. Technical implementation 81 The password is changeit. Keep this password and do not change it. You see the list of trusted signer certificates, as shown in Figure 6-6. Figure 6-6 IBM WebSphere Application server default trusted CAs SCC’s CA is added. To add a CA as a trusted one, follow these steps: 1. Copy the CA file to some local directory (in this scenario, it is /tmp/sccCA.cer). Click Add. 2. Enter the details about the file type and location, as shown in Figure 6-7. Click OK. Figure 6-7 Adding SCC CA as a trusted signer 3. Provide some description and close the key database file. 82 Deployment Guide Series: IBM Tivoli Identity Manager Express 4.6 Tip: There are some best practices when working with the IBM Key Management Tool: Always back up the key database file before making changes. Always close the database before exiting the IBM Key Management Tool. 6.1.4 Installing IBM HTTP Server The HTTP server for the SCC scenario is the IBM HTTP Server. In this section, we explain how to install and configure it for Identity Manager Express. Ensure that you have the document IBM HTTP Server Version 6: Getting Started2 before you start your installation. Before you install the IBM HTTP Server, make sure that the ports 80 (HTTP) and 443 (Hypertext Transfer Protocol-Secure (HTTPS)) are free by running the following commands: netstat -natp | grep LISTEN | grep “\:80” netstat -natp | grep LISTEN | grep “\:443” Tip: On Windows, you can also check for listening ports by issuing the following commands: netstat -na | find “LISTEN” | find “:80” netstat -na | find “LISTEN” | find “:443” 1. If the ports are free, you can begin the installation by calling the install.sh script. Tip: If you want to use your current Apache installation, you can skip to “Plug-in instructions” on page 87. However, if you want to disable it and install the IBM HTTP Server, issue the following commands: To disable the Apache HTTP Server startup on boot: chkconfig --del httpd To stop the current Apache HTTP Server: /etc/init.d/httpd stop 2 You can obtain IBM HTTP Server documents at the following location: http://www-306.ibm.com/software/webservers/httpservers/library/ Chapter 6. Technical implementation 83 2. After you accept the product Apache license, start answering the questions about the product installation location and features to install. Figure 6-8 shows the default installation path. Click Next. Figure 6-8 IBM HTTP Server: Default installation directory 84 Deployment Guide Series: IBM Tivoli Identity Manager Express 4.6 3. Choose the Custom installation, as shown in Figure 6-9. Click Next. Figure 6-9 IBM HTTP Server: Installation options Chapter 6. Technical implementation 85 4. Select both the base product and security features, as shown in Figure 6-10. Click Next. Figure 6-10 IBM HTTP Server: Available options 86 Deployment Guide Series: IBM Tivoli Identity Manager Express 4.6 5. Define the HTTP Port and HTTP Server Administration Port, as shown in Figure 6-11. Click Next. Figure 6-11 HTTP Server: HTTP port and administration port After you finish the installation, you have a functional HTTP server, but it is not properly connected to the WebSphere Application Server Identity Manager Express yet. The following section explains the steps to integrate the HTTP Server and WebSphere Application Server. Plug-in instructions The WebSphere Application Server Plug-in is the component that connects the HTTP Server to the WebSphere Application Server. In this section, we install and configure the plug-in for Identity Manager Express usage. Tip: The necessary WebSphere manuals are available online at: http://publib.boulder.ibm.com/infocenter/ws60help/index.jsp The plug-in installation manual is available at: http://publib.boulder.ibm.com/infocenter/wasinfo/v6r0/topic/com.ibm. websphere.base.doc/info/aes/ae/tins_webplugins.html Chapter 6. Technical implementation 87 1. When you install the plug-in, choose the Web server software for plug-in integration. In our scenario, IBM HTTP Server v6 is in use. Figure 6-12 shows the available options. Click Next. Figure 6-12 IBM HTTP Server: Software for plug-in integration 88 Deployment Guide Series: IBM Tivoli Identity Manager Express 4.6 2. For the SCC scenario, the HTTP server is deployed on a separate machine for added security. Choose Web server machine (remote), as shown in Figure 6-13. Click Next. Figure 6-13 Remote or local Web server for plug-in configuration Chapter 6. Technical implementation 89 3. In Figure 6-14, you have to select the location of the HTTP Server configuration file. Note that after the installation the plug-in is configured as a Web server module. However, we still have to configure it for WebSphere Application Server communications. Click Next. Figure 6-14 Web server configuration file 90 Deployment Guide Series: IBM Tivoli Identity Manager Express 4.6 4. Specify a unique Web server identification, as shown in Figure 6-15. If you have deployed multiple access networks, you can have one Web server at each network DMZ communicating with a central Identity Manager Express Server. Click Next. Figure 6-15 Unique Web server identification for plug-in At this point, the installation wizard has all the information for the plug-in to HTTP Server integration. From now on, it requests information about the plug-in to WebSphere integration. Chapter 6. Technical implementation 91 5. The plug-in uses an Extensible Markup Language (XML) configuration file. Figure 6-16 shows the default location for the plug-in file based on the chosen Web server definition name. Click Next. Figure 6-16 Plug-in configuration file 92 Deployment Guide Series: IBM Tivoli Identity Manager Express 4.6 6. Figure 6-17 shows that the plug-in installation wizard leaves some manual work to do. Click Next. Figure 6-17 Manual steps left for customization 7. Copy the /opt/IBM/WebSphere/Plugins/bin/configurewebserver1.sh script on the Web server machine to /opt/IBM/WebSphere/AppServer/profiles/default/bin on the Identity Manager Express Server. On the Identity Manager Express Server: a. Select /opt/IBM/WebSphere/AppServer/profiles/default/bin. b. Run ./configurewebserver1.sh default. Attention: At this time, you have deployed a WebSphere Application Server with no enabled security. If this is the case, you have to provide the adminId and adminPassword as command line parameters for the configurewebserver1.sh script. After this step, the Web server is able to connect to WebSphere Application server. If you perform any changes to the plug-in-cfg.xml, copy it to /opt/IBM/WebSphere/Plugins/config/webserver1/plug-in-cfg.xml on the Web server machine. Chapter 6. Technical implementation 93 Setting up IBM HTTP Server SSL support The IBM HTTP Server uses a Certificate Management System (CMS) database for storing its private keys, public certificates, and trusted CAs. Perform the following steps to enable Secure Sockets Layer (SSL) and Transport Layer Security (TLS) support: 1. Create a CMS key database file. 2. Create a request for a new certificate. 3. Send the request for signing at a well-known CA or an internal one. 4. Receive the signed certificate. 5. Configure the Web server to use this key for SSL and TLS secure communications. Note: These instructions are for IBM HTTP Server. For Apache instructions, check the official documentation for Apache at: http://httpd.apache.org/docs/2.0/ssl/ The first task is to create the CMS key database file. We choose to create it at /opt/IBMIHS/keys/webserver1.kdb. 1. To launch ikeyman, in a terminal with X support, type: /opt/IBMIHS/bin/ikeyman 94 Deployment Guide Series: IBM Tivoli Identity Manager Express 4.6 2. Figure 6-18 shows the ikeyman main window and the menu for the key database creation. Select Key Database File → Open. Figure 6-18 The ikeyman initial window: Creating a new key database file 3. You have to specify the correct key database type for IBM HTTP Server. Figure 6-19 shows the correct parameters. Click OK. Figure 6-19 IBM HTTP Server requires a CMS type key database Chapter 6. Technical implementation 95 4. Choose a strong password with no expiration time. Select Stash the password to a file, as shown in Figure 6-20. Click OK. Figure 6-20 Creating a strong password 5. At this time you have a key database file with some default trusted CAs and no own certificates inside. Figure 6-21 shows that ikeyman has three views for certificates: – Personal Certificates These are our own certificates. In this case, we have both private and public keys and the certificates can be self-signed or signed by any CA. – Signer Certificates These are the trusted CA public keys. The ikeyman utility comes with the most common CAs. If the personal certificate is signed by a different CA, you must import its public key into the ikeyman signer certificates. – Personal Certificates Requests To create a certificate signed by a CA, we have to create a personal certificate request. These requests stay in this view until the signed key is imported. 96 Deployment Guide Series: IBM Tivoli Identity Manager Express 4.6 To create a personal certificate, select Personal Certificate Requests and click New. Figure 6-21 Creating a personal certificate request Chapter 6. Technical implementation 97 6. Complete the form with proper information, as shown in Figure 6-22. Click OK. Figure 6-22 Certificate and local information to save the certificate request The ikeyman utility generates the private key that is written into the key database file. It also writes the certificate signing request (CSR) into a file with a .arm extension. Note: This file is a base64 encoded American Standard Code for Information Interchange (ASCII) file in the popular PEM format. 7. After a successful CSR creation (see Figure 6-23), send the request file for digital signing. Click OK. Figure 6-23 The certificate request is in PEM format and must be sent for signing 98 Deployment Guide Series: IBM Tivoli Identity Manager Express 4.6 8. For SCC, an internal OpenSSL-based CA is in use. Therefore we have to import this CA public key as a trusted CA. Switch to the Signer Certificates view, as shown in Figure 6-24. Figure 6-24 Before receiving the signed certificate the signer certificate must be trusted Chapter 6. Technical implementation 99 Check the list of trusted CAs and make sure that the signer certificate is listed. The default list is shown in Figure 6-25. Figure 6-25 If the chosen CA is not already trusted, import the signer certificate 100 Deployment Guide Series: IBM Tivoli Identity Manager Express 4.6 9. The signer certificate is usually distributed in base64-encoded ASCII data or binary data. Copy the digital certificate file to the server and enter the information for its import, as shown in Figure 6-26. Tip: There are some easy ways to identify the type of the certificate file: By file extension: – .cer are typically binary certificates – .crt are typically base64-encoded ASCII certificates By file type: On Linux (or Windows with Cygwin installed), issue the following command: file <name-of-certificate-file> It returns: – ASCII if the file is a base64-encoded ASCII certificate file – data if the file is a binary certificate file Look into its contents. A base64-encoded ASCII certificate file can be opened in a text editor, and starts and ends with the following lines: -----BEGIN CERTIFICATE---------END CERTIFICATE----- Figure 6-26 The signer certificate normally distributed in ASCII or binary data 10.Choose a label for the imported CA certificate, as shown in Figure 6-27. Click OK. Figure 6-27 Signer certificate label Chapter 6. Technical implementation 101 11.After the certificate is signed by the CA, the process is completed with the import of the signed certificate into the key database file. Switch to the Personal Certificates view and click the Receive... button, as shown in Figure 6-28. Figure 6-28 Receiving a signed certificate after CA process 102 Deployment Guide Series: IBM Tivoli Identity Manager Express 4.6 12.Choose the received file and click the Open button, as shown in Figure 6-29. Figure 6-29 Signed certificate in PEM format Chapter 6. Technical implementation 103 13.The imported signed certificate is displayed in the Personal Certificates view. The asterisk at its side means that it is the default personal certificate in the key database file, as shown in Figure 6-30. To view its content, select it and click the View/Edit... button. Figure 6-30 Imported signed certificate 104 Deployment Guide Series: IBM Tivoli Identity Manager Express 4.6 The personal certificate file is shown in Figure 6-31. Figure 6-31 Signed certificate details Chapter 6. Technical implementation 105 14.Close the key database file before exiting the ikeyman utility, as shown in Figure 6-32. Figure 6-32 Closing the key database before exiting key management tool At this time, the key database file is ready to use. In the next section, we configure the IBM HTTP Server SSL support. Important: Make sure that you have a reliable backup of the key database file. Always make a copy before and after any administration procedure, because any wrong procedure can lead to certificate loss. Also make sure that you safely store the password somewhere. A lost password means anything inside the key database is also lost. 106 Deployment Guide Series: IBM Tivoli Identity Manager Express 4.6 Enabling SSL in the IBM HTTP Server configuration file In this section, we enable the IBM HTTP Server SSL support by specifying SSL directives in its configuration file. The default location of the configuration file is /opt/IBMIHS/conf/httpd.conf. You can open it with any text editor. 1. Enable the SSL module. Uncomment the following directive to enable it: LoadModule ibm_ssl_module modules/mod_ibm_ssl.so 2. Create an SSL virtual host stanza in the httpd.conf file using the examples and directives shown in Example 6-1. Example 6-1 Creating an SSL virtual host stanza LoadModule ibm_ssl_module modules/mod_ibm_ssl.so <IfModule mod_ibm_ssl.c> Listen 443 <VirtualHost *:443> SSLEnable </VirtualHost> </IfModule> SSLDisable KeyFile "/opt/IBMIHS/keys/webserver1.kdb" Tip: Always perform a syntax check after changing the IBM HTTP Server configuration file. You can do this by issuing the following command on a shell prompt: /opt/IBMIHS/bin/apachectl -t 3. At this point, you can restart IBM HTTP Server and test SSL support accessing Identity Manager Express through HTTPS instead of HTTP. To restart the IBM HTTP Server, issue the following command at a shell prompt: /opt/IBMIHS/bin/apachectl restart Now Identity Manager Express is able to receive HTTPS requests. But for added security, you can improve the SSL support limiting it to accept encryption at only 128 bits or higher and also rewrite any HTTP request to HTTPS. These implementations are discussed in the following sections. Chapter 6. Technical implementation 107 IBM HTTP Server 128-bit encryption strength Most modern browsers support 256-bit encryption keys and almost all support 128-bit encryption keys. To deny access from lower strength browsers (40-bit or 56-bit), use the SSLCipherSpec directives within the SSL VirtualHost stanza located in the httpd.conf file in the /opt/IBMIHS/conf directory, as shown in Example 6-2. Example 6-2 SSLCipherSpec directives LoadModule ibm_ssl_module modules/mod_ibm_ssl.so <IfModule mod_ibm_ssl.c> Listen 443 <VirtualHost *:443> SSLEnable SSLCipherSpec 27 SSLCipherSpec 21 SSLCipherSpec 23 SSLCipherSpec 3A SSLCipherSpec 34 SSLCipherSpec 35 </VirtualHost> </IfModule> SSLDisable KeyFile "/opt/IBMIHS/keys/webserver1.kdb" SSLV2Timeout 100 SSLV3Timeout 1000 Rewriting HTTP requests to HTTPS Use the rewrite module (mod_rewrite.c) as an effective way to automatically rewrite all HTTP (port 80) requests to HTTPS (port 443). This provides an effective way to ensure that all traffic to and from the IBM HTTP Server is encrypted through SSL without having to use individual redirects or hard-coded HTTPS links. 108 Deployment Guide Series: IBM Tivoli Identity Manager Express 4.6 Add the directives shown in Example 6-3 to the global scope or any port 80 VirtualHost stanzas defined within the httpd.conf configuration file. Example 6-3 Rewriting HTTP requests to HTTPS LoadModule rewrite_module modules/mod_rewrite.so <VirtualHost *:80> ... RewriteEngine on RewriteCond %{SERVER_PORT} =80 RewriteRule ^(.*) https://%{SERVER_NAME}%{REQUEST_URI} </VirtualHost> Additionally, remove any port 80 in your WebSphere plug-in configuration (VirtualHost attribute). By doing this, any matching Uniform Resource Identifier (URI) on port 80 is rejected by the plug-in and handled by the Web server's default handler. At this point, the RewriteEngine is able to rewrite the URL to HTTPS and is handled by the WebSphere plug-in's port 443 VirtualHost attribute associated with the requested URL. Restart both the IBM HTTP Server and WebSphere Application Server after you make the preceding changes. Logging SSL request information in the access log The IBM HTTP Server implementation provides SSL environment variables, which you can configure with the LogFormat directive in the httpd.conf configuration file. Example 6-4 illustrates how to use SSL environment variables within the httpd.conf file to allow additional logging of SSL request information to the Web server access log. Example 6-4 Logging SSL request information to the Web server access log LogFormat "%h %l %u %t \"%r\" %>s %b \"%{Referer}i\" \"%{User-Agent}i\"" combined LogFormat "%h %l %u %t \"%r\" %>s %b" common LogFormat "%h %l %u %t \"%r\" %>s %b %{HTTPS}e %{SSL_CIPHER}e %{SSL_CLIENT_DN}e" SSL LogFormat "%{Referer}i -> %U" referer LogFormat "%{User-agent}i" agent Listen 443 <VirtualHost *:443> ServerName www.scc.com SSLEnable CustomLog logs/access.log SSL </VirtualHost> Chapter 6. Technical implementation 109 SSLDisable KeyFile "/opt/IBMIHS/keys/webserver1.kdb" SSLV2Timeout 100 SSLV3Timeout 1000 At this point, we have configured Identity Manager Express to only accept connections through strong SSL encryption. We also log SSL request information to the access.log. 6.1.5 Installing Identity Manager Express adapters Identity Manager Express supports two modes of adapters: ADK-based and TDI-based adapters. The following sections discuss these adapters in more detail. ADK-based adapters Most of the ADK-based adapters run on the Windows platform. You can install these adapters using an installation wizard. In this section, we demonstrate the steps for an ADK-based adapter installation. Tip: ADK-based adapters have a separate release schedule from Identity Manager Express. You can download the latest versions from the IBM Passport Advantage Web site. Adapter installation and base configuration ADK-based adapters are distributed in compressed archives. Figure 6-33 shows their typical contents. Figure 6-33 ADK-based adapter typical contents and installation wizard executable Run the setup.exe file to start the installation wizard. Always refer to the adapter documentation and release notes for specific adapter configurations. After you 110 Deployment Guide Series: IBM Tivoli Identity Manager Express 4.6 install the adapter, you can list the running adapters issuing the following command: agentcfg -list The command output is show in Figure 6-34. It scans all of the installed adapters and lists the ones that are running. The format of the returned list is: <Adapter name> port <adapter tcp port for local configuration> When you call the adapter configuration interface, it prompts you for the configuration key, which is agent by default. You must change this. See Figure 6-39 on page 114, which shows you how to change it. Figure 6-34 Running adapters list 1. To configure the adapter, type in the following command when your command prompt is pointing at the bin subdirectory of the adapter installation path: agentcfg -agent <name of the adapter> Chapter 6. Technical implementation 111 2. Figure 6-35 shows the adapter configuration initial screen, called the main configuration menu. From this menu, press A to see the main configuration settings of the adapter. Figure 6-35 Adapter configuration interface: Main configuration menu The default settings for a Windows local adapter are shown in Figure 6-36. Figure 6-36 Adapter configuration settings 3. From the main configuration menu, press B to see the protocol configuration settings of the adapter. 4. From the main configuration menu, press C to configure a protocol. 112 Deployment Guide Series: IBM Tivoli Identity Manager Express 4.6 5. From the main configuration menu, press A to select Directory Access Markup Language (DAML). The DAML protocol properties for a Windows local adapter are shown in Figure 6-37. Figure 6-37 Adapter protocol properties 6. To enable SSL between Identity Manager Express and this adapter, change the USE_SSL property from FALSE to TRUE. To do this, press E. The adapter configuration interface asks you to enter the new value. At this point, type TRUE, as shown in Figure 6-38. Figure 6-38 Enabling SSL for Identity Manager Express to adapter communications Chapter 6. Technical implementation 113 When you install multiple adapters on the same server, configure each one with a different TCP port number. To change it, press D at the DAML Protocol Properties screen (Figure 6-38) and enter the new port number. It is also a good security practice to change the properties USERNAME and PASSWORD to new values. This prevents other Identity Manager Express installations from issuing account operations to this adapter instance. To prevent adapter configurations change by unauthorized persons, go back to the main configuration menu by pressing X until this menu is shown. Press D to change the configuration key. Figure 6-39 shows the adapter configuration tool asking for a new password. Tip: Keep in mind that local administrators can also change the adapter configuration by changing its Windows registry keys. Therefore, to control physical access, ensure adequate hardening of the operating system. Figure 6-39 Changing the adapter configuration key Each adapter has its own specific registry items. They control adapter behavior and can make a significant impact on how the solution works. For example, for a Windows local adapter, there is a registry item called UnlockOnPasswordChange, which is shown in Figure 6-40. This changes the behavior of the Windows account restore. If it is set to FALSE, the user has to call the help desk for account restore if the Windows account is locked. If it is set to TRUE, the user can go to the Identity Manager Express Web interface and change its password, which also restores the user’s Windows account. 114 Deployment Guide Series: IBM Tivoli Identity Manager Express 4.6 Figure 6-40 Adapter registry items can be changed to achieve other adapter behavior Tip: To modify a value, you have to type the key name. For example, if you want to change ManageHomeDirs to FALSE, follow this sequence: 1. Press B. 2. Type ManageHomeDirs. 3. Type FALSE. With the adapter installed and running, configure Identity Manager Express to communicate with the adapter. The steps are: 1. Install the service profile, as described in “Adapter profile installation in Identity Manager Express”. 2. Set up SSL communications, as described in “Adapter SSL configuration” on page 119. 3. Set up Identity Manager Express to adapter communications, as described in “Service configuration” on page 123. Chapter 6. Technical implementation 115 Adapter profile installation in Identity Manager Express Each type of adapter (Windows, Linux, LDAP, SAP, and so on) has its own set of: Configuration forms This includes extra adapter login attributes, instance settings, and so on. Account definition forms This can influence the way the managed attributes are presented at the Identity Manager Express interface. Managed attributes This contain all platform-specific attributes managed by Identity Manager Express. Specific operation settings This can influence the operational behavior such as whether an account requires a new password to be restored. To install the adapter profile: 1. Log on to Identity Manager Express as the itim manager user, as shown in Figure 6-41. Figure 6-41 Logging on to Identity Manager Express using an administrator account 116 Deployment Guide Series: IBM Tivoli Identity Manager Express 4.6 2. Select Configure System → Manage Service Types. On the right panel, click the Import button, as shown in Figure 6-42. Figure 6-42 Importing a new service type Chapter 6. Technical implementation 117 3. Select the Java archive (jar) file that contains the adapter profile, as shown in Figure 6-43. This file comes with the adapter distribution archive shown in Figure 6-33 on page 110. Click OK. Figure 6-43 Jar file location containing the adapter profile 118 Deployment Guide Series: IBM Tivoli Identity Manager Express 4.6 Identity Manager Express now displays the success page shown in Figure 6-44. Figure 6-44 Successfully importing an adapter profile Tip: There is no specific order for adapter installation, adapter configuration, and profile import into Identity Manager Express. To save time, you can import all profile jar files one after the other in the same Identity Manager Express session. Adapter SSL configuration In the same directory where the agentCfg utility (described in “Adapter installation and base configuration” on page 110) is located, you can find the CertTool utility for adapter SSL configuration. 1. Run the CertTool utility from a command prompt: CertTool -agent <name of the adapter> Chapter 6. Technical implementation 119 2. Import the CA certificate used for signing the adapter certificate. In the main menu, press F to import the CA certificate. Figure 6-45 shows the CertTool main menu and the CA certificate import process. Note: The CA certificate must be in binary format. Figure 6-45 Adapter certificate management tool interface After entering the certificate, CertTool asks for confirmation, as shown in Figure 6-46. Figure 6-46 Adding a trusted CA 120 Deployment Guide Series: IBM Tivoli Identity Manager Express 4.6 Each adapter must have its own certificate. Perform the following steps for the adapter certificate: 1. 2. 3. 4. Create a request for a new certificate. Send the request for signing at a well-known CA or an internal one. Receive the signed certificate. Configure the adapter to use SSL secure communications (see “Adapter installation and base configuration” on page 110). We describe these steps in detail. 1. To create a request for a new certificate, press A in the CertTool main menu. Enter the values for a certificate request as shown in Figure 6-47. Figure 6-47 Creating a certificate request for the adapter 2. Send the CSR file path and send it for CA signing. Chapter 6. Technical implementation 121 3. To receive the signed certificate, press B in the CertTool main menu and enter the signed certificate file path, as shown in Figure 6-48. The file must be in binary format. Figure 6-48 Importing the signed certificate for the adapter 4. After you successfully import the certificate, restart the adapter service. 122 Deployment Guide Series: IBM Tivoli Identity Manager Express 4.6 Service configuration After you have installed and configured the profile and adapter, and set up the proper SSL, create a service instance in Identity Manager Express. 1. From the Identity Manager Express interface, go to the Manage Services page, shown in Figure 6-49. Click the Create button. Figure 6-49 Manage Services page Chapter 6. Technical implementation 123 2. Identity Manager Express displays all the installed profiles for service definition. Select the service type that you want to configure, as shown in Figure 6-50 and click the Go button. Figure 6-50 Selecting the type of new service 3. A form that is specific to the selected service type is displayed, as shown in Figure 6-51 on page 126. Complete this form with the following data: – Service Name Enter a service name that is easily interpreted by someone else. – Description Enter a reasonable description for the service. 124 Deployment Guide Series: IBM Tivoli Identity Manager Express 4.6 – URL This is the URL for the adapter and it consists of: <protocol>://<FQDN>:<tcp portnumber>/ Where • Protocol is either HTTP or HTTPS, depending on which one you configure at the adapter (see Figure 6-38 on page 113 for the ADK-based SSL configuration setting). • FQDN is the fully qualified domain name of the adapter host, meaning the host name plus the domain name of the adapter host. • tcp portnumber is the TCP port that the adapter is listening on (see Figure 6-37 on page 113 for the ADK-based protocol configuration settings). – User ID This is the user ID for the adapter protocol login (see Figure 6-37 on page 113 for the ADK-based protocol configuration settings). – Password This is the password for the adapter protocol login (see Figure 6-37 on page 113 for the ADK-based protocol configuration settings). Optionally, you can also set the following options at this time: – Owner This is the Identity Manager Express user who is responsible for this service. You can use this information in some management tasks or workflow approvals. – Service prerequisite If an account on this service requires the creation of other accounts first, you can specify the prerequisite service in this field. Chapter 6. Technical implementation 125 After you enter the details, click the Test connection button to check the communication between Identity Manager Express and the adapter. Figure 6-51 Service configuration page 126 Deployment Guide Series: IBM Tivoli Identity Manager Express 4.6 A success message is displayed, as shown in Figure 6-52. Figure 6-52 Service initial test success message This success message means: Identity Manager Express is able to connect to the adapter SSL communications between Identity Manager Express and the adapter is working User ID and password are also correct Tip: You can test the connection to adapters anytime you want. It is like a ping, and it is the first check to perform when you have communication error messages in failed transactions. TDI-based adapters The TDI-based adapters are installed together with the Identity Manager Express server installation. Typically, you do not have to install them at all. If you want to set up an already installed TDI-based adapter, such as an LDAP or UNIX adapter, refer to “Service configuration” on page 123. Chapter 6. Technical implementation 127 But there are some situations where you might have to install a TDI-based adapter: There is a newly available version of the adapter that fixes some of the problems you are experiencing or implements new features. A new adapter that was not available during the Identity Manager Express installation time. Failed installation of the TDI-based adapter during the Identity Manager Express installation. Whatever the situation is, the following section shows the necessary steps for a TDI-based adapter installation. TDI-based adapter installation and base configuration TDI-based adapters are distributed in compressed archives. Figure 6-53 shows the typical content of these adapters. Figure 6-53 TDI-based adapter typical content To manually install the adapter, first ensure that the installer is run on the same system as the Tivoli Directory Integrator Server. The installation wizard is packaged in a jar file. In this case, we install the Portable Operating System Interface (POSIX) adapter for UNIX management. Always refer to the adapter documentation and release notes for specific adapter configurations. To install this adapter, perform the following steps: 1. Download the POSIX adapter compressed file from the IBM Passport Advantage Web site. 2. Extract the content of the compressed file into a temporary directory and navigate to that directory. 128 Deployment Guide Series: IBM Tivoli Identity Manager Express 4.6 3. Start the installation wizard. From a shell prompt, issue the following command: java -jar PosixAdapterInstall.jar Tip: If the java command is not in the PATH, you can set the WebSphere Application Server command line environment to use its Java Virtual Machine (JVM). To do this, issue the following command: On UNIX: ./opt/IBM/WebSphere/AppServer/profiles/default/bin/setupCmdLine.sh On Windows: C:\Program Files\IBM\WebSphere\AppServer\profiles\default\bin\setupCmdLine.bat Then run the adapter installation wizard: java -jar PosixAdapterInstall.jar 4. In the Welcome window, shown in Figure 6-54, click Next. Figure 6-54 TDI-based adapter welcome window Chapter 6. Technical implementation 129 5. In the License Agreement window, review the license agreement, click Accept, and then click Next. 6. In the IBM Tivoli Directory Integrator Based Adapter Installer window, specify the location where Tivoli Directory Integrator is installed. Click Browse to specify the directory, as shown in Figure 6-55. Click Next. Figure 6-55 Tivoli Directory Integrator home directory 7. In the Installation Summary window, review the installation settings. Click Back to change any of these settings. Otherwise, click Next to begin the installation. 8. In the Installation Completed window, click Finish to exit the program. With the adapter installed and running (see “TDI-based adapter installation and base configuration” on page 128), configure Identity Manager Express to work with the adapter. To configure Identity Manager Express, perform these steps: 1. Install the service profile, as described in “Adapter profile installation in Identity Manager Express” on page 116. 2. Set up the Identity Manager Express to manage accounts through the adapter, as described in “Service configuration” on page 123. 130 Deployment Guide Series: IBM Tivoli Identity Manager Express 4.6 Adapter profile installation in Identity Manager Express The process of how to import the adapter profile into the Tivoli Identity Manager Server is the same for both ADK-based and TDI based adapters. Therefore, follow the steps discussed in “Adapter profile installation in Identity Manager Express” on page 116. Service configuration The service definition for a TDI-based adapter is mostly the same as for an ADK-based adapter. Therefore, follow the steps in “Service configuration” on page 123. During the process, a form specific for the selected service type is displayed, as shown in Figure 6-56 on page 132. Complete this form with the following data: Service Name Enter a service name that is easily interpreted by someone else. Description Enter a reasonable description for the service. Tivoli Directory Integrator location This is a URL for the Remote Method Invocation (RMI) dispatcher running on Tivoli Directory Integrator and is composed of: rmi://<FQDN>:<tcp portnumber>/ITDIDispatcher Where – FQDN is the fully qualified domain name of the adapter host, that is, the host name plus the domain name of the adapter host – tcp portnumber is the port that the RMI dispatcher is listening on This field is optional. If you leave it blank, it makes TIMx use the default, which is rmi://localhost:16231/ITDIDispatcher. Managed Resource Location Specify the Internet Protocol (IP) address or host name of the managed resource. Administrator Name Specify the user name for the administrator. Password Specify the password for the administrator name. Delete Home Directory on Account Delete Select this check box if you want the home directory of the user to be deleted when the user is deleted. Chapter 6. Technical implementation 131 Use Shadow File Select this check box if shadow passwords are enabled on the managed resource. This field applies to service forms only when using the Linux or Hewlett-Packard UNIX (HP-UX) service profiles. For Linux operating systems, shadow passwords are enabled by default. Optionally, we can also set up at the following options this time: Owner This is the Identity Manager Express user who is responsible for this service. You can use this information in some management tasks or workflow approvals. Service prerequisite If an account on this service requires the creation of other accounts first, you can specify the prerequisite service in this field. After you enter the details, click the Test connection button to check the communication between Identity Manager Express and the adapter. Figure 6-56 TDI-based adapter: Service configuration page 132 Deployment Guide Series: IBM Tivoli Identity Manager Express 4.6 6.1.6 Security hardening of Identity Manager Express components In 2.5, “Securing the Identity Manager Express environment” on page 30, we discussed how to implement proper Identity Manager Express security procedures. SCC requires the following Identity Manager Express components to be specifically secured: Directory Server HTTP Server Adapters WebSphere Application Server The following sections discuss each one of these components. Directory Server As discussed in “Directory Server security” on page 36, you can improve Directory Server security by using SSL connections, disabling access from other hosts, and preventing unauthenticated searches. SCC has decided to disable access from other hosts and prevent unauthenticated searches. The communication method is sufficient and we do not have to unnecessarily increase complexity by using SSL for the Identity Manager Express deployment. Disable external access by not allowing LDAP traffic to the Identity Manager Express Server. The LDAP communication ports are 389 and 636. Prevent unauthenticated searches by disabling anonymous binds into Tivoli Directory Server using its Web administration console. The administration console is installed together with Identity Manager Express, but you have to configure it before first use. To do this, perform the following steps: 1. On the Identity Manager Express Server, open: http://localhost:9080/IDSWebApp/IDSjsp/Login.jsp 2. Log in using superadmin as the user name and secret, as the password as shown in Figure 6-57. Chapter 6. Technical implementation 133 Figure 6-57 Tivoli Directory Server Web administration console 3. Click Console administration → Manage console servers → Add, as shown in Figure 6-58. Figure 6-58 Tivoli Directory Server Web administration console: Adding a console server 134 Deployment Guide Series: IBM Tivoli Identity Manager Express 4.6 4. In the Add Server panel, enter the details, as shown in Figure 6-59. It is not necessary to enable SSL because we are using the localhost to communicate with the server. This is possible because the Directory Server Web administration console is installed on the same machine as the Directory Server itself. Click OK. Figure 6-59 Tivoli Directory Server Web administration console: Adding localhost server Chapter 6. Technical implementation 135 5. To change the Tivoli Directory Server Web administration console password, Click Console administration → Change console administrator password, as shown in Figure 6-60. Figure 6-60 Tivoli Directory Server Web administration console: Changing the administration password 6. Click Logout to quit the Tivoli Directory Server Web administration console. Click the link of the logoff page to return to the login page. 136 Deployment Guide Series: IBM Tivoli Identity Manager Express 4.6 7. Choose the localhost server and enter the Tivoli Directory Server administrative account (cn=root) and its password, as shown in Figure 6-61. Figure 6-61 Tivoli Directory Server Web administration console: Server login Chapter 6. Technical implementation 137 8. Disable anonymous connections: a. Click Server administration → Manage connection properties. b. Clear the Allow anonymous connections check box, as shown in Figure 6-62. Figure 6-62 Tivoli Directory Server Web administration console: Disabling anonymous access 9. Restart Tivoli Directory Server: – On Windows net stop ibmslapd net start ibmslapd – On Linux /opt/ibm/ldap/V6.0/sbin/ibmslapd -k /opt/ibm/ldap/V6.0/sbin/ibmslapd -n 138 Deployment Guide Series: IBM Tivoli Identity Manager Express 4.6 HTTP Server security Improve the IBM HTTP server security with the following simple tasks: Enforce SSL access from browsers to the HTTP Server, as described in “Setting up IBM HTTP Server SSL support” on page 94. Enforce high-encryption SSL from browsers to the HTTP Server, as described in “IBM HTTP Server 128-bit encryption strength” on page 108. Keep track of any operating system and HTTP Server vulnerability and install the corresponding patches. When you use the IBM HTTP Server software, you can view the latest downloads and alerts, and also subscribe to IBM support e-mail updates at: http://www.ibm.com/software/webservers/httpservers/support/ Adapter security Securing an adapter means that you have at least the following features: Strong configuration key For details about how to set up a configuration key, see “Adapter installation and base configuration” on page 110. Strong user ID and password at the DAML protocol configuration For details about how to set up user ID and password for DAML protocol, see “Adapter installation and base configuration” on page 110. SSL enabled For details about SSL configuration, see “Adapter SSL configuration” on page 119. Only administrators can access the adapter host WebSphere security If you choose to enable global security on WebSphere Application Server after you install IBM Tivoli Identity Manager Express, complete the following steps: 1. Enable global security in WebSphere Application Server. 2. Update Identity Manager Express system user and Enterprise JavaBeans (EJB) user definitions. 3. Test Identity Manager Express with the secured WebSphere environment. Chapter 6. Technical implementation 139 Enabling global security in WebSphere Application Server To enable global security, perform the following steps: 1. Specify an administrative user with these steps: a. Create or select an administrative user in the user registry of your operating system. In subsequent examples, the user is called the system user or wasadmin. On Linux, create and set a secure password for this user using the following commands: • • useradd -g root wasadmin passwd wasadmin b. Create or select another administrative user in the user registry of your operating system. In subsequent examples, the user is called the EJB user or itimadmin. We use the wasadmin ID to log on to the WebSphere Application Server administrative console. We use the itimadmin ID optionally to enforce security on EJBs after installing Identity Manager Express. 2. Log on to the WebSphere Application Server Web console. For IBM Tivoli Identity Manager Express, do this from the following URL: http://localhost:9060/ibm/console No user ID is necessary at this point. 3. Configure the local operating system user registry with these steps: a. Click Security → Global Security → User Registries → Local OS. b. In the Server user ID field, enter the system user ID (wasadmin). In the Server user password field, enter the password, as shown in Figure 6-63. c. Click OK. d. Click Apply to save the configuration changes. 140 Deployment Guide Series: IBM Tivoli Identity Manager Express 4.6 Figure 6-63 Configuring WebSphere Application Server Local OS registry 4. Enable security with these steps: a. Click Security → Global security. b. In the General Properties panel (see Figure 6-64), select the Enable global security check box. This action automatically selects Enforce Java 2 security. Clear the Enforce Java 2 security check box. Note: Do not enable Java 2 security for an Identity Manager Express deployment. Enabling it brings some performance penalty and does not improve Identity Manager Express security, as discussed in “WebSphere Application Server Java 2 security” on page 35. c. In the Active Authentication Mechanism field, select Simple WebSphere Authentication Mechanism (SWAM). Chapter 6. Technical implementation 141 d. In the active user registry field, select Local OS. e. Click OK. f. Click Apply to save the configuration changes. g. Log out of the console. Figure 6-64 Enabling WebSphere Application Server global security 142 Deployment Guide Series: IBM Tivoli Identity Manager Express 4.6 Important: On Windows, WebSphere Application Server always attempts to use the domain context if the server is a domain member, even if the selected user ID is a local one. If your server is a domain member and you do not want to use the domain context, change it by adding an extra property for the Local OS user registry. In the WebSphere administrative console: 1. Expand Security. Select User registries → Local OS. 2. Click Custom properties. Click the New button. 3. Complete the form with the following data: a. Name: com.ibm.websphere.registry.UseRegistry b. Value: local c. Description: Disable the domain usage even if the server is a domain member. 4. Click OK. 5. At the message window, click Save. This change is reflected in the security.xml file. 5. Restart the WebSphere Application Server. When you stop the application server, specify the system user ID and password. – On Windows: WAS_HOME\bin\stopServer server1 -username wasadmin -password wasadminpwd WAS_HOME\bin\startServer server1 – On Linux: WAS_HOME/bin/stopServer.sh server1 -username wasadmin -password wasadminpwd WAS_HOME/bin/startServer.sh server1 Note: The default WAS_HOME on Linux is: /opt/IBM/WebSphere/AppServer/profiles/default Chapter 6. Technical implementation 143 On Windows, if you use the Windows Services panel to shut down the application server instead of the command line, add additional server stop arguments, which consist of the system user name and password to the Windows service. Do this before you stop the service. To add stop arguments to the stopServer command, perform the following steps: a. From WAS_HOME\bin\, run the WASService command with the following arguments: WASService -add <serverNodeName> -servername server1 -stopArgs "-username <wasAdminID> -password <wasAdminPassword>" -encodeParams -profilePath "WAS_HOME\profiles\default" Here serverNodeName is the name of the host and node on which the server resides, for example, myhostNode01. You can usually find this appended at the end of a WebSphere Application Server server service, for example, IBM WebSphere Application Server V6 - myhostNode01. b. Upon receiving a message of success, you are able to shut down and restart the application server from the Windows Services panel. 6. Verify that you can now use the system user ID and password by logging back into the application server Web console. Note that your browser is redirected to an SSL connection and that you must now log in. Updating the system user and EJB user Use the runConfig utility to set the user ID and password for the system user and the EJB user. Do this if you have not done so during the installation of IBM Tivoli Identity Manager Express, or if you have made changes to the system user ID or to the EJB User ID or their passwords on the operating system. Complete the following steps: 1. Start the system configuration utility. To do so, enter the following command: – On Windows: ITIM_HOME\bin\runConfig install – On Linux ITIM_HOME/bin/runConfig install Note: The default ITIM_HOME on Linux is: /opt/IBM/itim. 144 Deployment Guide Series: IBM Tivoli Identity Manager Express 4.6 2. In the window shown in Figure 6-65, perform the following steps: a. Update the System User field and its password with the system user ID (wasadmin), which you created in the local OS registry. b. Update the EJB User field and its password with the EJB user ID (wasadmin; or itimadmin, if you created this ID to further restrict access), which you created in the local OS registry, as shown in Figure 6-65. c. Click OK. Figure 6-65 Identity Manager Express application security settings 3. Restart the WebSphere Application Server. Testing the secured WebSphere environment After you complete the steps in the previous section, security in IBM Tivoli Identity Manager Express is enabled. To verify the Identity Manager Express functionality after enabling WebSphere security, log on to IBM Tivoli Identity Manager Express. If you are successful, then everything is working fine. Important: Any time that the system user or EJB user is modified outside of the IBM Tivoli Identity Manager Express interface, run the runConfig install command from ITIM_HOME/bin to update the IBM Tivoli Identity Manager Express configuration. Chapter 6. Technical implementation 145 Note: For testing purposes or troubleshooting, you might have to disable security. To disable security using the WebSphere Application Server administrative console, perform the following steps: 1. 2. 3. 4. Click Security → Global Security. Clear the Enabled and Enable Java 2 Security check boxes. Click Apply to save the changes. Stop and then start the WebSphere Application Server. This concludes our discussion about the installation and configuration of base components. We now examine deployment at SCC. 6.2 Deploying the solution Walking through the deployment phase means that we have to fulfill all of the requirements of SCC, as discussed in Chapter 5, “Identity management solution design” on page 61. We perform this by addressing the following details: Creating an identity feed for employee and customer data Setting up password self-reset using challenge-response Defining an identity policy Defining a password strength rule Setting up account defaults Setting up workflows for account requests Defining access control Defining help desk and account management procedures Educating the involved personnel Running the identity feed Running reconciliations for each installed adapter 6.2.1 Creating an identity feed for employee and customer data In “Identity feed planning” on page 43, we describe the planning and implementation steps to import user data into Identity Manager Express. For the SCC Identity Manager Express implementation, the authoritative data source chosen is the HR system, which uses a DB2 back-end database. One easy way to load user data into Identity Manager Express is by using a Comma Separated Values (CSV) file. We choose this because it is also easy to export data from a DB2 table to a CSV file. 146 Deployment Guide Series: IBM Tivoli Identity Manager Express 4.6 A CSV file contains a set of records separated by a carriage return-line feed (CRLF) pair. Each record contains a set of fields separated by a comma. The header is the first line and dictates the fields for every record, as shown in Example 6-5. Example 6-5 CSV file for Identity Manager Express identity data feed employeeNumber,title,cn,givenname,sn,uid,mail,telephonenumber,manager 1,CEO,Regis Abdallah,Regis,Abdallah,regiao,[email protected],404-413-3145, 702,HR Manager,Fernando Machado,Fernando,Machado,feu,[email protected],404-413-3346,Regis Abdallah 751,HR Advisor,Kristen Baker,Kristen,Baker,kbaker,[email protected],404-313-3365,Fernando Machado 339,HR Advisor,Michael Davis,Michael,Davis,mdavis,[email protected],404-413-3347,Fernando Machado employeeNumber,title,cn,givenname,sn,uid,mail,telephonenumber,manager In this example, Regis Abdallah manages Fernando Machado, who manages Kristen Baker and Michael Davis. Identity Manager Express maps each CSV field to the corresponding user attribute. You can use a global identity policy to select the schema attributes to create a user ID, so every created account has the user ID (UID) defined in the identity feed. Understanding the Identity Manager CSV file support Tivoli Identity Manager Express provides a CSV file identity feed parser that complies with Request for Comment (RFC) 41803 grammar, supporting 8-bit Unicode Transformation Format (UTF-8) encoding. Because of this, it is imperative to use an editor that supports UTF-8 encoding and that the data exported from the authoritative data source is encoded with UTF-8. 3 For more details, refer to: http://rfc.net/rfc4180.html Chapter 6. Technical implementation 147 Tip: Windows 2003 and Windows XP have Notepad as a UTF-8 capable editor. To use it, click File → Save As. Then, from the Encoding menu, select UTF-8. On Linux, most modern distributions are UTF-8 configured and no additional configuration is necessary. You can check whether your installation is configured for UTF-8 by issuing the following command at a shell: echo $LANG It returns your language code plus UTF-8 if it is already correctly set up. For example, the correct definition for Brazilian Portuguese is: pt_BR.UTF-8 When you use the Vi IMproved (Vim) text editor (a popular version of the classic vi editor) to force UTF-8 encoding even if your system is not configured for UTF-8, specify the following command: :set encoding=utf-8 :set guifont=-misc-fixed-medium-r-normal--18-120-100-100-c-90-iso10646-1 Note: For the 7-bit ASCII code subset, the UTF-8 encoded Unicode format is identical to 7-bit ASCII format. For input files that contain 7-bit ASCII (ASCII character values are between hex 20 and hex 7e), you can use a normal text editor to create the file. For files containing any other character values (including extended European characters), you have to save the file in UTF-8 format. For an exact list of the 7-bit ASCII characters as supported by UTF-8, visit the following Web site and click the Basic Latin link in the first column: http://www.unicode.org/charts/ The Tivoli Identity Manager Express CSV parser has the following RFC enhancements: It trims leading and trailing white space from unquoted text in a field. In contrast, RFC 4180 regards all spaces as significant, whether inside or outside of quote delimiters. It allows quoted and unquoted text to appear in the same field. In contrast, RFC 4180 does not allow both text types in the same field. 148 Deployment Guide Series: IBM Tivoli Identity Manager Express 4.6 It does not enforce the RFC 4180 restriction that all records have the same number of fields. However, the code that calls the CSV parser reports an error if a record has more fields than the CSV header has. It permits record termination to use carriage return (CR) or to use CRLF to be compatible with both UNIX and DOS base files. In contrast, RFC 4180 terminates all records with CRLF. CSV records and examples A CSV file contains a set of records separated by a CRLF pair. Each record contains a set of fields separated by a comma. If the field contains either a comma or a CRLF, the comma must be escaped with double quotation marks as the delimiter. The first record in the CSV source file defines the attributes provided in each of the following records. For example: uid,sn,cn,givenname,mail,initials,employeenumber,erroles The sn and cn attributes are required by the object classes used by Tivoli Identity Manager Express to represent a person. The object classes are: objectclass: erExpressPerson objectclass: erManagedItem objectclass: erPersonItem objectclass: inetorgperson objectclass: organizationalPerson objectclass: person The identity feed process uses all the objects in the file. The attributes must be valid attributes of the Tivoli Identity Manager Express profile. Attributes that are not valid are ignored. The CSV file cannot contain binary attributes. You might use a multi-valued attribute to specify a user who has membership in multiple groups, such as service owner, Windows local management (a self-defined group), and manager group. If you include multi-valued attributes, they must be represented by using multiple columns with the same attribute name. To specify multi-valued attributes, repeat the column the required number of times. For example: cn, erroles, erroles, erroles, sn cn1,role1, role2, role3, sn1 cn2,rolea,,,sn2 Chapter 6. Technical implementation 149 Providing a user’s user ID Identity Manager Express has a global identity policy that generates the user ID for Identity Manager Express login. You can change this global identity policy to map to some identity feed provided user ID attribute. To configure the global identity policy mapping it to the uid attribute, as an administrator, perform these tasks: 1. From the Identity Manager Express management interface, click Manage Policies → Manage Identity Policies. Click the Change global rule button, as shown in Figure 6-66. Figure 6-66 Changing Identity Manager Express global identity policy 150 Deployment Guide Series: IBM Tivoli Identity Manager Express 4.6 2. Select the Rule tab and select Requested user ID as the first attribute, as shown in Figure 6-67. Click the OK button to finish the global identity policy change. Figure 6-67 Defining new mapping rule for global identity policy Chapter 6. Technical implementation 151 A success message is displayed as shown in Figure 6-68. Figure 6-68 Identity Manager Express global identity policy changed successfully Providing a user’s first password Identity feeds that use CSV, DSML, or Tivoli Directory Integrator based formats can provide a password for a new user. Given the identity feed value, Tivoli Identity Manager Express uses the erPersonPassword attribute to create a password for a new user’s Tivoli Identity Manager Express account. The erPersonPassword attribute is used only to create a password for a new Tivoli Identity Manager Express user. If the user already exists, the value of the erPersonPassword attribute cannot be used to change the Tivoli Identity Manager Express user’s login password. In any identity feed where the erPersonPassword is not provided, Tivoli Identity Manager Express generates a new password for a new user and sends the generated password by e-mail to the new user. If the user’s e-mail address is not populated, the user must contact the help desk to obtain a password. Depending on your requirements, the new user’s password might also be sent to the user’s manager. 152 Deployment Guide Series: IBM Tivoli Identity Manager Express 4.6 For CSV identity feeds, the attribute is erPersonPassword and must be in clear text. Note that for a Tivoli Directory Integrator identity feed, this attribute must be encoded in base64 format. Additional attributes in an identity feed You can include some of the attributes in an identity feed that are not contained in the identity feed object class (inetOrgPerson for Tivoli Identity Manager Express). We can assert that the object class holding user information is inetOrgPerson, and that erPersonItem and erExpressPerson can hold additional attributes for Identity Manager Express management purposes. For example, the erRoles attribute determines a user’s membership in a Tivoli Identity Manager Express group. The erRoles attribute is not in either the organizationalPerson or the inetOrgPerson schema. Based on the value of the erRoles attribute in an initial identity feed, a user might become a member, for example, of a customized and a default help desk assistant group. If a repeated identify feed does not contain a value for an attribute that was previously specified for the user, for both organizationalPerson and inetOrgPerson identity feed types, the identity feed process deletes that attribute for the Tivoli Identity Manager Express user. If the incoming identity record for a user initially indicates membership in a customized group, Tivoli Identity Manager Express includes the user as a member of both the customized group and the default group of the same category. Tivoli Identity Manager Express interprets a subsequent identity feed, which includes the same user as a modification of the existing Tivoli Identity Manager Express user. If the subsequent identity feed specifies that the user has membership only in the customized group, but not in the default group of the same category as well, the user is removed from membership in the default group. To avoid this problem, ensure that both initial and subsequent identity feeds specify that a user has membership in both a customized and a default group of the same category. Chapter 6. Technical implementation 153 Setting person status during the identity feed By default, all accounts defined in a CSV file for reconciliation of a manual service are marked as active in Tivoli Identity Manager Express. To suspend a person using a manual service reconciliation, add the erPersonStatus attribute to the CSV file. A value of 0 (zero) indicates active and a value of 1 indicates inactive. If you select a CSV file format for an identity feed with the erPersonStatus attribute, specify a CSV template file similar to the one in Example 6-6. Example 6-6 CSV template file setting person status attribute employeeNumber,title,cn,givenname,sn,uid,mail,telephonenumber,manager,e rpersonstatus 1,CEO,Regis Abdallah,Regis,Abdallah,regiao,[email protected],404-413-3145,,0 702,HR Manager,Fernando Machado,Fernando,Machado,feu,[email protected],404-413-3346,Regis Abdallah,0 751,HR Advisor,Kristen Baker,Kristen,Baker,kbaker,[email protected],404-313-3365,Fernando Machado,0 339,HR Advisor,Michael Davis,Michael,Davis,mdavis,[email protected],404-413-3347,Fernando Machado,0 Setting up the identity feed In this section, we configure the SCC identity feed based on the CSV file shown in Example 6-5 on page 147. Important: Do not use a full CSV file at this point. Make sure that you only have people involved with the Identity Manager Express implementation within this file. We do not want to manage other users until Identity Manager Express is ready for production. 154 Deployment Guide Series: IBM Tivoli Identity Manager Express 4.6 To configure the CSV file identity feed, as an administrator, perform these tasks: 1. From the Identity Manager Express interface, click Manage Services. Click the Create button, as shown in Figure 6-69. Figure 6-69 Creating an identity feed service Chapter 6. Technical implementation 155 2. Select Comma Separated File (CSV) identity feed. Click Next, as shown in Figure 6-70. Figure 6-70 Selecting the CSV service type for the identity feed service 156 Deployment Guide Series: IBM Tivoli Identity Manager Express 4.6 3. Define the identity feed service parameters as shown in Figure 6-71. Attention: The name attribute works like a key for updating the user. It must be unique. Click the Test Connection button to verify that Identity Manager Express is able to read the CSV file. Figure 6-71 Defining identity feed parameters and testing the connection Chapter 6. Technical implementation 157 4. After you receive the success message, click Next, as shown in Figure 6-72. Figure 6-72 Successful connection to the CSV file 158 Deployment Guide Series: IBM Tivoli Identity Manager Express 4.6 5. In the reconciliation section, define when Identity Manager Express must reconcile users from the CSV file, as shown in Figure 6-73. You can run the first one by selecting the Perform a reconciliation now check box. Figure 6-73 Identity feed reconciliation schedule definition Chapter 6. Technical implementation 159 If the reconciliation is performed successfully, Identity Manager Express displays a success message, as shown in Figure 6-74. Figure 6-74 Identity feed successful definition 160 Deployment Guide Series: IBM Tivoli Identity Manager Express 4.6 6. To check the imported users, click Manage Users and click Search to display all users, as shown in Figure 6-75. Figure 6-75 Checking imported users Important: If the manager attribute is being defined in the CSV file, you have to run the reconciliation twice to have managed people connected to their managers. 6.2.2 Setting up password self-reset using challenge-response Identity Manager Express provides a method for a user who requires a new password to replace a forgotten password. In this method, the user answers a set of forgotten password questions, which can be administrator-created or user-created. For example, an administrator might define two questions that the users must answer to access Tivoli Identity Manager Express if they forget their passwords. If the administrator defines the questions, users type the answers that they want to use. If the administrator changes the questions, a user who subsequently logs Chapter 6. Technical implementation 161 in is requested to answer the additional questions. Alternatively, users can provide both the questions and the answers to use for forgotten passwords. The user must have an e-mail address to receive new passwords, or a shared secret if the system is configured not to send passwords by e-mail. Attention: The text in an answer is not case-sensitive. However, spaces are significant in an answer. If an original answer has additional spaces, the additional spaces must occur when the user later responds to the forgotten password question. To configure forgotten password questions, as an administrator, complete these tasks: 1. Click Configure System → Configure Forgotten Password Information. In the Configure Forgotten Password Information panel, shown in Figure 6-76, select Enable challenge-response authentication. Figure 6-76 Enabling challenge-response authentication 162 Deployment Guide Series: IBM Tivoli Identity Manager Express 4.6 2. Specify the challenge-response behavior and the number of challenges for either user-defined or administrator-defined questions. If you choose to have the administrator define the questions, enter the text of the questions, as shown in Figure 6-77. Click Add. Figure 6-77 Adding challenge-responses defined by the administrator Chapter 6. Technical implementation 163 3. When you have defined all the questions, as shown in Figure 6-78, click the OK button to finish the configuration. Figure 6-78 Defined list of challenge-responses 164 Deployment Guide Series: IBM Tivoli Identity Manager Express 4.6 The next time users log on to Identity Manager Express, they receive a form asking them to provide answers to the administrator-defined questions, as shown in Figure 6-79. Alternatively, if the user-defined option is configured, they have to answer the user-defined questions. Figure 6-79 Identity Manager Express asking users to set up their challenge-responses If you change the challenge-responses configuration, users have to re-enter their answers. Tip: It is common for users to forget their answers. You can reduce this problem by making small changes from time to time to one of the questions so that users have to re-enter their answers. 6.2.3 Defining an identity policy SCC requires consistent user IDs throughout their supported platforms. This is achieved by creating a single identity policy for all services. Because the SCC identity feed has already defined the UID attribute for users, we use it as the SCC identity policy. Chapter 6. Technical implementation 165 To configure the identity policy, as an administrator, perform these tasks: 1. Click Manage Policies → Manage Identity Policies. Click the Create button, as shown in Figure 6-80. Figure 6-80 Creating identity policy 166 Deployment Guide Series: IBM Tivoli Identity Manager Express 4.6 2. Enter the name and description, as shown in Figure 6-81. Click the Services tab for the next form. Figure 6-81 Identity policy description Chapter 6. Technical implementation 167 3. Select the services that will use this identity policy, as shown in Figure 6-82. Click the Rule tab for the next form. Figure 6-82 Identity policy services scope 168 Deployment Guide Series: IBM Tivoli Identity Manager Express 4.6 4. Define the rule for the identity policy, as shown in Figure 6-83. SCC is using the user ID already defined in the identity feed. You can combine other user attributes to create your own rule. One common rule is to use the first letter of the first name and concatenate it with the last name. Click the OK button to enable the policy. Figure 6-83 Defining identity policy rule Any account created for the services governed by this identity policy follows this user ID rule. Chapter 6. Technical implementation 169 6.2.4 Defining a password strength rule A password strength rule is a rule that a password must adhere to. For example, password strength rules might specify that the minimum number of characters of a password must be five and the maximum number of characters cannot exceed ten. When a user chooses to change a password, the password must conform to the rules for the service. You can define password strength rules either in a global password policy for all services, or in a password policy that is specific to one or more services. For example, you can specify the following rules, and also other rules for passwords: Minimum and maximum length Character restrictions Frequency of password reuse Disallowed user names or user IDs If your site has separate password policies for more than one service, and password synchronization is on, you might have to coordinate the password strength rules for the services. For example, one password strength rule might specify a minimum number of eight characters and another password strength rule might specify a maximum number of six characters for a password. You have to resolve such conflicts to enable a user to log on successfully. 170 Deployment Guide Series: IBM Tivoli Identity Manager Express 4.6 Creating a password policy As an administrator, you can create a password policy that defines the rules to which passwords must conform. To set the password strength rule for a service, perform these tasks: 1. From the navigation tree, select Manage Policies → Manage Password Policies. Click the Create button, as shown in Figure 6-84. Figure 6-84 Creating a password policy Chapter 6. Technical implementation 171 2. Enter general information about this policy, as shown in Figure 6-85. Figure 6-85 Password policy: General information 172 Deployment Guide Series: IBM Tivoli Identity Manager Express 4.6 3. Click the Services tab. Click the Add button to define the services that are governed by this password policy, as shown in Figure 6-86. Figure 6-86 Adding services for a password policy Chapter 6. Technical implementation 173 4. Click the Search button and select any services that you want to associate with this password policy, as shown in Figure 6-87. Figure 6-87 Selecting the password policy service 174 Deployment Guide Series: IBM Tivoli Identity Manager Express 4.6 5. Click the Rules tab to start defining the password strength rules, as shown in Figure 6-88. Figure 6-88 Services governed by the password policy Chapter 6. Technical implementation 175 6. In the Rule page for the password policy that you select, specify the rules that determine whether a password entry is valid. Figure 6-89 and Figure 6-90 on page 177 show the available rules. Figure 6-89 Password strength rules: Page 1 176 Deployment Guide Series: IBM Tivoli Identity Manager Express 4.6 7. Figure 6-90 shows page 2 of the available rules. After you define the password strength rules, click the OK button to finish the password policy setup. Figure 6-90 Password strength rules: Page 2 Chapter 6. Technical implementation 177 Identity Manager Express displays a success message, as shown on Figure 6-91. Figure 6-91 Password policy successful creation 6.2.5 Setting up account defaults Account defaults allow you to specify default values for account attributes, saving efforts on account creation and reducing errors. For each account attribute supported by the service type, you can specify any combinations of: Hardcoded constant values Values from the user attributes You can also specify these values as prefixes, suffixes, or combined together. You can also control the case of the values: Leave the value in their existing case. Change the value to uppercase. Change the value to lowercase. 178 Deployment Guide Series: IBM Tivoli Identity Manager Express 4.6 To set up account defaults, as an administrator, perform these tasks: 1. Select Manage Services and search for the service for which you want to set up account defaults. 2. Click the small arrow button on the right side of the service name. In the menu that opens, click the Account defaults option, as shown in Figure 6-92. Figure 6-92 Setting up account defaults for a service Chapter 6. Technical implementation 179 3. A list with the managed account attributes opens. Select the attribute that you want to define a default value for and click the Add default button, as shown in Figure 6-93. Figure 6-93 Choosing an attribute 4. In the attribute default value definition form, shown in Figure 6-94 on page 181, define the following options: – Prepend text This is a fixed text that can be prepended to the user attribute. – User attribute This is the user attribute that is inserted after the prepend text. – Append text This is a fixed text that can be appended to the user attribute. – Apply case Choose the case that you want. Click the OK button to define the account attribute defaults. 180 Deployment Guide Series: IBM Tivoli Identity Manager Express 4.6 Figure 6-94 Attribute mapping rule 5. Repeat steps 3 and 4 until you define all attribute defaults. Click the OK button to finish the account attribute defaults definition. Attention: Some of the attribute defaults are only available after a service reconciliation. For example, if you want to define a default group for UNIX users in Identity Manager Express, you cannot enter a group name. You can only choose an existing one instead, and group names are only available after service reconciliation. Keep in mind that this is also valid for new groups. If you create a new group, Identity Manager Express only knows about this new group after a reconciliation. Chapter 6. Technical implementation 181 6.2.6 Setting up workflows for account requests An account request workflow is a workflow that defines the activities for managing requests for accounts. The workflow can consist of activities that route the request for approval, provide e-mail notifications, and cause requests for information (RFIs) to occur. A global account request workflow exists for all account requests. You can customize the global account request workflow that applies to all services, or you can create new account request workflows to associate with one or more of your services. For example, you can add two approval activities that require both the manager and the administrator to approve the request for an account, and you can add e-mail activities to notify the user about the status of the request. Attention: The user or manager that you select must have permission to view the account attributes. As an administrator, you must also specify the appropriate permissions in an access control item (ACI) for the group of which the participant is a member. For example, a user who does not have read permission for account attributes performs the following steps: 1. Requests an account 2. Attempts to confirm the account request by clicking View Requests → View All My Requests 3. Clicks the appropriate request in the Request Type field to obtain the request details. The user sees no account information that requires account attribute permissions. To enable the user to see the account attribute information, grant the attribute permissions to the participant. By default, installing Tivoli Identity Manager Express creates an empty global account request workflow. This default condition allows any individual who has a Tivoli Identity Manager Express user ID to request and obtain an account on any existing service. No approval is required. In the order of precedence, Tivoli Identity Manager Express uses either a service-specific workflow or a global account request workflow: If a service-specific workflow exists for account requests, Tivoli Identity Manager Express uses the service-specific workflow. If there is no service-specific workflow for account requests, Tivoli Identity Manager Express uses the global workflow. If you create and then later 182 Deployment Guide Series: IBM Tivoli Identity Manager Express 4.6 remove a service-specific workflow, or remove a service from the workflow, new account requests for that service use the global workflow. Account request workflow activities Account request workflow activities specify approvals, requests for information, or e-mail notifications. You can change the sequence of activities that an account request workflow provides. A global account request workflow allows you to specify approval and e-mail activities. A service-specific workflow additionally enables you to specify a request for information. A workflow provides these activities: Approval Specifies the type of approver, an escalation interval, days in which the approver has to act before the request escalates, and the participant who receives an escalated request. Escalation occurs if there is no approval activity within the escalation interval. An approved or rejected request is not escalated. An approver or escalation participant can be any default or customized Tivoli Identity Manager Express group, or a specific user. Ensure that the approver you select has the appropriate permissions to process the approval. For example, a manager can approve or reject a request that a subordinate makes for an account. The manager might require permission to view the account attributes. Request for information Specifies the participant types and escalation interval for an RFI. A participant must provide a value for the RFI, such as the value of an attribute. The RFI fields vary, depending on the service for which an account is requested. For example, an RFI can go to any default or customized Tivoli Identity Manager Express group, or a specific user. The user or manager who you select must have permission to view the account attributes. As an administrator, you must also specify the appropriate permissions in an ACI for the group of which the participant is a member. Attributes that appear in the RFI activity are not subject to ACI. The participant needs to have read and write permission on any attribute in an RFI, even if an ACI does not grant the participant the read and write permission for the attribute. Mail Sends e-mail to users and participants in the account request. You can create, change, or delete notification templates. In addition to the e-mail activities explicitly included in the workflow, Tivoli Identity Manager Express Chapter 6. Technical implementation 183 also automatically sends e-mail notifications during the process, such as at the completion of the account request process. If an e-mail activity does not find any valid participants to receive the e-mail, the users see an empty “Requested for recipient” field in the Requests table when they click View Requests → View All My Requests in the navigation tree. Creating an account request workflow You can create an account request workflow that specifies approval, request for information, and e-mail activities that occur for an account request. SCC wants to implement two approvals for account creation. To create an account request workflow for a specific service, perform these steps: 1. From the navigation tree, select Design Workflow → Manage Account Request Workflows. In the Manage Account Request Workflows panel, in the Account Request Workflows section, click the Create button, as shown in Figure 6-95. Figure 6-95 Creating an account request workflow 184 Deployment Guide Series: IBM Tivoli Identity Manager Express 4.6 2. In the Manage Account Request Workflow General form, enter a name and description for the workflow, as shown in Figure 6-96. Figure 6-96 Workflow: General information Chapter 6. Technical implementation 185 3. In the Manage Account Request Workflow Services form, select all services that will use this workflow, as shown in Figure 6-97. Click the Add button. Figure 6-97 Adding services for a workflow 186 Deployment Guide Series: IBM Tivoli Identity Manager Express 4.6 4. With the services added, as shown in Figure 6-98, click the Activities tab. Figure 6-98 Workflow service scope Chapter 6. Technical implementation 187 5. In the Activities tab, shown in Figure 6-99, create an approval activity. Click the Go button to start configuring the approval activity. Figure 6-99 Creating workflow activities 188 Deployment Guide Series: IBM Tivoli Identity Manager Express 4.6 6. In the approval activity form, shown in Figure 6-100, define the following fields: – – – – An activity name An approver type The escalation time The escalation participant type Click the OK button to finish this approval activity. Figure 6-100 Defining workflow activity Chapter 6. Technical implementation 189 7. Repeat steps 5 and 6 to create another approval activity. This second approval is handled by the service owner, as shown in Figure 6-101. Figure 6-101 Another approval from a different participant type 190 Deployment Guide Series: IBM Tivoli Identity Manager Express 4.6 8. The activities form looks similar to Figure 6-102. Click the OK button to finish this workflow setup. Figure 6-102 Workflow activities Chapter 6. Technical implementation 191 Figure 6-103 shows the success page with a summary of the created workflow. Figure 6-103 Workflow definition success message 6.2.7 Defining access control As an administrator, you can set system security for groups by using ACIs and views that control what tasks users can do. Users Every user has a basic set of permissions, which defines the scope of their activities, providing an unprivileged view of the Tivoli Identity Manager Express system. The initial Tivoli Identity Manager Express permissions enable all users to manage their own accounts, personal profiles, passwords, activities, and requests. Additionally, users can specify information about forgotten password questions. Users are denied permission for delete and change operations for their own accounts. Users cannot suspend or restore their own accounts. Users might also belong to other default groups that Tivoli Identity Manager Express provides, or they might belong to customized groups that your site might also create. 192 Deployment Guide Series: IBM Tivoli Identity Manager Express 4.6 Groups A group is a collection of users. Users can belong to one or more groups. Groups are used to control user access to functions and data in Tivoli Identity Manager Express. Some users might belong to default groups that Tivoli Identity Manager Express provides. Your site might also create additional, customized groups. Each group references a user category, which has a related set of default permissions and operations, and also views that the user can access. Groups grant specific access to functions and resources within Tivoli Identity Manager Express. For example, one group might have members who work directly with data in an accounting application. Another group might have members who provide help desk assistance, or the member might own the accounting service itself. On the managed resources, groups are managed by the local administrators or application owners using the basic system or other user access tools, such as Tivoli Access Manager. Tivoli Identity Manager Express does not create or delete groups on managed resources, nor does it manage ACLs or resource access on managed resources. Group management Individuals in your organization might belong to default or customized Tivoli Identity Manager Express groups. Categories of users Tivoli Identity Manager Express provides categories of users, which are used to define the default permissions and operations, and also the views that the user can access. That is, for each category of user, Tivoli Identity Manager Express defines default ACIs and default views that the users can access. Tivoli Identity Manager Express provides the following categories of users: User All Tivoli Identity Manager Express users are automatically part of the user category and are granted the base level of permissions and granted access to the base set of views. Manager Members of the manager group are users who manage the accounts, profiles, and passwords of their direct subordinates, unless the person form is customized to exclude some of the attributes for which the manager has permission to read or write. Managers can manage and delegate activities on their to-do lists. Chapter 6. Technical implementation 193 Help desk assistant Members of the help desk assistant group can change or reset others’ passwords, profiles, and accounts, unless the person form is customized to exclude some of the attributes for which the help desk assistant has permission to read or write. Additionally, help desk assistants can restore accounts, and also view others’ requests and both manage and delegate to-do lists. Service owner Members of the service owner group manage a service, including the user accounts and requests for that service. Additionally, on services they own, service owners can view others’ request, such as authorizing an account, unless the person form is customized to exclude some of the attributes for which the service owner has permission to read or write. A service owner can manage and delegate activities on their to-do lists. System administrator Members of the system administrator group perform both security and system administration tasks. A Tivoli Identity Manager Express administrator has access to the complete portfolio of Tivoli Identity Manager Express functions and tasks. The first member of this group is the user ID named itim manager. This account allows the holder to create additional administrators, help desk assistants, managers, service owners, users, and groups. To prevent unrecoverable loss of access to administrator tasks, Tivoli Identity Manager Express does not provide menus that restrict this group. For each category of user, except the system administrator category, you can customize the views that are available to the users and create customized groups based on that category of user. The users in the default system administrator group always have access to all the views and can perform all operations in Tivoli Identity Manager Express. You cannot modify a category. 194 Deployment Guide Series: IBM Tivoli Identity Manager Express 4.6 To associate users to groups, as an administrator, perform the following tasks: 1. Click Set System Security → Change a Group. Click the Search button. 2. Select the group that you want to change. Click the Change button, as shown in Figure 6-104. Figure 6-104 Selecting a group to change memberships Chapter 6. Technical implementation 195 3. Click the Add Members button, as shown in Figure 6-105. Figure 6-105 Group information 196 Deployment Guide Series: IBM Tivoli Identity Manager Express 4.6 4. Click the Search button to show existing users, as shown in Figure 6-106. a. Select the users who you want to add to this group. b. Click the OK button. Figure 6-106 Adding members to a group Chapter 6. Technical implementation 197 5. To view group membership, in the group information form, click the View Membership button, as shown in Figure 6-107. Figure 6-107 Viewing group membership 198 Deployment Guide Series: IBM Tivoli Identity Manager Express 4.6 A list of all users who are members of this group are displayed, as shown in Figure 6-108. Figure 6-108 Group membership view Category relationships Let us take a closer look at the category relationships in Identity Manager Express. All Tivoli Identity Manager Express users are automatically part of the user category and are granted the base level of permissions and granted access to the base set of views. A user who has membership in a customized group also has membership in the default group that is associated with that category. For example, the help desk assistant group has an extensive range of tasks. For business reasons, the administrator might also create a more restricted help desk assistant group, limiting the ACIs for the customized help desk assistant group. Each category has a default view of the tasks that users can access. For each category of user, except the system administrator category, you can customize the views that are available to the users and create customized groups based on that category of user. Chapter 6. Technical implementation 199 ACIs and workflows can specify both default and customized groups. Until the customized ACIs are defined, any member of the limited help desk assistant group has full access to the extensive range of tasks that the initial help desk assistant group has. Users in the default system administrator group always have access to all the views and can perform all operations in Tivoli Identity Manager Express. To see each category view, click Set System Security → Define Views. Click each category to see its views, as shown in Figure 6-109. Figure 6-109 Defining category views 200 Deployment Guide Series: IBM Tivoli Identity Manager Express 4.6 6.2.8 Defining help desk and account management procedures With the Identity Manager Express configuration almost finished, we now document help desk and account management procedures using Identity Manager Express as the tool for these operations. You must document procedures for the following items: User suspension and restore Account suspension and restore New account creation Changing current accounts Changing user passwords 6.2.9 Enabling language support Because SCC has some business connections in Latin America, they have to support the Portuguese and Spanish languages. Identity Manager Express supports several languages with the installation of the Identity Manager Express Language Pack. It displays its interface in the language that matches the HTTP header Preferred Client Locale, always sent by the browser. Identity Manager Express reverts back to English if: The browser does not send the HTTP header Preferred Client Locale The language specified in this header is not installed In the following section, we discuss the installation and configuration of the Identity Manager Express Language Pack. Language pack installation and base configuration The Identity Manager Express Language Pack is distributed together with Identity Manager Express fix packs in a file called itimxlp_setup.jar. To install the language pack, ensure that you run the installer on the same system as the Identity Manager Express server. The installation wizard is in a jar file. To install the language pack, perform these steps: 1. Extract the itimxlp_setup.jar file from the installed Identity Manager Express fix pack archive. 2. Start the installation wizard. From a shell prompt, issue the following command: java -jar itimxlp_setup.jar Chapter 6. Technical implementation 201 Tip: If java is not in your PATH, you can configure the WebSphere Application Server command line environment to use its Java Virtual Machine. To do this, perform the following steps: 1. On UNIX, run the following command: . /opt /IBM/WebSphere/AppServer/profiles/default/bin/setupCmdLine.sh On Windows: “C:\Program Files \IBM\WebSphere\AppServer\profiles\default\bin\setupCmdLine.bat” 2. Run the adapter installation wizard: java -jar itimxlp_setup.jar 3. In the Welcome window, click Next. 4. In the License Agreement window, review the license agreement, click Accept, and click Next. 5. Specify the location where Identity Manager Express is installed, as shown in Figure 6-110. Click Next. Figure 6-110 Identity Manager Express Language Pack: Home directory 202 Deployment Guide Series: IBM Tivoli Identity Manager Express 4.6 6. Choose the languages to install, as shown in Figure 6-111. Click Next. Figure 6-111 Identity Manager Express Language Pack: Selecting the languages Chapter 6. Technical implementation 203 7. In the Installation Summary window, review the installation settings, as shown in Figure 6-112. Click Back to change any of these settings. Otherwise, click Next to begin the installation. SCC decided to install Portuguese and Spanish. Figure 6-112 Identity Manager Express Language Pack: Installation summary 8. In the Installation Completed window, click Finish to exit the program. 9. The Identity Manager Express Language Pack is installed, but not active yet. Restart the WebSphere Application Server to activate it. To restart it, issue the following commands: a. To stop WebSphere Application Server: /opt/IBM/WebSphere/AppServer/profiles/default/bin/stopServer.sh server1 \ -username <wasadmin_userid> -password <wasadmin_password> b. To start WebSphere Application Server: /opt/IBM/WebSphere/AppServer/profiles/default/bin/startServer.sh server1 204 Deployment Guide Series: IBM Tivoli Identity Manager Express 4.6 After you restart WebSphere Application Server, users are able to use Identity Manager Express in their chosen languages, as shown in Figure 6-113. Figure 6-113 Identity Manager Express login form in Portuguese 6.2.10 Educating the involved personnel You have to technically prepare everyone who is involved with the new identity management procedures. This includes management, service owners, and users. Managers and service owners Because we use workflows that require approval by at least managers and service owners, inform them about their new tasks and responsibilities. If possible, send them examples of Identity Manager Express notifications and Identity Manager Express interface usage. Make them aware of how critical their timely response is. Communicating to users Create a user’s manual that contains information about the following topics: The new password policy How to log on to Tivoli Identity Manager Express How to manage passwords How to set up and use challenge-response for the password reset self-service Chapter 6. Technical implementation 205 After you send it to all users, you are now ready to put Identity Manager Express into production. 6.2.11 Running the identity feed Run the identity feed, which is defined in “Setting up the identity feed” on page 154, but now with a full CSV file from the HR and contractors system. Important: Remember to run it twice for proper manager association, at least at this time. 6.2.12 Running reconciliations for each installed adapter For every service defined, run a reconciliation. The reconciliation process associates Identity Manager Express users and their accounts. 6.3 Managing the solution Users are able to request the creation, modification, and deletion of accounts for their own use. Account creation and modification requires approvals. Note the Pending and Completed tasks for all users to make sure that everything is working as designed. 6.3.1 Cleaning up orphan accounts In the procedure described in 6.2.12, “Running reconciliations for each installed adapter”, all accounts on every platform are mapped to an owner. The accounts that cannot be mapped are called orphan accounts and have to be managed individually. Depending on the number of orphan accounts, this can be a tedious task. However, you can do this on a daily basis, targeting a particular number of orphan accounts a day. SCC decided on the following actions: 1. Suspend all orphan accounts. 2. Delete the obvious accounts. 206 Deployment Guide Series: IBM Tivoli Identity Manager Express 4.6 3. For a month, work with the help desk staff and for each call regarding locked accounts, check whether the account is an orphan account and perform some analysis about corrective action for each case. Later SCC discovered some discrepancies between data feed and platform data regarding user IDs. Therefore, its decision not to delete all the orphan accounts was a precautionary measure that proved to be wise. 4. After three months, SCC deleted all remaining orphan accounts. 6.3.2 Account management using the Web user interface All users and accounts are now loaded in Identity Manager Express. Users can change their passwords using Identity Manager Express, and help desk uses Identity Manager Express to handle account problems. You can now perform all account management tasks using Identity Manager Express. At this point, all privileged access for account operations on individual platforms is denied. Therefore, only the platform administrators and Identity Manager Express can perform account management on the managed platforms. Because Identity Manager Express works based on requests, users managing accounts for other users have to be registered at the specific group level for successful request-based account operation. Having a single-point of account management improves security and provides SCC with a trusted audit solution through Identity Manager Express audit reports. 6.3.3 Setting up recertification of existing accounts SCC wants to recertify all accounts for one specific Linux service within an interval of 120 days. The recertification process must send tasks to each account-owner manager, and if declined, the account is deleted. Chapter 6. Technical implementation 207 To set up this recertification workflow, as an administrator, perform the following tasks: 1. From the Identity Manager Express interface, click Design Workflows → Manage Recertification. Click the Create button, as shown in Figure 6-114. Figure 6-114 Recertification workflow creation 208 Deployment Guide Series: IBM Tivoli Identity Manager Express 4.6 2. Complete the general form of the recertification workflow, as shown in Figure 6-115. Figure 6-115 Recertification workflow: General configuration 3. Select the Services tab. 4. Click the Add button. Chapter 6. Technical implementation 209 5. Using the Search field, search for the service that you want to set up account recertification for: a. Select the service. b. Click the OK button, as shown in Figure 6-116. Figure 6-116 Selecting a service for the recertification workflow 210 Deployment Guide Series: IBM Tivoli Identity Manager Express 4.6 The selected service is displayed in the Services tab, as shown in Figure 6-117. Figure 6-117 Services defined for account recertification workflow 6. Click the Participant Notices tab. Chapter 6. Technical implementation 211 7. Accept the default templates, as shown in Figure 6-118. Figure 6-118 Recertification workflow: Participant notices templates 8. Click the Confirmation Notices tab. 212 Deployment Guide Series: IBM Tivoli Identity Manager Express 4.6 9. Accept the default templates, as shown in Figure 6-119. Click the OK button to enable the account recertification workflow. Figure 6-119 Recertification workflow: Confirmation notices templates Chapter 6. Technical implementation 213 A success message is displayed similar to Figure 6-120. Figure 6-120 Account recertification workflow successful creation 6.3.4 Reports Tivoli Identity Manager Express provides request, account, and service reports, which display Tivoli Identity Manager Express system activity and information about resources such as accounts that users own, and historical data. Report data is staged through a data synchronization process, which gathers data from the Tivoli Identity Manager Express directory information store and prepares it for the reporting engine. You can run data synchronization on demand, or you can it schedule it to occur regularly. The generated reports are based on the most recent data synchronization, not on current data. Activity that occurs after the last data synchronization is described in the next data synchronized report. Data in the reports is obtained from the Tivoli Identity Manager Express database and the directory server. Tivoli Identity Manager Express provides a customized banner for a report, but does not support modifying the existing reports, creating new reports, or using third-party reporting tools. 214 Deployment Guide Series: IBM Tivoli Identity Manager Express 4.6 Only an administrator can run reports. To generate a report, you must run data synchronization at least once. You can enable or disable data synchronization. When enabled, report data is synchronized once a day at midnight. Although you cannot modify the automatic data synchronization time or frequency, you can manually run data synchronization at any time, using the Tivoli Identity Manager Express user interface. The date is obtained from the Tivoli Identity Manager Express Server if the Tivoli Identity Manager Express Server and the browser (the client) that the user is using to access the server are in the same time zone. Otherwise, the date is obtained from the time zone of the computer on which the browser is located. Reports are displayed in a separate window. Therefore, you must disable pop-up blocking in your browser for the reports to be displayed. You can generate reports as a PDF file or as a CSV file. By default, reports are generated in PDF and you can view (and print) them using a PDF capable reader. If you select a CSV file for the report output, the report is displayed using the application that is mapped to CSV files (for example, OpenOffice.org Calc). If no application is associated with the CSV file type, you are prompted to open the file in a browser window when the report is created. A PDF report, by default, can contain up to 5000 records. You can change this value using the enrole.ui.report.maxRecordsInReport property in the UI.properties file. You do not have to restart the server for the changes to take effect. Changes occur within 30 seconds. Although you can increase this value to obtain larger amounts of data in your reports, you might encounter an OutOfMemoryError error. If this error occurs, increase the application server heap size in the WebSphere Application Server and restart Tivoli Identity Manager Express. In some cases, PDF formatting produces an additional blank page at the end of the report, which does not indicate that data is missing. Generating reports You can generate reports based on requests, accounts, or services. Requests Approved or rejected requests, requests for an account type, for an individual, and pending approvals Accounts Accounts for individuals, suspended individuals, dormant accounts, and accounts for a service Chapter 6. Technical implementation 215 Services Type of service, service name, accounts on the service, account status, and account user information Configuring data synchronization for reports You can set the interval at which data is synchronized for Tivoli Identity Manager Express reports. To set the synchronization interval, perform these tasks: 1. In the navigation tree, click Reports → Set Report Properties. 2. In the Set Report Properties form, perform these steps: a. Select the Perform report data synchronization check box for an immediate data synchronization. b. In the Schedule report data synchronization option, select Daily. c. Click the OK button, as shown in Figure 6-121. Figure 6-121 Report data synchronization settings 216 Deployment Guide Series: IBM Tivoli Identity Manager Express 4.6 Identity Manager Express displays a success message, as shown in Figure 6-122. Figure 6-122 Report properties successful change Chapter 6. Technical implementation 217 Running reports As an administrator, you can run Tivoli Identity Manager Express reports. To run a report, complete the following tasks: 1. In the navigation tree, expand Reports. Select one of the report types. 2. If provided, enter values in the filter for the report. Some reports provide a filter that allows you to select a time interval or other attribute for the report data. For example, Figure 6-123 shows options for service reports. In this example, we selected the last reconciliation report for a service. Figure 6-123 Service reports options 218 Deployment Guide Series: IBM Tivoli Identity Manager Express 4.6 3. Select the service name and report format, as shown in Figure 6-124. Click OK. Figure 6-124 Last reconciliation report options Chapter 6. Technical implementation 219 The report is generated, as shown in the example in Figure 6-125. Figure 6-125 Last reconciliation report for SCC Identity feed service 6.3.5 Conclusion The Tivoli Identity Manager Express deployment at SCC helped the company to meet all the business requirements presented in 5.1, “Business requirements” on page 62. Because of its Express nature, Identity Manager Express can help any organization to achieve similar results with finite effort. Some of the tasks that we performed can be implemented in a simpler manner, such as identity and password policies, which can be customized only as global rules. But for educational purposes, we decided to implement more sophisticated rules. When running this implementation in production, as any identity management implementation, it is important to collect feedback on the deployed features to drive future changes, improvements, and deployment activities, giving business and users even more facilities and collecting better results. 220 Deployment Guide Series: IBM Tivoli Identity Manager Express 4.6 A Appendix A. Troubleshooting Problem determination is the process of determining why a product does not function as it is designed to function. This appendix provides information about resources and techniques that you can use when identifying and resolving problems related to Identity Manager Express deployments. It provides information about troubleshooting errors that occur due to improper setup, installation, configuration, and operation procedures. Finally, it also describes the steps and tools to gather detailed trace information to determine the source of problems that cannot be resolved through routine investigation. Refer to IBM Tivoli Identity Manager Express Problem Determination Guide V4.6, SC32-22631, for additional up-to-date information. To resolve a problem with Identity Manager Express, you must distinguish between the product response that is expected and the one that actually occurs. Most problems are preceded by symptoms, such as an error message that is logged during installation, an unanticipated error message that is displayed in the console, or slow response intervals during normal processing. Isolating and resolving a problem based on its symptoms can be as simple as interpreting a message and making a minor adjustment. It might also be an involved process that requires special tools to isolate the symptoms. 1 You can download this manual and other manuals at: http://publib.boulder.ibm.com/infocenter/tivihelp/v5r1/index.jsp © Copyright IBM Corp. 2006. All rights reserved. 221 Some errors and unanticipated results occur due to the following reasons: Product prerequisites are not installed or are not running Installation and configuration steps are not followed Product usage guidelines and procedures are not followed These errors and unanticipated results occur primarily when the product is installed, configured, and used for the first time. As you become more familiar with the features and functioning of Identity Manager Express, these types of errors are likely to diminish. The following sections provide hints, tips, and information that you can use to help minimize errors and ensure the successful installation, configuration, and operation of Identity Manager Express. General troubleshooting When you detect an error, you have to isolate the problem to a specific product or component. You can typically do this using the error messages displayed on the Identity Manager Express graphical user interface (GUI) and the various log files available. The actual problem can be in any of these products: IBM DB2 IBM Tivoli Directory Server IBM Tivoli Directory Integrator IBM WebSphere Application Server IBM Tivoli Identity Manager Express If the error occurs during installation, there are specific installation logs that you can view to determine the problem. If the error occurs after installation when you try to use Identity Manager Express, you can view the following features: Identity Manager Express error messages from the GUI Requests issued from the Identity Manager Express GUI Messages and information in the Identity Manager Express message and trace logs In many instances, when errors occur, it is because one or more of the prerequisite products or the Identity Manager Express application are not up and operational. We now examine how we can verify whether the prerequisite software is up and running. 222 Deployment Guide Series: IBM Tivoli Identity Manager Express 4.6 Verifying that DB2 is operational (Windows 2003 Server) To determine whether DB2 is up and running, perform the following steps: 1. Open a DB2 command prompt (issue the db2cmd command from a Windows command prompt). Issue the following command to determine whether the DB2 services are operational: net start | findstr /c:"DB2" You see a response similar to Figure A-1. Figure A-1 Verifying DB2 on Windows 2003 Server 2. Issue the following command to see whether the DB2 instance is up and operational: db2gcf -s -p 0 -i db2 You see a response similar to Figure A-2. Figure A-2 Verifying DB2 on Windows 2003 Server (continued) Appendix A. Troubleshooting 223 Verifying that DB2 is operational (Linux) Open a Linux command prompt and issue the following command to see whether the DB2 instance is up and operational: su - db2admin -c"db2gcf -s -p 0 -i db2admin" You see a response similar to Figure A-3. Figure A-3 Verifying DB2 on Linux Verifying that Identity Manager Express connects to DB2 (Windows 2003 Server) To determine whether Identity Manager Express connects to DB2 on Windows 2003 Server, perform the following steps: 1. Open a Windows command prompt. Assuming that Identity Manager Express is installed on the C drive, issue the following commands to determine whether Identity Manager Express can connect to the DB2 database: C: cd "\Program Files\ibm\itim\bin" runconfig 2. When the Identity Manager Express runconfig application GUI is displayed, click the Database tab, and click the Test button. You see a pop-up window with the message: DB2 connection successful. See Figure A-4. 224 Deployment Guide Series: IBM Tivoli Identity Manager Express 4.6 Figure A-4 Identity Manager Express DB2 connecting on Windows 2003 Server Verifying that Identity Manager Express connects to DB2 (Linux) To verify whether Identity Manager Express connects to DB2 on Linux, perform the following steps: 1. Open a Linux command prompt. Issue the following commands to determine whether Identity Manager Express can connect to the DB2 database: cd /opt/IBM/itim/bin ./runConfig 2. When the Identity Manager Express runConfig application GUI is displayed, click the Database tab, and click the Test button. You see a pop-up window with the message: DB2 connection successful. See Figure A-5. Appendix A. Troubleshooting 225 Figure A-5 Identity Manager Express DB2 connecting on Linux Verifying that Directory Server is operational (Windows 2003 Server) Open a Windows command prompt. Issue the following command to determine whether the IBM Tivoli Directory Server services are operational: net start | findstr /c:"IBM Tivoli Directory" You see a response similar to Figure A-6. Figure A-6 Verifying Directory Server on Windows 2003 Server 226 Deployment Guide Series: IBM Tivoli Identity Manager Express 4.6 Verifying that Directory Server is operational (Linux) Open a Linux command prompt. Issue the following commands to determine whether the IBM Tivoli Directory Service services are operational: ps aux | grep ibmslapd | grep -v grep ps aux | grep ibmdiradm | grep -v grep You see a response similar to Figure A-7. Figure A-7 Verifying Directory Server on Linux Verifying that Identity Manager Express connects to LDAP (Windows 2003 Server) To determine whether Identity Manager Express can connect to the Lightweight Directory Access Protocol (LDAP) database, perform the following steps: 1. Open a Windows command prompt. Assuming that Identity Manager Express was installed on the C drive, issue the following commands: C: cd "\Program Files\ibm\itim\bin" runconfig 2. When the Identity Manager Express runconfig application GUI is displayed, click the Directory tab, and click the Test button. You see a pop-up window with the message: Directory connection successful. See Figure A-8. Appendix A. Troubleshooting 227 Figure A-8 Identity Manager Express LDAP connecting on Windows 2003 Server Verifying that Identity Manager Express connects to LDAP (Linux) To determine whether Identity Manager Express can connect to the LDAP database, perform the following steps: 1. Open a Linux command prompt. Issue the following commands: cd /opt/IBM/itim/bin ./runConfig 2. When the Identity Manager Express runConfig application GUI is displayed, click the Directory tab, and click the Test button. You see a pop-up window with the message: Directory connection successful. See Figure A-9. 228 Deployment Guide Series: IBM Tivoli Identity Manager Express 4.6 Figure A-9 Identity Manager Express LDAP connecting on Linux Verifying that Directory Integrator is operational (Windows 2003 Server) Open a Windows command prompt. Issue the following command to determine whether the IBM Tivoli Directory Integrator service is operational: net start | findstr /c:"IBM Tivoli Identity Manager Adapter" You see a response similar to Figure A-10. Figure A-10 Verifying Directory Integrator on Windows 2003 Server Appendix A. Troubleshooting 229 Verifying that Directory Integrator is operational (Linux) Open a Linux command prompt. Issue the following command to determine whether the IBM Tivoli Directory Integrator service is operational: ps aux | grep ibmdisrv | grep -v grep You see a response similar to Figure A-11. Figure A-11 Verifying Directory Integrator on Linux Verifying that WebSphere Application Server is operational (Windows 2003 Server) To verify whether WebSphere Application Server is operational on Windows 2003 Server, perform the following steps: 1. Open a Windows command prompt. Issue the following command to determine whether the IBM WebSphere Application Server service is operational: net start | findstr /c:"IBM WebSphere" You see a response similar to Figure A-12. Figure A-12 Verifying WebSphere Application Server on Windows 2003 Server 2. Assuming that Identity Manager Express is installed on the C drive, issue the following commands to determine whether the IBM WebSphere Application Server is operational. C: cd \Program Files\IBM\WebSphere\AppServer\bin serverStatus.bat server1 230 Deployment Guide Series: IBM Tivoli Identity Manager Express 4.6 You see a response similar to Figure A-13. Figure A-13 Verifying WebSphere Application Server on Windows 2003 Server (continued) Verifying that WebSphere Application Server is operational (Linux) Open a Linux command prompt. Issue the following command to determine whether the IBM WebSphere Application Server is operational: /opt/IBM/WebSphere/AppServer/bin/serverStatus.sh server1 You see a response similar to Figure A-14. Figure A-14 Verifying WebSphere Application Server on Linux Appendix A. Troubleshooting 231 Verifying that the Identity Manager application is operational To determine whether the Identity Manager application is operational, perform the following steps: 1. Log on to the WebSphere Application Server administrator console using the following URL: http://hostname:9060/ibm/console See Figure A-15. Figure A-15 Logging on to WebSphere Application Server 232 Deployment Guide Series: IBM Tivoli Identity Manager Express 4.6 2. Click Applications → Enterprise Applications. The application status for ITIMx must be active, as shown in Figure A-16. Figure A-16 ITIMx application status Appendix A. Troubleshooting 233 Installation troubleshooting Before you install Identity Manager Express, review the Release Notes2 for changes to existing information contained in the documentation, for the latest information related to resolving known problems and issues, and for instructions about obtaining and installing the latest patches. There are two ways to install Identity Manager Express: 1. Perform a simplified installation on a pristine machine using the Identity Manager Express deployment wizard. The Identity Manager Express deployment wizard automatically installs and configures DB2, IBM Tivoli Directory Server, IBM Tivoli Directory Integrator, WebSphere Application Server, and Identity Manager Express on the machine. The machine must not have any of these products already installed. 2. Perform a manual installation of Identity Manager Express. You have to install each product separately in a specified order and configure them. Errors will occur if you try and install Identity Manager Express using the Identity Manager Express deployment wizard and any of the products already exist or were not properly uninstalled. Refer to the IBM Tivoli Identity Manager Express Installation Guide V4.6, SC32-22623, for details about how to install Identity Manager Express. The Identity Manager Express deployment wizard displays the progress of the Installation and allows you to display the details. In the Deployment Status window, you can display the Detailed Messages (summary of the installation) and the Master Log (messages, commands being issued and responses), as shown in the Figure A-17. 2 You can down load this and other manuals at: http://publib.boulder.ibm.com/infocenter/tivihelp/v5r1/index.jsp 3 You can download this from the Web site cited previously. 234 Deployment Guide Series: IBM Tivoli Identity Manager Express 4.6 Figure A-17 shows the deployment status window. Figure A-17 Deployment status window Appendix A. Troubleshooting 235 Figure A-18 shows an overview of the detailed messages. Figure A-18 Detailed messages 236 Deployment Guide Series: IBM Tivoli Identity Manager Express 4.6 Figure A-19 shows an overview of the detailed messages. Figure A-19 Master log You can also display other installation and configuration log files. The logs are text-based and you can view them with any standard system text viewer or editor. Windows 2003 Server: Using Notepad or WordPad Linux: Using vi, gedit, or the cat command Appendix A. Troubleshooting 237 The following list is an overview of the Windows 2003 Server log files: x:\itimx_solution_files\logs\IRU_DeploymentWizard.log x:\Program Files\ibm\SQLLIB\DB2install.log x:\Progam Files\ibm\WebSphere\AppServer\logs\log.txt x:\Documents and Settings\Administrator\Local Settings\Temp\log.txt x:\Documents and Settings\Administrator\Local Settings\Temp\idiinstall.log x:\Program Files\ibm\LDAP\var\ldapinst.log x:\Program Files\ibm\LDAP\var\ldsadm.log x:\Program Files\ibm\LDAP\var\ldsadmdb2.log x:\Program Files\ibm\LDAP\var\ldsadmdb2cmds.log x:\itim_install.stdout x:\itim_install.stderr x:\Progam Files\ibm\itim\install_logs\dbConfig.stdout x:\Progam Files\ibm\itim\install_logs\ldapConfig.stdout x:\Progam Files\ibm\itim\install_logs\setupEnrole.stdout The following list is an overview of the Linux log files: 238 /itimx_solution_files/logs/IRU_DeploymentWizard.log /opt/IBM/WebSphere/AppServer/logs/log.txt /opt/IBM/itim/itdi/home/solDir/ibmdi.log /opt/IBM/itim/itdi/install/itdi_install.log /var/idsldap/V6.0/idsadmdb2cmds.log /var/idsldap/V6.0/idsadmdb2.log /var/idsldap/V6.0/idsadm.log /var/idsldap/V6.0/idslink.log /itim_install.stdout /itim_install.stderr /opt/IBM/install_logs/dbConfig.stdout /opt/IBM/install_logs/ldapConfig.stdout /opt/IBM/install_logs/setupEnrole.stdout Deployment Guide Series: IBM Tivoli Identity Manager Express 4.6 Figure A-20 shows the itim_install.stdout log file as an example. Figure A-20 itim_install.stdout log file Operational troubleshooting In some cases, when a problem is detected while using the Identity Manager Express GUI, an error message is automatically generated and displayed to the user. In other cases, such as when an asynchronous request submitted from the Identity Manager Express GUI fails, you have to view the failed request to display the error message. There are also cases where you have to browse the various log files to determine the error. You have to analyze the error messages to determine the original error and distinguish it from other errors that resulted from the original error. Appendix A. Troubleshooting 239 Identity Manager Express messages Identity Manager Express messages are in the CTGIMcnnns format where: c One character product function identifier nnn 3-digit unique message identifier s one character message severity indicator I - Informational W - Warning E - Error The following list provides an overview of all product function identifiers: A B C D E F G H I J K L M N O P R S T U Workflow management Lifecycle management Post office management Remote services Policy Data service Service management Password management Account management Form customization Import/export management Web client Authentication response Reporting Common Installation and configuration Role management Container management Adapter management User interface Messages that are displayed on the Identity Manager Express GUI are hyperlinks. You can click the message identifier to display more information about the error. 240 Deployment Guide Series: IBM Tivoli Identity Manager Express 4.6 Figure A-21 shows an example of an error message. Figure A-21 Example of an error message Appendix A. Troubleshooting 241 If you click the hyperlink you can get more Information for message CTGIMO014E, as shown in Figure A-22. Figure A-22 More Information for message CTGIMO014E using the hyperlink Identity Manager Express requests You can view the details of requests that are issued from the Identity Manager Express GUI. By default all Identity Manager Express users can view: – Their pending requests – All of their requests By default, an administrator can also view: – Pending requests that are issued by another user – All requests that are issued by another user – All requests that are issued from a service By default, a service owner can also view: – All requests issued from a service 242 Deployment Guide Series: IBM Tivoli Identity Manager Express 4.6 By default, a help desk assistant can also view: – Pending requests that are issued by another user – All requests that are issued by another user Figure A-23 shows an example of an Identity Manager Express administrator viewing all of the issued requests. Figure A-23 Example of an administrator viewing all of the issued requests Identity Manager Express logs Identity Manager Express records message, trace, and debug information to log files. Messages are logged to a file named msg.log. This file contains the Identity Manager Express Informational, Warning, and Error messages (the messages are prefixed with CTGIM). Authentication requests are logged to a file named access.log. Appendix A. Troubleshooting 243 Trace information is logged to a file named trace.log. This file contains Identity Manager Express internal trace and debugging information. Identity Manager Express also logs First Failure Data Capture (FFDC) debug information that might eliminate the need to re-create problems. Identity Manager Express provides a command named serviceability that gathers the FFDC information and system information, and then creates a compressed file, which you can send to the Identity Manager Express support. By default, the logs are stored in subdirectories at these locations: x:\Program Files\ibm\tivoli\common\CTGIM (for Windows 2003 Server) /opt/IBM/Tivoli/common/CTGIM (for Linux) You can change the path during the Identity Manager Express installation. You can also change the path after the Identity Manager Express installation by making a change in the enroleLogging.properties file and restarting Identity Manager Express. You can also change additional logging options in the enroleLogging.properties file, such as the tracing options, log file names, maximum log file size, number of log files to archive, and so on. More information about how to change the logging options are discussed later in this section. The Identity Manager Express msg.log, access.log, and trace.log file information is stored in an Extensible Markup Language (XML) format. Identity Manager Express has a command line tool named viewer that converts the files to text or Hypertext Transfer Protocol (HTML) (specified through a command line argument). The viewer command also accepts one or more input log files as arguments. It then writes the contents to stdout. We recommend that you pipe the output to a file for browsing. The viewer command also allows you to query and select specific log file records. You can specify the query criteria as a command line argument. The query syntax is similar to Structured Query Language (SQL). The viewer command is not in the search path. It is necessary to change to the directory where the viewer command is installed. cd cd 244 x:\Program Files\ibm\itim\bin\logviewer (for Windows 2003 Server) /opt/IBM/itim/bin/logviewer (for Linux) Deployment Guide Series: IBM Tivoli Identity Manager Express 4.6 Figure A-24 shows the viewer command syntax. Figure A-24 The viewer command syntax Figure A-25 shows a raw XML msg.log file. Figure A-25 Raw XML msg.log file Appendix A. Troubleshooting 245 Figure A-26 shows a msg.log file that is converted to TEXT using the following viewer command and displayed to the console. viewer -s text c:"\Program Files\ibm\tivoli\common\CTGIM\logs\msg.log Figure A-26 XML msg.log file converted to text 246 Deployment Guide Series: IBM Tivoli Identity Manager Express 4.6 Figure A-27 shows a msg.log file that is converted to HTML using the following viewer command and piped to a file. viewer c:"\Program Files\ibm\tivoli\common\CTGIM\logs\msg.log > c:\temp\Msg.html Figure A-27 XML msg.log file converted to HTML Appendix A. Troubleshooting 247 Figure A-28 shows an example of a viewer command query to a msg.log that only displays error messages (SEVERITY=ERROR). viewer.bat -q "select default where Severity = ERROR" -s text c:"\Program Files\ibm\tivoli\common\CTGIM\logs\Msg.log" Figure A-28 XML msg.log file: Only error messages 248 Deployment Guide Series: IBM Tivoli Identity Manager Express 4.6 Figure A-29 shows an example of a trace log that is converted to HTML and displayed from a Web browser. Figure A-29 Example trace.log in HTML Appendix A. Troubleshooting 249 Figure A-30 shows an example of a security log that is converted to HTML and displayed from a Web browser. Figure A-30 Example security.log in HTML First Failure Data Capture support You can run the Identity Manager Express serviceability command to gather the FFDC data, log files, and system information. The serviceability command compresses the files together into one file named ibm-support.zip. The information that is gathered includes: 250 msg.log files trace.log files Checksums of Identity Manager Express jar files Java Version Operating system level and system information DB2 level Selected Identity Manager Express information stored in IBM Tivoli Directory Server (ldap) Deployment Guide Series: IBM Tivoli Identity Manager Express 4.6 The serviceability command is not in the search path. It is necessary to change to the directory where the serviceability command is installed. cd cd x:\Program Files\ibm\itim\bin\win (Windows 2003 Server) /opt/IBM/itim/bin/unix (Linux) After you run the serviceability command, the ibm-support.zip file is stored in the directory where the serviceability command resides. Figure A-31 shows how to run the serviceability command. Figure A-31 Serviceability command Appendix A. Troubleshooting 251 Figure A-32 shows the content of the ibm-support.zip file. Figure A-32 Serviceability ibm-support.zip file content Logging options As mentioned previously, the Identity Manager Express logging options are defined in the Identity Manager Express configuration file enroleLogging.properties. By default, this file is located in the following locations: x:\Program Files\ibm\itim\data (Windows 2003 Server) /opt/IBM/itim/data (Linux) You can change the logging options. You can restart Identity Manager Express to activate the changes immediately or you can wait for Identity Manager Express to automatically poll the enroleLogging.properties file for changes. By default, Identity Manager Express checks the enroleLogging.properties file for changes every 5 minutes. You can change this option (refreshInterval) also. The logging options are defined in these categories: General logging options Apply these options to the message, trace, and security (access) log files. Message logging options Apply these options only to the message log files. 252 Deployment Guide Series: IBM Tivoli Identity Manager Express 4.6 Trace logging options Apply these options only to the trace log files. Security logging options Apply these options only to the security (access) log files. FFDC logging options The message, trace, and security logging options override the general logging options. General logging options Look for the following stanzas in the enroleLogging.properties file. To change the logging options refresh time interval (in milliseconds): logger.refreshInterval=300000 To change the location of the log files: handler.file.fileDir=directory_location To change the maximum size of the log files (in KB): handler.file.maxFileSize=1024 Message logging options Look for the following stanzas in the enroleLogging.properties file. To turn message logging on or off: logger.msg.logging=true|false To change the message logging detail level: logger.msg.level=INFO|WARN|ERROR To change the name of the message log file: logger.file.msg.fileName=msg.log To change the number of message log files to keep: logger.file.msg.maxFiles=5 Appendix A. Troubleshooting 253 Trace logging options Look for the following stanzas in the enroleLogging.properties file. To turn trace logging on or off: logger.trace.logging=true|false To change the trace logging detail level: logger.trace.level=DEBUG_MIN|DEBUG_MID|DEBUG_MAX You can also change the trace logging level using the runConfig command. To change the name of the trace log file: logger.file.trace.fileName=trace.log To change the number of trace Log files to keep: logger.file.trace.maxFiles=10 You can enable individual component trace loggers with their own trace level. All you have to do is to uncomment the lines for the required component and set the trace level, as shown in Example A-1. Example: A-1 Enabling individual component trace loggers # # # # # # # # # # # # # # # # # # # 254 logger.trace.com.ibm.itim.adhocreport.level=DEBUG_MIN logger.trace.com.ibm.itim.adhocreport.crystal.level=DEBUG_MIN logger.trace.com.ibm.itim.adhocreport.changelog.level=DEBUG_MIN logger.trace.com.ibm.itim.apps.level=DEBUG_MIN logger.trace.com.ibm.itim.apps.ejb.adhocreport.level=DEBUG_MIN logger.trace.com.ibm.itim.authentication.level=DEBUG_MIN logger.trace.com.ibm.itim.authorization.level=DEBUG_MIN logger.trace.com.ibm.itim.common.level=DEBUG_MIN logger.trace.com.ibm.itim.fesiextensions.level=DEBUG_MIN logger.trace.com.ibm.itim.mail.level=DEBUG_MIN logger.trace.com.ibm.itim.messaging.level=DEBUG_MIN logger.trace.com.ibm.itim.dataservices.model.level=DEBUG_MIN logger.trace.com.ibm.itim.passworddelivery.level=DEBUG_MIN logger.trace.com.ibm.itim.policy.level=DEBUG_MIN logger.trace.com.ibm.itim.remoteservices.level=DEBUG_MIN logger.trace.com.ibm.itim.report.level=DEBUG_MIN logger.trace.com.ibm.itim.security.level=DEBUG_MIN logger.trace.com.ibm.itim.scheduling.level=DEBUG_MIN logger.trace.com.ibm.itim.systemConfig.level=DEBUG_MIN Deployment Guide Series: IBM Tivoli Identity Manager Express 4.6 # # # # # logger.trace.com.ibm.itim.util.level=DEBUG_MIN logger.trace.com.ibm.itim.webclient.level=DEBUG_MIN logger.trace.com.ibm.itim.workflow.level=DEBUG_MIN logger.trace.com.ibm.daml.level=DEBUG_MIN logger.trace.com.ibm.erma.level=DEBUG_MIN Security logging options Look for the following stanzas in the enroleLogging.properties file. You can configure Identity Manager Express to log authentication requests. To turn security logging on or off: logger.msg.com.ibm.itim.security.logging=true|false To change the security logging detail level: logger.msg.com.ibm.itim.security.logChoice=success|failure|both To change the name of the security log file: logger.file.security.fileName=access.log To change the location of the security log files: handler.file.security.fileDir=directory_location To change the number of security log files to keep: logger.file.security.maxFiles=10 First Failure Data Capture logging options Look for the following stanzas in the enroleLogging.properties file. To change the location of the FFDC base directory: handler.ffdc.baseDir=directory_location To change what files are included in the ibm-support.zip file when you run the serviceability command: handler.ffdc.fileCopy.filesToCopy="files_to_copy_separated_by_blanks" Password expiration for administrative users When you install IBM Tivoli Identity Manager Express for the first time, three users are created on your system. By default, these users are: enrole db2admin ldapdb2 Appendix A. Troubleshooting 255 Initially, the db2admin user is created with a password that is set to never expire. The ldapdb2 and enrole users are created using a password that expires based on the password policy of your system. If the passwords for these users expire, you will not be able to log on to Tivoli Identity Manager Express. To prevent these passwords from expiring, use the Windows Computer Management Console → Local Users and Groups → Users System Tool to set the passwords to never expire. Figure A-33 depicts the typical error message when the db2admin password has expired. Figure A-33 db2admin password has expired Figure A-34 depicts the typical error message when the ldapdb2 password has expired. Figure A-34 ldapdb2 password has expired This concludes our discussion on troubleshooting. 256 Deployment Guide Series: IBM Tivoli Identity Manager Express 4.6 B Appendix B. Modifying the Identity Manager Express LDAP adapter This appendix describes the steps to modify the IBM Tivoli Directory Integrator based Lightweight Directory Access Protocol (LDAP) adapter based on your LDAP directory requirements. We use a sample scenario to describe how to customize the adapter. For more detailed information about how to customize the LDAP adapter, refer to the IBM Tivoli Identity Manager Version 4.6 LDAP Adapter Customization Guide, which is included with the LDAP adapter package. © Copyright IBM Corp. 2006. All rights reserved. 257 Directory Integrator LDAP adapter description The Identity Manager Express 4.6 LDAP adapter is based on a set of IBM Tivoli Directory Integrator AssemblyLines. The AssemblyLines use Directory Integrator Connectors to communicate with the managed resource. The communication between the Identity Manager Express Server and the Directory Integrator based adapter is handled by the Remote Method Invocation (RMI) provider and dispatcher built into the product architecture. The adapter AssemblyLines are used to remotely perform the functions required to provision and maintain user entries in an LDAP directory. The LDAP adapter consists of several AssemblyLines, which handle the following provisioning requests: Add new users and set their group memberships Modify existing user attributes and their group memberships Change the user account password Suspend, restore, and delete existing users in the directory Reconcile user and group accounts 258 Deployment Guide Series: IBM Tivoli Identity Manager Express 4.6 Directory Integrator adapter architecture Figure B-1 illustrates the process flow for a Tivoli Directory Integrator (TDI) based adapter using RMI, when performing a requested operation for a managed resource. Figure B-1 Directory Integrator adapter architecture 1. A request for a task or operation to be performed for the managed resource is initiated with Identity Manager Express. Example operations include: a manual password reset operation by a user, or an internal process that creates a new user account required by a policy-driven identity feed. Components of a customized adapter include AssemblyLines appropriate for the operations and connectors appropriate for the managed resource. AssemblyLines support the following operations: Add, delete, modify, test, and search. 2. The RMI dispatcher on the Tivoli Directory Integrator receives the request from the RMI provider. Tivoli Directory Integrator uses an appropriate AssemblyLine to perform the requested operation. If the correct AssemblyLine is currently cached by Tivoli Directory Integrator, then it is used. If the correct AssemblyLine is not present, it is downloaded from the LDAP directory server (see step 3). The RMI provider is included as part of Appendix B. Modifying the Identity Manager Express LDAP adapter 259 the Tivoli Identity Manager Server. The RMI dispatcher is installed as an add-on to Tivoli Directory Integrator. 3. If required, Identity Manager Express downloads the appropriate AssemblyLine for the requested operation and passes the AssemblyLine using RMI to the Tivoli Directory Integrator. AssemblyLines are one of the components included in the custom profile for the adapter. Profiles are normally stored by the LDAP directory server that supports the Identity Manager Express system. 4. Tivoli Directory Integrator invokes the AssemblyLine and uses one or more appropriate connectors (stored on Tivoli Directory Integrator) to communicate with the managed resource. The requested operation is performed for the managed resource and the result is returned to Tivoli Directory Integrator. 5. Tivoli Directory Integrator returns the result of the operation using RMI to the Identity Manager Express Server. 6. If necessary, the Identity Manager Express Server provides an appropriate response to the request. Customizing the LDAP adapter The LDAP adapter supports a default configuration. If this is not your target configuration, then you have to configure certain aspects of the adapter. The LDAP adapter supports the following defaults: The default objectclass for creating a new user is inetOrgPerson. If your LDAP user directory uses a different objectclass or a custom objectclass, then change this configuration. The default IBM RDN™ for creating a new user entry is UID. If you have to specify an RDN using an attribute other than UID, then change this configuration. If you want to add additional attributes or remove attributes that are not needed from the user schema, then change this configuration. Group entries are created using the objectclass GroupOfNames. If your LDAP user directory uses a different objectclass for group membership, then change this configuration. The default container objectclass is the OrganizationalUnit objectclass. If your LDAP configuration uses a container other than OrganizationalUnit (ou), for example, domain (dc), then change this configuration. 260 Deployment Guide Series: IBM Tivoli Identity Manager Express 4.6 Setting up the scenario This section describes how to set up the LDAP directory information used in this scenario on the Identity Manager Express Server (which is running IBM Directory Server). This is done for the purpose of testing and demonstrating the LDAP adapter only. This scenario describes the setup for a Windows server. Setting up a Linux server is similar, but the path names are different for the IBM TIvoli Directory Server utilities. IBM Directory Server 6.0 comes with a sample directory, which you can load from the sample.ldif file. This file is located in the directory C:\Program Files\ibm\LDAP\examples (Windows) and /opt/ibm/ldap/V6.0/examples (Linux). For this example, we create a custom attribute named passportNumber and a custom objectclass named ODIperson to include the additional attribute, passportNumber. We then modify the sample.ldif file to have all the user entries of type object class ODIperson (we saved the file as newsample.ldif and it is available for download with this book). Making the directory changes for the example Perform the following steps using the Directory Server Web Administration Tool. 1. Log on to the Web Administration Tool as an authorized user. The URL to the Directory Server Web Administration Tool is: http://<your_hostname>/itimserver/IDSWebApp/IDSjsp/Login.jsp Log in as shown in Figure B-2. Figure B-2 Logging on to Directory Server Appendix B. Modifying the Identity Manager Express LDAP adapter 261 2. To add a new attribute to the directory, select Schema Management → Add an Attribute: a. Name the attribute passportNumber, as shown in Figure B-3. b. Assign an OID. c. Click OK to create the attribute. Figure B-3 Adding a new attribute 3. Create the custom objectclass, ODIperson. a. b. c. d. e. f. 262 In the left panel of operations, select Add an objectclass. Name the objectclass ODIperson, as shown in Figure B-4. Specify an OID. In the section for Superior object classes, select inetOrgPerson. Use the Add>> button to move it to the Selected object classes list. In the Object class type section, select Auxiliary. Deployment Guide Series: IBM Tivoli Identity Manager Express 4.6 Figure B-4 Adding a custom objectclass 4. Click the Attributes link on the left, and the dialog in Figure B-5 opens. a. Select passportNumber. b. Click the Add to optional button. Figure B-5 Adding additional attributes Appendix B. Modifying the Identity Manager Express LDAP adapter 263 c. Click OK to save the configuration, as shown in Figure B-6. Figure B-6 Adding a custom objectclass: Saving the configuration 5. Load some sample data from the newsample.ldif file into the directory. You can modify the sample.ldif file, which is installed with Directory Server and is located in the c:\Program Files\ibm\ldap\examples directory (Linux version is located in /opt/ib/ldap/V6.0/examples). For each user entry, change the object class to add inetOrgPerson and ODIperson as the object class type, as shown in Example B-1. Example: B-1 Changing the object class dn: cn=Robert Dean, ou=In Flight Systems, ou=Austin, o=IBM, c=US objectclass: top objectclass: person objectclass: organizationalPerson objectclass: inetOrgPerson objectclass: ODIPerson cn: Robert Dean sn: Dean telephonenumber: 1-812-855-5703 internationaliSDNNumber: 755-5703 264 Deployment Guide Series: IBM Tivoli Identity Manager Express 4.6 facsimiletelephonenumber: 1-812-855-5704 postalcode: 1701 facsimiletelephonenumber: 755-5704 seealso: cn=Maria Garcia, ou=In Flight Systems, ou=Austin, o=IBM, c=US Loading the LDIF file for the example Before you import the LDAP Data Interchange Format (LDIF) file, newsample.ldif, you must define the suffix o=ibm, c=us (see Example B-2). To define a new suffix in IBM Tivoli Directory Server, run the idscfgsug.cmd command. Before you run the command, stop IBM Tivoli Directory Server. After you issue the idscfgsuf command, you can restart the Directory Server. Follow these steps: 1. Enter the following command: net stop idsslapd-ldapdb2 2. Enter the following command: idscfgsuf -s o=ibm,c=us 3. To restart the Directory Server, enter: net start idsslapd-ldapdb2 4. Now import the ldif file into the directory. Enter the following command: idsldapadd -D cn=root -w tivoli -i newsample.ldif Example: B-2 Defining a new suffix adding adding adding adding adding adding adding adding adding adding adding adding o=IBM, adding adding adding adding new entry new entry new entry new entry new entry new entry new entry new entry new entry new entry new entry new entry c=US new entry new entry new entry new entry o=IBM, c=US ou=Austin, o=IBM, c=US ou=In Flight Systems, ou=Austin, o=IBM, c=US ou=Home Entertainment, ou=Austin, o=IBM, c=US ou=Groups, o=IBM, c=US cn=Bowling team, ou=Groups, o=IBM, c=US ou=Widget Division, ou=Austin, o=IBM, c=US cn=Mary Burnnet, ou=Widget Division, ou=Austin, o=IBM, c=US cn=David Campbell, ou=Widget Division, ou=Austin, o=IBM, c=US cn=James Campbell, ou=Widget Division, ou=Austin, o=IBM, c=US cn=Michael Campbell, ou=Widget Division, ou=Austin, o=IBM, c=US cn=Michael Campbell+postalcode=4609, ou=Widget Division, ou=Austin, cn=Bob Campbell, ou=In Flight Systems, ou=Austin, o=IBM, c=US cn=Bonnie Daniel, ou=Widget Division, ou=Austin, o=IBM, c=US cn=Brenda England, ou=Widget Division, ou=Austin, o=IBM, c=US cn=David Delbert, ou=Widget Division, ou=Austin, o=IBM, c=US Appendix B. Modifying the Identity Manager Express LDAP adapter 265 adding adding adding adding adding adding adding adding adding adding adding adding adding adding adding adding adding adding adding adding adding adding adding adding adding adding adding adding adding adding adding adding adding adding new new new new new new new new new new new new new new new new new new new new new new new new new new new new new new new new new new entry entry entry entry entry entry entry entry entry entry entry entry entry entry entry entry entry entry entry entry entry entry entry entry entry entry entry entry entry entry entry entry entry entry cn=Al Edwards, ou=Widget Division, ou=Austin, o=IBM, c=US cn=Arthur Edwards, ou=Widget Division, ou=Austin, o=IBM, c=US cn=Curtis Edwards Jr, ou=Widget Division, ou=Austin, o=IBM, c=US cn=Cynthia Flowers, ou=Home Entertainment, ou=Austin, o=IBM, c=US cn=Doug Edwards, ou=Home Entertainment, ou=Austin, o=IBM, c=US cn=Jeffrey James, ou=Home Entertainment, ou=Austin, o=IBM, c=US cn=Ron Edwards, ou=Home Entertainment, ou=Austin, o=IBM, c=US cn=Jerry Chevy, ou=Home Entertainment, ou=Austin, o=IBM, c=US cn=Marvin McGee, ou=Home Entertainment, ou=Austin, o=IBM, c=US cn=Marshall Riely, ou=Home Entertainment, ou=Austin, o=IBM, c=US cn=James Giliam, ou=Home Entertainment, ou=Austin, o=IBM, c=US cn=Al Garcia, ou=Home Entertainment, ou=Austin, o=IBM, c=US cn=Ben Garcia Jr, ou=Home Entertainment, ou=Austin, o=IBM, c=US cn=Becky Garcia, ou=In Flight Systems, ou=Austin, o=IBM, c=US cn=Maria Garcia, ou=In Flight Systems, ou=Austin, o=IBM, c=US cn=Bob Garcia, ou=Austin, o=IBM, c=US cn=Ricardo Garcia, ou=Austin, o=IBM, c=US cn=Amy Nguyen, ou=In Flight Systems, ou=Austin, o=IBM, c=US cn=James Nguyen, ou=In Flight Systems, ou=Austin, o=IBM, c=US cn=Henry Nguyen, ou=Austin, o=IBM, c=US cn=Kyle Nguyen, ou=Austin, o=IBM, c=US cn=Wayne Nguyen, ou=Austin, o=IBM, c=US cn=Jason Li, ou=In Flight Systems, ou=Austin, o=IBM, c=US cn=Melinda Charles, ou=In Flight Systems, ou=Austin, o=IBM, c=US cn=Bill Keller Jr., ou=In Flight Systems, ou=Austin, o=IBM, c=US cn=Cynthia Smith, ou=In Flight Systems, ou=Austin, o=IBM, c=US cn=Donald Sinclar, ou=In Flight Systems, ou=Austin, o=IBM, c=US cn=Ben Catu, ou=In Flight Systems, ou=Austin, o=IBM, c=US cn=Eddie Catu, ou=In Flight Systems, ou=Austin, o=IBM, c=US cn=Jesse Catu, ou=In Flight Systems, ou=Austin, o=IBM, c=US cn=Joe Simms, ou=In Flight Systems, ou=Austin, o=IBM, c=US cn=Judy Simms, ou=In Flight Systems, ou=Austin, o=IBM, c=US cn=Linda Carlesberg, ou=Austin, o=IBM, c=US cn=Robert Dean, ou=In Flight Systems, ou=Austin, o=IBM, c=US The directory is now ready for use with the following configuration scenario. You can use an LDAP browser or the ldapsearch command to view some of the directory entries. For example: ldapsearch -D cn=root -w tivoli -b ou=austin,o=ibm,c=us objectclass=ODIperson 266 Deployment Guide Series: IBM Tivoli Identity Manager Express 4.6 Scenario assumptions The directory information provided in this Directory Server scenario makes the following assumptions: The suffix is o=ibm, c=us, and the naming context is o=ibm, c=us. The objectclass for a user entry is ODIperson, which inherits the inetOrgPerson objectclass. There is a custom attribute that has to be provisioned, passportNumber. The RDN for user entry is cn. The group objectclass is GroupOfNames. Customizing the LDAP adapter Now that you have all the necessary background information, in this section, we start to describe the steps to customize the adapter to match our Directory Server scenario. Extracting the adapter configuration jar file All the files that are required for the LDAP adapter are packaged into one jar file, LDAPProfile.jar. You can find the jar file on the Identity Manager Express Server in the directory C:\Program Files\ibm\itim\itdi\install\adapters. Extract all the files in the jar file by running the following command: jar xvf LdapProfile.jar Example B-3 shows the output. Example: B-3 Extracting the files in the jar file C:\Program created: inflated: created: inflated: inflated: inflated: inflated: inflated: inflated: inflated: inflated: Files\ibm\itim\itdi\install\adapters>jar xvf LdapProfile.jar META-INF/ META-INF/MANIFEST.MF LdapProfile/ LdapProfile/CustomLabels.properties LdapProfile/erLDAPRMIService.xml LdapProfile/erLDAPUserAccount.xml LdapProfile/LDAPAdd.xml LdapProfile/LdapAL.xml LdapProfile/LDAPDelete.xml LdapProfile/LDAPModify.xml LdapProfile/LDAPSearch.xml Appendix B. Modifying the Identity Manager Express LDAP adapter 267 inflated: inflated: inflated: extracted: LdapProfile/LDAPTest.xml LdapProfile/schema.dsml LdapProfile/service.def LdapProfile/tmp38611.tmp The files are extracted to the directory LdapProfile. Customizing the schema files The first change that you have to make is to support the objectclass of ODIPerson for the directory entries. You have to update the following two files: schema.dsml service.def 1. In the schema.dsml file, change the objectclass used for the erLdapUserAccount class. In this case, change iNetOrgPerson to ODIperson, as shown in Example B-4. Example: B-4 Changing the schema.dsml file <!-- ******************************************************** --> <!-- erLDAPUserAccount Class --> <!-- ******************************************************--> <class superior="ODIPerson"> <name>erLDAPUserAccount</name> <description>Class representing LDAP RMI account</description> <object-identifier>1.3.6.1.4.1.6054.3.139.1.1</object-identifier> <attribute ref="eruid" required="true" /> <attribute ref="erpassword" required="false" /> <attribute ref="erLdapGroupName" required="false" /> <attribute ref="erAccountStatus" required="false" /> <attribute ref="erLdapContainerName" required="false" /> </class> Note: In this example, we use one directory for the provisioning target schema and the Identity Manager Express schema. Because we are using the same directory for both the attribute passportnumber and the objectclass ODIPerson, we need to define it only once. If the provisioning target is on other systems, then you have to define the attribute passportnumber and objectclass ODIPerson in the schema.dsml file. You can add the passportnumber attribute in the attribute section, and then the objectclass ODI Person in the objectclass section. 268 Deployment Guide Series: IBM Tivoli Identity Manager Express 4.6 2. Modify the service.def file to change the user objectclass override parameter as follows: a. Locate the definition for the LDAPAdd AssemblyLine. b. Change the tag userOClassoverrride to read: <default> ODIPerson inetorgperson organizationalperson person top </default> Figure B-7 on page 270 shows a screen capture of the snippet location within the service.def file. Note: This change is required for all AssemblyLines defined in service.def. In this case, there are five AssemblyLines: LDAPAdd, LDAPModify, LDAPDelete, LDAPSearch, and LDAPTest. You have to change the default to include ODIperson in five places, once for each AssemblyLine. Here is an example for both: <!-- ******************************************************** --> <!-- custom attribute passportNumber --> <!-- ******************************************************** --> <attribute-type single-value = "true" > <name>passportnumber</name> <description>custom attribute for LDAP Adapter</description> <object-identifier>1.3.6.1.4.1.6054.3.139.2.9</object-identifier> <syntax>1.3.6.1.4.1.1466.115.121.1.15</syntax> </attribute-type> <!-- ****************************************************** --> <!-- ODI Person Class --> <!-- ****************************************************** --> <class superior="inetorgperson"> <name>ODIPerson</name> <description>Class representing ODI Person LDAP Account</description> <object-identifier>1.3.6.1.4.1.6054.3.139.1.15</object-identifier> <attribute ref = "passportnumber" required = "false" /> </class> Appendix B. Modifying the Identity Manager Express LDAP adapter 269 Figure B-7 service.def snippet Make this change in the remaining four sections. Configuring the AssemblyLines The next set of changes require you to launch the IBM Tivoli Directory Integrator Configuration Editor. You can find the Configuration Editor in the directory c:\Program Files\ibm\itim\itdi\home. There is an AssemblyLine for each of the Adapter operations: LDAPAdd, LDAPModify, LDAPDelete, LDAPSearch, and LDAPTest. The LDAP adapter defaults to using the attributes defined for the iNetOrgPerson schema. The custom object class of ODIperson defines one additional attribute, passportNumber. For the LDAPAdd, LDAPSearch, and LDAPModify AssemblyLines, add the passportNumber attribute to the attribute mapping in the AssemblyLine. We do not have to modify the LDAPDelete or LDAPTest AssemblyLine. 270 Deployment Guide Series: IBM Tivoli Identity Manager Express 4.6 Launch the Configuration Editor, ibmditk.bat, as shown in Figure B-8. Figure B-8 Directory Integrator Configuration Editor For the Add, Search, and Modify AssemblyLines, add the attribute to the mapping in the AssemblyLine. Configuring the LDAPSearch AssemblyLine Start with modifying the LDAPSearch AssemblyLine. The Search AssemblyLine is used for a reconciliation operation. 1. Select File → Open and navigate to C:\Program Files\ibm\itim\itdi\install\adapters\LdapProfile. Select the LDAPSearch.xml configuration file, as shown in Figure B-9. Figure B-9 Opening the LDAPSearch AssemblyLine Appendix B. Modifying the Identity Manager Express LDAP adapter 271 2. Expand the AssemblyLines container in the left pane. Click the LDAPSearch AssemblyLine. The configuration of the AssemblyLine is displayed in the right pane, as shown in Figure B-10. Figure B-10 LDAPSearch AssemblyLine overview 272 Deployment Guide Series: IBM Tivoli Identity Manager Express 4.6 3. In the Feeds section, click the conLDAPUser connector to display the Connector configuration. Click the Config… tab. Add passportNumber to the list of Return attributes by typing it in at the end of the list, as shown in Figure B-11. Figure B-11 Configuring the LDAPSearch AssemblyLine Appendix B. Modifying the Identity Manager Express LDAP adapter 273 4. Click the Input Map tab. Click the add icon to add the new attribute passportNumber to the Work Attribute list, as shown in Figure B-12. Figure B-12 Adding the new attribute to the work attribute list 274 Deployment Guide Series: IBM Tivoli Identity Manager Express 4.6 5. Ensure that the mapping is automatically performed between the newly added attributes in the work entry to connector entry. You can check this by clicking the passportNumber attribute in the work entry. This is mapped to passportNumber in the connector entry, as shown in Figure B-13. Figure B-13 Checking the mapping between the newly added attributes This completes the changes required for the LDAPSearch AssemblyLine. 6. From the menu, click File → Save and File → Close. Appendix B. Modifying the Identity Manager Express LDAP adapter 275 Configuring LDAPAdd AssemblyLine Now modify the LDAPAdd AssemblyLine. 1. Select File → Open and navigate to C:\Program Files\ibm\itim\itdi\install\adapters\LdapProfile. Select the LDAPAdd.xml configuration file. 2. Expand the AssemblyLines container and select the LDAPAdd AssemblyLine. The AssemblyLine configuration is displayed, as shown in Figure B-14. Figure B-14 Configuring the LDAPAdd AssemblyLine 276 Deployment Guide Series: IBM Tivoli Identity Manager Express 4.6 3. Click the Call/Return tab. Select the add icon to add the new attribute passportNumber to the Call/Return Initial Work Entry (IWE) attribute list, as shown in Figure B-15. Figure B-15 Adding the new attribute to the Call/Return Initial Work Entry attribute list Appendix B. Modifying the Identity Manager Express LDAP adapter 277 4. Select the Data Flow tab. a. Click the conLDAPUser connector in the Flow container. b. Click the Output Map tab of the conLDAPUser connector, as shown in Figure B-16. Figure B-16 Configuring the LDAPAdd AssemblyLine (continued) c. Select passportNumber from the Work Entry list on the left column and drag it to the Connector Attribute list column to make the attribute available to our Output Map, as shown in Figure B-17. Figure B-17 Adding passportNumber to the Connector Attribute list 278 Deployment Guide Series: IBM Tivoli Identity Manager Express 4.6 You can now see passportNumber in the Connector Attribute list, as shown in Figure B-18. Figure B-18 Connector Attribute list showing passportNumber This completes the modification to the LDAPAdd AssemblyLine. 5. From the menu, click File → Save and File → Close. Configuring the LDAPModify AssemblyLine Follow the same set of steps that you performed in the previous section for the LDAPAdd AssemblyLine for the LDAPModify AssemblyLine also. Open the LDAPModify AssemblyLine and perform steps 1 through 5 of the LDAPAdd AssemblyLine to complete the AssemblyLine customizations required. Appendix B. Modifying the Identity Manager Express LDAP adapter 279 The final screen looks similar to Figure B-19. Figure B-19 LDAPModify AssemblyLine configuration When finished, close the IBM Tivoli Directory Integrator Configuration Editor. Repackaging the adapter bundle Now repackage the adapter bundle file and import it into the Identity Manager Express server configuration. 1. On a command line, make sure that you are in the directory C:\Program Files\ibm\itim\itdi\install\adapters. Create an updated jar file with all files in the LdapProfile directory by running the following command: jar uvf LdapProfile.jar LdapProfile 2. Log on to Identity Manager Express as a user with system administration privileges, such as itim manager. 280 Deployment Guide Series: IBM Tivoli Identity Manager Express 4.6 3. Navigate to Configure System → Manage Service Types, as shown in Figure B-20. Click on the Import… button in the work area. Figure B-20 Managing service types in Identity Manager Express 4. In the Manage Service Types pane (see Figure B-21): a. Click Browse… to select the updated jar file: C:\Program Files\ibm\itim\itdi\install\adapters\LdapProfile.jar. b. Click OK to continue. c. Close the window. Figure B-21 Importing service type Appendix B. Modifying the Identity Manager Express LDAP adapter 281 5. Restart the Identity Manager Express Adapter service so that the new changes are available. Go to the Windows Services dialog shown in Figure B-22. Click either the Restart link or the restart icon on the toolbar. Figure B-22 Restarting the Identity Manager Express Adapter service Customizing the forms You have to add the new attribute passportNumber to the LDAP account form so that it is available when a provisioning request is made. As mentioned at the beginning of this appendix, there is more than one user container in the directory, ou=Austin, ou=Home Entertainment, ou=Flight Systems, and ou=Widget Division (see Figure B-23). Figure B-23 Directory tree 282 Deployment Guide Series: IBM Tivoli Identity Manager Express 4.6 A flag is set on the form to make this entry a required entry so that the user gets created in the right container. A user with system administration privileges has to customize the form. You must still be logged in as itim manager. 1. Navigate to Configure System → Design Forms, as shown in Figure B-24. The forms designer is started. Expand the Account folder and then select the LDAP account form. Figure B-24 LDAP form design Appendix B. Modifying the Identity Manager Express LDAP adapter 283 2. Click the $tag.ldap.User tab to set focus on this tab. Click the passportnumber attribute in the Attribute List in the upper right corner, as shown in Figure B-25. Figure B-25 Adding passportnumber attribute to $tag.ldap.User 3. These are the attributes that are available but are not currently being displayed on the form. a. Double-click the attribute name and it moves to the $tag.ldap.User tab. It is now displayed on the form. b. Move the attribute passwordnumber up in the list using the that it appears just below the description attribute, as shown in Figure B-26. Figure B-26 Moving the passwordnumber attribute 284 Deployment Guide Series: IBM Tivoli Identity Manager Express 4.6 icon so 4. If you want to remove attributes that are not being provisioned, or change the number of tabs or information about the tab, you can do so from the forms designer. For example, delete a UID attribute, as shown in Figure B-27. Select the $uid attribute and click the delete icon on the toolbar. This deletes the attribute from the form. Figure B-27 Deleting the $uid attribute 5. Remove the Display Name attribute also. Appendix B. Modifying the Identity Manager Express LDAP adapter 285 6. Make the group container name a mandatory attribute. a. Select $erldapcontainername in the attribute list, as shown in Figure B-28. b. In the right lower corner, select the Constraint tab in the Properties table. Select the Required check box. Figure B-28 Making the Group Container name a mandatory attribute For this appendix, there are no more changes to make right now. 7. Click the Save icon on the toolbar to save the form changes, as shown in Figure B-29. a. Click OK to return to the forms designer. b. Click Close to leave the forms designer. Figure B-29 Saving the form changes 286 Deployment Guide Series: IBM Tivoli Identity Manager Express 4.6 Defining and testing the LDAP service Before you can test the customizations that you just performed, you have to define a service for the LDAP adapter in Identity Manager Express. 1. Navigate to the Manage Services task in the Portfolio menu shown in Figure B-30. Click the Create button to define a new service. Figure B-30 Defining the service 2. On the second page, shown in Figure B-31, select the LDAP profile Service Type. Click Next> to continue. Figure B-31 Selecting the LDAP profile service type Appendix B. Modifying the Identity Manager Express LDAP adapter 287 3. Complete the form in Figure B-32 using the following list: – – – – – – – – Name: ODI LDAP Directory User base DN: ou=Austin,o=ibm,c=us Group base DN: ou=Groups,o=ibm,c=us Directory server location: ldap://Linux_Target:389 Administrator name: cn=root Administrator password: tivoli RDN Attribute: select cn from the list Owner: Dan Meyers Figure B-32 Defining the service: Filling the details 4. When the form is complete, test the definition by clicking the Test Connection button. The test should return a successful connection, as shown in Figure B-33. Figure B-33 Successful connection message 288 Deployment Guide Series: IBM Tivoli Identity Manager Express 4.6 Note: If the connection is not successful, check that you have completed all the fields on the form correctly. 5. Click Next > to go to the Reconciliation page. 6. Select the Perform a reconciliation now check box, as shown in Figure B-34. Click the Finish button to run the reconciliation. Figure B-34 Performing the reconciliation 7. Check the status of the reconciliation request, as shown in Figure B-35. Figure B-35 Checking the reconciliation request status 8. The reconciliation is a success. Now check the service to view any accounts that are discovered. Click the Close link twice to return to the list of services. Appendix B. Modifying the Identity Manager Express LDAP adapter 289 9. Click the Refresh button so that the new service name is displayed, as shown in Figure B-36. To get the operation list, click the arrow icon next to the ODI LDAP Directory service. Select the Accounts... menu item. Figure B-36 New service name displayed 290 Deployment Guide Series: IBM Tivoli Identity Manager Express 4.6 10.Figure B-37 shows a list of accounts for this service. Click the Refresh button to view the list of accounts on the LDAP Directory. Select one of the entries to view the contents. In this case, we select Al Edwards. Figure B-37 Account overview for new service Figure B-38 shows the Al Edwards account details. Figure B-38 Account information details Appendix B. Modifying the Identity Manager Express LDAP adapter 291 Defining an identity policy Initially there is a global default identity policy in place that creates the account user ID based on first initial plus last name. The LDAP account entry requires that we set the user ID to the RDN of the entry; that is, in our case, cn or Full name is required. You can see this by looking at the entry for Al Edwards. Now we create an identity policy for the service to enforce this policy. We also create a user to test this. 1. Navigate to Manage Policies → Manage Identity Policies. Click the Create button, as shown in Figure B-39. Figure B-39 Defining an identity policy 2. Provide a name for the policy, and click the Services link, as shown in Figure B-40. Figure B-40 Adding information about the identity policy 292 Deployment Guide Series: IBM Tivoli Identity Manager Express 4.6 3. Click the Add button and select the ODI LDAP Directory service, as shown in Figure B-41. Figure B-41 Adding ODI LDAP directory service 4. Click the Rule link. Set the user ID to be the Full name in the Existing case, as shown in Figure B-42. Click OK to complete the definition of the identity policy. Figure B-42 Setting the User ID Appendix B. Modifying the Identity Manager Express LDAP adapter 293 Setting account defaults for LDAP service To make the provisioning request easier, add some account defaults to the ODI LDAP Directory Service. 1. In the Manage Services list of services, click the arrow icon for the ODI LDAP Directory Service, as shown in Figure B-43. Select Account defaults… from the menu. Figure B-43 Setting account defaults 2. For the e-mail address, First name, Full name, and Last name attributes, add the corresponding account default from the Identity Manager Express user attribute. We described how to create account defaults previously. Here is a review. a. Select Manage Services → Manage Account Defaults → Select an Account Attribute page, and click the Add… button. b. Select the attribute you want to set the default for, for example, e-mail address. Click the Add Default… button, shown in Figure B-44. c. On the next page, complete the information for the type of default you want to add. If you want to provide a default from an existing user attribute, select the Search button to select the attribute. d. When you have completed specifying the account defaults, click OK to save the changes. 294 Deployment Guide Series: IBM Tivoli Identity Manager Express 4.6 Figure B-44 Setting the account defaults Your account default definitions must look similar to Figure B-45. Figure B-45 Account default definitions Now we can test to create a new ODI LDAP directory account for an existing user. Appendix B. Modifying the Identity Manager Express LDAP adapter 295 Test adding a new LDAP account To test add a new LDAP account, perform the following steps: 1. After you add the account defaults, you see the page displayed in Figure B-46. Click the link Request an account for this service. Figure B-46 Test adding an LDAP account 2. We now create an account for Dan Meyers, as shown in Figure B-47. Figure B-47 Creating an account 296 Deployment Guide Series: IBM Tivoli Identity Manager Express 4.6 3. Complete the account form with some details about Dan Meyers, as shown in Figure B-48. Figure B-48 Adding information 4. Click Continue to set a password and create the account. Then click Submit to create the account. Appendix B. Modifying the Identity Manager Express LDAP adapter 297 5. Select the View the status of the request link. The status indicates success, as shown in Figure B-49. Figure B-49 Success status This concludes our discussion about how to customize the LDAP adapter. 298 Deployment Guide Series: IBM Tivoli Identity Manager Express 4.6 C Appendix C. Enhancing Identity Manager Express environment with Tivoli Directory Integrator IBM Tivoli Directory Integrator is an IBM product that provides data integration. It is a toolkit that allows you to build connections from one data source to another. It also allows you to move, transform, synchronize, and update data. IBM Tivoli Directory Integrator manages the technicalities of connecting to and interacting with the various data sources that you want to integrate, abstracting away the details of their application programming interfaces (APIs), transports, protocols, and formats. Instead of focusing on data, IBM Tivoli Directory Integrator enables you to concentrate on the transformation, filtering, and other business logic required to perform each exchange. For more information about IBM Tivoli Directory Integrator, consult the product documentation or refer to Enterprise Security Architecture Using IBM Tivoli Security Solutions, SG24-6014, and Robust Data Synchronization with IBM Tivoli Directory Integrator, SG24-6164. © Copyright IBM Corp. 2006. All rights reserved. 299 In this appendix, we explain two sample configurations using Directory Integrator: Populating the password dictionary used by the password policy Creating a custom identity feed from a DB2 database table Populating the password dictionary One of the features of the Identity Manager Express password policy is that you can create a dictionary for a password policy rule, which rejects the use of certain words as passwords. In this section, we describe how to use Directory Integrator to build the password dictionary. Password dictionary The password dictionary used by the Identity Manager Express password policy is stored in the Identity Manager Express Lightweight Directory Access Protocol (LDAP) directory. There is one directory entry for each word that you want to exclude from use as a user's password. The word entry is not case-sensitive. When the rule evaluates the password against the password dictionary, it is not case-sensitive; for example, TUESday matches tuesday. In the reference guide for Identity Manager Express1, the format of the dictionary word entry is described in LDAP Data Interchange Format (LDIF) syntax. Example C-1 shows how to define a word entry in LDIF syntax. Example: C-1 Defining a word entry in the LDIF syntax dn: erword=test,erdictionaryname=password, ou=itim, dc=com erWord: test objectclass: top objectclass: erDictionaryItem The dn of the entry is the first line. The erWord attribute defines the word that is to be disallowed. In this case, it is the word test. The entry must be of objectclass type erDictionaryItem. 1 300 You can find this manual at: http://publib.boulder.ibm.com/infocenter/tivihelp/v5r1/index.jsp Deployment Guide Series: IBM Tivoli Identity Manager Express 4.6 You can build an LDIF file such as the previous one for every word that you want to exclude. Alternatively, you can use Directory Integrator to perform this task for you. The example Directory Integrator configuration file (password_dictionary.xml and password.txt), which you can download as additional material to this book, assumes that you are starting with a text file that contains one word per line of the file. In this case, we created a file, password.txt, using Notepad. There is one line per word entry. Figure C-1 shows the contents of the password.txt file. Figure C-1 The password.txt file Building the AssemblyLine You can find the IBM Tivoli Directory Integrator Configuration Editor in the C:\Program Files\ibm\itim\itdi\home directory for Windows. 1. To start the Configuration Editor, launch the ibmditk.bat file. 2. After the configuration editor launches, open the sample configuration file provided with this book, password_dictionary.xml, as shown in Figure C-2. Browse to the directory where you saved the configuration file and select it for use. Appendix C. Enhancing Identity Manager Express environment with Tivoli Directory Integrator 301 Figure C-2 Opening the Directory Integrator AssemblyLine 3. Examine the main component of the configuration file, the AssemblyLines. a. Expand the AssemblyLines container to show the configured AssemblyLine, as shown in Figure C-3. b. There is one AssemblyLine in this configuration file, populate_password_dictionary. Click the AssemblyLine name and the content of the AssemblyLine is displayed in the work area on the right. You can see the two components or connectors to this AssemblyLine. Under Feeds, or sources of data, there is the words connector, which reads our data file, password.txt. Under Flow is the connector, which produces the output to the LDAP directory, dictionary. 302 Deployment Guide Series: IBM Tivoli Identity Manager Express 4.6 Figure C-3 Directory Integrator Configuration Editor c. Click the words connector and the right pane reveals the details shown in Figure C-4. Figure C-4 The words connector configured to access the password.txt file Appendix C. Enhancing Identity Manager Express environment with Tivoli Directory Integrator 303 The words connector is a file system connector. This connector reads from a file. There is also a parser configured for the connector, as shown in Figure C-5. A parser interprets the data in the byte stream. Figure C-5 The words file system connector configured with line reader parser 304 Deployment Guide Series: IBM Tivoli Identity Manager Express 4.6 The Line Reader parser reads single lines of data and returns the line contents in a single attribute, as shown in Figure C-6. Figure C-6 Work attribute line A single work attribute line is defined. It contains the value for each line that is read in the file. This work attribute is passed to the output connector, dictionary, because it is the main piece of information required to update the password dictionary. The connector is set to Iterator mode. This means that it iterates or reads each line of the file until it reaches the end. That is why it appears in the Feeds section of the AssemblyLine. After each line is read, control is passed to the next connector. Appendix C. Enhancing Identity Manager Express environment with Tivoli Directory Integrator 305 As you can see, connectors are the building blocks of AssemblyLines. The output connector is the dictionary connector, as shown in Figure C-7. It is displayed in the Flow section of the AssemblyLine. This connector is an LDAP Connector and uses the LDAP protocol to write to the Identity Manager Express LDAP directory. Figure C-7 The dictionary connector is an LDAP connector In the Configuration section of the connector, we specify parameters such as: The URL used to connect to the directory An authorized user ID who has read and write privileges to the directory The search base or starting point of where to read and write in the directory. Here we specify the base dn for the dictionary attributes. 306 Deployment Guide Series: IBM Tivoli Identity Manager Express 4.6 The output map of the dictionary connector (Figure C-8) shows the information that is actually written to the Identity Manager Express directory. Figure C-8 Output map of the LDAP connector dictionary Figure C-8 shows three attributes: $dn This attribute uniquely defines the entry. Select the Advanced Mapping option to specify the following script: work.getstring(“line”); ret.value=”erword=” + word + “,erdictionaryname=password,ou=itim,dc=com Appendix C. Enhancing Identity Manager Express environment with Tivoli Directory Integrator 307 erWord Set the erWord attribute to take the content of the work entry attribute line. See Figure C-9. Figure C-9 Output map of the LDAP connector dictionary: erWord attribute objectclass In the custom script setting for this attribute, define a multi-value attribute that specifies the objectclass of the new entry, as shown in Figure C-10. Figure C-10 Output map of the LDAP connector dictionary: objectclass attribute You can add additional logic to your connector processing. In our case, we have added some logging and error handling to the dictionary connector. Click the Hooks tab to view the breakpoints for additional processing. For example, in the After Add Hook, which is executed when an entry is added to the output connector target, the following script generates a message to the console log: task.logmsg(“*** Dictionary word “ + work.getString(“line”) + “ was added ***”); 308 Deployment Guide Series: IBM Tivoli Identity Manager Express 4.6 This hook configuration is shown in Figure C-11. Figure C-11 Hooks in the dictionary connector Appendix C. Enhancing Identity Manager Express environment with Tivoli Directory Integrator 309 Running the AssemblyLine To run the AssemblyLine, click the play arrow shown in Figure C-12. Figure C-12 Run the assembly line You can also select the AssemblyLine name and right-click it. This opens the operation menu. The first menu item is run, as shown in Figure C-13. Figure C-13 Selecting the Run option 310 Deployment Guide Series: IBM Tivoli Identity Manager Express 4.6 The console output in Figure C-14 shows the steps that the AssemblyLine is processing. Figure C-14 AssemblyLine output The shaded text in Figure C-14 shows the logging message that we added to the After Add hook. Seven entries are added to the password dictionary. In the following section, we test these words in our password policy rule. Appendix C. Enhancing Identity Manager Express environment with Tivoli Directory Integrator 311 Testing the password policy dictionary We configure a password policy to use the password dictionary. You must be a user who is a member of the system administrator group to be able to configure the password policy. 1. You can find the password policy configuration in the Identity Manager Express menu item Manage Policies → Manage Password Policies in portfolio. In this example, we change the global policy to use a password dictionary. Select the following button to change the global policy. 2. On page two of the Rules tab, select the option Do not allow in dictionary as shown in Figure C-15. Save the change by clicking the OK button. Figure C-15 Managing password policies The change is confirmed as shown in Figure C-16. Figure C-16 Password policy change success 312 Deployment Guide Series: IBM Tivoli Identity Manager Express 4.6 3. Try to change the password for one of the accounts of the user that you are logged in as. Use the Change My Passwords link in the portfolio. Click the View password strength rules link to display the password rules, as shown in Figure C-17. Figure C-17 Changing the My Password page The option Do not allow in dictionary is selected. Try to change the password to one of the words stored in the dictionary, for example, TUESDAY. In our case, the password change is rejected because the word we tried to use is in the password dictionary, as shown in Figure C-18. Figure C-18 Error message for non-conforming password Appendix C. Enhancing Identity Manager Express environment with Tivoli Directory Integrator 313 This is just one way that you can use IBM Tivoli Directory Integrator to accelerate your Identity Manager Express implementation. In the following section, we describe how to use IBM Tivoli Directory Integrator to provide a custom identity feed. Creating a custom identity feed In this section, we provide information about and a set of instructions for creating a custom identity feed for Identity Manager Express using IBM Tivoli Directory Integrator. Although Identity Manager Express provides several built-in methods to provide identity feeds, there can be circumstances in the environment that require you to build a custom data feed using Directory Integrator. Some of the reasons why you might have to build a custom Identity feed are: Data source format for the identity feed is not one of the built-in data formats An example of this might be that your identity data is contained in a database table or view. Additional attributes have to be mapped that are not part of the default LDAP or Active Directory attribute mapping For example, the Active Directory schema is extended with custom attributes and these are required for the Identity Manager Express user. A second example is that the data source is LDAP, but the object class is not inetOrgPerson, and these attributes require custom mapping to the Identity Manager Express user inetOrgPerson schema. You want to use Directory Integrator to suspend the Identity Manager Express users and their associated accounts based on the identity feed data source information. For example, you might have a human resources (HR) data source that keeps track of the employee or contractor status. If the status is changed to inactive or terminated, you might want to suspend the persons in Identity Manager Express so that they can no longer log on to Identity Manager Express and manage their accounts. In addition, you can suspend the accounts owned by these persons. In the Identity feed examples that we covered previously, Identity Manager Express initiated the pull of data from the target data source (CSV, AD, LDAP, and so on). You can also use IBM Tivoli Directory Integrator to write to the Identity Manager Express application directly. That is, the Directory Integrator server creates, updates, or deletes Identity Manager Express user information directly and does not use the reconciliation feature. 314 Deployment Guide Series: IBM Tivoli Identity Manager Express 4.6 Directory Integrator initiates updates to Identity Manager Express user information by using the Directory Integrator Java Naming and Directory Interface™ (JNDI) connector to connect directly to Identity Manager Express as part of an AssemblyLine. This method can be effective when you want to have more flexibility in making the updates to Identity Manager Express or if deletions are required. Your AssemblyLine can also be triggered by some change event on your data source using the change detection features of Directory Integrator, providing near real-time updates to Identity Manager Express user information. You can use the Directory Integrator to schedule the updates to run at a given time (for example, every night at midnight). In the following section, we walk you through two examples of using the JNDI interface to Identity Manager Express. These examples cover adding and updating Identity Manager Express user information. The scenario setup in this book In this section, we describe how to set up a sample DB2 employee database environment to demonstrate the capabilities of custom Directory Integrator based identity feeds. Use this setup only for demonstration purposes. Creating the DB2 database The files included in this book (refer to Appendix D, “Additional material” on page 343) contain schema information and the data to create the sample database. You can use the DB2 environment on your Identity Manager Express server to store this database. You have to create the sample database, import the tables and data, and then examine the data. To create the database, perform the following steps: 1. As an administrator, start the DB2 command environment, as shown in Figure C-19. Figure C-19 Starting the DB2 command environment Appendix C. Enhancing Identity Manager Express environment with Tivoli Directory Integrator 315 2. In the DB2 command window, type the following command to create the database: db2 create database Sample using codeset UTF-8 territory US The sample output from running this command is shown in Example C-2. Example: C-2 Sample output of the db2 create database command C:\Program Files\IBM\SQLLIB\BIN>db2 create database Sample using codeset UTF-8 territory US DB20000I The CREATE DATABASE command completed successfully. C:\Program Files\IBM\SQLLIB\BIN> Importing the schema The table and data information are stored in db2move format in a file SampleDB.zip. 1. DB2move is a utility that you can use to move databases from one system to another. Extract the SampleDB.zip file into a directory such as c:\examples. The files extracted from SampleDB.zip are stored in the directory SampleDB. 2. This directory contains the contents of an export of the table ddl and data that DB2move created. Use the db2move command to import this information into your Sample database. Change your current directory in the db2command window to the directory where you extracted SampleDB.zip. Issue the following command: db2move sample import Note: If you get the following error, you have to set the db2codepage variable before you run the db2move command. * IMPORT: table Administrator."DEPARTMENT" ***ERROR -3525. Check message file tab1.msg! *** SQLCODE: -3525 - SQLSTATE: *** SQL3525N The "CODEPAGE" option is incompatible with the "LOBSINFILE" option. Use the following command: db2set db2codepage=1208 After you run the db2move command, reset the db2codepage variable by setting it to a null string: db2set db2codepage= 316 Deployment Guide Series: IBM Tivoli Identity Manager Express 4.6 The output of the db2move command shows that two tables are successfully imported. See Example C-3. Example: C-3 Output of the db2move command C:\examples\sampleDB>db2move sample import ***** DB2MOVE ***** Action: IMPORT Start time: Sun Jun 25 08:50:51 2006 Connecting to database SAMPLE ... successful! Server V8.2.3 * IMPORT: table Administrator.DEPARTMENT -Rows read: 9 -Inserted: 9 -Rejected: 0 -Committed: 9 * IMPORT: table Administrator.EMPLOYEE -Rows read: 32 -Inserted: 32 -Rejected: 0 -Committed: 32 Disconnecting from database ... successful! End time: Sun Jun 25 08:50:52 2006 Server: DB2 Common Displaying the data To look at the SAMPLE database, use the DB2 Control Center application. 1. Select Start → Programs → IBM DB2 → General Administration Tools → Control Center, as shown in Figure C-20. Figure C-20 DB2 Control Center Appendix C. Enhancing Identity Manager Express environment with Tivoli Directory Integrator 317 2. If prompted, select the Advanced display option, as shown in Figure C-21. Figure C-21 DB2 Control Center: Selecting the advanced view 3. Expand the SAMPLE database folder and click the Tables container, as shown in Figure C-22. Figure C-22 DB2 Control Center: Selecting the table container 4. Right-click the EMPLOYEE table and select Open..., as shown in Figure C-23. 318 Deployment Guide Series: IBM Tivoli Identity Manager Express 4.6 Figure C-23 DB2 Control Center: Opening the EMPLOYEE table The contents of the EMPLOYEE table are displayed, as shown in Figure C-24. The database setup is now complete and you can begin working through the scenario examples. Figure C-24 DB2 Control Center: Table view Appendix C. Enhancing Identity Manager Express environment with Tivoli Directory Integrator 319 Use the DB2 Control Center application in the second scenario to make changes to the EMPLOYEE table data. Scenario one: Adding users to Identity Manager Express The requirement in this scenario is to build an AssemblyLine, which looks for all employees in the DB2 SAMPLE database and adds them to Identity Manager Express using the JNDI connector. The following steps show the flow of the AssemblyLine. 1. The input connector configuration selects the rows required for processing. 2. The connector loads the matching records into the connector object. 3. The input attributes are mapped to work object. 4. The next connector in the AssemblyLine, JNDIFeed is called. This connector is configured in AddOnly mode, therefore, it is considered an output connector. Only new records are added to Identity Manager Express. 5. Work attributes are mapped to the output map and the connector passes the data to Identity Manager Express using a JNDI or Directory Services Markup Language v2.0 (DSMLv2) connection. Identity Manager Express receives the DSMLv2 request and creates the user if it does not exist, otherwise an error is returned. Creating the Identity Manager Express service Create a service in Identity Manager Express that the Directory Integrator connector communicates with. 1. Log on to Identity Manager Express as a user with administrator privileges. 2. Navigate to Manage Services and click the Create button in the work area to create the new service, as shown in Figure C-25. Figure C-25 Creating the Identity Manager Express service 320 Deployment Guide Series: IBM Tivoli Identity Manager Express 4.6 3. Select IDI data feed as the Service Type. Click the Next button. 4. Complete the Service Information page (shown in Figure C-26 on page 322) with the information provided in the following list. Click Finish when you have entered the information. – Service name: DB2 Identity Feed – URL: http://itimserver The value of URL is unimportant to the JNDI connector because the service does not contact Directory Integrator. But this is a required attribute for other services. – User ID: agent – Password: agent Note: The Directory Integrator JNDI connector authenticates using the values defined in the service definition. – Naming context: dc=db2feed This is a required attribute and must be in an attribute=value pair format. This must be the same as the naming context defined in the JNDI connector. – Name attribute: cn The name attribute is required and specifies the attribute to use when forming the distinguished names in the search request. Remember to click the Finish button to save the configuration for the service. Appendix C. Enhancing Identity Manager Express environment with Tivoli Directory Integrator 321 Figure C-26 Entering the service information Configuring the AssemblyLine for scenario one Now we work with a sample Directory Integrator configuration file that we built for this scenario. 1. Launch the file to start the Directory Integrator configuration editor, ibmditk.bat, which you can find in the directory C:\Program Files\ibm\itim\itdi\home. Start Directory Integrator and open the configuration file that is included with this book, ITDIFeedScenario.xml. 2. When the configuration file is open, click the AssemblyLine name, TIMXAdd. You can see that there are two connectors defined in the AssemblyLine. Under the Feeds container, you see one input connector, db2connector, and under the Flow container is the output connector JNDItoTIMX. 322 Deployment Guide Series: IBM Tivoli Identity Manager Express 4.6 Figure C-27 shows the two connectors defined in AssemblyLine. Figure C-27 Directory Integrator ITDIFeedScenario AssemblyLine The input connector: db2connector Let us examine the configuration for the input connector, db2connector. 1. Click the connector name and the configuration is displayed in the work area. 2. Notice on the Status line that the connector is set for Iterator mode. This means that it processes all the rows returned by the connector configuration. Click the Config… tab, and then the Connection tab to view the connection details as shown in Figure C-28 on page 325. Note: You have to update this configuration to configure your Identity Manager Express system host name, port, and other parameters accordingly. Let us take a closer look at this configuration. – JDBC URL This specifies the connection to your database system. It is in the form of protocol://hostname:port/database-name. To determine the port that DB2 is listening on for JDBC (TCP) requests, open a db2cmd window and issue the command: db2 get dbm config Appendix C. Enhancing Identity Manager Express environment with Tivoli Directory Integrator 323 A long list of the configuration settings is displayed. Look for the value of SVCENAME, as shown in Example C-4. Example: C-4 Looking for SVCENAME TCP/IP Service name DB2_db2admin (SVCENAME) = Now view the contents of the etc/services file to see what port is used for that service name (see Example C-5). On Windows, etc/services is found in the C:\Windows\system32\driver\etc directory. Example: C-5 Contents of the etc/services file db2c_DB2 DB2_db2admin DB2_db2admini 50000/tcp 50002/tcp 50004/tcp The port setting for our URL is 50002. For example: jdbc:db2://itimserver:50002/SAMPLE – Username The user name to access the database – Password The user's password – Schema The schema the database was created under For this scenario, the user name is Administrator, password is tivoli and the schema is Administrator. – JDBC Driver In this field, we specify the DB2 JDBC Universal driver (Type 4). – SQL Select In this field, you can enter a query that defines what rows are selected for processing. In this example, we have an SQL select statement that joins two tables together. This way we can obtain the department name in the DEPARTMENT table based on the department code in the EMPLOYEE table. 324 Deployment Guide Series: IBM Tivoli Identity Manager Express 4.6 Figure C-28 Directory Integrator ITDIFeedScenario db2connector connector 3. Click the Input Map tab. Click the Connect icon to test the connection and discover the schema, as shown in Figure C-29. Figure C-29 Testing the connection and discovering the schema Appendix C. Enhancing Identity Manager Express environment with Tivoli Directory Integrator 325 4. Click the Play arrow icon to read a row from the database. Examine the input map fields shown in Figure C-30. Figure C-30 Checking the input map fields Notice that only a subset of the attributes is selected to be Work Attributes. These are the attributes that are passed to the next connector, the output connector, JNDItoTIMx. These are the attributes that are required for Identity Manager Express and are added to the output map, as the output connector sends the data to Identity Manager Express for processing. The output connector: JNDItoTIMx Let us examine the configuration for the output connector, JNDItoTIMx. 1. Click the name of the connector in the Flow container to open the JNDI connector configuration. 2. Select the Config… tab, and then the Connection tab. The JNDI connector requires specific configuration entries as shown in Figure C-31 on page 328. Enter the information as shown in the following list. Note: You have to update the URL to configure your Identity Manager Express system host name and port. 326 Deployment Guide Series: IBM Tivoli Identity Manager Express 4.6 The required parameters for the JNDI connector are: – JNDI Driver: com.ibm.dsml2.jndi.DSML2InitialContextFactory This is the name of the java class and is required. – Provider URL: http://hostname:port/enrole/dsml2_event_handler enrole/dsml2_event_handler is a fixed parameter. Use itimserver as your host name and port 80. – Authentication Method: Simple – Login username: agent – Login password: agent The user name and password must match the user name and password entry in the Directory Integrator identity data feed service defined on Identity Manager Express. See “Creating the Identity Manager Express service” on page 320. This is how the JNDI connector authenticates. We defined a Directory Integrator identity feed service called DB2 Identity Feed service in “Creating the Identity Manager Express service” on page 320. The user name for authentication is agent and the password is agent. This service is used for all the JNDI steps. – Name parameter: $dn Must match the dn value on the output map. In this configuration, it is $dn. – Search Base: dc=db2feed Set the Search Base field to the naming context defined in the Identity Manager Express identity feed service. In “Creating the Identity Manager Express service” on page 320, we defined a Directory Integrator identity feed service called DB2 Identity Feed. We defined the naming context as dc=db2feed. Therefore, this is the value to use for the JNDI connector. – Search Filter: (objectclass=*) This is a required value. Appendix C. Enhancing Identity Manager Express environment with Tivoli Directory Integrator 327 Figure C-31 Directory Integrator ITDIFeedScenario JNDItoTIMx connector Examining the output map To examine the output map, perform the following steps: 1. Click the Output Map tab. The output map, shown in Figure C-32, defines the Identity Manager Express user attributes that are defined when the user is created. If you click the Plug icon, you can test the connection to the Identity Manager Express server. The connection must be successful. 328 Deployment Guide Series: IBM Tivoli Identity Manager Express 4.6 Figure C-32 Directory Integrator ITDIFeedScenario output map 2. Examine the connector attributes. Click the eye icon to switch between the Detail, Schema, and List views. You see that some of the attributes use JavaScript™ to define their values, as shown in Figure C-33. This is a powerful feature of Directory Integrator. Figure C-33 Directory Integrator ITDIFeedScenario connector attributes 3. Set the values for $dn, cn, erRoles, objectclass, and mail in the output map. You must set $dn to a specific syntax. Open the advanced mapping for $dn. To do this, click the attribute $dn in the list, then click the icon until the view shown in Figure C-34 is shown. Appendix C. Enhancing Identity Manager Express environment with Tivoli Directory Integrator 329 $dn must have a special setting: ret.value="cn="+work.getString("FIRSTNME")+" "+work.getString("LASTNAME")+","+thisConnector.getConnectorParam("jn diSearchBase"); Append the portion thisConnector.getConnectorParam("jndiSearchBase") to the dn. The value that is returned is the Firstname attribute plus a space plus the Lastname attribute. The values that are assigned and passed to Identity Manager Express for $dn looks like: cn=john smith,dc=db2feed You can click the edit icon to view the JavaScript in Notepad. Figure C-34 Directory Integrator ITDIFeedScenario $dn advanced mapping 4. Look at the JavaScript for the other attributes. – Title: Set to the value of the database field Job field with trailing blanks removed – cn: Set to the value of the database field FIRSTNME plus space plus LASTNAME – erroles: Sets the Identity Manager Express user's group membership based on their title – Givenname: Mapped to the input attribute (work) FIRSTNME – SN: Mapped to the input attribute (work) LASTNAME – Mail: Is set to the first initial plus [email protected] – Objectclass: Sets the objectclass value to erExpressPerson 5. We want to add one additional attribute to the output connector. The attribute is named erpersonstatus. This Identity Manager Express attribute determines whether the user is active (0) or suspended (1). 330 Deployment Guide Series: IBM Tivoli Identity Manager Express 4.6 Click the icon to create a new connector attribute. Name this attribute erpersonstatus, as shown in Figure C-35. Figure C-35 Directory Integrator ITDIFeedScenario: Adding an attribute 6. Map this attribute to the EMPSTAT work attribute. Click the new attribute erpersonstatus in the connector list. The list of work attributes is shown in the schema view in Figure C-36. Map erpersonstatus to EMPSTAT. Figure C-36 Directory Integrator ITDIFeedScenario: Mapping the attribute This completes the definition of the custom Identity Feed AssemblyLine from DB2. Appendix C. Enhancing Identity Manager Express environment with Tivoli Directory Integrator 331 Testing the AssemblyLine Now run the AssemblyLine, TIMxAdd, to test the results. 1. Start the TIMxAdd AssemblyLine by clicking the forward arrow . If the AssemblyLine execution is successful, 32 new employees are added to Identity Manager Express. You see a message in the Directory Integrator Configuration Editor AssemblyLine execution window, as shown in Figure C-37. Figure C-37 AssemblyLine output 332 Deployment Guide Series: IBM Tivoli Identity Manager Express 4.6 2. Log on to Identity Manager Express and examine some of the users created. Navigate to Manage Users, as shown in Figure C-38. Search for all users with the title of Analyst. Click the link for Dolores Quintana to check which group she belongs to. Figure C-38 Identity Manager Express search Figure C-39 shows that Dolores is a member of the Help Desk Assistant group. Figure C-39 Identity Manager Express user details Appendix C. Enhancing Identity Manager Express environment with Tivoli Directory Integrator 333 This assignment was created in the output connector for the erroles attribute. Check the advanced mapping for the erroles attribute. The JavaScript constructs a case statement, which assigns the group based on the person's title. See Example C-6. Example: C-6 JavaScript case statement var job=String(work.getString("JOB").trim()); switch (job) { case "ANALYST": var grp="Help Desk Assistant"; break; case "OPERATOR": var grp="Service Owner"; break; case "MANAGER": var grp="Manager"; break; default: var grp=""; break; } ret.value=grp; 3. Request an account for Dolores Quintana. Return to the filtered list of users. Click the arrow icon next to the name and select Request accounts from the menu options for Dolores, as shown in Figure C-40. Figure C-40 Selecting request accounts option 334 Deployment Guide Series: IBM Tivoli Identity Manager Express 4.6 4. Select VPN Service on host Linux_Target, as shown in Figure C-41. Figure C-41 Requesting a service 5. Complete the account request and password details. Click the View the Status of this Request link to verify that the account is created. Figure C-42 shows the request status report. Figure C-42 Request status report Note: You might have to refresh the display a few times, waiting for the account request operation to complete. Now when you view the accounts for Dolores Quintana, there is one account assigned, as shown in Figure C-43. Figure C-43 User account overview This completes the scenario for adding new users to Identity Manager Express with a custom identity feed. Appendix C. Enhancing Identity Manager Express environment with Tivoli Directory Integrator 335 You can see that IBM Tivoli Directory Integrator is an easy-to-use tool, which helps you to create customized identity feeds from a variety of sources to create Identity Manager Express users. In the following section, we look at another example of how to update Identity Manager Express user information with Directory Integrator identity feeds. Scenario two: Updating users with an identity feed The previous example demonstrated how to add users. However, organizations are dynamic and to manage the identity management lifecycle of users, organizations have be able to handle change. New users are added, users might change jobs and require new accesses, and eventually they leave the organization and their accounts have to be terminated. Deprovisioning is one of the most important processes to maintain a secure environment. In this example, we change the Directory Integrator configuration to handle updates to Identity Manager Express user data, and also add new users. This scenario demonstrates a situation when an employee is terminated from our SampleDB company, and the EMPSTAT field is set to 1 in the database record indicating that account is no longer active. We capture this event in Identity Manager Express and suspend the Identity Manager Express user account along with any other accounts that might be provisioned. Updating the AssemblyLine To start the configuration for this scenario, return to the Directory Integrator Configuration Editor. 1. You have to make a change in the output connector to operate in update mode. This handles additions and updates for existing users if any information has changed. Return to the Directory Integrator Configuration Editor, and click the JNDItoTIMx Connector. The connector configuration is displayed in the work area, as shown in Figure C-44. Change the mode of the connector to Update from the drop-down menu, as shown in Figure C-44. 336 Deployment Guide Series: IBM Tivoli Identity Manager Express 4.6 Figure C-44 Connector configuration You have to set up a new configuration item for the update mode to work. Notice that the Link Criteria tab is now bold (active). The Link Criteria tells the connector how to define a match between the Directory Integrator input connector entry and the TIMx directory entry to perform the update. A filter is constructed that searches for a matching entry. The result has to return a single entry result for the update to be successful. 2. Click the Build criteria with custom script check box, as shown in Figure C-45. Our users in Identity Manager Express are uniquely identified by their full name or common name attribute. This is the concatenation of the first name and last name with a space in the middle. Figure C-45 Link Criteria configuration 3. Type in the following JavaScript. ret.filter=work.getString("FIRSTNME")+" "+work.getString("LASTNAME"); In the following section, we manually change Dolores Quintana's entry in the EMPLOYEE table. Dolores Quintana has resigned from the company and her status in the EMPLOYEE table has to be set to 1 indicating that she is no longer an active employee. Appendix C. Enhancing Identity Manager Express environment with Tivoli Directory Integrator 337 Changing the employee data in the database To change the employee data, perform these steps: 1. Launch the DB2 Control Center application and open the EMPLOYEE table. (Refer to “Displaying the data” on page 317, for instructions about how to start the DB2 Control Center.) 2. Locate the row for Dolores Quintana and update the EMSTAT field to 1. EMPSTAT is the last field in the table, therefore, you have to scroll to the far right, as shown in Figure C-46. Figure C-46 Changing DB2 table 3. Click the Commit button to save the change. Exposing the erPersonStatus attribute One of the features of Directory Integrator is that when a connector is in update mode, you can select to only send the changed data to the target using the output connector. You have to select the Compute Changes setting in the connector configuration, as shown in Figure C-47. Figure C-47 Connector configuration: Selecting compute changes By default, erPersonStatus is a hidden attribute of the user's personal information. Hidden attributes are controlled by the enRoleHiddenAttributes.properties file. You can find this file in c:\Program Files\ibm\itim\data. 338 Deployment Guide Series: IBM Tivoli Identity Manager Express 4.6 1. To no longer hide this attribute, comment out this line in the properties file, as shown in Figure C-48. Use Notepad or a similar editor to make the change. Remember to save the file. Figure C-48 Editing the enRoleHiddenAttributes.properties file After you make this change, you have to stop and start the Identity Manager Express application so that WebSphere can pick up the change in the properties files. 2. Select Start → Programs → IBM WebSphere → Application Server → Profiles → default → Stop the server, as shown in Figure C-49. Figure C-49 Stopping WebSphere Application Server Appendix C. Enhancing Identity Manager Express environment with Tivoli Directory Integrator 339 3. Start the server: Start → Programs → IBM WebSphere → Application Server → Profiles → default → Start the server, as shown in Figure C-50. Figure C-50 Starting WebSphere Application Server Testing the update You are now ready to test the AssemblyLine. 1. Click the arrow to run the AssemblyLine. You see the output shown in Figure C-51. Figure C-51 AssemblyLine output Only one entry is modified, the entry for Dolores Quintana, whose EMPSTAT field is set to 1 in the EMPLOYEE table. 340 Deployment Guide Series: IBM Tivoli Identity Manager Express 4.6 2. Verify her status in Identity Manager Express. Select Manage Users and search for Dolores, as shown in Figure C-52. Note that the Status for Dolores is now Inactive. She can no longer use the Identity Manager Express application to manage her accounts. Figure C-52 Identity Manager Express: Selecting a user 3. Check the accounts for Dolores. Click the arrow and select Accounts… from the menu, as shown in Figure C-53. The account is also Inactive. Figure C-53 Identity Manager Express select accounts Appendix C. Enhancing Identity Manager Express environment with Tivoli Directory Integrator 341 You can see how using custom identity feeds matches with the HR processes. Additionally, user lifecycle management can improve an organization's ability to not only provision users and accounts in a timely matter, but also deprovision users and accounts in a timely manner. This demonstrates an organization's ability to provide adequate control over the IT environment and keep it secure. 342 Deployment Guide Series: IBM Tivoli Identity Manager Express 4.6 D Appendix D. Additional material This book refers to additional material that can be downloaded from the Internet as described in the following section. Locating the Web material The Web material associated with this book is available in softcopy on the Internet from the IBM Redbooks Web server. Point your Web browser to: ftp://www.redbooks.ibm.com/redbooks/SG247233 Alternatively, you can go to the IBM Redbooks Web site at: ibm.com/redbooks Select the Additional materials and open the directory that corresponds with the redbook form number, SG247233. © Copyright IBM Corp. 2006. All rights reserved. 343 Using the Web material The additional Web material that accompanies this book includes the following file: File name SG247233.zip Description Assorted files to be used according to “How to use the Web material” on page 344. How to use the Web material Create a subdirectory (folder) on your workstation, and extract the contents of the Web material compressed file into this folder. You find the following details: Appendix B One file sample.ldif to be used with Appendix B, “Modifying the Identity Manager Express LDAP adapter” on page 257. Appendix C – Two files password_dictionary.xml and password.txt to be used with “Populating the password dictionary” on page 300 of Appendix C, “Enhancing Identity Manager Express environment with Tivoli Directory Integrator” on page 299. – Two files sampleDB.zip and ITDIFeedScenario.xml to be used with “Creating a custom identity feed” on page 314 of Appendix C, “Enhancing Identity Manager Express environment with Tivoli Directory Integrator” on page 299. 344 Deployment Guide Series: IBM Tivoli Identity Manager Express 4.6 Glossary 8-bit Unicode Transformation Format (UTF-8) This is a variable-length character encoding for Unicode that is able to represent any universal character in the Unicode standard. Yet all ASCII characters are represented as themselves and byte values in the ASCII range do not occur as part of multi-byte character representations making it reasonably compatible with existing ASCII based software. For this reason, it is steadily becoming the preferred encoding for e-mail, Web pages, and other places where characters are stored or streamed. access control In computer security, the process of ensuring that the resources of a computer system can be accessed only by principals in authorized ways. See also principal. access control item (ACI) Data that (a) identifies the permissions of principals and (b) is assigned to a resource. account An entity that contains a set of parameters, which define the application-specific attributes of a user. This includes the identity, user profile, and credentials. ACI See access control item. activity The smallest unit of work in a workflow. When a request requires approval, information, or additional actions, the workflow for that request generates the appropriate activities that are presented in the appropriate users' to-do lists. See also workflow. adapter A transparent, intermediary software component that allows different software components with different interfaces to work together. adopt To assign an orphan account to the appropriate owner. © Copyright IBM Corp. 2006. All rights reserved. adoption rules The set of rules that determines which orphan accounts belong to which owners. See also orphan account. agent A process that manages target resources on behalf of a system to respond to requests. alias In identity management, an identity for a user, which might match the user ID. The alias can be used during reconciliation to determine who owns the account. A person can have several aliases, for example, GSmith, GWSmith, and SmithG. approval A type of workflow activity that allows someone to approve or reject a request. See also workflow. audit trail A chronological record of events or transactions. You can use audit trails for examining or reconstructing a sequence of events or transactions and managing security. CA See certificate authority. certificate In computer security, a digital document that binds a public key to the identity of the certificate owner, thereby enabling the certificate owner to be authenticated. A certificate is issued by a certificate authority. certificate authority (CA) An organization that issues certificates. The CA authenticates the certificate owner's identity and the services that the owner is authorized to use, issues new certificates, renews existing certificates, and revokes certificates that belong to users who are no longer authorized to use them. challenge A request for certain information to a system. The information, which is sent back in response to this request, is necessary for authentication. 345 challenge-response authentication An authentication method that requires users to respond to a prompt by providing information to verify their identity when they log on to the system. For example, when users forget their password, they are prompted (challenged) with a question to which they must provide an answer (response) to either receive a new password or receive a hint for specifying the correct password. connector A plug-in that is used to access and update data sources. A connector accesses the data and separates out the details of data manipulations and relationships. See also adapter. credentials Authentication information that is associated with a principal. See also authentication and principal. comma separated values (CSV) file A common type of file which contains data that is separated by commas. CSV See comma separated values. DAML See Directory Access Markup Language. data model A description of the organization of data in a manner that reflects the information structure of an enterprise. delegate (noun) The user who is designated to approve requests or provide information for requests for another user. delegate (verb) (1) To assign all or a subset of administrator privileges to another user, such that the user can perform all or a subset of administrator activities for a specific set of the users. (2) To designate a user to approve requests or provide information for requests for another user. deprovision To remove a service or component. For example, to deprovision an account means to delete an account from a resource. See also provision. 346 digital certificate An electronic document that is used to identify an individual, server, company, or some other entity, and to associate a public key with the entity. A digital certificate is issued by a certification authority and is digitally signed by that authority. See also Certificate Authority. Directory Access Markup Language (DAML) An XML specification that extends the functions of Directory Services Markup Language 1.0 (DSML v1.0) to represent directory operations. In Tivoli Identity Manager, DAML is mainly used for server to adapter communications. See also Directory Services Markup Language v2.0. directory server A server that can add, delete, change, or search directory information on behalf of a client. Directory Services Markup Language v1.0 (DSMLv1) An XML implementation that describes the structure of data in a directory and the state of the directory. DSML can be used to locate data into a directory. DSMLv1 is an open standard defined by OASIS. Contrast with Directory Services Markup Language v2.0. Directory Services Markup Language v2.0 (DSMLv2) An XML implementation that describes the operations that a directory can perform (such as how to create, modify, and delete data) as well as the results of those operations. Whereas DSMLv1 can be used to describe the structure of data in a directory, DSMLv2 can be used to communicate with other products about that data. DSMLv2 is an open standard defined by OASIS. Contrast with DSMLv1. distinguished name (DN) The name that uniquely identifies an entry in a directory. A distinguished name is made up of name-component pairs. For example: cn=John Doe, o=My Organization, c=US. DN See distinguished name. DSMLv1 See Directory Services Markup Language v1.0. Deployment Guide Series: IBM Tivoli Identity Manager Express 4.6 DSMLv2 See Directory Services Markup Language v2.0. dynamic content tags A set of XML tags (based on the XML Text Template Language (XTTL) schema) that allows the administrator to provide customized information in a message, notification, or report. See also XML Text Template Language. entity A person or object about which you want to store information or manage. For example, a person and an account are both entities. escalation The process that defines what happens and who acts when an activity has not been completed in the specified amount of time. escalation limit The amount of time, for example hours or days, that a participant has to respond to a request, before an escalation occurs. Java Database Connectivity (JDBC) An industry standard for database-independent connectivity between the Java platform and a wide range of databases. The JDBC interface provides a call-level API for SQL-based database access. JDBC See Java Database Connectivity. LDAP See Lightweight Directory Access Protocol. LDAP directory A type of repository that stores information about people, organizations, and other resources and that is accessed using the LDAP protocol. The entries in the repository are organized into a hierarchical structure, and in some cases, the hierarchical structure reflects the structure or geography of an organization. event The encapsulated data that is sent as a result of an occurrence, or situation, in the system. LDAP Data Interchange Format (LDIF) A file format that is used to describe directory information as well as changes that have to be applied to a directory, such that directory information can be exchanged between directory servers that are using LDAP. FESI LDIF See Free EcmaScript Interpreter. Free EcmaScript Interpreter (FESI) An implementation of the EcmaScript scripting language, which is an ISO standard scripting language that is similar to the JavaScript scripting language. group users. A collection of Tivoli Identity Manager identity The subset of profile data that uniquely represents a person or entity within an identity context and that is stored in one or more repositories. identity feed The automated process of creating one or more identities from one or more common sources of identity data. identity policy The policy that defines the user ID to be used when creating an account for a user. See LDAP Data Interchange Format. lifecycle Passage or transformation through different stages over time. For example markets, brands, and offerings have lifecycles. lifecycle rules A set of rules in a policy that determine which operations to use when automatically handling commonly occurring events, such as suspending an account that has been inactive for a period of time. Lightweight Directory Access Protocol (LDAP) An open protocol that uses TCP/IP to provide access to directories that support an X.500 model and that does not incur the resource requirements of the more complex X.500 Directory Access Protocol (DAP). For example, LDAP can be used to locate people, organizations, and other resources in an Internet or intranet directory. Glossary 347 mail A type of workflow activity that sends a notification to one or more users about a request. managed resource An entity that exists in the runtime environment of an IT system and that can be managed. manual service A type of service that requires manual intervention to complete the request. namespace (1) The set of unique names that a service recognizes. (2) Space reserved by a file system to contain the names of its objects. notification A message that is sent to users or systems that indicates that a change has been made that might be of interest to the receiver. objectclass The specific type of object, or subcategory of classes, that an access control item can protect. For example, if the protection category is account, then the object class can be the type of account, such as an LDAP user account. See also protection category. operation An action that can be performed against an object; for example, add, modify, or delete. orphan account On a managed resource, an account whose owner cannot be automatically determined by the provisioning system. participant In identity management, a user or a group that has the authority to respond to a request that is part of a workflow. See also workflow. password In computer and network security, a specific string of characters that is used by a program, computer operator, or user to access the system and the information stored within it. password retrieval The method of retrieving a new or changed password by accessing a designated Web site and specifying a shared secret. See also shared secret. password strength rules The set of rules that a password must conform to, such as the length of the password and the type of characters that are allowed (or not allowed) in the password. password policy A policy that defines the password strength rules. A password policy is applied whenever a password is set or modified. password synchronization The process of coordinating passwords for services and systems such that only a single password is required to access those multiple services and systems. permission Authorization to perform activities on resources, such as reading and writing local files, creating network connections, and loading local code. person An individual in the system who has a person record in one or more corporate directories. personal profile The data that describes a user within the system, such as the user name, password, contact information, and so on. policy A set of considerations that influence the behavior of a managed resource or a user. principal (1) A person or group that has been granted permissions. (2) An entity that can communicate securely with another entity. privilege See permission. profile Data that describes the characteristics of a user, group, resource, program, device, or remote location. protection category The category of classes that an access control item can protect. For example, accounts or persons. See also objectclass. provision (1) To set up and maintain the access of a user to a system. (2) To create an account on a managed resource. provisioning The process of providing, deploying, and tracking a service or component. 348 Deployment Guide Series: IBM Tivoli Identity Manager Express 4.6 recertification policy A policy that defines the lifecycle rule for automatically validating accounts and users in the provisioning system after a certain period of time. reconciliation The process of synchronizing data in a central data repository with data on a managed resource. registration The process of accessing a system and requesting an account on that system. registry A repository that contains access and configuration information for users, systems, and software. repository A persistent storage area for data and other application resources. Common types of repositories are databases, directories, and file systems. request The item that initiates a workflow and instigates the various activities of a workflow. See also workflow. request for information (RFI) A workflow activity that requests additional information from the specified participant. See also workflow. resource A hardware, software, or data entity. See also managed resource. restore To activate an account that was suspended. RFI See request for information. rights See permission. rule A condition that is used in the evaluation of a policy. schema The fields and rules in a repository that comprise a profile. See also profile. Secure Sockets Layer (SSL) A security protocol that provides communication privacy. SSL enables client/server applications to communicate in a way that is designed to prevent eavesdropping, tampering, and message forgery. security The protection of data, system operations, and devices from accidental or intentional ruin, damage, or exposure. self-registration See registration. service A representation of a managed resource, application, database, or system. service owner An individual who uses Tivoli Identity Manager to set up and administer (a) the services that are managed by Tivoli Identity Manager or (b) the Tivoli Identity Manager users of those services. See also service. service type A category of related services that share the same schemas. See also service. shadow password The process of shadowing passwords is used to increase the security level of passwords on UNIX systems, by hiding the encrypted passwords from ordinary users. On a system without shadowed passwords, /etc/passwd holds the user information. shared secret An encrypted value that is used to retrieve the initial password of a user. This value is defined when the personal information for the user is initially loaded into the system. single sign-on (SSO) The ability of a user to log on once and access multiple applications without having to log on to each application separately. SSL See Secure Sockets Layer. SSO See single sign-on. supervisor An individual who uses Tivoli Identity Manager to manage their own accounts and passwords or the accounts and passwords of those people who they supervise. suspend To deactivate an account so that the account owner cannot access the service. system administrator An individual who is responsible for the configuration, administration, and maintenance of Tivoli Identity Manager. Glossary 349 to-do list A collection of outstanding activities. See also activity. user (1) Any individual, organization, process, device, program, protocol, or system that uses the services of a computing system. (2) An individual who uses Tivoli Identity Manager to managed accounts and passwords. UTF-8 See 8-bit Unicode Transformation Format. view A collection of graphical user interfaces that represent the set of tasks that a particular type of user is allowed to perform. Administrators can customize views to contain different collections of graphical user interfaces. workflow The sequence of activities performed in accordance with the business processes of an enterprise. See also activity. work order A workflow activity that requires a participant to perform an activity outside of the scope of the system. XML Text Template Language (XTTL) An XML schema that provides a means for representing dynamic content within a message, notification, or report. The XML tags are also called dynamic content tags. See also dynamic content tags. XTTL 350 See XML Text Template Language. Deployment Guide Series: IBM Tivoli Identity Manager Express 4.6 Related publications The publications listed in this section are considered particularly suitable for a more detailed discussion of the topics covered in this redbook. IBM Redbooks For information on ordering these publications, see “How to get IBM Redbooks” on page 353. Note that some of the documents referenced here may be available in softcopy only. Enterprise Security Architecture Using IBM Tivoli Security Solutions, SG24-6014 Robust Data Synchronization with IBM Tivoli Directory Integrator, SG24-6164 Identity Management Design Guide with IBM Tivoli Identity Manager, SG24-6996 Other publications IBM Tivoli Identity Manager Express Installation Guide V4.6, SC32-2262 IBM Tivoli Identity Manager Express Problem Determination Guide V4.6, SC32-2263 IBM Tivoli Identity Manager Express Release Notes Guide V4.6, SC32-2264 Online resources These Web sites and URLs are also relevant as further information sources: Tivoli Identity Manager Express solution and its documentations (requires an IBM Partner World user ID) https://www-304.ibm.com/jct09002c/partnerworld/mem/support/trs_sbe_i nfra_muaiyii.html Request for Comments (RFC): 2798 http://rfc.net/rfc2798.html © Copyright IBM Corp. 2006. All rights reserved. 351 RFC4180 http://rfc.net/rfc4180.html IBM Software - Passport Advantage http://www.lotus.com/services/passport.nsf/WebDocs/Passport_Advantag e_Home The IBM Passport Advantage Web site provides you access to product code and additional modules such as Identity Manager Express adapters. You require proper user access based on your IBM contract http://www.ibm.com/software/howtobuy/passportadvantage/index.html The IBM Tivoli Identity Manager Express product documentation (Information Center) http://publib.boulder.ibm.com/infocenter/tivihelp/v5r1/index.jsp The Information Center provides access to the following online manuals (none of which has an individual order number): – – – – – – – – – – – Overview Scenarios Planning Installing Administering Security Reference Release Notes Installation and Configuration Guide Problem Determination Guide Performance Tuning Guide IBM HTTP Server - Prerequisites http://www.ibm.com/software/webservers/httpservers/prereq.html IBM HTTP Server - Library http://www-306.ibm.com/software/webservers/httpservers/library/ IBM HTTP Server - Product Overview http://www.ibm.com/software/webservers/httpservers/ IBM HTTP Server - Support http://www.ibm.com/software/webservers/httpservers/support/ IBM Tivoli Identity Manager Express - Product support http://www.ibm.com/software/sysmgmt/products/support/IBMTivoliIdenti tyManagerExpress.html 352 Deployment Guide Series: IBM Tivoli Identity Manager Express 4.6 WebSphere Application Server, Version 6.0 - Information Center http://publib.boulder.ibm.com/infocenter/ws60help/index.jsp WebSphere Application Server, Version 6.0 - Plug-in installation manual http://publib.boulder.ibm.com/infocenter/wasinfo/v6r0/topic/com.ibm. websphere.base.doc/info/aes/ae/tins_webplugins.html Apache HTTP Server: SSL/TLS Encryption http://httpd.apache.org/docs/2.0/ssl/ The Unicode Character Code Charts By Script http://www.unicode.org/charts/ How to get IBM Redbooks You can search for, view, or download IBM Redbooks, IBM Redpapers, Hints and Tips, draft publications and Additional materials, as well as order hardcopy Redbooks or CD-ROMs, at this Web site: ibm.com/redbooks Help from IBM IBM Support and downloads ibm.com/support IBM Global Services ibm.com/services Related publications 353 354 Deployment Guide Series: IBM Tivoli Identity Manager Express 4.6 Index A access approval workflow 14 control 23, 42, 50 configuration 192 server security 31 access control item (ACI) 22, 24, 42, 50, 182 configuration 192 groups 24 limiting 199 planning 51 account 12, 16 adoption 49 configuring defaults 178 defaults 47 definition form 116 management 207 historical data 66 operations 64 procedures 201 orphan 4, 63, 67, 71, 206 provisioning 48 recertification 207 removal 67 report 214 request workflow 25, 182 configuration 184 status report 216 type request report 215 accountability 5 active directory adapter 76 activity list 25 adapter 28, 46 account defaults 47 account definition form 116 active directory 76 ADK-based 110 agentless 28 configuration form 116 custom 33 Lightweight Directory Access Protocol (LDAP) 32 © Copyright IBM Corp. 2006. All rights reserved. Linux 32 Lotus Notes 32 managed attribute 116 profile 20 installation 116 Secure Sockets Layer (SSL) configuration 119 security 139 server 77 service configuration 123 TCP port configuration 114 TDI-based 128 Windows registry entry 114 ADK-based adapter 110 administrative cost 5, 65 user, password expiration 255 adoption rule 42, 48 agentless adapter 28 American Standard Code for Information Interchange (ASCII) 98 Apache HTTP Server 83 application programming interface (API) 28 approval 71, 183 process 64 workflow 14 AssemblyLine 27, 301, 320 audit 6, 207 data integrity 68 requirement 5 trail 15 authentication 68 authoritative source 11, 43 availability 41 B backup 69 key database 106 business context 3 requirement 40 identity management foundation 62 355 C D carriage return-line feed (CRLF) 147 cat command 237 category relationship 199 users 22, 193 central processing unit (CPU) 78 certificate loss 106 signing request 98 types 96 certification 67 CertTool 119 challenge-response 19, 70 configuration 161 change management 69 Comma Separated Value (CSV) file 44, 147 identity feed 155 reporting 215 company profile 55 complexity of infrastructure 7 compliance 5, 7, 62, 67 component architecture logical 15 physical 26 compute changes 338 confidentiality 68 configuration access control item (ACI) 192 account defaults 178 challenge-response 161 data synchronization 216 identity feed 154 reconciliation 159 service 123 SSL for IBM HTTP Server 107 configuration form 116 configurewebserver1.sh script 93 connector 302 JNDI 320, 326 cost savings 18, 62, 65 custom adapter 33 data feed 314 identity feed 314 customer scenario, company profile 55 data confidentiality 68 sensitivity 7 store 27 synchronization 214 configuration 216 DB2 27 Express 27 security 37 db2cmd command 223 db2move command 316 deprovisioning 4, 336 design considerations 74 objectives 69 digital certificate 101 Directory Access Markup Language (DAML) 44 adapter configuration 113 Directory Integrator 27 adapter 128 AssemblyLine 27, 301, 320 connector 302 identity feed 314 JNDI connector 315 LDAP adapter 258 link criteria 337 password dictionary 300 service creation 320 SSH protocol 29 Directory Server 27 administrative ID 133 security 36, 133 Directory Services Markup Language v2 (DSMLv2) 44 distinguished name 321 Dynamic Host Configuration Protocol (DHCP) 56 356 E education 42 personnel 205 e-mail new password 152 notification 183 Enterprise Resource Planning (ERP) 57 erExpressPerson 153 erPersonItem 153 erPersonPassword 152 Deployment Guide Series: IBM Tivoli Identity Manager Express 4.6 erPersonStatus 154, 338 erRoles 153 error message 221 escalation 50 interval 183 Extensible Markup Language (XML) 33 F First Failure Data Capture (FFDC) 244 support 250 fix pack 75 forgot password option 19 form 42, 48 fully qualified domain name (FQDN) 125 functional requirement 41, 63 G gedit command 237 graphical user interface (GUI) 44 group access control 193 help desk assistant 194 management 193 manager 193 service owner 194 system administrator 194 user 193 workflow 24 H heap size 215 help desk assistant 23 group 194 procedures 201 human resources system 11, 28, 43 Hypertext Transfer Protocol (HTTP) 33 Hypertext Transfer Protocol-Secure (HTTPS) 33, 83 rewrite HTTP requests to HTTPS 108 I IBM DB2 27 IBM HTTP Server installation 83 security 139 SSL configuration 107 SSL support 94 syntax check 107 IBM Key Management 81 best practices 83 IBM Tivoli Directory Integrator see Directory Integrator IBM Tivoli Directory Server see Directory Server IBM WebSphere Application Server see WebSphere Application Server identity feed 11, 16, 42, 70, 146, 149, 314 additional attributes 153 configuration 154 creating new password 152 manager attribute 161 person status 154 planning 43 service parameter 157 management business requirement 62 definition 4 lifecycle 336 people 15 person 15 strategies 13 user 15 policy 21, 43, 47, 147, 150, 292 definition 165 Identity Manager Express log 243 logging option 252 message 240 request 242 idscfgsug.cmd command 265 inetOrgPerson 16, 29, 44, 153, 260 infrastructure complexity 7 Initial Work Entry (IWE) 277 install.sh script 83 installation adapter profile 116 IBM HTTP Server 83 Identity Manager Express Server 79 troubleshooting 234 itim manager 194 J Java 2 security 35 Index 357 java command 129 Java Database Connectivity (JDBC) 29 Java Naming and Directory Interface (JNDI) connector 315, 320, 326 N network diagram 57 nonfunctional requirement 75 notification 25 template 183 K key database backup 106 O L objectclass 260 operational troubleshooting 239 orphan account 4, 63, 67, 71, 206 OutOfMemoryError error 215 language support 201 LDAP Data Interchange Format (LDIF) 265 ldapsearch command 266 lifecycle events and impact 12 management 4, 10, 49, 336 Lightweight Directory Access Protocol (LDAP) 21 adapter 32, 258 customization 267 objectclass 260 security 133 link criteria 337 Linux adapter 32 log file Linux 238 Windows 2003 Server 238 logging 66 options 252 SSL environment variables 109 logical component architecture 15 Lotus Notes adapter 32, 76 M managed attribute 116 managed resource 20, 42 adapter 28 planning 46 security 31 see resource management group 193 password 6, 42, 64 manager 23 attribute 161 group 193 manual service 12, 21 master password store 19 multi-valued attribute 149 358 P password 17 capture 19 dictionary 300 expiration, administrative user 255 forgot option 19 global policy 170 management 6, 42, 64 new 152 pickup 19 policy 18, 21, 40, 43, 45, 300, 312 reset 18, 59, 63 self-reset 161 shadow password 132 store 19 strength 22 rule 170 synchronization 18, 43, 45, 70 PDF file report 215 pending approval report 215 performance 41, 69 person status 154 personal certificate 96 request 96 personnel education 205 physical architecture 74–75 component architecture 26 policy based provisioning 13 identity 150 password 18 pop-up blocking 215 Portable Operating System Interface (POSIX) 128 Preferred Client Locale 201 problem determination 221 Deployment Guide Series: IBM Tivoli Identity Manager Express 4.6 process ID 35 product function identifier 240 productivity 6 profile installation 116 protocol adapter configuration 113 provisioning 4, 6, 11, 48, 336 policy based 13 request-based 14 strategies 13 R random access memory (RAM) 78 random password 19 recertification 5, 15, 25, 67 accounts 207 reconciliation 17, 48, 71, 206, 289, 314 configuration 159 manager attribute 161 person status 154 recovery 69 Redbooks Web site 353 Contact us xiv Redundant Array of Independent Disks (RAID) 78 refreshInterval 252 registry adapter entry 114 rejected request report 215 reliability 41 Remote Method Invocation (RMI) 131, 258 report account 214 PDF file 215 pending approval 215 rejected request 215 request 214 service 214 reporting 207, 214 data synchronization 214 configuration 216 time zone 215 request based provisioning 14 for information (RFI) 50, 183 report 214 workflow 182 Request for Comment (RFC) 2798 16 4180 147 requirement business 62 functional 41, 63 nonfunctional 75 support 41 resource 4, 16, 20, 42 adapter 28 planning 46 provisioning 12 security 31 reverse password synchronization 19, 43 Role-Based Access Control (RBAC) 13 runConfig command 254 runConfig install command 145 S scenario, company profile 55 Secure Shell (SSH) protocol 29 Secure Sockets Layer (SSL) 32 128-bit encryption strength 108 adapter configuration 113, 119 configuration for IBM HTTP Server 107 environment variable logging 109 rewrite HTTP requests to HTTPS 108 support for IBM HTTP Server 94 security 7 adapter 139 compliance 62 design objectives 69 Directory Server 133 IBM HTTP Server 139 LDAP 133 managed resource 31 policy 40 risk 68 Web 34 WebSphere Application Server 139 server access security 31 sizing 78 user ID 35 service 16, 20 account request workflow 182 configuration 123 creation 320 definition file 20, 28 identity policy 165 Index 359 manual 21 owner 20, 23, 47 password strength rule 170 report 214 requirements 40 type 20 service level agreement (SLA) 41 service owner group 194 serviceability command 244 shadow password 132 signer certificate 96, 100 sizing server 78 solution architecture 42 SSLCipherSpec 108 stopServer command 144 Structured Query Language (SQL) 244 superadmin 133 support requirement 41 suspend person 154 synchronization, password 18 system administrator 23 group 194 T TDI-based adapter 76, 128 termination 13 to-do item 25 Transmission Control Protocol (TCP) 79 port, adapter configuration 114 Transport Layer Security (TLS) 32 troubleshooting 221 general 222 installation-related 234 operational 239 V vi command 237 Vi iMproved (Vim) 148 view 23 viewer command 244 virtual private network (VPN) 56 W WASService command 144 Web account management 207 security 34 user interface 207 WebSphere Application Server heap size 215 process ID 35 security 34, 139 server user ID 35 WebSphere Application Server Express 27 Windows registry, adapter entry 114 wireless technology 7 work order 21 workflow 14, 25, 42, 49, 70 account request 25, 182 configuration 184 approval 183 e-mail notification 183 escalation 183 group 24 notification template 183 request for information 183 U Uniform Resource Identifier (URI) 109 usability 41 use case 40 user 4, 23 access control 192 category 22 group 193 lifecycle management 4 management historical data 66 provisioning 6 UTF-8 encoding 147 360 Deployment Guide Series: IBM Tivoli Identity Manager Express 4.6 Deployment Guide Series: IBM Tivoli Identity Manager Express 4.6 (0.5” spine) 0.475”<->0.875” 250 <-> 459 pages Back cover ® Deployment Guide Series IBM Tivoli Identity Manager Express 4.6 Architecture and overview of logical and physical components Planning and deploying a customer scenario Best practices and troubleshooting IBM Tivoli Identity Manager Express is the first identity-management solution designed specifically for mid-market customers. For customers or departments that have to manage passwords, user accounts, and access permissions in heterogeneous IT environments, Identity Manager Express provides quick time-to-value. Its security and compliance capabilities address areas that have heightened awareness in many companies today. This IBM Redbook takes a step-by-step approach to implementing an identity management solution based on IBM Tivoli Identity Manager Express Version 4.6. We discuss the business context, and the logical and physical components of the solution. We walk you through an example company profile with existing business policies and guidelines, and build an identity management solution design for its particular environment. We describe how to integrate the new identity management components into the existing environment. We also focus on the detailed configuration of identity management integration tasks that you have to implement to create a fully functional end-to-end solution. This book is a valuable resource for security officers, administrators, and architects who want to understand and implement an identity management solution in a medium-scale environment. SG24-7233-00 ISBN 0738496839 INTERNATIONAL TECHNICAL SUPPORT ORGANIZATION BUILDING TECHNICAL INFORMATION BASED ON PRACTICAL EXPERIENCE IBM Redbooks are developed by the IBM International Technical Support Organization. Experts from IBM, Customers and Partners from around the world create timely technical information based on realistic scenarios. Specific recommendations are provided to help you implement IT solutions more effectively in your environment. For more information: ibm.com/redbooks