1
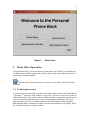
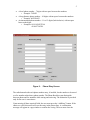
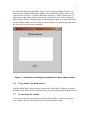
Software for Personal Address
and Phone Book
User Manual
Developed by:
Kasi Periyasamy
David Riley
Tom Gendreau
November 2003
2
Table of Contents
1. Introduction …………………………………………………………………... 3
1.1. System Requirements ………………………………………………….. 3
1.2. Installation …………………………………………………………….... 3
2. Getting Started …………………………………………………………………... 3
3. Phone Diary Operations …………………………………………………………. 4
3.1. To add a phone entry ……………………………………………………. 4
3.2. To delete a phone entry …………………………………………………. 6
3.3. To modify a phone entry ………………………………………………... 6
3.4. To search a phone entry based on last name ……………………………. 6
3.5. To search phone entries based on a phone number ……………………... 6
3.6. To go back to the Phone Book ………………………………………….. 7
3.7. To exit from the system ………………………………………………… 7
4. Appointment Calendar Operations ……………………………………………… 8
4.1. To add an appointment …………………………………………………. 9
4.2. To delete an appointment ……………………………………………… 10
4.3. To modify an appointment ……………………………………………...10
4.4. To search an appointment ………………………………………………10
4.5. To move an appointment from one slot to another ……………………. 11
4.6. To go back to the Phone Book ………………………………………… 11
4.7. To exit from the system ……………………………………………….. 11
Glossary ……………………………………………………………………………. 11
3
1. Introduction
This user manual describes how to use the software for a computerized personal address
and phone book (hereafter called ‘the Phone book’ in this document). The product is
single-user software. Using this product, a user can store and retrieve names, addresses
and phone numbers as well as personal appointments. The storage limit depends on the
secondary storage space available in the computer. The phone book uses a flat file and
does not use any database. Hence, it can be used as a stand-alone product.
1.1. System Requirements
This product runs on a PC with Windows operating system (98/2000/ME/XP).
1.2. Installation
The installation of the product is simple and straightforward. Copy the ZIP file that
comes with the product onto any directory that the user prefers, and extract the binary
executable file. The data files will be stored in the same directory where the binary
executable file resides.
2. Getting Started
The phone book consists of two separate components – a phone diary and an appointment
calendar. Each component works independent of the other and uses separate windows. A
user can however use both of them at the same time by opening multiple windows.
Upon start up, the product displays the main screen as shown in Figure 1. A user can do
the following:
• The phone diary component can be initialized by pressing the button “Initialize
Phone Diary”. This button can be used to initialize the phone diary for the first
time, or can also be used to reset the phone diary at any time by deleting all the
entries in the phone diary.
• The appointment calendar component can be initialized by pressing the button
“Initialize Appointment Calendar”. This button can be used to initialize the
appointment calendar for the first time, or can also be used to reset the phone
diary at any time by deleting all the entries in the appointment calendar.
• A user can select to operate the phone diary by pressing the button “Phone
Diary”. This will close the main screen and open the screen for the phone diary
that is shown in Figure 2.
• A user can select to operate the appointment calendar by pressing the button
“Appointment Calendar”. This will close the main screen and open the screen for
the appointment calendar that is shown in Figure 4.
• A user can exit from the system by pressing “Exit” the button. This will close all
the screens and terminate the program.
4
Figure 1:
Main Screen
3. Phone Diary Operations
Using the phone diary, a user can add a new phone entry (see Glossary for the definition
of a phone entry), modify a phone entry, delete a phone entry, and search an entry based
on the name or a phone number.
The last names in the phone diary are unique; no two entries will have the same
last name.
3.1. To add a phone entry
A user must enter the last name, first name and address of the person in the fields labeled
“Last name”, “First name” and “Address” respectively. The user can enter up to 5 lines of
address information. The software will not validate the address information and hence the
user can enter any information in the 5 lines corresponding to the address. The user is
then expected to give (up to) 3 phone numbers in the fields labeled “Phone Numbers”.
Phone number must be entered as a number with no other characters except digits. There
are 3 different formats for a phone number:
5
•
•
•
A local phone number – 7 digits with no space between the numbers
o Example: 7856823
A long distance phone number – 10 digits with no space between the numbers
o Example: 6087856823
An international phone number – 11 to 15 digits (both inclusive) with no space
between the digits
o Examples: 011914245672346
0118427384749
Figure 2:
Phone Diary Screen
The radio button beside each phone number entry, if enabled, lets the number to be stored
as a fax number rather than a phone number. The Phone Book does not distinguish
between phone and fax numbers while storing and retrieving. The distinction is provided
only for the user’s convenience.
Upon entering all these required fields, the user must press the “AddEntry” button. If the
entries are valid, this action will save the entry in the phone diary. A confirmation
message will appear in a pop-window to confirm the saving. The user must close the
6
window manually to proceed further with the software. After closing the pop up window,
the phone diary screen will appear again. If any one of the entries is invalid (for example,
a user tries to add an entry with the last name that already exists in the phone diary), a
pop-up window will appear with an error message. The user must close this window
manually to proceed further with the system.
3.2. To modify a phone entry
A user can modify any portion of a phone entry except the last name. In order to do that,
the user must enter the modified information along with the last name of the entry that the
user intends to modify. Without the last name, the user will not be able to modify the
entry. Once the user enters all information, the user must press the “ModifyEntry” button.
Possible fields that can be modified:
• First name
• Address lines
• Phone numbers
• Change of a phone number into a fax number and vice versa.
If the entry can be found (based on the last name) and the modified information is valid,
the user will get a confirmation message through a pop-up window. As before, the user
must manually close this window. This will take the user back to the Phone Diary screen.
If any one of the entries is invalid, an error message will appear in a separate pop-up
window; the user must close this window manually.
3.3. To delete a phone entry
In order to delete a phone entry, the user must enter the last name in the entry, and must
press the “DeleteEntry” button. If an entry corresponding to this last name is found, the
entry will be deleted from the phone book and a confirmation message will appear on a
separate pop-up window. If no entry is found with this last name, the user will get an
error message on a separate pop-up window. In either case, the user must close the
window manually.
3.4. To search an entry based on last name
A user can search a phone entry based on the last name in the entry. To do this, the user
must enter the last name in the field labeled “Last name” at the bottom of the screen, and
must press the “Search” button beside the last name. If the entry is found, the other fields
(first name, address and phone numbers) will be filled in from the entry. If the entry is
not found, the user will get an error message on a separate pop-up window; the user must
close this window manually.
3.5. To search a set of entries for a given phone number
A user can search the phone diary using a phone number. Since the phone numbers need
not be unique, this search may return more than one entry. To perform this search, the
user must enter the phone number in the field labeled “Phone number” at the bottom of
7
the screen and must press the button “Search” beside the phone number. If there is at
least one entry found with this phone number, the screen labeled “Phone Entries” will
appear (shown in Figure 3). The user must either press the “CLOSE” button or the “X”
button on the right corner of this screen in order to close this screen. After closing the
Phone Entries window, the Phone Diary screen will appear again. If no entry is found for
the given phone number, the user will get an error message on a separate pop-up window;
the user must close this window manually.
Figure 3. Results of searching phone entries for a given phone number
3.6. To go back to the main screen
From the Phone Diary screen, the user can press the “Phone Book” button to go back to
the main screen. This will close the Phone Diary screen and open the Phone Book screen.
3.7. To exit from the system
A user can exit from the system directly from the Phone Diary screen by pressing the
“Exit” button. This will close all the screens and terminate the system.
8
4. Appointment Calendar Operations
Figure 4. Appointment Calendar Screen
Using the appointment calendar, a user can add a new appointment, delete an existing
appointment, modify the information on an appointment, search for appointment calendar
using date and time of the appointments and move an appointment from one slot into
another within the appointment calendar. Appointments can be entered up to one year in
advance from the current date.
The appointments are uniquely identified by the date and time of the appointment.
All appointments fall on hour boundaries only; therefore, there can be a maximum of 24
appointments in a day.
9
4.1. To add an appointment
A user must select the date and time from the combo boxes on the top of this screen and
must press the “Add” button. This will close the Appointment Calendar screen and open
up the Appointment Entry screen that is shown in Figure 5.
If there is already another appointment at this selected date/time, an error message will be
displayed to the user on a separate pop-up window; the user must manually close this
window and the Appointment Calendar screen will appear again in order for the user to
choose another date and time.
Figure 5. Appointment Entry Screen
The date and time the user selected in the previous screen will be displayed on top of this
screen. The user then will enter the appointment description. Optionally, the user may
also enter a last name in the field labeled “Last name”. After entering the appointment,
the user must press the “Save” button. This will save the appointment entry, close the
Appointment Entry screen and will open up the Appointment Calendar again. The user
10
will get a confirmation message that the appointment is saved on a separate pop-up
window; the user must manually close this pop-up window in order to proceed further.
If the user does not save but presses the “Appointment Calendar” button, the appointment
will not be saved, the Appointment Entry screen will be closed the Appointment Calendar
screen will be opened up.
If the user presses the “Exit” button, all the windows will be closed, the entries will be
backed up and the program terminates.
4.2. To delete an appointment
A user must select the date and time of the appointment to be deleted from the combo
boxes on top of the Appointment Calendar screen and then must press the “Delete”
button. If there is an appointment at that date/time, the appointment will be deleted and
the user will get a confirmation message on a separate pop-up window. The user must
manually close this pop-up window and the Appointment Calendar will appear again. If
there is no appointment at the selected date/time, an error message will be displayed on a
separate pop-up window. The user must then manually close this window and get back to
the Appointment Calendar screen.
4.3. To modify an appointment
In order to modify an existing appointment, the user must first select the date and time of
the appointment from the combo boxes on the top of the Appointment Calendar screen. If
the appointment is not found, an error message will be displayed on a separate pop-up
window. The user must then manually close this window and get back to the
Appointment Calendar screen in order to select another date and time combination.
If there is an appointment at the selected date/time, the Appointment Calendar screen will
be closed and the Appointment Entry screen will be opened. On this screen, the date,
time, description of the appointment and the last name (if entered) will appear on their
respective fields. The user may modify the appointment or the last name. The date and
time fields are not editable and hence the user cannot change the date or time of the
appointment. The user can get back to the phone diary by pressing the “Phone Diary”
button beside the last name field. This will open up the Phone Diary screen and display
the entry corresponding to the last name. If there is no entry corresponding to this last
name, an error message will be displayed on a separate pop-up window. The user must
then manually close this window and get back to the Appointment Entry screen.
4.4.
To search an appointment
To search an appointment, a user must follow the same procedure as to modify an
appointment except that the user must press the “Search” button instead of the “Modify”
button. In fact, the user can modify the appointment that is returned as the result of
searching. See section 4.3 for the procedure to search and to modify an appointment.
11
4.5.
To move an appointment from one slot to another
A user can move an appointment from one slot (date/time combination) to another slot. In
order to do this, the user must first select the existing slot from the combo boxes on the
top of the Appointment Calendar screen and then select the new slot from the combo
boxes at the bottom of the same screen. The user must then press the “Move” button. If
this is a valid operation, the appointment is moved from its old slot to its new slot and the
user will get a confirmation message on a separate pop-up window. If there is no
appointment at the old slot, or if there is another appointment in the new slot, an error
message will be displayed on a separate pop-up window. In either case, the user must
manually close the pop-up window and the Appointment Calendar screen will be
displayed again.
4.6. To go back to the main screen
From the Phone Diary screen, the user can press the “Phone Book” button to go back to
the main screen. This will close the Phone Diary screen and open the Phone Book screen.
4.7. To exit from the system
A user can exit from the system directly from the Phone Diary screen by pressing the
“Exit” button. This will close all the screens and terminate the system.
Glossary
Phone Book – the entire product is called the Phone Book.
Phone Diary – the component that maintains the names, addresses and phone numbers.
Appointment Calendar - the component that maintains the appointments.
Phone Entry – an entry in the phone diary that consists of a last name, first name, an
address and up to 3 phone numbers. Phone entries are uniquely identified by last names.
Appointment Entry – an entry in the appointment calendar that consists of a date, start
time, end time, up to 5 lines of appointment description and an optional last name.
Appointment entries are uniquely identified by the date, start time and end time
combinations.