1
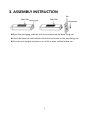
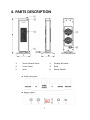
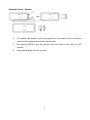
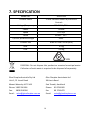
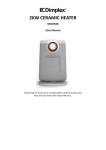
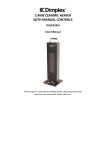
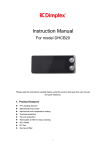
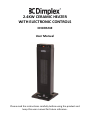
2.4KW CERAMIC HEATER WITH ELECTRONIC CONTROLS DHCER24E User Manual Please read the instructions carefully before using the product and keep this user manual for future reference. 1. PRODUCT FEATURES • 2.4kW heat output • Choice of heat settings • Double overheat protection • Tip over safety protection • Oscillating function • Electronic climate control • LED temperature display • Remote control • 12 month warranty 2 2. SAFETY WARNINGS • Please operate the heater on a dry even surface. • This appliance is not intended for use by persons (including children) with reduced physical, sensory or mental capabilities, or lack of experience and knowledge, unless they have been given supervision or instructions concerning the use of the appliance by a person responsible for their safety. • Disconnect the heater from mains when not in use or cleaning. • Do not operate the appliance with a damaged cord or plug. If the power supply cord is damaged, it must be replaced by the manufacturer or its service agent or a similarly qualified person in order to avoid a hazard. • It is not recommended to use an extension cord or power board on this appliance. • Do not immerse cord, plug or any part of the appliance in water or any other liquid. • Do not place the heater on or near any other source of heat. • WARNING: do not cover the heater. This may cause the unit to overheat. • A fire may occur if the heater is covered with or touches flammable material, including curtains, drapes, bedding etc. When in operation KEEP THE HEATER AWAY FROM SUCH MATERIALS. • Do not use the heater in the immediate surroundings of bathtubs, showers, washing stands or swimming pools. • Do not use the heater outdoors. • When the heater is turned on for the first time, it may release a slight, harmless odor. This odor is a normal occurrence caused by the initial heating of the internal heating elements and should not occur again. • Do not operate the heater in areas where flammable liquids are stored. • Do not operate the heater in close proximity to curtains or other combustible materials. Keep any combustible materials at least 1.0m away from the heater. 3 3. ASSEMBLY INSTRUCTION Open the packaging, take the unit out and unscrew the base fixing nut. Insert the base into the bottom of the unit and screw on the base fixing nut. Turn the unit upright and place it on a flat or even surface before use. 4 4. PARTS DESCRIPTION 1. Touch Sensor Panel 2. Display Window 3. Front Cover 4. Base 5. Inlet 6. Power Switch 5 5. OPERATING INSTRUCTIONS First, connect the power cord to the correct power supply (220-240V~/50Hz/ 10 amps). 1. Press the power button at the back of the unit to turn it on. You will hear 2 beeps, which indicates the unit is in standby mode. 2. Once in standby mode, the power button needs to be pressed to start the heater. This is the only button that works under standby mode. Press it a second time to switch it off. Touch Sensor Panel • Press the “On/Off” button to turn the unit On/Off. • Press the “Swing” button to start or stop oscillation. - The oscillation indicator light will illuminate when the swing function is activated. - The oscillation indicator light will be turned off when in fixed operation. • Press the “Temp/Timer” button to set your desired temperature. You can increase or decrease temperature by pressing the + or – button. The temperature range is from 15°C to 35°C and in increments of 1°C. • Press the “Temp/Timer” button a second time to set the timer. This will tell the heater how long you want the unit to operate before shutting off automatically. The timer range is from 1-12 hours and in increments of 1 hour. • Press the “Heater” button to set the unit on low or high heat. - The low heat indicator light will illuminate when the “Heater” button is pressed once. - The high heat indicator light will illuminate when the “Heater” button is pressed twice. 6 Remote Control • Press the button to turn the unit On/Off. • Press the button to start or stop oscillation. - The oscillation indicator light will illuminate when the swing function is activated. - The oscillation indicator light will be turned off when in fixed operation. • Press the “Set” button to set your desired temperature. You can increase or decrease temperature by pressing the + or – button. The temperature range is from 15°C to 35°C and in increments of 1°C. • Press the “Set” button a second time to set the timer. This will tell the heater how long you want the unit to operate before shutting off automatically. The timer range is from 1-12 hours and in increments of 1 hour. • Press the button to set the unit on low or high heat. - The low heat indicator light will illuminate when the “Heater” button is pressed once. - The high heat indicator light will illuminate when the “Heater” button is pressed twice. 7 Remote Control – Battery 1. To remove the battery, open the groove at the bottom of the remote (press buckle inwards to pull out the groove) 2. Put battery CR2032 into the groove with flat side to the back of the remote. 3. Push groove back into the remote. 8 6. CLEANING AND MAINTENANCE Make sure the power switch is turned off and the plug is disconnected from the socket before cleaning or maintenance. Otherwise, it may cause an electric shock. 1. Cleaning the unit’s surface: Clean the surface with a damp cloth (or add some detergent). Do not use corrosive detergent or solvent to clean, such as Petrol/ Turpentine etc. Do not wash the unit directly with water. 9 7. SPECIFICATION Model No. DHCER24E Product name 2.4kW Ceramic Heater w/Electronic Controls Voltage/Frequency 220-240V~/50Hz Power 2400W Speed ≥1.5 m/s Noise ≤50dB(1m) Tip over protection angle 45±5° Product size 608h x 222w x 210d (mm) N.W. 3.5kg G.W. 4.25kg DISPOSAL: Do not dispose this product as unsorted municipal waste. Collection of such waste is required to be disposed of separately. Glen Dimplex Australia Pty Ltd Glen Dimplex Australasia Ltd Unit 1, 21 Lionel Road 38 Harris Road Mount Waverley VIC 3149 East Tamaki, Auckland Phone: 1300 556 816 Phone: 09 274 8265 Fax: Fax: 09 274 8472 Email: [email protected] Email: 1800 058 900 [email protected] 10