1
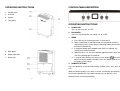
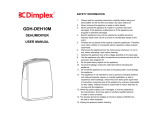
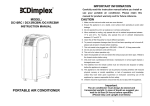
SAFETY INFORMATION
1.
GDDEU30
DEHUMIDIFIER
USER MANUAL
Please read the operating instructions carefully before using your
dehumidifier for the first time and keep it for future reference.
2. Never immerse the appliance in water or other liquids.
3. Never operate the appliance if a cable or connector has been
damaged or if the appliance malfunctions or if the appliance was
dropped or otherwise damaged.
4. Electrical appliances may only be repaired by qualified personnel;
improper repair work can be a source of considerable danger to users.
5. Children are not aware of the hazards of electric appliances. Therefore,
never allow children to operate electric appliances unless properly
supervised.
6. Disconnect the appliance from the mains power whenever it is not in
use and before relocating it.
7. Operate the appliance only at the voltage specified on the rating label.
8. Use the appliance only within household environments and only for the
purpose it was designed for.
9. Do not place heavy objects on the appliance.
10. To prevent spillage, empty the water tank before relocating the
appliance.
11. Do not tilt the appliance to any side as escaping water could damage
the appliance.
12. This appliance is not intended for use by persons (including children)
with reduced physical, sensory or mental capabilities, or lack of
experience and knowledge, unless they have been given supervision
or instruction concerning use of the appliance by a person responsible
for their safety. Children should be supervised to ensure that they do
not play with the appliance.
13. When the power supply cord is damaged, it must be replaced by
the manufacturer, its service agent or a similarly qualified person
in order to avoid a hazard.
14. The devices should be installed at minimum distant of 50cm from
the wall or other obstacles.
15. Unplug the appliance before cleaning.
1
OPERATING INSTRUCTIONS
CONTROL PANEL DESCRIPTION
1. Control panel
2. Air outlet
3. Handle
4. Front panel
OPERATING INSTRUCTIONS
1. POWER KEY
Press to turn unit “ON” or “OFF”.
2. FAN SPEED
Press this key to regulate fan speed, “HI” or “LOW”.
3. TIMER
a. Press the key to set time you need. (1 to 24 hours)
b. When setting timer in stand-by mode, the unit will be turned on
automatically; when setting timer in operating mode, the unit will be
turned off automatically.
c. If the power button pressed before the timer has elapsed, the
setting timer will be canceled.
d. While the timer is in use, the indicating light illuminates; when not in
use, the indicating light is turned off.
e. 5 seconds after the timer has been set, the display
will switch
back to show the ambient humidity. Press this button again to show
the progress of the timer.
5. Back panel
6. Water outlet hole
7. Water tank
4. HUMIDITY SETTING
Press this button to set the desired humidity (RH50%, 60%, 70%, 80%, AU,
CO.)
When the room humidity is less than 3% of the set humidity, the compressor
will turn off automatically. If the room humidity rises to above 3%, the
compressor will re-start automatically.
2
3
reasons, please check the plug and power supply for a poor power
The fan will continue to run until the unit is switched off.
connection. If the plug and power supply is in normal condition, wait for
Comfort Mode (Indicated by: AU)
10 minutes and restart the unit (it takes about 10 minutes to reset). If the
a. When ambient temperature is below 5
unit still does not start in 10 minutes, please contact your local retailer/
℃, the compressor will switch off.
b. When ambient temperature is between 5℃ and 20℃, it will automatically
set the humidity level at 60%
c. When ambient temperature is between 20
℃ and 27℃, it will
service agent for repair.
6. When the dehumidifier is in operation, the running compressor can
sometimes produce heat and make the room temperature higher. This is
automatically set the humidity level at 55%
℃
d. When ambient temperature is above 27 , it will automatically set the
humidity level at 50%
.
normal.
7 If the defrost light illuminates – it indicates that the unit is in defrost mode.
During this operation mode the compressor is switched off, however the
Continuous Mode (Indicated by: CO)
fan motor will still be running. The unit should resume normal operation
The continuous mode allows the dehumidifier to run continuously at a set
after several minutes.
humidity level. The unit will only stop once the water tank is full.
DRAINAGE INSTRUCTIONS
TANK FULL INDICATOR
The extracted water can be collected in the water tank, or drained
If this indicator illuminates, it shows that the water tank is full. The
continuously with a PVC hose (not supplied):
compressor and fan will stop automatically until the water tank is emptied.
WATER TANK:
PRECAUTIONS
1. The dehumidifier will not operate if the humidity setting is higher than the
ambient humidity.
2. Drain the water in the water storage tank when the water tank is full and
the water level indicator light illuminates. Reinstall the empty water tank
back to its position, so the unit can continue its operation.
3. When the unit stops, it is required that you wait for 3 minutes before you
restart the unit to protect the compressor from damage.
When the Tank Full indicator illuminates, the tank is
full, the compressor and the fan will stop operation,
please empty the water tank:
1. Remove the water tank as Fig 01. and empty it.
2. Insert the water tank gently back into the unit to
its original position.
4. The operating temperature range for this unit is 5-32oC
CONTINUOUS DRAINAGE
5. If the dehumidifier does not start (i.e. the operation light does not
When you want to use this function please pull out
illuminate) or the dehumidifier makes intermittent stops for unknown
4
Fig 01
Fig 02
the water tank and plug a PVC water discharge pipe
5
into the “Water outlet hole” (See Fig.02). Then insert the water tank back into
the unit, so the unit can resume operation.
The continuous drainage hose will need to be directed towards an outdoor
area for unrestricted flow of water.
TROUBLE SHOOTING
Problems
E1
Cause of problem
Solution
Temperature sensor error
please contact service agent or
indicating E1, control system is off
FILTER REMOVAL
•The filter can be removed from its slot by pulling on the filter handle and
similarly qualified persons for
E2
Coil sensor error indicating E2,
repair
control system is off
sliding it out from the back of the appliance.
• It is recommended that the filter is removed
and cleaned with warm water, below 40°C
SPECIFICATIONS
MODEL
every 2 weeks. Allow for it to dry naturally
GDDEU30
SPECIFICATIONS
and then reinstall.
POWER SUPPLY
220-240V~50Hz
MAINTENANCE INSTRUCTIONS
POWER INPUT(EN60335)
390W
1. Do not position the unit on an uneven surface when in operation to avoid
RUNNING CURRENT
1.8A
vibration and noise and potential damage to the unit.
2. Never insert any objects into the unit’s body to avoid hazards or unit
failure.
3. During power off or when not in use for a long time, please remove the
power cord from the outlet.
NET WEIGHT
13.4Kg
MOISTURE REMOVAL
( 30
RH80%)
30 litres/day
CABINETDIMEMSION
360Wx246D x506H
℃
TEMP. RANGE FOR USE
5⁰C~32⁰C
WATER TANK CAPACITY
3.2L
4. For better dehumidifying, the areas in front and rear of the unit should
be clear and free from obstacles.
5. Clean the air filter once every two weeks (never use alcohol, gasoline,
or hot water with a temperature of over 400C).
(CE) N 842/2006:
R410A is a type of fluorinated greenhouse gases covered by the Kyoto Protocol.
Its total global warming potential (GWP) is 1975
6
7
SUPPLIER INFORMATION
Glen Dimplex Australia Pty Ltd
Unit 1, 21 Lionel Road,
Mount Waverley VIC 3149
Australia
Ph: 1300 556 816
Fax: 1800 058 900
Web: www.dimplex.com.au
Glen Dimplex New Zealand Ltd
38 Harris Road, East Tamaki,
Manukau, Auckland 2013
New Zealand
Ph: (09) 274 8265
Fax: (09) 274 8472
Web: www.dimplex.co.nz
This marking indicates that this product should not be disposed with other
household wastes throughout NZ/AUS. To prevent possible harm to the
environment or human health from uncontrolled waste disposal, recycle
it responsibly to promote the sustainable re-use of material resources. To
return your used device, please use the return and collection systems or
contact the retailer where the product was purchased. They can direct you
on how to dispose it in an environmentally friendly manner.
8