1
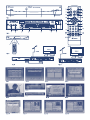
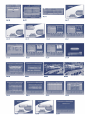
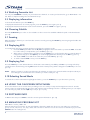
Picture similar
Digital Free-To-Air Terrestrial
Receiver PRIMA III
User Manual
PART 1 • English
DIGITAL FREE-TO-AIR TERRESTRIAL RECEIVER PRIMA III
USER MANUAL
Safety Instructions
Always read the safety instructions carefully
Keep this User's Manual for future reference
Keep this equipment away from humidity
Lay this equipment on a reliable flat surface before setting it up.
Do not position the receiver on soft furnishings.
If any of the following situations arise, get the equipment checked by a service technician:
n The equipment has been exposed to moisture.
n The equipment has been dropped and damaged.
n The equipment has obvious sign of breakage.
n The equipment has not been working well or you cannot get it work according to User's Manual.
Warning
To prevent the risk of electric shock, do not open the cover or the back of the receiver.
Do not block the ventilation holes of the device. Leave appropriate gap above and around it to allow for
adequate ventilation.
Do not place the device in an unventilated cabinet or on top of a unit which emits heat.
Copyright Statement
No part of this publication may be reproduced in any form by any means without the prior written permission. Other
trademarks or brand names mentioned herein are trademarks or registered trademarks of their respective companies.
Disclaimer
Information in this document is subject to change without notice. The manufacturer does not make any representations
or warranties (implied or otherwise) regarding the accuracy and completeness of this document and shall in no event be
liable for any loss of profit or any commercial damage, including but not limited to special, incidental, consequential, or
other damage.
English
Please read this User Manual carefully to ensure proper use of this product and keep this manual for future reference.
PART 1 • English
TABLE OF CONTENTS
1.0 INTRODUCTION
1.1 Main Features
1.2 Accessories
3
3
3
2.0 FRONT PANEL AND REAR PANEL
2.1 Front panel
2.2 Rear panel
2.3 Remote Control
2.4 Installing the Batteries
2.5 Using the Remote Control
3
3
3
4
4
4
3.0 CONNECTIONS
3.1 Connecting to a TV Set
3.2 Connecting to TV and VCR
4
4
5
4.0 FIRST TIME INSTALLATION
5
5.0 BASIC OPERATIONS
5.1 Switching On and Off
5.2 Changing Channels
5.3 Adjusting the Volume
5.4 Watching Favourite List
5.5 Displaying information
5.6 Choosing Subtitle
5.7 Freezing
5.8 Displaying EPG
5.9 Displaying Text
5.10 Selecting Sound Mode
5
5
5
5
6
6
6
6
6
6
6
6.0 USING THE ON-SCREEN SETUP MENU
6
7.0 SOFTWARE INFO
6
8.0 MANAGING PROGRAM LIST
8.1 Creating Favourite Channel Groups
8.2 Locking a Channel
8.3 Editing a Channel
8.4 Moving a Channel
8.5 Sorting Channels
8.6 Skipping a Channel
8.7 Deleting a Channel
8.8 Searching for a Channel
8.9 Watching Locked Channels
6
7
7
7
7
7
7
7
8
8
9.0 INSTALLATION
9.1 Antenna Power
9.2 Country Setting
9.3 Language
9.4 Time Setting
9.5 Program Search
8
8
8
8
8
8
10.0 TV SETUP
10.1 TV Format
10.2 TV Mode
10.3 OSD Transparency & Banner Display Time
10.4 Video Output
10.5 Video Enhancement
9
9
9
9
9
9
11.0 PASSWORD
9
12.0 ADVANCED TIMER
10
13.0 SET DEFAULT
10
14.0 SOFTWARE UPDATE
10
15.0 ACCESSORY
10
16.0 TROUBLESHOOTING
10
17.0 SPECIFICATIONS
11
PART 1 • English
1.0 INTRODUCTION
English
PRIMA III is a Free-To-Air digital terrestrial receiver, allowing you to access free-to-air digital terrestrial TV channels
and radio broadcasts on your TV set. Its digital reception covers VHF & UHF band. Compared with the analogue TV
programs, digital TV programs eliminate the noise and interference but offer high quality video and audio. An on-screen
initial installation guide is provided so that you can easily start to enjoy watching the programs. In addition, a fully
featured remote controller is included that offers you access to every feature with a simple press of a button.
1.1 Main Features
n
n
n
n
n
n
n
n
n
n
n
n
n
n
n
n
n
Fully complies with European DVB-T standard
MPEG-2 ISO/IEC 13818 transport stream compliant audio/video decoding
Bandwidth of 6/7/8 MHz supported
COFDM demodulator
Automatic/manual channel search
Many Channel handling options as: locking, editing, moving, sorting, skipping, deletion and searching
Parental lock control
NTSC/PAL converting automatically and manually
EPG (Electronic Program Guide) and Teletext function with search function
Multiple-language OSD
Supports multi-subtitle
USB port ONLY for software upgrade
2 SCART’s (TV SCART output/VCR SCART input)
Tuner RF in/loop through
Active antenna support (5 volt)
Full function remote control
Extended FAV list for up to 8 groups
1.2 Accessories
Before installation, please check the items of the package. The package should contain the following items:
n SRT PRIMA III Receiver x1
n Remote Control x1
n AAA Battery for the remote control x2
n User Manual x1
2.0 FRONT PANEL AND REAR PANEL
2.1 Front panel
(Fig. 1)
1. POWER BUTTON
Used to turn on/off the main power supply.
2. REMOTE CONTROL SENSOR Used to receive the signal from the remote control.
3. STANDBY INDICATOR
Used to visually show power state of the receiver, the green LED will be
light if turned on the receiver and the red LED will be light if the receiver
entered standby mode.
4. CHANNEL UP/DOWN
Used to change channels without using the remote control.
2.2 Rear panel
(Fig. 2)
1.
2.
3.
4.
5.
6.
7.
ANT IN
TO TV
S/PDIF COAXIAL
VCR SCART
TV SCART
USB-Service Port
POWER CABLE
This socket connects to your external aerial.
This socket will bypass the RF signal to either your TV or another video system.
This socket connects to a coaxial socket on your surround sound system.
This socket connects to either a DVD or other video system.
This socket connects to your TV.
This socket is explicitly to use for software upgrade.
This is used to connect to your main power supply.
3
PART 1 • English
2.3 Remote Control
(Fig. 3)
1. DTV/VCR
2. INFO
NOTE:
To switch between the VCR SCART input and the DTV output mode.
To display information about the program being viewed or further information about the
channel data.
3. PAUSE
To pause or playback the program being viewed.
4. EPG
To display information about the program being viewed and what’s on next.
5. EXIT
To return to the previous screen or menu.
6. OK
To confirm a selection within a menu.
7. VOL+
To move around the menu screens or changing the volume in non-menu state.
8. FAVORITE
To access your favourite channels.
9. GAME
To display built-in mini game: Gomoku.
10. RECALL
To switch between the last two viewed channels.
11. SUBTITLE
To switch between different subtitles that are broadcasted
12. TEXT
To open teletext OSD display if teletext available in the broadcasted stream. 2nd pressing
will call up search function.
13. STANDBY
To switch the receiver to Standby and ON.
14. MUTE
To turn the sound on or off.
15. MENU
To open the Main Menu.
16. CH+
To move around the menu screens or selecting the channels in non-menu state.
17. VOLTo move around the menu screens or changing the volume in non-menu state.
18. CHTo move around the menu screens or selecting the channels in non-menu state.
19. NUMBER KEYS To select channel numbers or input numbers/letters in menus.
20. AUDIO
To set the sound output, the available settings are STEREO, LEFT, RIGHT, MONO.
21. TV/RADIO
To switch between TV channels and Radio stations.
22. COLOR KEYS (RED/GREEN/YELLOW/BLUE):
To operate different functions in Menu screens or in viewing mode: RED -set time for sleep
timer, GREEN -Call directly TV List from Main Menu, YELLOW -Multi Picture (9 PIC.).
SUBTITLE/TEXT/LANGUAGE may not be available for all channels
2.4 Installing the Batteries
Remove the battery cover from the remote control and put 2 x AAA size batteries inside the compartment.
The diagram inside the battery compartment shows the correct way to install the batteries.
1. Open the cover
2. Install batteries
3. Close the cover
2.5 Using the Remote Control
To use the remote control, point it towards the front of the digital receiver. The remote control has a range of up to 7
metres from the receiver at an angle of up to 60 degrees. (Fig. 4)
The remote control will not operate if its path is blocked.
NOTE:
Sunlight or very bright light will decrease the sensitivity of the remote control.
3.0 CONNECTIONS
CAUTION:
Make sure to check the voltage specification of the wall outlet is the same rating with the receiver. To
prevent the risk of electric shock, do not open the cover or the back of the receiver.
3.1 Connecting to a TV Set
(Fig. 6)
4
PART 1 • English
3.2 Connecting to TV and VCR
NOTE:
When connecting the receiver to other equipment, e.g., TV, VCR and amplifier, make sure to refer to relevant
user manual for instruction. Also, make sure you disconnect all the equipments from the mains supply before
the connection. (Fig. 5)
English
4.0 FIRST TIME INSTALLATION
After all the connections have been made properly, switch on your TV. Make sure the receiver is connected to the mains
and press Power to switch the receiver on. If you are using the receiver for the first time, a Setup - Installation menu will
be displayed to guide you through the initial setup. Use the remote control to finish the setup.
1. At the Setup - Installation menu, select in first step your regional settings, accordingly to your region and
settings you prefer.
2. Select then following settings Antenna Power, Country Setting, OSD Language, Audio Language, Subtitle
Language, LCN, Time Zone. If you use an active antenna please select Antenna Power to ON.
For well known countries where the Logical Channel Numbering is provided the LCN mode is
automatically set to ON, but if your country is providing LCN although, then you can switch ON. If you
aren't sure on that point please leave it switched OFF.
(Scr. 1) Press q to adjust time settings (Scr. 2)
NOTE:
Make sure to select the region you are located since the receiver will scan the channels based on the
bandwidth of the region you selected. If your region is not on the list, you are recommended to conduct a
manual search. Press Manual Search (GREEN) button on remote control.
3. Then select Auto Scan (RED) to proceed (Scr. 3)
4. Wait to complete the scanning.
In case you want to stop the scanning, press the EXIT key. The channels already found will still be stored.
(Scr. 4)
5. When finished, all channels found will be stored automatically. The first found channel will be played. Refer
to chapter Country Setting & Program Search. (Scr. 5)
Now you are ready to watch digital terrestrial TV channels and radio broadcasts.
In case you skip the Setup - Installation screen, you can still specify your Country Settings and Program Search via the
on-screen setup menu.
The Country Setting & Program Search menu can be accessed via Main Menu >Installation. Refer to chapter Country
Setting & Program Search.
5.0 BASIC OPERATIONS
Once program search is completed, you can start to watch digital terrestrial TV and radio channels. Some typical
operations are given in this chapter.
5.1 Switching On and Off
Whenever you are not using the receiver, press the STANDBY key on remote control to put it into standby mode.
5.2 Changing Channels
To switch between different channels, you can:
n Press OK to display the channel list and p/q to select a desired channel.
n Press the p/q key or buttons on the receiver to go to the previous/next channel.
n Use the numeric keys to select a channel number.
n Use the RECALL key to return to the previous viewed channel.
Whenever you change a channel, a banner appears at the bottom of the screen displaying the basic information on the
current channel. (Scr. 6)
5.3 Adjusting the Volume
Press the t/u key to adjust the volume. (Scr. 7)
5
PART 1 • English
5.4 Watching Favourite List
You can press FAVORITE to watch your preset favourite channels. To create your favourite list, go to Main Menu > TV
List. Refer to chapter Creating Favourite Channel Group.
5.5 Displaying information
To show the Info Banner press the INFO key.
To display the detailed info of current program, press the INFO key once again. (Scr. 8)
To display the detailed information of the current channel, press the INFO once again. (Scr. 9)
5.6 Choosing Subtitle
Press the SUBTITLE key to select or close subtitles on the screen. The available subtitles depend on the broadcaster.
(Scr. 10)
5.7 Freezing
When watching a channel, you can freeze the current screen by pressing the PAUSE key. Pressing it again disables the
freeze function.
5.8 Displaying EPG
To view the EPG (electronic program guide) provided by the content provider.
1. Press the EPG key and then use the p/q key highlight a desired channel to preview the EPG. To be able
to scroll in today's complete EPG, press the u key. (Scr. 11)
2. When today's complete EPG is displayed, use the p/q key to scroll along the EPG. To view the EPG of
next/previous day, press the t/u key. To see the highlighted EPG details, press the OK key. (Scr. 12)
3. The detailed EPG screen will show as below if pressed the OK key. (Scr. 13)
4. To exit the detailed EPG screen, press the EXIT key.
5.9 Displaying Text
Press the TEXT key to start Teletext function. If Teletext is transmitted, press q key and OK. 2nd pressing will call up
search function. Each time by pressing OK button the level of transparency will be changed. Press EXIT key to close it.
(Scr. 14)
NOTE:
When you want to use the search function for Teletext, we suppose to insert the whole text phrase what you
are looking for to minimize the time schedule you need to wait. (Scr. 15)
5.10 Selecting Sound Mode
To switch the sound mode between Left, Right and Stereo, press the AUDIO key to open this menu. (Scr. 16)
6.0 USING THE ON-SCREEN SETUP MENU
The receiver features an on-screen menu providing access to a variety of setup and management controls. Use the
remote control to navigate through the menu and activate required settings. As this is a dialling menu you can adjust
it's order like you prefer. Use the t/u key to adopt. (Scr. 17, 18)
7.0 SOFTWARE INFO
In Main menu state press INFO to view the current system information. (Scr. 19)
8.0 MANAGING PROGRAM LIST
Main Menu > TV List / Radio List
All TV channels are listed in the TV List and all Radio channels in Radio List. There you can make your own favorite
groups or lock, edit, move, sort, skip, delete and search for a channel. You can also access TV List when you press the
GREEN button in viewing mode.
6
PART 1 • English
Possible via TV or Radio list depending on what channel you will add to FAV list.
This feature allows you to group your favorite channels. To create your favorite groups:
1. Select the Heart sign (below channel list) with the channel t/u keys than choose channel with p/q keys
which you would like to add to one of the Favorite groups.
2. Then press Numeric key between 1 and 8 to select a Favorite group which the desired channel should
belong to. The symbol for the favorite group will be coloured. Now you have the possibility to Save
(YELLOW) or you add other channels to Favorite groups.
3. Once your Favorite group is created, you can press the FAVORITE key to quickly access your favorite
channels. The according Favorite group symbol is from now on as well coloured to see in INFO. (Scr. 20)
8.2 Locking a Channel
Possible via TV or Radio list depending on what channel you will lock.
1. Select the Padlock sign (below channel list) with the channel t/u keys than choose channel with p/q
keys which you would like to lock. (Scr. 21)
2. To apply done changes press Save (YELLOW).
8.3 Editing a Channel
Possible via TV or Radio list depending on what channel you will edit.
1. Select the Edit sign (below channel list) with the channel t/u keys than choose channel with p/q keys
which you would like to edit.
2. The field with channel name will be shown and then press OK to edit channel name. (Scr. 22)
3. To apply done changes press Save (YELLOW).
8.4 Moving a Channel
Possible via TV or Radio list depending on what channel you will add to FAV list.
1. Select the Move sign (below channel list) with the channel t/u keys than choose channel with p/q keys
which you like to move.
2. Press OK and the symbol will be displayed.
3. Use the p/q keys to move the channel to a desired position. (Scr. 23)
4. To apply done changes press Save (YELLOW).
8.5 Sorting Channels
Possible via TV or Radio list depending on what channel you will add to FAV list.
1. Select the Sort sign (below channel list) with the channel t/u keys than choose channel with p/q keys
which you would like to sort.
2. Then you can sort the channels by the channel name A-Z or Z-A (RED) or Free - Pay / Pay - Free (GREEN).
Select one method as required. (Scr. 24)
3. Press MENU or EXIT to return the menu. The list is now sorted by the specified order.
NOTE:
Please take care once desired order is executed this order stays.
8.6 Skipping a Channel
Possible via TV or Radio list depending on what channel you will skip.
1. Select the Skip sign (below channel list) with the channel t/u keys than choose channel with p/q keys
which you would like to skip in channel zapping mode.
8.7 Deleting a Channel
1. Select the Delete sign (below channel list) with the channel t/u keys than choose channel with p/q keys
which you like to delete.
2. Press OK and an X symbol will be displayed. Repeat this step at the channel(s) to be deleted.
3. To apply done changes press Save (YELLOW).
7
English
8.1 Creating Favourite Channel Groups
PART 1 • English
8.8 Searching for a Channel
1. Select the Search sign (below channel list) with the channel t/u keys than press OK and keypad will appear
to insert channel name you're searching for.
8.9 Watching Locked Channels
Once a channel is locked, whenever you want to watch a locked channel, correct PIN must be entered. (Scr. 25)
9.0 INSTALLATION
9.1 Antenna Power
The default setting is OFF. Set this option to ON if this receiver is connected to an external active antenna that amplifies
the received signal. This receiver box can supply 5 V DC at 50 mA maximum.
Caution:
If you are using a normal passive antenna, make sure to set this setting to OFF. (Scr. 17)
9.2 Country Setting
Country:
Select the country you are located. Depending on the country you select, the LCN mode and time
zone settings change accordingly. (Scr. 1)
9.3 Language
OSD Language:
Audio Language:
Select the on-screen-display language as required.
This option allows you to select your audio language. If neither of your selected language is available
on the program transmitted, the main language of the program will be used. You can alternatively
press the AUDIO key (in viewing mode) to use another available language.
Subtitle Language: Allows you to select the subtitle language. If your selected language is not available on the program
transmitted, the main language of the program will be used. You can also select OFF to close the
subtitle on the screen.
9.4 Time Setting
Select an appropriate time zone to display the local time correctly. Both EPG and system schedule need a correct time
zone setting.
Auto Time Zone: Allows you to enable/disable Greenwich Mean Time (GMT) usage & the time zone which is adjusted
through your adjusted country.
If you prefer to set the time manually, select OFF in Auto Time Zone item and then manually select the time zone. (Scr. 2)
9.5 Program Search
Auto Scan
1. Enter the Auto Scan menu via Main Menu > Installation.
2. Select Auto Scan (RED) to start auto search. (Scr. 1)
3. Select whether to erase your previous channel list as required or to cancel Auto Scan. (Scr. 26)
4. Wait to complete the scanning.
In case you want to stop the scanning, press the EXIT key. The channels already found will still be stored.
(Scr. 4)
5. When finished, the first found channel will be played.
8
Manual Scan
If any channel is missing after auto search, or you want to add newly launched channels, you can use Manual Scan to scan the
desired channels. To manually search the target channel, you must know its parameters, e.g., the channel number. After the
channel is found, it is appended to the current channel list.
1. Enter the Manual Scan menu via Main Menu > Installation.
2. Specify the appropriate channel number in the Channel No field by pressing t/u keys. Upon your
selection, the frequency and bandwidth values are changed accordingly. Use Numeric buttons to enter a
specific frequency.
3. Select OK to start manual search. (Scr. 27)
4. If no signal is found, a message indicating no signal will appear. Otherwise scanned channel will be saved
and appended to the current channel list.
10.0 TV SETUP
10.1 TV Format
This option allows you to select the aspect ratio of the video output. If you are using normal 4:3 TV, it is OK to view the
regular 4:3 content being broadcasted. But occasionally broadcasters transmit widescreen content; in this situation, you
can choose how to display it in a conventional TV set.
4:3 LB (Letterbox) For conventional 4:3 TV. The full width of widescreen content is displayed on a normal TV with black
bars above and below the picture. (Scr. 28)
4:3 PS (Pan & Scan)For conventional 4:3 TV. It crops the left and right edges of a widescreen content to fit a normal TV.
(Scr. 29)
16:9PB
If you are using a wide screen TV, select this option or select 16:9 Auto to see when content is
switched to 4:3.
10.2 TV Mode
This option allows you to select your TV system among PAL, NTSC and Auto. (Scr. 30)
10.3 OSD Transparency & Banner Display Time
This options you can adjust according your wishes.
10.4 Video Output
Set the video mode as CVBS or RGB.
10.5 Video Enhancement
This options you can adjust according your wishes.
11.0 PASSWORD
This feature allows you to prevent children or unauthorized people from access to your settings or watching channels.
1. Go to Main Menu > Password. First you will need to enter PIN as prompted to use the parental control
menu. The default PIN is 0000
2. After correct PIN input, the following options are provided: (Scr. 31)
Menu Lock:
Allows you to lock important setting menus.
Channel Lock:
Allows you to switch ON or OFF the channel lock for desired channel (s). When set to ON, all the
channels with padlock symbol will be locked (provided that you have set in TV-List). (Scr. 21)
Censorship Lock:
If on a certain channel is broadcasted a parental rating for example 12 years, then the movie will be
locked with Password.
Change Password: Allows you to change the PIN. A PIN can be entered in 4 digits. To change the PIN, enter the old,
new PIN in the provided fields. After pressing OK, a message indicating PIN Code Changed will
appear.
NOTE:
To activate the channel lock feature, Channel Lock must be set to YES. If you want to lock particular channels while
keeping other channels unlocked, use TV List table to make the settings.
9
English
PART 1 • English
PART 1 • English
12.0 ADVANCED TIMER
This feature allows the receiver to automatically switch on (from Standby) and tune to a pre-specified channel for a preset length of time. You can use this feature to schedule recording if your receiver is connected to a VCR-recorder or as a
reminder of a certain programs. Up to 10 tasks can be scheduled.
1. First choose a Timer which you want to configure (between 1-10).
2. Press Edit (RED) to enter the Event edit pane.
3. Enter the following settings as required. Use the p/q keys to move between setting items, the t/u key
to switch between available selections and numeric keys to enter numeric value.
Mode:
You can repeat the task by setting the cycle as Once, Daily, Weekly or Monthly. Or you can select Stop
to disable the task.
Start and End Time: Enter the start and end time that automatically turns on and off the receiver.
Channel Type:
Select TV or radio channel as required.
Channel No:
Select the channel to be played at scheduled time.
4. When the setting is done, press OK to save the changes. (Scr. 32, 33)
13.0 SET DEFAULT
Go to Main Menu > Set Default. First, you will need to enter PIN as prompted to be able to set factory default.
1. To reset defaults, press OK. (Scr. 34, 35)
2. All programs you have searched will be erased and all parameters, e.g., the regional settings, languages
and favourite lists, will return to the factory default.
3. After restoring defaults, the Setup Installation screen appears.
14.0 SOFTWARE UPDATE
Whenever a software update is available on our Website (www.strong.tv), the receiver can be upgraded through USB.
(Scr. 36)
15.0 ACCESSORY
Includes Gomoku, Calendar & Calculator
16.0 TROUBLESHOOTING
If you experience problems with this receiver or its installation, in the first instance please read carefully the relevant
sections of this User Manual and this Troubleshooting section.
Problem
Possible cause
What to do
Standby light not lit
Power cord unplugged
Mains fuse blown
Check power cord
Check fuse
No signal found
Antenna disconnected
Antenna is damaged/misaligned
Out of digital signal area
Check antenna lead
Check antenna
Check with dealer
No picture or sound
Viewing incorrect SCART output
Tuned to digital teletext channel
Press the DTV/VCR button
Retune to another channel
Mosaic blocks in picture or
picture freezes
Antenna may not be compatible
Check antenna
Scrambled channel message
Channel is scrambled
Select an alternative channel
Forgotten channel lock code
10
Re-install channels to cancel channel lock
PART 1 • English
No response to remote
control
Receiver off
Handset not aimed correctly
Front panel obstructed
Remote control batteries are inserted
incorrectly
Handset batteries exhausted
Plug in and turn on receiver
Aim handset at front panel
Check for obstructions
Check batteries direction
After moving the receiver to
another room, there is no
digital reception
The antenna feed may come through a
Try a direct feed from the antenna
distribution system which may reduce the
digital signal now received by the receiver
English
Replace remote control batteries
17.0 SPECIFICATIONS
Demodulation
Demodulator:
OFDM Modulation:
Packet Carries:
Guard Interval:
COFDM
2K, 8K FFT, SFN and MFN
2K/8K
1/4, 1/8, 1/16, 1/32
Tuner
Frequency Range:
Input Impedance:
Signal Input Level:
Bandwidth:
174 ~ 230 MHz (VHF), 470 ~ 862 MHz (UHF)
75 Ohms unbalanced
-78 ~ -25 dBm
6 / 7 / 8 MHz
Decoder
Video:
Audio:
MPEG-2 Transport MP@ML
MPEG-2 Audio Layer I & II
Display
Decoder Module:
Resolution:
Aspect Ratio:
PAL, NTSC
720 x 576 (PAL); 720 x 480 (NTSC)
4:3 (Letterbox, Pan & Scan), 16:9 PB and Auto
Connectors
ANT IN
TO TV
TV SCART
VCR SCART
RCA
USB
IEC 169-2 female connector
IEC 165-2 male connector
composite video (CVBS), RGB, audio L/R
composite video, audio L/R
S/PDIF coaxial for digital audio output
type A female for software upgrade
General Data
Supply Voltage:
Power Consumption (max):
Standby Power Consumption:
Operating Temperature:
Storage Temperature:
Operating Humidity Range:
Net-weight:
Size (W x D x H) in mm:
100 - 240 V AC (SMPS), 50/60 Hz
10 W
2W
0 ~ +45 °C
-25 ~ +60 °C
10 ~ 60 %, RH, Non-condensing
0.78 kg
220 x 161 x 45
Subject to alterations. In consequence of continuous research and development technical specifications, design and appearance of products
may change. All product names are trademarks or registered trademarks of their respective owners.
© STRONG 2009. All rights reserved. 04/2009
11
PART 1 • English
12
Environmental Issues
ENVIRONMENTAL ISSUES
STRONG is committed to reducing the impact of its products on the environment.
To maximise the benefits of our design enhancements, your co-operation is required.
Electronic product recycling
Do not dispose of this product with your
domestic rubbish.
At the end of its useful life, this product
contains materials which when processed
correctly can be recovered and recycled. By
participating in the responsible recycling
of this product you will be reducing the
requirement for new raw materials and
reducing the amount of material that
would otherwise end up in landfill.
When you purchase a new, similar product
your retailer may offer to take this old one
off you. Alternatively, you can take it to
your local recycling centre. Your retailer or
local municipal authority will advise you of
the collection facilities available for waste
electronically products in your area. User
of this service will be free to you.
Within the scope of the European
legislation on Waste Electrical and
Electronic Equipment (Directive 2002/96/
EC valid as of August 2005) STRONG
provides a recycling system free of charge
for consumers to returning products after
end of life. For more information about
STRONG’s environmental policy to you:
www.strong.tv - select “About us” and
“Environmental Policy“ from the submenu.
Packaging
When disposing of this
product packaging, please
ensure that it is recycled.
Packaging material is to be
depolluted in waste
separation.
Power Saving
To save power and money,
please put the product into
standby mode when not in
use. We also recommend
disconnection from mains
supply when not in use for longer
periods of time.
Batteries
Do not dispose of the batteries
from your handset with your
domestic waste.
Where they are available,
participate in your local municipal
or retailer collection schemes
for spent batteries. Batteries
discarded in landfill sites or
incinerated increases the chances
of pollutants being dispersed into
the atmosphere.
Alternations reserved 04/2009
Environmental Issues