1
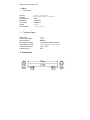
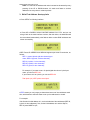
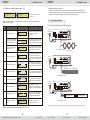
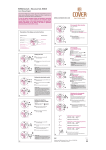
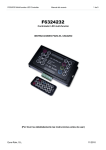
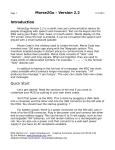
DMX512 LED digital tube manual
DMX512 Digital Tube
User’s manual
(Please read through this manual before use)
DMX512 LED digital tube manual
, Forw ord,
Thanks for choosing our digital tube. Before installation and use, we strongly
recommend you to read through this manual carefully. If device has been
damaged during transport, please report it to your supplier immediately. Please
don’t take any action without contacting your supplier first.
, After-sales Service,
One year from your purchase date, if being used properly in accordance with the
instruction, and quality problems occur, we provide free repair or replacement
services except the following cases:
1. Any defects caused by wrong operations...
2. Any damages caused by unauthorized removal, maintenance, modifying circuit,
incorrect connections and replacing chips.
3. Any damages due to transportation, vibration etc after the purchase.
4. Any damages caused by acts of God, earthquake, fire, lightning strike, pollution
and abnormal voltage.
5. Any damages caused by negligence, inappropriate storing at high temperature
and humidity environment or near harmful chemicals.
6. Product has been updated
, Safety Warnings,
1. Please don’t install this controller in lightning, intense magnetic or high-voltage
fields.
2. To reduce the risk of component damage and fire caused by short circuit, make
sure connections are correct.
3. Always be sure to mount this unit in an area that will allow proper ventilation to
ensure the temperature is in the proper range.
4. Check the voltage is in the proper range and the power adapter polarity is correct.
Do not connect cables with power on and make sure connections are correct.
Check for short circuits with a test instrument before powering on.
5. Please don’t attempt any repairs yourself; doing so will void your manufacturer’s
warranty.
For update information, please consult with your supplier.
DMX512 LED digital tube manual
Product Brief
DMX512 digital tube is a RGB tube light suitable for indoor and outdoor
applications, it is an ideal choice for linear lighting and building decorations.
Conform to international standard DMX512/1990 protocol, which can be
controlled by any DMX device; It adopts three in one SMD LED with long
lifespan ,high color Vibrancy and ultrahigh brightness. By using address encoder,
each tube can be divided into 1, 2, 4, 8, or 16 pixels (respectively occupy 3, 6, 12,
24, 48 DMX addresses). Number of tubes can be written DMX address
continuously, or set for every tube independently, very high flexibility and
universality. This introduced a rich imagination to the architect and lighting
designer and widely used for lighting enhancement among areas such as
Building exterior, bridge, plaza, stage, shopping mall, hotel or casino, etc.
Ⅰ. Product features:
Our Digital Tube boasts the following features over other LED Tubes using 144 RGB LED’s:
● The brightness with 48pcs of SMD led is twice as that of other products with
144pcs of dips type LED.
● The LED color enhanced obviously, you can see the obvious difference.
● With longer lifespan LED, stronger performance on the destructive life test.
● You can program the DMX address uniformly after the project installation,
which brings convenience for the construction.
● Increase more circuit protection function, the product quality is more stable and
reliable
● The dimming is more suitable for human vision, the changing effect is more
exquisite and no flickers in the dynamic and static state.
● Special procedure + excellent color effect LED, which makes it easier to adjust
the real color at your will while compares to the traditional DMX lamps.
DMX512 LED digital tube manual
Ⅱ. Specs:
1. Tube specs
LED qty
Housing
Viewing angle
Brightness
Life Tenure
Length
Pixel possible
SMD 3 in 1 LED 48pcs/m
Milky white/Transparent ¢50 PC tube
≥250°
≥800cd/m2
≥50000hrs
0.5m/1m
1, 2, 4,8,16 pixel/m
2. Technical Specs:
Input power
Power consumption
Data connector
Dmx address setting
Compatible controller
Suitable temperature
Protection level
Ⅲ. Product size:
DC12V
≤12W/m
DMX512
LT-8900dmx address encoder
Standard DMX512 controller/Console
-20C°~50C°
IP66
DMX512 LED digital tube manual
Ⅳ. Definition for 4-pin data cable:
Data cable
Brown
Green
Blue
Black
Definition
DMX512 digital wire A
DMX512 digital wire B
NC(no connection)
GND
Ⅴ. Conjunction sample:
Any dmx controller can run DMX digital tubes compatible with
universal standard DMX512 protocol
DMX512 LED digital tube manual
Appendix:
DMX512 address encoder
Ⅰ. Major function:
1. Write dmx initial address;
2. Divide each meter into 1, 2, 4, 8 or 16 segments;
3. Test DMX512 tube;
Ⅱ. Definition for data cable
Data cable
Brown
Green
Blue
Black
Definition
DMX512 digital wire A
DMX512 digital wire B
Address encoding wire
GND
Ⅲ. Instructions:
1. Preparation:
Connect data cable of DMX tube with the data cable of DMX Address
Encoder first, then set parameters via the four buttons (MODE; SETUP; UP;
DOWN) on the DMX Address Encoder.
2. Main interface:
Press MODE and enter the following interface:
WRITING ADDR: 1: the current initial address, you can press UP or DOWN
to modify;
REP:/1: the current repeatable value, press UP or DOWN to divide each
tube to different segments;
DMX512 LED digital tube manual
STEP: 1: It refers to the address total value increased or decreased by every
pressing of the UP or DOWN buttons; it’s easier and faster to set dmx
addresses for many tubes in a batch process.
3. Write First Address & setup pixels
● Press SETUP to following interface:
● Press UP or DOWN to select initial DMX address from 1-512, and you can
also go back to the main interface to select, after the choice, the addresses will
be remembered automatically, tube flashes white to show DMX addresses are
written successfully.
●REP: Press UP & DOWN to set different segments per meter for each tube, as
follows:
REP: 1 means 16pixels (48 dmx channels) per
meter; REP:/2 (8 pixels, 24 dmx channels);
REP:/4 (4 pixels, 12 dmx channels);
REP:/8 (2 pixels, 6 dmx channels)
REP:/16 (1pixel, 3 dmx channels);
For example, if you want to set a 16-pixel digital dmx tube to 8 pixels per
meter, you can set REP=/02.
If you want to set it to 4 pixels, you can set REP=/04.
Total pixels (16) ÷REP pixels=actual pixel.
●STEP means you can jump a pre-determined amount of dmx addresses each
time, which makes it easier & faster to set up dmx addresses in a batch.
For example:
If the first tube’s initial address is 1,and each tube has 6 dmx addresses (REP:/8,
2 pixels, 6 dmx addresses), first, set the initial address as1 and the Step=6,
REP: 8 press MODE to quit;
DMX512 LED digital tube manual
Now let’s write dmx addresses for the first tube, the initial address for first tube is
1, the first tube is done;
Then press Uppity will be 1+6=7(the initial address for the 2nd tube),press UP
again, it will be 7+6=13(the initial address for the 3rd tube) …… and so on, in this
way, you will find it easier and faster to set up dmx addresses in batch without
complicated calculation.
● Press UP or DOWN to recall the EX-work parameter, if successful, it will show
the following on the display:
4. Testing
Press MODE & enter the following interface:
TESTING ADDR: 8 The LED at segment 8 will light up
VAL: 255
The brightness is at Level 255, the brightest level.
STEP: 1
Now the step is 1,Press UP and DOWN will increase one dmx
address or decrease one dmx address.
Press UP and DOWN to test corresponding address, and the LED at
corresponding address will light up.
If you want to change the above parameters, you can press button SETUP to get
into the set up interface:
There are 4 parameters including FIRST ADDR 、VAL、STEP and Load default.
1) Press SETUP and view the following display:
Press UP and DOWN to test address from 1-512, or go back to main interface to
select.
2) Press SETUP and view the following display:
DMX512 LED digital tube manual
Press UP and DOWN from 0-255 to test the current address’ brightness,
3) Press SETUP and view the following display:
Press UP and DOWN to select from 1-48, “STEP” means how many dmx
channels it jumps each time under testing.
4) Press SETUP again to recall ex work parameters:
Press UP or DOWN to confirm, if successful, it will show following on the
display
LTECH
LT-800 DMX controller
LT-800
DMX controller
LTECH
2.
LT-800 DMX controller
Function features
1. With LCD screen, easy to operate in showing all functions.
2. Built-in perpetual calendar, real-time display system clock , can be set up to play different programs in any time,
Monday to Sunday or holiday.
3. 30 lighting modes. Such as, 7 color, skipping synchronism, smooth synchronism, color flow, color chasing, color
smooth and flow and Meteor shower trailing, etc.
4. Multilevel changing speed, brightness and RGB grey scale adjustment for your choices.
5. Feel free to define many changing modes into a step, 8 independent cycle steps maximum.
6. Output with international Standard signal DMX512/1990, can control 512 DMX channels (170 full color RGB pixels)
7. Support different output ports like standard XLR-3, RJ45 and European terminals. Etc.
8. with the functions of anti-interference and automatic breakdown recover y.
3.
Construction drawing
163mm
153mm
LCD screen
RoHS
COMPLIANT
ISO9001:2008
warranty
3 years
LT- 8 00
2012-01-01
WELCOME
12 : 00
LT-800 DMX512 controller is the output signal of international standard DMX/1990.It not only can control all the LED lights in
the market as long as can receive the standard DMX signal, but also can work with our DMX Decoder to control general LED
lights without DMX512.
LT-800 DMX512 Controller is easy to operate with a LCD screen. Available with wireless control and keying control on the
changing modes, speed and brightness, automatic timing and more than 30 modes for your choices, Supporting pause in
Changing modes and very easy to keep the specific color.
1.
108mm
Product parameter
HOTKEY
LT-800
Working Voltage
DC12 (with an adapter to convert AC100-240V to DC12V)
Power Consumption
<2W
Output Signal
DMX512/1990
Output Loop
1 Port
Transmission Speed
250Kbps
Function Mode
39 modes
Control Quantity
512 DMX channels( 170 pixels)
Working Temperature
-30℃~65℃
Product Dimensions
L163×W108×H40mm
Package Dimensions
L260×W132×H46mm
Upper surface
Control button
33mm
Front
Mode+/Mode
Speed +/Speed –
40mm
BRT +/ BRT –
Setup
Weight(G.W)
Power
switch
Power
input
Infrared
interface
Manufacturers
spare USB
interface
Green
terminal
RJ45
interface
85mm
XLR-3
DIY Scene
Provide three kinds of interface,
connect one of them
760g
IR remote control
1
ZHUHAI LTECH ELECTRONIC TECHNOLOGY CO., LTD.
2
Tel: +86 756 620 8823
Fax: +86 756 620 8833
[email protected]
WWW.LTECHONLINE.COM
LTECH
4.
LT-800 DMX controller
LTECH
Following form is general change functional modes.
Note: For mode 2-8, static color will be showed when minimum speed 1 and maximum speed 8,
and speed 2-7 is strobe speed.
Operating instructions
8 function keys on the controller, MODE+/MODE-(mode),SPEED+/SPEED-(speed),
BRT+/BRT-(brightness),SETUP(setup),HOTKEY(function)
1) Pressing MODE+/MODE- button, to switch general change modes1-30, automatic change
modes 31-38 and automatic timing run change modes 39.
14 :17
31 PLAY1 OFF
2012-01-01
12 : 00
30 COLOR
SPEED : 8
FLOW R
BRT : 8
38 PLAY8 OFF
2012-01-01
12 : 00
39 PLAY1-PLAY8
2012-01-01
12 : 00
(general change modes1-30)
(Automatic combination change modes
31-38)
1
BLACK
2
STATIC RED
3
STATIC GREEN
4
STATIC BLUE
5
STATIC YELLOW
6
STATIC PURPLE
7
STATIC CYAN
8
STATIC WHITE
9
RGB CHANGE
COLOR CHANGE
11
RG SMOOTH
12
RB SMOOTH
13
GB SMOOTH
14
RGB SMOOTH
15
COLOR SMOOTH
SPEED/BRIGHTNESS
ADJUSTMENT
SPEED/BRIGHTNESS
ADJUSTMENT
SPEED/BRIGHTNESS
ADJUSTMENT
SPEED/BRIGHTNESS
ADJUSTMENT
SPEED/BRIGHTNESS
ADJUSTMENT
SPEED/BRIGHTNESS
ADJUSTMENT
SPEED/BRIGHTNESS
ADJUSTMENT
SPEED/BRIGHTNESS
ADJUSTMENT
SPEED/BRIGHTNESS
ADJUSTMENT
SPEED/BRIGHTNESS
ADJUSTMENT
SPEED/BRIGHTNESS
ADJUSTMENT
SPEED/BRIGHTNESS
ADJUSTMENT
SPEED/BRIGHTNESS
ADJUSTMENT
SPEED/BRIGHTNESS
ADJUSTMENT
No. DisplayInstruction
Instruction
16
WHITE FADE
17
COLOR FADE
18
COLOR COVER
19
COLOR SPLIT
20
COLOR CLOSE
21
RGB CHASE F
22
RGB CHASE R
23
COLOR CHASE F
24
COLOR CHASE R
25
WHITE METEO F
26
WHITE METEO R
27
COLOR METEO F
28
COLOR METEO R
29
COLOR FLOW F
30
COLOR FLOW R
SPEED/BRIGHTNESS
ADJUSTMENT
SPEED/BRIGHTNESS
ADJUSTMENT
SPEED/BRIGHTNESS
ADJUSTMENT
SPEED/BRIGHTNESS
ADJUSTMENT
SPEED/BRIGHTNESS
ADJUSTMENT
SPEED/BRIGHTNESS
ADJUSTMENT
SPEED/BRIGHTNESS
ADJUSTMENT
SPEED/BRIGHTNESS
ADJUSTMENT
SPEED/BRIGHTNESS
ADJUSTMENT
SPEED/BRIGHTNESS
ADJUSTMENT
SPEED/BRIGHTNESS
ADJUSTMENT
SPEED/BRIGHTNESS
ADJUSTMENT
SPEED/BRIGHTNESS
ADJUSTMENT
SPEED/BRIGHTNESS
ADJUSTMENT
SPEED/BRIGHTNESS
ADJUSTMENT
At status of Mode 1-30, press button SETUP for 3 seconds to enter submenu,
see the form below.
2. Submenu operational approach of general change modes 1-30
14 :17
10
(automatic timing run change modes 39)
2) Under the general change modes, pressing SPEED+/SPEED- button to adjust the speed of the change
modes; Pressing BRT+/BRT- button to adjust the brightness of the change modes.
3) Pressing SETUP button for 3 seconds, then enter into the submenu setting surface of general change
modes or automatic change modes .Pressing MODE+/MODE- button to switch the submenu page.
Pressing SPEED+/SPEED- button to sway the configuration item .Pressing BRT+/BRT- to change the
parameter values of the configuration item. Pressing SETUP button to Exit the submenu of setting surface.
4) Pressing HOTKEY button for 3 seconds, enter into the submenu of address operation, pressing HOTKEY
to Exit the submenu of address operation.
01 BLACK
2012-01-01
Instruction
No. DisplayInstruction
1. Basic Control
01 BLACK
2012-01-01
LT-800 DMX controller
30 COLOR
SPEED : 8
FLOW R
BRT : 8
(general change modes1-30)
Submenu function
No.
(Press MODE+/to change menu below)
LCD display condition
Setting methods
1
PIXEL QUANTITY
ADJUSTMENT
PIXEL NUMBER : 032
RANGE : 4-170
Press BRT+/- increase or
decrease pixel quantity
2
OPERATION TIMES
ADJUSTMENT
RUN TIMES : 255
000 =NOT RUNNING
Press BRT+/- increase or decrease
operation times (only work between
mode 31-38)
3
RGB OUTPUT GREY
LEVEL ADJUSTMENT
RGB BRIGHT ADJ
R255 G255 B255
Press BRT+/- to adjust each RGB
level, press SPEED+/- to
change R, G, or B
4
MODE RECOVER
DEFAULT
LOAD DEFAULT SET
PRESS BRT+ - KEY
Press BRT+/- to recover dafault
Finish each parameter setting, then press button SETUP to exit.
4
3
ZHUHAI LTECH ELECTRONIC TECHNOLOGY CO., LTD.
Tel: +86 756 620 8823
Fax: +86 756 620 8833
[email protected]
WWW.LTECHONLINE.COM
LTECH
LT-800 DMX controller
38 PLAY8 OFF
2012-01-01
12 : 00
Submenu function
When set to the 39th mode, according to the preset switch condition and running time of
automatic change modes 31-38 to run the corresponding mode. The submenu only has the
items that restore to default status (Please Carefully Choose this item)
(Automatic combination change
modes 31-38)
When you in the situation of 31-38 modes, press set up key for 3 seconds entering into the
Submenu, such as below:
No.
LT-800 DMX controller
4. Automatic timing run mode 39
3. Sub Menu of Automatic change modes 31-38
31 PLAY1 OFF
2012-01-01
12 : 00
LTECH
5.
Connection schemes
1. Connect to the LED Lamps with DMX chip inside
Setting methods
(Press MODE+/to change menu below)
LCD display condition
setting switch state
31 PLAY1 OFF
OPEN1
SAVE1
Press “BRT+/-”to set the switch state,
Select “ON” to 39 automatic
circle modes
store the times of operating
(it is convenient to set basic
on the last time setting)
31 PLAY1 OFF
OPEN1
SAVE1
Press ” SPEED+/- ” enter into “OPEN”
(turn out the operation times of 1-30
modes ), then Press “BRT+” to confirm.
save the setting about the
operation time
31 PLAY1 OFF
OPEN1
SAVE1
Press “SPEED+/-” enter into “SAVE”
(save the setting about the operation
time), Press “BRT+/-” to confirm.
adapter
AC100-240V
DMX signal output
1
connect to the power supply
DMX spot light
2
Setting operation week
RUN WEEK : MTWTFSS
TIME : 18 : 00-06 : 00
Press “SPEED+/-” then you can see the
“MTWTFSS”(Monday to Sunday) and
00:00 00:00(time), press “BRT+/-” to
choose(if you do not choose the Monday
to Sunday, the screen will appear _ the
one mark)
3
Operate time and date 1
DATE01 : 0101-0103
TIME : 00 : 00-00 : 00
Press “SPEED+/-” you can press
“BRT+/-” choose 0101-0103(date) and
00:00-00:00(time) to adjust date and
time.
Operate time and date 2
DATE01 : 0101-0103
TIME : 00 : 00-00 : 00
Press “SPEED+/-” you can press
“BRT+/-” choose 0101-0103(date) and
00:00-00:00(time) to adjust date and
time.
Operate time and date 3
DATE01 : 0101-0103
TIME : 00 : 00-00 : 00
Press “SPEED+/-” you can press
“BRT+/-” choose 0101-0103(date) and
00:00-00:00(time) to adjust date and
time.
4
5
6
System clock setting
DATE/TIME SETUP
2012-01-01 12 :00
Press “SPEED+/-” to choose
“2012-01 01”(date), 12:00(time),
press ”BRT+/-” to adjust date and time.
7
RGB sequence setting
RGB ORDER : RGB
Press “BRT+/-” to adjust the RGB
brightness sequence, for example:
RGB, RBG, GRB, GBR, BRG, BG.
8
Modes restore default
value
LOAD DEFAULT SET
PRESS BRT+ - KEY
adapter
AC100-240V
DMX signal output
DMX wall washer
connect to the power supply
adapter
AC100-240V
DMX signal output
LED DMX digital tube
LED DMX digital tube
connect to the power supply
Press “BRT+/-” restore the
automatic default value.
【Note】please confirm the LED lamp you connected can receive standard DMX512 signal, otherwise, it can’t work properly
Finish each parameter setting, then press button SETUP to exit.
6
5
ZHUHAI LTECH ELECTRONIC TECHNOLOGY CO., LTD.
DMX wall washer
Tel: +86 756 620 8823
Fax: +86 756 620 8833
[email protected]
WWW.LTECHONLINE.COM
LTECH
LT-800 DMX controller
LTECH
LT-800 DMX controller
2. connect to the DMX driver
adapter
AC100-240V
DMX signal output
DMX signal input
DMX512 OUT
ON
1
3
4
5
6
7
8
9 10
471
471
DMX512 OUT
ON
1
D
N
G K
L
C TA
A
D +
C
D
+
C
D
D
N
G D
N
G TA
A
D
R
B R G
511
SPI signal output
RI
电源输入
DC5V-24V
GND
750
2
2
3
4
5
6
7
8
9 10
DMX512 OUT
ON
1
1
H
C
2
H
C 3
H
C
+
V
9 10
2
3
4
6
5
7
8
9 10
DMX512 OUT
1
H
C 2
H
C 3
H
C
V
8
MODEL : LT-DMX-1809
DC12V-24V
512 CHANNEL
DC
+VC
DC12V
hi –power projection lamp
7
power
supply
IN
+12V
GND
CI
DI
SPI signal output
6
512 CHANNEL
AC
L N
CC PWM output
LED SMD RGB strip
MODEL : LT-DMX-6803
DC
5
AC
L N
DC48V
DC12V
DMX-SPI signal driver
DMX-SPI signal driver
power
supply
MODEL : LT-8090-350
DC12V-DC48V
350mA x3CH
DC
4
CV PWM output
DMX-PWM CC driver
power
supply
AC
L N
3
3A X3CH
Output
NI 215XMD
2
MODEL : LT-DMX-8030
DC
Input
Output
NI 215XMD
ON
DMX-PWM CV driver
power
supply
AC
L N
Input
Output
NI 215XMD
1
Input
Output
NI 215XMD
471
R
511
471
CI
302
RI
RS
104 R
682
UI
511
471
+VC
TM1809 driving IC LED strip
RI
R
750
B R G
511
IN
+12V
GND
DGNG
DI
GND
OUT
DO
+12V
GND
DGNG
471
GND
LDP6803 driving IC LED strip
(DATA,CLK two signal cables)
471
471
471
R
511
471
CI
302
RI
RS
104 R
682
UI
511
471
471
GND
OUT
DO
+12V
5.
GND
DGNG
+
RGB
Attention
1. The product shall be installed and serviced by a qualified person.
2. This product is non-waterproof. Please avoid the sun and rain. When installed outdoors please
ensure it is mounted in a water proof enclosure.
3. Good heat dissipation will prolong the working life of the controller. Please ensure good ventilation.
4. Please check if the output voltage of any LED power supplies used comply with the working voltage of the product.
5. Please ensure that adequate sized cable is used from the controller to the LED lights to carry the current.
Please also ensure that the cable is secured tightly in the connector to avoid the accidents due to overheat and
poor contact on the wire.
6. Ensure all wire connections and polarities are correct before applying power to avoid any damages to the LED lights.
7. If a fault occurs please return the product to your supplier. Do not attempt to fix this product by yourself.
6.
Warranty Agreement
1. We provide lifelong technical assistance with this product:
A 3 year warranty is given from the date of purchase. The warranty is for free repair or replacement and covers
manufacturing faults only.
For faults beyond the 3 year warranty we reserve the right to charge for time and parts.
2. Warranty exclusions below:
Any man-made damages caused from improper operation, or connecting to excess voltage and overloading.
The product appears to have excessive physical damage.
Damage due to natural disasters and force majeure.
Warranty label, fragile label and unique barcode label have been damaged.
The product has been replaced by a brand new product.
3. Repair or replacement as provided under this warranty is the exclusive remedy to the customer.
Ltech shall not be liable for any incidental or consequential damages for breach of any stipulation in this warranty.
4. Any amendment or adjustment to this warranty must be approved in writing by Ltech only.
★ This manual only applies to this model. Ltech reserves the right to make changes without prior notice.
8
7
ZHUHAI LTECH ELECTRONIC TECHNOLOGY CO., LTD.
Tel: +86 756 620 8823
Fax: +86 756 620 8833
[email protected]
WWW.LTECHONLINE.COM