1
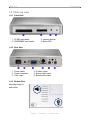
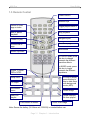
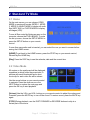
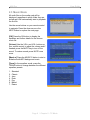
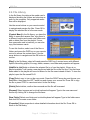
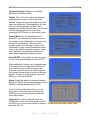
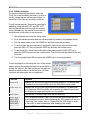
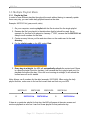
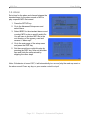
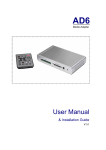
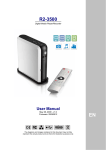
AR6 Pro
Digital Signage Player
User Manual
v1.1
October 22, 2008
AR6 Pro
User Guide
Table of Contents
1
INTRODUCTION
1.1
1.2
1.3
1.3.1
1.3.2
1.4
1.4.1
1.4.2
1.4.3
1.5
1.6
1.6.1
1.6.2
THE AR6 PRO
PACKAGE CONTENTS
PLAYBACK FORMATS
SUPPORTED MEDIA CARDS
PLAYBACK FORMATS
CLOSE-UP VIEW
FRONT VIEW
REAR VIEW
BOTTOM VIEW
REMOTE CONTROL
SYSTEM SETUP
TV CONNECTION
TV OUTPUT
2
STANDARD TV MODE
2.1
2.2
2.3
2.4
2.5
2.6
2.7
HOME
VIDEO MODE
MUSIC MODE
PHOTO MODE
SLIDE SHOW
FILE LIBRARY
SETUP MENU
3
AUTOMATED PLAYBACK
3.1
3.1.1
3.1.2
3.2
3.2.1
3.2.2
3.3
3.3.1
3.3.2
3.3.3
3.4
3.4.1
3.4.2
3.4.3
3.5
3.6
SLIDESHOW SETUP
AUTO PLAY
PHOTO + MUSIC
SINGLE PLAYLIST MODE
CREATING A PLAYLIST
EDITING A PLAYLIST
MULTIPLE PLAYLIST MODE
PLAYLIST BY DATE
PLAYLIST BY TIME
PLAYLIST BY DATE+TIME
PLAYING MODE
STANDARD
REPEAT
MANUAL & STANDBY
AUTO ON/OFF
ALARM
4
APPENDIX
4.1
4.2
FAQ
ABOUT THIS MANUAL
1
1
1
1
1
1
2
2
2
2
3
4
4
4
5
5
5
6
7
7
8
9
11
11
11
11
11
11
12
13
13
14
15
16
16
16
16
17
18
19
19
20
AR6 Pro
User Guide
1 Introduction
1.1 The AR6 Pro
The AR6 is an entry-level advertising solution that allows the user to play content from an
array of media cards on to a display screen. With a host of features and semi-customizable
software, it is an extremely cost-effective digital signage solution. The integrated real-time
clock allows you to schedule content delivery to get your message across when you need it
most.
Product Dimensions:
14.0cm x 8.5 cm x 2.6 cm
5.51” x 3.35” x 1.02”
1.2 Package Contents
• AR6 media player
• External power adapter;
Input 100-240V, Output +12V/1A
• Composite AV and S-Video cables
• Infrared remote control
• User manual
1.3 Playback Formats
1.3.1 Supported Media Cards
Compact Flash type I/II, IBM MicroDrive, MS, MS-Pro, MS-Duo, SD and MMC.
1.3.2 Playback Formats
• Video:
MPEG-1, MPEG-2, MPEG-4
(ASF simple profile 320 x 240 video)
• Audio:
MP3, WAV
(MP3 minimum 32 Kbps, maximum 256 Kbps)
• Photo:
JPEG, Motion JPEG (AVI)
(JPG minimum 16 x 16pixels, maximum 5120 x 3840pixels)
(Motion JPG maximum 10 fps)
Page 1 / Chapter 1 - Introduction
AR6 Pro
User Guide
1.4 Close-up view
1.4.1 Front View
X
Y
1. CF/MD card reader
2. SD/MS/MMC card reader
Z
[
3. Infrared receiver
4. Status LED
1.4.2 Rear View
X
Y
1. Power switch
2. Power receptacle
3. VGA output
Z
[
\
]
4. S-Video output
5. Analog video output
6. Stereo audio output
1.4.3 Bottom View
Mounting holes for
wall mount.
Page 2 / Chapter 1 - Introduction
AR6 Pro
User Guide
1.5 Remote Control
Power ON/OFF
Number keys
Return to home
page or index
Toggle playlist ON/OFF
Start or pause
playback
Stop playback
Confirm or play
Navigation pad
Previous file or
page
Next file or page
Mute sound
Volume Up/Down
In PHOTO mode, press
this key to change
between the different
transition effects.
In MUSIC mode, press
this key to toggle
between the different
equalizers.
Toggle TV mode
PAL or NTSC
Setup menu
In PHOTO mode,
press this key to
start a slide show
with background
music (MP3).
TV output
Info/context
menu
Rotate image
Add file to
playlist
Delete selected
file from playlist
Fast forward & reverse
Zoom 3x/4x image
Note: Ensure the battery (3V lithium cell, CR2025) is inserted before use.
Page 3 / Chapter 1 - Introduction
AR6 Pro
User Guide
1.6 System Setup
1.6.1 TV Connection
Find a suitable place for your AR6, within 1.4m of your TV screen,
panel or LCD display. Connect the power supply to your device and
the power outlet.
Included with your AR6 is the standard video cable with RCA
connector and the S-Video cable. Plug in your preferred video cable
to the video output connector on the AR6 and your screen.
Composite
S-Video
Video
For better video quality, we recommend using the S-Video cable
and S-Video connector instead of the yellow RCA connector. For
LCD displays, an optional VGA cable is also available.
For audio output, use the red and white RCA connectors. Connect
this cable to the audio output on your AR6 and plug it into your TV,
external speakers or sound system.
Stereo Audio
1.6.2 TV Output
Once you have connected the cables, turn on the power switch. Wait a few seconds for the
system to boot, then use the remote control to navigate and control the device.
If the screen stays blank, press the OUTPUT key on your remote control to toggle through
the different video channels until you find the correct one.
To change between PAL and NTSC TV systems, press the SETUP button on your remote
control and change the TV Type under Preferences or use the PAL/NTSC key.
To prevent any accidental change of the video output, you can lock your settings. To do this,
press the SETUP key, go to Preferences, press the FAST FORWARD key once to unlock
the menu and then select Output Lock. Turn it ON by selecting your preferred output and
clicking OK to save it.
If you are using this device for the first time,
set the correct time by going to the setup menu
and pressing the DISP key on your remote
control.
Set the time using the virtual keyboard and
press OK to save the settings. You can select
CANCEL or press the DISP key to skip the
other settings.
Page 4 / Chapter 1 - Introduction
AR6 Pro
User Guide
2 Standard TV Mode
2.1 Home
On the main screen, you can choose VIDEO
MODE to preview all movies (MPEG-1, MPEG2, MPEG-4), MUSIC MODE to display all audio
files (MP3, WAV) or PHOTO MODE to display
all images (JPG).
To see all files sorted by folders as seen on the
computer, choose the FILE LIBRARY. To enter
the set up menu, choose the SETUP MENU or
press the SETUP button on your remote
control.
If more than one media card is inserted, you can select the one you want to access before
seeing the HOME screen.
[HOME] To get back to the HOME screen, press the STOP key on your remote control,
followed by the HOME key.
[Disp] Press the DISP key to see the calendar, date and the current time.
2.2 Video Mode
All movies on the media card will be displayed,
regardless in which folder they are stored. A
preview with small thumbnails and a short
movie clip for each video file will be shown.
Use the arrow buttons on your remote control
to navigate. Press the down arrow or the
NEXT button to explore the next page and
press the OK key to start playback.
[Volume] Use the VOL+ and VOL- buttons on your remote control to adjust the volume and
if needed, press the MUTE key to turn off the sound. To restore sound, press the MUTE key
again.
[FF/RV] During playback, use the FAST FORWARD or REVERSE buttons to skip to a
certain part of the movie.
Page 5 / Chapter 2 - TV Mode
AR6 Pro
User Guide
2.3 Music Mode
All audio files on the media card will be
displayed, regardless in which folder they are
stored and it will automatically start to playback
the first file.
Use the arrow buttons on your remote control
to navigate. Press the down arrow or the
NEXT button to explore the next page.
[OK] Press the OK button to display the
equalizer and further details for the chosen
music file.
[Volume] Use the VOL+ and VOL- buttons on
your remote control to adjust the volume and if
needed, press the MUTE key to turn off the
sound. To restore sound, press MUTE once
more.
[Music.s] Press the MUSIC.S button to start a
slideshow with MP3 background music.
[Trans] In the equalizer mode, press the
TRANS button to change between the different
equalizer presets.
1.
2.
3.
4.
5.
6.
7.
Standard
Classic
Jazz
Rock
Pop
Ballad
Dance
Page 6 / Chapter 2 - TV Mode
AR6 Pro
User Guide
2.4 Photo Mode
All images on the media card will be displayed,
regardless in which folder they are stored. A
preview with small thumbnail images will be
shown.
Use the arrow buttons on your remote control
to navigate. Press the down arrow or the
NEXT button to explore the next page if you
have a lot of images and use the OK key to
display the photo of your choice.
[ZOOM] When displaying a single image, you can use the ZOOM button to toggle through
different enlargements (ON, 3x, 4x, OFF). During zoom mode, use the arrow buttons to pan.
[ROTATE] When displaying a single image, you can use the ROTATE button to rotate your
photos clockwise in 90° increments. This function is not available during a slideshow.
[Music.s] Press the MUSIC.S button to start a slide show presentation with background
music. This will automatically play back MP3 files stored on the media card.
[Trans] Press the TRANS button to toggle through 13 different transition effects for the
slideshow presentation.
1.
2.
3.
4.
5.
6.
7.
Full Screen
Roll: Top to Bottom
Roll: Bottom to Top
Roll: Top/Bottom to Centre
Roll: Centre to Top/Bottom
Blind: Top to Bottom
Roll: Left to Right
8. Roll: Right to Left
9. Roll: Left/Right to Centre
10. Roll: Centre to Left/Right
11. Roll: Implode
12. Blind: Left to Right
13. Cross Fade
14. Random
2.5 Slide Show
This is the same as when pressing the MUSIC.S button on the remote control in Photo
Mode. It will start a slide show presentation using all the images and automatically play the
MP3 files stored on the media card as background music.
Press the TRANS button during playback to toggle through the 13 different transition effects
for the slideshow presentation.
Page 7 / Chapter 2 - TV Mode
AR6 Pro
User Guide
2.6 File Library
In the file library, the data on the media card is
displayed showing the folders and structure as
seen on the computer. Only supported media
files will be displayed.
Use the arrow buttons on your remote control
to navigate and preview the files. Press OK to
display the selected file in full screen mode.
[Context Menu] In the file library, you have the
ability to erase and rename files, copy them to
a different location and create new folders and
add or delete files from the playlist. If more
than one media card is inserted, you can also
copy files between cards.
To use this function, select one of the files or
folders and press the DISP key on your remote
control to access the context menu. Use the
arrow buttons to navigate and the OK button to
confirm.
[Disp] In the file library, select a file and press the DISP key. A context menu with different
options like editing playlist, file copy, delete, rename, new folder and properties will appear.
[Add/Del to List] Adds or deletes the selected file to or from the playlist. If there is no
playlist available, it will create a new playlist and add the file on the first line. Files that have
been added to the playlist will have red letters for the file name instead of black. To view the
playlist, open the file named PLAY.
[Copy] Select copy to turn on the copy mode. Press the RIGHT arrow key and choose your
destination, then press the LEFT arrow key and choose your source file. Press OK to copy
the file or press STOP to cancel and return to the file library.
[Delete] Select delete, confirm the command and the file will be erased.
[Rename] Select rename and a virtual keyboard will appear. Type in the new name and
confirm by clicking OK to change the file name.
[New Folder] Select new folder and a virtual keyboard will appear. Type in the folder name
and click OK to create a new folder.
[Properties] Select properties to show detailed information about the file. Press OK to
return to the file library.
Page 8 / Chapter 2 - TV Mode
AR6 Pro
User Guide
2.7 Setup Menu
To access the player’s preferences and
advanced settings, go to the HOME screen and
press the SETUP key.
To set the time, alarm clock and Auto ON/OFF
function, press the DISP key.
[Photo Setup] Settings for the thumbnail
preview matrix (4/9/16/25 images on one page),
transition mode (fast or slow) and display
orientation (default or ignore).
If the orientation is set to default and the EXIF data or the JPG image includes the
orientation tag, it will automatically rotate the image.
[Music Setup] Set the repeat mode when playing music. You can set it to repeat one file
(ONE), all files (ALL) or turn it OFF completely (OFF). The current mode will be displayed at
the bottom of the music library.
[Video Setup] Set the thumbnail preview matrix (4/9/16/25 previews on one page) and the
repeat mode when playing videos. You can set it to play the video files once in sequence
(ONE LOOP), repeat the same file (SINGLE) or repeat all continuously (CONTINUOUS).
[Slideshow Setup] Settings for the slideshow with transition effects (13 effects), interval
timing (1/3/5/10 seconds) and repeat mode. If the folder repeat mode is set to ON, it will
play the images continuously until stopped. If set to OFF, it will only play them once.
If Auto Play is turned ON, the next time you turn on the power, all files stored on the media
card will be listed alphabetically and playback starts automatically. If PHOTO+MUSIC is ON,
it will play only JPG images with background music (MP3) instead. Set the slideshow mode
to AUTO for automatic playback or MANUAL to manually advance to the next file.
[Preferences] Settings for the menu language,
video output and reset function for preferences.
Output: S-Video, Composite, VGA, RGB
TV Type: NTSC, PAL, Multi. System
TV Display: Pan Scan, Letter Box, Wide Screen
OSD Languages: English, Chinese, Japanese
OSD Message: On-screen messages (ON/OFF).
Note: The Output Lock function is locked by
default, to prevent changing it by accident. To use it, press the FAST FORWARD key to
enable access, select one of the video outputs and then press the OK key to lock the video
output setting.
Page 9 / Chapter 2 - TV Mode
AR6 Pro
User Guide
[Advanced Setup] Settings for scheduled
playback and timer functions.
Playlist: Set to OFF when using the standard
and automated modes or select one of the
playlists. Single uses a single playlist only, Date
uses one list per day, Time depends on the time
with up to 24 lists per day and Date+Time
depends on both the date and time. You can also
turn the Single playlist mode on or off by
pressing the INFO button on the remote control.
Playing Mode: Use the standard mode to
browse for your files with the remote control or
use repeat to play all files that are stored on the
media card continuously. The manual and
standby modes allow the user to press a key
combination to play certain files and then either
return to the title file (manual) or wait for further
input (standby). See Automated Playback for
more details regarding the playing modes.
Auto ON/OFF: If turned ON, you can set a time
for the unit to automatically turn ON and OFF.
After enabling this function, go to the main page
of the setup menu and press the DISP key on
your remote control to enter the timer setup.
Enter the clock time using the virtual keyboard,
then the shut down time and at the end the start
up time. To skip one of the settings, press the
DISP key or choose CANCEL.
Alarm: Enable the alarm by choosing between
MP3 music (MP3) and the standard alarm sound
(BEEP) or disable the alarm clock (OFF).
To set the time for the alarm clock, go to the
main page of the setup menu and press the
DISP key on your remote control to enter the
timer setup wizard.
[Calendar] To view the calendar, press the
HOME key to return to the main page and then
the DISP key on your remote control to display it. To save the correct date, select it and
press the OK key.
Page 10 / Chapter 2 - TV Mode
AR6 Pro
User Guide
3 Automated Playback
3.1 Slideshow Setup
The slideshow is an easy way to play all files or
only images with background music and
automatically start when the power is turned on.
3.1.1 Auto Play
When this function is enabled, it will play all files
(video, audio, images) continuously as soon as
the player is turned on. After turning it ON, exit
the setup menu and press the HOME key.
3.1.2 Photo + Music
When this function is enabled, it will play only
images (JPG) with background music (MP3)
continuously as soon as the player is turned on.
After turning it ON, exit the setup menu and
press the HOME key.
Note: To turn off the slideshow, go back to the
setup menu and select OFF for that function, exit
the setup menu and press the HOME key.
3.2 Single Playlist Mode
Go to Playlist in the advanced setup menu and
select Single. It will then automatically play all
files in the playlist (maximum 50 files).
Instead of using the setup menu, you can also
turn the playlist mode on or off by pressing the
INFO button. After changing it, press the HOME
key to start playback or return to the main screen.
3.2.1 Creating a playlist
To use the playlist mode, a text file (play.lst) written on the computer and stored on the
media card or a playlist that has been created via remote control has to prepared.
1. Turn on the media player, enter the file library and select a file.
2. Press the DISP key to open the context menu and select “Add to list” or without
context menu, simply press the ADD LIST key on your remote control.
3. The letters of the files that have been added to the playlist will turn red.
Page 11 / Chapter 3 - Automated Playback
AR6 Pro
User Guide
3.2.2 Editing a playlist
To view the current single playlist, select the
PLAY file in the file library and open it or refer to
the file names that are red instead of black, to
see which of the files are currently on the list.
To edit a single playlist, files can be removed or
added by using the ADD LIST and DEL LIST
keys on the remote control or with the context
menu. Alternatively, the play.lst file can also be
modified with a text editor on the computer.
1. Stop playback and enter the setup menu.
2. Go to the advanced setup and turn off the playlist by enabling the standard mode.
3. Exit the setup menu, press the HOME key and then enter the file library.
4. To remove files that are currently on the playlist, select those with red letters and
press the DEL LIST key or press the DISP key and use the context menu.
5. To add more files, select those with black letters and press the ADD LIST key or
press the DISP key and use the context menu. The new files will be added at the end
of the list.
6. Turn the playlist back ON and press the HOME key to continue playback.
To edit the playlist on the computer, turn off the media
player, remove the media card and use a text editor to
modify the “play.lst” file. Add one file per line with one
extra line break at the end of the list (max. 50 files).
Note that sub-directories are not supported.
File Path
Playback
/J001.JPG
Displays the JPG file J001.jpg from the root directory. The display time
will depend on the interval time set in the Slide Show setup menu.
/J001.JPG 12
Displays the JPG file J001.jpg from the root directory. The additional
time (maximum 65535 seconds) will overwrite the default interval time
and display the image as long as set in the playlist.
/A001.MP3
Plays the MP3 file A001.mp3 from the root directory.
/J001.JPG 1
/A001.MP3
/J002.JPG 1
/A002.MP3
A JPG image followed by a MP3 file on the next line will use the MP3
file as background music, while displaying the JPG image until the end
of the song. Use a delay time of 1 second for the JPG image in order
for the music to start immediately after displaying the image.
/M001.MPG
Plays the MPG video M001.mpg from the root directory.
Page 12 / Chapter 3 - Automated Playback
AR6 Pro
User Guide
3.3 Multiple Playlist Mode
3.3.1 Playlist by Date
In order to have different playlists throughout the week without having to manually update
them every day, you can create daily playlists based on the date.
Example: 20070101.lst (year, month, date)
1. On your computer, create a playlist with the file structure like the single playlist.
2. Rename the file from play.lst to the date when that list should be used. As an
example, for the files to be played on January 1st 2007, rename the file 20070101.lst.
Always use 8 numbers for the date.
3. Create as many lists as you like and store them on the media card in the root
directory.
4. For the playlist mode on the AR6, select Date.
5. Every day at midnight, the AR6 will automatically refresh the content and if there
is a specific playlist found for that day, it will rename the file to play.lst and use it for
playback throughout the day. If the unit is not running at midnight, it will refresh the
content as soon as it’s started.
Note: Always use 8 numbers for the date (example: 20070408). When using the daily
playlist function, make sure to first set the correct date and time on your AR6.
2007/01/01
;
2007/01/02
20070101.lst
2007/01/03
20070102.lst
2007/01/04
;
20070104.lst
If there is no particular playlist for that day, the AR6 will pause at the main screen and
continue playback as soon as it can find a new playlist for that particular day.
Page 13 / Chapter 3 - Automated Playback
AR6 Pro
User Guide
3.3.2 Playlist by Time
In order to use different playlists throughout the day without having to manually update them,
you can create up to 24 different playlists based on the time.
Example: _0900_1800.lst
1. On your computer, create a playlist with the file structure like the single playlist.
2. Rename the file from play.lst to the time when that list should be used. As an
example, for the files to be played from 9AM to 6PM, rename the file
_0900_1800.lst. Always use 4 numbers for each time with an underscore in front.
3. Create up to 24 lists and store them on the media card in the root directory.
4. For the playlist mode on the AR6, select Time.
5. Whenever the time is up, the AR6 will automatically refresh the content and if there
is a specific playlist found for that time, it will rename the file to play.lst and use it for
playback during the defined period.
6. If there is a gap in-between some of the time based playlists, it will automatically use
the title.lst playlist. If that does not exist, it will pause at the main screen.
Note: When using the playlist by time function, make sure to first set the correct time on
your AR6. Do not let the playlists overlap themselves in time!
09:00
12:00
_0000_0900.lst _0900_1200.lst
15:00
title.lst
18:00
_1500_1800.lst
title.lst
If there is no playlist for a certain time and there is a gap until the next playlist starts, the
AR6 will automatically use the title.lst playlist instead. If there is no title.lst, it will pause at
the main screen and continue playback as soon as the time for the next playlist is up.
Page 14 / Chapter 3 - Automated Playback
AR6 Pro
User Guide
3.3.3 Playlist by Date+Time
In order to use different playlists throughout the day and also depending on the date without
having to manually update them, you can create playlists based on the date&time.
Example: 20070101_0900_1200.lst (year, month, day, time)
1. On your computer, create a playlist with the file structure like the single playlist.
2. Rename the file from play.lst to the date+time when that list should be used. As an
example, for the files to be played from 9AM to 6PM on January 1st 2007, rename
the file 20070101_0900_1800.lst. Always use 8 numbers for the date and 4
numbers for the time with an underscore in between.
3. Create as many lists as you like but with a maximum of 24 per day and store them
on the media card in the root directory.
4. For the playlist mode on the AR6, select Date+Time.
5. Whenever the time is up, the AR6 will automatically refresh the content and if there
is a specific playlist found for that date+time, it will rename the file to play.lst and use
it for playback during the defined period.
6. If there is a gap in between some of the time based playlists, it will automatically use
the title.lst playlist. If that does not exist or there is no playlist at all for that day, it
will pause at the main screen.
Note: When using the playlist by date&time function, make sure to first set the correct date
and time on your AR6. Do not let the playlists overlap themselves in time!
2007/01/01
title.lst
09:00
18:00
20070101_0900_1800.lst
24:00
title.lst
2007/01/02
20070102_0000_2400.lst
If there is no playlist on that date at all or there is no title.lst, it will pause at the main screen
and continue playback as soon as the time is up for the next playlist.
Page 15 / Chapter 3 - Automated Playback
AR6 Pro
User Guide
3.4 Playing Mode
This is the play mode that is used when the
playlist and slideshow is turned off. By default, it
is set to standard and the files on the media
player can be accessed with the remote control.
3.4.1 Standard
This is the standard browser mode of the AR6
media player. The user is presented with the
main screen and can then use the remote control
to access and playback the media files.
3.4.2 Repeat
This mode is identical to the Auto Play function in the slideshow setup menu. It will play and
repeat all the media files that are stored on the media card.
3.4.3 Manual & Standby
This play mode offers quick
access to certain files via the
numeric buttons on the remote
control from 000-999. This
function can be used for kiosks
and other digital signage
applications, where users may
request certain information with
the push of a button.
When this mode is used, the
player will require a title file
(e.g. 000.avi or 000.jpg) and up
to 999 other media files (JPG,
MP3, MPG or AVI), which are played when the corresponding numeric buttons are pressed.
In Manual mode, once the media file has finished playing, it will return to the title file until
another button combination is pressed. In Standby mode, it will wait for further user input.
Button
000 (title file)
001-999
File
000 (MPG, AVI, JPG or MP3)
001 ~ 999 (MPG, AVI, JPG or MP3)
Note: If you enable the Manual or Standard mode and there is no 000 file, it will display a
message saying “No This File”. The same message will appear if the 000 file is not an AVI,
MPG, JPG or MP3 file.
Important: Make sure that there is no more than one file with the same file name!
Page 16 / Chapter 3 - Automated Playback
AR6 Pro
User Guide
3.5 Auto ON/OFF
For automated daily playback of advertisement or media files, scheduled playback with or
without playlist can be set up.
Set a time for the unit to turn on and a time for it
to turn off again automatically.
1. Press the SETUP key on your remote
control to enter the setup menu.
2. Go to the Advanced Setup menu.
3. Select Auto ON/OFF.
4. Turn it ON and exit the setup menu.
If you have already set the turn on and turn off time, you can skip this step, otherwise go
back to the setup menu and set up the timer.
1. Press the SETUP key on your remote
control to enter the setup menu.
2. Press the DISP key to enter the setup
wizard for the timer setup.
3. Set the current time by using the virtual
keyboard and select OK to confirm it. If
you have previously set up the time, you
can skip this step by selecting CANCEL or
by pressing the DISP key
4. Skip the next step (set alarm time) by
selecting CANCEL or by pressing the
DISP key.
5. Use the virtual keyboard to enter the Auto
OFF time and select OK to confirm it.
6. Repeat the previous step for the Auto ON
time and select OK to finish the set up
wizard.
The media player will now turn on and off automatically on a daily basis at your pre-set time.
To turn this function OFF, go to the Advanced Setup menu, select Auto ON/OFF and
deactivate it.
Page 17 / Chapter 3 - Automated Playback
AR6 Pro
User Guide
3.6 Alarm
Set a time for the alarm and choose between the
standard beep for the alarm sound or MP3 to
play a specific MP3 file instead.
1. Press the SETUP key.
2. Go to the Advanced Setup menu and
select Alarm.
3. Select BEEP for the standard alarm sound
or select MP3 to play a specific audio file.
You will have to store an MP3 file in the
root directory of the memory card and
rename it “alarm.mp3”.
4. Go to the main page of the setup menu
and press the DISP key.
5. Set the current time or skip this step by
pressing the DISP key. Now set the alarm
time and finish the setup wizard by
skipping the other steps.
Note: If the device is turned OFF, it will automatically turn on and play the wake up music or
the alarm sound. Press any key on your remote control to stop it
Page 18 / Chapter 3 - Automated Playback
AR6 Pro
User Guide
4 Appendix
4.1 FAQ
Q: How do I display the file properties?
A: Press the DISP button to see the file info and press it again to turn it off. For more details,
go to the File Library, select a file, click DISP and choose Properties. Press OK to close the
file info.
Q: How do I access preferences when it’s greyed out?
A: Exit the setup menu, press the HOME key to return to the main screen, press the
SETUP key to enter the setup menu again and you will be able to access preferences.
Q: Why can’t the output lock under preferences be selected?
A: To unlock this option, press the FAST FORWARD key.
Q: Where do I set the clock time?
A: Go to the SETUP menu and press the DISP key. Enter the time and confirm it. In the
following screens, select Cancel or press the DISP key to skip the rest of the settings.
Q: I pressed the OUTPUT key but it doesn’t change the video signal!
A: The video output has been locked. Unlock it first and then press the OUTPUT key again.
To unlock, press the SETUP key, go to Preferences, press the FAST FORWARD key once
and then select Output Lock. Turn it OFF and you can use the OUTPUT key to toggle
between the different video outputs.
Q: How do I upgrade the firmware?
A: Download the latest firmware from our website and store the ROM file on a media card
in the top directory. Then follow these instructions:
1.
2.
3.
4.
5.
6.
7.
8.
Turn off the device and remove all media cards.
Insert the media card with the new firmware.
Turn on the power and watch the screen.
It will read the new firmware and show Write/Erase during the process.
When the upgrade is finished (~ 1 minute), it will show Done and go blank.
Only now turn off the power and remove the media card.
Erase the firmware on your media card.
Turn the device back on; your new firmware is now ready to use.
Q: How can I view the content of the playlist on screen?
A: Stop playback and go to the file library. Either browse for and open the file named PLAY
or refer to all the file names that are in red, indicating that they belong to the current playlist.
Page 19 / Chapter 4 - Appendix
AR6 Pro
User Guide
Q: My screen is blank and pressing OUTPUT doesn’t change anything!
A: The OUTPUT key is locked. Unlock it first and then press the key again until you find the
right video signal. Follow these instructions to unlock it:
1.
2.
3.
4.
5.
6.
7.
Remove all media cards and turn off the power
Turn on the power and wait for player to boot up (you can hear a ping)
Press the SETUP key
Press the DOWN key 4 times and hit OK
Press the UP key twice
Press the RIGHT arrow key once and hit OK
Press SETUP and now use OUTPUT again to change the video signal
Q: I’ve turned on Auto Play in the Slideshow Setup menu but it only plays one file!
A: Go to the Slideshow Setup menu, select Slideshow Mode and change it to AUTO.
Q: Where do I set the TV aspect ratio?
A: Go to preferences in the setup menu and select TV Display. Normal PS stands for 4:3
PanScan, Normal LB stands for 4:3 Letterbox and Wide stands for 16:9 wide screen.
4.2 About this Manual
This manual covers all versions and combinations for the AR6 Pro media player. The
functions in this manual are based on the firmware version 20081001_AR6_Pro. Images,
descriptions and firmware functions may slightly vary between this manual and the actual
product you have.
Visit our website at www.macpower.com.tw for the latest upgrades and download the
updated version of this manual in PDF format.
© Copyright 2008 by Macpower & Tytech Technology Co., Ltd. all Rights Reserved
The information contained in this manual is believed to be accurate and reliable at time of publication.
Macpower & Tytech Technology assumes no responsibility for any errors contained in this manual and
reserves the right to make changes in the specifications and/or design of this product without prior notice. The
diagrams contained in this manual may also not fully represent the product that you are using and are there
for illustration purposes only. Macpower & Tytech Technology assumes no responsibility for any differences
between the product mentioned in this manual and the product you may have.
Page 20 / Chapter 4 - Appendix