1
ARS Technologies User's Guide
V 2.130
Last Update June /2011
ARS Technologies
'USB2', 'SSI2', and 'XPRS'
families of products
User’s Guide
V 2.130
[1]
ARS Technologies User's Guide
V 2.130
Last Update June /2011
Proprietary Information
Information specific to the design contained in this document is
proprietary to ARS Technologies (http:/www.arstech.com). It is against
the law to copy software on any media except as specifically allowed
in the license or nondisclosure agreement.
Copyright
© Copyright 2011 by ARS Technologies . All rights reserved. No part of this
publication may be reproduced, transmitted, transcribed, stored in a retrieval
system, or translated into any language or computer language, in any form or
by any means, electronic, mechanical, magnetic, optical, chemical, manual, or
otherwise, without the prior written permission of ARS Technologies.
Disclaimers
ARS TECHNOLOGIES MAKES NO REPRESENTATIONS OR WARRANTIES WITH
RESPECT TO THE DESIGN AND DOCUMENTATION HEREIN DESCRIBED AND
ESPECIALLY DISCLAIMS ANY IMPLIED WARRANTIES OF MERCHANTABILITY OR
FITNESS FOR ANY PARTICULAR PURPOSE. FURTHER, ARS TECHNOLOGIES
RESERVES THE RIGHT TO REVISE THIS DESIGN AND ASSOCIATED
DOCUMENTATION AND TO MAKE CHANGES FROM TIME TO TIME IN THE
CONTENT WITHOUT OBLIGATION OF ARS TECHNOLOGIES TO NOTIFY ANY
PERSON OF SUCH REVISIONS OR CHANGES.
Trademarks
USB2ISA®, USB2PCMCIA®, SSI®, and are registered trademarks of ARS
Technologies in the US and number of other countries in the world.
Third-party brands and names are the property of their respective owners.
[2]
ARS Technologies User's Guide
V 2.130
Last Update June /2011
No Warranty
Everyone using the software and hardware provided by ARS Technologies
acknowledges that the hardware and software is provided “AS IS” WITH NO
WARRANTIES WHATSOEVER, WHETHER EXPRESS, IMPLIED OR STATUTORY,
INCLUDING, BUT NOT LIMITED TO ANY WARRANTY OF MERCHANTABILITY,
NONINFRINGEMENT, FITNESS FOR ANY PARTICULAR PURPOSE, OR ANY
WARRANTY OTHERWISE ARISING OUT OF ANY PROPOSAL, SPECIFICATION,
OR SAMPLE.
Damages
In no event will ARS Technologies be liable to anyone using the software
and hardware provided by ARS Technologies, for any loss of profits, loss
of use, incidental, consequential, indirect, or special damages arising out
of this or any other damage, whether or not such party had advance
notice of the possibility of such damages.
[3]
ARS Technologies User's Guide
V 2.130
Last Update June /2011
Table of Contents
1. Introduction .................................................................................................................................................6
1.1 ARS Technologies Products.......................................................................................................................7
1.2 Software.....................................................................................................................................................9
1.3 Customers.................................................................................................................................................10
2. Considerations before and after purchase...................................................................................................11
2.1 Hardware considerations...........................................................................................................................11
2.2 Software Considerations...........................................................................................................................14
3. USB2 product line......................................................................................................................................16
3.1 USB2ISA-R card .....................................................................................................................................16
3.2 USB2ISA-X3 card....................................................................................................................................20
3.3 Other USB2 cards.....................................................................................................................................24
4. SSI2 Product Line.......................................................................................................................................25
4.1 SSI2 ISA card ..........................................................................................................................................25
4.2 SSI2 PCI card ..........................................................................................................................................29
4.3 SSI2 ISA X3 card ....................................................................................................................................33
4.4 SSI2 PCI X3 card ....................................................................................................................................37
4.5 SSI2 PCMCIA card..................................................................................................................................41
4.6 SSI2 Host PCI card..................................................................................................................................44
4.7 SSI2 Host CB card...................................................................................................................................45
4.8 Evolution of SSI2 cards............................................................................................................................47
5. XPRS Product Line....................................................................................................................................48
5.1 XPRS-Host-DT card ................................................................................................................................48
5.2 XPRS-Host-EC card ................................................................................................................................49
5.3 XPRS-EC card .........................................................................................................................................50
5.4 XPRS-PX-X1 card ...................................................................................................................................51
5.5 XPRS-PX-X16 card .................................................................................................................................52
5.6 XPRS-PCI-X1 card..................................................................................................................................53
5.7 XPRS-CB card .........................................................................................................................................55
5.8 XPRS-PCI-X3 card .................................................................................................................................56
5.7 XPRS-cPCIe card ....................................................................................................................................58
6. Installation...................................................................................................................................................59
6.1 Software Setup..........................................................................................................................................59
6.2 Specifics for Windows platform................................................................................................................60
6.3 64bit Windows operating systems.............................................................................................................65
[4]
ARS Technologies User's Guide
V 2.130
Last Update June /2011
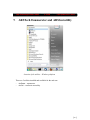
7. ARSTech Enumerator and ARSGui utility.................................................................................................67
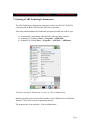
7.1 Starting of ARS Technologies Enumerator .............................................................................................68
7.2 Specifics for USB2 products – exclusive mode and host controller support............................................72
7.3 Specifics for SSI2 products – exclusive mode and host controller support..............................................76
7.4 Universal Software Layer..........................................................................................................................77
7.5 Diagnostics mode of the ARS Technologies Enumerator.........................................................................79
7.6 Main Enumerator window........................................................................................................................81
7.7 Adding resources......................................................................................................................................84
7.6 Delete Settings, choosing another host.....................................................................................................86
7.7 Loading drivers.........................................................................................................................................87
7.8 Example of a modified .INF file for installing ..........................................................................................92
7.9 ArsGUI.....................................................................................................................................................94
7.10 Developers' support – basic/simple API set for access of ISA / PCI / PCMCIA hardware...................96
8. ISA cards - use .........................................................................................................................................101
8.1 Using of a PnP ISA card ........................................................................................................................101
8.2 Using of a standard (non PnP) ISA card ...............................................................................................104
8.3 Software types ......................................................................................................................................107
8.4 '16bit DOS' software type.......................................................................................................................109
8.5 '32bit Windows NT type driver - no .inf file' software type....................................................................111
8.6 '32bit Windows type driver - with .inf file' software type.......................................................................113
8.7 Example of a modified .INF file for installing .......................................................................................115
9. PCMCIA cards - use ...............................................................................................................................117
10. PCI cards – use.......................................................................................................................................121
11. PCI Express -x1 and -x16 cards - use ....................................................................................................125
12. ExpressCard type34 and type54 cards – use...........................................................................................128
13. Compact PCI Express and PXI Express cards - use ..............................................................................130
Appendix.......................................................................................................................................................132
A. SSI2 host support for desktop computers................................................................................................132
B. SSI2 host support for notebook computers.............................................................................................133
C. Uniform DOS support..............................................................................................................................134
[5]
ARS Technologies User's Guide
V 2.130
Last Update June /2011
1. Introduction
The User's Guide is organized in the following sections :
–
–
–
–
introduction – chapters 1 , 2 ; outlines the product lines and individual products
that we have, and considerations for purchasing and using of our products
hardware – chapters 3, 4, 5 ; shows the individual products in the 'USB2' , 'SSI2'
and 'XPRS' - settings, connecting, powering, enclosures
software – chapters 6, 7 ; describes installation of the software and utilities, with
details and specifics for the ARSTech Enumerator
use – chapters 8, ; shows the use of ISA, PCMCIA, PCI, PCI Express peripheral
cards with our products
We recommend our customers to read :
–
introduction - all of chapters 1, 2
–
hardware – the specific chapter(s) for our product(s) planned to be purchased, or
already purchased; this will allow to do physical installation, jumper settings,
powering, putting into enclosure
–
software – all of chapters 6, 7 , which helps in understanding the specifics of
running on different operating systems, using through USB, settings for peripheral
cards
–
use - the specific chapter, based on the peripheral card used
[6]
ARS Technologies User's Guide
V 2.130
Last Update June /2011
1.1 ARS Technologies Products
-
ARS Technologies has 4 lines of products:
USB1 line - discontinued
USB2 line - active, mature
SSI2 line - active, mainstream
XPRS line – active, growing
Information on products based on USB1.1 interface is available in earlier versions of
this document. This User’s Guide deals only with the current active products.
USB2 Cards
The USB2 line of products allows using ISA and 16bit PCMCIA cards outside of
computers systems through USB. It includes two families of products:
USB2.0 to ISA cards family of products
USB2.0 to PCMCIA card
The family of USB 2.0 to ISA cards enable connection of one or more ISA cards and
use through USB. The products of the family USB 2.0 to ISA include 2 active
products:
USB2ISA-R – USB2.0 to ISA card, allows the use of one ISA card
USB2ISA-X3 – USB2.0 to ISA 3 connector card, allows use of up to 3 ISA
cards
Other cards are available only on special/volume orders:
USB2ISA-RA – USB2.0 to ISA right angle card, allows the use of one ISA
card
USB2ISA-SL - USB2.0 to ISA slot version card, requires a separate passive
ISA back plane where it is installed, and allows the use of number of ISA
cards, depending on the number of ISA connectors on the back plane
USB2ISA-X7 – USB2.0 to ISA 7 connector card, allows the use of up to 7
ISA cards
[7]
ARS Technologies User's Guide
V 2.130
Last Update June /2011
The USB 2.0 to PCMCIA card enables connection of a PCMCIA card and use
through USB. It is available only on special/volume orders. The products of the
USB2.0 to PCMCIA family includes:
USB2PCMCIA-R – USB2.0 to PCMCIA card, allows the use of one 16bit
PCMCIA card
SSI2 Cards
The SSI2 line of products allows use of PCI, ISA and 16/32bit PCMCIA cards
outside of computers systems, through cable.
The SSI2 products are multi-interface products which connect with:
–
SSI2 host cards
–
standard USB2 hosts
The SSI2 products include:
–
–
–
SSI2 ISA family - allow the use of one or 3 ISA cards
SSI2 PCI family - allows the use of one or 3 PCI cards
SSI2 PCMCIA - allows the use of one 16/32bit PCMCIA card
The SSI2 Host side products include:
SSI2 HostPCI – mounted in a PCI slot of a desktop computer
SSI2 HostCB – mounted in a CardBus slot of a notebook computer
[8]
ARS Technologies User's Guide
V 2.130
Last Update June /2011
XPRS Cards
The XPRS line of products allows use of PCI, PCI Express, ExpressCard, and 32bit
PCMCIA cards outside of computers systems, through cable.
There are 2 type of XPRS products:
- host cards – mounted on a desktop system, or on a notebook system with
- and peripheral cards – handling PCI, PCI Express, ExpressCard, and 32bit PCMCIA
cards
Based on the computer system there are the following host cards:
- xprs-host-dt for a PCI Express desktop system
- or, xprs-host-ec for a notebook system with an ExpressCard slot
There are the following XPRS peripheral cards:
- xprs-px-x1 with a PCI Express X1 card
- xprs-px-x16 with a PCI Express X16 card
- xprs-pci-x1 with a PCI card
- xprs-cb with a PCMCIA CardBus card
- xprs-ec with an ExpressCard card
1.2 Software
Supported Platforms
The platforms that ARS Technologies' cards work on are:
Windows
Linux
Mac OS X
The Windows platform includes support on - Windows 98, Windows ME, Windows
2000, Windows XP, Windows Server 2003, Windows Vista, Windows Server 2008,
and Windows 7.
The Linux platform includes support on 2.6.xx kernels, 32bit and 64bit releases.
The Mac OS platform includes support for Mac OS X 10.5 and 10.6 releases.
[9]
ARS Technologies User's Guide
V 2.130
Last Update June /2011
Software Utility, and basic API set
There is one utility included within the installation software that give the user manual
access to the physical memory and I/O space of the ISA, PCI and PCMCIA cards
arsgui - graphical user interface program
The installation software includes a folder with a description of our simple/basic API
set and samples for software developers dealing with peripheral cards.
1.3 Customers
We offer our products to two groups of customers:
Manufacturers of ISA, PCI, or PCMCIA cards. Manufactures have the
source code of the software for their cards. They can use our ArsGui utility to
manually access the hardware on the peripheral card, them our basic simple
API set to develop programs. Or they can use the API set and samples in our
SDKBUS kit to convert their software to work our USB2.0 products, or the
SSI2 products. For more information, please visit :
www.arstech.com/SDKBUS.htm
End users who do not have the source code, but just the binaries of an ISA,
PCI or PCMCIA card they use. End users can use our universal software layer
(USL) option with the original software of the card. The USL is included in
the installation software. There is a detailed description on the purpose, set-up
and use of the universal software layer in the following chapters.
[ 10 ]
ARS Technologies User's Guide
V 2.130
Last Update June /2011
2. Considerations before and after purchase
This chapter provides considerations on selecting of our products.
If you have selected, purchased and use the ideal set of products – congratulations!
In all the other cases you may need to revisit multiple times this chapter before and
after purchasing of our products.
2.1 Hardware considerations
XPRS or SSI2 / USB2 ?
XPRS line of products allows handling of peripheral cards in a way like they are
attached directly to the computer system.
If you have a high data throughput peripheral card we strongly recommend using
XPRS line of products.
The USB interface is present / available on almost all systems and supported in our
USB2 and SSI2 product lines, however is not similar to the interfaces of the
peripheral cards. We recommend testing/evaluating first with 1 set of –
product/enclosure/power supply/cable .
Single card or multiple cards ?
All of our product lines have products supporting a single peripheral card, or up to 3
peripheral cards .
If having multiple cards not similar to each other, we recommend mounting/testing
with one peripheral card at a time.
Choosing of powering of a peripheral card
An ISA card may use:
either +5V only
or +5V, and any combination of +12V, -5V and -12V
[ 11 ]
ARS Technologies User's Guide
V 2.130
Last Update June /2011
A PCI card may use:
either +5V only
or +3.3V only
or +5V and any combination of +12V and -12V
or +3.3V and any combination of +12V and -12V
A 16bit PCMCIA card may use:
either +5V only
or +3.3V only
A 32bit PCMCIA card uses
+3.3V only
A PCI Express card may use:
either +3.3V only
or +3.3V and +12V
A ExpressCard card may use:
+3.3V only
or +3.3V and +1.5V
Regarding the voltages used by peripheral cards, please check our articles in the
'Knowledge Base' section - http://www.arstech.com/page--ste_whitepapers.html
All of product our lines provide power through the cable – some peripheral cards may
be powered/handled in this way.
ARS Technologies offers the following power supply options for ISA and PCI
peripheral cards:
isa-pwr- Power-supply-module-isapwr.html
isa-pwr-xr- External-Power-Supply-25W-ROHS
ARS Technologies offers the following power supply options for PCI, PCMCIA and
PCI Express peripheral cards:
pwr-3v - 3.3V Power-supply
pwr-5v, -eu, -uk - 5V Power-Supply
The currents consumed by the different voltages may vary from several mA to
several A .
The voltages used by a particular card are available in the
documentation/specifications sheet for that particular card. When using multiple
cards, please add the currents for a particular voltage to get the total current
consumed.
[ 12 ]
ARS Technologies User's Guide
V 2.130
Last Update June /2011
Choosing an enclosure for ISA, PCI and PCI Express cards
If you have a single ISA, PCI or PCI Express card, you can choose between:
Enclosure-for-1-ISA-PCI-card
Enclosure-Double-length-for-1-ISA-PCI-card
If you have multiple ISA, PCI or PCI Express cards, you can choose between:
Enclosure-for-3-ISA-PCI-cards-isax3b1.html
Enclosure-Double-length-for-3-ISA-PCI-cards
The above web pages offer:
the enclosure images
the maximum dimensions of an ISA, PCI or PCI Express card which can fit
into the enclosure
assembly instructions for the enclosure and the peripheral card
[ 13 ]
ARS Technologies User's Guide
V 2.130
Last Update June /2011
2.2 Software Considerations
Different operating systems
Software written for one operating system may or may not work on other operating
systems.
ARS Technologies recommends finding software packages for the same hardwarei.e. ISA, PCI, PCMCIA cards- for different operating system, and testing on the
particular operating system where you want to use the peripheral card.
Virtualization
Current solutions for virtualized operating systems are good for application / user
level software, however may be having problems with drivers / kernel level software
and special hardware.
If a test with our products on virtualized operating system, an option may be to test on
current os which is not virtualized.
Resources detection
Some peripheral cards like PCI, PCMCIA and Plug and Play (PNP) ISA cards can be
detected by our software and can provide their resources.
Other cards, like non PNP ISA cards can be scanned by our software and the detected
resources reported.
There may be a need to manually add resources which were not automatically
detected by ARS Technologies' installation software.
ISA card handling
Peripheral cards like PCI, PCI Express, PCMCIA and Plug and Play (PNP) ISA cards
can be detected by our software and the associated drivers automatically loaded.
[ 14 ]
ARS Technologies User's Guide
V 2.130
Last Update June /2011
The ISA software can include - 16bit DOS type
- 32bit windows 98 direct i/o type
- 32bit driver - no .inf file
- 32bit driver - with .inf file
Adjustments
You can view ARS Technologies' warranty/refund store policies at:
http://www.arstech.com/page--ste_storepolicies.html
You can consider a number of solutions, until you find the most suitable optionperipheral solution card, power supply, enclosure and/or cable.
If our product from one line does not work with a peripheral card, you can consider
testing with a product from another line which handles the same type of a peripheral
card.
[ 15 ]
ARS Technologies User's Guide
V 2.130
Last Update June /2011
3. USB2 product line
The chapter describes each individual card and the ways of powering, placing it in an
enclosure and connecting the card.
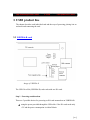
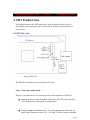
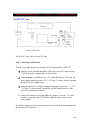
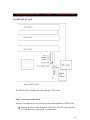
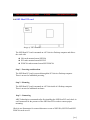
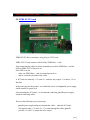
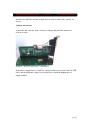
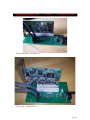
3.1 USB2ISA-R card
Image of USB2ISA-R
The USB 2.0 to ISA (USB2ISA-R) card works with one ISA card.
Step 1 - Powering considerations
There are 3 possible choices for powering an ISA card mounted on an USB2ISA-R:
using the power provided through the USB cable- if the ISA card needs only
+5V and the power consumption is within 500mA.
[ 16 ]
ARS Technologies User's Guide
V 2.130
Last Update June /2011
using an isa-pwr- in addition to the +5V coming through the USB cable, the
power supply module provides +12V, -12V and -5V when currents consumed
by an ISA card are within 50mA.
using an external power supply ( isa-pwr-xr) adapters to provide +5v, +12V,
-12V and -5V when currents consumed by an ISA within the limits of the
particular external power adapter.
To find out if a particular ISA card needs additional voltages please read the article
located at:
http://www.arstech.com/page--pwrsupplyneeds.html .
To find the currents consumed, please check the documentation of the particular ISA
card in use.
ARS Technologies offers the following powering options:
isa-pwr- Power-supply-module
isa-pwr-xr- External-Power-Supply-25W-ROHS
If you want to use the isa-pwr (power supply module), it has to be mounted on the
power supply socket .
If you want to use the isa-pwr-xr (external power supply), the USB 2.0 to ISA card
will not work until the external power is turned on.
To assist with choosing a powering option, ARS Technologies offers a universal
choice, which can cover most available ISA cards - using isa-pwr-xr external power
supply to power ISA cards.
The USB2ISA-R board has a light emitting diode (LED) which indicates when there
is power supplied or not. When there is power, the LED is on, when there is no
power, the LED is off.
ARS Technologies recommends first connecting the USB 2.0 to ISA card without an
ISA card mounted and then checking in our Enumerator for connect/disconnect
events in order to make certain that the USB2ISA-R card is powered properly.
After mounting an ISA card in the USB 2.0 to ISA card, check in our Enumerator for
connect/disconnect events to make sure certain that the USB2ISA-R card is powered
[ 17 ]
ARS Technologies User's Guide
V 2.130
Last Update June /2011
properly.
The power selection jumper has two options:
(Please reference the USB2ISA-R image in section 3.1 to change jumper position)
Option 1: 1-2 Position (default)
1-2 (default) - power provided by the USB cable; this choice has 2 options:
1.
ISA card using only +5V; there is limit of 500 mA current
consumption from +5V
2.
isa-pwr power supply module connected providing –5V, +12V or
-12V to the ISA card; the card consumes currents within the powering
limitations.
Option 2: 2-3 Position
2-3 - power provided by an external power source; this choice has the option:
The power comes from an external power supply in the power socket
( isa-pwr-xr) adapters; there are +5V, +12V, -12V or -5V going to the
ISA card; the limit of current consumption depends on the external power
supply
External Jumper Powering Options
The external power jumper is placed in permanent position:
2-3 – (default) power provided by the isa-pwr-xr
Step 2 (optional) – Place USB2ISA-R card into an enclosure
ARS Technologies offers single and double length plastic enclosures. You will need
to measure the ISA card you have and select the appropriate single or double length
plastic enclosure for your card.
[ 18 ]
ARS Technologies User's Guide
V 2.130
Last Update June /2011
If you have an ISA card and are using the USB2ISA-R you can choose between two
enclosure options:
Enclosure-for-1-ISA-PCI-card
Enclosure-Double-length-for-1-ISA-PCI-card
The above web pages offer:
enclosure images
maximum dimensions of an ISA card which can fit into the enclosure
assembly instructions for the enclosure and the peripheral card
[ 19 ]
ARS Technologies User's Guide
V 2.130
Last Update June /2011
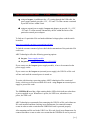
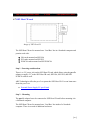
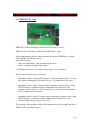
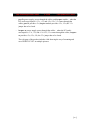
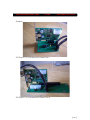
3.2 USB2ISA-X3 card
Image of USB2ISA-X3
The USB 2.0 to ISA Three Connector (USB2ISA-X3) card works with up to three
ISA cards.
Step 1 - Powering considerations
There are 3 possible choices for powering an ISA card mounted on an USB2ISA-X3:
using the power provided through the USB cable- if the ISA card needs only
+5V and the power consumption is within 500mA.
[ 20 ]
ARS Technologies User's Guide
V 2.130
Last Update June /2011
using an isa-pwr- in addition to the +5V coming through the USB cable, the
power supply module provides +12V, -12V and -5V when currents consumed
by an ISA card are within 50mA.
using an external power supply ( isa-pwr-xr) adapters to provide +5v, +12V,
-12V and -5V when currents consumed by an ISA within the limits of the
particular external power adapter.
To find out if a particular ISA card needs additional voltages please read the article
located at:
http://www.arstech.com/page--pwrsupplyneeds.html .
To find the currents consumed, please check the documentation of the particular ISA
card in use.
ARS Technologies offers the following powering options:
isa-pwr- Power-supply-module
isa-pwr-xr- External-Power-Supply-25W-ROHS
If you want to use the isa-pwr (power supply module), it has to be mounted on the
power supply socket .
If you want to use the isa-pwr-xr (external power supply), the USB 2.0 to ISA card
will not work until the external power is turned on.
To assist with choosing a powering option, ARS Technologies offers a universal
choice, which can cover most available ISA cards - using isa-pwr-xr external power
supply to power ISA cards.
The USB2ISA-X3 board has a light emitting diode (LED) which indicates when there
is power supplied or not. When there is power, the LED is on, when there is no
power, the LED is off.
ARS Technologies recommends first connecting the USB 2.0 to ISA card without an
ISA card mounted and then checking in our Enumerator for connect/disconnect
events in order to make certain that the USB2ISA-X3 card is powered properly.
[ 21 ]
ARS Technologies User's Guide
V 2.130
Last Update June /2011
After mounting an ISA card in the USB 2.0 to ISA card, check in our Enumerator for
connect/disconnect events to make sure certain that the USB2ISA-X3 card is
powered properly.
The power selection jumper has two options:
(Please reference the USB2ISA-X3 image in section 3.2 to change jumper
position)
Option 1: 1-2 Position (default)
1-2 (default) - power provided by the USB cable; this choice has 2 options:
3.
ISA card using only +5V; there is limit of 500 mA current
consumption from +5V
4.
isa-pwr power supply module connected providing –5V, +12V or
-12V to the ISA card; the card consumes currents within the powering
limitations.
Option 2: 2-3 Position
2-3 - power provided by an external power source; this choice has the option:
The power comes from an external power supply in the power socket
( isa-pwr-xr) adapters; there are +5V, +12V, -12V or -5V going to the
ISA card; the limit of current consumption depends on the external power
supply
External Jumper Powering Options
The external power jumper is placed in permanent position:
2-3 – (default) power provided by the isa-pwr-xr
Step 2 (optional) – Place USB2ISA-X3 card into an enclosure
ARS Technologies offers single and double length plastic enclosures. You will need
to measure the ISA card you have and select the appropriate single or double length
plastic enclosure for your card.
[ 22 ]
ARS Technologies User's Guide
V 2.130
Last Update June /2011
If you have an ISA card and are using the USB2ISA-X3 you can choose between two
enclosure options:
Enclosure-for-3-ISA-PCI-cards
Enclosure-Double-length-for-3-ISA-PCI-cards
The above web pages offer:
enclosure images
maximum dimensions of an ISA card which can fit into the enclosure
assembly instructions for the enclosure and the peripheral card
[ 23 ]
ARS Technologies User's Guide
V 2.130
Last Update June /2011
3.3 Other USB2 cards
ARS Technologies did previously offer also the following products:
- USB2ISA-RA – takes one ISA card, mounted horizontally
–
USB2ISA-SL – takes multiple ISA cards, mounted in a passive ISA backplane
–
USB2ISA-X7 – takes up to 7 ISA cards
–
USB2PCMCIA-R – takes one 3.3V or 5V 16bit PCMCIA card
You can initially evaluate with our regular – similar / comparable products, and
contact us if you want to get a specific one of the above products.
[ 24 ]
ARS Technologies User's Guide
V 2.130
Last Update June /2011
4. SSI2 Product Line
This chapter describes the SSI2 product line; each individual card; the ways of
powering the cards; and how to place the card in an enclosure and connect it to a
power source.
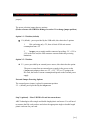
4.1 SSI2 ISA card
Image of SSI2 ISA
The SSI2 ISA card allows the work with one ISA card.
Step 1 - Powering considerations
There are 3 possible choices for powering an ISA card mounted on a SSI2 ISA:
using the power provided through the USB cable- if the ISA card needs only
+5V and the power consumption is within 500mA.
using an isa-pwr- in addition to the +5V coming through the USB cable, the
power supply module provides +12V, -12V and -5V when currents consumed
[ 25 ]
ARS Technologies User's Guide
V 2.130
Last Update June /2011
by an ISA card are within 50mA.
using an external power supply ( isa-pwr-xr) adapters to provide +5v, +12V,
-12V and -5V when currents consumed by an ISA within the limits of the
particular external power adapter.
To find out if a particular ISA card needs additional voltages please read the article
located at:
http://www.arstech.com/page--pwrsupplyneeds.html .
To find the currents consumed, please check the documentation of the particular ISA
card in use.
ARS Technologies offers the following powering options:
isa-pwr- Power-supply-module
isa-pwr-xr- External-Power-Supply-25W-ROHS
If you want to use the isa-pwr (power supply module), it has to be mounted on the
power supply socket .
If you want to use the isa-pwr-xr (external power supply), the SSI2 ISA card will not
work until the external power is turned on.
To assist with choosing a powering option, ARS Technologies offers a universal
choice, which can cover most available ISA cards - using isa-pwr-xr external power
supply to power ISA cards.
The SSI2 ISA board has a light emitting diode (LED) which indicates when there is
power supplied or not. When there is power, the LED is on, when there is no power,
the LED is off.
ARS Technologies recommends first connecting the SSI2 ISA card without an ISA
card mounted and then checking in our Enumerator for connect/disconnect events in
order to make certain that the SSI2 ISA card is powered properly.
After mounting an ISA card in the SSI2 ISA card, check in our Enumerator for
connect/disconnect events to make sure certain that the SSI2 ISA card is powered
properly.
[ 26 ]
ARS Technologies User's Guide
V 2.130
Last Update June /2011
The power selection jumper has two options:
(Please reference the SSI2 ISA image in section 4.1 to change jumper position)
Option 1: 1-2 Position (default)
1-2 (default) - power provided by the USB cable; this choice has 2 options:
- ISA card using only +5V; there is limit of 500 mA current consumption
from +5V
- isa-pwr power supply module connected providing –5V, +12V or -12V
to the ISA card; the card consumes currents within the powering
limitations.
Option 2: 2-3 Position
2-3 - power provided by an external power source; this choice has the option:
The power comes from an external power supply in the power socket
( isa-pwr-xr) adapters; there are +5V, +12V, -12V or -5V going to the
ISA card; the limit of current consumption depends on the external power
supply
External Jumper Powering Options
The external power jumper is placed in permanent position:
2-3 – (default) power provided by the isa-pwr-xr
Step 2 (optional) – Place SSI2 ISA card into an enclosure
ARS Technologies offers single and double length plastic enclosures. You will need
to measure the ISA card you have and select the appropriate single or double length
plastic enclosure for your card.
[ 27 ]
ARS Technologies User's Guide
V 2.130
Last Update June /2011
If you have an ISA card and are using the SSI2 ISA you can choose between two
enclosure options:
Enclosure-for-1-ISA-PCI-card
Enclosure-Double-length-for-1-ISA-PCI-card
The above web pages offer:
enclosure images
maximum dimensions of an ISA card which can fit into the enclosure
assembly instructions for the enclosure and the peripheral card
[ 28 ]
ARS Technologies User's Guide
V 2.130
Last Update June /2011
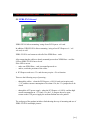
4.2 SSI2 PCI card
Image of SSI2 PCI
The SSI2 PCI card works with one PCI card.
Step 1 - Powering considerations
There are 4 possible choices for powering a PCI card mounted on a SSI2 PCI:
using the power provided through the USB cable- if the PCI card needs only
+5V and the power consumption is within 500mA.
using an isa-pwr- in addition to the +5V coming through the USB cable, the
power supply module provides +12V, -12V and -5V when currents consumed
by an ISA card are within 50mA.
using an external power supply ( isa-pwr-xr) adapters to provide +5v, +12V,
-12V and -5V when currents consumed by an ISA within the limits of the
particular external power adapter.
using of an external power supply (pwr-3v) adapter to provide +3.3v when
currents consumed by the PCI cared are within the limits of the external
power adapter.
To find the voltages used and currents consumed, please check the documentation of
the particular PCI card in use.
[ 29 ]
ARS Technologies User's Guide
V 2.130
Last Update June /2011
ARS Technologies offers the following powering options:
•
•
•
isa-pwr- Power-supply-module
isa-pwr-xr- External-Power-Supply-25W-ROHS
pwr-3v - External-Power-Supply-3V
If you want to use the isa-pwr (power supply module), it has to be mounted on the
power supply socket .
If you want to use the isa-pwr-xr (external power supply), the SSI2 PCI card will not
work until the external power is turned on.
To assist with choosing a powering option, ARS Technologies offers a universal
choice, which can cover most available PCI cards - using isa-pwr-xr external power
supply to power PCI cards.
The SSI2 PCI board has a light emitting diode (LED) which indicates when there is
power supplied or not. When there is power, the LED is on, when there is no power,
the LED is off.
ARS Technologies recommends first connecting the SSI2 PCI card without a PCI
card mounted and then checking in our Enumerator for connect/disconnect events in
order to make certain that the SSI2 PCI card is powered properly.
After mounting a PCI card in the SSI2 PCI card, check in our Enumerator for
connect/disconnect events to make sure certain that the SSI2 PCI card is powered
properly.
The power selection jumper has two options:
(Please reference the SSI2 PCI image in section 4.2 to change jumper position)
Option 1: 1-2 Position (default)
1-2 (default) - power provided by the USB cable; this choice has 2 options:
- PCI card using only +5V; there is limit of 500 mA current consumption
from +5V
- isa-pwr power supply module connected providing –5V, +12V or -12V
to the PCI card; the card consumes currents within the powering
limitations.
[ 30 ]
ARS Technologies User's Guide
V 2.130
Last Update June /2011
Option 2: 2-3 Position
2-3 - power provided by an external power source; this choice has the options:
- The power comes from an external power supply ( isa-pwr-xr) adapters;
externally, there are +5V, +12V and -12V going to the PCI card; the limit of
current consumption depends on the external power supply
- The power comes from an external power supply (i.e. pwr-3v) adapters;
externally, there is +3.3V going to the PCI card; the limit of current consumption
depends on the external power supply
External Jumper Powering Options
The external power jumper is placed in permanent position:
2-3 – (default) power provided by the isa-pwr-xr
The +3.3V jumper has two powering options:
1-2 (default) - +3.3V power provided for the PCI card by other sources;
including the USB cable, floppy connector or external power supplies
2-3 - +3.3V power provided for the PCI card by the pwr-3v
Step 2 (optional) – Place SSI2 PCI card into an enclosure
ARS Technologies offers single and double length plastic enclosures. You will need
to measure the PCI card you have and select the appropriate single or double length
plastic enclosure for your card.
[ 31 ]
ARS Technologies User's Guide
V 2.130
Last Update June /2011
If you have an PCI card and are using the SSI2 PCI you can choose between two
enclosure options:
Enclosure-for-1-ISA-PCI-card
Enclosure-Double-length-for-1-ISA-PCI-card
The above web pages offer:
enclosure images
maximum dimensions of an ISA card which can fit into the enclosure
assembly instructions for the enclosure and the peripheral card
[ 32 ]
ARS Technologies User's Guide
V 2.130
Last Update June /2011
4.3 SSI2 ISA X3 card
Image of SSI2 ISA X3
The SSI2 ISA X3 card allows the work with up to 3 ISA cards.
Step 1 - Powering considerations
There are 3 possible choices for powering an ISA card mounted on a SSI2 ISA X3:
using the power provided through the USB cable- if the ISA card needs only
+5V and the power consumption is within 500mA.
[ 33 ]
ARS Technologies User's Guide
V 2.130
Last Update June /2011
using an isa-pwr- in addition to the +5V coming through the USB cable, the
power supply module provides +12V, -12V and -5V when currents consumed
by an ISA card are within 50mA.
using an external power supply ( isa-pwr-xr) adapters to provide +5v, +12V,
-12V and -5V when currents consumed by an ISA within the limits of the
particular external power adapter.
To find out if a particular ISA card needs additional voltages please read the article
located at:
http://www.arstech.com/page--pwrsupplyneeds.html .
To find the currents consumed, please check the documentation of the particular ISA
card in use.
ARS Technologies offers the following powering options:
isa-pwr- Power-supply-module
isa-pwr-xr- External-Power-Supply-25W-ROHS
If you want to use the isa-pwr (power supply module), it has to be mounted on the
power supply socket .
If you want to use the isa-pwr-xr (external power supply), the SSI2 ISA X3 card will
not work until the external power is turned on.
To assist with choosing a powering option, ARS Technologies offers a universal
choice, which can cover most available ISA cards - using isa-pwr-xr external power
supply to power ISA cards.
The SSI2 ISA X3 board has a light emitting diode (LED) which indicates when there
is power supplied or not. When there is power, the LED is on, when there is no
power, the LED is off.
ARS Technologies recommends first connecting the SSI2 ISA X3 card without an
ISA card mounted and then checking in our Enumerator for connect/disconnect
events in order to make certain that the SSI2 ISA X3 card is powered properly.
[ 34 ]
ARS Technologies User's Guide
V 2.130
Last Update June /2011
After mounting an ISA card in the SSI2 ISA X3 card, check in our Enumerator for
connect/disconnect events to make sure certain that the SSI2 ISA X3 card is powered
properly.
The power selection jumper has two options:
(Please reference the SSI2 ISA X3 image in section 4.3 to change jumper
position)
Option 1: 1-2 Position (default)
1-2 (default) - power provided by the USB cable; this choice has 2 options:
- ISA card using only +5V; there is limit of 500 mA current consumption
from +5V
- isa-pwr power supply module connected providing –5V, +12V or -12V
to the ISA card; the card consumes currents within the powering
limitations.
Option 2: 2-3 Position
2-3 - power provided by an external power source; this choice has the option:
The power comes from an external power supply in the power socket
( isa-pwr-xr) adapters; there are +5V, +12V, -12V or -5V going to the
ISA card; the limit of current consumption depends on the external power
supply
External Jumper Powering Options
The external power jumper is placed in permanent position:
2-3 – (default) power provided by the isa-pwr-xr
[ 35 ]
ARS Technologies User's Guide
V 2.130
Last Update June /2011
Step 2 (optional) – Place SSI2 ISA X3 card into an enclosure
ARS Technologies offers single and double length plastic enclosures. You will need
to measure the ISA card you have and select the appropriate single or double length
plastic enclosure for your card.
If you have an ISA card and are using the SSI2 ISA X3 you can choose between two
enclosure options:
Enclosure-for-3-ISA-PCI-cards-isax3b1.html
Enclosure-Dbl-length-for-3-ISA-PCI-cards-isax3b2.html
The above web pages offer:
enclosure images
maximum dimensions of an ISA card which can fit into the enclosure
assembly instructions for the enclosure and the peripheral card
[ 36 ]
ARS Technologies User's Guide
V 2.130
Last Update June /2011
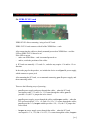
4.4 SSI2 PCI X3 card
Image of SSI2 PCI X3
The SSI2 PCI X3 card works with up to 3 PCI cards.
Step 1 - Powering considerations
There are 4 possible choices for powering a PCI card mounted on a SSI2 PCI X3:
using the power provided through the USB cable- if the PCI card needs only
+5V and the power consumption is within 500mA.
using an isa-pwr- in addition to the +5V coming through the USB cable, the
power supply module provides +12V, -12V and -5V when currents consumed
by an ISA card are within 50mA.
using an external power supply ( isa-pwr-xr) adapters to provide +5v, +12V,
-12V and -5V when currents consumed by an ISA within the limits of the
particular external power adapter.
using of an external power supply (pwr-3v) adapter to provide +3.3v when
currents consumed by the PCI cared are within the limits of the external
power adapter.
[ 37 ]
ARS Technologies User's Guide
V 2.130
Last Update June /2011
To find the voltages used and currents consumed, please check the documentation of
the particular PCI card in use.
ARS Technologies offers the following powering options:
•
•
•
isa-pwr- Power-supply-module
isa-pwr-xr- External-Power-Supply-25W-ROHS
pwr-3v - External-Power-Supply-3V
If you want to use the isa-pwr (power supply module), it has to be mounted on the
power supply socket .
If you want to use the isa-pwr-xr (external power supply), the SSI2 PCI X3 card will
not work until the external power is turned on.
To assist with choosing a powering option, ARS Technologies offers a universal
choice, which can cover most available PCI cards - using isa-pwr-xr external power
supply to power PCI cards.
The SSI2 PCI X3 board has a light emitting diode (LED) which indicates when there
is power supplied or not. When there is power, the LED is on, when there is no
power, the LED is off.
ARS Technologies recommends first connecting the SSI2 PCI X3 card without a PCI
card mounted and then checking in our Enumerator for connect/disconnect events in
order to make certain that the SSI2 PCI X3 card is powered properly.
After mounting a PCI card in the SSI2 PCI X3 card, check in our Enumerator for
connect/disconnect events to make sure certain that the SSI2 PCI X3 card is powered
properly.
The power selection jumper has two options:
(Please reference the SSI2 PCI X3 image in section 4.4 to change jumper
position)
[ 38 ]
ARS Technologies User's Guide
V 2.130
Last Update June /2011
Option 1: 1-2 Position (default)
1-2 (default) - power provided by the USB cable; this choice has 2 options:
- PCI card using only +5V; there is limit of 500 mA current consumption
from +5V
- isa-pwr power supply module connected providing –5V, +12V or -12V
to the PCI card; the card consumes currents within the powering
limitations.
Option 2: 2-3 Position
2-3 - power provided by an external power source; this choice has the options:
- The power comes from an external power supply ( isa-pwr-xr) adapters;
externally, there are +5V, +12V and -12V going to the PCI card; the limit of
current consumption depends on the external power supply
- The power comes from an external power supply (i.e. pwr-3v) adapters;
externally, there is +3.3V going to the PCI card; the limit of current consumption
depends on the external power supply
External Jumper Powering Options
The external power jumper is placed in permanent position:
2-3 – (default) power provided by the isa-pwr-xr
The +3.3V jumper has two powering options:
1-2 (default) - +3.3V power provided for the PCI card by other sources;
including the USB cable, floppy connector or external power supplies
2-3 - +3.3V power provided for the PCI card by the pwr-3v
[ 39 ]
ARS Technologies User's Guide
V 2.130
Last Update June /2011
Step 2 (optional) – Place SSI2 PCI X3 card into an enclosure
ARS Technologies offers single and double length plastic enclosures. You will need
to measure the PCI card you have and select the appropriate single or double length
plastic enclosure for your card.
If you have an PCI card and are using the SSI2 PCI X3 you can choose between two
enclosure options:
Enclosure-for-3-ISA-PCI-cards-isax3b1.html
Enclosure-Dbl-length-for-3-ISA-PCI-cards-isax3b2.html
The above web pages offer:
enclosure images
maximum dimensions of an ISA card which can fit into the enclosure
assembly instructions for the enclosure and the peripheral card
[ 40 ]
ARS Technologies User's Guide
V 2.130
Last Update June /2011
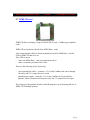
4.5 SSI2 PCMCIA card
Image of SSI2 PCMCIA
The SSI2 PCMCIA card works with one 16bit ‘PC Card’ type of PCMCIA card, or
one 32bit ‘Card Bus’ type of a PCMCIA card.
Only +3.3V PCMCIA cards are supported.
Step 1 - Powering considerations
There is a PCMCIA power selection jumper and a +3.3V power jack on the SSI2
PCMCIA card, which permits selection of different sources of +3.3V as a Vpp
voltage to the PCMCIA card.
There are two possible choices of powering on an SSI2 PCMCIA card:
using the power provided through the USB cable, if the PCMCIA card
consumes up to 500mA of current
using the pwr-3v adapter, which will provide up to 2A of current for the
PCMCIA card
[ 41 ]
ARS Technologies User's Guide
V 2.130
Last Update June /2011
The power selection jumper has two choices:
closed (default) – provides +3.3V as Vpp power to the PCMCIA card through
the USB cable
open – provides +3.3V as Vpp to the PCMCIA card using the pwr-3v adapter
To find out the voltage and current consumed, check the
documentation/specifications sheet of the particular PCMCIA card.
ARS Technologies offers the pwr-3v to power the SSI2 PCMCIA card. You can find
more info about the pwr-3v at:
External-Power-Supply-3V-pwr3v.html
Step 2 – Mounting
The SSI2 PCMCIA card comes with an enclosure.
In general one PCMCIA card has a top side and a bottom side. Ideally, when
connected to SSI2 PCMCIA card, the top side will be up, and the bottom side will
face down.
Mount the PCMCIA card to the SSI2 PCMCIA card as indicated in the figure located
in section 4.5.
Step 3 – Connecting
The PCMCIA card has to be mounted in SSI2 PCMCIA before connecting to SSI2
host.
Change the jumper settings according to the current (amperage needs) of the
PCMCIA card.
[ 42 ]
ARS Technologies User's Guide
V 2.130
Last Update June /2011
If you want to use the SSI2 PCMCIA card with an external power source:
1. Connect the power source
2. Turn the power on
3. Connect the SSI2 PCMCIA card to the SSI2 host
The SSI2 PCMCIA card will not work until the external power is turned on.
We recommend connecting initially the SSI2 PCMCIA card without a PCMCIA card
mounted and checking in our Enumerator for connect/disconnect events in order to
ensure the proper powering.
After mounting a PCMCIA card in the SSI2 PCMCIA card, check in our Enumerator
for connect/disconnect events, in order to ensure proper powering once again.
[ 43 ]
ARS Technologies User's Guide
V 2.130
Last Update June /2011
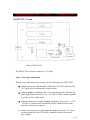
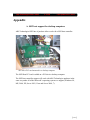
4.6 SSI2 Host PCI card
Image of SSI2 Host PCI
The SSI2 Host PCI card is mounted on a PCI slot in a Desktop computer and allows
the work with:
ISA cards mounted on an SSI2 ISA
PCI cards mounted on an SSI2 PCI
PCMCIA cards mounted on an SSI2 PCMCIA
Step 1 - Powering considerations
The SSI2 Host PCI card is powered through the PCI slot in a Desktop computer.
There is no need of additional powering.
Step 2 - Mounting
The SSI2 Host PCI card is mounted on a PCI slot inside of a Desktop computer.
There is no need of additional enclosure.
Step 3 - Connecting
ARS Technologies recommends after first installing the SSI2 Host PCI card, check in
our Enumerator for the presence of the SSI2 Host PCI in order to ensure proper
mounting.
Check in our Enumerator for connect/disconnect events of SSI2 ISA, SSI2 PCI and SSI2
PCMCIA cards as well..
[ 44 ]
ARS Technologies User's Guide
V 2.130
Last Update June /2011
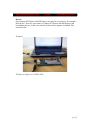
4.7 SSI2 Host CB card
Image of SSI2 Host CB
The SSI2 Host CB card is mounted on a ‘Card Bus’ slot in a Notebook computer and
permits work with:
ISA cards mounted on SSI2 ISA
PCI cards mounted on SSI2 PCI
PCMCIA cards mounted on SSI2 PCMCIA
Step 1 - Powering considerations
There is a +5V power jack on the SSI2 Host CB card which allows using the pwr-5v
adapter to supply +5V to the SSI2 Host CB card, SSI2 ISA, SSI2 PCI, and SSI2
PCMCIA cards as well.
ARS Technologies offers the pwr-5v to power the SSI2 Host CB. You can learn more
about the pwr-5v at:
External-Power-Supply-5V-pwr5v.html
Step 2 – Mounting
The pwr-5v adapter has to be connected to SSI2 Host CB card before mounting it in
a Notebook computer.
The SSI2 Host CB card is mounted on a ‘Card Bus’ slot inside of a Notebook
computer. There is no need of additional enclosure.
[ 45 ]
ARS Technologies User's Guide
V 2.130
Last Update June /2011
Step 3 – Connecting
ARS Technologies recommends after first installing the SSI2 Host CB card to check
in our Enumerator for the presence of the SSI2 Host CB to make ensure proper
mounting.
In addition you can plug and eject the SSI2 Host CB card and check in our
Enumerator for these events.
Please check in our Enumerator for connect/disconnect events of the SSI2 ISA, SSI2
PCI and SSI2 PCMCIA cards as well.
[ 46 ]
ARS Technologies User's Guide
V 2.130
Last Update June /2011
4.8 Evolution of SSI2 cards
The ssi2 line have multi-protocol products which works currently through - usb , on systems with usb2.0 hosts
–
or, with our our ssi2-host-.. cards
We plan
–
including additional interfaces
- adding support for devices – iphone/ipad, android ...
[ 47 ]
ARS Technologies User's Guide
V 2.130
Last Update June /2011
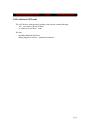
5. XPRS Product Line
XPRS line of products allow using of peripheral cards – PCI, ExpressCard, PCI
Express, CardBus outside of computer systems – through cable.
This chapter describes the XPRS product line; each individual card; the ways of
powering the cards; and how to place the card in an enclosure and connect it to a
power source.
5.1 XPRS-Host-DT card
XPRS-Host-DT product is a kit containing – the card, 2 cables of 0.5m / 1.6” length
and a metal bracket.
The card is mounted in a computer system (normally a desktop) with PCI Express -x1
connectors.
Optionally XPRS-Host-DT card may be mounted and used in a PCI Express -x16
connectors.
XPRS-Host-DT card connects with all of the XPRS-.. peripheral cards
The web page of the product includes a link showing the way of mounting and use of
XPRS-Host-DT in multiple pictures.
[ 48 ]
ARS Technologies User's Guide
V 2.130
Last Update June /2011
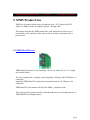
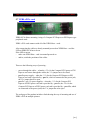
5.2 XPRS-Host-EC card
XPRS-Host-EC product is a kit containing – type54 card (as on the picture above),
type34 card, and 2 cables of 0.5m / 1.6”.
Some computer systems can not take type54 card – please use type 34 card in this
case.
The card is mounted in a computer system (normally a notebook) with an
ExpressCard slot.
XPRS-Host-EC card connects with all of the XPRS-.. peripheral cards
The web page of the product includes a link showing the way of mounting and use of
XPRS-Host-EC in multiple pictures.
[ 49 ]
ARS Technologies User's Guide
V 2.130
Last Update June /2011
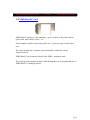
5.3 XPRS-EC card
XPRS-EC allows mounting / using of ExpressCard type34 and type54 peripheral
cards .
XPRS-EC card connects with all of the XPRS-Host-.. cards
After connecting the cables to already mounted/powered on XPRS-Host-.. card the
LED on XPRS-EC has to be on.
If the LED is not on:
–
make sure XPRS-Host-.. card is mounted/powered on
–
and/or, switch the positions of the cables
The web page of the product includes a link showing the way of mounting and use of
XPRS-EC in multiple pictures.
[ 50 ]
ARS Technologies User's Guide
V 2.130
Last Update June /2011
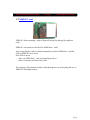
5.4 XPRS-PX-X1 card
XPRS-PX-X1 allows mounting / using of one PCI Express -x1 card.
XPRS- PX-X1 card connects with all of the XPRS-Host-.. cards
After connecting the cables to already mounted/powered on XPRS-Host-.. card the
LED on XPRS- PX-X1 has to be on.
If the LED is not on:
–
make sure XPRS-Host-.. card is mounted/powered on
–
and/or, switch the positions of the cables
A PCI Express card uses +3.3v and also may require +12v to function.
There are the following ways of powering :
–
through the cables - when the PCI Express -x1 card uses/requires only +3.3v, and
has current consumption of less than 0.5A; the 3.3v jumpers has to be closed
–
through the cables / with 3,3v power module mounted in the 6pin socket - when
the PCI Express -x1 card has current consumption of less than 0.5A, and
consumes of up to 50mA on +12v; the jumper for +12v has to in closed position;
the 3.3v jumpers has to be closed
–
through the cables / with 12V external supply connected to the power jack - when
the PCI Express -x1 card has current consumption of less than 0.5A, and
consumes high current , of up to 5A on +12v
The web page of the product includes a link showing the way of mounting and use of
XPRS- PX-X1 in multiple pictures.
[ 51 ]
ARS Technologies User's Guide
V 2.130
Last Update June /2011
5.5 XPRS-PX-X16 card
XPRS-PX-X16 allows mounting / using of one PCI Express -x16 card.
In addition, XPRS-PX-X16 allows mounting / using of one PCI Express -x1 / -x4 /
-x8 card, as well.
XPRS- PX-X16 card connects with all of the XPRS-Host-.. cards
After connecting the cables to already mounted/powered on XPRS-Host-.. card the
LED on XPRS- PX-X16 has to be on.
If the LED is not on:
–
make sure XPRS-Host-.. card is mounted/powered on
–
and/or, switch the positions of the cables
A PCI Express card uses +3.3v and also may require +12v to function.
There are the following ways of powering :
–
through the cables - when the PCI Express -x1/4/8/16 card uses/requires only
+3.3v, and has current consumption of less than 0.5A; the 3.3v jumpers has to be
closed
–
through the ATX power supply - when the PCI Express -x1/4/8/16 card has high
current consumption on +3,3v and +12v; the 3.3v jumpers has to be open;
to turn on the ATX power supply the on-board button has to be pushed
The web page of the product includes a link showing the way of mounting and use of
XPRS- PX-X16 in multiple pictures.
[ 52 ]
ARS Technologies User's Guide
V 2.130
Last Update June /2011
5.6 XPRS-PCI-X1 card
XPRS-PCI-X1 allows mounting / using of one PCI card.
XPRS- PCI-X1 card connects with all of the XPRS-Host-.. cards
After connecting the cables to already mounted/powered on XPRS-Host-.. card the
LED on XPRS- PCI-X1 has to be on.
If the LED is not on:
–
make sure XPRS-Host-.. card is mounted/powered on
–
and/or, switch the positions of the cables
A PCI card uses normally +3.3v and +5v , and also may require +12v and/or -12v to
function.
In the order page for the product , we include the choice to add pwr-5v power supply,
which connects to power jack.
After mounting the PCI card , we recommend connecting pwr-5v power supply, and
then connecting cables.
There are the following ways of powering :
–
pwr-5v power supply and power through the cables - when the PCI card
uses/requires only +3.3v and +5v; 3.3v comes through the cables; pwr-5v
provides +5v; the 3.3v jumper has to be closed
–
pwr-5v power supply, power through the cables, and isa-pwr module - when the
PCI card uses/requires +3.3v, +5v, and +12v/-12v; 3.3v comes through the cables;
pwr-5v provides +5v; isa-pwr module provides +12v, -12v; the 3.3v jumper has
to be closed
–
isa-pwr-xr power supply, power through the cables - when the PCI card
uses/requires +3.3v, +5v, and +12v/-12v; 3.3v comes through the cables; isa-pwr[ 53 ]
ARS Technologies User's Guide
V 2.130
Last Update June /2011
xr provides +5v,+12v,-12v; the 3.3v jumper has to be closed
The web page of the product includes a link showing the way of mounting and
use of XPRS- PCI-X1 in multiple pictures.
[ 54 ]
ARS Technologies User's Guide
V 2.130
Last Update June /2011
5.7 XPRS-CB card
XPRS-CB allows mounting / using of 32bit PCMCIA card - CardBus type peripheral
cards .
XPRS-CB card connects with all of the XPRS-Host-.. cards
After connecting the cables to already mounted/powered on XPRS-Host-.. card the
LED on XPRS- CB has to be on.
If the LED is not on:
–
make sure XPRS-Host-.. card is mounted/powered on
–
and/or, switch the positions of the cables
There are the following ways of powering :
–
–
power through the cables - when the +3.3v for the CardBus card comes through
the cables; the 3.3v jumper has to be closed
pwr-3v power supply- when the +3.3v for the CardBus card is provided by pwr-3v, which is connected to the power jack; the 3.3v jumper has to be open
The web page of the product includes a link showing the way of mounting and use of
XPRS- CB in multiple pictures.
[ 55 ]
ARS Technologies User's Guide
V 2.130
Last Update June /2011
5.8 XPRS-PCI-X3 card
XPRS-PCI-X3 allows mounting / using of up to 3 PCI cards.
XPRS- PCI-X3 card connects with all of the XPRS-Host-.. cards
After connecting the cables to already mounted/powered on XPRS-Host-.. card the
LED on XPRS- PCI-X3 has to be on.
If the LED is not on:
–
make sure XPRS-Host-.. card is mounted/powered on
–
and/or, switch the positions of the cables
A PCI card uses normally +3.3v and +5v , and also may require +12v and/or -12v to
function.
In the order page for the product , we include the choice to add pwr-5v power supply,
which connects to power jack.
After mounting the PCI card/s , we recommend connecting pwr-5v power supply,
and then connecting cables.
There are the following ways of powering :
–
pwr-5v power supply and power through the cables - when the PCI card/s
uses/requires only +3.3v and +5v; 3.3v comes through the cables; pwr-5v
provides +5v; the 3.3v jumper has to be closed
[ 56 ]
ARS Technologies User's Guide
V 2.130
Last Update June /2011
–
pwr-5v power supply, power through the cables, and isa-pwr module - when the
PCI card/s uses/requires +3.3v, +5v, and +12v/-12v; 3.3v comes through the
cables; pwr-5v provides +5v; isa-pwr module provides +12v, -12v; the 3.3v
jumper has to be closed
–
isa-pwr-xr power supply, power through the cables - when the PCI card/s
uses/requires +3.3v, +5v, and +12v/-12v; 3.3v comes through the cables; isa-pwrxr provides +5v,+12v,-12v; the 3.3v jumper has to be closed
The web page of the product includes a link showing the way of mounting and
use of XPRS- PCI-X3 in multiple pictures.
[ 57 ]
ARS Technologies User's Guide
V 2.130
Last Update June /2011
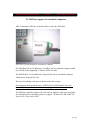
5.7 XPRS-cPCIe card
XPRS-cPCIe allows mounting / using of a Compact PCI Express or PXI Express type
peripheral cards .
XPRS- cPCIe card connects with all of the XPRS-Host-.. cards
After connecting the cables to already mounted/powered on XPRS-Host-.. card the
LED on XPRS-cPCIe has to be on.
If the LED is not on:
–
make sure XPRS-Host-.. card is mounted/powered on
–
and/or, switch the positions of the cables
There are the following ways of powering :
–
–
–
power through the cables - when the +3.3v for the Compact PCI Express or PXI
Express card comes through the cables; the 3.3v jumper has to be closed
pwr-3v power supply - when the +3.3v for the Compact PCI Express or PXI
Express card card is provided by - pwr-3v, which is connected to the power jack;
the 3.3v jumper has to be open
pwr-3v + pwr-12v power supplies - when the +3.3v for the Compact PCI
Express or PXI Express card card is provided by - pwr-3v, the +12v for the
Compact PCI Express or PXI Express card card is provided by - pwr-12v, which
are connected to the power jacks; the 3.3v jumper has to be open
The web page of the product includes a link showing the way of mounting and use of
XPRS- cPCIe in multiple pictures.
[ 58 ]
ARS Technologies User's Guide
V 2.130
Last Update June /2011
6. Installation
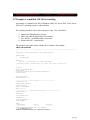
6.1 Software Setup
Step 1: Download zip file
The ARS Technologies installation software is packed in a single ZIP file and is
available for download at:
www.arstech.com/install2rel.zip
The install file – install2rel.zip , after unzipping, has a number of folders, including:
–
\windows - a folder for the Windows platform; single setup file covers installing
for 32bit and 64bit Windows releases
–
\linux - a folder for the Linux platform; there are 2 separate packages – one for
32bit and for 64bit Linux releases
–
\mac-os-x - a folder for the Mac OS X platform; single package file covers
installing for all Mac OS X releases
–
\4developers – a folder with information for developers; it includes our
simple/basic API set and a sample which covers all operating systems that we
support
Step 2: Run the setup file
The Windows platform folder contains a single executable file– setup-X-Y.exe ,
where -X-Y represents the current software version, for example setup-2-130.exe .
Please run this file, and follow the install process.
In the same way Linux and Mac OS X have setup package files - run the particular
file, and follow the install process.
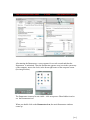
Step 3: Run / test / view the installed files
The setup process installs multiple files, however the following are accessible for the
user:
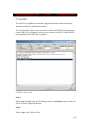
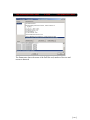
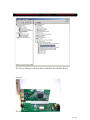
arsenum - Enumerator , showing connect/disconnect events and resources
arsgui - utility for manual read/write with peripheral cards
users-guide – this file
[ 59 ]
ARS Technologies User's Guide
V 2.130
Last Update June /2011
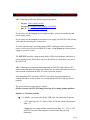
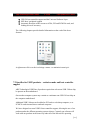
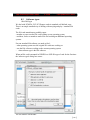
6.2 Specifics for Windows platform
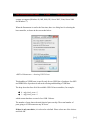
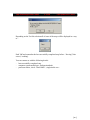
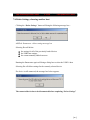
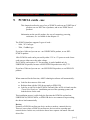
Choose the way of starting of the Enumerator – during setup
A message box with a question appears asking:
Run the ARSTech Enumerator
automatically- at start up
manually- from the menu
If you choose “Yes”, our Enumerator program arsenum3 is placed in the Start / Programs / StartUp ,
and will be started immediately after boot of the operating system.
If you choose “No”, our Enumerator program arsenum3 is placed in the Start / Programs / ARSTech ,
and after boot of the operating system have to be started manually.
NOTE!!! It is recommended for first time users to select ‘No’ and start the
program manually.
[ 60 ]
ARS Technologies User's Guide
V 2.130
Last Update June /2011
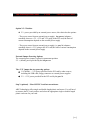
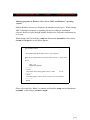
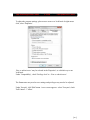
Running programs on Windows Vista , Server 2008 , and Windows 7 operating
systems
Modern Windows releases are designed with multiple security layers. When running
ARS Technologies programs, or installing our drivers within our installation
software, the process goes through multiple dialog boxes, and needs confirmation on
every step.
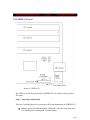
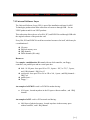
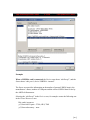
When starting ARS Technologies' setup.exe; Enumerator arsenum3; or the utilities
arscmd and arsgui, the screen below appears:
User Account Control
x
! An unidentified program wants access to your computer
Don't run the program unless you know where it's from , or you've used
it
before
setup.....exe
Unidentified publisher
---------------> Cancel
I don't know where this program is from, or what
it's for
---------------> Allow
I trust this program. I know where it's from or I've used it before
--------------~ Details
Please select and click “Allow” to continue and finish the setup, run the Enumerator
arsenum3, or the utilities, arscmd or arsgui.
[ 61 ]
ARS Technologies User's Guide
V 2.130
Last Update June /2011
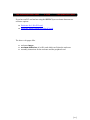
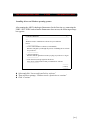
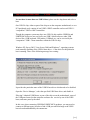
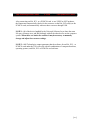
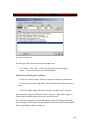
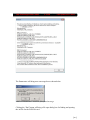
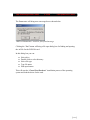
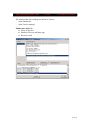
Installing drivers on Windows operating systems
After running the ARS Technologies Enumerator for the first time or, connecting the
USB2 / SSI2 / XPRS cards when the Enumerator does not run, the following message
box appears:
Found New Hardware
x
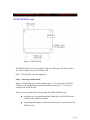
-----------------------------------------------------------------------------------------Windows needs to install driver software for your Unknown
Device
-------------------* Locate and install driver software (recommended)
Windows will guide you through the process of installing driver software
for your device.
----------------------> Ask me again later
Windows will ask again the next time you plug in your device or log on.
---------------------* Don't show this message again for this device
Your device will not function until you install driver software.
--------------------------------| Cancel |
----------
Select and click “Locate and install driver software”
There will be a message, “Windows needs a permission to continue”
Click “Continue”
[ 62 ]
ARS Technologies User's Guide
V 2.130
Last Update June /2011
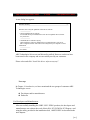
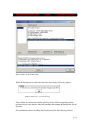
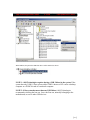
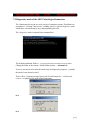
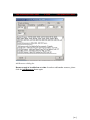
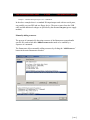
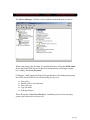
A new dialog box appears
Windows Security
x
--------------------------------------------------------------------------------------------------Windows can't verify the publisher of this driver software
--------------------> Don't install this driver software
You should check your manufacturer's web site for updated driver software
for your device.
-------------------> Install this driver software anyway
Only install driver software obtained from your manufacturer's web site or
disk. Unsigned software from other sources may harm your computer or steal
information.
-------------------~ See details
ARS Technologies' drivers are not Microsoft certified. However our drivers have
been tested in our company and are successfully used by our customers.
Please select and click “Install this driver software anyway”.
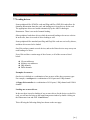
Next steps
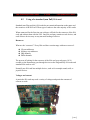
In Chapter 1: Introduction, we have mentioned the two groups of customers ARS
Technologies serves:
Developers and/or manufacturers
End users
For Developers and Manufacturers
After successfully installing the USB2 / SSI2 / XPRS products, the developers and
manufacturers can evaluate the work of their ISA, PCI, PCMCIA, PCI Express card
using the utility provided in the installation disk, ARSGUI.EXE as described in the
next chapters.
[ 63 ]
ARS Technologies User's Guide
V 2.130
Last Update June /2011
The next steps for developers and manufacturers may be to:
use the basic / simple API set included in the install software to develop
peripheral card software
use the additional commands available in our SDKBUS kit product and
convert their software to work on the USB2 products or the SSI2 products;
More information is available at: www.arstech.com/SDKBUS.htm
End Users
End users can use the ISA, PCI, or PCMCIA card they have with the original
software of the card, using the ARS Technologies Universal Software Layer (USL)
feature. More information on the purpose, setting up, and use of the USL is provided
in the next chapters.
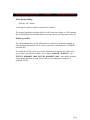
Upgrading of the software
ARS Technologies offers free upgrades on the installation software for our products.
These upgrades are available for download on our web site, packed as a single .zip
file at:
www.arstech.com/install2rel.zip
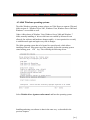
Step 1
The first step in upgrading is to unload the currently running ARS Technologies
software. Please bring up the ARS Technologies Enumerator arsenum3 dialog box,
and click the ‘Unload’ button.
Step 2
The next step is to remove the previously installed ARS Technologies software.
After this, please run the Setup file and go through the installation process described
in the previous chapters. Please read the important message below:
Note!!!: Please preserve all older setup-X-Y.exe files, to restore previous
software versions, if necessary.
[ 64 ]
ARS Technologies User's Guide
V 2.130
Last Update June /2011
6.3 64bit Windows operating systems
The older Windows operating systems releases are 32bit. However separate 32bit and
64bit versions of - Windows Server 2003, Windows Vista, Windows Server 2008 and
Windows 7 are available as well.
Under 64bit releases of Windows Vista, Windows Server 2008 and Windows 7
64bit, normally installing of drivers which are not certified by Microsoft is not
allowed. Our software and hardware changes rapidly – it is not practical to re-certify
it with Microsoft again and again every time it changes.
The 64bit operating system has to be booted in a special mode, which allows
installing of drivers. After power on of the computer, before the operating system
starts booting, press F8
key. This will bring the following screen:
Select 'Disable driver signature enforcement' and boot the operating system.
Installing and using our software is done in the same way - as described in the
previous chapters.
[ 65 ]
ARS Technologies User's Guide
V 2.130
Last Update June /2011
In order to use our hardware and software under Windows Vista 64bit Windows
Server 2008 64bit, and Windows Vista 64bit the operating system must be booted
every time in this way.
[ 66 ]
ARS Technologies User's Guide
7.
V 2.130
Last Update June /2011
ARSTech Enumerator and ARSGui utility
Location of the utilities – Windows platform
There are 2 utilities installed and available for the end user:
–
ArsEnum – enumerator
–
ArsGui – read/write test utility
[ 67 ]
ARS Technologies User's Guide
V 2.130
Last Update June /2011
7.1 Starting of ARS Technologies Enumerator
The ARS Technologies Enumerator must run in order to use ISA, PCI, PCMCIA,
cards and cards with the USB2 and the SSI2 lines of products.
After setup and installation, the Enumerator program is loaded one of three ways:
automatically, immediately after the boot of the operating system or
manually, by clicking on Start -> Programs -> ARSEnum
manually, by clicking Start -> Programs -> ARSTech -> ARSEnum
Manually starting the Enumerator in a way of – Run as administrator
Modern operating system releases like Windows Vista, Windows Server 2008 and
Windows 7 have strict security requirements in place.
The program have to be started as – Run as administrator .
[ 68 ]
ARS Technologies User's Guide
V 2.130
Last Update June /2011
To adjust the program settings, place mouse cursor over 'ArsEnum' do right mouse
click, select 'Properties'.
'Run as administrator' may be selected in the 'Properties', as a default way to run
'ArsEnum'.
Under 'Compatibility' , check 'Privilege level' to - 'Run as administrator'.
The Enumerator may need to save settings and privileges may need to be adjusted.
Under 'Security', click 'Edit' button. A new screen appears - select 'Everyone', check
'Full Control' -> 'Allow'.
[ 69 ]
ARS Technologies User's Guide
V 2.130
Last Update June /2011
After starting the Enumerator, a screen appears for several seconds and then the
Enumerator is minimized. Then the Enumerator appears as an icon in the system tray
of the computer, next to the clock, in the down right corner of the computer screen.
(See images below.)
The Enumerator icon may be not visible – click on up arrow 'Show hidden icons' to
see the Enumerator icon.
When you double click on the Enumerator icon, the main Enumerator windows
comes up.
[ 70 ]
ARS Technologies User's Guide
V 2.130
Last Update June /2011
Main window of the Enumerator
When the Enumerator is run for the first time, the message below may appear:
ARSTech Enumerator – first time message
Please follow the instructions and the specifics for the different operating systems
presented in previous chapters when the installing and running the Enumerator for the
first time.
Our installation software including the Enumerator offers the following features:
[ 71 ]
ARS Technologies User's Guide
V 2.130
Last Update June /2011
USB 2.0 host controller support and the Universal Software Layer
SSI2 host / peripheral support
Automatic detection of the resources of ISA, PCI and PCMCIA cards, and
loading drivers if necessary
The following chapters provide detailed information on the each of the above
features.
A right mouse click over the icon brings a menu – to minimize/restore/quit .
7.2 Specifics for USB2 products – exclusive mode and host controller
support
ARS Technologies USB2 line of products require that at least one USB 2.0 host chip
be present on the motherboard.
One modern computer system may contain as a minimum one USB 2.0 host chip on
the computer motherboard.
Additional USB 2.0 hosts can be added as PCI cards to a desktop computer, or as
PCMCIA cards inserted into a notebook computer.
We have designed our own USB 2.0 host controller support, allowing the use of our
products under the different operating system releases. Currently our software will
work with our products in the same way under all of the Microsoft’s operating
[ 72 ]
ARS Technologies User's Guide
V 2.130
Last Update June /2011
systems we support (Windows 98, ME, 2000, XP, Server 2003, Vista, Server 2008
and Windows 7).
When the Enumerator is run for the first time, there is a dialog box for selecting the
host controller, as shown in the screen shot below:
ARSTech Enumerator – choosing USB 2.0 host
This handling of USB2 hosts is specific only for our USB2 line of products. Our SSI2
and XPRS lines of products do not need selecting and disabling a USB2 host.
The drop down box lists all of the available USB 2.0 host controllers, for example:
0 – mfg=Intel, ports=3
1 – mfg=Intel, ports=3
which means that there are total of two USB 2.0 hosts.
The number of ports shows the total physical ports on chip. The actual number of
ports going to a USB connector may be lower.
If there is only one choice, it is selected as a default. Please select one of the choices
and click OK.
[ 73 ]
ARS Technologies User's Guide
V 2.130
Last Update June /2011
In case there is more than one USB 2.0 host, please use the drop down and select a
host.
One USB 2.0 chip- either as part of the chip set on the computer motherboard, or on a
PCI peripheral card- consists of one USB 2.0 EHCI controller and several USB 1.1
“companion” UHCI or OHCI controllers.
Though the computer system may have one USB 2.0 chip, and the USB2ISA and
USB2PCMCIA devices are serviced by our USB 2.0 host software, other USB
devices like a USB keyboard, USB mouse, USB hub, etc. can be serviced by the
“companion” USB 1.1 host controllers within the USB 2.0 chip.
Windows XP, Server 2003, Vista, Server 2008 and Windows 7, operating systems
need manually disabling of the USB2.0 host driver – if the driver for the particular
host is running. There is the following message box coming:
It provides the particular name of the USB2.0 host driver which needs to be disabled.
Open the ‘Device Manager’, select the specified USB2 host driver, and disable it.
If having 2 identical USB2 hosts, as part of the chip set on the motherboard, some of
the USB ports located on the computer enclosure are service by one of the USB2
hosts, and some ports by the other.
In this case, when connecting USB2ISA/USB2PCMCIA products, you may need to
connect to different ports, in order to find a USB port which belongs to the USB2
host selected and handled by the enumerator.
[ 74 ]
ARS Technologies User's Guide
V 2.130
Last Update June /2011
When disabled, the particular USB2 host driver will be marked as shown -
NOTE 1: ARS Technologies requires having a USB 2.0 host in the system. If the
system has only USB 1.1 hosts, please add a USB 2.0 host as a PCI card to a desktop
computer or a PCMCIA card to a notebook computer.
NOTE 2: If the system has more than one USB2.0 host, ARS Technologies
recommends selecting the last one. Leave the first one, normally belonging to the
motherboard, to service other USB devices.
[ 75 ]
ARS Technologies User's Guide
V 2.130
Last Update June /2011
7.3 Specifics for SSI2 products – exclusive mode and host controller
support
The SSI2 products connect to and work with standard USB2 host controllers on
almost any computer system.
The ssi2-isa/pci/pcmcia product works in a very specific way through usb. We have
our own support and the card does not show in the 'device manager' as usb device,
however shows in the enumerator.
The enumerator has to have 'ssi2-host-usb-0'
for ex. listed in the 'status' area.
There is normally only one usb port in the system, which can work with ssi2 cards.
The enumerator shows in the 'status' area if the supported usb port is empty or taken.
If taken, you can remove usb devices selectively one at a time, and when you find the
port you can connect to ssi2-isa/pci/pcmcia .
You need to connect ssi2-isa/pci/pcmcia to all of the different usb ports of the
computers you have, and wait 5-30s .
Only one of the usb ports will support ssi2-isa/pci/pcmcia and will show up in the
enumerator.
Another way to find the specific supported usb port is to plug a standard usb device to
all available usb ports and check for a message in the enumerator 'usb port not available/taken'.
Then you can plug the ssi2-isa/pci/pcmcia only to this port.
If disabled, the usb2 host driver can be re-enabled. Disabled driver is needed only for
our older usb2isa/pcmcia .
If you have 2 usb2 hosts listed, you can have also 2 supported ports to connect ssi2isa/pci/pcmcia .
In summary step1 - the enumerator has to have 'ssi2-host-usb' listed in the 'status' area.
step2 - finding the supported usb port, plug/use ssi2-isa/pci/pcmcia on this port
[ 76 ]
ARS Technologies User's Guide
V 2.130
Last Update June /2011
7.4 Universal Software Layer
The Universal Software Layer (USL) is part of the installation software for ARS
Technologies products that allow redirection of resources through USB – for our
'USB2' products and for our 'SSI2' products.
This redirection allows the use of an ISA, PCI, and PCMCIA card through USB with
the original software of the particular card.
Every ISA, PCI and PCMCIA cards has associated resources for itself, which may be
a combination of :
I/O ports
Physical memory area
IRQ channels
DMA channels (ISA only)
Resources
For example, a multifunction ISA card with one disk controller, one floppy
controller, one parallel port and two serial ports has:
disk - 10 I/O ports - base port 1f0 or 170 , 8 ports + 3f6,7 or 376,7 , 2 ports ,
and 1 IRQ channel - IRQ14 or 15
serial ports - base port 3f8 or 3e8 or 2f8 or 2e8 , 8 ports , and IRQ channels IRQ3 or 4
parallel port - ...
floppy - ...
An example of a PCMCIA card is a PCMCIA modem having:
8 I/O ports , located anywhere in the I/O space without conflicts , and 1 IRQ
channel
An example of a PCI card is a PCI network card having:
4096 bytes of physical memory, located anywhere in the memory space
without conflicts , and 1 IRQ channel
[ 77 ]
ARS Technologies User's Guide
V 2.130
Last Update June /2011
After connecting an ISA, PCI , or a PCMCIA card to our 'USB2' or SSI2' products,
the Enumerator automatically checks for the resources on the ISA, PCI card(s) or the
PCMCIA card, and automatically redirects these resources through USB.
NOTE 1: All of the device handled by the Universal Software Layer share the same
I/O space, Memory area, and IRQ channels with all the other devices on the computer
system. When there are hardware conflicts it maybe necessary to manually
change and adjust the resources settings.
NOTE 2: ARS Technologies cannot guarantee that the software for an ISA, PCI , or
PCMCIA card under the USL will work with all combinations of computer hardware,
operating systems, and ISA, PCI or PCMCIA card software.
[ 78 ]
ARS Technologies User's Guide
V 2.130
Last Update June /2011
7.5 Diagnostics mode of the ARS Technologies Enumerator
The Enumerator has to run on a wide variety of computer systems. If problems are
encountered – 'freezing', 'blue screen', 'crashing', there is a special diagnostics mode
which allow execution step by step, and pinpointing the issue.
The diagnostics mode is entered from command line -
The default installation folder is - C:\Program Files\ARS Technologies\ArsTech Utilities .
Change the folder to the current / default folder and run –> arsenum3 /d
You as a user may need to enter this mode only for diagnostics purposes – normally
this mode is not entered or used.
There will be 3 separate message boxes with Yes/No buttons for – initialization,
connect, exit phases of the work of the Enumerator:
then,
then,
[ 79 ]
ARS Technologies User's Guide
V 2.130
Last Update June /2011
Depending on the Yes/No selection all of some of the steps will be displayed in a way
as -
Push 'OK' and remember the last successfully completed step before - 'freezing', 'blue
screen', 'crashing'.
You can contact us with the following details :
− last successfully completed step
− computer system model/type - desktop/notebook
− processor maker, clock – Intel/AMD..., single/multi core...
[ 80 ]
ARS Technologies User's Guide
V 2.130
Last Update June /2011
7.6 Main Enumerator window
The main ARS Technologies Enumerator window is brought up by double clicking
on the Enumerator icon in the system tray.
Clicking the “OK” button will close the window, however the Enumerator still runs.
Clicking the “Unload” button will remove the Enumerator application and the
Enumerator icon from the system tray.
There are three areas in the Enumerator window:
Devices area – shows currently connected devices
The groups currently available:
–
USB2 line of devices, showing as for example USB2ISA-p1 ,
USB2PCMCIA-p4
–
SSI2 line of devices, showing as for example SSI2-ISA-0 , SSI2PCMCIA-0 , SSI2-PCI-0
Virtual Resources area – shows information about the card and resources
Status area – shows available hosts, the short status messages, for example
insertion / removal, error messages
A screen shot of the ARSTech Enumerator –main Enumerator window is on the
next page.
[ 81 ]
ARS Technologies User's Guide
V 2.130
Last Update June /2011
Examples
When a USB2ISA card is connected, the Devices area shows “usb2isa-p1”, and the
Status shows “ehci port 1, device USB2ISA - inserted”.
The Status area provides information on the number of present USB2.0 host(s), the
manufacturer’s name, number of USB ports and the selected USB2.0 host for use by
the ARSTech Enumerator.
Selecting the “usb2isa-p1” in the Devices area, for example creates the following text
in the Virtual Resources area:
ISA card(s) resources
p5, Detected I/O ports - 278/8, 6f8/8, 7f0/8
p5, Detected memory – none
[ 82 ]
ARS Technologies User's Guide
V 2.130
Last Update June /2011
There are three buttons in the middle of the Enumerator window:
Add Resources - clicking it will bring a dialog box for manually adding
resources which have not been detected.
Load Drivers - applies only to an ISA device, with a driver which needs
loading; clicking it will bring load driver dialog box.
Delete Settings - clicking this button will remove previously entered settings.
[ 83 ]
ARS Technologies User's Guide
V 2.130
Last Update June /2011
7.7 Adding resources
The Enumerator auto-detects resources, however the auto-detect process is not
perfect. Some peripheral cards hide their resources and need a sequence of
commands to enable these resources.
When not detected, resources can be added manually for an ISA , PCMCIA , PCI ,
PCI Express card by clicking the Add Resources button.
A dialog box comes up, where the status area contains:
the system I/O ports used
the system physical memory
In addition, there are instructions on way of adding resources.
The dialog box allows adding:
I/O ports
Physical memory
IRQ channels
DMA channels (ISA card only)
Extend/shorten the read/write timing
The Enumerator allows setting the read/write cycle time of the ISA or 16bit PCMCIA
bus. By standard, the time is 250ns and it may be extended to 2.3ųs.
[ 84 ]
ARS Technologies User's Guide
V 2.130
Last Update June /2011
Add Resources dialog box
Resources need to be added one at a time. In order to add another resource, please
click the Add Resources button again.
[ 85 ]
ARS Technologies User's Guide
V 2.130
Last Update June /2011
7.6 Delete Settings, choosing another host
Clicking the “Delete Settings” button will bring the following message box –
ARSTech Enumerator –delete settings message box
Selecting Yes will delete:
the settings for all of the previously loaded devices
the USB2 host settings
the current manually added resources
Running the Enumerator again will bring a dialog box to select the USB 2.0 host.
Selecting No will delete settings for the currently selected device.
If a device is still connected, the message box below appears:
The connected device has to be disconnected before completing “Delete Settings”.
[ 86 ]
ARS Technologies User's Guide
V 2.130
Last Update June /2011
7.7 Loading drivers
Some peripherals like PCMCIA cards and Plug and Play (PNP) ISA cards allow for
obtaining information about the card, and loading one or more drivers for the card.
The appropriate drivers are loaded automatically by the ARS Technologies
Enumerator. There is no need of manual loading.
Other peripheral cards have drivers which do not need loading or do not use a driver.
In such cases, there is no need of driver loading as well.
Some peripherals like standard (non Plug and Play) ISA cards are serviced by drivers,
and these drivers need to be loaded.
One ISA card may contain several devices, and each of these devices may or may not
need loading of a driver.
Every ISA card has a certain range of the of some, or all of the resources listed
below:
I/O port addresses
Memory area addresses
IRQ channels
DMA channels
Examples of resources
One device is defined as a combination of one or more of the above resource types.
For example, a serial port is a combination of 8 I/O ports and 1 IRQ channel.
A floppy disk controller is a combination of 6 I/O ports, 1 IRQ channel and 1 DMA
channel.
Loading one or more drivers
In the case there is need to loading of one or more drivers for the devices on the ISA
card, you will need to bring up the main Enumerator window by double clicking on
the Enumerator icon and click “Load Drivers”.
This will bring the following dialog box shown on the next page:
[ 87 ]
ARS Technologies User's Guide
V 2.130
Last Update June /2011
Load driver dialog box
The dialog box has resources sections and a status area:
•
•
I/O, Memory, IRQ, DMA - section , in the top part of the dialog box
Status – an area on the lower part of the dialog box
The process of selecting goes as follows:
1. Select one of the I/O ports / Memory ranges listed in the drop down boxes
2. If necessary, select one of the IRQ / DMA channels listed in the drop down
boxes
3. Click the “Load” button; the status provides a feedback on the selection
Repeat the above steps for different I/O ports / Memory + IRQ / DMA ranges, if
needed. When finished adding, please go to the next section .
The selections provided for I/O port and Memory ranges are found automatically
after scanning, or added manually, and depend on the ISA/PCMCIA card mounted.
Each is responding to different addresses.
[ 88 ]
ARS Technologies User's Guide
V 2.130
Last Update June /2011
When finished adding:
Click the “OK” button
A message box appears with the current device instance.
The original installation software disk for an ISA card (on a floppy or a CD) contains
the .inf installation files and hold the drivers for the devices on a particular ISA card.
Modifying .inf files
The .inf installation files for the different devices need to be modified manually in
order to install and load drivers for a device on an ISA card mounted to a USB2ISA
and SSI2-ISA.
To modify the .inf file, please pay careful attention to the message box which will
give you the current device instance- for example, arsusb100 , arsusb101, ... or
PCI\VEN_0010&DEV_0064, PCI\VEN_0010&DEV_0065 ... etc, and the location
where the modification is made. Please refer to next chapters for examples of
modified .inf files.
[ 89 ]
ARS Technologies User's Guide
V 2.130
Last Update June /2011
The Enumerator will bring next a message box as shown below:
ARSTech Enumerator –no driver files found message
Clicking the “Yes” button will bring a file open dialog box for finding and opening
the .inf file for the PCMCIA card.
[ 90 ]
ARS Technologies User's Guide
V 2.130
Last Update June /2011
In this dialog box you can:
Select drive
Double click to select directory
Select file type
Type file name
Push open button
This will start the “Found New Hardware” installation process of the operating
system and load the driver for the card.
[ 91 ]
ARS Technologies User's Guide
V 2.130
Last Update June /2011
7.8 Example of a modified .INF file for installing
An example of a modified .inf file for Windows 2000, XP, Server 2003, Vista ,Server
2008 and 7 operating systems is shown bellow.
The example provided is for reference purposes only. You will need to:
1.
2.
3.
4.
Identify the [Manufacturer] section,
Add a line with the particular device instance
Save the file – preferably under a new name
Point to this file – when needed
The example below adds a line with the device instance PCI\VEN_0010&DEV_0064 .
-------------------------------------------------------------------------------------;
;Copyright (c) ARS Technologies - All rights Reserved
;
;Module Name:
;
;
arswdm2kxp.INF
;
;Abstract:
;
INF file for installing of a sample wdm driver :
;
; operating systems - Windows 2000, XP, Server 2003, Vista, Server 2008, 7
;
[Version]
Signature="$WINDOWS NT$"
Class=Sample
ClassGuid={78A1C341-4539-11d3-B88D-00C04FAD5171}
Provider=%ARS%
[DestinationDirs]
DefaultDestDir = 12
; ================= Class section =====================
[ClassInstall32]
Addreg=SampleClassReg
[SampleClassReg]
HKR,,,0,%ClassName%
HKR,,Icon,,-5
; ================= Device Install section =====================
[Manufacturer]
%ARS%=ARS
[SourceDisksFiles]
arswdm1.sys=1
[SourceDisksNames]
1=%DISK_NAME%,
[ARS]
; DisplayName
Section
DeviceId
; -----------------------%ARSwdm1.DRVDESC%=ARSwdm1_Inst,root\ARSwdm1
; !!! modified here !!!
%ARSwdm1.DRVDESC%=ARSwdm1_Inst,PCI\VEN_0010&DEV_0064
[ 92 ]
ARS Technologies User's Guide
V 2.130
Last Update June /2011
[ARSwdm1_Inst.NT]
CopyFiles=ARSwdm1.CopyFiles
[ARSwdm1.CopyFiles]
arswdm1.sys
[ARSwdm1_Inst.NT.Services]
AddService=ARSwdm1,0x00000002,ARSwdm1_Service
[ARSwdm1_Service]
DisplayName
= %ARSwdm1.SVCDESC%
ServiceType
= 1
StartType
= 3
ErrorControl
= 1
ServiceBinary = %12%\arswdm1.sys
; SERVICE_KERNEL_DRIVER
; SERVICE_DEMAND_START
; SERVICE_ERROR_NORMAL
[Strings]
ARS = "ARS Technologies"
ClassName = "ARS Technologies Sample Drivers"
ARSwdm1.SVCDESC = "ARS Technologies Sample wdm Service"
ARSwdm1.DRVDESC = "ARS Technologies Sample wdm Driver"
DISK_NAME = "ARS Technologies Sample Install Disk"
--------------------------------------------------------------------------------------
[ 93 ]
ARS Technologies User's Guide
V 2.130
Last Update June /2011
7.9 ArsGUI
The ArsGUI is a graphical user interface program that allows manual read/write
functions of I/O ports and Physical memory.
The ArsGUI utility allows access to resources on ISA and PCMCIA cards mounted
on our USB2.0 line of products, and access to resources on ISA, PCI and PCMCIA
cards mounted on our SSI2 line of products.
ArsGUI – main screen
Step 1:
When using the application, the first thing to select is the Resource type. Decide if ti
will be I/O port or Physical Memory.
Step 2:
Select a Size - 8bit, 16bit or 32bit.
[ 94 ]
ARS Technologies User's Guide
V 2.130
Last Update June /2011
Step 3: Read or Write
To do a read, type the hexadecimal address in the edit box, and push the
Read button.
To do a write, type the hexadecimal address and the hexadecimal data in the
two edit boxes. Then push the Write button.
The results are displayed in the main status area.
With cards mounted to a USB2ISA/USB2PCMCIA type card
When reading or writing resources on ISA/PCMCIA cards mounted on connected
USB2ISA or USB2PCMCIA cards, the status shows the device as connected. For
example, “USB2ISA-1” and the results from the operation.
With cards mounted to an SSI2 ISA, SSI2 PCI or SSI2 PCMCIA type card
When reading or writing resources on ISA/PCI/PCMCIA cards mounted on
connected SSI2 ISA, SSI2 PCI or SSI2 PCMCIA cards, the resources are part of the
computer system’s resources. The status shows “System” and the results from the
operation.
The ArsGui utility is a powerful utility and extreme care must be taken when
deciding what resources are accessed. Be careful when writing to memory or i/o areas
of the system.
Exiting
To exit the application, click the Exit button.
[ 95 ]
ARS Technologies User's Guide
V 2.130
Last Update June /2011
7.10 Developers' support – basic/simple API set for access of
ISA / PCI / PCMCIA hardware
Introduction
This chapter will help a developer of hardware and software to bring up the
hardware, and develop / build / debug / test the software to working condition.
We offer a subset of our API set from our commercial product - SDKBUS, to ISA /
PCI / PCMCIA software developers.
The current version is based specifically on our USB2 line of products - USB2ISA
family products and USB2PCMCIA, and the SSI2 line of products - SSI2 ISA, SSI2
PCI, SSI2 PCMCIA .
We are establishing a standard , in dealing with peripherals , for all of the operating
systems , programming levels , and programming languages we support .
The general API set is available on user / application level, for the following
languages:
- c/c++
- Windows, Linux, Mac OS X platforms
- Visual Basic - Windows platform
The API set is available through a static library / archive. Use of the API set is
demonstrated in the 'isarw' sample.
Hardware not working yet
We offer a test utility - ArsGui which can generate access commands to read/write to
i/o ports, and physical memory to a peripheral connected on our USB2 and SSI2
products.
A developer of the hardware can analyze how is the generated access handled by the
peripheral card hardware - modify it, and bring it to working condition.
[ 96 ]
ARS Technologies User's Guide
V 2.130
Last Update June /2011
Connecting existing and new peripheral card hardware
One hardware peripheral device is a collection of one or more of the following
resources:
- physical memory registers
- i/o ports registers
- IRQ channels
- DMA channels (ISA bus only)
A developer has to know the exact resources by the peripheral card.
When the peripheral card is mounted on one of our products, the ARSTech
Enumerator auto-detects resources.
The developer has to compare the detected resources with what the peripheral card
actually has.
The card may contain hidden resources, made available after software initialization.
If needed , the developer may add manually resources in the enumerator for the
particular peripheral card.
Developing software for a new peripheral card
Our API set, as described in the 'ars-api.txt', is available as part of our installation
software.
A developer may build a variety of applications including - stand alone / command
line, or graphical GUI/X application.
An additional API set and samples are available in our SDKBUS product.
[ 97 ]
ARS Technologies User's Guide
V 2.130
Last Update June /2011
Working sample of use
Pre-requisites
To illustrate the use of the API set we offer one sample which can be built and used
in real world conditions.
The sample uses one of our USB2ISA family cards - you will need to order one,
download the installation software, setup the software, and get familiar with our
user's guide.
Different environments may has some specific requirements for installing and setup.
In addition, the sample uses 2 ISA cards :
- standard ISA i/o card which includes - 1 floppy and 1 ide controllers, 1 parallel, 2
serial ports; this type of card was popular in the past - with dozens of different
manufacturers, and millions of cards produced;
- standard ISA VGA card; popular in the past as well - with lots of different
manufacturers and cards produced;
You can mount USB2ISA + ISA cards, and connect/disconnect to USB. The
ARSTech Enumerator will show auto detected resources for the connected ISA card i/o ports, memory area, IRQ channels.
If some resources are not detected, they can be added manually in the Enumerator.
The resources of the particular used ISA cards may appear as :
- ISA i/o card - i/o ports: 278/8, 5f0/8, 7f0/10 | irq: 4,7,14
device interpretation:
~ i/o port x278/8 + irq 7 are the resources for LPT2, as selected by the jumpers on
the particular isa card;
~ i/o port x5f0/8 + irq 14 are the resources for the IDE controller; initially located
at i/o address x1f0; the enumerator 're-located' it with x400 to avoid a collision with
the controller on the motherboard of the system;
~ i/o port x7f0/10 + irq 4 are several devices; the address is i/o x3f0 're-located'
with x400 to avoid a collision; x7f0-7f3 are floppy controller ports, the irq6 is not
connected by jumpers; i/o x7f6-7f7 are IDE ports; i/o x7f8-7ff + irq 4 are the COM1
ports; COM2 ports and irq are not connected / enabled by jumpers;
- ISA VGA card - i/o ports: i/o ports x3c0/10 | irq 9 | physical memory xc0000/8000
device interpretation:
the card is has a video BIOS area - x0c0000/8000, which has to be executed in
order to initialize and 'see' the video ram area - x0a0000+ ; the video card is
controlled through the i/o ports and irq channel;
[ 98 ]
ARS Technologies User's Guide
V 2.130
Last Update June /2011
Building of the 'isarw' sample
Almost identical 'C/Cpp' source code is placed in a number of folders for the different
environments - Windows, Linux, Mac OS X.
The source code of the sample includes switches for defining of the environment :
......
#define WINDOWS
//#define LINUX
//#define MACOSX
......
In this way identical source code can be used for cross platform development.
Windows folder includes 2 samples built with - Visual C++ 6.0 and Visual Basic 6.0.
Linux, and Mac OS X come with the GCC compiler environment - already preinstalled.
To build, go to the particular folder and run from terminal/command line ./mk.bat
Under 64bit Windows environment the sample built as 32bit application can still
execute and work .
We provide a number of Linux shared libraries containing our API set - built on
different kernels, including 2.6.11/2.6.18/2.6.23 32bit, and 2.6.23 64bit .
Under 64bit Linux environments the application has to be built as 64bit app, and
needs to use the 64bit shared library.
Running of the 'isarw' sample
The 'isarw' sample contains 3 sub-tests :
a) i/o read/write test
- uses USB2ISA with an ISA i/o card - uses the parallel port portion of the card
- does write to the par.port - digital outputs, which may be observed with a voltmeter
on the 25pin connector
- exercises in8(),out8() - single 8bit i/o port read/write commands of the API set
b) irq test
- uses USB2ISA with an ISA i/o card - uses the parallel port portion of the card;
[ 99 ]
ARS Technologies User's Guide
V 2.130
Last Update June /2011
requires an additional wire connecting 2 pins on the 25 pin con.
- exercises GetIrqDmaSts(), in8(),out8() - checking irq and dma status, and single 8bit
i/o port read/write commands of the API set
c) physical memory buffer read test
- uses USB2ISA with an ISA VGA card - uses the VGA BIOS on the card
- does a single read of a portion of the VGA BIOS
- exercises rd16() - 16bit phys.mem. read commands of the API set
[ 100 ]
ARS Technologies User's Guide
8.
V 2.130
Last Update June /2011
ISA cards - use
This chapter describes the way of use of ISA cards on our 'USB2' line of
products, and on our 'SSI2' line of products. Information on the
specific product, the way of connecting, powering, enclosures, etc. is
available in the chapters 1-3 .
8.1
Using of a PnP ISA card
Plug and play ISA cards are a special type if ISA cards. They contain information on
the name and the resources of the ISA card.
When connected for the first time, ARS Technologies software will automatically:
Look for the resources of the card
Redirect them with the USL
Look for an .inf file for the ISA card and if the .inf file is found, start the
“Found New Hardware” installation process of the operating system, and
load the driver for the card.
This installation process is called only the first time. Afterward, when an ISA card
and USB2ISA card are connected, the driver is automatically loaded.
No .inf file found
When connecting for the first time it is possible that no .inf file is found for the
particular PnP ISA card. In this case, the Enumerator will bring a message box
reading, “No driver files found”.
Clicking the “Yes” button will bring a file open dialog box for finding and opening
the .inf file for the PnP ISA card.
is dialog box you can:
Select driv
e
Double click to select directory
Select file type, type file name
Push open button
This will start the “Found New Hardware” installation process of the operating
system and load the driver for the card.
[ 101 ]
ARS Technologies User's Guide
V 2.130
Last Update June /2011
Normally one PnP ISA card has multiple devices such as sound, midi, joystick, etc
devices.
Voltages and current
A particular PnP card may need a variety of voltages and particular amounts of
currents to work.
Example – PnP ISA sound card + USB2ISA-R
In the above example there is a PnP ISA sound card. The power comes from the USB
cable, and the additional voltages are provided by the mounted isa-pwr (power
supply module).
[ 102 ]
ARS Technologies User's Guide
V 2.130
Last Update June /2011
The Enumerator shows the name of the PnP ISA card, number of devices and
resources detected.
[ 103 ]
ARS Technologies User's Guide
8.2
V 2.130
Last Update June /2011
Using of a standard (non PnP) ISA card
Standard (non Plug and play) ISA cards do not contain information on the name and
the resources of the ISA card. These type of cards are the wide majority of ISA cards.
When connected for the first time our software will look for the resources of the ISA
card, and redirect them with the USL. One ISA card may contain several devices, and
each of these devices may or may not need loading of a driver.
Resources
What are the “resources”? Every ISA card has a certain range with one or more of:
I/O port addresses
Memory area addresses
IRQ channels
DMA channels
The process of looking for the resources of the ISA card may take up to 10-30
seconds, as the Enumerator goes through devices on the Plug and Play ISA cards and
standard ISA cards as well.
Normally one ISA card has multiple devices, such as for example sound, midi, or
joystick devices.
Voltages and current
A particular ISA card may need a variety of voltages and particular amounts of
currents to work.
[ 104 ]
ARS Technologies User's Guide
V 2.130
Last Update June /2011
Example – standard ISA input/output card + USB2ISA-R
In the above example there is a standard ISA input/output card with two serial ports,
one parallel port, one IDE and one floppy device. The power comes from the USB
cable and the additional voltages are provided by the mounted isa-pwr (power supply
module).
Manually adding resources
The process of automatically detecting resources of the Enumerator cannot handle
specific ISA cards which have hidden resources that need to be enabled by a
sequence of commands.
The Enumerator allows manually adding resources by clicking the “Add Resources”
button in the main Enumerator window.
[ 105 ]
ARS Technologies User's Guide
V 2.130
Last Update June /2011
Manually loading drivers for a device on an ISA card
When an ISA card is mounted in USB2ISA or SSI2-ISA type of card for the first time
the 'software types' dialog box comes – as described in the next chapter.
The Enumerator allows manual loading of a driver by clicking the “Load Driver”
button in the main Enumerator window.
The .inf file of the driver needs to be modified
When connecting for the first time it is possible that no .inf file will be found for the
particular ISA card. In this case the Enumerator will bring a message box that reads
“No driver files found”.
Clicking the “Yes” button will bring a file open dialog box for finding and opening
the .inf file for the ISA card. In this dialog box you can:
Select drive
Double click to select directory
Select file type
Type file name
Push open button
This will start the “Found New Hardware” installation process of the operating
system and load the driver for the card.
This installation process is called only the first time the ISA card and USB2ISA or
SSI2-ISA card are connected. Each proceeding time, the driver loads automatically.
[ 106 ]
ARS Technologies User's Guide
8.3
V 2.130
Last Update June /2011
Software types
16bit DOS type
We deal with PCMCIA, PCI, PCI Express cards in standard well defined ways.
There is no single standard way of dealing with non plug and play / standard ISA
cards.
The ISA card manufacturer probably spent - months or years to make ISA card working on one operating system
- and then, weeks or months to make ISA card working on additional operating
systems
For non standard ISA software you need to find - what operating system was the original ISA software working on
- was the ISA software working on the current operating system
–
what software type is the ISA software
When an ISA card is mounted in USB2ISA or SSI2-ISA type of card for the first time
the 'software types' dialog box comes -
The isa software can include [ 107 ]
ARS Technologies User's Guide
V 2.130
Last Update June /2011
- 16bit DOS type of a driver or and / or application
- 32bit Windows 98 type of an application
- 32bit Windows NT type driver - no .inf file
- 32bit Windows driver - with .inf file
Based on the above you can deal with the isa cards that you have.
If not knowing the software type for the ISA card/s software, you can push 'Cancel'.
The 'software types' dialog box will come again when USB2ISA / SSI2-ISA with ISA
card/s are connected.
If knowing the software type, please select it and push 'OK' button. The 'software
types' dialog box will not come again, but will perform an action cased on the
selection.
If the ISA software is 16bit DOS type , you need to run it under our customized
'dosbox' environment.
A Windows 98 application with direct i/o ports access will crash is run on windows
2000 and later operating system. We provide support for this type of application so
that it run normal on modern operating systems.
When having 32bit Windows NT type driver, the driver has to be in
'stopped' state after boot. Then, after connecting USB2ISA / SSI2-ISA with ISA
card/s the driver has to be started.
If having 32bit Windows driver - with .inf file, you need to modify the .inf file, and
go through the 'Install new hardware' process to install the driver, and then load it.
When having an application built using the ARSTech API set, or the type is not
known, there are no additional actions taken – the device/s on ISA card/s are handled
by USL or API set.
Details on the specific steps are in the following chapters.
[ 108 ]
ARS Technologies User's Guide
8.4
V 2.130
Last Update June /2011
'16bit DOS' software type
With this selection for 'software type the following screen comes -
After opening the main dosbox window, you will need to select the location of the
DOS software.
If, for example, the DOS software is placed in the “dosprog” folder, please type:
mount c c:\dosprog
Then type:
c:
DOS drivers
If the ISA DOS software includes a driver, you need to load it in advance.
A utility DEVLOAD - provides a method of loading device drivers from the
command line under MS-DOS, rather than having to re-boot in order to load extra
drivers. It is freeware, available on ftp://ftp.infradead.org/pub/devload/devload.exe
Then you can run the main ISA DOS application.
[ 109 ]
ARS Technologies User's Guide
V 2.130
Last Update June /2011
Windows 3.1 / 3.11 ISA software
The ISA software may have been running on Windows 3.1 or 3.11 operating systems.
Such software may be handled under our 'dosbox' environment.
The initial step is to install Windows 3.1 (or 3.11), as follows –
make folders in the dosbox directory for each install disk,
–
then in the 'dosbox' window (after mounting 'dosbox direcotry' as C) go to the first
folder and start setup,
–
select to do custom setup so you could tell where each disk folder location is (7
total)
After installation, if mouse doesn't work - shut down dosbox (and as a precaution
unload and restart the enumerator).
The location of the dosbox is in the following folder \windows\inf
When you start 'dosbox', mount the drive, go to windows folder, and type win
the windows 3.1 / 3.11 starts, and mouse is working.
You may need to install additional packages required by the isa software.
There is additional information available, listed when doing a Google search for windows 3.1 dosbox
After installing all software needed, and having USB2/SSI2 ISA , while in Windows
3.1 , the ISA board/s is found and working.
[ 110 ]
ARS Technologies User's Guide
8.5
V 2.130
Last Update June /2011
'32bit Windows NT type driver - no .inf file' software
type
With this selection for 'software type' the driver has to be in 'stopped' state after boot.
The procedure is - connect usb2isa / ssi2-isa + isa
- do 'start' on isa driver
- run the isa application
You can do start / stop by - In 'computer management' -> 'device manager' -> 'view' ,
- check 'show hidden devices'
- enlarge 'non plug and play drivers'
- select the particular isa driver – for ex. 'msisadrv'
(normally the listed device for ex. 'abc' is based on the driver name 'abc.sys')
- double click on the 'msisadrv' device , select 'driver' tab
[ 111 ]
ARS Technologies User's Guide
V 2.130
Last Update June /2011
The above screen shows the way of 'stop'/'start'.
An alternative way of start / stop is to type from command line net start msisadrv
net stop msisadrv
The Enumerator attempts to do automatically the stop / start process, however you
may need to make additional checks to find what the current state of the Windows
NT type driver is, and do start / stop in 'device manager' or from command line.
[ 112 ]
ARS Technologies User's Guide
8.6
V 2.130
Last Update June /2011
'32bit Windows type driver - with .inf file' software type
The original installation software disk for an ISA card (on a floppy or a CD) contains
the .inf installation files and hold the drivers for the devices on a particular ISA card.
The .inf installation files for the different devices need to be modified manually in
order to install and load drivers for a device on an ISA card mounted to a USB2ISA
and SSI2-ISA.
Modifying .inf files
With selection of '32bit Windows type driver - with .inf file' a message box appears
with the current device instance.
9
To modify the .inf file, please pay careful attention to the message box which will
give you the current device instance- for example, arsusb100 , arsusb101, ... or
PCI\VEN_0010&DEV_0064, PCI\VEN_0010&DEV_0065 ... etc, and the location
where the modification is made. Please refer to next chapters for examples of
modified .inf files.
[ 113 ]
ARS Technologies User's Guide
V 2.130
Last Update June /2011
The Enumerator will bring next a message box as shown below:
ARSTech Enumerator –no driver files found message
Clicking the “Yes” button will bring a file open dialog box for finding and opening
the .inf file for the PCMCIA card.
In this dialog box you can:
Select drive
Double click to select directory
Select file type
Type file name
Push open button
This will start the “Found New Hardware” installation process of the operating
system and load the driver for the card.
[ 114 ]
ARS Technologies User's Guide
V 2.130
Last Update June /2011
8.7 Example of a modified .INF file for installing
An example of a modified .inf file for Windows 2000, XP, Server 2003, Vista ,Server
2008 and 7 operating systems is shown bellow.
The example provided is for reference purposes only. You will need to:
5.
6.
7.
8.
Identify the [Manufacturer] section,
Add a line with the particular device instance
Save the file – preferably under a new name
Point to this file – when needed
The example below adds a line with the device instance for example ARSTech\arsusb102
-------------------------------------------------------------------------------------;
;Copyright (c) ARS Technologies - All rights Reserved
;
;Module Name:
;
;
arswdm2kxp.INF
;
;Abstract:
;
INF file for installing of a sample wdm driver :
;
; operating systems - Windows 2000, XP, Server 2003, Vista, Server 2008
;
[Version]
Signature="$WINDOWS NT$"
Class=Sample
ClassGuid={78A1C341-4539-11d3-B88D-00C04FAD5171}
Provider=%ARS%
[DestinationDirs]
DefaultDestDir = 12
; ================= Class section =====================
[ClassInstall32]
Addreg=SampleClassReg
[SampleClassReg]
HKR,,,0,%ClassName%
HKR,,Icon,,-5
; ================= Device Install section =====================
[Manufacturer]
%ARS%=ARS
[SourceDisksFiles]
arswdm1.sys=1
[SourceDisksNames]
1=%DISK_NAME%,
[ARS]
; DisplayName
Section
DeviceId
; -----------------------%ARSwdm1.DRVDESC%=ARSwdm1_Inst,root\ARSwdm1
; !!! modified here !!!
%ARSwdm1.DRVDESC%=ARSwdm1_Inst,ARSTech\arsusb102
[ 115 ]
ARS Technologies User's Guide
V 2.130
Last Update June /2011
[ARSwdm1_Inst.NT]
CopyFiles=ARSwdm1.CopyFiles
[ARSwdm1.CopyFiles]
arswdm1.sys
[ARSwdm1_Inst.NT.Services]
AddService=ARSwdm1,0x00000002,ARSwdm1_Service
[ARSwdm1_Service]
DisplayName
= %ARSwdm1.SVCDESC%
ServiceType
= 1
StartType
= 3
ErrorControl
= 1
ServiceBinary = %12%\arswdm1.sys
; SERVICE_KERNEL_DRIVER
; SERVICE_DEMAND_START
; SERVICE_ERROR_NORMAL
[Strings]
ARS = "ARS Technologies"
ClassName = "ARS Technologies Sample Drivers"
ARSwdm1.SVCDESC = "ARS Technologies Sample wdm Service"
ARSwdm1.DRVDESC = "ARS Technologies Sample wdm Driver"
DISK_NAME = "ARS Technologies Sample Install Disk"
--------------------------------------------------------------------------------------
[ 116 ]
ARS Technologies User's Guide
9.
V 2.130
Last Update June /2011
PCMCIA cards - use
This chapter describes the way of use of PCMCIA cards on our 'USB2' line of
products, on our 'SSI2' line of products, and on our 'XPRS' line of
products.
Information on the specific product, the way of connecting, powering,
enclosures, etc. is available in the chapters 1-3 .
The PCMCIA interface supports 2 types of cards –
16bit , 'PC Card' type
–
32bit , 'CardBus' type
If you have 16bit card you can use - our USB2PCMCIA product, or our SSI2PCMCIA product.
16bit PCMCIA cards can be powered by either 3.3V or +5V power to work. Some
cards can use either one or the other voltage.
If a PCMCIA card requires +5V for powering, it can be handled only by
USB2PCMCIA product, because our SSI2-PCMCIA product uses only 3.3V.
If you have 32bit card you can use - our SSI2-PCMCIA product, or our XPRS-CB
product.
When connected for the first time, ARS Technologies software will automatically:
Look for the resources of the card
Redirect them with the USL (do not apply to XPRS-CB)
Look for an .inf file for the PCMCIA card and if the .inf file is found, start the
“Found New Hardware” installation process of the operating system, and
load the driver for the card.
This installation process is called only the first time the PCMCIA card and our
USB2PCMCIA, SSI2-PCMCIA, or XPRS-CB device are connected. In proceeding,
the drivers load automatically.
Devices
Normally a PCMCIA card has one device such as a modem, a network device...
There are cases where a PCMCIA card has two devices such as a modem and
network device. In this case, each device has to have separate .inf install. files and
driver files.
[ 117 ]
ARS Technologies User's Guide
V 2.130
Last Update June /2011
The results of the driver loading are shown in 2 places –
in the Enumerator
–
in the 'Device manager'
Enumerator shows the:
Name of the card
Number of devices and their type
Resources used
[ 118 ]
ARS Technologies User's Guide
V 2.130
Last Update June /2011
The ‘Device Manager’ will show a driver loaded, based on the type of a device.
When connecting for the first time, it is possible that there will be no .inf file found
for the particular PCMCIA card. In this case the Enumerator will bring a message
box reading “No driver files found”.
Clicking the “Yes” button will bring a file open dialog box for finding and opening
the .inf file for the PCMCIA card. In this dialog box you can:
Select drive
Double click to select directory
Select file type
Type file name
Push open button
This will start the “Found New Hardware” installation process of the operating
system, and load the driver for the card.
[ 119 ]
ARS Technologies User's Guide
V 2.130
Last Update June /2011
Examples -
16bit PCMCIA modem card + USB2PCMCIA
32bit PCMCIA network card + SSI2 PCMCIA
32bit PCMCIA network card + XPRS-CB
[ 120 ]
ARS Technologies User's Guide
V 2.130
Last Update June /2011
10. PCI cards - use
This chapter describes the way of use of PCI cards on our 'SSI2' line of
products, and on our 'XPRS' line of products.
Information on the specific product, the way of connecting, powering,
enclosures, etc. is available in the chapters 1-3 .
When connected for the first time, the ARS Technologies software will
automatically:
Look for the resources of the card
Redirect them with the USL (do not apply to XPRS-PCI-..)
Look for an .inf file for the PCI card and if the .inf file is found
Start the 'Found New Hardware' installation process of the operating system,
and load the driver for the card.
This installation process is called only the first time the PCI card and SSI2-PCI /
XPRS-PCI-.. are connected. Afterward, the driver is loaded automatically.
When connecting for the first time, it is possible that there will be no .inf file found
for the particular PCI card. In this case the Enumerator will bring a message box that
reads “No driver files found”.
Clicking the “Yes” button will bring a file open dialog box for finding and opening
the .inf file for the PCI card. In this dialog box you can:
Select drive
Double click to select directory
Select file type
Type file name
Push open button
This will start the “Found New Hardware” installation process of the operating
system and then load the driver for the card.
Devices
One PCI card may have one device, for example modem device, or a network device.
There are cases where a PCI card has multiple devices. In this case each device has to
have separate .inf install. files and driver files.
[ 121 ]
ARS Technologies User's Guide
V 2.130
Last Update June /2011
The results of the driver loading are shown in 2 places –
in the Enumerator
–
in the 'Device manager'
The Enumerator shows the:
Vendor/Product ID of the card
Number of devices and their type
Resources used
[ 122 ]
ARS Technologies User's Guide
V 2.130
Last Update June /2011
The ‘Device Manager’ will show drivers loaded for the USB host devices.
Example
PCI USB2.0 host card + SSI2 PCI
[ 123 ]
ARS Technologies User's Guide
V 2.130
Last Update June /2011
PCI network card + XPRS-PCI-X1
2 PCI cards + XPRS-PCI-X3
[ 124 ]
ARS Technologies User's Guide
V 2.130
Last Update June /2011
11. PCI Express -x1 and -x16 cards - use
This chapter describes the way of use of PCI Express -x1/-x16 cards on our
'XPRS' line of products.
Information on the specific product, the way of connecting, powering,
enclosures, etc. is available in the chapters 1-3 .
When connected for the first time, the ARS Technologies software will
automatically:
Look for the resources of the card
Look for an .inf file for the PCI Express -x1/-x16 card and if the .inf file is
found
Start the 'Found New Hardware' installation process of the operating system,
and load the driver for the card.
This installation process is called only the first time the PCI Express -x1/-x16 card
and XPRS-PX-.. are connected. Afterward, the driver is loaded automatically.
When connecting for the first time, it is possible that there will be no .inf file found
for the particular PCI Express -x1/-x16 card. In this case the Enumerator will bring a
message box that reads “No driver files found”.
Clicking the “Yes” button will bring a file open dialog box for finding and opening
the .inf file for the PCI card. In this dialog box you can:
Select drive
Double click to select directory
Select file type
Type file name
Push open button
This will start the “Found New Hardware” installation process of the operating
system and then load the driver for the card.
Devices
One PCI Express -x1/-x16 card may have one device, for example video device, or a
network device. There are cases where a PCI Express -x1/-x16 card has multiple
devices. In this case each device has to have separate .inf install. files and driver files.
[ 125 ]
ARS Technologies User's Guide
V 2.130
Last Update June /2011
Examples
PCI Express -x1 card mounted in XPRS-PX-X1
PCI Express -x1 card mounted in XPRS-PX-X16
[ 126 ]
ARS Technologies User's Guide
V 2.130
Last Update June /2011
PCI Express -x16 card mounted in XPRS-PX-X16
[ 127 ]
ARS Technologies User's Guide
V 2.130
Last Update June /2011
12. ExpressCard type34 and type54 cards - use
This chapter describes the way of use of ExpressCard type34/type54 cards on
our 'XPRS' line of products.
Information on the specific product, the way of connecting, powering,
enclosures, etc. is available in the chapters 1-3 .
When connected for the first time, the ARS Technologies software will
automatically:
Look for the resources of the card
Look for an .inf file for the ExpressCard type34/type54 card and if the .inf
file is found
Start the 'Found New Hardware' installation process of the operating system,
and load the driver for the card.
This installation process is called only the first time the ExpressCard type34/type54
card and XPRS-EC are connected. Afterward, the driver is loaded automatically.
When connecting for the first time, it is possible that there will be no .inf file found
for the particular ExpressCard type34/type54 card. In this case the Enumerator will
bring a message box that reads “No driver files found”.
Clicking the “Yes” button will bring a file open dialog box for finding and opening
the .inf file for the PCI card. In this dialog box you can:
Select drive
Double click to select directory
Select file type
Type file name
Push open button
This will start the “Found New Hardware” installation process of the operating
system and then load the driver for the card.
Devices
One ExpressCard type34/type54 card may have one device, for example 1394 device,
or a network device. There are cases where a ExpressCard type34/type54 card has
multiple devices. In this case each device has to have separate .inf install. files and
driver files.
[ 128 ]
ARS Technologies User's Guide
V 2.130
Last Update June /2011
Examples
ExpressCard type34 1394 card + XPRS-CB
[ 129 ]
ARS Technologies User's Guide
V 2.130
Last Update June /2011
13. Compact PCI Express and PXI Express cards
- use
This chapter describes the way of use of Compact PCI Express and PXI
Express cards on our 'XPRS' line of products.
Information on the specific product, the way of connecting, powering,
enclosures, etc. is available in the chapters 1-3 .
When connected for the first time, the ARS Technologies software will
automatically:
Look for the resources of the card
Look for an .inf file for the Compact PCI Express and PXI Express card and
if the .inf file is found
Start the 'Found New Hardware' installation process of the operating system,
and load the driver for the card.
This installation process is called only the first time the Compact PCI Express and
PXI Express card and XPRS-cPCIe are connected. Afterward, the driver is loaded
automatically.
When connecting for the first time, it is possible that there will be no .inf file found
for the particular Compact PCI Express and PXI Express card. In this case the
Enumerator will bring a message box that reads “No driver files found”.
Clicking the “Yes” button will bring a file open dialog box for finding and opening
the .inf file for the PCI card. In this dialog box you can:
Select drive
Double click to select directory
Select file type
Type file name
Push open button
This will start the “Found New Hardware” installation process of the operating
system and then load the driver for the card.
[ 130 ]
ARS Technologies User's Guide
V 2.130
Last Update June /2011
Devices
One Compact PCI Express and PXI Express card may have one device, for example a
DAQ device. There are cases where a Compact PCI Express and PXI Express card
has multiple devices. In this case each device has to have separate .inf install. files
and driver files.
Examples
PXI Express DAQ card + XPRS-cPCIe
[ 131 ]
ARS Technologies User's Guide
V 2.130
Last Update June /2011
Appendix
A. SSI2 host support for desktop computers
ARS Technologies SSI2 line of products allow work with a SSI2 host controller.
SSI2 Host PCI card mounted in a desktop computer
The SSI2 Host PCI card is added on a PCI slot in a desktop computer.
The SSI2 host controller support will work with ARS Technologies products in the
same way under all of the Microsoft’s operating systems we support (Windows 98,
ME, 2000, XP, Server 2003, Vista and Server 2008, 7).
[ 132 ]
ARS Technologies User's Guide
V 2.130
Last Update June /2011
B. SSI2 host support for notebook computers
ARS Technologies SSI2 line of products allow work with a SSI2 host.
SSI2 Host CB card mounted in a notebook computer
The SSI2 Host CB card is added on a ‘Card Bus’ slot in a notebook computer which
has a PCMCIA slot supporting ‘Card Bus’ PCMCIA cards.
The SSI2 Host EC card is added on a ‘ExpressCard’ slot in a notebook computer
which has an ‘ExpressCard’ slot.
The way of mounting is the same as shown on the above image.
One important detail is that the card - SSI2 Host CB or SSI2 Host EC has to be
powered by the pwr-5v adapter before being plugged into the notebook.
The SSI2 host controller support will work with our products in the same way under
all of the Microsoft’s operating systems we support – Windows 98, ME, 2000, XP,
Server 2003, Vista, Server 2008.
[ 133 ]
ARS Technologies User's Guide
V 2.130
Last Update June /2011
C. Uniform DOS support
Introduction
DOS is an operating system used primarily 15-25 years ago. There is still hardware in
the industrial, embedded, scientific, medical fields that use DOS.
ARS Technologies provides uniform support for software written for DOS operating
system, servicing ISA and PCMCIA cards used with our USB2ISA and
USB2PCMCIA products under today's popular operating systems.
DOS software can be used under variety of modern operating system using DOS
emulators. ARS Technologies chose to use the DOSBOX emulator because it is open
source and supports a wide number of operating systems.
Builds
ARS Technologies currently provides builds for Windows and Linux operating
systems.
An end user can copy the files from the “builds-windows” folder and start using their
DOS software with our products like the USB2ISA and ISA cards, for example.
Prerequisites
In order to use the binaries of the dosbox builds, the ARS Technologies software
must be installed and our Enumerator must be running.
Developer support and sources
ARS Technologies provides the sources of the dosbox files we modify, as well as our
object files for different environments.
Details on the sources are included in the readme.txt file in the “/src” folder.
The included files are released under the condition of use exclusively with the
hardware and software products of ARS Technologies.
A developer may use the included files, modify them if needed and make their own
dosbox build.
[ 134 ]
ARS Technologies User's Guide
V 2.130
Last Update June /2011
Use
There are two main modes in the ARS Technologies dosbox builds:
Standard mode - started from terminal/command line with dosbox
doubleclick on the dosbox.exe file
This mode brings one screen only, and has the maximum possible performance.
Debug mode - started from terminal/command line with
dosbox b
This mode provide two screens. The second screen brings up status debug
messages when connecting / disconnecting / accessing ARS Technologies
products.
This mode is recommended for testing purposes only. Displaying reduces
performance.
[ 135 ]
ARS Technologies User's Guide
V 2.130
Last Update June /2011
Connecting / disconnecting
When using the dosbox in debug mode, connecting / disconnecting events of the ISA,
PCI and PCMCIA cards, on USB2ISA/USB2PCMCIA or SSI2 ISA, SSI2 PCI and
SSI2 PCMCIA cards are registered on the debug window.
In addition, the connecting event shows the detected resources.
The process of auto detection is not always precise. There may be a need to add
resources.
To do this please check our user's guide on the particular environment for adding
resources in the ARSTech Enumerator.
Running DOS software
After opening the main dosbox window, you will need to select the location of the
DOS software.
If, for example, the DOS software is placed in the “dosprog” folder, please type:
on Windows enviroment
mount c c:\dosprog
Then type:
c:
and run the DOS software
[ 136 ]
ARS Technologies User's Guide
V 2.130
Last Update June /2011
If the ISA DOS software includes a driver, you need to load it in advance.
A utility DEVLOAD - provides a method of loading device drivers from the
command line under MS-DOS, rather than having to re-boot in order to load extra
drivers. It is freeware, available on ftp://ftp.infradead.org/pub/devload/devload.exe
Then you can run the main ISA DOS application.
Utilities
There is currently one DOS utility included with the install software- tst16.exe.
Resources access
The utility allows read / write capabilities to I/O ports and memory areas.
Please note that the address range for I/O ports is 0 to ffff, having the most widely
used area of 0 to 3ff in hex addresses.
The address range for memory area is 0 to ffffff, with the most widely used area of
b000 to fffff in hex addresses. This is a “memory hole” where some hardware
peripheral cards and the system's BIOS are located.
Tests
The tst16 utility includes two tests:
Serial port
Disk tests
Both tests requite an ISA card which includes one of the following:
rs232/rs422/rs485 serial ports
ata/atapi ide disk controller
Please follow the prompts to select I/O ports and IRQ channel.
ARS Technologies recommends using dosbox in the debug mode, and check the
debug screen for the actual DOS accesses.
Please note that selected IRQ channels must be free and available for use. While use
of the IRQ 3/4 may be allowed, if the serial ports on a system's motherboard are not
present or used, the use of IRQ 14/15 will interfere with the use of the system's
motherboard IDE controller.
[ 137 ]
ARS Technologies User's Guide
V 2.130
Last Update June /2011
[ 138 ]