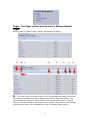
1
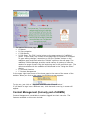
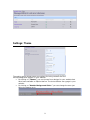
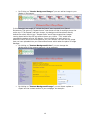
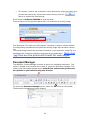
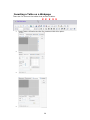
Instructional Technology Updated © EdPoint The Latest in Teacher Website Development Software Updated August 2008 User Manual Version 3 Published in August 2008 by ETS Instructional Technology All rights reserved. No part of this book may be reproduced, by any means, without written permission of ETS Instructional Technology, for any purpose not directly related to authorized Greenville County School District activities. Printed in the United States of America Table of Contents Introduction to EdPoint© Getting Started Supported Browsers Accessing a Site Editing the Home Page Content Manager Pages Saving and Publishing Subsites Lists and Libraries Settings: Theme Settings: User Toolbar Options Edit Page Adding Text Deleting Text Copy Text Cut and Paste Paste Applying Formatting Bold/Italicize/Underline Aligning Text Bullets and Numbering Applying Color Fonts/Sizes Creating New Paragraphs Predefined Styles Image Manager Document Manager Adding Hyperlinks Adding Email Links Inserting Tables 3 3 3 4 4 5 6 8 8 8 9 12 13 15 15 15 15 15 16 16 16 16 16 17 19 20 20 20 23 25 25 26 Introduction to EdPoint© Grounded in Microsoft Corporation’s SharePoint Technologies, EdPoint© utilizes the robust functionality inherent in SharePoint and SharePoint Portal Services to support a teacher friendly rapid web site creation and management tool. Feature List: Automated creation of default web sites based on Active Directory with the default template containing: WYSIWIG editor: MS Word – like editor minimizes training time to produce top quality sites and supports: Content Management and List and Libraries provide easy access to page management, document management, and sub site management Getting Started In August 2008, the Edpoint Website Software was updated. Those changes are explained in this manual. When a teacher joins the Greenville County School District, a default web site is created automatically. This site consists of a single page containing basic information most of which can be changed to any content that the teacher would like. 1. 2. 3. 4. 5. 6. 7. District/School Banner (dynamically updated based on teacher’s location) Welcome Banner (editable to any content) District Mission Statement (editable to any content) Class Schedule (editable to any content) Email link Site Navigation Bar Log out link at the top Supported Browsers: The following internet browsers are supported by EdPoint© • • • MS Internet Explorer 6.0 w/latest SP/Patches (Windows) Netscape Navigator 6.2 and up (Windows/MAC/Unix) MS Internet Explorer 5.2 and up (MAC OS x) 3 To Access Your Site: • To access your site, open the browser and type the URL in the address line: http://staff.greenville.k12.sc.us/sites/XXX XXX is the teacher’s e-mail username • When you finish your website and you are happy with it, send the following link to your webmaster. They can then link your name on your school site to your new school website: http://teachers.greenville.k12.sc.us/sites/XXX XXX is the teacher’s e-mail name This is the link that should go on business cards or communication home to parents as it is your direct link to your webpage. The above address is the public view of your site. If you want a site that more accurately reflects what is going on in your classroom, the Content Management option under the site navigation column provides a variety of options to create and maintain pages, create sub-sites, manage files and more. The radEditor content management tool provides a MS Word-like interface to make managing text, graphics, flash files, and other options quick and easy. By clicking Pages on the left of your site, you can manage your website by adding more pages, graphics, PowerPoints, colors, and fonts to suit the level of creativity that you desire your site to reflect. The radEditor is like an edit box where you can actually create the pages in an environment much like Microsoft Word. Editing the Home Web Page Three elements on the Home web page are available for edit. References to the “default webpage” are meant to refer to the site as it automatically comes up the first time you access it and before you begin editing it to make it your own. • Welcome Banner • Class Schedule • Site Navigation Column To edit the banner, click on “Edit Banner.” To edit the page, click on “Edit Page.” The radEditor Content Manager screen will come up. You can begin editing either area at this point. 4 The parts of the home page are: • A. Banner • B. Site navigation • C. Edit Banner • D. Edit Page: The “Edit” option brings up the page content in “radEditor” mode. In this mode, any content on the page may be modified or changed. To save editing changes, remember to click the “Update” button on the radEditor page, and then select the “Publish” option on the edit page. The radEditor Content Manager provides a wide variety of options to meet the needs of a range of users from the beginning user to the proficient user. The options available with the radEditor are discussed in the “Using the Editor” section. • E. Lists and Libraries • F. Content Management In the upper right hand corner of the home page is the name of the owner of the website. When you click on the name, the following screen appears: To sign out, just click on “Sign Out” and then click “Close Window.” If you desire to sign in as a different user, click that and a new log in screen will appear. Content Management (formerly part of ADMIN) Content Management is available to teachers logged into their own site. The features available on this menu include: 5 Pages: The Pages options provide tools to Manage Edpoint Pages Use this page to create, modify, reorder, and delete your pages. A. B. C. D. A. E. F. G. H. The “New” option provides an easy tool to create additional pages for the web site. Selecting the New page option displays the actual Create Page screen. This screen allows the creation of a new page by entering the page name as it should display in the site navigation pane and pressing Create. This method creates a page without content which can be added later using the Manage Pages options. 6 B. Actions allow you to view pages pending approval. As administrator of the webpage you are in position to approve the potential pages on your site that are created by others. This is especially important when students or others are creating sub sites on your site. The Submit for Approval is for non-admins. Publish page would be for it to take effect on the http://teachers. Greenville… side of things. Here are the two most common paths: 1) Teacher edits page. a. Click Update/Save. Now there is a draft version that they are editing. b. When they are satisfied with the page. Click Publish Page. This will push it so that anyone can view the changes. This is similar to the previous version just worded differently. 2) Non-Admin edits page: a. This will occur when a teacher adds a user to the site using the Manage Users page. That user can now edit but not publish pages. (You can do this with the home page and the banner in the new version now). b. Once the student/assistant/etc edits the page and clicks save. A draft version is saved similar to when the teacher edits. c. The Student is happy with the changes and wants to publish the page. They click Submit for Approval. d. Now the Teacher has to come through and Click Publish page for the public to view it. Teachers can see a list of pages awaiting approval from a drop down on the Pages list. C. Page Title— When you click on the title of a page you have created, you will have two options. One is to view the page. The other is to edit the name of the page. D. E. The Visible in Navigation option provides a means of hiding a page or pages from public view until you are ready to make the page available to visitors to your website. If a check mark displays in the box, the page is visible and accessible from the site navigation pane. To hide one or more pages, simple click on the check box to deselect the page(s). Deselecting a page hides that page and any subordinate pages. Reasons for not making a page available include (1) the page is under construction and not ready to be viewed and (2) it is not the appropriate time for the information on the page to be displayed—for instance, you have a page dedicated to a class project with pertinent information about the project, but you have not assigned the project yet. Approval Status is designated for each page. To approve a page you, the administrator, must take “action” to approve it. Please refer to” B. Actions.” 7 F. G. H. Indent allows you to put one or more of your pages in indentation on the site navigation column. The “Level” feature is used to place one or more pages up to three levels deep under one heading according to your needs. The “Delete” option deletes a page from the website. Deleted pages cannot be restored. Be very conscious of what you are doing when you click “Delete.” Saving and Publishing a page: When you have completed creating or modifying a page, click the “save draft” button near the lower right side of the radEditor. This will return you to the page you were working on. From this screen, click on the “Publish Page” button. If you are a designated user and need to have the page approved by the administrator, click on the “submit page for approval” button. Subsites By clicking on the sub sites options under site navigation, you will be able to manage EdPoint subsites. Use this page to create, reorder, and delete your subsites. Lists and Libraries (formerly part of the Admin Menu) This option replaces several of the options of the former ADMIN menu. When you create a calendar, a photo gallery, and shared documents, you create folders. Those folders are contained in this section. To add to, modify, or create you can click on the name of the folder under Lists and Libraries and it will open and show you the tools that you need to use. 8 Settings: Theme The setting option brings some new options for being creative with the theme/background options on your website. • By clicking on “Theme:” you can choose from designs for your website that have been available on Edpoint before. The choice affects every page in your website. • By clicking on “Header Background Color:” you can change the area just below the banner as in 9 • By Clicking on “Header Background Image:” you can add an image to your header in the banner. In this example, the image of “United We Stand” was imported from Shared Documents. The option to “Repeat Across” was chosen so that it would go across the entire top. If “No Repeat” had been chosen, the design would have been directly behind the school district logo. “Repeat Down” would have created two images coming down behind the GS logo and not been very visible. “Tile” would have repeated the pattern all over the banner. You will need to try each option to determine which will be the most effective for your website. You can use any image that you have uploaded into your Shared Documents which takes the place of Image Manager. • By clicking on “Content Background Color:” you can change the background of the content area only. As an example: • By clicking on “Content Background Image:” you can insert a photo or clipart into the content section of your webpage. An example: 10 • By clicking on “Footer Background Color:” you can change the color of the footer at the bottom: • By clicking on “Footer Background Image:” you can add an image to the footer: You will need to refer to the “Repeat” options under “Header Background Images” above. 11 Important to consider: With these new options available to you, the web designers, you will have an opportunity to be more creative and individualized. It is your responsibility to ensure that the design is easily readable as well as viewable. Not all browsers show a website the way we have designed it. Sometimes “too much” can interfere with the content for the viewer. For instance, in the Content Background Image example above, the font colors are not readable against every element of the background image. Animated background images would be very distracting to the viewer. It is important that you consider these things when you design a webpage. Settings: User By clicking user settings you can add additional names of people who can work on your website. This was formerly designated “Manage Users.” It is to be used if you are allowing students to set up subsites or if you are giving some other GSD employee permission to work on your website. You must approve any work that is done by others before it will show on the web. By clicking on “New,” you can add additional names: When you insert a new name, you will need to add the GSD email address of that person, whether it is a student or a teacher. To verify the email address, you can click on the icon below the white box. Then, click “Add.” Edit Page icon on the top of each content page On the page you want to edit, is a button entitled “edit page.” By clicking on it the radEditor Content Manager appears and provides a tool that looks and feels like Microsoft Word™. The radEditor feature is designed for the novice user to HTML experts. It is very user friendly. 12 Basic features of radEditor include: Multi-level undo/redo with action trails Hyperlinker/break hyperlink Dockable and floating toolbars Table management Adaptive buttons Real-time HTML View with code indentation option Spell checker Flash Manager Toolbar Options The following table provides a guide to each toolbar option and its function. GENERAL BUTTONS Icon Description of Function Shortcut Design button - Switches r.a.d.editor into Design Mode. None Available HTML button - Switches r.a.d.editor into HTML Mode. None Available Show/Hide Border - Shows or hides borders around tables in the content area. None Available Toggle Docking - Docks all floating toolbars to their respective docking areas. None Available Cut button - Cuts the selected content and copies it to the clipboard. Ctrl+X Copy button - Copies the selected content to the clipboard. Ctrl+C Paste button - Pastes the copied content from the clipboard into the editor. Ctrl+V Spell button - Launches the spellchecker. None Available 13 Flash Manager button - Inserts a Flash animation and lets you set its properties. None Available Paste as HTML button - Pastes HTML code in the content area and keeps all the HTML tags. None Available Undo button - Undoes the last action. Ctrl+Z Redo button - Redoes/Repeats the last action, which has been undone. Ctrl+Y Format Stripper button - Removes custom or all formatting from selected text. None Available INSERT AND MANAGE LINKS, TABLES, SPECIAL CHARACTERS, IMAGES and MEDIA Image Manager button - Inserts an image from a predefined image folder(s). Ctrl+G Insert Table button - Inserts a table in the r.a.d.editor. None Available Toggle Table Borders - Toggles borders of all tables within the editor. None Available Document Manager - Inserts a link to a document on the server (PDF, DOC, etc.) None Available Hyperlink Manager button - Makes the selected text or image a hyperlink. Ctrl+K Remove Hyperlink button - Removes the hyperlink from Ctrl+Shift+K the selected text or image. CREATE, FORMAT AND EDIT PARAGRAPHS and LINES Paragraph Style Dropdown button - Applies standard text styles to selected text. None Available Out dent button - Indents paragraphs to the left. None Available Indent button - Indents paragraphs to the right. None Available Align Left button - Aligns the selected paragraph to the left. None Available Center button - Aligns the selected paragraph to the center. None Available Align Right button - Aligns the selected paragraph to the right. None Available Justify button - Justifies the selected paragraph. None Available Bulleted List button - Creates a bulleted list from the selection. None Available Numbered List button - Creates a numbered list from the selection. None Available CREATE, FORMAT AND EDIT TEXT, FONT and LISTS Bold button - Applies bold formatting to selected text. 14 Ctrl+B Italic button - Applies italic formatting to selected text. Ctrl+I Underline button - Applies underline formatting to selected text. Ctrl+U Font Select button - Sets the font typeface. None Available Font Size button - Sets the font size. None Available Text Color (foreground) button - Changes the foreground color of the selected text. None Available Text Color (background) button - Changes the background color of the selected text. Highlights text only. None Available OTHER KEYBOARD SHORTCUTS - Selects all text, images and tables in the editor. Ctrl+A - Finds a string of text or numbers in the page. Ctrl+F - Closes the active window. Ctrl+W - Closes the active application. Ctrl+F4 Managing Text: The radEditor provides a variety of options for managing text on a page. Adding Text: Adding text is easy using the radEditor content management tool. To do so, simply place the cursor in the content window and type the desired information or cut/paste from another application using one of radEditor Content Manager’s pasting features. To save the new text, click the “Update” button. Then, click the “save page” button. To learn more about cut and paste, refer to the Cut and Paste section. Deleting Text: To delete text from a page, simply select the information by placing the cursor at the beginning of the section to be deleted, press and hold the left mouse button and scroll over the material until all the required text is highlighted. Press <Delete> to remove the data. To save the deletion, click the “Update” button. Then, click the “save page” button. Copy Text: To copy text from within the existing page, select the text and press option on the toolbar. Use one of the paste options to place the copied text the in the new location. To save the copied text, click the “Update” button. Then, click the “save page” button. Cut and Paste: The cut and paste features of the radEditor Content Manager provide a variety of options for bringing in existing content from other applications as well as moving sections within a web page. To save the cut and pasted text, click the “Update” button. Then, click the “save page” button. option To CUT a section of text, select the desired section and press the on the toolbar. This places the selected text on the clipboard for pasting. To save the text without the cut text, click the “Update” button. Then, click the “save page” button. 15 To PASTE text cut from the existing page or another source, place the cursor in the desired location and select the paste options. To save the pasted text within the new page, click the “Update” button. Then, click the “save page” button. button on the toolbar. This option The PASTE option is accessed with the pastes text from the clipboard with its original formatting. Note that formatting in some applications may not be compatible with the web. Applying Formatting Add interest to the page by using the various formatting options available in the radEditor Content Manager. Bold – Italicize – Underline To BOLD text, select the text and press on the formatting toolbar. To ITALICIZE text, select the text and press To UNDERLINE text, select the text and press on the formatting toolbar. on the formatting toolbar. Aligning Text To LEFT ALIGN text, select the text and press on the toolbar. Visually, the selected text is aligned with the left indent or left margin. on the toolbar. Visually, the To CENTER text, select the text and press selected text is centered between the right and left indents or margins. on the toolbar. Visually, To RIGHT ALIGN text, select the text and press the selected text is aligned with the right indent or right margin. on the toolbar. Visually, the To JUSTIFY text, select the text and press selected text is aligned between the right and left indents or margins. To INDENT text, select the text or position the cursor where the indentation should begin and press on the toolbar. To OUTDENT text, select the text or position the cursor where the out dent should begin and press on the toolbar. Bullets and Numbering To create a NUMBERED LIST, move the cursor to the desired location or select the text to be included and press on the toolbar. To create a BULLETED LIST, move the cursor to the desired location or select the text to be included and press 16 on the toolbar. Applying Color To modify the BACKGROUND color of text, select the text and press the drop down arrow on the icon on the toolbar to display the available colors. Be advised that this only changes the color directly behind the text as if it is highlighted. To use one of the default colors, click on the desired graphic. To add custom color, select the Add Custom Color… option. Press the Define Custom Colors>> button. Use the pointer to select the desired color by placing the cursor at the desired location and clicking the left mouse button. Use the arrow to select the desired hue and press the Add to Custom Colors button. The color will display in the Custom Colors panel. Press OK to save the color or Cancel to abort the change. 17 To add hex color—a color for which you know the hex number like FF6633, select the desired text. Select the Add Hex Color… option. Enter the HEX value (for instance, FF6633 for the desired color and press OK. **In order to use the any one of numerous color shades, type the Hex Code value in the HEX CODE field in the foreground and background Add Hex Code… • Options or enter the Hex Code directly into HTML code. For instance: <font color=”FFCCFF”> • To find these colors on the web for idea of color saturation, check out: http://www.greenville.k12.sc.us/district/web/picker/palette.htm To modify the FOREGROUND color or actual text color, select the text icon on the toolbar to display the and press the drop down arrow on the available colors. To use one of the default colors, click on the desired graphic. To add custom color, select the Add Custom Color… option. 18 Press the Define Custom Colors>> button. Use the pointer to select the desired color by placing the cursor at the desired location and clicking the left mouse button. Use the arrow to select the desired hue and press the Add to Custom Colors button. The color will display in the Custom Colors panel. Press OK to save the color or Cancel to abort the change. To add hex color, select the desired text. Select the Add Hex Color… option. Enter the HEX value of the desired color and press OK. For a list of HEX codes and corresponding colors, see Appendix D. Fonts and Sizes EdPoint© comes with a default set of FONTS. Press the drop down arrow option and choose the desired option. To apply a next to the different font to pre-existing text, select the text before selecting the font. 19 To apply a particular SIZE or pitch to text, press the drop down arrow next to option and choose the desired size. To apply a different size to the pre-existing text, select the text before selecting the size. Provided the fonts are web compliant, text can be cut from other documents or web pages and pasted into the radEditor Content Manager with the existing fonts intact. Creating New Paragraphs: To create a new paragraph, press the option on the toolbar and begin entering text. A paragraph style can be applied by selecting the text after it is typed and adding the desired style or select the style after creating a new paragraph. Predefined Styles: A PARAGRAPH STYLE is a set of formatting characteristics that govern the appearance of all aspects of a paragraph including text alignment, tab stops, line spacing, and borders. In some cases, they can also include character formatting. To apply a paragraph style with the radEditor, press the drop down arrow next to the field. Image Management The radEditor Content Manager provides two special options for managing images. This option is located on the toolbar and is used to access the image manager. X This option provides access to the image manager screen. To access this option select the button on the toolbar. The image manager screen displays. 20 When trying to upload photos to your site through the radEditor, the “upload image” tab is grayed out and seems to be inactive. When you open a folder, this tab becomes active. Photos/clipart must be uploaded to a folder. In the image below, one of the folders under “name” was double clicked. When it opened the contents were displayed. At the same time, the “upload image” file tab was activated. It is shown below in black/white and can be used. The browse files tab provides a means of managing uploaded images. Clicking on the sign in front of the folder displays the images stored in that location. Pressing the blue arrow at the top of the file window will restore the summary view. Components of Image Manager: 1. Upload image tab. See note above to ensure that image is uploaded into an existing file. 2. Double click to create a new file. Then name it in the box provided. 3. To delete an image from the list, highlight the image file name, press the option. 4. Insert the image as best fit. 5. Insert the image as actual size of image. 6. Zoom in to image. 7. Zoom out from image. 8. Create a thumbnail of the image. 9. The refresh option is used to up date the list of images on demand. To option. refresh, press the 21 10. Displays the names of the files in an outline form. 11. Displays the names of the files in list form. To insert an existing image: one that you have already uploaded--on a page, either double click on the name of the desired image or click on the image and press the button. To upload an image: The same option is used to upload images for use on web pages. To access the upload screen, select the button on the toolbar. The image management screen displays. Use the cursor to highlight the file name that you wish to place the image. Use the cursor to select the Upload Image tab. The upload image screen displays . The Directory field displays the location the image should be uploaded (or copied) to for access by the web site. The File field specifies the full path to the image desired. The used to search for a file using the familiar Microsoft tree structure. button is Select the desired file from the Choose File screen by double clicking on the file name. The selected name displays in the File Name field on the Choose file screen. Press the button to post the desired file name in the File field on the Upload Image screen. button. The To UPLOAD the image to the location specified, press the image manager screen displays with the new image listed and displayed. button on the next screen. To INSERT the image, press the To edit the image, place the cursor on the image and right click. An option to set image properties displays. Click on the option to display the set image properties screen. 22 This screen is used to set up borders, insert descriptions, align the image, and set size and positioning. Once these values are set, press the button to activate the new settings. Don’t forget to SAVE and PUBLISH to save the page! The final option on the upload image screen is to overwrite an existing image. The “Overwrite if file with such name exists?” checkbox is used to indicate whether the image being uploaded should replace an existing image with the same name or not. The Upload Image screen also provides information on the maximum image file size allowed as well as the file extensions supported by the application. Note that .jpg files are the preferred format for web pages. Document Manager The radEditor Content Manager provides an option for managing documents. This option is located on the toolbar and is used to access the document manager. This option works like Image Manager does. PowerPoints and streaming videos can be uploaded to your website using this function. X To access the Document Manager screen, select the The document management screen displays. 23 button on the toolbar. The browse files tab provides a means of managing uploaded documents. Note that unless the path is changed, images and documents share the same directory. Clicking on the folder displays the documents stored in that location. Pressing the blue arrow at the top of the opened file will close the file. To upload a new document, you must double click on to open the file in which you want to save the document. It is like the requirements in image manager. Use the cursor to select the Upload Attachment tab. The upload attachment screen displays. It is the same as before. It operates the same as the upload image function in image manager. The refresh option is used to up date the list of documents on demand. To option. refresh, press the To delete an item from the list, highlight the document file name and press option. the To insert an existing document on a page, either double click on the name of the desired image or click on the document and press the button. The same option is used to upload documents for use on web pages. To button on the toolbar. The access the upload screen, select the attachment management screen displays. This is how you can upload a PowerPoint or streaming video to your website. It will show as a link to the PowerPoint or video. After one clicks on the link, the presentation begins. The Directory field displays the location the image should be uploaded (or copied) to for access by the web site. The File field specifies the full path to the image desired. The button is used to search for a file using the familiar Microsoft tree structure. Select the desired file from the Choose File screen by double clicking on the file name. The selected name displays in the File Name field on the Choose file screen. Press the button to post the desired file name in the File field on the Upload Image screen. To UPLOAD the document to the location specified, press the button. The document manager screen displays with the new image listed and displayed. button. To INSERT the document, press the To edit the image, place the cursor on the image and right click. An option to set image properties displays. Click on the option to display the set image properties screen. 24 Adding a Hyperlink: X To add a hyperlink to a site on the Internet, click on the globe with the closed link below it. • • When this screen appears, type the URL in the appropriate box. (See “http://www.janbrett.com”.) In the Link Text box, type in the text you desire to appear on the webpage. (See “Jan Brett’s Site.”) Click “OK.” If you wish to include a link to your e-mail address, click on the “E-Mail” tab at the top. • • • Complete the “Address” box with the e-mail address. (See [email protected].) Complete the “Link” box with the text that you want to appear on the webpage. (See “Email Mrs. Cloer.”) Click “OK.” 25 Inserting a Table on a Webpage There are five icons on the toolbar that pertain to tables. X X • X X X Insert Table—following are the four screens within this option • • • 26 • • • • • Set Table properties Show/Hide Border Insert Table Elements—from this option you can insert and delete rows and columns Merge Cells Horizontally 27