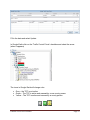
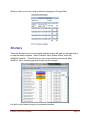
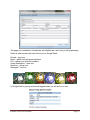
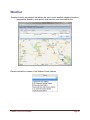
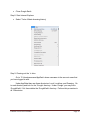
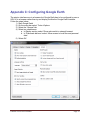
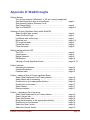
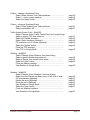
1
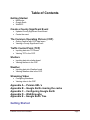
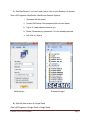
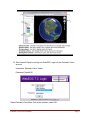
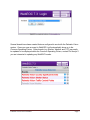
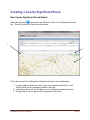
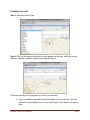
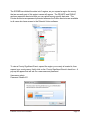
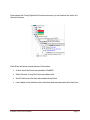
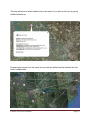
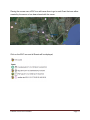
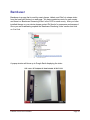
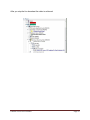
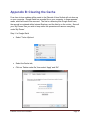
EMD Palmetto Vision Beta Test Guide Prepared by: Robert Zawarski - [email protected] Phillip Armijo – [email protected] Earth Technology Integration (ETI) Palmetto Vision User’s Manual Page 1 Table of Contents Getting Started NeoRouter Google Earth WebEOC Create a County Significant Event Updated County Significant Event Board Create the event The Common Operating Picture (COP) Getting Familiar with COP data layers Viewing a County Significant Event Traffic Control Point (TCP) Inputting data into TCP board Viewing TCP in the COP Shelters Inputting data into shelter board Viewing shelters in the COP Weather Inputting data into Weather board Viewing Weather data in the COP Streaming Video Configuring Bambuser Viewing video in the COP Appendix A – Pvision URL’s Appendix B – Google Earth clearing the cache Appendix C – Configuring Google Earth Appendix D – Walkthroughs Appendix E – Google Earth Tree Getting Started Palmetto Vision User’s Manual Page 2 A) Start NeoRouter, if you don’t have it as an icon on your desktop it is located: Start->All Programs->NeoRouter->NeoRouter Network Explorer i. Username will be scemd ii. Contact Phil Armijo if the password has not been saved iii. ‘log on to’ www.palmettovision.sc.gov iv. Select ‘Remember my password’ if it is not already selected v. Left click on ‘Sign in’ Initial Screen Successful Login B) Start the free version of Google Earth Start->All Programs->Google Earth->Google Earth Palmetto Vision User’s Manual Page 3 C) Start Internet Explorer and log into WebEOC, login into the Palmetto Vision account Username: Palmetto Vision Tester Password: Stealth101 Select Palmetto Vision Beta Test as the Incident, select OK. Palmetto Vision User’s Manual Page 4 Several boards have been created that are configured to work with the Palmetto Vision system. Once you save an event in WebEOC it will automatically show up in the Common Operating Picture. Other boards (e.g. Shelter, Weather and TCP) can easily be updated to be displayed within the Common Operating Picture, contact Phil Armijo if you are interested in updating any WebEOC boards. Palmetto Vision User’s Manual Page 5 Creating a County Significant Event New County Significant Events Board Select the blue plus, , across from the ‘Palmetto Vision County Significant Events’ line. This will bring up the New Record interface 1 2 3 This is the current County Significant Events board with a few modifications: 1. Location Address allows the user to type in an address of an Event or will AutoFill when an icon has been placed on the map 2. Latitude/Longitude will AutoFill when an icon has been placed on the map 3. Google Map is used to give a GIS component to the Event Palmetto Vision User’s Manual Page 6 Creating an event Step 1: Select the Event Type. Step 2: Click on the map and an Event icon will appear on the map, with the Location Address, Latitude, and the Longitude automatically filled in. There are two ways of moving the icon once it’s on the map: a) Type in an address and select the Enter button on your keyboard. Note the map will not automatically move to the new location, you’ll have to do that by hand. Palmetto Vision User’s Manual Page 7 b) Left click on the icon; keep pushing the button as you move the mouse. Release the button and the icon will drop to its new location, updating ‘Address’, ‘Latitude’, and ‘Longitude’. Step 3: Fill in the rest of the board data. Description, Priority, and Action are optional. Step 4: Select the Create button, the event can now be seen in Google Earth. Step 5: Close the board by clicking on the red x at the very rightmost corner of the browser. Google Earth Enterprise Client If you are unfamiliar with the Google Earth program please contact Phil Armijo and he will send you a Google Earth Training Manual. The Infrastructure data layer of information that each county should review to confirm that the accurate. County GIS folks have the latest/greatest information and if they are willing to share that data it can easily be hosted within the Common Operating Picture. Palmetto Vision User’s Manual Page 8 There are several sections within the Palmetto Vision KML tree; the Infrastructure shows our attempt to chart infrastructure throughout the state. Natural Hazards contains data sets that are related to earthquakes, fires, hurricanes, and Floods. Palmetto Vision User’s Manual Page 9 The SCEMD has divided the state into 6 regions, as you expand a region the county that are currently part of this project names will appear. The PRIVATE and PUBLIC sections represent directories that you can upload county specific data sets. The Private directories are password protected whereas the Public directories are available to all users who have access to the Palmetto Vision software. To view a County Significant Event; expand the region your county is located in, then expand your county name, finally click on the ‘County Significant Events’ check box. A pop-up will appear that will ask for a username and password. Username: admin Password: Stealth101 Palmetto Vision User’s Manual Page 10 Now expand the County Significant Events section and you will see that the event is in the tree structure. Each Event will show several pieces of information: A timer since the Event was created in WebEOC Which Servers (if any) the Event was shared with Work Products are the files associated with an Event Last Update is the date/time when the latest data was associated with the Event Palmetto Vision User’s Manual Page 11 The map will show an event-related icon for the event, if you click on the icon a pop-up bubble will show up By placing the mouse over the event icon you will see white lines that indicate who the event is shared with. Palmetto Vision User’s Manual Page 12 Placing the mouse over a EOC icon will cause lines to go to each Event that was either created by the server or has been shared with the server. Click on the EOC icon and all Events will be displayed, Palmetto Vision User’s Manual Page 13 PVision Interface UICDS is a middleware that has no interface but it can perform many tasks. The pvision interface displays active Significant Event. This interface is not the Common Operating Picture but rather an interface that allows you to: add information to an event, share an event to any county, and to close an event (which removes it from the COP). There are two ways of accessing the pvision interface A) From Google Earth, select the blue ‘Add Share’ or ‘New Attachment’. B) Internet Explorer, refer to Appendix A for the URL to type in. In either case, a pop-up will appear: Top text box – admin Bottom text box – Stealth101 Palmetto Vision User’s Manual Page 14 The pvision interface requires Internet Explorer so if you have a different browser select as your default browser please cut/paste the URL into Internet Explorer. 1 2 3 Here is a breakdown of the interface: 1. UICDS Tasks 2. Red circle indicates which Event you are currently working on 3. Detailed information of Event in Red Circle. a. If you used ‘B’ from the previous page you’ll need to click on the icon to have the red circle appear around it. Palmetto Vision User’s Manual Page 15 Tasks Pulldown Options . The image above shows the first tasks that the interface will support: 1. New Attachment – Allows a user to associate any file to a specific UICDS incident or upload a file onto the server 2. Share Incident – push the Event to another computer(s) 3. Close Incident – Incident is over and needs to be removed from the Common Operating Picture. File Sharing - Associating a File with an Incident This interface allows you to assign a file to the Event. A file has to be located on the server before it can be assigned to an incident. Begin by selecting New Attachment from the Tasks pulldown menu. 1. This interface starts up opening on the “E” drive on the server which is hosting the Pvision interface. The ‘Attach’ tab is selected by default and is used to associate a file with an incident. Palmetto Vision User’s Manual Page 16 2. The interface is a simple file chooser that allows you to double click on the directory names to drill down to the specific file you would like to assign to the incident. If the file is an image a thumbnail image will appear once you place the mouse over the filename. 3. You can assign a file by double clicking on a file name; ‘Link’ and ‘Description’ fields will automatically fill in. If by chance the file needs to be associated with a specific place you can click on the interactive map. A paperclip icon shows up on the map and the ‘Address’, ‘Lat’, ‘Long’ data will auto fill. 4. Select ‘Submit’ 5. Close the interface by selecting the red ‘x’, not the one that closes the browser. Palmetto Vision User’s Manual Page 17 Uploading a File At certain times you’ll want to transfer files from your computer to a server. This uploaded file can be viewed in the Common Operating Picture or assigned to an incident. 1. Select the ‘Upload’ tab 2. Select the Browse button, a pop-up will appear that is a file selector showing files on your computer. Double click on the file name and then select ‘Open’. Palmetto Vision User’s Manual Page 18 3. Click on ‘Upload’ to transfer the file from your machine to the server Palmetto Vision User’s Manual Page 19 Sharing an Incident There are several steps to push an Event from your local server to another server. Start by selecting Share Incident from the Tasks pulldown menu. By default all County Significant Events are shared with the SCEMD. Now click on the ‘+’ next to the county name that you wish to share the incident out to The final step is to select the Apply button Palmetto Vision User’s Manual Page 20 Close an Incident At some point in time an incident will have wound down then you’ll want to remove it from the Common Operating Picture (and store it in a database table). 1. Select the incident that you want to close 2. Select ‘Task->Close Incident’ 3. A popup will appear asking you to confirm that you want to close the incident, select ‘OK’ 4. A confirmation popup will appear letting you know the incident has been closed, the icon will leave the Common Operating Picture Traffic Control Points There will already be one or more traffic control points created for you. Select ‘Palmetto Vision Traffic Control Points’ within the WebEOC board list. This will show you a static list of the TCP’s, this is a status page, no data can be changed. Palmetto Vision User’s Manual Page 21 Left click on the Location name to bring up the dynamic interface. Currently data can be entered for 5 personnel who will be manning at the TCP, this is a configurable item, please contact Phil Armijo if you would like to have this section expanded. There are 2 check boxes in the upper right hand corner: State – Selected if the person who is staffing the TCP is not from your county. Staffed – Selected when the TCP is activated and manned The text boxes are as follows: Agency/Leo – The agency or law enforcement office of the individual manning the TCP Name – Name of the person Contact # - Cell phone of the person Call # - Call sign of the person Channel – the radio frequency the person’s radio is currently using RES - this is to show that we can configure the radio channels into a pull-down menu Palmetto Vision User’s Manual Page 22 Fill in the data and select Update In Google Earth click on the ‘Traffic Control Points’ checkbox and select the arrow (when it appears) The icons in Google Earth will change color: Grey – the TCP is not active Green – The TCP is active and manned by a non-county person Yellow – The TCP is active and manned by a county person Palmetto Vision User’s Manual Page 23 When you click on an icon a pop-up window will appear in Google Earth Shelters There will already be one or more shelter and this section will walk you through what to do with the shelter interface. Select ‘Palmetto Vision Shelter Status’ within the WebEOC board list. This will show you how many shelters are currently within WebEOC, this is a status page and no data can be changed. Left click on the Name to bring up the dynamic interface. Palmetto Vision User’s Manual Page 24 The page is a combination of textboxes and checkboxes, each entry is self-explanatory. Status is what controls the look of the icons in Google Earth: Closed – grey icon Open – green icon with green numbers Full – orange icon with red numbers Under Renovation – blue icon Stand-by – yellow icon Damaged – red icon In Google Earth a pop-up window will appear when you left click on a icon Palmetto Vision User’s Manual Page 25 Weather Weather board is an interface that allows the user to enter weather related information: temperature, humidity, wind speed, wind direction, and circle radius size. Places contains the location of the Nuclear Power stations Palmetto Vision User’s Manual Page 26 Left click on the map and a circle will appear, the default radius is set to 10,000 meters. Location Address will automatically fill in as well as Latitude and Longitude. A left mouse click, within the map, will move the circle to a new location or typing a new address. You’ll note that the is an arrow pointing towards the center of the circle and the two outer lines represent 90 degrees from the center while the two inner lines represent 45 degrees. Below is how the circle is displayed within Google Earth. Palmetto Vision User’s Manual Page 27 Bambuser Bambuser is an app that is used by smart phones, tablets, and iPad’s to stream video from the hand held device to a web page. We have created accounts for each county and there is a ‘Bambuser Streaming Video’ in the COP for each county. After you have installed the app on your device please contact Phil Armijo for username and password. Once you are broadcasting expand the ‘Bambuser Streaming Video’ section and click on ‘Live’ link A popup window will show up in Google Earth displaying the video Palmetto Vision User’s Manual Page 28 After you stop the live broadcast the video is achieved. Palmetto Vision User’s Manual Page 29 Appendix A: PVision URL’s: The SCEMD is in the process of installing SSL certificates on all of the servers but the process has not been completed so if the URL times out, in IE, try changing the ‘:4430/eti/cop/pvision.html’ to ‘:8090/eti/cop/pvision.html’ and ‘https’ to ‘http’. Abbeville: https://pvision-abbevil.palmettovision.sc.gov/eti/cop/pvision.html Aiken: https://pvision-aiken.palmettovision.sc.gov/eti/cop/pvision.html Anderson: https://pvision-anderso.palmettovision.sc.gov/eti/cop/pvision.html Barnwell: https://pvision-barnwel.palmettovision.sc.gov/eti/cop/pvision.html Beaufort: https://pvision-beaufor.palmettovision.sc.gov/eti/cop/pvision.html Berkeley: https://pvision-berkele.palmettovision.sc.gov/eti/cop/pvision.html Charleston: https://pvision-charles.palmettovision.sc.gov/eti/cop/pvision.html Cherokee: https://pvision-cheroke.palmettovision.sc.gov/eti/cop/pvision.html Chesterfield: https://pvision-chester.palmettovision.sc.gov/eti/cop/pvision.html Colleton: https://pvision-colleto.palmettovision.sc.gov/eti/cop/pvision.html Darlington: https://pvision-darling.palmettovision.sc.gov/eti/cop/pvision.html Dillon: https://pvision-dillon.palmettovision.sc.gov/eti/cop/pvision.html Dorchester: https://pvision-dorches.palmettovision.sc.gov/eti/cop/pvision.html Fairfield: https://pvision-fairfie.palmettovision.sc.gov/eti/cop/pvision.html Florence: https://pvision-florenc.palmettovision.sc.gov/eti/cop/pvision.html Georgetown: https://pvision-georget.palmettovision.sc.gov/eti/cop/pvision.html Greenville: https://pvision-greenvi.palmettovision.sc.gov/eti/cop/pvision.html Greenwood: https://pvision-greenwo.palmettovision.sc.gov/eti/cop/pvision.html Hampton: https://pvision-hampton.palmettovision.sc.gov/eti/cop/pvision.html Jasper: https://pvision-jasper.palmettovision.sc.gov/eti/cop/pvision.html Lee: https://pvision-lee.palmettovision.sc.gov/eti/cop/pvision.html Marlboro: https://pvision-marlbor.palmettovision.sc.gov/eti/cop/pvision.html McCormick: https://pvision-mccormi.palmettovision.sc.gov/eti/cop/pvision.html Newberry: https://pvision-newberr.palmettovision.sc.gov/eti/cop/pvision.html Oconee: https://pvision-oconee.palmettovision.sc.gov/eti/cop/pvision.html Orangeburg: https://pvision-orangeb.palmettovision.sc.gov/eti/cop/pvision.html Pickens: https://pvision-pickens.palmettovision.sc.gov/eti/cop/pvision.html Richland: https://pvision-richlan.palmettovision.sc.gov/eti/cop/pvision.html SCEMD: https://pvision-scemd.palmettovision.sc.gov/eti/cop/pvision.html Spartanburg: https://pvision-spartan.palmettovision.sc.gov/eti/cop/pvision.html York: https://pvision-york.palmettovision.sc.gov/eti/cop/pvision.html Palmetto Vision User’s Manual Page 30 Appendix B: Clearing the Cache From time to time updates will be made to the Palmetto Vision file that will not show up on your computer. Google Earth has a cache file on your computer, in three separate areas, which will need to be removed. The first is a directory that Google Earth uses, the second is contained within Internet Explorer, and the third is on the c drive. Save all your ‘My Places’ files you wish to keep since this procedure will remove everything under ‘My Places’. Step 1: In Google Earth Select ‘Tools->Options’ Select the Cache tab; Click on ‘Delete cache file’; then select ‘Apply’ and ‘OK’ Palmetto Vision User’s Manual Page 31 Close Google Earth Step 2: Start Internet Explorer Select ‘Tools->Delete browsing history’ Step 3: Clearing out the ‘c’ drive Go to ‘C:\Users\username\AppData’ where username is the account name that you have logged in with. Under AppData there are three directories: Local, LocalLow, and Roaming. Go to each directory and look for the ‘Google’ directory. Under ‘Google’ you may find a ‘GoogleEarth’ if it’s there delete the ‘GoogleEarth’ directory. Preform this procedure to all 3 directories. Palmetto Vision User’s Manual Page 32 Appendix C: Configuring Google Earth The pvision interface runs in a browser but Google Earth has to be configured to pass a URL off to a browser rather than try and display it within the Google Earth Interface. Follow the steps below: 1) Start Google Earth 2) On the menu bar select ‘Tools->Options 3) Select the ‘General’ tab 4) Select two checkboxes: a. In Display section select ‘Show web results in external browser’ b. In ‘Placemark balloons’ select ‘Allow access to local files and personal data’ 5) Select OK Palmetto Vision User’s Manual Page 33 Appendix D: Walkthroughs Getting Started: Turn on the computer (Windows 7 or XP are currently supported) Start NeoRouter then sign in to NeoRouter………………..… Start Internet Explorer (Versions 8 or 9) Start Google Earth………………………………………………… Sign in to WebEOC……………………………………………….. page 3 page 4 page 4-5 Creating a County Significant Event within WebEOC Select the blue plus symbol……………………………………... Select the Event Type……………………………………………. Left Mouse click on the map…………………………………….. Move the icon……………………………………………………... Fill in optional data………………………………………………… Create the event…………………………………………………… Close the board……………………………………………………. page 6 page 7 page 7 page 7-8 page 8 page 8 page 8 Getting familiar with the COP The COP…………………………………………………………… Infrastructure………………………………………………………. Natural Hazards…………………………………………………… EM-Regions……………………………………………………….. Viewing a County Significant Event…………………………….. page 8 page 9 page 9 page 10 page 10-13 Pvision Interface Accessing the interface…………………………………………… Interface breakdown……………………………………………… Pulldown menu..…………………………………………………… page 14 page 15 page 16 Pvision – adding a file to a County significant Event Select ‘New Attachment’ from Tasks pulldown………………… Select Attach tab (if necessary)…………………………………. Double click to go to appropriate directory…………………….. Double click on file name………………………………………… Select Submit.…………………………………………………….. Dismiss interface………………………………………………….. page 16 page 16 page 16 page 17 page 17 page 17 Pvision – uploading a file to the server Select ‘New Attachment’ from Tasks pulldown………………… Select ‘Upload’ tab……………..…………………………………. Select the ‘Browse’ tab…………………….…………………….. Move the file selector to the appropriate directory..…………… Double click on the filename…………………………………….. Select the ‘Open’ button………………………………………….. Select the ‘Upload’ button………………………………………… page 18 page 18 page 18 page 18 page 18 page 18 page 19 Palmetto Vision User’s Manual Page 34 Pvision – sharing a Significant Event Select ‘Share Incident’ from Tasks pulldown…………………… Select ‘+’ next to county name(s).………………………………. Select the ‘Apply’ button…………………….…………………….. page 20 page 20 page 20 Pvision – closing a Significant Event Select ‘Close Incident’ from Tasks pulldown…………………… Select confirmation ‘OK’ .…………………………..……………. page 21 page 21 Traffic Access Control Point - WebEOC Select ‘Palmetto Vision Traffic Control Point’ from board listing Select a specific TCP from static list……………………………. Select the ‘Staffed’ checkbox..…………….…………………….. Select ‘State’ checkbox (Optional)………………....…………… Fill in data for up to 5 officers (Optional)……………………….. Select the ‘Update’ button……………………………………….. Close the TCP interface………………..………………………… View TCP in Google Earth………………………………………. page 21 page 22 page 22 page 22 page 22 Shelters - WebEOC Select ‘Palmetto Vision Shelters’ from board listing Select a specific Shelter from static list…………………………. Select a ‘Status’ from the pull-down menu…………………….. Select the ‘Save’ button………………………………………….. Close the Shelter interface……………..………………………… View Shelters in Google Earth…………………………………. page 24 page 25 page 25 Weather - WebEOC Select ‘Palmetto Vision Weather’ from board listing Select from the ‘Places’ pull-down menu or left click on map… Fill in board data (Optional)……………………………..……….. Resize the circle (Optional).………………………….………….. Move the circle (Optional)……………..………………………… View Shelters in Google Earth…………………………………. Select the ‘Save’ button…………………………………………. . Close the Weather interface…………………………………….. View Weather in Google Earth………………………………….. page 26 page 27 page 27 page 27 page 27 page 27 Palmetto Vision User’s Manual page 23 page 25 page 27 Page 35 Appendix E: Google Earth Tree To install the ‘Palmetto Vision’ tree into any version of Google Earth you need to follow the steps below. 1) Start Google Earth 2) Start Internet Explorer and type in this URL: https://pvision-scemd.palmettovision.sc.gov 3) Select ‘Open’ when the pop appears 4) The file will open under the ‘Places->Temporary Places’ section in Google Earth, 5) Right click on ‘SCEMD Palmetto Vision’ select ‘Cut’ 6) Right click on ‘My Places’ and select ‘Paste’ 7) If all goes well your ‘My Places’ will look similar to the image below Palmetto Vision User’s Manual Page 36 A) Terminology – During each beta test I’ll be asking you to ‘open’ a specific section of the Palmetto Vision Tree. As an example if I say “Open EM Region 2 and then Laurens County” Palmetto Vision User’s Manual Page 37