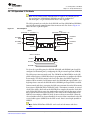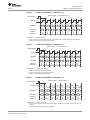
1
KeyStone Architecture
Serial Peripheral Interface (SPI)
User Guide
Literature Number: SPRUGP2A
March 2012
www.ti.com
Release History
Release
Date
Description/Comments
A
March 2010
Updated SCSFUN field description in SPIPC0 register from two pins to multiple pins (Page 3-9)
Updated description as CSHOLD bit is 0 in Chip Select Hold Option section (Page 2-6)
Updated the description of CSDEF field in SPIDEF register (Page 3-16)
Updated the description of CSHOLD field in SPIDAT1 register (Page 3-11)
Updated the description of CSNR field in SPIDAT1 register (Page 3-11)
Updated the slave chip select pins number from 2 to n, which is device specific (Page 1-2)
Modified the description of CSNR field in the SPIDAT1 register. (Page 3-11)
SPRUGP2
November 2010
Initial Release
ø-ii
KeyStone Architecture Serial Peripheral Interface (SPI) User Guide
SPRUGP2A—March 2012
Submit Documentation Feedback
Contents
www.ti.com
Contents
Release History. . . . . . . . . . . . . . . . . . . . . . . . . . . . . . . . . . . . . . . . . . . . . . . . . . . . . . . . . . . . . . . . . . . . . . . . . . . . . . . . . . . . . . . . . . . . . . . . . . . . . . . ø-ii
List of Tables . . . . . . . . . . . . . . . . . . . . . . . . . . . . . . . . . . . . . . . . . . . . . . . . . . . . . . . . . . . . . . . . . . . . . . . . . . . . . . . . . . . . . . . . . . . . . . . . . . . . . . . . . ø-v
List of Figures . . . . . . . . . . . . . . . . . . . . . . . . . . . . . . . . . . . . . . . . . . . . . . . . . . . . . . . . . . . . . . . . . . . . . . . . . . . . . . . . . . . . . . . . . . . . . . . . . . . . . . . . ø-vi
Preface
ø-vii
About This Manual. . . . . . . . . . . . . . . . . . . . . . . . . . . . . . . . . . . . . . . . . . . . . . . . . . . . . . . . . . . . . . . . . . . . . . . . . . . . . . . . ø-vii
Notational Conventions . . . . . . . . . . . . . . . . . . . . . . . . . . . . . . . . . . . . . . . . . . . . . . . . . . . . . . . . . . . . . . . . . . . . . . . . . . . ø-vii
Related Documentation from Texas Instruments . . . . . . . . . . . . . . . . . . . . . . . . . . . . . . . . . . . . . . . . . . . . . . . . . . ø-viii
Trademarks . . . . . . . . . . . . . . . . . . . . . . . . . . . . . . . . . . . . . . . . . . . . . . . . . . . . . . . . . . . . . . . . . . . . . . . . . . . . . . . . . . . . . . ø-viii
Chapter 1
Introduction
1.1
1.2
1.3
1.4
1.5
1-1
Purpose of the Peripheral . . . . . . . . . . . . . . . . . . . . . . . . . . . . . . . . . . . . . . . . . . . . . . . . . . . . . . . . . . . . . . . . . . . . . . 1-2
Terminology Used in This Document . . . . . . . . . . . . . . . . . . . . . . . . . . . . . . . . . . . . . . . . . . . . . . . . . . . . . . . . . . . 1-2
Features . . . . . . . . . . . . . . . . . . . . . . . . . . . . . . . . . . . . . . . . . . . . . . . . . . . . . . . . . . . . . . . . . . . . . . . . . . . . . . . . . . . . . . . 1-2
Functional Block Diagram . . . . . . . . . . . . . . . . . . . . . . . . . . . . . . . . . . . . . . . . . . . . . . . . . . . . . . . . . . . . . . . . . . . . . . 1-3
Industry Standard(s) Compliance Statement . . . . . . . . . . . . . . . . . . . . . . . . . . . . . . . . . . . . . . . . . . . . . . . . . . . . 1-3
Chapter 2
Peripheral Architecture
2.1
2.2
2.3
2.4
2.5
2-1
Clock . . . . . . . . . . . . . . . . . . . . . . . . . . . . . . . . . . . . . . . . . . . . . . . . . . . . . . . . . . . . . . . . . . . . . . . . . . . . . . . . . . . . . . . . . . 2-2
Signal Descriptions . . . . . . . . . . . . . . . . . . . . . . . . . . . . . . . . . . . . . . . . . . . . . . . . . . . . . . . . . . . . . . . . . . . . . . . . . . . . 2-2
Operation Modes . . . . . . . . . . . . . . . . . . . . . . . . . . . . . . . . . . . . . . . . . . . . . . . . . . . . . . . . . . . . . . . . . . . . . . . . . . . . . . 2-2
Programmable Registers . . . . . . . . . . . . . . . . . . . . . . . . . . . . . . . . . . . . . . . . . . . . . . . . . . . . . . . . . . . . . . . . . . . . . . . 2-3
Master Mode Settings . . . . . . . . . . . . . . . . . . . . . . . . . . . . . . . . . . . . . . . . . . . . . . . . . . . . . . . . . . . . . . . . . . . . . . . . . . 2-4
2.5.1 Master Mode Timing Options. . . . . . . . . . . . . . . . . . . . . . . . . . . . . . . . . . . . . . . . . . . . . . . . . . . . . . . . . . . . . . . . . . . . . . . . 2-5
2.5.1.1 Chip Select Setup Time . . . . . . . . . . . . . . . . . . . . . . . . . . . . . . . . . . . . . . . . . . . . . . . . . . . . . . . . . . . . . . . . . . . . . . . 2-5
2.5.1.2 Chip Select Hold Time . . . . . . . . . . . . . . . . . . . . . . . . . . . . . . . . . . . . . . . . . . . . . . . . . . . . . . . . . . . . . . . . . . . . . . . . 2-5
2.5.1.3 Automatic Delay Between Transfers . . . . . . . . . . . . . . . . . . . . . . . . . . . . . . . . . . . . . . . . . . . . . . . . . . . . . . . . . . 2-6
2.5.1.4 Chip Select Hold Option . . . . . . . . . . . . . . . . . . . . . . . . . . . . . . . . . . . . . . . . . . . . . . . . . . . . . . . . . . . . . . . . . . . . . . 2-6
2.6 SPI Operation: 3-Pin Mode . . . . . . . . . . . . . . . . . . . . . . . . . . . . . . . . . . . . . . . . . . . . . . . . . . . . . . . . . . . . . . . . . . . . . 2-7
2.7 SPI Operation: 4-Pin with Chip Select Mode . . . . . . . . . . . . . . . . . . . . . . . . . . . . . . . . . . . . . . . . . . . . . . . . . . . . . 2-8
2.8 Data Formats . . . . . . . . . . . . . . . . . . . . . . . . . . . . . . . . . . . . . . . . . . . . . . . . . . . . . . . . . . . . . . . . . . . . . . . . . . . . . . . . . . 2-9
2.8.1
2.8.2
2.8.3
2.8.4
Character Length . . . . . . . . . . . . . . . . . . . . . . . . . . . . . . . . . . . . . . . . . . . . . . . . . . . . . . . . . . . . . . . . . . . . . . . . . . . . . . . . . . . 2-9
Shift Direction . . . . . . . . . . . . . . . . . . . . . . . . . . . . . . . . . . . . . . . . . . . . . . . . . . . . . . . . . . . . . . . . . . . . . . . . . . . . . . . . . . . . .2-10
Clock Phase and Polarity . . . . . . . . . . . . . . . . . . . . . . . . . . . . . . . . . . . . . . . . . . . . . . . . . . . . . . . . . . . . . . . . . . . . . . . . . . .2-10
SPI Data Transfer Example . . . . . . . . . . . . . . . . . . . . . . . . . . . . . . . . . . . . . . . . . . . . . . . . . . . . . . . . . . . . . . . . . . . . . . . . . .2-12
2.9 Interrupt Support . . . . . . . . . . . . . . . . . . . . . . . . . . . . . . . . . . . . . . . . . . . . . . . . . . . . . . . . . . . . . . . . . . . . . . . . . . . . .2-13
2.10 DMA Events Support. . . . . . . . . . . . . . . . . . . . . . . . . . . . . . . . . . . . . . . . . . . . . . . . . . . . . . . . . . . . . . . . . . . . . . . . .2-13
2.11 Robustness Features . . . . . . . . . . . . . . . . . . . . . . . . . . . . . . . . . . . . . . . . . . . . . . . . . . . . . . . . . . . . . . . . . . . . . . . .2-14
2.11.1 SPI Internal Loopback Test Mode (Master Only) . . . . . . . . . . . . . . . . . . . . . . . . . . . . . . . . . . . . . . . . . . . . . . . . . . . .2-14
2.11.2 SPI Transmission Continuous Self-Test . . . . . . . . . . . . . . . . . . . . . . . . . . . . . . . . . . . . . . . . . . . . . . . . . . . . . . . . . . . .2-14
2.12 Reset Considerations . . . . . . . . . . . . . . . . . . . . . . . . . . . . . . . . . . . . . . . . . . . . . . . . . . . . . . . . . . . . . . . . . . . . . . . .2-14
2.12.1 Software Reset Considerations . . . . . . . . . . . . . . . . . . . . . . . . . . . . . . . . . . . . . . . . . . . . . . . . . . . . . . . . . . . . . . . . . . . .2-14
2.12.2 Hardware Reset Considerations . . . . . . . . . . . . . . . . . . . . . . . . . . . . . . . . . . . . . . . . . . . . . . . . . . . . . . . . . . . . . . . . . . .2-14
2.13 Power Management . . . . . . . . . . . . . . . . . . . . . . . . . . . . . . . . . . . . . . . . . . . . . . . . . . . . . . . . . . . . . . . . . . . . . . . . .2-15
2.14 Emulation Considerations . . . . . . . . . . . . . . . . . . . . . . . . . . . . . . . . . . . . . . . . . . . . . . . . . . . . . . . . . . . . . . . . . . .2-15
2.15 Initialization . . . . . . . . . . . . . . . . . . . . . . . . . . . . . . . . . . . . . . . . . . . . . . . . . . . . . . . . . . . . . . . . . . . . . . . . . . . . . . . . .2-16
SPRUGP2A—March 2012
Submit Documentation Feedback
KeyStone Architecture Serial Peripheral Interface (SPI) User Guide
ø-iii
Contents
www.ti.com
Chapter 3
Registers
3-1
3.1 SPI Global Control Register 0 (SPIGCR0) . . . . . . . . . . . . . . . . . . . . . . . . . . . . . . . . . . . . . . . . . . . . . . . . . . . . . . . . . 3-3
3.2 SPI Global Control Register 1 (SPIGCR1) . . . . . . . . . . . . . . . . . . . . . . . . . . . . . . . . . . . . . . . . . . . . . . . . . . . . . . . . . 3-4
3.3 SPI Interrupt Register (SPIINT0) . . . . . . . . . . . . . . . . . . . . . . . . . . . . . . . . . . . . . . . . . . . . . . . . . . . . . . . . . . . . . . . . . 3-5
3.4 SPI Interrupt Level Register (SPILVL) . . . . . . . . . . . . . . . . . . . . . . . . . . . . . . . . . . . . . . . . . . . . . . . . . . . . . . . . . . . . 3-6
3.5 SPI Flag Register (SPIFLG) . . . . . . . . . . . . . . . . . . . . . . . . . . . . . . . . . . . . . . . . . . . . . . . . . . . . . . . . . . . . . . . . . . . . . . 3-7
3.6 SPI Pin Control Register 0 (SPIPC0) . . . . . . . . . . . . . . . . . . . . . . . . . . . . . . . . . . . . . . . . . . . . . . . . . . . . . . . . . . . . . . 3-9
3.7 SPI Transmit Data Register 0 (SPIDAT0) . . . . . . . . . . . . . . . . . . . . . . . . . . . . . . . . . . . . . . . . . . . . . . . . . . . . . . . .3-10
3.8 SPI Transmit Data Register 1 (SPIDAT1) . . . . . . . . . . . . . . . . . . . . . . . . . . . . . . . . . . . . . . . . . . . . . . . . . . . . . . . .3-11
3.9 SPI Receive Buffer Register (SPIBUF) . . . . . . . . . . . . . . . . . . . . . . . . . . . . . . . . . . . . . . . . . . . . . . . . . . . . . . . . . . .3-12
3.10 SPI Emulation Register (SPIEMU) . . . . . . . . . . . . . . . . . . . . . . . . . . . . . . . . . . . . . . . . . . . . . . . . . . . . . . . . . . . . .3-13
3.11 SPI Delay Register (SPIDELAY) . . . . . . . . . . . . . . . . . . . . . . . . . . . . . . . . . . . . . . . . . . . . . . . . . . . . . . . . . . . . . . . .3-14
3.12 SPI Default Chip Select Register (SPIDEF) . . . . . . . . . . . . . . . . . . . . . . . . . . . . . . . . . . . . . . . . . . . . . . . . . . . . .3-16
3.13 SPI Data Format Registers (SPIFMTn) . . . . . . . . . . . . . . . . . . . . . . . . . . . . . . . . . . . . . . . . . . . . . . . . . . . . . . . . .3-17
3.14 SPI Interrupt Vector Register 0 (INTVEC0) . . . . . . . . . . . . . . . . . . . . . . . . . . . . . . . . . . . . . . . . . . . . . . . . . . . . .3-18
3.15 SPI Interrupt Vector Register 1 (INTVEC1) . . . . . . . . . . . . . . . . . . . . . . . . . . . . . . . . . . . . . . . . . . . . . . . . . . . . .3-19
Appendix A
Timing Diagrams
A-1
A.1 SPI 3-Pin Mode . . . . . . . . . . . . . . . . . . . . . . . . . . . . . . . . . . . . . . . . . . . . . . . . . . . . . . . . . . . . . . . . . . . . . . . . . . . . . . . .A-1
A.2 SPI 4-Pin with Chip Select Mode . . . . . . . . . . . . . . . . . . . . . . . . . . . . . . . . . . . . . . . . . . . . . . . . . . . . . . . . . . . . . . . .A-2
ø-iv
KeyStone Architecture Serial Peripheral Interface (SPI) User Guide
SPRUGP2A—March 2012
Submit Documentation Feedback
List of Tables
www.ti.com
List of Tables
Table 1-1
Table 2-1
Table 2-2
Table 2-3
Table 2-4
Table 2-5
Table 3-1
Table 3-2
Table 3-3
Table 3-4
Table 3-5
Table 3-6
Table 3-7
Table 3-8
Table 3-9
Table 3-10
Table 3-11
Table 3-12
Table 3-13
Table 3-14
Table 3-15
Table 3-16
Terminology . . . . . . . . . . . . . . . . . . . . . . . . . . . . . . . . . . . . . . . . . . . . . . . . . . . . . . . . . . . . . . . . . . . . . . . . . . . . . . . . . . . . . . . . . . . . . . . . . . . . 1-2
SPI Pins . . . . . . . . . . . . . . . . . . . . . . . . . . . . . . . . . . . . . . . . . . . . . . . . . . . . . . . . . . . . . . . . . . . . . . . . . . . . . . . . . . . . . . . . . . . . . . . . . . . . . . . . . 2-2
SPI Registers . . . . . . . . . . . . . . . . . . . . . . . . . . . . . . . . . . . . . . . . . . . . . . . . . . . . . . . . . . . . . . . . . . . . . . . . . . . . . . . . . . . . . . . . . . . . . . . . . . . . 2-3
SPI Register Settings Defining Master Modes . . . . . . . . . . . . . . . . . . . . . . . . . . . . . . . . . . . . . . . . . . . . . . . . . . . . . . . . . . . . . . . . . . . . . 2-4
Allowed SPI Register Settings in Master Modes . . . . . . . . . . . . . . . . . . . . . . . . . . . . . . . . . . . . . . . . . . . . . . . . . . . . . . . . . . . . . . . . . . . 2-4
Clocking Modes . . . . . . . . . . . . . . . . . . . . . . . . . . . . . . . . . . . . . . . . . . . . . . . . . . . . . . . . . . . . . . . . . . . . . . . . . . . . . . . . . . . . . . . . . . . . . . . . 2-10
SPI Registers . . . . . . . . . . . . . . . . . . . . . . . . . . . . . . . . . . . . . . . . . . . . . . . . . . . . . . . . . . . . . . . . . . . . . . . . . . . . . . . . . . . . . . . . . . . . . . . . . . . . 3-2
SPI Global Control Register 0 (SPIGCR0) Field Descriptions . . . . . . . . . . . . . . . . . . . . . . . . . . . . . . . . . . . . . . . . . . . . . . . . . . . . . . . . 3-3
SPI Global Control Register 1 (SPIGCR1) Field Descriptions . . . . . . . . . . . . . . . . . . . . . . . . . . . . . . . . . . . . . . . . . . . . . . . . . . . . . . . . 3-4
SPI Interrupt Register (SPIINT0) Field Descriptions . . . . . . . . . . . . . . . . . . . . . . . . . . . . . . . . . . . . . . . . . . . . . . . . . . . . . . . . . . . . . . . . 3-5
SPI Interrupt Level Register (SPILVL) Field Descriptions . . . . . . . . . . . . . . . . . . . . . . . . . . . . . . . . . . . . . . . . . . . . . . . . . . . . . . . . . . . 3-6
SPI Flag Register (SPIFLG) Field Descriptions. . . . . . . . . . . . . . . . . . . . . . . . . . . . . . . . . . . . . . . . . . . . . . . . . . . . . . . . . . . . . . . . . . . . . . 3-7
SPI Pin Control Register 0 (SPIPC0) Field Descriptions . . . . . . . . . . . . . . . . . . . . . . . . . . . . . . . . . . . . . . . . . . . . . . . . . . . . . . . . . . . . . 3-9
SPI Data Register 0 (SPIDAT0) Field Descriptions . . . . . . . . . . . . . . . . . . . . . . . . . . . . . . . . . . . . . . . . . . . . . . . . . . . . . . . . . . . . . . . . . 3-10
SPI Data Register 1 (SPIDAT1) Field Descriptions . . . . . . . . . . . . . . . . . . . . . . . . . . . . . . . . . . . . . . . . . . . . . . . . . . . . . . . . . . . . . . . . . 3-11
SPI Buffer Register (SPIBUF) Field Descriptions. . . . . . . . . . . . . . . . . . . . . . . . . . . . . . . . . . . . . . . . . . . . . . . . . . . . . . . . . . . . . . . . . . . 3-12
SPI Emulation Register (SPIEMU) Field Descriptions . . . . . . . . . . . . . . . . . . . . . . . . . . . . . . . . . . . . . . . . . . . . . . . . . . . . . . . . . . . . . . 3-13
SPI Delay Register (SPIDELAY) Field Descriptions . . . . . . . . . . . . . . . . . . . . . . . . . . . . . . . . . . . . . . . . . . . . . . . . . . . . . . . . . . . . . . . . 3-14
SPI Default Chip Select Register (SPIDEF) Field Descriptions . . . . . . . . . . . . . . . . . . . . . . . . . . . . . . . . . . . . . . . . . . . . . . . . . . . . . . 3-16
SPI Data Format Register (SPIFMTn) Field Descriptions . . . . . . . . . . . . . . . . . . . . . . . . . . . . . . . . . . . . . . . . . . . . . . . . . . . . . . . . . . . 3-17
SPI Interrupt Vector Register 0 (INTVEC0) Field Descriptions. . . . . . . . . . . . . . . . . . . . . . . . . . . . . . . . . . . . . . . . . . . . . . . . . . . . . . 3-18
SPI Interrupt Vector Register 1 (INTVEC1) Field Descriptions. . . . . . . . . . . . . . . . . . . . . . . . . . . . . . . . . . . . . . . . . . . . . . . . . . . . . . 3-19
SPRUGP2A—March 2012
Submit Documentation Feedback
KeyStone Architecture Serial Peripheral Interface (SPI) User Guide
ø-v
List of Figures
www.ti.com
List of Figures
Figure 1-1
Figure 2-1
Figure 2-2
Figure 2-3
Figure 2-4
Figure 2-5
Figure 2-6
Figure 2-7
Figure 2-8
Figure 2-9
Figure 3-1
Figure 3-2
Figure 3-3
Figure 3-4
Figure 3-5
Figure 3-6
Figure 3-7
Figure 3-8
Figure 3-9
Figure 3-10
Figure 3-11
Figure 3-12
Figure 3-13
Figure 3-14
Figure 3-15
Figure 3-16
Figure 3-17
Figure A-1
Figure A-2
ø-vi
SPI Block Diagram . . . . . . . . . . . . . . . . . . . . . . . . . . . . . . . . . . . . . . . . . . . . . . . . . . . . . . . . . . . . . . . . . . . . . . . . . . . . . . . . . . . . . . . . . . . . . . . 1-3
SPI 3-Pin Option . . . . . . . . . . . . . . . . . . . . . . . . . . . . . . . . . . . . . . . . . . . . . . . . . . . . . . . . . . . . . . . . . . . . . . . . . . . . . . . . . . . . . . . . . . . . . . . . . 2-7
SPI 4-Pin Option with SPISCS[n] . . . . . . . . . . . . . . . . . . . . . . . . . . . . . . . . . . . . . . . . . . . . . . . . . . . . . . . . . . . . . . . . . . . . . . . . . . . . . . . . . . 2-8
Format for Transmitting 12-Bit Word . . . . . . . . . . . . . . . . . . . . . . . . . . . . . . . . . . . . . . . . . . . . . . . . . . . . . . . . . . . . . . . . . . . . . . . . . . . . . 2-9
Format for 10-Bit Received Word. . . . . . . . . . . . . . . . . . . . . . . . . . . . . . . . . . . . . . . . . . . . . . . . . . . . . . . . . . . . . . . . . . . . . . . . . . . . . . . . . 2-9
Clock Mode with POLARITY = 0 and PHASE = 0 (A) . . . . . . . . . . . . . . . . . . . . . . . . . . . . . . . . . . . . . . . . . . . . . . . . . . . . . . . . . . . . . . . 2-10
Clock Mode with POLARITY = 0 and PHASE = 1 (A) . . . . . . . . . . . . . . . . . . . . . . . . . . . . . . . . . . . . . . . . . . . . . . . . . . . . . . . . . . . . . . . 2-11
Clock Mode with POLARITY = 1 and PHASE = 0 (A) . . . . . . . . . . . . . . . . . . . . . . . . . . . . . . . . . . . . . . . . . . . . . . . . . . . . . . . . . . . . . . . 2-11
Clock Mode with POLARITY = 1 and PHASE = 1 (A) . . . . . . . . . . . . . . . . . . . . . . . . . . . . . . . . . . . . . . . . . . . . . . . . . . . . . . . . . . . . . . . 2-11
SPI Data Transfer, Five Bits per Character (4-Pin with Chip Select Option) . . . . . . . . . . . . . . . . . . . . . . . . . . . . . . . . . . . . . . . . . 2-12
SPI Global Control Register 0 (SPIGCR0) . . . . . . . . . . . . . . . . . . . . . . . . . . . . . . . . . . . . . . . . . . . . . . . . . . . . . . . . . . . . . . . . . . . . . . . . . . 3-3
SPI Global Control Register 1 (SPIGCR1) . . . . . . . . . . . . . . . . . . . . . . . . . . . . . . . . . . . . . . . . . . . . . . . . . . . . . . . . . . . . . . . . . . . . . . . . . . 3-4
SPI Interrupt Register (SPIINT0). . . . . . . . . . . . . . . . . . . . . . . . . . . . . . . . . . . . . . . . . . . . . . . . . . . . . . . . . . . . . . . . . . . . . . . . . . . . . . . . . . . 3-5
SPI Interrupt Level Register (SPILVL). . . . . . . . . . . . . . . . . . . . . . . . . . . . . . . . . . . . . . . . . . . . . . . . . . . . . . . . . . . . . . . . . . . . . . . . . . . . . . 3-6
SPI Flag Register (SPIFLG) . . . . . . . . . . . . . . . . . . . . . . . . . . . . . . . . . . . . . . . . . . . . . . . . . . . . . . . . . . . . . . . . . . . . . . . . . . . . . . . . . . . . . . . . 3-7
SPI Pin Control Register 0 (SPIPC0) . . . . . . . . . . . . . . . . . . . . . . . . . . . . . . . . . . . . . . . . . . . . . . . . . . . . . . . . . . . . . . . . . . . . . . . . . . . . . . . 3-9
SPI Data Register 0 (SPIDAT0) . . . . . . . . . . . . . . . . . . . . . . . . . . . . . . . . . . . . . . . . . . . . . . . . . . . . . . . . . . . . . . . . . . . . . . . . . . . . . . . . . . . 3-10
SPI Data Register 1 (SPIDAT1) . . . . . . . . . . . . . . . . . . . . . . . . . . . . . . . . . . . . . . . . . . . . . . . . . . . . . . . . . . . . . . . . . . . . . . . . . . . . . . . . . . . 3-11
SPI Buffer Register (SPIBUF) . . . . . . . . . . . . . . . . . . . . . . . . . . . . . . . . . . . . . . . . . . . . . . . . . . . . . . . . . . . . . . . . . . . . . . . . . . . . . . . . . . . . . 3-12
SPI Emulation Register (SPIEMU) . . . . . . . . . . . . . . . . . . . . . . . . . . . . . . . . . . . . . . . . . . . . . . . . . . . . . . . . . . . . . . . . . . . . . . . . . . . . . . . . 3-13
SPI Delay Register (SPIDELAY). . . . . . . . . . . . . . . . . . . . . . . . . . . . . . . . . . . . . . . . . . . . . . . . . . . . . . . . . . . . . . . . . . . . . . . . . . . . . . . . . . . 3-14
Example: tC2TDELAY = 8 SPI Module Clock Cycles . . . . . . . . . . . . . . . . . . . . . . . . . . . . . . . . . . . . . . . . . . . . . . . . . . . . . . . . . . . . . . . . . 3-14
Example: tT2CDELAY = 4 SPI Module Clock Cycles . . . . . . . . . . . . . . . . . . . . . . . . . . . . . . . . . . . . . . . . . . . . . . . . . . . . . . . . . . . . . . . . . 3-15
SPI Default Chip Select Register (SPIDEF) . . . . . . . . . . . . . . . . . . . . . . . . . . . . . . . . . . . . . . . . . . . . . . . . . . . . . . . . . . . . . . . . . . . . . . . . 3-16
SPI Data Format Register (SPIFMTn) . . . . . . . . . . . . . . . . . . . . . . . . . . . . . . . . . . . . . . . . . . . . . . . . . . . . . . . . . . . . . . . . . . . . . . . . . . . . . 3-17
SPI Interrupt Vector Register 0 (INTVEC0) . . . . . . . . . . . . . . . . . . . . . . . . . . . . . . . . . . . . . . . . . . . . . . . . . . . . . . . . . . . . . . . . . . . . . . . . 3-18
SPI Interrupt Vector Register 1 (INTVEC1) . . . . . . . . . . . . . . . . . . . . . . . . . . . . . . . . . . . . . . . . . . . . . . . . . . . . . . . . . . . . . . . . . . . . . . . . 3-19
SPI 3-Pin Master Mode with WDELAY. . . . . . . . . . . . . . . . . . . . . . . . . . . . . . . . . . . . . . . . . . . . . . . . . . . . . . . . . . . . . . . . . . . . . . . . . . . . . A-1
SPI 4-Pin with SPISCS[n] Mode with T2CDELAY, WDELAY, and C2TDELAY . . . . . . . . . . . . . . . . . . . . . . . . . . . . . . . . . . . . . . . . . . A-2
KeyStone Architecture Serial Peripheral Interface (SPI) User Guide
SPRUGP2A—March 2012
Submit Documentation Feedback
Preface
About This Manual
This document describes the features, architecture and registers associated with the
serial peripheral interface (SPI) module.
Notational Conventions
This document uses the following conventions:
• Commands and keywords are in boldface font.
• Arguments for which you supply values are in italic font.
• Terminal sessions and information the system displays are in screen font.
• Information you must enter is in boldface screen font.
• Elements in square brackets ([ ]) are optional.
Notes use the following conventions:
Note—Means reader take note. Notes contain helpful suggestions or references
to material not covered in the publication.
The information in a caution or a warning is provided for your protection. Please read
each caution and warning carefully.
CAUTION—Indicates the possibility of service interruption if precautions are
not taken.
WARNING—Indicates the possibility of damage to equipment if precautions are
not taken.
SPRUGP2A—March 2012
Submit Documentation Feedback
KeyStone Architecture Serial Peripheral Interface (SPI) User Guide
ø-vii
Preface
www.ti.com
Related Documentation from Texas Instruments
C66x CorePac User Guide
SPRUGW0
C66x CPU and Instruction Set Reference Guide
SPRUGH7
Enhanced Direct Memory Access 3 (EDMA3) for KeyStone Devices User Guide
SPRUGS5
Trademarks
TMS320C66x and C66x, VLYNQ, Packet Accelerator, are trademarks of Texas Instruments Incorporated.
All other brand names and trademarks mentioned in this document are the property of Texas Instruments
Incorporated or their respective owners, as applicable.
ø-viii
KeyStone Architecture Serial Peripheral Interface (SPI) User Guide
SPRUGP2A—March 2012
Submit Documentation Feedback
Chapter 1
Introduction
This document describes the serial peripheral interface (SPI) module.
1.1
1.3
1.4
1.5
SPRUGP2A—March 2012
Submit Documentation Feedback
"Purpose of the Peripheral" on page 1-2
"Features" on page 1-2
"Functional Block Diagram" on page 1-3
"Industry Standard(s) Compliance Statement " on page 1-3
KeyStone Architecture Serial Peripheral Interface (SPI) User Guide
1-1
1.1 Purpose of the Peripheral
Chapter 1—Introduction
www.ti.com
1.1 Purpose of the Peripheral
The SPI is a high-speed synchronous serial input/output port that allows a serial bit
stream of programmed length (2 to 16 bits) to be shifted into and out of the device at a
programmed bit-transfer rate. The SPI is normally used for communication between
the device and external peripherals. Typical applications include interface to external
I/O or peripheral expansion via devices such as shift registers, display drivers, SPI
EPROMS, and analog-to-digital converters.
1.2 Terminology Used in This Document
Table 1-1 defines the important acronyms used in this document.
Table 1-1
Terminology
Acronym
Definition
DMA
Direct Memory Access
LSB
Least significant bit
MSB
Most significant bit
SPI
Serial peripheral interface
End of Table 1-1
1.3 Features
The SPI has the following features:
• 16-bit shift register
• 16-bit Receive buffer register (SPIBUF) and 16-bit Receive buffer emulation alias
register (SPIEMU)
• 16-bit Transmit data register (SPIDAT0) and 16-bit Transmit data and format
selection register (SPIDAT1)
• 8-bit baud clock generator
• Serial clock (SPICLK) I/O pin
• Slave in, master out (SPISIMO) I/O pin
• Slave out, master in (SPISOMI) I/O pin
• Multiple slave chip select (SPISCS[n]) I/O pins (4 pin mode only)
• Programmable SPI clock frequency range
• Programmable character length (2 to 16 bits)
• Programmable clock phase (delay or no delay)
• Programmable clock polarity (high or low)
• Interrupt capability
• DMA support (read/write synchronization events)
• Up to 66 MHz operation
Note—Please see the device-specific data manual for the number of slave chip
select pins (SPISCS[n]) supported.
1-2
KeyStone Architecture Serial Peripheral Interface (SPI) User Guide
SPRUGP2A—March 2012
Submit Documentation Feedback
1.4 Functional Block Diagram
Chapter 1—Introduction
www.ti.com
The SPI allows software to program the following options:
• SPICLK frequency (SPI module clock/2 through SPI module clock/256)
• 3-pin and 4-pin options
• Character length (2 to 16 bits) and shift direction (MSB/LSB first)
• Clock phase (delay or no delay) and polarity (high or low)
• Delay between transmissions in master mode.
• Chip select setup and hold times in master mode
• Chip select hold in master mode
The SPI does not support the following features:
• Multibuffer mode
• Parallel mode or parity
• SPIENA pin
• SPI slave mode
• GPIO mode
1.4 Functional Block Diagram
Figure 1-1 shows the SPI block diagram.
Figure 1-1
SPI Block Diagram
SPISIMO
SPISOMI
MUX
TX Shift Reg
TXBUF
SPIDAT1
CPU/DMA Write
RX Shift Reg
RXBUF
SPIBUF
CPU/DMA Read
(See Note B)
MUX
SPI Module Clock
SPISCS[n]
Mode
and Clock
Generation
Logic
SPICLK
Charlen
(A)
Prescale
Polarity
Phase
(A)
(A)
SPINT1 (Interrupt)
SPIREVT (EDMA Event)
(A)
CLKMOD
SPINT0 (Interrupt)
SPIXEVT (EDMA Event)
(A)
(A) Indicates the log controlled by SPI register bits.
(B) Solid line represents data flow for SPI master mode.
1.5 Industry Standard(s) Compliance Statement
The programmable configuration capability of the SPI allows it to gluelessly interface
to a variety of SPI format devices. The SPI does not conform to a specific industry
standard.
SPRUGP2A—March 2012
Submit Documentation Feedback
KeyStone Architecture Serial Peripheral Interface (SPI) User Guide
1-3
1.5 Industry Standard(s) Compliance Statement
Chapter 1—Introduction
1-4
KeyStone Architecture Serial Peripheral Interface (SPI) User Guide
www.ti.com
SPRUGP2A—March 2012
Submit Documentation Feedback
Chapter 2
Peripheral Architecture
This chapter describes the SPI operation modes. It gives an overview of SPI operation
and then provides details on the 3-pin and 4-pin options, as well as more specific details
on the supported data formats.
2.1
2.2
2.3
2.4
2.5
2.6
2.7
2.8
2.9
2.10
2.11
2.12
2.13
2.14
2.15
SPRUGP2A—March 2012
Submit Documentation Feedback
"Clock" on page 2-2
"Signal Descriptions" on page 2-2
"Operation Modes" on page 2-2
"Programmable Registers" on page 2-3
"Master Mode Settings" on page 2-4
"SPI Operation: 3-Pin Mode" on page 2-7
"SPI Operation: 4-Pin with Chip Select Mode" on page 2-8
"Data Formats" on page 2-9
"Interrupt Support" on page 2-13
"DMA Events Support" on page 2-13
"Robustness Features " on page 2-14
"Reset Considerations " on page 2-14
"Power Management " on page 2-15
"Emulation Considerations " on page 2-15
"Initialization" on page 2-16
KeyStone Architecture Serial Peripheral Interface (SPI) User Guide
2-1
2.1 Clock
Chapter 2—Peripheral Architecture
www.ti.com
2.1 Clock
The SPI clock (SPICLK) is derived from the SPI module clock. The maximum clock bit
rate supported is SPI module clock/2, as determined by the PRESCALE field in the SPI
data format register n (SPIFMTn). The SPICLK frequency is calculated as:
SPICLK frequency = [SPI module clock] / [SPIFMTn.PRESCALE + 1]
When SPIFMTn.PRESCALE is cleared to 0, the SPICLK frequency defaults to SPI
module clock/2.
2.2 Signal Descriptions
Table 2-1 shows the SPI pins used to interface to external devices.
Table 2-1
SPI Pins
Pin
Type
Function
SPISIMO
Output
Serial data output in master mode
SPISOMI
Input
Serial data input in master mode
SPICLK
Output
Serial clock output in master mode
Output
Slave chip select output in master mode
SPISCS[n]
1
End of Table 2-1
1. The value n indicates the SPI pins available; that is, SPISCS[0], SPISCS[1], etc. See the device-specific data manual to determine
how many SPI pins are available.
2.3 Operation Modes
The SPI operates in master mode. The SPI bus master is the device that drives the
SPICLK, SPISIMO, and optionally the SPISCS[n] signals, and therefore initiates SPI
bus transfers. The CLKMOD and MASTER bits in the SPI global control register 1
(SPIGCR1) selects master mode. In the master mode, the SPI supports two options:
• 3-pin option
• 4-pin with chip select option
The 3-pin option is the basic clock, data in, and data out SPI interface and uses the
SPICLK, SPISIMO, and SPISOMI pins. The 4-pin with chip select option adds the
SPISCS[n] pin that is used to support multiple SPI slave devices on a single SPI bus.
2-2
KeyStone Architecture Serial Peripheral Interface (SPI) User Guide
SPRUGP2A—March 2012
Submit Documentation Feedback
2.4 Programmable Registers
Chapter 2—Peripheral Architecture
www.ti.com
2.4 Programmable Registers
A general representation of the SPI programmable registers is shown in Table 2-2. For
details on registers, see Chapter 3.
Table 2-2
SPI Registers
Offset Address 1
Acronym
Name
Description
Section
0h
SPIGCR0
Global control register 0
Contains the software reset bit for the module
Section 3.1
4h
SPIGCR1
Global control register 1
Controls basic configurations of the module
Section 3.2
8h
SPIINT0
Interrupt register
Enable bits for interrupts, error, DMA and other functionality.
Section 3.3
Ch
SPILVL
Level register
SPI interrupt levels are set in this register.
Section 3.4
10h
SPIFLG
Flag register
Shows the status of several events during the operation.
Section 3.5
14h
SPIPC0
Pin control register 0
Determines if pins operate as general I/O or SPI functional pin.
Section 3.6
38h
SPIDAT0
Transmit data register 0
Transmit data register
Section 3.7
3Ch
SPIDAT1
Transmit data register 1
Transmit data with format selection register
Section 3.8
40h
SPIBUF
Receive buffer register
Holds received word
Section 3.9
44h
SPIEMU
Receive buffer emulation
Mirror of SPIBUF. Read does not clear flags register.
Section 3.10
48h
SPIDELAY
Delay register
Sets SPISCS[n] mode, SPISCS[n] pre-transfer / post-transfer delay time.
Section 3.11
4Ch
SPIDEF
Chip select default register In SPISCS[n] decoded mode only: sets high low/active SPISCS[n] signal. Section 3.12
50h
SPIFMT0
Format 0 register
Configuration of data word format 0.
Section 3.13
54h
SPIFMT1
Format 1 register
Configuration of data word format 1.
Section 3.13
58h
SPIFMT2
Format 2 register
Configuration of data word format 2.
Section 3.13
5Ch
SPIFMT3
Format 3 register
Configuration of data word format 3.
Section 3.13
60h
INTVEC0
Interrupt vector register 0
Interrupt vector for line INT0.
Section 3.14
64h
INTVEC1
Interrupt vector register 1
Interrupt vector for line INT1.
Section 3.15
End of Table 2-2
1. The actual address of these registers is device specific and CPU specific. See the device-specific data manual to verify the SPI register addresses.
SPRUGP2A—March 2012
Submit Documentation Feedback
KeyStone Architecture Serial Peripheral Interface (SPI) User Guide
2-3
2.5 Master Mode Settings
Chapter 2—Peripheral Architecture
www.ti.com
2.5 Master Mode Settings
The two master mode options are defined by the configuration bit settings listed in
Table 2-3. Other configuration bits may take any value in the range listed in Table 2-4.
The values listed in Table 2-3 and Table 2-4 should not be changed while the ENABLE
bit in the SPI global control register 1 (SPIGCR1) is set to 1. Note that in certain cases
the allowed values may still be ignored. For example, Table 2-4 indicates that
SPIDELAY may take a range of values in Master 3-pin mode; however, SPIDELAY has
no effect in Master 3-pin mode. For complete details on each mode, see the following
sections that explain the SPI operation for each of the master modes.
Table 2-3
SPI Register Settings Defining Master Modes
Register
Bit(s)
Master 3-pin
Master 4-pin Chip Select
SPIGCR0
RESET
1
1
SPIGCR1
ENABLE
1
1
SPIGCR1
LOOPBACK
0
0
SPIGCR1
CLKMOD
1
1
SPIGCR1
MASTER
1
1
SPIPC0
SOMIFUN
1
1
SPIPC0
SIMOFUN
1
1
SPIPC0
CLKFUN
1
1
SPIPC0
ENAFUN
0
0
SPIPC0
SCS0FUN
0
1
End of Table 2-3
Table 2-4
Allowed SPI Register Settings in Master Modes
Register
Bit(s)
Master 3-pin
Master 4-pin Chip Select
SPIINT0
ENABLEHIGHZ
0,1
0,1
SPIFMTn
WDELAY
0 to 3Fh
0 to 3Fh
SPIFMTn
PARPOL
0,1
0,1
SPIFMTn
PARENA
0,1
0,1
SPIFMTn
WAITENA
0
0
SPIFMTn
SHIFTDIR
0,1
0,1
SPIFMTn
DISCSTIMERS
0,1
0,1
SPIFMTn
POLARITY
0,1
0,1
SPIFMTn
PHASE
0,1
0,1
SPIFMTn
PRESCALE
0 to FFh
0 to FFh
SPIFMTn
CHARLEN
2 to 10h
2 to 10h
SPIDELAY
C2TDELAY
0 to FFh
0 to FFh
SPIDELAY
T2CDELAY
0 to FFh
0 to FFh
SPIDELAY
T2EDELAY
0 to FFh
0 to FFh
SPIDELAY
C2EDELAY
0 to FFh
0 to FFh
End of Table 2-4
2-4
KeyStone Architecture Serial Peripheral Interface (SPI) User Guide
SPRUGP2A—March 2012
Submit Documentation Feedback
2.5 Master Mode Settings
Chapter 2—Peripheral Architecture
www.ti.com
2.5.1 Master Mode Timing Options
The SPI in master mode supports several options to modify the timing of its generation
of the chip select signal (SPISCS[n]). This allows the SPI to support the timing
requirements of various slave devices without adding additional overhead to the CPU
by generating the appropriate delays automatically.
2.5.1.1 Chip Select Setup Time
The master can be configured to provide a (slow) slave device a certain chip select setup
time to the first edge on SPICLK. This delay is controlled by the C2TDELAY field in
the SPI delay register (SPIDELAY) and can be configured between 2 and 257 SPI
module clock cycles. The C2TDELAY is applicable only in 4-pin with chip select mode.
The C2TDELAY begins when the SPI master asserts SPISCS[n]. The C2T delay period
is specified by:
Maximum duration of C2TDELAY period = SPIDELAY.C2TDELAY + 2 (SPI module clock cycles)
The previous value of the CSHOLD bit in the SPI transmit data register (SPIDAT1)
must be cleared to 0 for the C2T delay to be enabled.
Note—If the SPIDAT1.CSHOLD bit is set within the control field, the current
hold time and the following setup time will not be applied in between
transaction.
2.5.1.2 Chip Select Hold Time
The master can be configured to provide a (slow) slave device a certain chip select hold
time after the last edge on SPICLK. This delay is controlled by the T2CDELAY bit in
the SPI delay register (SPIDELAY) and can be configured between for 1 and 256 SPI
module clock cycles. The T2CDELAY is applicable only in 4-pin with chip select mode.
The T2CDELAY begins after the data shifting period ends. The T2C delay period is
specified by:
Maximum duration of T2CDELAY period = SPIDELAY.T2CDELAY + 1 (SPI module clock cycle)
If the PHASE bit in the SPI data format register n (SPIFMTn) is 0, then the T2CDELAY
period lasts for an additional ½ SPICLK time over that specified by the above equation.
The current value of the CSHOLD bit in the SPI transmit data register (SPIDAT1) must
be cleared to 0 for T2C delay to be enabled.
Note—If the SPIDAT1.CSHOLD bit is set within the control field, the current
hold time and the following setup time will not be applied in between
transaction.
SPRUGP2A—March 2012
Submit Documentation Feedback
KeyStone Architecture Serial Peripheral Interface (SPI) User Guide
2-5
2.5 Master Mode Settings
Chapter 2—Peripheral Architecture
www.ti.com
2.5.1.3 Automatic Delay Between Transfers
The SPI master can automatically insert a delay of between 2 and 65 SPI module clock
cycles between transmissions. This delay is controlled by the WDELAY field in the SPI
data format register n (SPIFMTn) and is enabled by setting the WDEL bit in the SPI
transmit data register (SPIDAT1) to 1. The WDELAY period begins when the
T2EDELAY period terminates (if T2E delay period is enabled) or when
the T2CDELAY period terminates (if T2E delay period was disabled and T2C delay
period was enabled) or when the master deasserts SPISCS[n] (if T2E and T2C delay
periods are disabled). If a transfer is initiated by writing a 32-bit value to SPIDAT1,
then the new values of SPIDAT1.WDEL and SPIFMTn.WDELAY are used; otherwise,
the old values of SPIDAT1.WDEL and SPIFMTn.WDELAY are used. The WDELAY
delay period is specified by:
Maximum duration of WDELAY period = SPIFMTn.WDELAY + 2 (SPI module clock cycles)
2.5.1.4 Chip Select Hold Option
There are slave devices available that require the chip select signal to be held
continuously active during several consecutive data word transfers. Other slave devices
require the chip select signal to be deactivated between consecutive data word transfers.
The SPI can support both types of slave devices. The CSHOLD bit in the SPI transmit
data register (SPIDAT1) selects between the two options.
If the chip select hold option is enabled, the chip select will not toggle between two
consecutive accesses. Therefore, the SPIDELAY.T2CDELAY of the first transfer and
the SPIDELAY.C2TDELAY of the second transfer will not be applied. However, the
wait delay could still be applied between the two transactions, if the WDEL bit in
SPIDAT1 is set to 1.
When the CSHOLD bit is 0, during the data transmission, the value of the chip select
number field (CSNR[n:0]) in the SPIDAT1 register is put on the chip select SPISCS[n]
to SPISCS[0] pins. When the transmission finishes, the chip select default pattern
(CSDEF[n:0]) is put on the SPISCS[n] to SPISCS[0] pins.
The current and previous values of the CSHOLD bit are retained. Although the current
value of the CSHOLD bit is initialized to 0 when the RESET bit in the SPI global control
register 0 (SPIGCR0) is cleared to 0, the previous value of the CSHOLD bit is not
initialized. The previous value of the CSHOLD bit must be explicitly initialized by
writing twice to the CSHOLD bit.
2-6
KeyStone Architecture Serial Peripheral Interface (SPI) User Guide
SPRUGP2A—March 2012
Submit Documentation Feedback
2.6 SPI Operation: 3-Pin Mode
Chapter 2—Peripheral Architecture
www.ti.com
2.6 SPI Operation: 3-Pin Mode
Note—If only unidirectional communication is required, the SPICLK pin and
the two data pins (SPISOMI and SPISIMO) must all be configured as
functional pins. A 2-pin unidirectional mode is not supported.
The SPI 3-pin mode uses only the clock (SPICLK) and data (SPISOMI and SPISIMO)
pins for bidirectional communication between master and slave devices. Figure 2-1
shows the basic 3-pin SPI option.
Figure 2-1
SPI 3-Pin Option
Master
(MASTER = 1; CLKMOD = 1)
SPISIMO
CPU/DMA
Write
SPIDAT1
SPISOMI
CPU/DMA
Read
SPIBUF
SPICLK
Slave
(MASTER = 0; CLKMOD = 0)
SPISIMO
SPIBUF
CPU/DMA
Read
SPISOMI
SPIDAT1
CPU/DMA
Write
SPICLK
Write to SPIDAT1
SPICLK
SPISIMO
SPISOMI
To select the 3-pin SPI option, the SPICLK, SPISOMI, and SPISIMO pins should be
configured as functional pins by configuring the SPI pin control register 0 (SPIPC0).
The SPI operates in master mode only. The CLKMOD and MASTER bits in the SPI
global control register 1 (SPIGCR1) must be programmed to 1 to configure the SPI for
master mode. The SPI bus master is the device that drives the SPICLK signal and
initiates SPI bus transfers. In SPI master mode, the SPISOMI pin output buffer is in a
high-impedance state and the SPICLK and the SPISIMO pin output buffer is enabled.
In master mode with the 3-pin option, the DSP writes transmit data to the SPI transmit
data registers (SPIDAT0[15:0] or SPIDAT1[15:0]). This initiates a transfer. A series of
clocks pulses will be driven out on the SPICLK pin to complete the transfer. Each clock
pulse on the SPICLK pin causes the simultaneous transfer (in both directions) of one
bit by both the master and slave SPI devices. CPU writes to the configuration bits in
SPIDAT1 (not writing to SPIDAT1[15:0]) do not result in a new transfer. When the
selected number of bits has been transmitted, the received data is transferred to the SPI
receive buffer register (SPIBUF) for the CPU to read. Data is stored right-justified in
SPIBUF.
Note—Either SPIDAT0 or SPIDAT1 can be used on both master and slaves
sides.
SPRUGP2A—March 2012
Submit Documentation Feedback
KeyStone Architecture Serial Peripheral Interface (SPI) User Guide
2-7
2.7 SPI Operation: 4-Pin with Chip Select Mode
Chapter 2—Peripheral Architecture
www.ti.com
2.7 SPI Operation: 4-Pin with Chip Select Mode
The 4-pin with chip select option is a superset of the 3-pin option and uses the chip
select (SPISCS[n]) pin in addition to the clock (SPICLK) and data (SPISOMI and
SPISIMO) pins. Figure 2-2 shows the SPI 4-pin chip select option.
Figure 2-2
SPI 4-Pin Option with SPISCS[n]
Master
(MASTER = 1; CLKMOD = 1)
SPISIMO
CPU/DMA
Write
SPIDAT1
CPU/DMA
Read
SPIBUF
SPISOMI
SPICLK
SPISCS[n]
Slave
(MASTER = 0; CLKMOD = 0)
SPISIMO
SPIBUF
CPU/DMA
Read
SPISOMI
SPIDAT1
CPU/DMA
Write
SPICLK
SPISCS[n]
Write to SPIDAT1
SPISCS[n]
SPICLK
SPISIMO
SPISOMI
Note—Either SPIDAT0 or SPIDAT1 can be used on both master and slaves
sides.
To select the 4-pin with chip select option, the SPICLK, SPISOMI, SPISIMO, and
SPISCS[n] pins should be configured as functional pins by configuring the SPI pin
control register 0 (SPIPC0).
In SPI master mode, the SPISOMI pin output buffer is in a high-impedance state and
the SPICLK, SPISIMO, and SPISCS[n] pin output buffer is enabled.
In master mode, the SPISCS[n] pin functions as an output, and toggles when a specific
slave device is selected. However, this is most useful on devices that support multiple
SPISCS[n] pins. The SPI supports only a single SPISCS[n] and so the usefulness of this
pin in master mode is limited. In practice, general-purpose I/O pins are needed to
support multiple slave device chip selects.
However, one reason to use the SPISCS[n] pin as a functional pin for the SPI master is
to take advantage of the timing parameters that can be set using the SPI delay register
(SPIDELAY). The SPIDELAY allows delays to be added automatically so that the slave
timing requirements between clock and chip select may be more easily met. Another
reason would be to make use of the error detection built into the SPI.
2-8
KeyStone Architecture Serial Peripheral Interface (SPI) User Guide
SPRUGP2A—March 2012
Submit Documentation Feedback
2.8 Data Formats
Chapter 2—Peripheral Architecture
www.ti.com
2.8 Data Formats
The SPI provides the capability to configure four independent data formats. These
formats are configured by programming the corresponding SPI data format registers
(SPIFMTn). In each data format, the following characteristics of the SPI operation are
selected:
• Character length from 2 to 16 bits: The character length is configured by the
SPIFMTn.CHARLEN field.
• Shift direction (MSB first or LSB first): The shift out direction is configured by the
SPIFMTn.SHIFTDIR bit.
• Clock polarity: The clock polarity is configured by the SPIFMTn.POLARITY bit.
• Clock phase: The clock phase is configured by the SPIFMTn.PHASE bit.
The data format is chosen on each transaction. Transmit data is written to the SPI
transmit data register 1 (SPIDAT1) and in the same write the data word format select
(DFSEL) bit in SPIDAT1 indicates which data format is to be used for the next
transaction. Alternatively, the data format can be configured once and applies to all
transactions that follow until the data format is changed.
2.8.1 Character Length
The character length is configured by the SPIFMTn.CHARLEN bit. Legal values are 2
bits (2h) to 16 bits (10h). The character length is independently configured for each of
the four data formats; and it must be programmed in the master mode.
Transmit data is written to SPIDAT1. The transmit data must be written right-justified
irrespective of the character length. The SPI automatically sends out the data correctly
based on the chosen data format.
Figure 2-3 shows how a 12-bit word (EC9h) must be written to the transmit buffer in
order to be transmitted correctly.
Figure 2-3
Format for Transmitting 12-Bit Word
D15
D14
D13
D12
D11
D10
D9
D8
D7
D6
D5
D4
D3
D2
D1
D0
x
x
x
x
1
1
1
0
1
1
0
0
1
0
0
1
The data received in SPIBUF is right-justified irrespective of the character length and
is padded with 0s when character length is less than 16.
Figure 2-4 shows how a 10-bit word (3A2h) is stored in the buffer once it is received.
Figure 2-4
Format for 10-Bit Received Word
D15
D14
D13
D12
D11
D10
D9
D8
D7
D6
D5
D4
D3
D2
D1
D0
0
0
0
0
0
0
1
1
1
0
1
0
0
0
1
0
SPRUGP2A—March 2012
Submit Documentation Feedback
KeyStone Architecture Serial Peripheral Interface (SPI) User Guide
2-9
2.8 Data Formats
Chapter 2—Peripheral Architecture
www.ti.com
2.8.2 Shift Direction
The shift out direction is configured as most-significant bit (MSB) first or least
significant bit (LSB) first. The SPI supports automatic right-alignment of receive data
independent of shift direction and data word length. Transmit data has to be written
right-aligned into the SPI and the internal shift register will sort out according to
selected shift direction and data word length for correct transfer.
The shift out direction is selected by the SPIFMTn.SHIFTDIR bit. The shift out
direction is independently configured for each of the four data formats.
• When SPIFMTn.SHIFTDIR is 0, the transmit data is shifted out MSB first.
• When SPIFMTn.SHIFTDIR is 1, the transmit data is shifted out LSB first.
2.8.3 Clock Phase and Polarity
The SPI provides the flexibility to program four different clock mode combinations
that SPICLK may operate, enabling a choice of the clock phase (delay or no delay) and
the clock polarity (rising edge or falling edge). When operating with PHASE active, the
SPI makes the first bit of data available after SPIDAT1 is written and before the first
edge of SPICLK. The data input and output edges depend on the values of both the
POLARITY and PHASE bits as shown in Table 2-5.
Table 2-5
POLARITY
Clocking Modes
PHASE
Action
0
0
Data is output on the rising edge of SPICLK. Input data is latched on the falling edge.
0
1
Data is output one half-cycle before the first rising edge of SPICLK and on subsequent
falling edges. Input data is latched on the rising edge of SPICLK.
1
0
Data is output on the falling edge of SPICLK. Input data is latched on the rising edge.
1
1
Data is output one half-cycle before the first falling edge of SPICLK and on
subsequent rising edges. Input data is latched on the falling edge of SPICLK.
End of Table 2-5
Figure 2-5 to Figure 2-8 show the four possible signals of SPICLK corresponding to
each mode. Having four signal options allows the SPI to interface with different types
of serial devices. Also shown are the SPICLK control bit polarity and phase values
corresponding to each signal.
Figure 2-5
Clock Mode with POLARITY = 0 and PHASE = 0 (A)
Clock Polarity = 0, Clock Phase = 0
Write SPIDAT
SPICLK
2
1
3
4
5
6
7
8
SPISIMO
MSB
D6
D5
D4
D3
D2
D1
LSB
SPISOMI
D7
D6
D5
D4
D3
D2
D1
D0
Sample in
Reception
(A) Clock phase = 0 (SPICLK without delay)
» Data is output on the rising edge of SPICLK.
» Input data is latched on the falling edge of SPICLK.
» A write to the SPIDAT register starts SPICLK.
2-10
KeyStone Architecture Serial Peripheral Interface (SPI) User Guide
SPRUGP2A—March 2012
Submit Documentation Feedback
2.8 Data Formats
Chapter 2—Peripheral Architecture
www.ti.com
Figure 2-6
Clock Mode with POLARITY = 0 and PHASE = 1 (A)
Clock Polarity = 0, Clock Phase = 1
Write SPIDAT
SPICLK
2
1
3
4
5
6
7
8
SPISIMO
MSB
D6
D5
D4
D3
D2
D1
LSB
SPISOMI
D7
D6
D5
D4
D3
D2
D1
D0
Sample in
Reception
(A) Clock phase = 1 (SPICLK with delay)
» Data is output one-half cycle before the first rising of SPICLK and on subsequent falling edges of SPICLK.
» Input data is latched on the rising edge of SPICLK.
Figure 2-7
Clock Mode with POLARITY = 1 and PHASE = 0 (A)
Clock Polarity = 1, Clock Phase = 0
Write SPIDAT
SPICLK
2
1
3
4
5
6
7
8
SPISIMO
MSB
D6
D5
D4
D3
D2
D1
LSB
SPISOMI
D7
D6
D5
D4
D3
D2
D1
D0
Sample in
Reception
(A) Clock phase = 0 (SPICLK without delay)
» Data is output on the falling edge of SPICLK.
» Input data is latched on the rising edge of SPICLK.
» A write to the SPIDAT register starts SPICLK.
Figure 2-8
Clock Mode with POLARITY = 1 and PHASE = 1 (A)
Clock Polarity = 1, Clock Phase = 1
Write SPIDAT
SPICLK
1
2
3
4
5
6
7
8
SPISIMO
MSB
D6
D5
D4
D3
D2
D1
LSB
SPISOMI
D7
D6
D5
D4
D3
D2
D1
D0
Sample in
Reception
(A) Clock phase = 1 (SPICLK with delay)
» Data is output one-half cycle before the first falling edge of SPICLK and on the subsequent rising edges of
SPICLK.
» Input data is latched on the falling edge of SPICLK.
SPRUGP2A—March 2012
Submit Documentation Feedback
KeyStone Architecture Serial Peripheral Interface (SPI) User Guide
2-11
2.8 Data Formats
Chapter 2—Peripheral Architecture
www.ti.com
2.8.4 SPI Data Transfer Example
Figure 2-9 shows an SPI data transfer between two devices using a character length of
five bits.
Figure 2-9
SPI Data Transfer, Five Bits per Character (4-Pin with Chip Select Option)
Master SPI Interrupt Flag
Slave SPI Interrupt Flag
SPISOMI From Slave
7
6
5
4
3
7
6
5
4
3
7
6
5
4
3
7
6
5
4
3
SPISIMO From Master
SPICLK Signal Options:
Clock Polarity = 0
Clock Phase = 0
Clock Polarity = 0
Clock Phase = 1
Clock Polarity = 1
Clock Phase = 0
Clock Polarity = 1
Clock Phase = 1
B
K
SPISCS[n]
2-12
KeyStone Architecture Serial Peripheral Interface (SPI) User Guide
SPRUGP2A—March 2012
Submit Documentation Feedback
2.9 Interrupt Support
Chapter 2—Peripheral Architecture
www.ti.com
2.9 Interrupt Support
The SPI module outputs two interrupts that are routed to the CPU. The SPI interrupt
system is controlled by three registers:
• The SPI interrupt level register (SPILVL) controls which events (INT0 or INT1)
are assigned to each interrupt.
• The SPI interrupt register (SPIINT0) contains bits to selectively enable/disable
each interrupt event.
• The SPI flag register (SPIFLG) contains flags indicating when each of the
interrupt conditions have occurred.
Multiple interrupt sources can be assigned to the same CPU interrupt. To identify the
interrupt source in the SPI peripheral, the CPU reads the SPI flag status register
(SPIFLG) or the INTVECTn code in the SPI interrupt vector register n (INTVECn).
Check the device-specific data manual for details on the exact CPU interrupt numbers
assigned to the SPI interrupts.
2.10 DMA Events Support
If handling the SPI message traffic on a character-by-character basis requires too much
CPU overhead, then the CPU can configure the system DMA to handle the SPI data
transfer.
The SPI module has two DMA synchronization event outputs for receive (REVT) and
transmit (XEVT), allowing DMA transfers to be triggered by SPI read receive and write
transmit events. The SPI module enables DMA requests by enabling the DMA request
enable (DMAREQEN) bit in the SPI interrupt register (SPIINT0).
When a character is to be transmitted the SPI module signals the DMA via the XEVT
signal. The DMA controller then transfers the data from the source buffer into the SPI
transmit data register (SPIDAT1). When a character is received, the SPI module signals
the DMA via the REVT signal. The DMA controller then reads the data from the SPI
receive buffer register (SPIBUF) and transfers it to a destination buffer for ready access.
In most cases, if the DMA is being used to service received data from the SPI, the receive
interrupt enable (RXINTEN) bit in SPIINT0 should be cleared to 0. This prevents the
CPU from responding to the received data in addition to the DMA. For specific SPI
synchronization event number assignments and detailed DMA features, see your
device-specific data manual.
SPRUGP2A—March 2012
Submit Documentation Feedback
KeyStone Architecture Serial Peripheral Interface (SPI) User Guide
2-13
2.11 Robustness Features
Chapter 2—Peripheral Architecture
www.ti.com
2.11 Robustness Features
The SPI module includes many features to make the SPI communication link robust. A
internal loopback test mode can be used to facilitate a power on self test routine.
Additionally, the SPI master continually monitors the bus for faults on its data line. The
following sections describe these robustness features in more detail.
2.11.1 SPI Internal Loopback Test Mode (Master Only)
CAUTION—The internal loop-back self-test mode should not be entered during
a normal data transaction or unpredictable operation may occur.
To select the loopback mode, the SPICLK, SPISOMI, SPISIMO pins should be
configured as functional pins by configuring the SPI pin control register 0 (SPIPC0)
and by setting the LOOPBACK bit in the SPI global control register 1 (SPIGCR1). The
internal loop-back self-test mode can be used to test the SPI transmit path and receive
path including the transmit and receive buffers. In this mode, the transmit signal is
internally fed back to the receiver and the SPISIMO, SPISOMI, and SPICLK pins are in
a high-impedance state. This mode allows the CPU to write into the transmit buffer,
and check that the receive buffer contains the correct transmit data. If an error occurs
the corresponding error is set within the status field.
2.11.2 SPI Transmission Continuous Self-Test
During a data transfer, the SPI inputs the value from its data output pin on the
appropriate SPICLK edge. This value is compared against the expected value and any
difference indicates a fault on the SPI bus. If a fault is detected, then the BITERR bit in
the SPI receive buffer register (SPIBUF) and the BITERRFLG bit in the SPI flag register
(SPIFLG) are set and an error interrupt is generated if enabled. The SPI continuous
self-test mode is not available in SPI loopback mode.
2.12 Reset Considerations
This section describes the software and hardware reset considerations.
2.12.1 Software Reset Considerations
The SPI module contains a software reset (RESET) bit in the SPI global control register
0 (SPIGCR0) that is used to reset the SPI module. As a result of a reset, the SPI module
register values go to their reset state. The RESET bit must be set before any operation
on the SPI is done.
2.12.2 Hardware Reset Considerations
In the event of a hardware reset, the SPI module register values go to their reset state
and the application software needs to reprogram the registers to the desired values.
2-14
KeyStone Architecture Serial Peripheral Interface (SPI) User Guide
SPRUGP2A—March 2012
Submit Documentation Feedback
2.13 Power Management
Chapter 2—Peripheral Architecture
www.ti.com
2.13 Power Management
The SPI module can be put in either local or global low-power mode. Global low-power
mode is asserted by the system and is not controlled by the SPI. During global
low-power mode, all clocks to the SPI are turned off so the module is completely
inactive.
The SPI local low-power mode is asserted by setting the POWERDOWN bit in the SPI
global control register 1 (SPIGCR1). Setting this bit stops the clocks to the SPI
internal logic and the SPI registers. Setting the POWERDOWN bit causes the SPI
to enter local low-power mode and clearing the POWERDOWN bit causes SPI to exit
from local low-power mode. All the registers are accessible during local power-down
mode as any register access enables the clock to SPI for that particular access alone.
Because entering a low-power mode has the effect of suspending all state machine
activities, care must be taken when entering such modes to ensure that a valid state is
entered when low-power mode is active. As a result, application software must ensure
that a low-power mode is not entered during a transmission or reception of data.
2.14 Emulation Considerations
CAUTION—Viewing or otherwise reading the following SPI registers: SPIBUF,
SPIFLG, INTVEC0, and INTVEC1 through the JTAG debugger will cause
their contents to change, possibly invalidating the results of the debug session.
Be sure to set up the debugger to avoid reading these registers.
The SPI module does not support soft or hard stop during emulation breakpoints. The
SPI module will continue to run if an emulation breakpoint is encountered.
In addition, any status registers that are cleared after reading will be affected if viewed
in a memory or watch window of the debugger because the emulator will read these
registers to update the value displayed in the window.
SPRUGP2A—March 2012
Submit Documentation Feedback
KeyStone Architecture Serial Peripheral Interface (SPI) User Guide
2-15
2.15 Initialization
Chapter 2—Peripheral Architecture
www.ti.com
2.15 Initialization
Perform the following procedure for initializing the SPI:
1. Reset the SPI by clearing the RESET bit in the SPI global control register 0
(SPIGCR0) to 0.
2. Take the SPI out of reset by setting SPIGCR0.RESET to 1.
3. Configure the SPI for master mode by configuring the CLKMOD and MASTER
bits in the SPI global control register 1 (SPIGCR1).
4. Configure the SPI for 3-pin or 4-pin with chip select mode by configuring the SPI
pin control register 0 (SPIPC0).
5. Choose the SPI data format register n (SPIFMTn) to be used by configuring the
DFSEL bit in the SPI transmit data register (SPIDAT1).
6. Configure the SPI data rate, character length, shift direction, phase, polarity and
other format options using SPIFMTn selected in step 5.
7. In master mode, configure the master delay options using the SPI delay register
(SPIDELAY).
8. Select the error interrupt notifications by configuring the SPI interrupt register
(SPIINT0) and the SPI interrupt level register (SPILVL).
9. Enable the SPI communication by setting the SPIGCR1.ENABLE to 1.
10. Setup and enable the DMA for SPI data handling and then enable the DMA
servicing for the SPI data requests by setting the SPIINT0.DMAREQEN to 1.
11. Handle SPI data transfer requests using DMA and service any SPI error
conditions using the interrupt service routine.
2-16
KeyStone Architecture Serial Peripheral Interface (SPI) User Guide
SPRUGP2A—March 2012
Submit Documentation Feedback
Chapter 3
Registers
This chapter describes the SPI control, data, and pin registers. The offset is relative to
the associated base address of the module. See the device-specific data manual for the
memory address of these registers.
3.1
3.2
3.3
3.4
3.5
3.6
3.7
3.8
3.9
3.10
3.11
3.12
3.13
3.14
3.15
SPRUGP2A—March 2012
Submit Documentation Feedback
"SPI Global Control Register 0 (SPIGCR0)" on page 3-3
"SPI Global Control Register 1 (SPIGCR1)" on page 3-4
"SPI Interrupt Register (SPIINT0)" on page 3-5
"SPI Interrupt Level Register (SPILVL)" on page 3-6
"SPI Flag Register (SPIFLG)" on page 3-7
"SPI Pin Control Register 0 (SPIPC0)" on page 3-9
"SPI Transmit Data Register 0 (SPIDAT0)" on page 3-10
"SPI Transmit Data Register 1 (SPIDAT1)" on page 3-11
"SPI Receive Buffer Register (SPIBUF)" on page 3-12
"SPI Emulation Register (SPIEMU)" on page 3-13
"SPI Delay Register (SPIDELAY)" on page 3-14
"SPI Default Chip Select Register (SPIDEF)" on page 3-16
"SPI Data Format Registers (SPIFMTn)" on page 3-17
"SPI Interrupt Vector Register 0 (INTVEC0)" on page 3-18
"SPI Interrupt Vector Register 1 (INTVEC1)" on page 3-19
KeyStone Architecture Serial Peripheral Interface (SPI) User Guide
3-1
Chapter 3—Registers
www.ti.com
Table 3-1 lists the SPI registers.
Table 3-1
SPI Registers
Offset Address 1
Acronym
Register Description
Section
0h
SPIGCR0
SPI Global Control Register 0
Section 3.1
4h
SPIGCR1
SPI Global Control Register 1
Section 3.2
8h
SPIINT0
SPI Interrupt Register
Section 3.3
Ch
SPILVL
SPI Interrupt Level Register
Section 3.4
10h
SPIFLG
SPI Flag Register
Section 3.5
14h
SPIPC0
SPI Pin Control Register 0 (Function)
Section 3.6
38h
SPIDAT0
SPI Data Transmit Register 0
Section 3.7
3Ch
SPIDAT1
SPI Data Transmit Register 1 (Data Transmit and Format Select)
Section 3.8
40h
SPIBUF
SPI Receive Buffer Register
Section 3.9
44h
SPIEMU
SPI Receive Emulation Register
Section 3.10
48h
SPIDELAY
SPI Delay Register
Section 3.11
4Ch
SPIDEF
SPI Default Chip Select Register
Section 3.12
50h
SPIFMT0
SPI Data Format Register 0
Section 3.13
54h
SPIFMT1
SPI Data Format Register 1
Section 3.13
58h
SPIFMT2
SPI Data Format Register 2
Section 3.13
5Ch
SPIFMT3
SPI Data Format Register 3
Section 3.13
60h
INTVEC0
SPI Interrupt Vector Register 0
Section 3.14
64h
INTVEC1
SPI Interrupt Vector Register 1
Section 3.15
End of Table 3-1
1. The actual addresses of these registers are device specific. See your device-specific data manual to verify the SPI register addresses.
3-2
KeyStone Architecture Serial Peripheral Interface (SPI) User Guide
SPRUGP2A—March 2012
Submit Documentation Feedback
3.1 SPI Global Control Register 0 (SPIGCR0)
Chapter 3—Registers
www.ti.com
3.1 SPI Global Control Register 0 (SPIGCR0)
The SPI Global Control Register 0 (SPIGCR0) is shown in Figure 3-1 and described in
Table 3-2.
Figure 3-1
SPI Global Control Register 0 (SPIGCR0)
31
16
Reserved
R-0
spacer
15
1
0
Reserved
RESET
R-0
R/W-0
Legend: R = Read only; R/W = Read/Write; -n = value after reset
Table 3-2
SPI Global Control Register 0 (SPIGCR0) Field Descriptions
Bit
Field
Description
31-1
Reserved
Reads return 0 and writes have no effect.
0
RESET
Reset bit for the module. This bit needs to be set to 1 before any operation on SPI can be done.
0 = SPI is in reset state.
1 = SPI is out of reset state.
End of Table 3-2
SPRUGP2A—March 2012
Submit Documentation Feedback
KeyStone Architecture Serial Peripheral Interface (SPI) User Guide
3-3
3.2 SPI Global Control Register 1 (SPIGCR1)
Chapter 3—Registers
www.ti.com
3.2 SPI Global Control Register 1 (SPIGCR1)
The SPI Global Control Register 1 (SPIGCR1) is shown in Figure 3-2 and described in
Table 3-3.
Figure 3-2
SPI Global Control Register 1 (SPIGCR1)
31
25
24
Reserved
ENABLE
R-0
R/W-0
23
17
16
Reserved
LOOPBACK
R-0
R/W-0
spacer
15
9
8
7
2
1
0
Reserved
POWERDOWN
Reserved
CLKMOD
MASTER
R-0
R/W-0
R-0
R/W-0
R/W-0
Legend: R = Read only; R/W = Read/Write; -n = value after reset
Table 3-3
Bit
SPI Global Control Register 1 (SPIGCR1) Field Descriptions
Field
Description
31-25
Reserved
Reads return 0 and writes have no effect.
24
ENABLE
SPI enable. This bit enables the SPI transfers. The other SPI configuration registers except SPIINT0.DMAREQEN should be
configured before writing a 1 to this bit. This will prevent the SPI from responding to bus operations erroneously while it
is in the process of being configured. The SPIINT0.DMAREQEN should be enabled after setting ENABLE. If
SPIINT0.DMAREQEN is enabled before setting ENABLE then the first DMA request that occurs before the SPI is ready for
data transfer may get dropped.
When ENABLE bit is cleared to 0, the following SPI registers get forced to their default states (to 0s except for RXEMPTY
bit in SPIBUF):
• Both TX and RX shift registers
• The TXDATA fields of SPIDAT0 and SPIDAT1 registers
• All the fields of the SPIFLG register
• Contents of SPIBUF and the internal RXBUF registers
0 = SPI is not activated for transfers.
1 = Activates SPI.
23-17
Reserved
Reads return 0 and writes have no effect.
16
LOOPBACK
Internal loop-back test mode. The internal self-test option can be enabled by setting this bit. If the SPISIMO and SPISOMI
pins are configured with SPI functionality, then the SPISIMO pin is internally connected to the SPISOMI pin. The transmit
data is looped back as receive data and is stored in the receive field of the concerned buffer.
Externally, during loop-back operation, the SPICLK pin outputs an inactive value, SPISIMO and SPISOMI pins remain in
high-impedance state. The SPI has to be initialized in master mode before the loop-back can be selected. If the SPI is
initialized in slave mode or a data transfer is ongoing, errors may result.
0 = Internal loop-back test mode disabled.
1 = Internal loop-back test mode enabled.
15-9
Reserved
Reads return 0 and writes have no effect.
8
POWERDOWN
When active, the SPI state machine enters a power-down state.
0 = The SPI is in active mode.
1 = The SPI is in power-down mode.
7-2
Reserved
Reads return 0 and writes have no effect.
1-0
CLKMOD,
MASTER
These two bits (CLKMOD, MASTER) determine whether the SPI operates in master or slave mode.
0-2h = Reserved
3h = MASTER MODE. SPICLK is an output and the SPI initiates transfers. Data is transmitted on the SPISIMO pin and
received on the SPISOMI pin. The SPISCS[n] pin is an output pin if configured as SPI slave chip select.
Note: Both CLKMOD and MASTER bits are retained for compatibility purposes even though only one value (3h) is valid
for master operation of SPI
End of Table 3-3
3-4
KeyStone Architecture Serial Peripheral Interface (SPI) User Guide
SPRUGP2A—March 2012
Submit Documentation Feedback
3.3 SPI Interrupt Register (SPIINT0)
Chapter 3—Registers
www.ti.com
3.3 SPI Interrupt Register (SPIINT0)
The SPI Interrupt Register (SPIINT0) is shown in Figure 3-3 and described in
Table 3-4.
Figure 3-3
SPI Interrupt Register (SPIINT0)
31
17
Reserved
16
DMAREQEN
R-0
R/W-0
spacer
15
10
Reserved
9
8
7
6
5
4
3
TXINTENA RXINTENA Reserved OVRNINTENA Reserved BITERRENA
R-0
R/W-0
R/W-0
R-0
R/W-0
R-0
R/W-0
0
Reserved
R-0
Legend: R = Read only; W = Write only; -n = value after reset
Table 3-4
Bit
SPI Interrupt Register (SPIINT0) Field Descriptions
Field
Description
31-17
Reserved
Reads return 0 and writes have no effect.
16
DMAREQEN
DMA request enable. Enables the DMA request signal to be generated for both receive and transmit channels. Set
DMAREQEN only after setting the SPIGCR1.ENABLE bit to 1.
0 = DMA is not used.
1 = DMA requests will be generated.
Note: A transmit DMA request will be generated each time a transmit data is copied to the shift register either from
TXBUF or directly from SPIDAT0/SPIDAT1.
Note: A receive DMA request will be generated each time a received data is copied to SPIBUF register either from RXBUF
or directly from the shift register.
15-10
Reserved
Reads return 0 and writes have no effect.
9
TXINTENA
An interrupt is to be generated every time data is written to the shift register, so that a new data can be written to TXBUF.
Setting this bit will generate an interrupt if the SPIFLG.TXINTFLG bit is set to 1.
0 = No interrupt will be generated upon SPIFLG.TXINTFLG being set to 1.
1 = Interrupt will be generated upon SPIFLG.TXINTFLG being set to 1.
8
RXINTENA
Receive interrupt enable. An interrupt is to be generated when the SPIFLG.RXINTFLAG bit is set.
0 = Interrupt will not be generated.
1 = Interrupt will be generated.
7
Reserved
Reads return 0 and writes have no effect.
6
OVRNINTENA
Overrun interrupt enable. An interrupt is to be generated when the SPIFLG.OVRNINTFLG bit is set.
0 = Overrun interrupt will not be generated.
1 = Overrun interrupt will be generated.
5
Reserved
Reads return 0 and writes have no effect.
4
BITERRENA
Enables interrupt on bit error. An interrupt is to be generated when the SPIFLG.BITERRFLG is set.
0 = No interrupt asserted upon bit error.
1 = Enables an interrupt on a bit error.
3-0
Reserved
Reads return 0 and writes have no effect.
End of Table 3-4
SPRUGP2A—March 2012
Submit Documentation Feedback
KeyStone Architecture Serial Peripheral Interface (SPI) User Guide
3-5
3.4 SPI Interrupt Level Register (SPILVL)
Chapter 3—Registers
www.ti.com
3.4 SPI Interrupt Level Register (SPILVL)
The SPI Interrupt Level Register (SPILVL) is shown in Figure 3-4 and described in
Table 3-5.
Figure 3-4
SPI Interrupt Level Register (SPILVL)
31
16
Reserved
R-0
spacer
15
10
9
Reserved
TXINTLVL
R-0
R/W-0
8
7
6
5
4
3
RXINTLVL Reserved OVRNINTLVL Reserved BITERRLVL
R/W-0
R-0
R/W-0
R-0
R/W-0
0
Reserved
R-0
Legend: R = Read only; W = Write only; -n = value after reset
Table 3-5
Bit
SPI Interrupt Level Register (SPILVL) Field Descriptions
Field
Description
31-10
Reserved
Reads return 0 and writes have no effect.
9
TXINTLVL
Transmit interrupt level.
0 = Transmit interrupt is mapped to interrupt line INT0.
1 = Transmit interrupt is mapped to interrupt line INT1.
8
RXINTLVL
Receive interrupt level.
0 = Receive interrupt is mapped to interrupt line INT0.
1 = Receive interrupt is mapped to interrupt line INT1.
7
Reserved
Reads return 0 and writes have no effect.
6
OVRNINTLVL
Receive overrun interrupt level.
0 = Receive overrun interrupt is mapped to interrupt line INT0.
1 = Receive overrun interrupt is mapped to interrupt line INT1.
5
Reserved
Reads return 0 and writes have no effect.
4
BITERRLVL
Bit error interrupt level.
0 = Bit error interrupt is mapped to interrupt line INT0.
1 = Bit error interrupt is mapped to interrupt line INT1.
3-0
Reserved
Reads return 0 and writes have no effect.
End of Table 3-5
3-6
KeyStone Architecture Serial Peripheral Interface (SPI) User Guide
SPRUGP2A—March 2012
Submit Documentation Feedback
3.5 SPI Flag Register (SPIFLG)
Chapter 3—Registers
www.ti.com
3.5 SPI Flag Register (SPIFLG)
The SPI Flag Register (SPIFLG) is shown in Figure 3-5 and described in Table 3-6.
Figure 3-5
SPI Flag Register (SPIFLG)
31
16
Reserved
R-0
spacer
15
10
Reserved
9
8
7
6
5
4
TXINTFLG RXINTFLG Reserved OVRNINTFLG Reserved BITERRFLG
R-0
R-0
R/WC-0
R-0
R/WC-0
R-0
R/WC-0
3
0
Reserved
R-0
Legend: R = Read only; W = Write only, WC = Write/Clear; -n = value after reset
Table 3-6
Bit
SPI Flag Register (SPIFLG) Field Descriptions (Part 1 of 2)
Field
Description
31-10
Reserved
Reads return 0 and writes have no effect.
9
TXINTFLG
Transmitter empty interrupt flag. Serves as an interrupt flag indicating that the transmit buffer (TXBUF) is empty and a
new data can be written to it. This flag is set when a data is copied to the shift register either directly or from the TXBUF
register. This bit is cleared by one of following ways:
• Writing a new data to either SPIDAT0 or SPIDAT1
• Writing a 0 to SPIGCR1.ENABLE
0 = Transmit buffer is now full. No interrupt pending for transmitter empty.
1 = Transmit buffer is empty. An interrupt is pending to fill the transmitter.
8
RXINTFLG
Receiver full interrupt flag. This flag is set when a word is received and copied into the buffer register (SPIBUF). This bit is
cleared under the following ways:
• Reading the SPIBUF register. During emulation mode, however, a read to the emulation register (SPIEMU) does not clear
this flag bit.
• Reading INTVEC0 or INTVEC1 register when there is a receive buffer full interrupt
• Writing a 1 to this bit
• Writing a 0 to SPIGCR1.ENABLE
• System reset
0 = No new received data pending. Receive buffer is empty.
1 = A newly received data is ready to be read. Receive buffer is full.
Note: Clearing RXINTFLG bit by writing a 1 before reading the SPIBUF sets the RXEMPTY bit of the SPIBUF register too.
This way, one can ignore a received data. However, if the internal RXBUF is already full, the data from RXBUF will be
copied to SPIBUF and the RXEMPTY bit will be cleared again. The SPIBUF contents should be read first if this situation
needs to be avoided.
7
Reserved
Reads return 0 and writes have no effect.
6
OVRNINTFLG
Receiver overrun flag. The bit is set when a receive operation completes before the previous character has been read
from the receive buffer. The bit indicates that the last received character has been overwritten and therefore lost. This bit
is cleared under the following conditions:
• Reading INTVEC0 or INTVEC1 register when there is a receive buffer overrun interrupt
• Writing a 1 to this bit
0 = Overrun condition did not occur.
1 = Overrun condition has occurred.
Note: Reading SPIBUF register does not clear the OVRNINTFLG bit. If an overrun interrupt is detected, then the SPIBUF
may need to be read twice to get to the overrun buffer. This is due to the fact that the overrun will always occur to the
internal RXBUF. Each read to the SPIBUF will result in RXBUF contents (if it is full) getting copied to SPIBUF.
Note: A special condition under which OVRNINTFLG flag gets set. If both SPIBUF and RXBUF are already full and while
another buffer receive is underway, if any errors like TIMEOUT, BITERR and DLENERR occur, then OVRNINTFLG will be
set to indicate that the status flags are getting overwritten by the new transfer. This overrun should be treated like a
normal receiver overrun.
5
Reserved
Reads return 0 and writes have no effect.
SPRUGP2A—March 2012
Submit Documentation Feedback
KeyStone Architecture Serial Peripheral Interface (SPI) User Guide
3-7
3.5 SPI Flag Register (SPIFLG)
Chapter 3—Registers
Table 3-6
www.ti.com
SPI Flag Register (SPIFLG) Field Descriptions (Part 2 of 2)
Bit
Field
Description
4
BITERRFLG
This bit is set when a mismatch of internal transmit data and transmitted data is detected. The SPI samples the signal of
the transmit pin (master: SPISIMO, slave: SPISOMI) at the receive point (half clock cycle after transmit point). If the
sampled value differs from the transmitted value a bit error is detected and the flag is set. A possible reason for a bit error
can be a too high bit rate/capacitive load or another master/slave trying to transmit at the same time. This flag can be
cleared by one of the following ways:
• Write a 1 to this bit.
• Set SPIGCR1.ENABLE bit to 0.
0 = No bit error occurred.
1 = A bit error occurred.
3-0
Reserved
Reads return 0 and writes have no effect.
End of Table 3-6
3-8
KeyStone Architecture Serial Peripheral Interface (SPI) User Guide
SPRUGP2A—March 2012
Submit Documentation Feedback
3.6 SPI Pin Control Register 0 (SPIPC0)
Chapter 3—Registers
www.ti.com
3.6 SPI Pin Control Register 0 (SPIPC0)
The SPI Pin Control Register 0 (SPIPC0) is shown in Figure 3-6 and described in
Table 3-7.
Figure 3-6
SPI Pin Control Register 0 (SPIPC0)
31
16
Reserved
R-0
spacer
15
12
Reserved
R-0
11
10
SOMIFUN SIMOFUN
R/W-0
R/W-0
9
8
n+1
n
0
CLKFUN
Reserved
SCSFUN
R/W-0
R-0
R/W-0
Legend: R = Read only; W = Write only; -n = value after reset
Table 3-7
Bit
SPI Pin Control Register 0 (SPIPC0) Field Descriptions
Field
Description
31-12
Reserved
Reads return 0 and writes have no effect.
11
SOMIFUN
Slave out, master in pin function. This bit determines whether the SPISOMI pin is Reserved or a SPI functional pin.
0 = SPISOMI pin is reserved.
1 = SPISOMI pin is a SPI functional pin.
10
SIMOFUN
Slave in, master out pin function. This bit determines whether the SPISIMO pin is Reserved or a SPI functional pin.
0 = SPISIMO pin is reserved.
1 = SPISIMO pin is a SPI functional pin.
9
CLKFUN
SPI clock pin function. This bit determines whether the SPICLK pin is Reserved or a SPI functional pin.
0 = SPICLK pin is reserved.
1 = SPICLK pin is a SPI functional pin.
8-(n+1)
Reserved
Reads return 0 and writes have no effect.
n-0
SCSFUN
SPI chip select pin function. The bit position i in this field determines whether the SPISCS[i] pin is Reserved or a SPI
functional pin. Please see the device-specific data manual for supported number of the chip select pins.
Bit position i in this field:
0 = The corresponding SPISCS[i] pin is Reserved
1 = The corresponding SPISCS[i] pin is a SPI functional pin.
End of Table 3-7
SPRUGP2A—March 2012
Submit Documentation Feedback
KeyStone Architecture Serial Peripheral Interface (SPI) User Guide
3-9
3.7 SPI Transmit Data Register 0 (SPIDAT0)
Chapter 3—Registers
www.ti.com
3.7 SPI Transmit Data Register 0 (SPIDAT0)
The SPI Transmit Data Register 0 (SPIDAT0) is shown in Figure 3-7 and described in
Table 3-8.
Figure 3-7
SPI Data Register 0 (SPIDAT0)
31
16
Reserved
R-0
spacer
15
0
TXDATA
R/W-0
Legend: R = Read only; W = Write only; -n = value after reset
Table 3-8
Bit
SPI Data Register 0 (SPIDAT0) Field Descriptions
Field
Description
31-16
Reserved
Reads return 0 and writes have no effect.
15-0
TXDATA
SPI transmit data (value = 0-FFFFh). When written, these bits will be copied to the shift register if it is empty. If the shift
register is not empty, the TXBUF will hold the written values. SPIGCR1.ENABLE must be set to 1 before this register can be
written to. Writing a 0 to the SPIGCR1.ENABLE forces the TXDATA[15:0] field to 0.
Note: Irrespective of the character length, the transmit data should be right-justified before writing to SPIDAT0 register.
Note: The default data format control register for SPIDAT0 is SPIFMT0. However, it is possible to reprogram the DFSEL
field of SPIDAT1 before using SPIDAT0, to select a different SPIFMTn register.
End of Table 3-8
3-10
KeyStone Architecture Serial Peripheral Interface (SPI) User Guide
SPRUGP2A—March 2012
Submit Documentation Feedback
3.8 SPI Transmit Data Register 1 (SPIDAT1)
Chapter 3—Registers
www.ti.com
3.8 SPI Transmit Data Register 1 (SPIDAT1)
The SPI Transmit Data Register (SPIDAT1) is shown in Figure 3-8 and described in
Table 3-9.
Figure 3-8
SPI Data Register 1 (SPIDAT1)
31
29
Reserved
R-0
28
27
CSHOLD Reserved
R/W-0
R-0
26
25
24
WDEL
DFSEL
R/W-0
R/W-0
23
16
CSNR
R/W-0
spacer
15
0
TXDATA
R/W-0
Legend: R = Read only; W = Write only; -n = value after reset
Table 3-9
Bit
SPI Data Register 1 (SPIDAT1) Field Descriptions
Field
Description
31-29
Reserved
Reads return 0 and writes have no effect.
28
CSHOLD
Chip select hold mode. The CSHOLD bit is supported in master mode only. In slave mode, this bit is ignored. CSHOLD
defines the behavior of the chip select lines at the end of a data transfer.
0 = The SPISCS[n] to SPISCS[0] pins are restored to CSDEF[n:0] bits in SPIDEF register at the end of a transfer after the
T2CDELAY time has passed.
1 = The SPISCS[n] to SPISCS[0] pins are continued as CSNR[n:0] at the end of a transfer until a control field with new data
and control information is loaded into SPIDAT1. The setup and hold delays in SPIDELAY register (C2TDELAY and
C2TDELAY) are not applied between transactions which have CSHOLD=1.
Note: If a transfer with CSHOLD=0 is followed by a transfer with CSHOLD=1, then SPIDELAY.C2TDELAY will be applied at
the beginning of the second transfer. To do multiple transactions to a slave without deactivating chip select between
transfers, maintain CSHOLD of 1 and same CSNR information to keep the same slave selected in the transfers.
27
Reserved
Reads return 0 and writes have no effect.
26
WDEL
Enable the delay counter at the end of the current transaction. The WDEL bit is supported in master mode only. In slave
mode, this bit is ignored.
0 = No delay will be inserted. However, SPISCS[n] pin will still be deactivated for at least 2 SPI module clock cycles if
CSHOLD = 0.
1 = After a transaction, SPIFMTn.WDELAY of the selected data format will be loaded into the delay counter. No
transaction will be performed until the SPIFMTn.WDELAY counter overflows. The SPISCS[n] pin will be deactivated for
at least (WDELAY + 2) × SPI module clock period.
25-24
DFSEL
Data word format select:
0 = Data word format 0 is selected
1h = Data word format 1 is selected
2h = Data word format 2 is selected
3h = Data word format 3 is selected
Note: Preselecting a Format Register. Writing to just the control field (using byte writes) does not initiate any SPI
transfer in master mode. This feature can be used to set up SPICLK phase or polarity before actually starting the
transfer by just updating the DFSEL fields in the control field to select the required phase/polarity combination.
23-16
CSNR
Chip select number (value = 0-FFh). The CSNR field defines the chip select that will be activated during the data transfer.
In slave mode, this field must be written as 00h; in master mode, the value of this field is driven on the chip select pins, i.e.
bit[(16+n):16] are put out on SPISCS[n] to SPISCS[0] respectively during a transfer. Please see the device-specific data
manual for the supported number of the chip select pins.
15-0
TXDATA
Transfer data (value = 0-FFFFh). When written, these bits will be copied to the shift register if it is empty. If the shift
register is not empty, the TXBUF will hold the written values.
SPIGCR1.ENABLE must be set to 1 before this register can be written to. Writing a 0 to the SPIGCR1.ENABLE forces the
lower 16 bits of the SPIDAT1 to 0.
Note: Irrespective of the character length, the transmit data should be right-justified before writing to SPIDAT1.
End of Table 3-9
SPRUGP2A—March 2012
Submit Documentation Feedback
KeyStone Architecture Serial Peripheral Interface (SPI) User Guide
3-11
3.9 SPI Receive Buffer Register (SPIBUF)
Chapter 3—Registers
www.ti.com
3.9 SPI Receive Buffer Register (SPIBUF)
The SPI Receive Buffer register (SPIBUF) is shown in Figure 3-9 and described in
Table 3-10.
Figure 3-9
31
SPI Buffer Register (SPIBUF)
30
29
28
27
16
RXEMPTY RXOVR TXFULL BITERR
RS-1
RC-0
R-0
Reserved
RC-0
R-0
spacer
15
0
RXDATA
R-0
LEGEND: R/W = Read/Write; R = Read only; C = Clear; S = Set; -n = value after reset
Table 3-10
SPI Buffer Register (SPIBUF) Field Descriptions
Bit
Field
Description
31
RXEMPTY
Receive data buffer empty. When the host reads the SPIBUF field or the whole SPIBUF register, this will automatically set
the RXEMPTY flag. When a data transfer is completed, the received data is copied into SPIBUF, the RXEMPTY flag is cleared.
This flag is set to 1 under following conditions:
• Reading the RXDATA portion of the SPIBUF register.
• Writing 1 to clear the RXINTFLG bit in SPIFLG register.
0 = New data has been received and copied into the SPIBUF register.
1 = No data received since last reading of SPIBUF register.
Write-clearing the SPIFLG.RXINTFLG bit before reading the SPIBUF indicates the received data is being ignored. Conversely,
SPIFLG.RXINTFLG can be cleared by reading the RXDATA portion of the SPIBUF register or the entire SPIBUF register.
30
RXOVR
Receive data buffer overrun. When a data transfer is completed and the received data is copied into the RXBUF while it is
already full, RXOVR is set. An overrun always occurs to the RXBUF, and SPIBUF contents never get overwritten until after it is
read by the CPU/DMA.
Reading SPIBUF register does not clear the RXOVR bit. If an overrun interrupt is detected, then the SPIBUF may need to be
read twice to get to the overrun buffer. This is due to the fact that the overrun will always occur to the internal RXBUF. Each
read to the SPIBUF will result in RXBUF contents (if it is full) getting copied to SPIBUF.
Note: A special condition under which RXOVR flag gets set. If both SPIBUF and RXBUF are already full and while another
buffer receive is underway, if any errors like TIMEOUT, BITERR and DLENERR occur, then RXOVR will be set to indicate
that the status flags are getting overwritten by the new transfer. This overrun should be treated like a normal receiver
overrun.
0 = No receive data overrun condition occurred since last time reading the data field.
1 = A receive data overrun condition occurred since last time reading the data field.
29
TXFULL
Transmit data buffer full. This flag is a read-only flag. Writing into SPIDAT0 or SPIDAT1 field while the TX shift register is full
will automatically set the TXFULL flag. Once the data is copied to the shift register, the TXFULL flag will be cleared. Writing
to the SPIDAT0/SPIDAT1 register when both TXBUF and the TX shift register are empty does not set the TXFULL flag.
0 = The transmit buffer is empty; SPIDAT0/SPIDAT1 is ready to accept a new data.
1 = The transmit buffer is full; SPIDAT0/SPIDAT1 is not ready to accept a new data.
28
BITERR
Bit error. There was a mismatch of internal transmit data and transmitted data. The SPI samples the signal of the transmit
pin (master: SIMO, slave: SOMI) at the receive point (half clock cycle after transmit point). If the sampled value differs from
the transmitted value, a bit error is detected and the flag BITERR is set. A possible reason for a bit error can be noise, a
too-high bit rate/capacitive load, or another master/slave trying to transmit at the same time.
Note: This flag is cleared to 0 when RXDATA portion of the SPIBUF register is read.
0 = No bit error occurred.
1 = A bit error occurred.
27-16
Reserved
Reads return 0 and writes have no effect.
15-0
RXDATA
SPI receive data (value = 0-FFFFh). This is the received data, transferred from the receive shift-register at the end of a
transfer completion. Irrespective of the programmed character length and the direction of shifting, the received data is
stored right-justified in the register.
End of Table 3-10
3-12
KeyStone Architecture Serial Peripheral Interface (SPI) User Guide
SPRUGP2A—March 2012
Submit Documentation Feedback
3.10 SPI Emulation Register (SPIEMU)
Chapter 3—Registers
www.ti.com
3.10 SPI Emulation Register (SPIEMU)
The SPI Emulation Register (SPIEMU) is shown in Figure 3-10 and described in
Table 3-11.
Note—All the fields of SPIEMU register are Read-Only. Read operation on this
register under any mode will not have any impact on the status of this or any
other registers.
Figure 3-10
31
RXEMPTY
R-1
SPI Emulation Register (SPIEMU)
30
29
28
27
16
RXOVR TXFULL BITERR
R-0
R-0
Reserved
R-0
R-0
spacer
15
0
RXDATA
R-0
Legend: R = Read only; -n = value after reset
Table 3-11
SPI Emulation Register (SPIEMU) Field Descriptions
Bit
Field
Description
31
RXEMPTY
Receive data buffer empty.
0 = New data has been received and copied into the SPIBUF register.
1 = No data has been received since the last time the SPIBUF register was read.
30
RXOVR
Receive data buffer overrun.
0 = No receive data overrun condition occurred since last time the data field was read.
1 = A receive data overrun condition occurred since the last time the data field was read.
29
TXFULL
Transmit data buffer full.
0 = The transmit buffer is empty; SPIDAT0/SPIDAT1 is ready to accept new data.
1 = The transmit buffer is full; SPIDAT0/SPIDAT1 is not ready to accept new data.
28
BITERR
Mismatch of internal transmit data and transmitted data.
0 = No bit error occurred.
1 = A bit error occurred.
27-16
Reserved
Reads return 0 and writes have no effect.
15-0
RXDATA
SPI receive data (value = 0-FFFFh). SPI emulation is a mirror of the SPIBUF register. The only difference between SPIEMU
and SPIBUF is that a read from SPIEMU does not clear any of the status flags.
End of Table 3-11
SPRUGP2A—March 2012
Submit Documentation Feedback
KeyStone Architecture Serial Peripheral Interface (SPI) User Guide
3-13
3.11 SPI Delay Register (SPIDELAY)
Chapter 3—Registers
www.ti.com
3.11 SPI Delay Register (SPIDELAY)
The SPI Delay Register (SPIDELAY) is shown in Figure 3-11 and described in
Table 3-12.
Figure 3-11
SPI Delay Register (SPIDELAY)
31
24
23
C2TDELAY
16
T2CDELAY
R/W-0
R/W-0
spacer
15
0
Reserved
R-0
Legend: R = Read only; W = Write only; -n = value after reset
Table 3-12
SPI Delay Register (SPIDELAY) Field Descriptions
Bit
Field
Description
31-24
C2TDELAY
Chip-select-active-to-transmit-start delay (value = 0-FFh). C2TDELAY is used in master mode only. It defines a setup time
for the slave device that delays the data transmission from the chip select active edge by a multiple of SPI module clock
cycles. C2TDELAY can be configured between 2 and 257 SPI module clock cycles. See Figure 3-12.
The setup time value is calculated as follows:
tC2TDELAY = (C2TDELAY + 2) × SPI module clock period
Note: If C2TDELAY = 0, then tC2TDELAY = 0.
Example: SPI module clock = 25 MHz -> SPI module clock period = 40 ns; C2TDELAY = 06h; then tC2TDELAY = 320 ns;
When the chip select signal becomes active, the slave has to prepare for data transfer within 320 ns.
Note: If phase = 1, the delay between SPISCS[n] falling edge to the first edge of SPISCS[n] will have an additional 0.5
SPICLK period delay. This delay is as per the SPI protocol.
23-16
T2CDELAY
Transmit-end-to-chip-select-inactive delay (value = 0-FFh). T2CDELAY is used in master mode only. It defines a hold time
for the slave device that delays the chip select deactivation by a multiple of SPI module clock cycles after the last bit is
transferred. T2CDELAY can be configured between 2 and 256 SPI module clock cycles.
See Figure 3-13.
The hold time value is calculated as follows:
tT2CDELAY = (T2CDELAY + 1) × SPI module clock period
Note: If T2CDELAY = 0, then tT2CDELAY = 0
Example: VBUSPCLK = 25 MHz -> VBUSPCLK period = 40 ns; T2CDELAY = 03h; then tT2CDELAY = 160 ns;
After the last data bit (or parity bit) is being transferred the chip select signal is held active for 160 ns.
Note: If phase = 0, then between the last edge of SPICLK and rise-edge of SPISCS[n] there will be an additional delay of 0.5
SPICLK period. This is as per the SPI protocol.
15-0
Reserved
Reads return 0 and writes have no effect.
End of Table 3-12
Figure 3-12
Example: tC2TDELAY = 8 SPI Module Clock Cycles
SPISCS[n]
SPICLK
SPISOMI
SPI module clock
tC2TDELAY
3-14
KeyStone Architecture Serial Peripheral Interface (SPI) User Guide
SPRUGP2A—March 2012
Submit Documentation Feedback
3.11 SPI Delay Register (SPIDELAY)
Chapter 3—Registers
www.ti.com
Figure 3-13
Example: tT2CDELAY = 4 SPI Module Clock Cycles
SPISCS[n]
SPICLK
SPISOMI
SPI module clock
tT2CDELAY
SPRUGP2A—March 2012
Submit Documentation Feedback
KeyStone Architecture Serial Peripheral Interface (SPI) User Guide
3-15
3.12 SPI Default Chip Select Register (SPIDEF)
Chapter 3—Registers
www.ti.com
3.12 SPI Default Chip Select Register (SPIDEF)
The SPI Default Chip Select Register (SPIDEF) is shown in Figure 3-14 and described
in Table 3-13.
Figure 3-14
SPI Default Chip Select Register (SPIDEF)
31
16
Reserved
R-0
spacer
15
n+1
n
0
Reserved
CSDEF
R-0
R/W-1
Legend: R = Read only; W = Write only; -n = value after reset
Table 3-13
Bit
SPI Default Chip Select Register (SPIDEF) Field Descriptions
Field
Description
31-(n+1)
Reserved
Reads return 0 and writes have no effect.
n-0
CSDEF
Chip Select Default pattern. In master mode, the bit position i in this field determines the SPISCS[i] pin state when no
transmissions are currently performed. It allows the user to set a chip select pattern which deselects all the SPI slaves.
Please see the device-specific data manual for supported number of the chip select pins.
Bit position i in this field:
0 = The corresponding SPISCS[i] pin is cleared to 0 when no transfer occurs.
1 = The corresponding SPISCS[i] pin is set to 1 when no transfer occurs.
End of Table 3-13
3-16
KeyStone Architecture Serial Peripheral Interface (SPI) User Guide
SPRUGP2A—March 2012
Submit Documentation Feedback
3.13 SPI Data Format Registers (SPIFMTn)
Chapter 3—Registers
www.ti.com
3.13 SPI Data Format Registers (SPIFMTn)
The SPI Data Format Registers (SPIFMT0, SPIFMT1, SPIFMT2, and SPIFMT3) are
shown in Figure 3-15 and described in Table 3-14.
Figure 3-15
31
SPI Data Format Register (SPIFMTn)
30
29
24
Reserved
WDELAY
R-0
R/W-0
23
21
Reserved
20
19
18
17
16
SHIFTDIR Reserved DISCSTIMERS POLARITY PHASE
R-0
R/W-0
R-0
R/W-0
R/W-0
R/W-0
spacer
15
8
7
5
4
0
PRESCALE
Reserved
CHARLEN
R/W-0
R-0
R/W-0
Legend: R = Read only; W = Write only; -n = value after reset
Table 3-14
SPI Data Format Register (SPIFMTn) Field Descriptions
Bit
Field
Description
31-30
Reserved
Reads return 0 and writes have no effect.
29-24
WDELAY
Delay in between transmissions. Idle time that will be applied at the end of the current transmission if the bit WDEL is
set in the current buffer. The delay to be applied is equal to:
WDELAY × PSPI module clock + 2 × PSPI module clock
PSPI module clock -> Period of SPI module clock
23-21
Reserved
Reads return 0 and writes have no effect.
20
SHIFTDIR
Shift direction.
0 = Most significant bit is shifted out first.
1 = Least significant bit is shifted out first.
19
Reserved
Reads return 0 and writes have no effect.
18
DISCSTIMERS
Disable chip select timers for this format register. The C2TDELAY and T2CDELAY timers are by default enabled for all
the data format registers. Using this bit, these timers can be disabled for a particular data format if not required. When
a master is handling multiple slaves, with varied set-up hold requirement, the application can selectively choose to
include or not include the chip select delay timers for any slaves.
0 = Both C2TDELAY and T2CDELAY counts are inserted for the chip selects.
1 = No C2TDELAY or T2CDELAY is inserted in the chip select timings.
17
POLARITY
SPI clock polarity.
0 = SPI clock signal is low-inactive (before and after data transfer the clock signal is low).
1 = SPI clock signal is high-inactive (before and after data transfer the clock signal is high).
16
PHASE
SPI clock delay.
0 = SPI clock signal is not delayed versus the transmit/receive data stream. The first data bit is transmitted with the
first clock edge and the first bit is received with the second (inverse) clock edge.
1 = SPI clock signal is delayed by a half SPI clock cycle versus the transmit/receive data stream. The first transmit bit
has to output prior to the first clock edge. The master and slave receive the first bit with the first edge.
15-8
PRESCALE
SPI prescaler (value = 0-FFh). It determines the bit transfer rate if the SPI is the network master and is directly derived
from the SPI module clock. If the SPI is configured as slave, PRESCALE does not need to be configured.
The clock rate can be calculated as:
SPI clock frequency = SPI module clock/(PRESCALE + 1)
Note: When PRESCALEx is cleared to 0, the SPI clock rate defaults to SPI module clock/2.
7-5
Reserved
Reads return 0 and writes have no effect.
4-0
CHARLEN
SPI data word length (value = 0-1Fh). Legal values are 2h (data word length = 2 bit) to 10h (data word length = 16).
Illegal values, such as 0 or 1Fh are not detected and their effect is indeterminate.
End of Table 3-14
SPRUGP2A—March 2012
Submit Documentation Feedback
KeyStone Architecture Serial Peripheral Interface (SPI) User Guide
3-17
3.14 SPI Interrupt Vector Register 0 (INTVEC0)
Chapter 3—Registers
www.ti.com
3.14 SPI Interrupt Vector Register 0 (INTVEC0)
The SPI Interrupt Vector Register 0 (INTVEC0) is shown in Figure 3-16 and described
in Table 3-15.
Figure 3-16
SPI Interrupt Vector Register 0 (INTVEC0)
31
16
Reserved
R-0
spacer
15
6
5
1
0
Reserved
INTVECT0
Reserved
R-0
R-0
R-0
Legend: R = Read only; -n = value after reset
Table 3-15
SPI Interrupt Vector Register 0 (INTVEC0) Field Descriptions
Bit
Field
Description
31-6
Reserved
Reads return 0 and writes have no effect.
5-1
INTVECT0
Interrupt vector for interrupt line INT0. INTVECT0 returns the vector of the pending interrupt at interrupt line INT0. If more than
one interrupt is pending, INTVECT0 always references the highest priority interrupt source first. The interrupts available for SPI
in the descending order of their priorities are as given below.
• Transmission error Interrupt
• Receive buffer overrun interrupt
• Receive buffer full interrupt
• Transmit buffer empty interrupt
The INTVECT0 field just reflects the status of SPIFLG in a vectorized format. So, any updates to SPIFLG will automatically reflect
in the vector value in this register.
Vectors for each of these interrupts will be reflected on the INTVECT0 bits, when they occur. Reading the vectors for the receive
buffer overrun and receive buffer full interrupts will automatically clear the respective flags in the SPIFLG. Reading the vector
register when transmitter empty is indicated does not clear the TXINTFLG in SPIFLG. Writing a new data to SPIDAT0/SPIDAT1
clears the transmitter empty interrupt. On reading the INTVECT0 bits, the vector of the next highest priority interrupt (if any)
will be then reflected on the INTVECT0 bits. If two or more interrupts occur simultaneously, the vector for the highest priority
interrupt will be reflected on the INTVECT0 bits.
The following are the SPI interrupt vectors for line INT0:
0 = No interrupt pending
1h-10h = Reserved
11h = Error interrupt pending. See the lower halfword of SPIINT0 to determine more details about the type of error.
12h = The pending interrupt is receive buffer full interrupt.
13h = The pending interrupt is receive buffer overrun interrupt.
14h = The pending interrupt is transmit buffer empty interrupt.
15h-1Fh = Reserved
0
Reserved
Reads return 0 and writes have no effect.
End of Table 3-15
3-18
KeyStone Architecture Serial Peripheral Interface (SPI) User Guide
SPRUGP2A—March 2012
Submit Documentation Feedback
3.15 SPI Interrupt Vector Register 1 (INTVEC1)
Chapter 3—Registers
www.ti.com
3.15 SPI Interrupt Vector Register 1 (INTVEC1)
The SPI Interrupt Vector Register 1 (INTVEC1) is shown in Figure 3-17 and described
in Table 3-16.
Figure 3-17
SPI Interrupt Vector Register 1 (INTVEC1)
31
16
Reserved
R-0
spacer
15
6
5
1
0
Reserved
INTVECT1
Reserved
R-0
R-0
R-0
Legend: R = Read only; -n = value after reset
Table 3-16
SPI Interrupt Vector Register 1 (INTVEC1) Field Descriptions
Bit
Field
Description
31-6
Reserved
Reads return 0 and writes have no effect.
5-1
INTVECT1
Interrupt vector for interrupt line INT1. INTVECT1 returns the vector of the pending interrupt at interrupt line INT1. If more
than one interrupt is pending, INTVECT1 always references the highest priority interrupt source first. The interrupts available
for SPI in the descending order of their priorities are as given below.
• Transmission error Interrupt
• Receive buffer overrun interrupt
• Receive buffer full interrupt
• Transmit buffer empty interrupt
The INTVECT1 field just reflects the status of SPIFLG in a vectorized format. So, any updates to SPIFLG will automatically reflect
in the vector value in this register. Vectors for each of these interrupts will be reflected on the INTVECT0 bits, when they occur.
Reading the vectors for the receive buffer overrun and receive buffer full interrupts will automatically clear the respective
flags in the SPIFLG. Reading the vector register when transmitter empty is indicated does not clear the TXINTFLG in SPIFLG.
Writing a new data to SPIDAT0/SPIDAT1 clears the transmitter empty interrupt. On reading the INTVECT1 bits, the vector of
the next highest priority interrupt (if any) will be then reflected on the INTVECT1 bits. If two or more interrupts occur
simultaneously, the vector for the highest priority interrupt will be reflected on the INTVECT1 bits.
The following are the SPI interrupt vectors for line INT1:
0 = No interrupt pending
1h-10h = Reserved
11h = Error interrupt pending. See the lower halfword of SPIINT0 to determine more details about the type of error.
12h = The pending interrupt is receive buffer full interrupt.
13h = The pending interrupt is receive buffer overrun interrupt.
14h = The pending interrupt is transmit buffer empty interrupt.
15h-1Fh = Reserved
0
Reserved
Reads return 0 and writes have no effect.
End of Table 3-16
SPRUGP2A—March 2012
Submit Documentation Feedback
KeyStone Architecture Serial Peripheral Interface (SPI) User Guide
3-19
3.15 SPI Interrupt Vector Register 1 (INTVEC1)
Chapter 3—Registers
3-20
KeyStone Architecture Serial Peripheral Interface (SPI) User Guide
www.ti.com
SPRUGP2A—March 2012
Submit Documentation Feedback
Appendix A
Timing Diagrams
This appendix contains timing diagrams illustrating the C2TDELAY, T2CDELAY, and
WDELAY delays and their interaction with the SPISCS[n] pins for all SPI modes.
A.1 SPI 3-Pin Mode
Figure A-1 illustrates the WDELAY option in SPI 3-pin master mode. This is the only
delay available in this mode. In CASE1, a new transfer is initiated during the WDELAY
period and the transfer begins immediately after the WDELAY period ends. In CASE2,
while WDELAY has completed, a new transfer will not begin until SPIDAT0/SPIDAT1
have been written with new data.
Figure A-1
SPI 3-Pin Master Mode with WDELAY
Case 1
SPICLK
(ii)
SPICLK
(iii)
SPICLK
SPICLK
a
(WDELAY)
(i)
(iv)
Case 2
SPICLK
SPICLK
SPICLK
SPICLK
(i)
a
(WDELAY)
(ii)
(iii)
(iv)
SPRUGP2A—March 2012
Submit Documentation Feedback
KeyStone Architecture Serial Peripheral Interface (SPI) User Guide
A-1
A.2 SPI 4-Pin with Chip Select Mode
Appendix A—Timing Diagrams
www.ti.com
A.2 SPI 4-Pin with Chip Select Mode
Figure A-2 illustrates the T2CDELAY, WDELAY and C2TDELAY delays in SPI 4-pin
with SPISCS[n] master mode. All the three delay periods T2CDELAY, WDELAY, and
C2TDELAY proceed to completion when enabled.
Figure A-2
SPI 4-Pin with SPISCS[n] Mode with T2CDELAY, WDELAY, and C2TDELAY
SPICLK
SPICLK
SPICLK
SPICLK
(i)
a
b
c
(T2CDELAY) (WDELAY) (C2TDELAY)
(ii)
(iii)
(iv)
SPISCS[n]
A-2
KeyStone Architecture Serial Peripheral Interface (SPI) User Guide
SPRUGP2A—March 2012
Submit Documentation Feedback
IMPORTANT NOTICE
Texas Instruments Incorporated and its subsidiaries (TI) reserve the right to make corrections, modifications, enhancements, improvements,
and other changes to its products and services at any time and to discontinue any product or service without notice. Customers should
obtain the latest relevant information before placing orders and should verify that such information is current and complete. All products are
sold subject to TI’s terms and conditions of sale supplied at the time of order acknowledgment.
TI warrants performance of its hardware products to the specifications applicable at the time of sale in accordance with TI’s standard
warranty. Testing and other quality control techniques are used to the extent TI deems necessary to support this warranty. Except where
mandated by government requirements, testing of all parameters of each product is not necessarily performed.
TI assumes no liability for applications assistance or customer product design. Customers are responsible for their products and
applications using TI components. To minimize the risks associated with customer products and applications, customers should provide
adequate design and operating safeguards.
TI does not warrant or represent that any license, either express or implied, is granted under any TI patent right, copyright, mask work right,
or other TI intellectual property right relating to any combination, machine, or process in which TI products or services are used. Information
published by TI regarding third-party products or services does not constitute a license from TI to use such products or services or a
warranty or endorsement thereof. Use of such information may require a license from a third party under the patents or other intellectual
property of the third party, or a license from TI under the patents or other intellectual property of TI.
Reproduction of TI information in TI data books or data sheets is permissible only if reproduction is without alteration and is accompanied
by all associated warranties, conditions, limitations, and notices. Reproduction of this information with alteration is an unfair and deceptive
business practice. TI is not responsible or liable for such altered documentation. Information of third parties may be subject to additional
restrictions.
Resale of TI products or services with statements different from or beyond the parameters stated by TI for that product or service voids all
express and any implied warranties for the associated TI product or service and is an unfair and deceptive business practice. TI is not
responsible or liable for any such statements.
TI products are not authorized for use in safety-critical applications (such as life support) where a failure of the TI product would reasonably
be expected to cause severe personal injury or death, unless officers of the parties have executed an agreement specifically governing
such use. Buyers represent that they have all necessary expertise in the safety and regulatory ramifications of their applications, and
acknowledge and agree that they are solely responsible for all legal, regulatory and safety-related requirements concerning their products
and any use of TI products in such safety-critical applications, notwithstanding any applications-related information or support that may be
provided by TI. Further, Buyers must fully indemnify TI and its representatives against any damages arising out of the use of TI products in
such safety-critical applications.
TI products are neither designed nor intended for use in military/aerospace applications or environments unless the TI products are
specifically designated by TI as military-grade or "enhanced plastic." Only products designated by TI as military-grade meet military
specifications. Buyers acknowledge and agree that any such use of TI products which TI has not designated as military-grade is solely at
the Buyer's risk, and that they are solely responsible for compliance with all legal and regulatory requirements in connection with such use.
TI products are neither designed nor intended for use in automotive applications or environments unless the specific TI products are
designated by TI as compliant with ISO/TS 16949 requirements. Buyers acknowledge and agree that, if they use any non-designated
products in automotive applications, TI will not be responsible for any failure to meet such requirements.
Following are URLs where you can obtain information on other Texas Instruments products and application solutions:
Products
Applications
Audio
www.ti.com/audio
Automotive and Transportation www.ti.com/automotive
Amplifiers
amplifier.ti.com
Communications and Telecom www.ti.com/communications
Data Converters
dataconverter.ti.com
Computers and Peripherals
www.ti.com/computers
DLP® Products
www.dlp.com
Consumer Electronics
www.ti.com/consumer-apps
DSP
dsp.ti.com
Energy and Lighting
www.ti.com/energy
Clocks and Timers
www.ti.com/clocks
Industrial
www.ti.com/industrial
Interface
interface.ti.com
Medical
www.ti.com/medical
Logic
logic.ti.com
Security
www.ti.com/security
Power Mgmt
power.ti.com
Space, Avionics and Defense
www.ti.com/space-avionics-defense
Microcontrollers
microcontroller.ti.com
Video and Imaging
www.ti.com/video
RFID
www.ti-rfid.com
OMAP Mobile Processors
www.ti.com/omap
Wireless Connectivity
www.ti.com/wirelessconnectivity
TI E2E Community Home Page
e2e.ti.com
Mailing Address: Texas Instruments, Post Office Box 655303, Dallas, Texas 75265
Copyright © 2012, Texas Instruments Incorporated