1
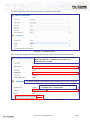
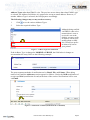
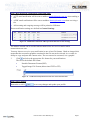
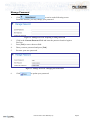
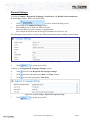
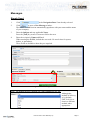
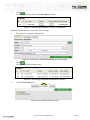
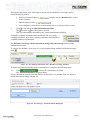
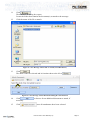
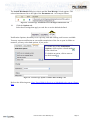
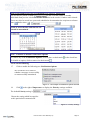
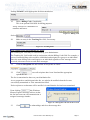
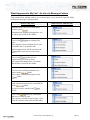
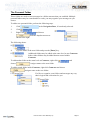
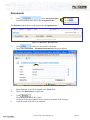
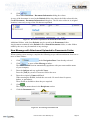
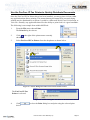
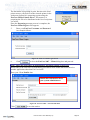
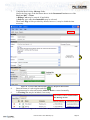
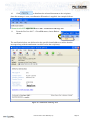
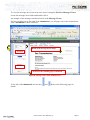
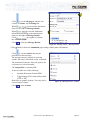
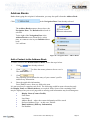
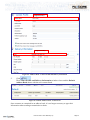
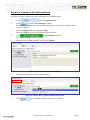
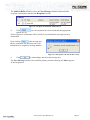
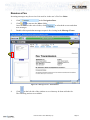
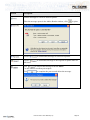
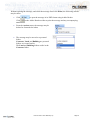
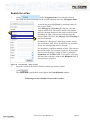
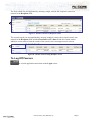
FaxCore 2007 User Manual Table of Contents Introduction ................................................................................................................................ 1 Contacting FaxCore ................................................................................................................... 1 Getting Started ........................................................................................................................... 2 Understanding FaxCore’s User Interface................................................................................... 3 Settings: Your User Profile ........................................................................................................ 4 Personal Information and Addresses ..................................................................................... 4 Manage Password .................................................................................................................. 8 General Settings ..................................................................................................................... 9 Messages .................................................................................................................................. 11 Simply Send ......................................................................................................................... 11 What Happened to My Fax? An Intro to Message Folders ................................................ 19 The Personal Folder ............................................................................................................. 21 The Sent Folder .................................................................................................................... 22 The Failed Folder ................................................................................................................. 22 Documents ............................................................................................................................... 23 New Message with Attachment Uploaded to Documents Folder ........................................ 25 Use the FaxCore IP Fax Printer to Quickly Distribute Documents ..................................... 27 Address Books ......................................................................................................................... 33 Add a Contact to the Address Book ..................................................................................... 33 Send to a Contact in the Address Book ............................................................................... 35 Receive a Fax ........................................................................................................................... 37 Search for a Fax ....................................................................................................................... 40 To Log Off Faxcore ................................................................................................................. 41 Table of Figures ....................................................................................................................... 42 FaxCore 2007™ User Manual (v1.0) TOC- 1 Introduction FaxCore is the next generation of network fax software; it is a high-performance engine designed to track, document, manage and deliver fax traffic over enterprise networks of any size. The only major fax solution built native for Microsoft's .NET platform, FaxCore lets your organization leverage the full potential of fax archiving vital data, speeding communication and fax-enabling your applications. FaxCore is technology that adapts to how you use fax every day. Not the other way around. The information provided in this guide instructs users how to send messages using FaxCore 2007. It also provides additional information on more advanced product features. The terms fax, message, and transmission are interchangeable and all are used throughout this document. Contacting FaxCore At FaxCore, we strive to provide you with the highest quality product support. Send your questions to [email protected]. Please send your feedback and comments regarding this documentation to [email protected]. FaxCore 2007™ User Manual (v1.0) Page 1 Getting Started This section offers quick step-by-step instructions on sending a message to a single recipient. This assumes that this user account has been configured by the administrator and has the permission for sending. 1. Launch Internet Explorer (IE 6.x or higher) and enter the FaxCore website URL (address) in the Address Bar. Mozilla’s Firefox web browser is also supported. Note: FaxCore URL (Address) Obtain the FaxCore address from your system administrator. Figure 1 - FaxCore Login Screen 2. Enter your Login and Password; click .. Upon successful login, the primary window appears. 3. Click if not already selected. Figure 2 - FaxCore Main Screen FaxCore 2007™ User Manual (v1.0) Page 2 Understanding FaxCore’s User Interface FaxCore is a 100% browser-based web application. It possesses a standard look and feel; it is easy to use especially if you have grown accustomed to products like Microsoft Outlook. Following is an introduction to FaxCore’s user interface. You will find that the interface is consistent throughout the application. The same components are used on each web page. The website consists of five primary sections; all are accessible from the Navigation Pane on the initial page. When Messages is selected, its folder structure displays. The five primary sections are as follows: Messages Access this section to manage all incoming and outgoing faxes. When faxes are received, they show in the Inbox. Other folders in this section are the Outbox, Sent, Failed, Cancelled, Hold, Trash, and Personal Folders. Address Book The Address Book encourages organization of personal information of those who will receive faxes from you. Documents Manage and organize documents. Settings Define your personal profile, change your password, and store company, regional, and notification settings. Search Search for a particular fax that resides in your fax library. Search using one or more message properties. Figure 3 - Navigation Pane To navigate to one of the five primary sections, merely click the section’s name in the Navigation Pane. In the example above, Messages has been selected. When a particular section is selected, its name shows in another color and its folder structure is accessible. In addition, the information to the right changes to reflect the selection. In this case all the folders in which messages may reside are listed above the Navigation Pane and the contents of the Inbox show to the right of the Navigation Pane. Click each of the sections in the Navigation Pane to see what appears above and to the right of the Navigation Pane. FaxCore 2007™ User Manual (v1.0) Page 3 Settings: Your User Profile User profiles and configuration options may be modified. This section explains how users may modify settings in their profiles. Click in the Navigation Pane to configure your User Profile. FaxCore allows us to define the following when establishing our profile. Click each link, one at a time and make the applicable entries. Personal Info (and Addresses) This section contains your user name and contact information. Manage Password Change your password regularly from this location. General Settings Enter your physical address. If you are an employee, enter your company’s name and address. Include your language and time zone. Define you default notification settings and if a cover page should be attached along with your fax transmission. Figure 4 - Settings - User Profile Configuration Refer to the following for additional details. Personal Information and Addresses This information is about you, the registered FaxCore User. The information entered becomes the default information required when sending a transmission to a recipient. 1. Click to access the Personal Information screen. Note: User Name (User Account Name) No changes may be made to the User Name field. 2. Press [Tab] to move from one field to the next. Enter and/or change all applicable information. 3. Click to update your profile. Refer to the following example. FaxCore 2007™ User Manual (v1.0) Page 4 The following shows the current information contained in each field. Figure 5 - Personal Information Next, notice the changes that this particular user has made to her personal information. The user has changed her Display Name and added a Middle Name and Address. In addition the send and receive notification have enabled. You will be notified at this address when transmissions are sent or received. Preferable notification delivery address depending on administrator‘s configuration. NOR NOS Figure 6 - Personal Information and Addresses with Changes FaxCore 2007™ User Manual (v1.0) Page 5 Address Types other than EMAIL exist. The previous screen shows that when EMAIL type is selected, the Address field below it is prepared to accept an email address. However, if another Address Type is selected, the field prepares accordingly. The following changes may or may not be necessary. 1. Click to see the various Address Types. 2. Select the required Address Type. Although being notified via EMAIL when a fax transmission is sent or received is set as the default, you may prefer an alert be sent to your mobile phone or land line. Would you prefer an alert to be sent to your printer? Figure 7 - Address Types for Notification If the Address Type is changed to MOBILE or PHONE, the field below it changes to accommodate the entry. Refer to the following example. Figure 8 - Notification via MOBILE The most common methods of notification are by Email, File, and Printer. When being notified via Email the Addresses section appears as follows. Notice the NOR (notification of receipt) and NOS (notification of send) at the base of the section. Notifications will be sent via Email. Figure 9 - Notification via Email (NOR and NOS are Enabled) FaxCore 2007™ User Manual (v1.0) Page 6 Note: More Detail on Notifications (NOR and NOS) A TIF email notification will be sent to mailbox [email protected] when sending a fax. A PDF email notification will be sent to mailbox [email protected] when receiving a fax. All incoming and outgoing message will be printed to IP Printer. Ensure notification settings are defined in General Settings. Figure 10 - Additional Notification of Receipt and Notification of Sent Settings The address entered can be notified when transmissions are received and/or when transmissions are sent. You may choose to receive your notification in one of two file formats. Both are imaged; this means that the text and/or graphics contained in the file can not be selected. As a result, no ability to copy and paste the content exists. The text can not be extracted; it is a graphic. 3. Click and select the appropriate file format for your notifications. The first is the default file format. Portable Document Format (PDF) Tagged Image File Format (abbreviated TIFF or TIF) Figure 11 - Notifications May Be Received in One of Two File Formats Note: Save Changes Remember to click to save any changes and update your profile. FaxCore 2007™ User Manual (v1.0) Page 7 Manage Password 1. Click to arrive at the following screen. From this location, you may change your password. Figure 12 - Manage Password - Preparing to Change Password 2. Click in the Current Password field and enter the password used to login to FaxCore. 3. Press [Tab] to move the next field. 4. Enter your new password and press [Tab]. 5. Re-enter your new password. Figure 13 - Manage Password - Changing Password Entries 6. Click to update your password. FaxCore 2007™ User Manual (v1.0) Page 8 General Settings To define Company, Regional & Language, Notification, and Default Send Attachment (Cover Page) settings, follow the steps below. 1. Click to arrive at the following screen. Begin with the Company Settings section. 2. Press [Tab] to move from one field to the next. Enter the address of your company or organization. The example that follows shows the physical address for FaxCore, Inc. The information entered here is used as the default information when sending a transmission. Figure 14 - General Settings - Company Settings 3. Click to update your profile. Continue to the Regional & Language Settings section. 4. Click and select the Regional & Language Settings. 5. Click and select the appropriate Date and Time formats. 6. Click to select the appropriate Time Zone. Figure 15 - General Settings - Regional & Language Settings 7. Click to update your profile. FaxCore 2007™ User Manual (v1.0) Page 9 Continue to the Notifications Settings section. 8. Click to place a check mark in the appropriate check boxes. Keep in mind you are defining default settings. Defaults settings are those settings you would like to have applied most often to a transmission received or sent. Figure 16 - General Settings - Notification Settings 9. Click to save changes and update your profile. Continue to the Default Send Attachment (Cover Page) section. By default a cover page is sent with each fax transmission. You may or may not require a cover page at your organization. If a cover page is required, do nothing. Figure 17 - General Settings - Default Send Attachment (Cover Page) 10. If no cover page is necessary, click to produce the dropdown menu and select None above Default Cover Page in the dropdown. Figure 18- General Settings - Default Send Attachment – No Cover Page Necessary If no cover page is necessary, this field shows as follows. Figure 19- General Settings - Default Send Attachment - Cover Page Field Empty 11. Click to update your profile. Your User Profile has been defined. Please, feel free to edit your profile at any time. FaxCore 2007™ User Manual (v1.0) Page 10 Messages Simply Send 1. Click in the Navigation Pane if not already selected. 2. Click to open a New Message window. The Sender Profile section automatically populates with your name and the name of your company. 3. Enter the Subject and any applicable Notes. Press the [Tab] key to move from one field to the next. 4. Enter the recipient’s Name and Fax #. When entering the FAX #, include the area code. No need exists for spaces, dashes, or parenthesis. These fields are bolded to show they are required. Figure 20 - New Message Window Note: The default delivery method for each transmission is FAX. Although the method of delivery is, by default, FAX, feel free to choose a different method when appropriate. FaxCore 2007™ User Manual (v1.0) Page 11 5. Click . The recipient’s name shows in the Recipients section. Figure 21 - New Message: Recipients (to Receive Transmission) Additional recipients may receive the same message. 6. Enter the next recipient’s information. Figure 22 - New Message: Another Recipient Receives the Same FAX 7. Click . The names of both recipients show. Figure 23 - New Message: Multiple Recipients Receive the FAX 8. Click the Documents tab. Figure 24 - New Message: Documents Tab FaxCore 2007™ User Manual (v1.0) Page 12 Documents that reside in the following locations may be attached to a message and be transmitted along with it. 9. FaxCore personal folders ( in this location) Shared (public) folder ( Your computer’s local drives or the network drives to which you have access , initially only the Default folder resides ) Click to the left of the Shared Documents folder. The becomes a once the folder is opened. The list of documents uploaded by the system administrator displays. Examples of shared documents may include the fax cover page, company brochures, price lists, contracts, and other documentation available within an organization. The Default Cover Page will be transmitted along with your message and any other attachments selected. To remove the Default Cover Page so it is not included along with this particular message click . Figure 25 - New Message: Documents Tab - Default Cover Page Attached To attach a document from the local or network drive, complete the following steps. 10. Click to locate the document(s) to attach. The Attach Documents dialog box shows. Select a document from the local hard drive, network drive, or personal FaxCore folder to attach and transmit along with the fax. Figure 26 - New Message: Attach Documents Dialog Box FaxCore 2007™ User Manual (v1.0) Page 13 11. Click . The Choose File dialog box opens. Locate the folder that contains the document(s) to attach to the message. 12. Click the name of the file to attach. Figure 27 - New Message: Choose File to Attach (Local Hard Drive) 13. Click . The name of the file selected and its location show to the left of . Figure 28 - New Message: Attach Documents Dialog Box with Selection 14. Click necessary. 15. Click to browse for an additional document to attach, if once all attachments have been selected. FaxCore 2007™ User Manual (v1.0) Page 14 The Attach Documents dialog box closes and the New Message screen appears. The selected attachments list to the right of the Documents tab. An example follows. Figure 29 - New Message: Attachments List to the Right of Documents Tab 16. Click the Options tab. Select those settings that apply to each fax or use the defaults defined. Notification Options, the ability to set a priority, and add a billing code become available. You may request notification on successful transmission of the fax or upon its failure to transmit; you may select both options, if you prefer. To enable any of the Notification Options, click to place a check mark in the check box. To disable an option, click to remove its check mark, . Figure 30 - New Message: Options Available When Sending a Fax Refer to the following note, Note: Faxes Held for Preview or Scheduled to be sent at a Future Date. FaxCore 2007™ User Manual (v1.0) Page 15 Note: Faxes Held for Preview or Scheduled to be sent at a Future Date The fax may be placed on hold ( ) in the event the sender or another individual must preview it before it is sent. It remains in the sender’s Outbox until released. Faxes may also be stored in a queue and scheduled to be transmitted to recipients at a future date ( ) and/or time ( ). ( ) Click to select the date and time the fax should be transmitted. Note: To Enable or Disable Notification Options To enable any of the Notification Options, click to place a check mark To disable an option, click to remove its check mark, in the check box. . Let us set the following. 17. Click to enable the following two Notification Options. We would like to be notified whether a message is successfully or unsuccessfully transmitted. Figure 31 - An Example of Notification Options Selected 18. Click to the right of Importance to display the Priority settings available. The default Priority setting is . Choose the setting which best applies to this particular fax transmission. Figure 32 - Priority Settings FaxCore 2007™ User Manual (v1.0) Page 16 Perhaps Normal is most appropriate for this transmission. 19. Enter a Billing Code, if applicable. This is an optional field used for billing purposes. It may consist of a combination of numbers and letters. Figure 33 - Billing Code Such as 20. . Make an entry in the Tracking No. field, if necessary. Figure 34 - Tracking Field Note: Billing Code and Tracking No. Fields The Tracking No. field may be customized by your administrator. The Tracking No. field could work in conjunction with the Billing Code field. For example, a series of internal billing codes could be established and assigned to a group or an individual. Since the same billing code would apply to an individual regardless of the message sent or received, it becomes easier to track those messages. 21. Click the Recipients tab and confirm all recipients are listed. 22. Click options are set. once all recipients have been listed and the appropriate The fax is transmitted to those on your distribution list. As we prepared to send this particular fax, we asked to be notified when the fax was successfully transmitted or if the transmission failed. Each recipient or an alternate will be notified via email that the fax has been transmitted. Upon clicking , this Windows Internet Explorer message advises us that the fax has been sent; each transmission is assigned a message number. Figure 35 - Message Box Advises the Fax is Sent 23. Click to acknowledge and close the message box. FaxCore 2007™ User Manual (v1.0) Page 17 The New Message window closes and the primary window showing our Inbox appears in the foreground. Now that you can see how easy it is to send a transmission, whether as a fax or in another form, suppose we discuss the various folders that show on the primary screen. It is important to know the purpose of each folder and why a certain message appears in one folder and not another. All the folders that show to the right, with the exception of New Folder, exist by default. Figure 36 - Folders that Store Transmissions The following table introduces the various folders that show above. The table explains the purpose of each folder and the actions that can be taken with the messages that reside in it. Refer to What Happened to My Fax? FaxCore 2007™ User Manual (v1.0) Page 18 What Happened to My Fax? An Intro to Message Folders Each transmission, whether sent by you or received by you is stored in a specific folder dedicated to that type of transmission. Where is my Fax? What can I do with this fax? Transmissions you receive from others reside in your . Transmissions assigned (delegated) to you by others also reside in this folder. Faxes in the are waiting to be sent. They may have been scheduled to be sent on another day or at another time. These transmissions will be moved to the folder once they are processed. Faxes in the folder are fax transmissions you sent to others. All completed transmissions, even those that failed are stored in this folder. Faxes not successfully transmitted are moved to the folder. These same transmissions appear in the folder. Only transmissions that were cancelled list in the folder. A copy of each is stored in the folder. Faxes in the folder are incomplete and not yet ready to send. They may be on hold for previewing. Once sent, they will be removed from this folder. FaxCore 2007™ User Manual (v1.0) Page 19 Where is my Fax? What can I do with this fax? Faxes in the are expected to be permanently removed eventually. However, they may be restored if not yet permanently deleted. The may house other folders you create to keep transmissions organized. Note: These items will be deleted when messages are purged by the system. The system administrator sets the purge rules. Now that you are familiar with the various folders and what they do, it is time to revisit the following three. Personal folder Sent folder Failed folder FaxCore 2007™ User Manual (v1.0) Page 20 The Personal Folder These folders are used to store messages in a folder structure that you establish. Multiple personal folders may be created and as a result, you may organize your messages as you choose. To add a new personal folder, perform the following steps. 1. Click in the Navigation Pane, if not already selected. 2. Click 3. Right-click . and choose from the dropdown menu as shown to the right. The following shows. 4. Type the name of the new folder and press the [Enter] key. Additional folders may be added at the same level as our Contracts folder. Other folders may be added that are nested within Contracts. To add another folder at the same level as Contracts, right-click choose and . Assign a name to the new folder. To add a nested folder inside Contracts, right-click Contracts and choose . Assign a name to the new folder. Feel free to organize your folders and messages any way that is logical and convenient for you. FaxCore 2007™ User Manual (v1.0) Page 21 The Sent Folder Click initiated. in the Folder List to see the fax transmissions you An example of faxes sent show below. Figure 37 - Transmission Sent One of three actions may be performed on the transmissions stored in this folder. The transmission may be tagged for deletion, forwarded or delegated to other users, or another attempt may be made to send the transmission which was not successfully sent the first time. The Failed Folder Click to show transmission attempts that were unsuccessful. Figure 38 - Transmission Attempted and Failed The following actions may be performed on faxes that reside in . These are the same actions that may be performed on messages in . FaxCore 2007™ User Manual (v1.0) Page 22 Documents 1. Click on the Navigation Pane. Document folders show above the Navigation Pane. The Default window shows to the right of the Navigation Pane. Figure 39 - Documents - Default Folder 2. Click to add a new document to the folder. The Create Document – Document Information dialog box appears. Figure 40 - Create Document - Document Information Dialog Box 3. Enter the name of the file to upload in the Name field. 4. Enter a file Description, if applicable. 5. Click . The Choose File dialog box opens. Locate the folder that contains the document(s) to attach to the message. 6. Click the name of the file to be attached. FaxCore 2007™ User Manual (v1.0) Page 23 Figure 41 - Choose File to Upload 7. Click . The name of the file selected and its location (path) show to the left of the Upload File field. in The Name and Upload File fields are bolded to show they are required. Figure 42 - Create Document - Document Information Dialog Box - File Selected to Upload FaxCore 2007™ User Manual (v1.0) Page 24 8. Click . The Create Document - Document Information dialog box closes. A copy of the document is saved to the Default folder since that is the folder selected in the Create Document - Document Information dialog box. The file also resides in its original location; it was only a copy of the file that was uploaded. Figure 43 - Document is Uploaded to the Default Document Folder Additional folders, aside from Default, may be nested in the Documents folder. Any document contained in the Default folder, Shared Documents folder, or other folders added by the user, may be attached to any message. New Message with Attachment Uploaded to Documents Folder When creating a new message, complete the following step to add an attachment from one or more of these folders. 1. Click in the Navigation Pane if not already selected. 2. Click to open a New Message window. The Sender Profile section automatically populates with your name and the name of your company. 3. Enter the Subject and any applicable Notes. Press the [Tab] key to move from one field to the next. 4. Enter the recipient’s Name and Fax #. When entering the FAX #, include the area code. No need exists for spaces, dashes, or parenthesis. These fields are bolded to show they are required. 5. Click . The recipients name shows in the Recipients section. 6. Click the Documents tab. Figure 44 - New Message: Document Tab FaxCore 2007™ User Manual (v1.0) Page 25 7. Click to the left of the Documents folder to display the Default folder nested within it. If the Default folder is visible, click the to its left. The becomes a once the folder is opened. A list of documents uploaded to this folder displays. In this example, only one file has been uploaded; the Rules and Regulations file resides in the Default folder. Documents often attached to messages may be organized in a collection of folders. 8. Double-click the name of the file to attach to the message. In this example, only the one file is available. The name of the file shows to the right of the Documents tab along with the Default Cover Page that it is provided. Figure 45 - An Uploaded Document is Attached 9. Click the Options tab. Select the settings that apply to each fax or use the defaults defined. Notification Options, the ability to set a priority, and add a billing code become available. You may request notification on the successful transmission of the fax or upon its failure to transmit; you may select both options, if you choose. 10. Click once all recipients have been listed, documents attached, and the appropriate options are set. Upon clicking , a message box advises us that the fax has been sent; each transmission is assigned a message number. Figure 46 - Message Box Advises the Fax is Sent 11. Click to acknowledge and close the message box. The New Message window closes and the primary window showing our Inbox appears in the foreground. FaxCore 2007™ User Manual (v1.0) Page 26 Use the FaxCore IP Fax Printer to Quickly Distribute Documents Once the FaxCore IP Fax Printer driver has been installed, you may print to it from within any application that allows printing. This means that any document (file) currently being worked may be distributed to recipients. It could be a Microsoft Word, Excel, PowerPoint, or Visio file. Actually, any application that offers the ability to print from it is a good candidate. The following is an example from within MS Word. 1. From the File menu choose Print. The Print dialog box shows. 2. Click to the right of the printer name currently showing. 3. Select FaxCore IP Fax Printer from the dropdown as shown below. Figure 47 - Printer Dialog Box with FaxCore IP Fax Printer Listed The FaxCore IP Fax Printer is selected. Figure 48 - Printer Dialog Box with FaxCore IP Fax Printer Selected 4. Click driver. to close the Print dialog box and print using the selected print FaxCore 2007™ User Manual (v1.0) Page 27 The document is preparing to print, but not to the local printer next to your desk or to the network printer in the workroom. Instead it is preparing to print using the FaxCore IP Fax Printer driver. This means it is preparing the file to be distributed to the list of recipients you select. Once the Preparing message process is complete, the FaxCore Client Login screen appears. 5. Enter your FaxCore Username and Password. An example follows. Figure 49 - FaxCore Client Login Screen 6. Click to close the FaxCore 2007 – Client dialog box and proceed. Note: This is the first time I’m distributing a document outside of FaxCore! What if this is the first time I’m distributing a document from within Microsoft Word or another application other that FaxCore itself? Enter your Client Profile data. Obtain this information from your system administrator. Figure 50 - FaxCore 2007 – Client Profile Data Click to save the entries. FaxCore 2007™ User Manual (v1.0) Page 28 7. Complete the necessary Message fields. Notice the first page of the document shows in the Document Preview area of the FaxCore 2007 – Client. A Billing Code may be entered, if applicable. A Delivery type other than Immediate may be selected. The Cover Page will be provided by default; however, it may be disabled when necessary. Figure 51 - FaxCore 2007 Client Sender, Message, Recipients Information 8. 9. Enter the name of each recipient and click . Recipients may be selected from the Address Book or entered manually. A Tracking No. may be included, if necessary. The names of those notified when the message is sent. Figure 52 - FaxCore 2007 – Recipients Named FaxCore 2007™ User Manual (v1.0) Page 29 10. Click to distribute the selected document to the recipients. Once the message is sent, a confirmation ID number is supplied. An example follows. Figure 53 - FaxCore 2007 - Confirmation of Message Sent 11. From the FaxCore 2007 – Client File menu, choose Exit as shown. The notification below was delivered to the specified email address to advise that the message along with the attachment was delivered to the recipient(s). Figure 54 - Notification of Message Sent FaxCore 2007™ User Manual (v1.0) Page 30 To view the message once it has been sent, access it using the FaxCore Message Viewer. Locate the message in its folder and double-click it. An example of the message sent shows below in the Message Viewer. Use the scroll bar just to the right of the thumbnails to see all pages sent in the transmission; click a thumbnail to show it full size. Details of the message show on Page 1. Thumbnail Thumbnail Scroll to see the remaining pages transmitted. Figure 55 - Message Viewer from within FaxCore To the left of the thumbnails are two tabs, details. and . Refer to the following page for FaxCore 2007™ User Manual (v1.0) Page 31 Click to see the Message #, when it was created, its Status, and Tracking No. While is selected, the document shows to the right of Message Details. When is selected, additional information pertaining to the transmission shows to the right of Message Details. Click once again to return to the document pages. Click to close the Message Details. Figure 56 - Message Viewer - Message Details Click (Dock) to show the thumbnail pages along with the other information. Click to see the Actions that may be performed on this message. The message may be printed, saved using another file name, forwarded, resent, or deleted. The transmission may be delivered again to all recipients or a selected number. The Output File is currently PDF. It may be either one of the following. Portable Document Format (PDF) Tagged Image File Format (abbreviated TIFF or TIF) Both files are graphic formats. Text may not be selected and/or copied. Click Figure 57 - Message Viewer - Actions to close Actions. FaxCore 2007™ User Manual (v1.0) Page 32 Address Books Rather than typing the recipient’s information, you may also pull it from the Address Book. Click in the Navigation Pane if not already selected. The Address Books structure shows above the Navigation Pane. The Default address book is selected. To the right of the Navigation Pane is the Address Books screen. Most likely, at this time, no contacts exist in your Default address book. Let’s add one. Figure 58 - Navigation Pane - Address Books Add a Contact to the Address Book To add a contact to the Default Address Book, follow the steps below. 1. Click if not already selected. 2. Click The menu shows. 3. Click . The following screen allows the entry of your contact’s profile and delivery information. 4. Enter the applicable information. Press [Tab] to move from one field to the next. or allow the mouse pointer to hover over it. It is not necessary to complete each field. The following would be most relevant, but only the Display Name and Email (address) are required fields. Some of the remaining fields may be displayed on your cover page and so entering such information may be advantageous. Display Name (Contact Profile) First Name Last Name Address Book – where the contact information will be stored Preferred Address Type – in this case, EMAIL Email (address) (Delivery Information) Fax Number FaxCore 2007™ User Manual (v1.0) Page 33 Required entry Required entry Figure 59 - Address Book - Contact Profile and Delivery Information 5. Click . The Contact Profile and Delivery Information window closes and the Default Address Book shows with the new contact listed. Figure 60 - Default Address Book - Contact Lists Once contacts are contained in an address book, it is no longer necessary to type their information when sending a transmission to them. FaxCore 2007™ User Manual (v1.0) Page 34 Send to a Contact in the Address Book It is time to send a transmission to the individual in our address book. 1. Click in the Navigation Pane. 2. Click to open a New Message window. The Sender Profile section automatically populates with your name and the name of your company. 3. Enter the Subject and any applicable Notes. Press the [Tab] key to move from one field to the next. 4. Click in the Recipients section. The Address Books window displays. 5. Select the correct address book; in this case, Default. Figure 61 - Address Books - Default with Listing 6. Click the name of the contact as shown below. Figure 62 - Address Books - Default with Recipient Selected 7. Click to include the selected contact as a recipient. FaxCore 2007™ User Manual (v1.0) Page 35 The Address Books window closes; the New Message window returns with the recipient’s information listed in the Recipients section. Figure 63 - Recipient from Default Address Book 8. Click options are set. once all recipients have been listed and the appropriate Each recipient or an alternate will be notified via email that the message has been transmitted. Upon clicking , this message box advises us that the fax has been sent; each transmission is assigned a message number. Figure 64 - Message Box Advises the Fax is Sent 9. Click to acknowledge and close the message box. The New Message window closes and the primary window showing our Inbox appears in the foreground. FaxCore 2007™ User Manual (v1.0) Page 36 Receive a Fax Incoming messages may be received via email or in the user’s FaxCore Inbox. 1. Click 2. Click in the Navigation Pane. to return to the Inbox folder. Once the Inbox is the active folder, click new messages. 3. to refresh the screen and show Double-click a particular message to open it for viewing in the Message Viewer. Figure 65 - Message Viewer - Read the Fax 4. Click on the left side of the window to see what may be done with the fax. The following actions are available. FaxCore 2007™ User Manual (v1.0) Page 37 Action Description Print the message to a local or network printer. When the message opens in the Adobe Reader window, click to print. Choose to forward this message to selected recipients. Choose still listed. to resend this message to the original recipients who are Click to remove this message from the Inbox. You are asked to confirm your request. Click to complete the process and delete the message. FaxCore 2007™ User Manual (v1.0) Page 38 Without opening the message, and while the message lists in the Inbox, the following actions may be taken. Click to open the message in its PDF format using Adobe Reader. Click on the Adobe Reader toolbar to print the message and any accompanying attachments. From the Actions menu, the message may be deleted or forwarded to others The message may be moved to a personal folder. Contracts, Land, and Building are personal folders we created earlier. The Land and Building folders reside in the Contracts folder. FaxCore 2007™ User Manual (v1.0) Page 39 Search for a Fax 1. Click in the Navigation Pane if not already selected. The fields on which a message can be searched display above the Navigation Pane. A search may be accomplished by entering criteria in one or more fields. If the Message # or Tracking # is known, enter the value in either field. Since these numbers are unique, only one message that meets the criteria will be found. Searching on either of these two fields provides the fastest results. However, the Message # and Tracking # may not be known. Searching by a Recipient’s name may produce a long list of messages. Still, this is an efficient way to search for the one message that must be located. It is possible to search on multiple criteria. This narrows the search results. For example, search for all messages sent or received during a range of dates by using the From Date and To Date fields. If you prefer, you may still enter the recipient’s name in the Recipient field, if you know how to spell it. Figure 66 – Search Fields – Enter Criteria 2. Enter the criteria in the field or fields on which you wish to search. 3. Click . The results of the search show to the right in the Search Results window. Following are two examples of successful searches. FaxCore 2007™ User Manual (v1.0) Page 40 The first search was accomplished by entering a single criteria; the recipient’s name was entered in the Recipient field. Figure 67 - Results of Search on Recipient's Name The second search was accomplished by entering multiple criteria; the recipient’s name was entered in the Recipient field and the From Date and To Date fields also contain entries. Multiple criteria tend to limit the results of the search; fewer messages meet the criteria. Figure 68 - Results of Search using Multiple Criteria To Log Off Faxcore to exit the application and return to the Login screen. FaxCore 2007™ User Manual (v1.0) Page 41 Table of Figures Figure 1 - FaxCore Login Screen............................................................................................................ 2 Figure 2 - FaxCore Main Screen ............................................................................................................. 2 Figure 3 - Navigation Pane ..................................................................................................................... 3 Figure 4 - Settings - User Profile Configuration ..................................................................................... 4 Figure 5 - Personal Information .............................................................................................................. 5 Figure 6 - Personal Information and Addresses with Changes ............................................................... 5 Figure 7 - Address Types for Notification .............................................................................................. 6 Figure 8 - Notification via MOBILE ...................................................................................................... 6 Figure 9 - Notification via Email (NOR and NOS are Enabled) ............................................................ 6 Figure 10 - Additional Notification of Receipt and Notification of Sent Settings .................................. 7 Figure 11 - Notifications May Be Received in One of Two File Formats .............................................. 7 Figure 12 - Manage Password - Preparing to Change Password ............................................................ 8 Figure 13 - Manage Password - Changing Password Entries ................................................................. 8 Figure 14 - General Settings - Company Settings................................................................................... 9 Figure 15 - General Settings - Regional & Language Settings ............................................................... 9 Figure 16 - General Settings - Notification Settings ............................................................................. 10 Figure 17 - General Settings - Default Send Attachment (Cover Page) ............................................... 10 Figure 18- General Settings - Default Send Attachment – No Cover Page Necessary ......................... 10 Figure 19- General Settings - Default Send Attachment - Cover Page Field Empty ............................ 10 Figure 20 - New Message Window....................................................................................................... 11 Figure 21 - New Message: Recipients (to Receive Transmission) ....................................................... 12 Figure 22 - New Message: Another Recipient Receives the Same FAX .............................................. 12 Figure 23 - New Message: Multiple Recipients Receive the FAX ....................................................... 12 Figure 24 - New Message: Documents Tab .......................................................................................... 12 Figure 25 - New Message: Documents Tab - Default Cover Page Attached ........................................ 13 Figure 26 - New Message: Attach Documents Dialog Box .................................................................. 13 Figure 27 - New Message: Choose File to Attach (Local Hard Drive)................................................. 14 Figure 28 - New Message: Attach Documents Dialog Box with Selection .......................................... 14 Figure 29 - New Message: Attachments List to the Right of Documents Tab ..................................... 15 Figure 30 - New Message: Options Available When Sending a Fax .................................................... 15 Figure 31 - An Example of Notification Options Selected ................................................................... 16 Figure 32 - Priority Settings .................................................................................................................. 16 Figure 33 - Billing Code ....................................................................................................................... 17 Figure 34 - Tracking Field .................................................................................................................... 17 Figure 35 - Message Box Advises the Fax is Sent ................................................................................ 17 Figure 36 - Folders that Store Transmissions ....................................................................................... 18 Figure 37 - Transmission Sent .............................................................................................................. 22 Figure 38 - Transmission Attempted and Failed ................................................................................... 22 Figure 39 - Documents - Default Folder ............................................................................................... 23 Figure 40 - Create Document - Document Information Dialog Box .................................................... 23 Figure 41 - Choose File to Upload ........................................................................................................ 24 Figure 42 - Create Document - Document Information Dialog Box - File Selected to Upload ........... 24 Figure 43 - Document is Uploaded to the Default Document Folder ................................................... 25 Figure 44 - New Message: Document Tab ........................................................................................... 25 Figure 45 - An Uploaded Document is Attached .................................................................................. 26 Figure 46 - Message Box Advises the Fax is Sent ................................................................................ 26 Figure 47 - Printer Dialog Box with FaxCore IP Fax Printer Listed .................................................... 27 Figure 48 - Printer Dialog Box with FaxCore IP Fax Printer Selected ................................................. 27 Figure 49 - FaxCore Client Login Screen ............................................................................................. 28 Figure 50 - FaxCore 2007 – Client Profile Data ................................................................................... 28 Figure 51 - FaxCore 2007 Client Sender, Message, Recipients Information ....................................... 29 Figure 52 - FaxCore 2007 – Recipients Named .................................................................................... 29 FaxCore 2007™ User Manual (v1.0) Page 42 Figure 53 - FaxCore 2007 - Confirmation of Message Sent ................................................................. 30 Figure 54 - Notification of Message Sent ............................................................................................. 30 Figure 55 - Message Viewer from within FaxCore .............................................................................. 31 Figure 56 - Message Viewer - Message Details.................................................................................... 32 Figure 57 - Message Viewer - Actions ................................................................................................. 32 Figure 58 - Navigation Pane - Address Books ...................................................................................... 33 Figure 59 - Address Book - Contact Profile and Delivery Information ................................................ 34 Figure 60 - Default Address Book - Contact Lists................................................................................ 34 Figure 61 - Address Books - Default with Listing ................................................................................ 35 Figure 62 - Address Books - Default with Recipient Selected ............................................................. 35 Figure 63 - Recipient from Default Address Book ............................................................................... 36 Figure 64 - Message Box Advises the Fax is Sent ................................................................................ 36 Figure 65 - Message Viewer - Read the Fax ......................................................................................... 37 Figure 66 – Search Fields – Enter Criteria ............................................................................................ 40 Figure 67 - Results of Search on Recipient's Name .............................................................................. 41 Figure 68 - Results of Search using Multiple Criteria .......................................................................... 41 FaxCore 2007™ User Manual (v1.0) Page 43