1
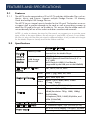
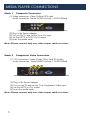
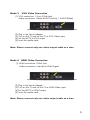
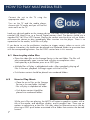
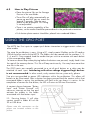
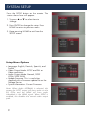
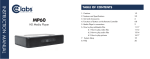
INSTRUCTION MANUAL
MP75
HD Media Player
TABLE OF CONTENTS
1. Caution
2
2. Features and Specifications
3
3. Unit and Accessories
4
4. Functions of Buttons on the Remote Control
4
5. Media Player’s Connections
5-6
6. How to Play Multimedia Files
7-8
6.1 How to play video files
7
6.2 How to play audio files
7
6.3 How to play pictures
8
7. Using the GPIO Port
8
8. System SETUP
9
9. FAQ
1
10
CAUTION
1. Caution
1.1
Please do not use this product in high temperature or humidity areas.
1.2
Keep the Media Player away from magnetic devices, since it might
effect data transfer of the product.
1.3
Please do not move or strike the Media Player while it is working.
1.4
Please use the power adapter included. Other power adapters may
damage the Media Player.
1.5
Please don't turn on the power until you finish connecting the Media
Player with TV.
1.6
When you power on the Media Player, please be patient as the boot
up time may be long if a Hard Drive is attached.
1.7
Please don’t remove the Storage Device while it is being read by the
Media Player. Please turn off power before removing Storage Device
to prevent any damage to the Media Player or Storage Device.
1.8
Please don’t turn off the power instantly after turning on the power as
this interrupts the boot process.
2
FEATURES AND SPECIFICATIONS
2.1
2.1.1
Features
The MP75 can be connected to a SD or HD TV and play Multimedia Files such as:
Movies, Music, and Pictures. Supports multiple Storage Devices: SD Memory
Cards and multiple USB Storage Devices.
The MP75 has an integral security bracket for the SD card. The bracket serves as
a support shelf to prevent damage to the card as well as providing a means to
attach the SD card to the unit via a cable tie. This ensures that the media card will
not accidentally fall out of the socket and deter unauthorized removals.
NOTE: In order to shorten the time for file search, we suggest you to put the same
types of files in the same folders, like all movies in one folder, all music in one folder,
etc. But it is also ok if the files are mixed in different folders, it will just take a bit longer
for the Media Player to classify and list the folders and files
2.2
Specifications
Item
Por table
Suppor ted Format
Memory cards
memor y
cards or
devices
USB Storage
Device USB
File System of S torage
Device
Suppor ted format
SDHC, SD, MMC, and MS can be directly
inserted into the Media Player
USB Flash Drive,
USB2.0 External Hard Disk Drive (2.5” or
3.5” HDD)
MP3 Player & USB2.0 Card Reader.
(supported by the USB port on the READER)
FAT, FAT16, FAT32 ,NTFS
Photo
JPEG (*.jpg), BMP, GIF, PNG
Audio
mp3, wma, mpa, aac,
Video
Audio
MPEG 1/2/4, WMV, MPG, H.264
(*.mpg, *.mpeg)
Stereo, HDMI, TOSLINK® (Only one at a time)
Composite Video (480i),
Output
HDMI (Resolution: 720p, 1080i, 1080p)
Video
24/50/60Hz
Component (720P, 1080P) 50/60Hz, and
VGA (1024x768)
Suppor ted T V mode
PAL, NTSC
Interactive Inter face
5 Pushbutton Inputs, 4 pin (see GPIO pin out)
Power supply
AC to DC Power adapter: 100 240V, 50/60Hz.
Power input to Media Player: 12V, 1.5A
UNIT AND ACCESSORIES
Media Player
AC Power Adapater
Remote Control
User’s Manual
Optional
1
1
1
1
Cables, Memory, Push Buttons
Remote Control Functions:
Power:
On or Off
Home:
Go to Home Menu Page
Numbers:
Press to emulate GPIO pushbuttons
Browser:
Navigate the attached memory device
Setup:
Change MP75 Parameters
Arrows:
Navigate Menu Options
Vol:
Volume Up or Down
Output:
AV, VGA, YUV, HDMI
IR Remote
Function
Power
To switch on and off / UNIT LED, Red = Off, Blue= On
Home
Go to the main menu
1
Press to play file(s) in folder number one on the Storage Device
2
Press to play file(s) in folder number two on the Storage Device
3
Press to play file(s) in folder number three on the Storage Device
4
Press to play file(s) in folder number four on the Storage Device
5
Press to play file(s) in folder number five on the Storage Device
Enter
Choose the currently highlighted selection
Move cursor upward
Move cursor downward
Move to left selection
Move to right selection
VOL-
Decrease the volume while playing Movie/Music.
VOL+
Increase the volume while playing Movie/Music.
Setup
Go to the setup menu
AV
Press to set unit output to Composite Video
VGA
Press to set unit output to VGA Video
YUV
Press to set unit output to Component Video
HDMI
Press to set unit output to HDMI Video
Note: You must remove Memory Card to switch VIDEO Output Format
MEDIA PLAYER CONNECTIONS
Mode 1
Composite Connection
(1) Video connection: Video (Yellow) RCA Jack
Audio connection: Stereo AUDIO-L(white) / AUDIO-R(Red)
(2)
(3)
(4)
(5)
Plug in the Power Adapter
Turn on the TV and set the TV to AV input
Set the MP75 to NTSC (A/V) output
Insert the media card.
Note: Please connect only one video output cable at a time.
Mode 2
Component Video Connection
(1) YUV connection: Video (Green, Blue, Red) RCA Jacks
Audio connection: Stereo AUDIO-L(white) / AUDIO-R(Red)
(2)
(3)
(4)
(5)
Plug in the Power Adapter
Turn on the TV and set the TV to Component Video input
Set the MP75 to YUV output
Insert the media card.
Note: Please connect only one video output cable at a time.
5
Mode 3
VGA Video Connection
(1) VGA connection: 15 pin D-Sub Jack
Audio connection: Stereo AUDIO-L(white) / AUDIO-R(Red)
(2)
(3)
(4)
(5)
Plug in the Power Adapter
Turn on the TV and set the TV to VGA Video input
Set the MP75 to VGA output
Insert the media card
Note: Please connect only one video output cable at a time.
Mode 4
HDMI Video Connection
(1) HDMI connection: HDMI Jack
Audio connection: Internal to HDMI Signal
(2)
(3)
(4)
(5)
Plug in the Power Adapter
Turn on the TV and set the TV to HDMI Video input
Set the MP75 to HDMI output
Insert the media card.
Note: Please connect only one video output cable at a time.
6
HOW TO PLAY MULTIMEDIA FILES
Connect the unit to the TV using the
appropriate cable.
Turn on the TV and the media player,
choose right TV mode, and you will see the
main menu on the TV.
Load your desired media on the storage device. You may use a USB memory stick, an
external USB Hard Drive, or a Secure Digital memory card. The device should use a
standard FAT16/32 or NTFS format. Placing the content onto the drive with no folders
will cause the content to play immediately after insertion into the player. There is no
separation for the media, so all files will play.
If you desire to use the pushbutton interface to trigger certain videos or music with
customer interaction, the media can be placed into numbered folders to associate them
with the corresponding buttons. See the GPIO section later in this manual.
6.1 How to play video files
• Place the video files on the Storage Device in the root folder. The files will
play automatically upon insertion and will play to completion unless
interrupted by a pushbutton press on a GPIO port.
• Multiple files will play in alphabetical order. After completely playing all
files in the root, playback will begin again with the first file.
• Push button content should be placed into numbered folders.
6.2
How to Play Music
• Place the music files on the Storage
Device in the root folder. Multiple
files will play in alphabetical order.
• Push button content should be
placed into numbered folders
While music files are playing, the MP75 will output a graphics screens with a
title of the media, and equalizer display, and a progress bar. There are no
options to advance to a next file. You may select an alternative music title by
pressing a GPIO push button associated with a folder that contains the desired
content.
7
6.3
How to Play Pictures
• Place the picture files on the Storage
Device in the root folder.
• These files will play automatically on
power up and will stay on screen for
around 7 seconds. Then the next
photo will be displayed. This timing
is not adjustable.
• There is no rotation capability of the
photos, so the media should be pre-rendered in the preferred orientation.
• Push button photo content should be placed into numbered folders.
USING THE GPIO PORT
The MP75 has five inputs to support push button interaction to trigger certain videos or
other media.
The setup for pushbuttons is easy. Using a PC, simply create 5 folders on the SD card or
USB drive to be used with the MP75. The folders must be named with the numbers 1, 2,
3, 4, and 5. Once created, load the media that you wish to associate with each button
in the corresponding folder.
To have an attract loop video playing before the buttons are pressed; simply load it into
the root of the memory device. This file will loop continuously. You may have more than
one file in the root.
The GPIO ports are normally connected to a set of push buttons or a relay may be
attached to each input. Interfacing with other voltage triggered logic devices
is not recommended. In other words, a dry contact closure system only, please.
Two pins are provided to power LED indicators within the pushbutton. This allows all
buttons to be illuminated. After a button has been pressed and the content within that
associated folder is active, the pushbutton will flash to let you know it is active. At the
completion of content for that button, the LED will return to full time illumination.
A contact closure between “Button
Input” and “Button Ground” will
cause an interrupt on that line and
activate the media in the folder
associated with that button input.
I.E.: Pressing button 3 will play
content stored in folder #3 on the
SD or USB drive.
Please note the connectors on the
player are inverted relative to this
picture.
8
SYSTEM SETUP
Press the SETUP button on the remote. The
screen shown here will appear.
1. To press ▲ or ▼ to select item to
change
2. Press ENTER to change the setup. Press
HOME to return to previous menu.
3. Keep pressing HOME to exit from the
SETUP screen.
Setup Menu Options
• Language: English, Deutsch, Spanish, and
French
• Video Output Mode: NTSC and PAL or
Video resolutions
• Audio Output Mode: Normal, SPDIF
LCPM, SPDIF RAW
• Update firmware: This is used when
supplied with a firmware update file on the
Storage Device
• System Information: Current Firmware
Note: When Audio NORMAL is selected, this
means the NTSC output will have audio on the
R/L RCAs and the HDMI will have audio
imbedded in the HDMI signal. When SPDIF is
enabled, this disables the normal audio output
path.
9
FAQ
Q: Why can’t I see any video on the HDMI monitor?
The unit may be set to output on the Composite, Component, or VGA Video
output ports. The MP75 does not support dual simultaneous output. The Video
Output Mode must match the type of cable and monitor attached to the player.
Do not connect more than one output at a time to the player. This will degrade
the output quality. Remove the storage device to stop playback and press the
desired A/V output button on the remote to change.
Q: The unit will not play my files but I can see them on the computer?
The SD card may have corrupt files on it that could confuse the player. Reformat
the SD card and reload your content. (Do not use “Quick Format”)
Please check if the media files are the formats supported by the media player
(Media files format please refer to 2.2 Specifications.)
Q: How do I change photo transitions, or rotation, or slide display
length?
Sorry, these parameters are fixed and are not user adjustable.
Q: There is a display, but the brightness is very low, why?
It is very likely that there is more than one video output cable connected. Only
connect one video output cable at a time for maximum performance.
Q: How do I change Video Output? The buttons on the remote don’t
work.
The output may be changed by going to setup and changing the video output
in the menu, or you may use the direct access buttons on the remote. Before the
direct access buttons are active, you must stop playback and remove the
memory card from the MP75. Change to the desired output and reinsert the
memory card.
10
WARRANTY
Cable Electronics, Inc. warrants this product to be free from defects in
material and workmanship, under normal use and service, for a period of
one year from the purchase by the original purchaser. If this product is
defective or malfunctions, Cable Electronics will replace or repair this unit (at
their option) within a reasonable time. No expressed or implied warranty is
made for any defects caused by immersion or exposure to liquids, abuse,
neglect, improper operation of unit, excess wear and tear and defects
resulting from unauthorized disassembly and or modification.
3209 Wood Drive
Garland, TX 75041
Phone: (469) 429-9200
Toll free: (800) 767-6189
Fax: (469) 429-9205
www.celabs.net
Document: MP75_manual.pdf
930-2214-01_Rev.A