Transcript
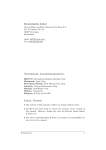
What’s in the box:
OutstandingPet ®
Remote Trainer LR – 800M
Thank you for choosing the OutstandingPet Remote Trainer LR-800M!
With an extended 875 yard range and a fully waterproof Receiver
Collar, the LR-800M is designed for active outdoor use and field
training. This unit is recommended for use with medium to large sized
dogs. With this unit you will be able to apply consistent training
responses to gradually adjust your dog’s behavior. This remote trainer
has been used in eliminating nuisance barking, curbing aggressive
behavior to humans or other dogs, establishing territorial boundaries in
your home, training dogs to walk by their owner's heels without a leash,
or assist in potty-training. Whatever your training needs, indoors or
outdoors, the LR-800M will begin working from day one.
Receiver Collar
Contact Point
We are confident you and your dog will be pleased with the results from
your purchase. If you need any further assistance, please feel free to visit
out website for technical support or warranty claims at:
www.outstandingpet.com
Receiver Collar Test Light
Remote Transmitter
O-rings
Remote Trainer LR – 800M
User Manual
USB Charger Cable/AC Charger Adapter
USB AC Adapter
Remote Transmitter Lanyard
Please read this manual carefully before using the product.
Features
• 875 Yard (800 Meter) Range
• 2.4G ISM Digital Transmission
• Adaptive Frequency Hopping (AFH) technology
• Rechargeable Remote Transmitter and Receiver Collar
• Waterproof Receiver Collar
• Active Connectivity & Battery Level Indicators on Unit
• 7 Progressive Levels of Correction
• 2 Modes of Correction (Vibration & Electrical Stimulation)
• 1 Year Limited Warranty
Table of Contents
Operating Guide
Operating Guide………………………………………........….......3
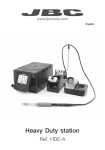
1) Charging the Receiver Collar
1. Lift the rubber cover on the Receiver Collar.
2. Connect the USB Charger Cable into the USB AC Adapter.
3. Connect one of the AC Charging Adapter connectors (either
connector will work) into the Receiver Collar Charging Interface
(figure 1) for 6 to 8 hours (on the first use of the product, charge the
Receiver Collar for 12 to 14 hours).
4. While the Receiver Collar is charging it will have a solid red light.
5. When the Receiver Collar is fully charged, the red light will blink
every four seconds; the red light will flash every one second if the
Receiver Collar needs to be recharged.
6. When charging is complete, replace the rubber cover over the
Receiver Collar Charging Interface.
Charging the Receiver Collar………………………………..........4
Turning On / Off the Receiver Collar…………...........…………..4
Charging the Remote Transmitter……………..........……............4
Turning On / Off the Remote Transmitter…………….....………5
Pairing the Receiver Collar and Remote Transmitter…….........…..5
Turning On / Off the Receiver Collar – Indicator Lights
Receiver Collar Indicator Light Receiver Collar Status
Red light is off
Receiver Collar is turned off
Red light blinks every 4 seconds Receiver Collar is turned on
Operating the Remote Transmitter…………………….................6
Remote Transmitter Sleep Mode………………………….............7
figure 1 – Receiver Collar Charging Interface
Charging the Receiver Collar – Indicator Lights
Receiver Collar Indicator Light Receiver Collar Status
Red light is solid in color
Receiver Collar is charging
Red light blinks every 4 seconds Receiver Collar is charged
Red light blinks every second
Receiver Collar requires charging
3
4. While the Remote Transmitter is flashing"code" on the LCD, hold
down the power switch on the Receiver Collar for 10 seconds. The
Receiver Collar Indicator Light will turn on first as a solid light,
then it will begin to blink rapidly (as it seeks to pair with the Remote
Transmitter); when the Receiver Collar's Indicator Light begins to
blink, release the Power Switch on the Receiver Collar (ensuring that
the Remote Transmitter is still flashing "code").
5. The Remote Transmitter and Receiver Collar should pair within two
to three seconds.
6. If the Receiver Collar and Remote Transmitter pair successfully, the
Receiver Collar Indicator Light will blink four times and go solid.
The Remote Transmitter LCD will no longer display "code" to
indicate a successful pairing.
7. If the Receiver Collar and Remote Transmitter do not pair
successfully, the Remote Transmitter LCD will display the number
"8" and go back to the default Power Up status; please repeat steps 1
through 6, if you do not initially pair the units successfully.
6) Testing the Receiver Collar and Remote Transmitter Pairing
1. Place the Test Light on the Skin Contacts of the Receiver Collar.
2. Press the
button on the Remote Transmitter, the Test Light
will turn on (figure 5).
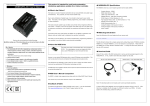
figure 6 – Remote Transmitter
figure 5 – Receiver Collar Test Light Turning On
7) Adjusting the Collar Receiver
1. Turn the Receiver Collar off.
2. Place the Receiver Collar on the dog and ensure the contact points
are centered underneath the dog’s neck.
3. Tighten the Receiver Collar straps and attach the Receiver Collar
Strap to the Receiver Collar Buckle.
4. Pull any excess strap material through the Receiver Collar Loop.
5. For optimal results, ensure the Receiver Collar is snug on the dog’s
neck, but you should be able to insert one finger between the
Receiver Collar and the dog’s neck.
figure 4 – Receiver Collar Test Light
7
8) Operating the Remote Transmitter
8
Increase Correction Level
Press the
button to increase the Correction Level.
Each press of the
button increases the Correction
Level by one step (out of seven total). The LCD will
increase the corresponding level. If you hold the
button for more than three seconds, the Remote
Transmitter can be powered-on or powered-off.
Electric Stimulation
Press the
button to send an Electric Stimulation to the
Receiver Collar. When the Electric Stimulation is
successfully sent, the Remote Transmitter will display on the
LCD a number between 1 and 7 indicating the Correction
Level applied and the Electric Stimulation symbol (figure 7).
If the Electric Stimulation is not sent successfully, the
Correction Level number and the Electric Stimulation
Symbol will not display on the Remote Transmitter. If the
button is held down, an Electric Stimulation will be
sent for five consecutive seconds, turn off for five seconds,
and then be sent for another five consecutive seconds,
continued indefinitely, until the user releases the
button.
Vibration
Press the
button to send a Vibration to the Receiver
Collar. Each Vibration lasts for three seconds and will
continue indefinitely. If the Vibration is sent successfully to
the Receiver Collar, the Remote Transmitter LCD will
display the Vibration Symbol (figure 7).
Decrease Correction Level
Press the
button to decrease the Correction
Level. Each press of the
button decreases the
Correction Level by one step (out of seven total). The
LCD will display the corresponding level.
9
10
Receiver Collar
Charging Interface
figure 2 – Receiver Collar Power Switch and Charging Interface
Adjusting the Collar Receiver………………………….........……5
OutstandingPet (1) Year Limited Warranty...................................12
Contact Points
3) Charging the Remote Transmitter
1. Lift the rubber cover on the Remote Transmitter
2. Connect one of the AC Charging Adapater connectors (either
connector will work) into the Remote Transmitter Charging Interface
(figure 3) for six to eight hours (on the first use of the product, charge
the Remote Transmitter for 12 to 14 hours).
3. When the Remote Transmitter is connected for charging, the Remote
Transmitter LCD Display will activate and the Battery Charge
Indicator will show a repetitive charging graphic. When the unit is
fully charged the Battery Charge Indicator will show three bars.
4. You can monitor the battery level in the Remote Transmitter LCD
Display, by checking the Battery Charge Indicator.
Power switch
Testing the Receiver Collar and Remote Transmitter Pairing…......5
Remote Trainer Best Practices & Precautions.……………….........9
2) Turning On / Off the Receiver Collar
1. Press the Power Switch (figure 2) for three seconds to turn on the
Receiver Collar (the red light will go solid and begin to blink every
four seconds if sufficiently charged)
2. While the Receiver Collar is on, press the Power Switch for three
seconds to turn off the Receiver Collar (the red light will turn solid
and then turn completely off)
Electric
stimulation display
Vibration display
Stimulation
level display
Code pairing display
figure 7 – LCD Display Window
on Remote Transmitter
9) Remote Transmitter Sleep Mode
If the Remote Transmitter and Receiver are not operated for a period
of time, the Remote Transmitter will automatically go into Sleep
Mode and turn of the LCD Display Window. If you press any
button on the Remote Transmitter, it will power up to the normal
“On” state.
10) Remote Trainer & Best Practices
1. Some dogs will require multiple trainings session to be
comfortable with the Remote Trainer.
2. Under normal circumstances this product will work from 875
yards (800M); however, if there obstacles between the Remote
Transmitter and Receiver Collar it may reduce the effective
transmissions range of the Remote Trainer.
3. The Receiver Collar is completely waterproof and designed for
active outdoor use; this product warranty covers water damage.
4. This product is intended for use on pets such as dogs. DO NOT
use it on the human body in any way.
5. Never leave the Receiver Collar on your dog’s neck for more than
12 hours every day.
11
5) Pairing the Receiver Collar and Remote Transmitter
Note: This unit comes pre-paired; if you wish to connect an existing
component with a new component, then proceed with the pairing
process described below.
1. Power down the Remote Transmitter, by holding the
button for
four seconds (Once the LCD is blank, confirm the Remote
Transmitter is turned off by pressing the
button and make
sure the Remote Transmitter is not in Sleep Mode).
2. Power down the Receiver Collar by holding down the Power Switch
for four seconds (confirm the Receiver Collar Indicator Light is off).
3. While the Remote Transmitter is off, Hold the
button on the
Remote Transmitter for ten seconds; it will first display the number
“1” (which is the normal Power Up state) and then it will begin to
blink “code” on the lower lerft of the Remote Transmitter LCD
Display. Release the
button, when “code” is flashing.
figure 3 – Charging the Remote Transmitter
4
Battery
charge indicator
4) Turning On / Off the Remote Transmitter
1. Hold the
button for three seconds to power up the
Remote Transmitter (the LCD will turn on to indicate a successful
power-up).
2. While the Remote Transmitter is turned on, hold the
button for
three seconds to power down the unit (the LCD will turn off to
indicate the successful power down).
OutstandingPet (1) Year Limited Warranty
WARRANTY COVERAGE
OutstandingPet’s warranty obligations for this product are limited to
the terms set forth below:
Sunfire Enterprises, LLC - OutstandingPet("OutstandingPet")
warrants this product against defects in materials and workmanship,
when subject to normal and proper residential use, for a period of
ONE (1) YEAR from the date of original retail purchase, If a defect
exists, at its option OutstandingPet will (1) repair the product at no
charge, using new or refurbished replacement parts, (2) exchange the
defective product component with a replacement product component
which has been manufactured from new or serviceable used parts and
is at least functionally equivalent to the original product or defective
component, or (3) refund the purchase price of the product. A
replacement product/part assumes the remaining warranty of the
original product or thirty (30) days from the date of replacement or
repair, whichever provides longer coverage for you.
This warranty does not apply: (1) to consumable parts, such as
batteries, unless damage has occurred due to a defect in materials and
workmanship; (2) to cosmetic damage, including but not limited to
scratches, dents, and broken plastic; (3) to damage caused by use with
non-OutstandingPet products; (4) to damage caused by accident,
abuse, misuse, flood, fire, earthquake or other external causes; or (5) to
a product or part that has been modified to alter functionality or
capability.
OutstandingPet will not be liable under this warranty for any defect,
failure or malfunction of any of its products caused by normal wear,
abuse, misuse, unauthorized adjustments or disassembling. OutstandingPet will not be liable for any consequential damages resulting from
12
5
6
any defect in material or workmanship of any of its products. Some
states do not allow limitations on how long an implied warranty lasts
or exclusion or limitation of incidental or consequential damages, so
the above limitations or exclusions may not apply to you.
Warranty is non-transferrable and shall automatically terminate if
the original retail consumer purchaser resells the OutstandingPet
product or transfers the property on which the OutstandingPet
product is installed.
OBTAINING WARRANTY SERVICE
To obtain warranty service, you must follow OutstandingPet’s warranty
process. To begin the process, please send us an email at
[email protected] describing the nature of the problem in
this email include your full name, email address, date of purchase,
phone number, and where you purchased the product; otherwise, you
may also call the OutstandingPet Customer Support group at
866-933-8429 to begin your claim. You will be responsible for all
return shipping costs under this warranty.
This device complies with part 15 of the FCC Rules. Operation is subject to
the following two conditions:
(1) This device may not cause harmful interference, and (2) this device
must accept any interference received, including interference that may cause
undesired operation.
CAUTION: Modification or changes to this equipment not expressly approved
by OutstandingPet may void the user’s authority to operate the equipment.
13
Copyright 2012
OutstandingPet®
www.outstandingpet.com