1
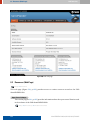
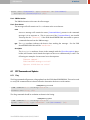
User Manual
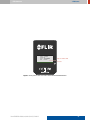
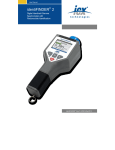
identiFINDER® R300
Digital Handheld Gamma Spectrometer with
Radionuclide Identi cation
identiFINDER® R300/en/2014.4(13623)/Feb2015
FLIR Detection
This document is changed in accordance with our Quality Management system. All changes are
archived.
Revision
identiFINDER® R300/en/2014.4(13623)/Feb2015
Product
FLIR identiFINDER R300
Language
Version
Latest Change
English (en)
2014.4 (13623)
February 19, 2015 at 13:49 (UTC-0600h)
nanoRaider® is a registered trademark of FLIR Detection, Inc.
FLIR® is a registered trademark of FLIR Systems, Inc.
All other trademarks belong to their respective holders.
Copyright © 2012–2015 FLIR Detection, Inc.
All rights reserved.
2
identiFINDER® R300/en/2014.4(13623)/Feb2015
FLIR Detection
CONTENTS
Contents
List of Figures
9
1 Welcome
17
1.1
Conventions Used in This Document . . . . . . . . . . . . . . . . . . . . . . . . . . .
17
1.2
Safety Warnings . . . . . . . . . . . . . . . . . . . . . . . . . . . . . . . . . . . . . . .
18
1.3
Before First Use . . . . . . . . . . . . . . . . . . . . . . . . . . . . . . . . . . . . . . .
18
1.4
The FLIR identiFINDER R300 . . . . . . . . . . . . . . . . . . . . . . . . . . . . . . .
19
1.5
Unpacking and Identifying Accessories . . . . . . . . . . . . . . . . . . . . . . . . . .
20
1.6
Instrument Description and Application Overview . . . . . . . . . . . . . . . . . . .
24
2 Operating the FLIR identiFINDER R300
2.1
27
The FLIR identiFINDER R300 Display . . . . . . . . . . . . . . . . . . . . . . . . . . .
29
2.1.1
Status LEDs . . . . . . . . . . . . . . . . . . . . . . . . . . . . . . . . . . . .
31
The FLIR identiFINDER R300 Keys . . . . . . . . . . . . . . . . . . . . . . . . . . . .
32
2.2.1
Using Command Lists . . . . . . . . . . . . . . . . . . . . . . . . . . . . . .
35
2.2.2
Choosing from Menus . . . . . . . . . . . . . . . . . . . . . . . . . . . . . .
35
2.2.2.1
Scrolling in Menus . . . . . . . . . . . . . . . . . . . . . . . . .
37
2.2.3
Changing Values . . . . . . . . . . . . . . . . . . . . . . . . . . . . . . . . . .
37
2.2.4
Changing Composite Values . . . . . . . . . . . . . . . . . . . . . . . . . . .
40
2.2.5
Changing Numerical Values . . . . . . . . . . . . . . . . . . . . . . . . . . .
41
2.2.6
Entering Text . . . . . . . . . . . . . . . . . . . . . . . . . . . . . . . . . . .
43
2.2.7
Entering the Password . . . . . . . . . . . . . . . . . . . . . . . . . . . . . .
46
2.2.8
Taking Screenshots . . . . . . . . . . . . . . . . . . . . . . . . . . . . . . . .
49
2.3
The FLIR identiFINDER R300 Holster . . . . . . . . . . . . . . . . . . . . . . . . . . .
50
2.4
The FLIR identiFINDER R300 Web Server . . . . . . . . . . . . . . . . . . . . . . . .
51
2.4.1
Operating the Web Server Pages . . . . . . . . . . . . . . . . . . . . . . . .
51
2.4.2
Tables on Web Pages . . . . . . . . . . . . . . . . . . . . . . . . . . . . . . .
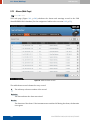
55
2.4.3
Records on Web Pages . . . . . . . . . . . . . . . . . . . . . . . . . . . . . .
56
2.4.4
Printing Web Pages . . . . . . . . . . . . . . . . . . . . . . . . . . . . . . . .
59
2.4.5
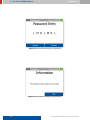
Password Entry . . . . . . . . . . . . . . . . . . . . . . . . . . . . . . . . . .
59
2.4.6
Administration Access . . . . . . . . . . . . . . . . . . . . . . . . . . . . . .
60
Starting Up the FLIR identiFINDER R300 . . . . . . . . . . . . . . . . . . . . . . . . .
62
2.2
2.5
identiFINDER® R300/en/2014.4(13623)/Feb2015
3
CONTENTS
FLIR Detection
2.6
Shutting Down the FLIR identiFINDER R300 . . . . . . . . . . . . . . . . . . . . . . .
64
2.7
Low Power Conditions . . . . . . . . . . . . . . . . . . . . . . . . . . . . . . . . . . .
65
2.8
Resetting the FLIR identiFINDER R300 . . . . . . . . . . . . . . . . . . . . . . . . . .
66
3 Field Operating Guide
69
3.1
Switching On and Checking the Instrument . . . . . . . . . . . . . . . . . . . . . . .
70
3.2
Observing the Environment . . . . . . . . . . . . . . . . . . . . . . . . . . . . . . . .
70
3.2.1
Gamma Radiation Survey . . . . . . . . . . . . . . . . . . . . . . . . . . . .
70
3.2.2
Neutron Radiation Survey . . . . . . . . . . . . . . . . . . . . . . . . . . . .
71
3.3
Locating a Radiation Source . . . . . . . . . . . . . . . . . . . . . . . . . . . . . . . .
73
3.4
Identifying a Radiation Source . . . . . . . . . . . . . . . . . . . . . . . . . . . . . . .
75
3.5
Communicate with a Local Computer . . . . . . . . . . . . . . . . . . . . . . . . . . .
77
3.6
Sending Results to a Remote Server . . . . . . . . . . . . . . . . . . . . . . . . . . . .
81
3.7
Switching Off . . . . . . . . . . . . . . . . . . . . . . . . . . . . . . . . . . . . . . . . .
84
4 FLIR identiFINDER R300 Modes
85
4.1
Dose Rate Mode . . . . . . . . . . . . . . . . . . . . . . . . . . . . . . . . . . . . . . .
86
4.2
Finder Mode . . . . . . . . . . . . . . . . . . . . . . . . . . . . . . . . . . . . . . . . .
88
4.3
Identi ication Mode . . . . . . . . . . . . . . . . . . . . . . . . . . . . . . . . . . . . .
90
4.4
Automated Mode . . . . . . . . . . . . . . . . . . . . . . . . . . . . . . . . . . . . . . .
93
4.5
Remote-Controlled Spectrum Acquisition . . . . . . . . . . . . . . . . . . . . . . . .
95
5 FLIR identiFINDER R300 Alarms
5.1
Gamma Alarms . . . . . . . . . . . . . . . . . . . . . . . . . . . . . . . . . . . . . . . .
5.2
Neutron Alarms . . . . . . . . . . . . . . . . . . . . . . . . . . . . . . . . . . . . . . . 101
5.3
Sigma Noti ications . . . . . . . . . . . . . . . . . . . . . . . . . . . . . . . . . . . . . 101
6 FLIR identiFINDER R300 Menu Reference
4
97
98
103
6.1
Complete Option Menus (Outline) . . . . . . . . . . . . . . . . . . . . . . . . . . . . . 103
6.2
Spectrum . . . . . . . . . . . . . . . . . . . . . . . . . . . . . . . . . . . . . . . . . . . 106
6.3
Calibration . . . . . . . . . . . . . . . . . . . . . . . . . . . . . . . . . . . . . . . . . . 115
6.4
Identi ication Settings . . . . . . . . . . . . . . . . . . . . . . . . . . . . . . . . . . . . 116
6.5
Nuclide Visibility . . . . . . . . . . . . . . . . . . . . . . . . . . . . . . . . . . . . . . . 118
6.6
Nuclide Usage . . . . . . . . . . . . . . . . . . . . . . . . . . . . . . . . . . . . . . . . . 119
6.7
Nuclide Severity . . . . . . . . . . . . . . . . . . . . . . . . . . . . . . . . . . . . . . . 120
6.8
Presets . . . . . . . . . . . . . . . . . . . . . . . . . . . . . . . . . . . . . . . . . . . . . 121
6.9
Display Settings . . . . . . . . . . . . . . . . . . . . . . . . . . . . . . . . . . . . . . . 122
6.10
Clock Settings . . . . . . . . . . . . . . . . . . . . . . . . . . . . . . . . . . . . . . . . . 125
6.11
GPS Settings . . . . . . . . . . . . . . . . . . . . . . . . . . . . . . . . . . . . . . . . . . 127
identiFINDER® R300/en/2014.4(13623)/Feb2015
FLIR Detection
CONTENTS
6.12
Set Password . . . . . . . . . . . . . . . . . . . . . . . . . . . . . . . . . . . . . . . . . 128
6.13
Clear Password . . . . . . . . . . . . . . . . . . . . . . . . . . . . . . . . . . . . . . . . 129
6.14
Show Status . . . . . . . . . . . . . . . . . . . . . . . . . . . . . . . . . . . . . . . . . . 130
6.15
Reset Factory Settings . . . . . . . . . . . . . . . . . . . . . . . . . . . . . . . . . . . . 132
6.16
Erase All Spectra . . . . . . . . . . . . . . . . . . . . . . . . . . . . . . . . . . . . . . . 133
6.17
Erase All Alarms . . . . . . . . . . . . . . . . . . . . . . . . . . . . . . . . . . . . . . . 133
6.18
Erase All Screenshots . . . . . . . . . . . . . . . . . . . . . . . . . . . . . . . . . . . . 134
6.19
Self Test . . . . . . . . . . . . . . . . . . . . . . . . . . . . . . . . . . . . . . . . . . . . 134
6.20
Automated Mode Settings . . . . . . . . . . . . . . . . . . . . . . . . . . . . . . . . . . 135
6.21
Send Identi ication . . . . . . . . . . . . . . . . . . . . . . . . . . . . . . . . . . . . . . 137
6.22
Send Spectrum . . . . . . . . . . . . . . . . . . . . . . . . . . . . . . . . . . . . . . . . 140
6.23
Bluetooth . . . . . . . . . . . . . . . . . . . . . . . . . . . . . . . . . . . . . . . . . . . 141
6.23.1
Bluetooth SPP Status . . . . . . . . . . . . . . . . . . . . . . . . . . . . . . . 141
6.23.2
Bluetooth SPP Settings . . . . . . . . . . . . . . . . . . . . . . . . . . . . . . 142
6.23.3
Bluetooth Periphery . . . . . . . . . . . . . . . . . . . . . . . . . . . . . . . 144
6.24
Remote Server Settings . . . . . . . . . . . . . . . . . . . . . . . . . . . . . . . . . . . 149
6.25
Mass Storage . . . . . . . . . . . . . . . . . . . . . . . . . . . . . . . . . . . . . . . . . 150
6.26
Network . . . . . . . . . . . . . . . . . . . . . . . . . . . . . . . . . . . . . . . . . . . . 152
6.27
Report Settings . . . . . . . . . . . . . . . . . . . . . . . . . . . . . . . . . . . . . . . . 153
6.28
Download Settings . . . . . . . . . . . . . . . . . . . . . . . . . . . . . . . . . . . . . . 154
6.29
Gamma, Neutron Counters . . . . . . . . . . . . . . . . . . . . . . . . . . . . . . . . . 155
6.30
Finder Settings . . . . . . . . . . . . . . . . . . . . . . . . . . . . . . . . . . . . . . . . 157
6.31
Dose Rate Settings . . . . . . . . . . . . . . . . . . . . . . . . . . . . . . . . . . . . . . 159
6.32
Alarm Indicators . . . . . . . . . . . . . . . . . . . . . . . . . . . . . . . . . . . . . . . 160
6.33
Dose Alarm Thresholds . . . . . . . . . . . . . . . . . . . . . . . . . . . . . . . . . . . 161
6.34
Dose Rate Alarm Thresholds . . . . . . . . . . . . . . . . . . . . . . . . . . . . . . . . 162
6.35
Neutron Alarm Thresholds . . . . . . . . . . . . . . . . . . . . . . . . . . . . . . . . . 163
6.36
Current Alarm State . . . . . . . . . . . . . . . . . . . . . . . . . . . . . . . . . . . . . 165
7 Connecting the FLIR identiFINDER R300 to a Local Computer
167
7.1
Plugging and Unplugging . . . . . . . . . . . . . . . . . . . . . . . . . . . . . . . . . . 168
7.2
The FLIR identiFINDER R300 as a Mass Storage Device . . . . . . . . . . . . . . . . 170
7.3
Preparing the USB Network Connection on a Computer . . . . . . . . . . . . . . . . 171
7.4
7.3.1
Linux . . . . . . . . . . . . . . . . . . . . . . . . . . . . . . . . . . . . . . . . 171
7.3.2
Windows XP . . . . . . . . . . . . . . . . . . . . . . . . . . . . . . . . . . . . 171
7.3.3
Windows Vista, Windows 7 . . . . . . . . . . . . . . . . . . . . . . . . . . . 175
Using the Network Connection . . . . . . . . . . . . . . . . . . . . . . . . . . . . . . . 178
identiFINDER® R300/en/2014.4(13623)/Feb2015
5
CONTENTS
FLIR Detection
8 Using the FLIR identiFINDER R300 Web Server
8.1
Info (Web Page) . . . . . . . . . . . . . . . . . . . . . . . . . . . . . . . . . . . . . . . 181
8.2
Resources (Web Page) . . . . . . . . . . . . . . . . . . . . . . . . . . . . . . . . . . . . 182
8.3
General (Web Page) . . . . . . . . . . . . . . . . . . . . . . . . . . . . . . . . . . . . . 184
8.3.1
Measurement . . . . . . . . . . . . . . . . . . . . . . . . . . . . . . . . . . . 184
8.3.2
Identi ication . . . . . . . . . . . . . . . . . . . . . . . . . . . . . . . . . . . 184
8.3.3
User Interface . . . . . . . . . . . . . . . . . . . . . . . . . . . . . . . . . . . 186
8.4
GPS and Clock (Web Page) . . . . . . . . . . . . . . . . . . . . . . . . . . . . . . . . . 186
8.5
Alarm (Web Page) . . . . . . . . . . . . . . . . . . . . . . . . . . . . . . . . . . . . . . 188
8.6
8.7
8.5.1
Alarm Indicators . . . . . . . . . . . . . . . . . . . . . . . . . . . . . . . . . 188
8.5.2
Gamma Alarms . . . . . . . . . . . . . . . . . . . . . . . . . . . . . . . . . . 189
8.5.3
Neutron Alarms . . . . . . . . . . . . . . . . . . . . . . . . . . . . . . . . . . 190
Connectivity (Web Page) . . . . . . . . . . . . . . . . . . . . . . . . . . . . . . . . . . 190
8.6.1
Local Area Network . . . . . . . . . . . . . . . . . . . . . . . . . . . . . . . 190
8.6.2
Remote Server . . . . . . . . . . . . . . . . . . . . . . . . . . . . . . . . . . . 192
8.6.3
Reports . . . . . . . . . . . . . . . . . . . . . . . . . . . . . . . . . . . . . . . 192
8.6.4
Download Options . . . . . . . . . . . . . . . . . . . . . . . . . . . . . . . . 192
Bluetooth SPP Settings (Web Page) . . . . . . . . . . . . . . . . . . . . . . . . . . . . 192
8.7.1
Bluetooth SPP Settings (Web Page) . . . . . . . . . . . . . . . . . . . . . . 192
8.8
Nuclides (Web Page) . . . . . . . . . . . . . . . . . . . . . . . . . . . . . . . . . . . . . 193
8.9
Backup (Web Page) . . . . . . . . . . . . . . . . . . . . . . . . . . . . . . . . . . . . . 194
8.10
Bulk Download (Web Page) . . . . . . . . . . . . . . . . . . . . . . . . . . . . . . . . . 197
8.11
Identi ications (Web Page) . . . . . . . . . . . . . . . . . . . . . . . . . . . . . . . . . 199
8.11.1
8.12
8.13
Identi ication Details (Web Page) . . . . . . . . . . . . . . . . . . . . . . . . 200
Spectra (Web Page) . . . . . . . . . . . . . . . . . . . . . . . . . . . . . . . . . . . . . 202
8.12.1
Spectrum Details (Web Page) . . . . . . . . . . . . . . . . . . . . . . . . . . 203
Alarms (Web Page) . . . . . . . . . . . . . . . . . . . . . . . . . . . . . . . . . . . . . . 206
8.13.1
Alarm Details (Web Page) . . . . . . . . . . . . . . . . . . . . . . . . . . . . 207
8.14
Screenshots (Web Page) . . . . . . . . . . . . . . . . . . . . . . . . . . . . . . . . . . . 207
8.15
Live Screen (Web Page) . . . . . . . . . . . . . . . . . . . . . . . . . . . . . . . . . . . 208
8.16
Live Spectrum (Web Page) . . . . . . . . . . . . . . . . . . . . . . . . . . . . . . . . . 209
8.17
Software Update (Web Page) . . . . . . . . . . . . . . . . . . . . . . . . . . . . . . . . 215
8.18
Password (Web Page) . . . . . . . . . . . . . . . . . . . . . . . . . . . . . . . . . . . . 215
8.19
System Files (Web Page) . . . . . . . . . . . . . . . . . . . . . . . . . . . . . . . . . . 216
9 Sending Data to a Remote Server
9.1
6
179
219
Internet Connection . . . . . . . . . . . . . . . . . . . . . . . . . . . . . . . . . . . . . 220
identiFINDER® R300/en/2014.4(13623)/Feb2015
FLIR Detection
CONTENTS
10 Connecting via Satellite Phone
223
10.1
Pairing the FLIR identiFINDER R300 to a Satellite Phone . . . . . . . . . . . . . . . 223
10.2
Con iguring Remote Server Settings for the Satellite Phone . . . . . . . . . . . . . . 227
11 Powering the FLIR identiFINDER R300
11.1
External Power Sources . . . . . . . . . . . . . . . . . . . . . . . . . . . . . . . . . . . 229
11.1.1
11.2
Wall Mounted Power Supply . . . . . . . . . . . . . . . . . . . . . . . . . . 230
Charging the FLIR identiFINDER R300 . . . . . . . . . . . . . . . . . . . . . . . . . . 230
11.2.1
11.3
Charging Durations . . . . . . . . . . . . . . . . . . . . . . . . . . . . . . . . 231
Battery Power Saving Tips . . . . . . . . . . . . . . . . . . . . . . . . . . . . . . . . . 231
12 Accessories for the FLIR identiFINDER R300
12.1
229
233
Source Set . . . . . . . . . . . . . . . . . . . . . . . . . . . . . . . . . . . . . . . . . . . 233
Appendix
235
A Info Pool
237
A.1
identiFINDER R 300: Speci ications . . . . . . . . . . . . . . . . . . . . . . . . . . . . 237
A.2
Detector Positions . . . . . . . . . . . . . . . . . . . . . . . . . . . . . . . . . . . . . . 241
A.3
Optimum Illumination of Detector Crystals . . . . . . . . . . . . . . . . . . . . . . . 242
A.4
Unmanned Neutron Detection . . . . . . . . . . . . . . . . . . . . . . . . . . . . . . . 243
A.5
Certi icates . . . . . . . . . . . . . . . . . . . . . . . . . . . . . . . . . . . . . . . . . . 244
A.5.1
A.6
A.7
FLIR identiFINDER R300: Manufacturer’s declaration of conformity (CE) 244
Bluetooth Serial Port Pro ile (SPP) Communication Overview . . . . . . . . . . . . 245
A.6.1
Bluetooth Device Name and PIN . . . . . . . . . . . . . . . . . . . . . . . . 245
A.6.2
Data Format . . . . . . . . . . . . . . . . . . . . . . . . . . . . . . . . . . . . 245
A.6.3
Conventions and Usage Notes . . . . . . . . . . . . . . . . . . . . . . . . . . 245
A.6.4
General Command Format . . . . . . . . . . . . . . . . . . . . . . . . . . . . 246
A.6.5
General Update Format . . . . . . . . . . . . . . . . . . . . . . . . . . . . . 247
A.6.6
General Error Format . . . . . . . . . . . . . . . . . . . . . . . . . . . . . . 248
SPP Commands and Updates . . . . . . . . . . . . . . . . . . . . . . . . . . . . . . . . 249
A.7.1
Ping . . . . . . . . . . . . . . . . . . . . . . . . . . . . . . . . . . . . . . . . . 249
A.7.2
Status . . . . . . . . . . . . . . . . . . . . . . . . . . . . . . . . . . . . . . . . 250
A.7.3
Get Spectra . . . . . . . . . . . . . . . . . . . . . . . . . . . . . . . . . . . . . 252
A.7.4
Counts . . . . . . . . . . . . . . . . . . . . . . . . . . . . . . . . . . . . . . . 253
A.7.5
Dose Rate . . . . . . . . . . . . . . . . . . . . . . . . . . . . . . . . . . . . . 253
A.7.6
Neutron Rate . . . . . . . . . . . . . . . . . . . . . . . . . . . . . . . . . . . 253
A.7.7
Serial Number . . . . . . . . . . . . . . . . . . . . . . . . . . . . . . . . . . . 254
A.7.8
Other Commands and Updates . . . . . . . . . . . . . . . . . . . . . . . . . 254
identiFINDER® R300/en/2014.4(13623)/Feb2015
7
CONTENTS
FLIR Detection
B Maintenance
255
B.1
Field Maintenance . . . . . . . . . . . . . . . . . . . . . . . . . . . . . . . . . . . . . . 255
B.2
Software Installation . . . . . . . . . . . . . . . . . . . . . . . . . . . . . . . . . . . . . 255
B.3
Storage . . . . . . . . . . . . . . . . . . . . . . . . . . . . . . . . . . . . . . . . . . . . . 256
B.4
After Sales Service and Support . . . . . . . . . . . . . . . . . . . . . . . . . . . . . . 257
C Nuclide Library
259
D Glossary
267
Index
291
8
identiFINDER® R300/en/2014.4(13623)/Feb2015
FLIR Detection
List of Figures
List of Figures
1
The FLIR identiFINDER R300 with accessories . . . . . . . . . . . . . . . . . . . . . . . .
21
2
The FLIR identiFINDER R300 with accessories in Pelican carrying case . . . . . . . . . .
22
3
Name plate at the rear side of the FLIR identiFINDER R300 . . . . . . . . . . . . . . . . .
23
4
Functional units of the FLIR identiFINDER R300 (see text). . . . . . . . . . . . . . . . . .
25
5
Map of the FLIR identiFINDER R300 components . . . . . . . . . . . . . . . . . . . . . . .
26
6
Surveying an object with the FLIR identiFINDER R300. . . . . . . . . . . . . . . . . . . .
27
7
Papercraft model of the FLIR identiFINDER R300 with operating elements: Display,
LEDs and keys. . . . . . . . . . . . . . . . . . . . . . . . . . . . . . . . . . . . . . . . . . . .
28
8
Anatomy of the FLIR identiFINDER R300 display. . . . . . . . . . . . . . . . . . . . . . . .
29
9
Signals of the status LED . . . . . . . . . . . . . . . . . . . . . . . . . . . . . . . . . . . . .
31
10
Right-handed operation of the FLIR identiFINDER R300 with normal key assignments .
33
11
Left-handed operation of the FLIR identiFINDER R300 with reverse key key assigments
34
12
Skipping commands for value editing . . . . . . . . . . . . . . . . . . . . . . . . . . . . . .
35
13
Choosing from a menu: Initial state without chosen item . . . . . . . . . . . . . . . . . .
35
14
Choosing from a menu: Choosing the next item with Down . . . . . . . . . . . . . . . . .
36
15
Choosing from a menu: Choosing other items with Down . . . . . . . . . . . . . . . . . .
36
16
Choosing from a menu: After executing the command with Select . . . . . . . . . . . . .
37
17
Choosing from a menu: Scrolling in long menus . . . . . . . . . . . . . . . . . . . . . . . .
37
18
Changing Values: Choosing the setting . . . . . . . . . . . . . . . . . . . . . . . . . . . . .
38
19
Changing Values: Selected entry ield . . . . . . . . . . . . . . . . . . . . . . . . . . . . . .
38
20
Changing Values: Changed entry ield . . . . . . . . . . . . . . . . . . . . . . . . . . . . . .
39
21
Changing Values: Revealing more commands . . . . . . . . . . . . . . . . . . . . . . . . .
39
22
Changing Values: Changed setting accepted . . . . . . . . . . . . . . . . . . . . . . . . . .
40
23
Changing Combined Values: Changing the selected component . . . . . . . . . . . . . . .
40
24
Changing Combined Values: Selecting components. . . . . . . . . . . . . . . . . . . . . . .
41
25
Changing Numerical Values: Changing the selected digit . . . . . . . . . . . . . . . . . . .
42
26
Changing Numerical Values: Selecting digits . . . . . . . . . . . . . . . . . . . . . . . . . .
42
27
Editing Text: First character “J” is selected. . . . . . . . . . . . . . . . . . . . . . . . . . . .
43
28
Editing Text: Next character to the right is selected (“o”). . . . . . . . . . . . . . . . . . .
44
29
Editing Text: Set of available characters . . . . . . . . . . . . . . . . . . . . . . . . . . . . .
44
identiFINDER® R300/en/2014.4(13623)/Feb2015
9
List of Figures
FLIR Detection
30
Editing Text: After changing the selected “o” to an “a”. . . . . . . . . . . . . . . . . . . . .
44
31
Editing Text: About to delete the selected character “h”. . . . . . . . . . . . . . . . . . . .
45
32
Editing Text: After deleting a character, the next character is selected. . . . . . . . . . . .
45
33
Editing Text: After inserting space before “ Doe” for an additional character. . . . . . . .
46
34
Editing Text: Done. . . . . . . . . . . . . . . . . . . . . . . . . . . . . . . . . . . . . . . . . .
46
35
Entering a password to access the option menus. . . . . . . . . . . . . . . . . . . . . . . .
47
36
Password entered but not yet con irmed. . . . . . . . . . . . . . . . . . . . . . . . . . . . .
48
37
Message after entering a wrong password. . . . . . . . . . . . . . . . . . . . . . . . . . . .
48
38
Status display showing the number of saved screenshots. . . . . . . . . . . . . . . . . . .
49
39
Inserting the FLIR identiFINDER R300 into a holster so alarm LEDs remain visible . . .
50
40
FLIR identiFINDER R300 in a belt holster with visible alarm LEDs . . . . . . . . . . . . .
50
41
Anatomy of a FLIR identiFINDER R300 web page, narrow layout . . . . . . . . . . . . . .
52
42
Anatomy of a FLIR identiFINDER R300 web page, wide layout . . . . . . . . . . . . . . .
53
43
Visible menu hierarchy on a web page with narrow layout . . . . . . . . . . . . . . . . .
53
44
Single submenu on a web page with wide layout . . . . . . . . . . . . . . . . . . . . . . .
54
45
Anatomy of a web page with a data table . . . . . . . . . . . . . . . . . . . . . . . . . . . .
55
46
Anatomy of a web page with details of a record . . . . . . . . . . . . . . . . . . . . . . . .
57
47
Web page section with GPS coordinates . . . . . . . . . . . . . . . . . . . . . . . . . . . . .
58
48
Steps of the transmission of data to a reachback server . . . . . . . . . . . . . . . . . . .
58
49
Successful transmission of data to a reachback server . . . . . . . . . . . . . . . . . . . .
59
50
Example printout of measurement results . . . . . . . . . . . . . . . . . . . . . . . . . . .
60
51
Entering the password before accessing protected web pages . . . . . . . . . . . . . . .
61
52
Entering the administration password . . . . . . . . . . . . . . . . . . . . . . . . . . . . .
61
53
Powering up the FLIR identiFINDER R300: Product identi ication . . . . . . . . . . . . .
62
54
Powering up the FLIR identiFINDER R300: Starting up . . . . . . . . . . . . . . . . . . .
63
55
Powering up the FLIR identiFINDER R300: Initialization . . . . . . . . . . . . . . . . . .
63
56
FLIR identiFINDER R300 after powering up. . . . . . . . . . . . . . . . . . . . . . . . . . .
63
57
Shutting down the FLIR identiFINDER R300 . . . . . . . . . . . . . . . . . . . . . . . . . .
64
58
Shutting down the FLIR identiFINDER R300 during an alarm . . . . . . . . . . . . . . . .
65
59
Battery almost empty. . . . . . . . . . . . . . . . . . . . . . . . . . . . . . . . . . . . . . . .
65
60
Schematic timing of triple beeps indicating low power conditions. . . . . . . . . . . . . .
65
61
Low Power Dose Rate Mode . . . . . . . . . . . . . . . . . . . . . . . . . . . . . . . . . . .
66
62
Battery is empty. . . . . . . . . . . . . . . . . . . . . . . . . . . . . . . . . . . . . . . . . . .
66
63
Powering up the FLIR identiFINDER R300: General system status . . . . . . . . . . . . .
70
64
Dose Rate mode . . . . . . . . . . . . . . . . . . . . . . . . . . . . . . . . . . . . . . . . . .
71
65
Surveying an object with the FLIR identiFINDER R300. . . . . . . . . . . . . . . . . . . .
72
66
Dose rate warning reported on screen . . . . . . . . . . . . . . . . . . . . . . . . . . . . .
72
10
identiFINDER® R300/en/2014.4(13623)/Feb2015
FLIR Detection
List of Figures
67
Optimum posture for neutron detection . . . . . . . . . . . . . . . . . . . . . . . . . . . .
73
68
Finder mode: Initial background measurement . . . . . . . . . . . . . . . . . . . . . . . .
74
69
Finder mode: Continuous measurement . . . . . . . . . . . . . . . . . . . . . . . . . . . .
74
70
Spectrum acquisition in Identi ication Mode . . . . . . . . . . . . . . . . . . . . . . . . . .
75
71
Finding the position for best measurements . . . . . . . . . . . . . . . . . . . . . . . . . .
76
72
Identi ication results . . . . . . . . . . . . . . . . . . . . . . . . . . . . . . . . . . . . . . . .
76
73
Spectrum the identi ication is based upon . . . . . . . . . . . . . . . . . . . . . . . . . . .
77
74
Valid IP address after a connection was established . . . . . . . . . . . . . . . . . . . . .
78
75
The FLIR identiFINDER R300’s home page . . . . . . . . . . . . . . . . . . . . . . . . . . .
78
76
Table of identi ication result records . . . . . . . . . . . . . . . . . . . . . . . . . . . . . .
79
77
Details of an identi ication result record . . . . . . . . . . . . . . . . . . . . . . . . . . . .
80
78
Identi ication results . . . . . . . . . . . . . . . . . . . . . . . . . . . . . . . . . . . . . . . .
81
79
Identi ication result summary for sending . . . . . . . . . . . . . . . . . . . . . . . . . . .
82
80
Data transmission progress . . . . . . . . . . . . . . . . . . . . . . . . . . . . . . . . . . . .
82
81
Ready to search for Bluetooth devices . . . . . . . . . . . . . . . . . . . . . . . . . . . . . .
83
82
List of suitable Bluetooth devices detected . . . . . . . . . . . . . . . . . . . . . . . . . . .
83
83
Pairing with a Bluetooth device . . . . . . . . . . . . . . . . . . . . . . . . . . . . . . . . .
83
84
Shutting down the FLIR identiFINDER R300 . . . . . . . . . . . . . . . . . . . . . . . . . .
84
85
Cycling the manual modes Dose Rate, Finder, and Identi ication . . . . . . . . . . . . . .
86
86
While Finder mode is disabled, cycling modes will toggle between Dose Rate and Identi ication modes . . . . . . . . . . . . . . . . . . . . . . . . . . . . . . . . . . . . . . . . . .
86
87
Dose Rate mode . . . . . . . . . . . . . . . . . . . . . . . . . . . . . . . . . . . . . . . . . .
86
88
Detector overload . . . . . . . . . . . . . . . . . . . . . . . . . . . . . . . . . . . . . . . . .
87
89
Finder mode: Initial background measurement . . . . . . . . . . . . . . . . . . . . . . . .
89
90
Finder mode: Continuous measurement . . . . . . . . . . . . . . . . . . . . . . . . . . . .
89
91
Identi ication Mode: Progress display during time limited data acquisition . . . . . . . .
90
92
Identi ication Mode: Count rate too low for best results . . . . . . . . . . . . . . . . . . .
91
93
Identi ication Mode: Count rate too high for best results . . . . . . . . . . . . . . . . . . .
91
94
Identi ication Mode: Progress display during count limited data acquisition . . . . . . .
92
95
Identi ication Mode: Identi ication was not possible. . . . . . . . . . . . . . . . . . . . . .
92
96
Identi ication Mode: Identi ied radionuclides . . . . . . . . . . . . . . . . . . . . . . . . .
93
97
Countdown announcing the start of a scheduled measurement . . . . . . . . . . . . . . .
94
98
Automated measurement . . . . . . . . . . . . . . . . . . . . . . . . . . . . . . . . . . . . .
94
99
Message during remote-controlled spectrum acquisition . . . . . . . . . . . . . . . . . .
96
100 Dose rate display with alarm indication . . . . . . . . . . . . . . . . . . . . . . . . . . . . .
98
101 Alarm display: Dose rate warning . . . . . . . . . . . . . . . . . . . . . . . . . . . . . . . .
99
102 Alarm display: Dose rate alarm . . . . . . . . . . . . . . . . . . . . . . . . . . . . . . . . .
99
identiFINDER® R300/en/2014.4(13623)/Feb2015
11
List of Figures
FLIR Detection
103 Gamma alarms as announced by the red LED, beeper, and vibrator . . . . . . . . . . . . . 100
104 Alarm display: Neutron alarm . . . . . . . . . . . . . . . . . . . . . . . . . . . . . . . . . . 101
105 Neutron incidents as announced by the blue LED, beeper, and vibrator . . . . . . . . . . 101
106 Dose rate display with 𝜎 noti ication . . . . . . . . . . . . . . . . . . . . . . . . . . . . . . 102
107 Hierarchy of the FLIR identiFINDER R300 menu . . . . . . . . . . . . . . . . . . . . . . . 105
108 Anatomy of the spectrum display . . . . . . . . . . . . . . . . . . . . . . . . . . . . . . . . 106
109 Spectrum information around the chart . . . . . . . . . . . . . . . . . . . . . . . . . . . . 107
110 Acquiring spectrum data . . . . . . . . . . . . . . . . . . . . . . . . . . . . . . . . . . . . . 107
111 Acquiring spectrum data while the duration is preset . . . . . . . . . . . . . . . . . . . . 108
112 Spectrum with cursor at local peak . . . . . . . . . . . . . . . . . . . . . . . . . . . . . . . 109
113 ROI Speci ication: Moving the cursor . . . . . . . . . . . . . . . . . . . . . . . . . . . . . . 110
114 ROI Speci ication: Marking the irst ROI boundary . . . . . . . . . . . . . . . . . . . . . . 110
115 ROI Speci ication: Marking the second ROI boundary . . . . . . . . . . . . . . . . . . . . 111
116 Spectrum Scale: Complete spectrum visible . . . . . . . . . . . . . . . . . . . . . . . . . . 111
117 Spectrum Scale: First half of spectrum visible . . . . . . . . . . . . . . . . . . . . . . . . . 112
118 Spectrum Scale: One display pixel equals the width of one spectral channel . . . . . . . 112
119 Spectrum Scale: The de ined ROI its into the available screen width . . . . . . . . . . . 113
120 Choosing a saved spectrum to be loaded for display . . . . . . . . . . . . . . . . . . . . . 113
121 Radionuclides identi ied in the current spectrum . . . . . . . . . . . . . . . . . . . . . . . 114
122 Checking the calibration . . . . . . . . . . . . . . . . . . . . . . . . . . . . . . . . . . . . . . 116
123 Upper items of the identi ication settings . . . . . . . . . . . . . . . . . . . . . . . . . . . . 117
124 Top of the nuclide list used by the identi ication algorithm . . . . . . . . . . . . . . . . . 119
125 Usage information in the nuclide list used by the identi ication algorithm . . . . . . . . 120
126 Severity information in the nuclide list used by the identi ication algorithm . . . . . . . 121
127 Preset times for spectrum data acquisition . . . . . . . . . . . . . . . . . . . . . . . . . . . 122
128 Display settings in daytime colors . . . . . . . . . . . . . . . . . . . . . . . . . . . . . . . . 123
129 Display settings in nighttime colors . . . . . . . . . . . . . . . . . . . . . . . . . . . . . . . 123
130 Display settings in classic colors . . . . . . . . . . . . . . . . . . . . . . . . . . . . . . . . . 124
131 Setting date and time while GPS clock is not available. . . . . . . . . . . . . . . . . . . . . 125
132 Clock Settings: Selecting the time zone . . . . . . . . . . . . . . . . . . . . . . . . . . . . . 126
133 Clock Settings: Selecting the time zone . . . . . . . . . . . . . . . . . . . . . . . . . . . . . 126
134 GPS Settings . . . . . . . . . . . . . . . . . . . . . . . . . . . . . . . . . . . . . . . . . . . . . 127
135 Entering a new password . . . . . . . . . . . . . . . . . . . . . . . . . . . . . . . . . . . . . 129
136 Entering a new password: Con irmation . . . . . . . . . . . . . . . . . . . . . . . . . . . . 129
137 Removing the password . . . . . . . . . . . . . . . . . . . . . . . . . . . . . . . . . . . . . . 130
138 FLIR identiFINDER R300 status display: System . . . . . . . . . . . . . . . . . . . . . . . 131
139 FLIR identiFINDER R300 status display: GPS . . . . . . . . . . . . . . . . . . . . . . . . . 131
12
identiFINDER® R300/en/2014.4(13623)/Feb2015
FLIR Detection
List of Figures
140 Reestablishing the factory default settings . . . . . . . . . . . . . . . . . . . . . . . . . . . 132
141 Deleting saved spectra . . . . . . . . . . . . . . . . . . . . . . . . . . . . . . . . . . . . . . . 133
142 Starting a self test of the FLIR identiFINDER R300. . . . . . . . . . . . . . . . . . . . . . . 135
143 Testing the annunciators. . . . . . . . . . . . . . . . . . . . . . . . . . . . . . . . . . . . . . 135
144 Automated Mode Settings . . . . . . . . . . . . . . . . . . . . . . . . . . . . . . . . . . . . . 136
145 Sending Data: Choosing a record of identi ication results . . . . . . . . . . . . . . . . . . 137
146 Sending Data: Identi ication summary . . . . . . . . . . . . . . . . . . . . . . . . . . . . . 138
147 Sending Data: Incomplete settings . . . . . . . . . . . . . . . . . . . . . . . . . . . . . . . . 139
148 Sending Data: Transmission progress . . . . . . . . . . . . . . . . . . . . . . . . . . . . . . 139
149 Sending Data: Mission accomplished . . . . . . . . . . . . . . . . . . . . . . . . . . . . . . 140
150 Sending Data: Choosing a spectrum . . . . . . . . . . . . . . . . . . . . . . . . . . . . . . . 141
151 Sending Data: Spectrum summary . . . . . . . . . . . . . . . . . . . . . . . . . . . . . . . . 141
152 Bluetooth SPP . . . . . . . . . . . . . . . . . . . . . . . . . . . . . . . . . . . . . . . . . . . . 142
153 Bluetooth SPP . . . . . . . . . . . . . . . . . . . . . . . . . . . . . . . . . . . . . . . . . . . . 143
154 Bluetooth Periphery . . . . . . . . . . . . . . . . . . . . . . . . . . . . . . . . . . . . . . . . 144
155 SPP Enabled . . . . . . . . . . . . . . . . . . . . . . . . . . . . . . . . . . . . . . . . . . . . . 144
156 Ready to search for Bluetooth devices . . . . . . . . . . . . . . . . . . . . . . . . . . . . . . 145
157 Searching for Bluetooth devices . . . . . . . . . . . . . . . . . . . . . . . . . . . . . . . . . 146
158 No devices detected . . . . . . . . . . . . . . . . . . . . . . . . . . . . . . . . . . . . . . . . 146
159 List of suitable Bluetooth devices detected . . . . . . . . . . . . . . . . . . . . . . . . . . . 147
160 Selecting a PIN for the pairing of Bluetooth devices . . . . . . . . . . . . . . . . . . . . . . 147
161 Pairing with a Bluetooth device . . . . . . . . . . . . . . . . . . . . . . . . . . . . . . . . . 148
162 Paired to a Bluetooth device . . . . . . . . . . . . . . . . . . . . . . . . . . . . . . . . . . . 148
163 Pairing to a Bluetooth device failed . . . . . . . . . . . . . . . . . . . . . . . . . . . . . . . 149
164 Upper items of the remote server settings . . . . . . . . . . . . . . . . . . . . . . . . . . . 149
165 Starting the USB mass storage mode . . . . . . . . . . . . . . . . . . . . . . . . . . . . . . 151
166 The FLIR identiFINDER R300 in USB mass storage mode . . . . . . . . . . . . . . . . . . 151
167 Network settings . . . . . . . . . . . . . . . . . . . . . . . . . . . . . . . . . . . . . . . . . . 152
168 Report settings . . . . . . . . . . . . . . . . . . . . . . . . . . . . . . . . . . . . . . . . . . . 154
169 Download settings . . . . . . . . . . . . . . . . . . . . . . . . . . . . . . . . . . . . . . . . . 155
170 Gamma counter information . . . . . . . . . . . . . . . . . . . . . . . . . . . . . . . . . . . 156
171 Gamma and neutron counter information (Available only for variants equipped with a
neutron detector.) . . . . . . . . . . . . . . . . . . . . . . . . . . . . . . . . . . . . . . . . . 156
172 Finder settings . . . . . . . . . . . . . . . . . . . . . . . . . . . . . . . . . . . . . . . . . . . 157
173 Dose rate settings . . . . . . . . . . . . . . . . . . . . . . . . . . . . . . . . . . . . . . . . . 159
174 Alarm indication settings . . . . . . . . . . . . . . . . . . . . . . . . . . . . . . . . . . . . . 160
175 Dose alarm threshold settings . . . . . . . . . . . . . . . . . . . . . . . . . . . . . . . . . . 161
identiFINDER® R300/en/2014.4(13623)/Feb2015
13
List of Figures
FLIR Detection
176 Dose rate alarm threshold settings . . . . . . . . . . . . . . . . . . . . . . . . . . . . . . . 163
177 Neutron alarm threshold settings . . . . . . . . . . . . . . . . . . . . . . . . . . . . . . . . 164
178 Current Alarm State . . . . . . . . . . . . . . . . . . . . . . . . . . . . . . . . . . . . . . . . 165
179 Connecting the FLIR identiFINDER R300 (Mini USB-B connector) and a computer (USBA connector) . . . . . . . . . . . . . . . . . . . . . . . . . . . . . . . . . . . . . . . . . . . . 168
180 USB socket covered by a lap in the rubber boot . . . . . . . . . . . . . . . . . . . . . . . . 168
181 Plugging and unplugging the cable . . . . . . . . . . . . . . . . . . . . . . . . . . . . . . . . 169
182 Do not bend the cable or the plug! . . . . . . . . . . . . . . . . . . . . . . . . . . . . . . . . 169
183 FLIR identiFINDER R300 mounted as mass storage device on a computer running Microsoft Windows 7 . . . . . . . . . . . . . . . . . . . . . . . . . . . . . . . . . . . . . . . . . 170
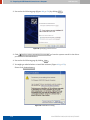
184 FLIR RNDIS driver installer . . . . . . . . . . . . . . . . . . . . . . . . . . . . . . . . . . . . 171
185 Beginning of the installation . . . . . . . . . . . . . . . . . . . . . . . . . . . . . . . . . . . 172
186 Installation warning . . . . . . . . . . . . . . . . . . . . . . . . . . . . . . . . . . . . . . . . 172
187 End of the installation . . . . . . . . . . . . . . . . . . . . . . . . . . . . . . . . . . . . . . . 173
188 Windows XP reporting new hardware at the noti ication area. . . . . . . . . . . . . . . . 173
189 Windows XP New Hardware Wizard . . . . . . . . . . . . . . . . . . . . . . . . . . . . . . 173
190 Specifying a driver source . . . . . . . . . . . . . . . . . . . . . . . . . . . . . . . . . . . . . 174
191 Installation warning . . . . . . . . . . . . . . . . . . . . . . . . . . . . . . . . . . . . . . . . 174
192 End of the installation . . . . . . . . . . . . . . . . . . . . . . . . . . . . . . . . . . . . . . . 175
193 FLIR RNDIS driver installer . . . . . . . . . . . . . . . . . . . . . . . . . . . . . . . . . . . . 176
194 Installation warning . . . . . . . . . . . . . . . . . . . . . . . . . . . . . . . . . . . . . . . . 176
195 Beginning of the installation . . . . . . . . . . . . . . . . . . . . . . . . . . . . . . . . . . . 177
196 End of the installation . . . . . . . . . . . . . . . . . . . . . . . . . . . . . . . . . . . . . . . 177
197 Windows 7 reporting and con iguring new hardware . . . . . . . . . . . . . . . . . . . . 177
198 End of the installation . . . . . . . . . . . . . . . . . . . . . . . . . . . . . . . . . . . . . . . 178
199 Valid addresses of the FLIR identiFINDER R300 after a connection to a computer was
established . . . . . . . . . . . . . . . . . . . . . . . . . . . . . . . . . . . . . . . . . . . . . 178
200 Info web page . . . . . . . . . . . . . . . . . . . . . . . . . . . . . . . . . . . . . . . . . . . . 182
201 Resources web page . . . . . . . . . . . . . . . . . . . . . . . . . . . . . . . . . . . . . . . . 183
202 General Settings web page . . . . . . . . . . . . . . . . . . . . . . . . . . . . . . . . . . . . 185
203 The GPS and Clock settings web page . . . . . . . . . . . . . . . . . . . . . . . . . . . . . . 187
204 Alarm Settings web page . . . . . . . . . . . . . . . . . . . . . . . . . . . . . . . . . . . . . 189
205 Connectivity Settings web page . . . . . . . . . . . . . . . . . . . . . . . . . . . . . . . . . 191
206 Bluetooth Settings web page . . . . . . . . . . . . . . . . . . . . . . . . . . . . . . . . . . . 193
207 Nuclide Settings web page . . . . . . . . . . . . . . . . . . . . . . . . . . . . . . . . . . . . 194
208 Backup web page . . . . . . . . . . . . . . . . . . . . . . . . . . . . . . . . . . . . . . . . . . 195
209 Bulk download web page . . . . . . . . . . . . . . . . . . . . . . . . . . . . . . . . . . . . . 198
14
identiFINDER® R300/en/2014.4(13623)/Feb2015
FLIR Detection
List of Figures
210 Table of identi ication result records . . . . . . . . . . . . . . . . . . . . . . . . . . . . . . 200
211 Details of an identi ication result record . . . . . . . . . . . . . . . . . . . . . . . . . . . . 201
212 Table of spectrum records . . . . . . . . . . . . . . . . . . . . . . . . . . . . . . . . . . . . . 203
213 Details of a spectrum record . . . . . . . . . . . . . . . . . . . . . . . . . . . . . . . . . . . 205
214 Table of alarm records . . . . . . . . . . . . . . . . . . . . . . . . . . . . . . . . . . . . . . . 206
215 Details of an alarm record . . . . . . . . . . . . . . . . . . . . . . . . . . . . . . . . . . . . . 207
216 Table of screenshots . . . . . . . . . . . . . . . . . . . . . . . . . . . . . . . . . . . . . . . . 208
217 The FLIR identiFINDER R300’s screen live in the web interface . . . . . . . . . . . . . . . 209
218 Empty live spectrum page . . . . . . . . . . . . . . . . . . . . . . . . . . . . . . . . . . . . . 210
219 Live spectrum page during data acquisition . . . . . . . . . . . . . . . . . . . . . . . . . . 213
220 Identi ication results of a live spectrum . . . . . . . . . . . . . . . . . . . . . . . . . . . . . 214
221 File upload web page . . . . . . . . . . . . . . . . . . . . . . . . . . . . . . . . . . . . . . . 215
222 Web page to change the administrator password . . . . . . . . . . . . . . . . . . . . . . . 216
223 System iles web page . . . . . . . . . . . . . . . . . . . . . . . . . . . . . . . . . . . . . . . 217
224 A possible scenario for remote handling of FLIR identiFINDER R300 data . . . . . . . . 219
225 Connection for uploading FLIR identiFINDER R300 data to a remote server . . . . . . . 221
226 Select ”Change Device” if an unwanted device is paired . . . . . . . . . . . . . . . . . . . 224
227 ”Prepare your Bluetooth devices…” appears after selecting ”Change device” . . . . . . . 224
228 Searching for Bluetooth devices . . . . . . . . . . . . . . . . . . . . . . . . . . . . . . . . . 224
229 No Bluetooth devices detected . . . . . . . . . . . . . . . . . . . . . . . . . . . . . . . . . . 225
230 Detected SD1000 device entry chosen . . . . . . . . . . . . . . . . . . . . . . . . . . . . . 225
231 Selecting a PIN for the pairing of Bluetooth devices . . . . . . . . . . . . . . . . . . . . . . 226
232 Bluetooth Periphery Information: Pairing is in progress... . . . . . . . . . . . . . . . . . . 226
233 Pairing to a Bluetooth device failed . . . . . . . . . . . . . . . . . . . . . . . . . . . . . . . 226
234 The Device Details indicates successfull pairing . . . . . . . . . . . . . . . . . . . . . . . . 227
235 Power Supply: Removing the international adapter . . . . . . . . . . . . . . . . . . . . . . 230
236 Power Supply: Attaching an international adapter . . . . . . . . . . . . . . . . . . . . . . 230
237 Source set (sold separately) . . . . . . . . . . . . . . . . . . . . . . . . . . . . . . . . . . . . 233
238 Position of the detector centers of the FLIR identiFINDER R300 . . . . . . . . . . . . . . 241
239 Optimal dose rate calculation needs a uniform illumination of the three detector crystals, for which the source to detector distance should be at least 15 cm (6 in) (drawn to
scale). . . . . . . . . . . . . . . . . . . . . . . . . . . . . . . . . . . . . . . . . . . . . . . . . 242
240 Recommended setup for unmanned measurements of fast neutrons . . . . . . . . . . . . 243
241 After uploading a software package . . . . . . . . . . . . . . . . . . . . . . . . . . . . . . . 256
242 Full width at half maximum height of a peak . . . . . . . . . . . . . . . . . . . . . . . . . . 274
243 Ionizing radiation warning symbol (ISO 21482) . . . . . . . . . . . . . . . . . . . . . . . . 277
244 Multi Channel Scaling . . . . . . . . . . . . . . . . . . . . . . . . . . . . . . . . . . . . . . . 280
identiFINDER® R300/en/2014.4(13623)/Feb2015
15
List of Figures
FLIR Detection
245 Shielding of ionizing radiation (not to scale) . . . . . . . . . . . . . . . . . . . . . . . . . . 283
16
identiFINDER® R300/en/2014.4(13623)/Feb2015
FLIR Detection
1. Welcome
Chapter 1
Welcome
This chapter offers introductory information about this manual, some important advice for your
safety and that of the instrument, and a general overview of the FLIR identiFINDER R300 and its
accessories.
1.1
Conventions Used in This Document
This document uses the following conventions to signify various kinds of text.
Ordinary Text
looks like this, sometimes bold or italics is used for emphasis.
Constant Width
is used for URLs, ile names, path names, text you have to enter somewhere.
Information about danger for yourself, an instrument, or data.
Information you should carefully consider before proceeding.
Additional information you should pay attention to.
A tip suggests commands or procedures for advanced usage. You might skip tips on your irst
pass through this document.
Information related to particular variants of the product.
The path to a command or setting in the FLIR identiFINDER R300 menu hierarchy or the web interface, respectively, is displayed at the beginning of appropriate sections as shown in the following
examples:
Options Menu (p. 103) ä More Options (p. 103) ä Identi cation Options (p. 103) ä Identi cation Settings
Settings (p. 180) ä General (p. 184) ä Identi cation
identiFINDER® R300/en/2014.4(13623)/Feb2015
17
1.2. Safety Warnings
FLIR Detection
If you read this manual as a PDF document, you can click cross references, items in the table
of contents, links into the Internet or similar to immediately view the designated item.
1.2
Safety Warnings
The FLIR identiFINDER R300 is designed for outdoor use. When operated in accordance with the
operating instructions, it should not present any hazard to the operator.
The housing is essential to the integrity and safe operation of the instrument. Under no circumstances should the housing be tampered with, penetrated, or otherwise removed except
for normal access to the external connectors (see chapter 7, p. 167 and 11, p. 229).
The FLIR identiFINDER R300 is not certi ied for use in explosive environments.
The power adapter is connected to line power. Normal care in handling such a line power
device should be exercised. In particular this unit should not be connected to line power if it
is wet.
The nature of the application is such that objects being surveyed with the FLIR
identiFINDER R300 could emit radioactive radiation with hazardous intensity.
1.3
Before First Use
We recommend charging the batteries of the FLIR identiFINDER R300 after unpacking (11.2,
p. 230) prior to irst time use.
This is a good time to get familiar with the FLIR identiFINDER R300 by reading this manual.
Please read at least the rest of this chapter and those on basic operation (chapters 2, p. 27
and 3, p. 69) before starting to experiment with the FLIR identiFINDER R300.
Chapter 2, p. 27 explains the principles of operating the FLIR identiFINDER R300 to get you prepared for a typical survey you will be guided through in chapter 3, p. 69.
The fundamental modes of operation of the FLIR identiFINDER R300 are detailed in chapter 4, p. 85,
followed by explanations of the FLIR identiFINDER R300 alarms in chapter 5, p. 97.
A detailed reference on all the commands is given in chapter 6, p. 103, which you should read to
know about all the features and possibilities in case you need them.
Chapter 7, p. 167 explains how to setup the connection of the FLIR identiFINDER R300 to a local
computer. The web interface for monitoring, con iguring and transferring data is detailed in chapter
8, p. 179.
18
identiFINDER® R300/en/2014.4(13623)/Feb2015
FLIR Detection
1. Welcome
The setup for sending data to a remote server (reachback) is explained in chapter 9, p. 219
Chapter 11, p. 229 details the power supply for the FLIR identiFINDER R300.
The appendix comprises speci ication data (Appendix A.1, p. 237), maintenance information (Appendix B, p. 255), information about the nuclides the FLIR identiFINDER R300 can identify (Appendix C, p. 259), a glossary of terms and abbreviations (Appendix D, p. 267) and, inally, an index
(p. 291)
The FLIR identiFINDER R300 is available in several variants (see A.1, p. 237 for detailed speci ications). All variants share almost identical operating procedures and are covered in this
manual. The few places where a feature of a certain variant differs from the main stream are
marked accordingly in the text.
1.4
The FLIR identiFINDER R300
The FLIR identiFINDER R300 instrument, engineered and manufactured by FLIR Detection is a digital, self-contained battery-powered instrument that provides the power of advanced spectroscopy
in your palm. It is part of the FLIR Detection family of instruments designed to provide critical capabilities required in a wide range of mission circumstances. Such capabilities include:
• Search for sources of gamma radiation or scan areas contaminated with gamma radionuclides
• Automatic identi ication of radionuclides by analysis of gamma ray spectra
• Gamma dose and dose rate measurements
• Neutron detection with count rate and accumulated counts (Available only for variants
equipped with a neutron detector.)
• Semi-conductor detector for improved resolution and ruggedness
The FLIR identiFINDER R300 combines the capabilities of a Personal Radiation Detector (PRD) with
the radionuclide identi ication capabilities of a Radio-Isotope Identi ication Detector (RIID) into
one conveniently small package. The FLIR identiFINDER R300 utilizes the same reliable advanced
technology that is deployed in the well-known identiFINDER 2 family of instruments. We offer a
family of handheld products to address the various applications operators will encounter while
ensuring operators will be presented with the same screens, information, and operation between
all our devices.
identiFINDER® R300/en/2014.4(13623)/Feb2015
19
1.5. Unpacking and Identifying Accessories
FLIR Detection
The FLIR identiFINDER R300 is designed for the survey of objects ranging from small packages to
large objects such as freight containers to search for illicit traf icking of radioactive material, to scan
containers for radiation leaks, to monitor medical waste or scrap metal, you name it. It will detect
and identify radioactive materials. If the type or quantity of radioactive material exceeds pre-set
alarm levels then this information will be provided to you.
In particular, the FLIR identiFINDER R300 will identify threat objects. A threat object is de ined
as radioactive material whose signature is consistent with that of material that could be used for
terrorist purposes. Threat materials are usually those used in a nuclear explosive device or which
could be used in Radiological Dispersive Devices (“Dirty” bombs).
The FLIR identiFINDER R300 incorporates advanced physics algorithms that allow any user to
make highly sophisticated scienti ic measurements. The two button interface and simple menu
structure were designed so that it can be operated with minimal training. The high degree of automation allows for successful operation even in distracting and hostile environments. The instrument is very robust and stable even in the most demanding conditions and can be operated successfully with only a few buttons.
Outstanding features are:
• Large Cadmium Zinc Telluride (CZT) detector for fast and accurate identi ication
• Brilliant color display with 320×240 pixels, that is easy to read in all lighting conditions
• Large database capacity for more than half a million spectra or other data
• GPS receiver to log incident locations
• Wired communication via standard USB interface
• Wireless communication via Bluetooth for reachback
• Web interface for monitoring and con iguration of the instrument without additional PC software
… and many more. See A.1, p. 237 for the complete speci ications.
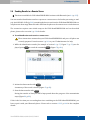
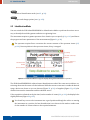
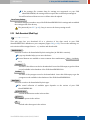
1.5
Unpacking and Identifying Accessories
The FLIR identiFINDER R300 is available in several variants (see A.1, p. 237) which are shipped
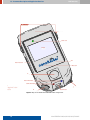
with their accessories (Figure 1, p. 21) in a sturdy case (Figure 2, p. 22)
A. FLIR identiFINDER R300 instrument with rubber boot and wrist strap string
B. Wrist Strap (Lanyard)
C. Holster
20
identiFINDER® R300/en/2014.4(13623)/Feb2015
FLIR Detection
1. Welcome
C
A
E
D
E
H
E
F
G
B
.
Figure 1. The FLIR identiFINDER R300 with accessories
D. Wall power adapter with USB-A receptacle
E.
International adapters for power adapter (US, Euro, UK)
F.
Car power adapter with USB-A receptacle
G. Mini USB-B to USB-A cable for connection to local computer or power adapter (USB 2.0)
H. CD-ROM with manual and drivers
I.
Pelican case
Review the parts and components received. In the event that a component cannot be located contact the appropriate support organization (see Chapter B.4, p. 257).
A name plate (Figure 3, p. 23) is attached to the rear side of the instrument. It lists the type of
instrument, the serial number and other important information.
You might want to remember the serial number. It is sometimes used to identify the FLIR
identiFINDER R300 in a computer network.
After the initial charge, the FLIR identiFINDER R300 is ready for use.
identiFINDER® R300/en/2014.4(13623)/Feb2015
21
1.5. Unpacking and Identifying Accessories
FLIR Detection
I
H
E
E
A
D
E
F
G
C
B
.
Figure 2. The FLIR identiFINDER R300 with accessories in Pelican carrying case
22
identiFINDER® R300/en/2014.4(13623)/Feb2015
FLIR Detection
1. Welcome
Model:
Variant:
Serial:
DOT:
nanoRaider
ZH
103156000000
SP12131
Only for variants with
a certain neutron
detector.
Figure 3. Name plate at the rear side of the FLIR identiFINDER R300
identiFINDER® R300/en/2014.4(13623)/Feb2015
23
1.6. Instrument Description and Application Overview
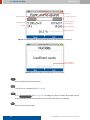
1.6
FLIR Detection
Instrument Description and Application Overview
The FLIR identiFINDER R300 can be described as a small but powerful computer with keyboard
and LCD screen further equipped with dedicated detectors for gamma and neutron radiation plus
some auxiliary sensors such as a receiver for the NAVSTAR global positioning system (GPS). All data
acquired by the sensors are recorded, processed and evaluated by a sophisticated software that
discriminates innocent from threatening radiation even when operated by personnel with minimal
training.
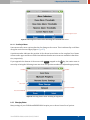
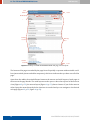
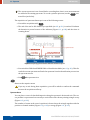
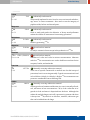
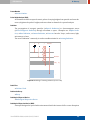
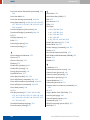
A general outline of the FLIR identiFINDER R300’s functional elements is given in Figure 4, p. 25,
while Figure 5, p. 26 helps to identify and locate the various components of the instrument.
• A microcomputer shown in the center of Figure 4, p. 25 is the central element of the FLIR
identiFINDER R300. It is connected to various peripherals for input, output, and communication.
• Green circles in the upper left part of Figure 4, p. 25 represent input peripherals including the
keys and, most prominently, the sensors for radioactive radiation:
– A cadmium zinc telluride (CZT, CdZnTe) semiconductor crystal to record gamma radiation spectra
– Two CdZnTe crystals for dose rate measurements
– A 3 He detector for neutron radiation (optional)
• Output of the FLIR identiFINDER R300 is directed mainly to the screen plus some status lights,
a beeper, and a vibrator symbolized by blue circles in Figure 4, p. 25.
• The light gray circles in Figure 4, p. 25 represent elements accessible from the outside of the
instrument like the communication facilities.
24
identiFINDER® R300/en/2014.4(13623)/Feb2015
FLIR Detection
1. Welcome
1 CdZnTe
.
Crystal for Identi cation
Spectra
3
2 CdZnTe
.
.
He Detector †
Crystals for Dose Rate
for Neutrons
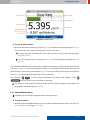
Measurement
Radiation
.
Detectors
.
Keys
.
Input
http
.
GPS
.
Server
Receiver
.
USB
.
.
Socket
.
Clock
.
FLIR identiFINDER R300
.
Commu.
Microcomputer
nication
Rechargeable
.
.
Bluetooth
.
.
Battery
.
Gamma
.
.
.
Alarm
Status
.
Output
.
Display
.
.
.
Neutron
Alarm †
.
Beeper
.
Vibrator
Available only for variants
equipped with a neutron
detector.
Figure 4. Functional units of the FLIR identiFINDER R300 (see text).
identiFINDER® R300/en/2014.4(13623)/Feb2015
25
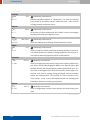
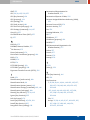
1.6. Instrument Description and Application Overview
FLIR Detection
Operating
Op
erating Keys
Detector
Status LED
Display
GPS
Neutron Detector
Bluetooth
Beeper
Neutron Alarm LED
Gamma Alarm LED
Available only for variants
Av
equipped with a neutron
detector.
Lanyard Connector
Lany
PPower Key
USB Socket
Figure 5. Map of the FLIR identiFINDER R300 components
26
identiFINDER® R300/en/2014.4(13623)/Feb2015
FLIR Detection
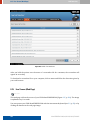
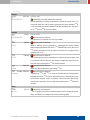
2. Operating the FLIR identiFINDER R300
Chapter 2
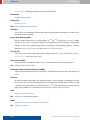
Operating the FLIR identiFINDER R300
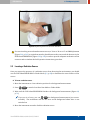
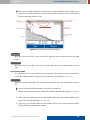
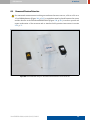
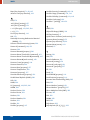
The FLIR identiFINDER R300 is optimized for single-handed operation (see Figure 6, p. 27). The
detector should point to the object to be surveyed while you watch the display and control the
instrument by pressing the keys with thumb and middle inger.
For best dose rate calculations the source must not be too close to the instrument (Figure 239,
p. 242).
Figure 6. Surveying an object with the FLIR identiFINDER R300.
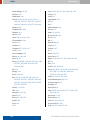
The FLIR identiFINDER R300 display consists of a color LCD screen and several LEDs (Figure 7,
p. 28).
The fundamental principle of operation is to choose one of the available options and then execute
the associated command or function by pressing a key.
identiFINDER® R300/en/2014.4(13623)/Feb2015
27
2. Operating the FLIR identiFINDER R300
FLIR Detection
Operating Key
Operating Key
Status LED
Display
Neutron Alarm LED
Gamma Alarm LED
Available only for variants equipped with a
neutron detector.
PPower Key
Figure 7. Papercraft model of the FLIR identiFINDER R300 with operating elements: Display, LEDs and keys.
28
identiFINDER® R300/en/2014.4(13623)/Feb2015
FLIR Detection
2.1
2. Operating the FLIR identiFINDER R300
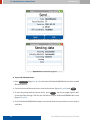
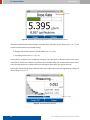
The FLIR identiFINDER R300 Display
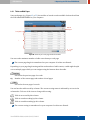
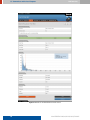
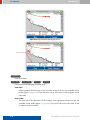
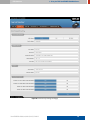
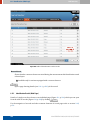
The FLIR identiFINDER R300 display (Figure 7, p. 28) is a color LCD screen divided into three principle areas (Figure 8, p. 29):
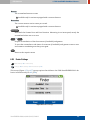
TOP: Title and Status Bar
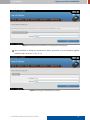
This area contains a brief title of the currently performed operation or the current mode the
instrument is switched to and some icons representing the status of several components of
the instrument.
When a warning or an alarm is raised, the alarm information is shown alternating with the
title (see, for example, Figure 100, p. 98).
Energy Saving Options
Title and Status Bar
GPS Status
Date, Time
Screen Title, Alarm Info
Main Display Area
Baery Status
Key Descriptions
Figure 8. Anatomy of the FLIR identiFINDER R300 display.
The power indicator and the title are grouped in the left part of the bar.
Full battery
Empty or no battery
Triangles symbolize the connection to an external power supply. This information is
also shown by a green LED (see 11.2, p. 230).
A segment lickers while the battery is being charged.
The current date and time and indicators for the GPS receiver and the energy saving options are grouped in the right part of the title bar.
19 Feb, 14:10
The current local date and time are shown as day, month, hours (24-hour notation) and
minutes.
identiFINDER® R300/en/2014.4(13623)/Feb2015
29
2.1. The FLIR identiFINDER R300 Display
FLIR Detection
The time is supplied by the clock built into the FLIR identiFINDER R300. It uses UTC
(a.k.a. “Greenwich Time”) for internal purposes and for time-stamping records saved
in the database, for example, spectra or identi ication results.
For correct values you have to ensure the correct setting of the clock and the correct
speci ication of your local time zone (see 6.10, p. 125).
The correct time and date can be set using the GPS receiver built into the FLIR
identiFINDER R300. If it is switched on (see 6.11, p. 127), it adjusts the clock to the
high-precision UTC time received from the GPS satellites. All you have to specify is your
local time zone (see 6.10, p. 125).
If the internal clock is completely off, for example after storing the instrument with
empty batteries for a couple of weeks, you have to adjust the internal clock and
specify the time zone (see 6.10, p. 125).
A one-minute countdown is shown instead of the current clock to announce the
beginning of scheduled automated identi ication measurement (see 4.4, p. 93).
A satellite symbolizes the state of the GPS receiver.
GPS receiver is switched off (factory setting, 6.11, p. 127).
GPS receiver is switched on (6.11, p. 127) but the GPS reception is not good enough to
determine the current position. Invalid coordinates, marked as such, are saved.
GPS receiver is switched on (6.11, p. 127) and the GPS reception is suf icient to determine the current position which is saved with measurement data and identi ication results.
A light bulb symbolizes the current energy saving options.
The FLIR identiFINDER R300 will not try to save energy because the current operation requires an active display, for example, during an identi ication measurement (4.3,
p. 90).
The backlight of the screen will be dimmed after the timeout you speci ied (6.9, p. 122).
The backlight of the screen will be dimmed after the timeout you speci ied (6.9, p. 122)
and the application software will power down half a minute later.
This mode is not used while the FLIR identiFINDER R300 is powered by an external
power source.
You can wake up a sleeping system by pressing a key.
CENTER: Variable Main Display
The contents of this area vary with the current operation of the FLIR identiFINDER R300.
It shows, for example, status information after power up (Figure 55, p. 63), menus to choose
commands from (Figure 13, p. 35), the strength of the observed gamma radiation (Figure 87,
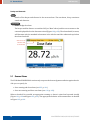
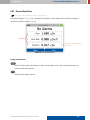
p. 86), or corresponding alarms (Figure 101, p. 99).
30
identiFINDER® R300/en/2014.4(13623)/Feb2015
FLIR Detection
2. Operating the FLIR identiFINDER R300
BOTTOM: Key Descriptions
The ields in this bar name the current function of each of the operating keys L. R. .
2.1.1
Status LEDs
Several LEDs (Figure 5, p. 26) indicate various status information.
. Red
.
labeled “G” (short for “Gamma”) indicates dose and dose rate alarms.
. Blue
.
labeled “N” (short for “Neutron”) indicates neutron counts and alarms.
Available only for variants equipped with a neutron detector.
. Green
.
indicates the power status (Figure 9, p. 31).
Instrument Off .
Running on Battery
Running on Low Battery
External Power
clock
1s
1s
1s
1s
1s
1s
Figure 9. Signals of the status LED
You can switch off the red and blue LEDs (6.32, p. 160).
identiFINDER® R300/en/2014.4(13623)/Feb2015
31
2.2. The FLIR identiFINDER R300 Keys
2.2
FLIR Detection
The FLIR identiFINDER R300 Keys
The FLIR identiFINDER R300 is equipped with three keys (Figure 5, p. 26 and Figure 7, p. 28).
The single key at the bottom is the power key
I
. It is used to switch the instrument on and off,
to cancel edit operations or return to superior menus.
The other two buttons on the L left and R right side of the instrument are the main operating keys. They change their function according to the current mode of operation of the FLIR
identiFINDER R300.
For your convenience, the actual function of these keys in any given situation is displayed in the
bottom part of the screen (Figure 7, p. 28). A detailed description of the keys’ functions under
various circumstances is given in chapter 6, p. 103.
Holding the FLIR identiFINDER R300 with your hand (Figure 10, p. 33), you can, for example, press
one key with your thumb and the other one with your middle inger.
To accomodate to your handedness or your personal preferences (Figure 10, p. 33 and Figure 11,
p. 34), you can swap the function of these keys (6.9, p. 122).
This document refers to the keys and their functions using the “normal” assigment and label
them as L and R , respectively.
32
identiFINDER® R300/en/2014.4(13623)/Feb2015
FLIR Detection
2. Operating the FLIR identiFINDER R300
.
Figure 10. Right-handed operation of the FLIR identiFINDER R300 with normal key assignments
identiFINDER® R300/en/2014.4(13623)/Feb2015
33
2.2. The FLIR identiFINDER R300 Keys
FLIR Detection
.
Figure 11. Left-handed operation of the FLIR identiFINDER R300 with reverse key key assigments
34
identiFINDER® R300/en/2014.4(13623)/Feb2015
FLIR Detection
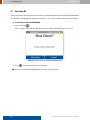
2.2.1
2. Operating the FLIR identiFINDER R300
Using Command Lists
Most features of the FLIR identiFINDER R300 offer more commands than you could immediately
reach with the FLIR identiFINDER R300’s limited number of keys.
In these cases the special command Skip is permanently mapped to L and you can use it to cycle
the available commands. If you reach the end of the list, L cycles to the start of the list.
For example, the commands to edit values are + , - , Left , Right , Accept , and Cancel (2.2.3,
p. 37). You can swap these commands with Skip (Figure 12, p. 35).
Accept
Cancel
Left
Right
Skip
+
L
R
Figure 12. Skipping commands for value editing
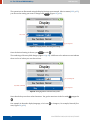
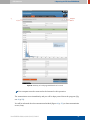
2.2.2
Choosing from Menus
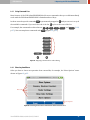
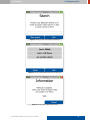
Often you have to choose an operation from a menu like, for example, the “More Options” menu
shown in Figure 13, p. 35.
Menu Items
Key Descriptions
Figure 13. Choosing from a menu: Initial state without chosen item
identiFINDER® R300/en/2014.4(13623)/Feb2015
35
2.2. The FLIR identiFINDER R300 Keys
FLIR Detection
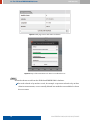
While no item is chosen, you can press R to Exit to the superior screen.
You can choose items from the menu with the command Down mapped to the L key. The chosen
item is decorated by a distinct color and symbols (Figure 14, p. 36).
Chosen Item
Choose
ose Items with Down
Figure 14. Choosing from a menu: Choosing the next item with Down
Press L repeatedly to choose other menu items (Figure 15, p. 36).
EXIT
Chosen Item
Choose
ose Items with Down
Figure 15. Choosing from a menu: Choosing other items with Down
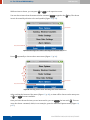
After reaching the bottom of the menu (Figure 15, p. 36), no item will be chosen on the next press
of L and Exit becomes available.
Once you have chosen the item you are interested in, you can Select the item with R . This executes the chosen command, which, in our example, opens the Advanced Options menu (Figure 16,
p. 37).
36
identiFINDER® R300/en/2014.4(13623)/Feb2015
FLIR Detection
2. Operating the FLIR identiFINDER R300
Return to Superior Screen
Figure 16. Choosing from a menu: After executing the command with Select
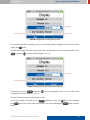
2.2.2.1
Scrolling in Menus
Some menus offer more options than the ive itting on the screen. This is indicated by scroll bars
along the vertical screen edges (Figure 17, p. 37).
A position marker indicates the position of the chosen item relative to the complete list of items.
Arrows at the upper and lower visible item indicate whether more items are available in that direction, respectively.
If you approach the bottom of the screen with Down mapped to the L key, the entire menu is
moved up to bring the following items into view. The position markers are adjusted appropriately.
Scroll
croll Bar
Scroll Bar
PPosition
osition Marker
PPosition Marker
Chosen Item
More Items Available
Choose
ose Items with Down
Figure 17. Choosing from a menu: Scrolling in long menus
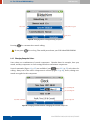
2.2.3
Changing Values
Many settings of your FLIR identiFINDER R300 require you to choose from a list of options.
identiFINDER® R300/en/2014.4(13623)/Feb2015
37
2.2. The FLIR identiFINDER R300 Keys
FLIR Detection
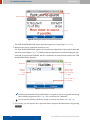
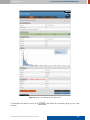
The operations are illustrated using the Display Settings as an example. Like in a menu (2.2.2, p. 35),
you choose the setting you want to change with Down (Figure 18, p. 38).
Chosen Item
Key Descriptions
Figure 18. Changing Values: Choosing the setting
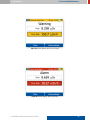
Once the desired setting is chosen, you Select it with R .
The rendering of the entry ield changes (Figure 19, p. 38): a different color and two arrows indicate
there is a list of values you can choose from.
Selected Entry Field
Reveal
eveal More Commands
Key Descriptions
Figure 19. Changing Values: Selected entry ield
Note that the keys now have other functions. You get the next item in the list with + mapped to
R.
Our example is about the display language, so let’s use R to change to, for example, Deutsch (German, Figure 20, p. 39).
38
identiFINDER® R300/en/2014.4(13623)/Feb2015
FLIR Detection
2. Operating the FLIR identiFINDER R300
Changed Value
Reveal
eveal More Commands
Go to Next Value
Figure 20. Changing Values: Changed entry ield
The actual setting did not change yet, the screen is still displayed in English. You can choose other
values with + ad lib.
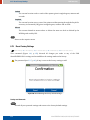
To make your changes effective, you need another command which is currently inaccessible. Press
Skip mapped to L to make it visible (Figure 21, p. 39).
Changed Value
Reveal
eveal More Commands
Figure 21. Changing Values: Revealing more commands
The moment you press Accept mapped to R , the new setting takes effect. In our case the screen
is displayed in German (Figure 22, p. 40).
The keys’ functions return to their previous state.
In case you change your mind, you can Cancel editing the value with R (Reveal the command
with Skip if necessary). The value in effect before you started editing with Select will be reestablished.
identiFINDER® R300/en/2014.4(13623)/Feb2015
39
2.2. The FLIR identiFINDER R300 Keys
FLIR Detection
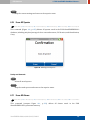
Changed Value Accepted
Chosen Item
Down, Select
Figure 22. Changing Values: Changed setting accepted
Pressing
I
for a moment also cancels editing.
Do not press
2.2.4
I
for too long. That would power down your FLIR identiFINDER R300.
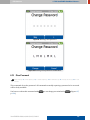
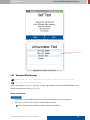
Changing Composite Values
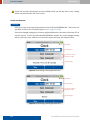
Some values are combinations of several components. Calendar dates for example, have year,
month, and day components or clock settings have hour and minute components.
Several commands (Figure 12, p. 35) are available if you Select (see 2.2.3, p. 37) such values for
editing. Always one of the value’s components is selected (Figure 23, p. 40), that is, editing commands are applied to this component.
Selected Entry Field
Selected Component
Reveal
eveal More Commands
Increase Component
Figure 23. Changing Combined Values: Changing the selected component
40
identiFINDER® R300/en/2014.4(13623)/Feb2015
FLIR Detection
2. Operating the FLIR identiFINDER R300
You increase the component with + and decrease it with - . In the example shown here, you
edit the year of the date since it is the selected component.
Now you need commands to select the other components of the value (see 2.2.1, p. 35). You can
reveal them with Skip mapped to L (Figure 24, p. 41).
Selected Entry Field
Selected Component
Next Component
Reveal
eveal More Commands
Figure 24. Changing Combined Values: Selecting components.
Press Left or Right to select the component you want to edit.
To get the commands for editing back, press Skip until + or - reappear.
After you inished editing all components, press Skip until you see the Accept command, then
press R .
In case you change your mind, you can Cancel editing the value with R (Reveal the command
with Skip if necessary). The value in effect before you started editing with Select will be reestablished.
Pressing
I
for a moment also cancels editing.
Do not press
2.2.5
I
for too long. That would power down your FLIR identiFINDER R300.
Changing Numerical Values
A lot of settings are numerical values, often with a immutable unit.
Several commands (Figure 12, p. 35) are available for editing numerical values. One of the number’s
digits is always selected (Figure 25, p. 42), that is, editing commands are applied to this digit. If you
start changing a number with Select (see 2.2.3, p. 37), the rightmost (least signi icant) digit is
selected.
identiFINDER® R300/en/2014.4(13623)/Feb2015
41
2.2. The FLIR identiFINDER R300 Keys
FLIR Detection
Selected Entry Field
Selected Digit
Reveal
eveal More Commands
Increase Digit
Figure 25. Changing Numerical Values: Changing the selected digit
You increase the selected digit with + and decrease it with - . If you increase the selected digit
above 9 or decrease it below 0, the surrounding digits are changed appropriately.
If you want to change the number in larger or smaller increments, you can select another digit to
be immediateley affected by the + and - commands. Press Skip until you see the commands
Left or Right , and then use them to select the digit you want to change (Figure 26, p. 42).
Selected Entry Field
Selected Digit
Reveal
eveal More Commands
Previous Digit
Figure 26. Changing Numerical Values: Selecting digits
To get the commands for editing back, press Skip until + and - reappear.
After you inished editing the number, press Skip until you see the Accept command, then press
R.
42
identiFINDER® R300/en/2014.4(13623)/Feb2015
FLIR Detection
2. Operating the FLIR identiFINDER R300
In case you change your mind, you can Cancel editing the value with R (Reveal the command
with Skip if necessary). The value in effect before you started editing with Select will be reestablished.
Pressing
I
for a moment also cancels editing.
Do not press
2.2.6
I
for too long. That would power down your FLIR identiFINDER R300.
Entering Text
Several entries consist of arbitrary text, for example the operator’s name, phone numbers, or settings for Bluetooth communication to a remote server (Figure 164, p. 149). Entering and editing
text with the FLIR identiFINDER R300’s limited number of keys is, of course, challenging. It is similar to editing composite values as described in 2.2.4, p. 40, with every character being a component.
Editing text is a lot more convenient via the FLIR identiFINDER R300’s web interface (see 8,
p. 179).
Several commands are available if you Select (see 2.2.3, p. 37) text values for editing. These commands are mapped to the R key. Use Skip mapped to L to cycle through the available commands (see 2.2.1, p. 35).
During text editing, exactly one character is selected (Figure 27, p. 43), that is, editing commands
are applied to this character.
Selected Entry Field
Selected Character
Reveal
eveal More Commands
Select Next Character
Figure 27. Editing Text: First character “J” is selected.
To select another character, use Left or Right (Figure 28, p. 44).
If you reach the left end of the text, Left does nothing. At the end of the text, however, Right
moves to two additional characters (spaces) to facilitate appending another word to the text.
identiFINDER® R300/en/2014.4(13623)/Feb2015
43
2.2. The FLIR identiFINDER R300 Keys
FLIR Detection
Selected Entry Field
Selected Character
Reveal
eveal More Commands
Select Next Character
Figure 28. Editing Text: Next character to the right is selected (“o”).
For the selected character (Figure 30, p. 44), you can use the commands + and - to cycle through
the available characters in the sequence shown in Figure 29, p. 44.
Use the web interface (see 8, p. 179) to enter international characters like æ, î, ö, ñ, ß, ëtç.
!”§$%&/()[]{}=?*+#’-_@.:,;
0123456789
(Space)
abcdefghijklmnopqrstuvwxyz
ABCDEFGHIJKLMNOPQRSTUVWXYZ
Figure 29. Editing Text: Set of available characters
Selected Entry Field
Selected Character
Change Selected
Character
Reveal
eveal More Commands
Figure 30. Editing Text: After changing the selected “o” to an “a”.
To delete the selected character use Delete (Figure 31, p. 45).
44
identiFINDER® R300/en/2014.4(13623)/Feb2015
FLIR Detection
2. Operating the FLIR identiFINDER R300
Selected Entry Field
Selected Character
Reveal
eveal More Commands
Delete Selected
Character
Figure 31. Editing Text: About to delete the selected character “h”.
The characters from the selected one to the end of the text will be moved towards the beginning to
ill the gap (Figure 32, p. 45).
Selected Entry Field
Selected Character
Figure 32. Editing Text: After deleting a character, the next character is selected.
To insert a character before the currently selected character, use Insert . The existing characters,
including the selected one, are pushed one position towards the end of the text (Figure 33, p. 46).
After you inished editing the text, press Skip until you see the Accept command and press R
(Figure 34, p. 46).
Spaces at the start or end of the text, if any, are removed from your entry.
identiFINDER® R300/en/2014.4(13623)/Feb2015
45
2.2. The FLIR identiFINDER R300 Keys
FLIR Detection
Selected Entry Field
Selected Character
Reveal
eveal More Commands
Insert Character
Figure 33. Editing Text: After inserting space before “ Doe” for an additional character.
Figure 34. Editing Text: Done.
In case you change your mind, you can Cancel editing the value with R (Reveal the command
with Skip if necessary). The value in effect before you started editing with Select will be reestablished.
Pressing
I
for a moment also cancels editing.
Do not press
2.2.7
I
for too long. That would power down your FLIR identiFINDER R300.
Entering the Password
If your FLIR identiFINDER R300 is protected by a password, you will have to enter it before you can
access most of the options and settings menus of the instrument (Figure 35, p. 47).
If your variant comes with a factory-set password, it is LMRLMRL.
46
identiFINDER® R300/en/2014.4(13623)/Feb2015
FLIR Detection
2. Operating the FLIR identiFINDER R300
Figure 35. Entering a password to access the option menus.
For better protection against unwanted changes of the instrument characteristics, you should
change the password to something else (6.12, p. 128).
If you don’t need protection but want faster access to the menus, you can remove the password
(6.13, p. 129).
Settings and Commands
Skip
Cycle the list of commands (see 2.2.1, p. 35).
L , M , R
Enter the password by seven presses in the correct sequence.
To cancel the password entry press
I
for a moment.
After the seventh entry, the key labels change (Figure 36, p. 48).
Accept
Con irm your password entry and have the instrument check your entry for correctness.
After you entered the correct password, you don’t have to enter it again until you switch
off the instrument.
If you enter a wrong password, you will be informed (Figure 37, p. 48). After you con irm the
message with OK , the instrument will return to the mode it was in before asking for the
password.
Cancel
Cancel the password entry and return without proceeding to the protected options and commands.
identiFINDER® R300/en/2014.4(13623)/Feb2015
47
2.2. The FLIR identiFINDER R300 Keys
FLIR Detection
Figure 36. Password entered but not yet con irmed.
Figure 37. Message after entering a wrong password.
48
identiFINDER® R300/en/2014.4(13623)/Feb2015
FLIR Detection
2.2.8
2. Operating the FLIR identiFINDER R300
Taking Screenshots
You can save the contents of the FLIR identiFINDER R300’s display at any time.
Ô To take a screenshot…
1. Press and hold
I
.
2. Press L .
You have to press L , even if you swapped the assignment of the operating keys (6.9,
p. 122).
Do not wait too long between pressing
I
and L , otherwise you might initiate the
power down command (2.6, p. 64).
Screenshots are saved in the FLIR identiFINDER R300’s permanent memory as image iles named
after the screen taken suf ixed by the current date, time and time zone offset.
To access the saved screenshots, connect your FLIR identiFINDER R300 to a computer (8.14,
p. 207).
You can check the number of saved screenshots in the status display (6.14, p. 130, Figure 38, p. 49)
or erase them (6.18, p. 134).
Figure 38. Status display showing the number of saved screenshots.
identiFINDER® R300/en/2014.4(13623)/Feb2015
49
2.3. The FLIR identiFINDER R300 Holster
2.3
FLIR Detection
The FLIR identiFINDER R300 Holster
For general monitoring of the environment for gamma or neutron radiation, you can insert the FLIR
identiFINDER R300 into its holster (Figure 39, p. 50) and wear it on your belt (Figure 40, p. 50). You
can still hear and feel the alarms and watch the alarm LEDs.
.
Figure 39. Inserting the FLIR identiFINDER R300 into a holster so alarm LEDs remain visible
.
Figure 40. FLIR identiFINDER R300 in a belt holster with visible alarm LEDs
50
identiFINDER® R300/en/2014.4(13623)/Feb2015
FLIR Detection
2.4
2. Operating the FLIR identiFINDER R300
The FLIR identiFINDER R300 Web Server
To access the FLIR identiFINDER R300’s web interface, simply point your web browser to one of
the addresses given after a connection between your computer and the FLIR identiFINDER R300 is
established (see 7.4, p. 178).
Provided a network connection can be established, you can use any modern browser running on, for
example, a desktop or laptop PC, a netbook, a tablet, or a smart phone. The browser must support
• HTML 5
• CSS 3
• Javascript
• Scalable Vector Graphics (SVG)
The following examples were successfully tested:
• Apple Safari 5 (Microsoft Windows, Mac OS X)
• Microsoft Internet Explorer 9 (Microsoft Windows)
• Mozilla Firefox 20 (Linux, Microsoft Windows, Mac OS X)
• Opera 10.6 (Microsoft Windows)
The FLIR identiFINDER R300 web access needs no cookies. If cookies are allowed, they are used to
remember your settings, for example the number of items you prefer in listings.
2.4.1
Operating the Web Server Pages
The web pages of the FLIR identiFINDER R300 are available in slightly different layouts for different
screen or window widths. A narrow version (Figure 41, p. 52) is used on mobile devices like smart
phones or tablet computers. The wider version (Figure 42, p. 53) is used on desktop or laptop
computers.
The instrument serving these web pages is identi ied in the page header, which also contains the
menus and several status indicators.
If you print a web page, the page header is suppressed.
The title of the current web page is shown in the main area below the page header. The content of
most web pages is divided into sections of related items.
A tool tip giving details about elements of web pages is shown if you hover and stay with the
pointer above an element. (Not available on touch-driven devices without pointer.)
identiFINDER® R300/en/2014.4(13623)/Feb2015
51
2.4. The FLIR identiFINDER R300 Web Server
FLIR Detection
Serial
Number
Menu Buon
PPage Header
TType of Instrument
PPage Title
Web Page
Sections
Software
Version
Baery Status
GPS Status
Main Page
Area
PPage Footer
Figure 41. Anatomy of a FLIR identiFINDER R300 web page, narrow layout
The bottom of the pages is marked by the page footer. Especially on systems without visible scrollbars (most mobile phones and tablet computers), this footer indicates that you have seen all of the
page.
Apart from the width, the main difference between the narrow and wide layouts of web pages is
the menu in the page header. The wide layout uses the space to show the top level of the menu in
a bar (Figure 42, p. 53), the narrow layout (Figure 41, p. 52) shows a button. If you click a menu in
either layout the menu hierarchy below that item is revealed and you can navigate to the desired
web page (Figure 43, p. 53, Figure 44, p. 54).
52
identiFINDER® R300/en/2014.4(13623)/Feb2015
FLIR Detection
2. Operating the FLIR identiFINDER R300
Serial
Number
T of Instrument
Type
PPage Header
T
Top-Level
Menu
Chosen Menu
PPage Title
GPS Status
Baery Status
Main Page
Area
Web Page
Sections
Software
Version
PPage Footer
Figure 42. Anatomy of a FLIR identiFINDER R300 web page, wide layout
Figure 43. Visible menu hierarchy on a web page with narrow layout
identiFINDER® R300/en/2014.4(13623)/Feb2015
53
2.4. The FLIR identiFINDER R300 Web Server
FLIR Detection
.
Figure 44. Single submenu on a web page with wide layout
54
identiFINDER® R300/en/2014.4(13623)/Feb2015
FLIR Detection
2.4.2
2. Operating the FLIR identiFINDER R300
Tables on Web Pages
Some web pages (e.g., Figure 45, p. 55) show tables of stored records available for download from
the FLIR identiFINDER R300 to your computer.
Multi-P Table
Multi-Page
Navigation
Column Titles with
Sorting Buons
TTable Rows
P Length
Page
Seings
Figure 45. Anatomy of a web page with a data table
You can set the maximum number of table rows shown per web page.
The current page length is remembered on your computer if cookies are allowed.
Depending on your page length setting and the total number of table entries, a table might be split
across multiple pages which you can navigate using the buttons above the table.
Previous
Proceed to the previous page of records.
x/y
Number of the current page and number of total pages
Next
Proceed to the next page of records.
You can have the table sorted by columns. The current sorting status is indicated by an icon in the
column title. Click one of the icons to change table sorting.
Table is not sorted by this column.
Table is sorted ascending by this column.
Table is sorted descending by this column.
The current sorting is remembered on your computer if cookies are allowed.
identiFINDER® R300/en/2014.4(13623)/Feb2015
55
2.4. The FLIR identiFINDER R300 Web Server
FLIR Detection
You can view details about a record listed in the table.
Show
Opens a window or browser tab showing details of the record for further inspection or analysis (see 2.4.3, p. 56).
2.4.3
Records on Web Pages
These pages show the results of a single measurement stored in the FLIR identiFINDER R300’s
database, for example, an identi ication measurement (Figure 46, p. 57). The main contents vary
with the type of shown records. Several buttons are available for navigation and housekeeping.
Previous
Proceed to the previous record of the same type.
Back
Return to the table of records of the same type.
Next
Proceed to the next record of the same type.
Spectrum
If the record contains a spectrum, you can hover above the chart to get details of the pointed
part shown. (Not available on touch-driven devices without pointer.)
GPS Coordinates
If GPS coordinates were stored with a record, they are shown in an additional section of the
details page (Figure 47, p. 58).
Look Up with GeoHack
Send the GPS coordinates stored with the record to the GeoHack page on the Wikimedia
Toolserver, a free service of Wikimedia Deutschland e.V. (Internet access required).
The service links to international servers of maps, satellite images, aerial photographs
etc. which cover the coordinates saved with your record.
Download
Download the shown record to the computer.
The name of the downloaded *.zip archive begins with the serial number of the FLIR
identiFINDER R300 followed by the type and the reference number of the record, for example
103156000000 Identification 4711.zip
Send
Send the record to the con igured (see 6.24, p. 149 and 8.6.2, p. 192) reachback server (see
9, p. 219).
56
identiFINDER® R300/en/2014.4(13623)/Feb2015
FLIR Detection
2. Operating the FLIR identiFINDER R300
TType and Number of
Record
Navigation
Buons
Figure 46. Anatomy of a web page with details of a record
Your computer must be connected to the Internet for this operation.
The transmission starts immediately and you will be kept posted about the progress (Figure 48, p. 58).
You will be informed after the transmission inished (Figure 49, p. 59) or about transmission
errors, if any.
identiFINDER® R300/en/2014.4(13623)/Feb2015
57
2.4. The FLIR identiFINDER R300 Web Server
FLIR Detection
Figure 47. Web page section with GPS coordinates
Figure 48. Steps of the transmission of data to a reachback server
Delete
Delete the shown record from the FLIR identiFINDER R300’s database.
Records referred to by another record, for example a spectrum referred to by an identi ication measurement, are not actually deleted but marked as unreachable for future
direct accesses.
58
identiFINDER® R300/en/2014.4(13623)/Feb2015
FLIR Detection
2. Operating the FLIR identiFINDER R300
Figure 49. Successful transmission of data to a reachback server
2.4.4
Printing Web Pages
You can print web pages with the usual printing procedures of your web browser.
Some of the shown elements are suppressed when printing web pages, for example the navigation
menus or push buttons (Figure 50, p. 60).
Many web browsers suppress printing of background images and colors. For better printing results
we recommend to tick the appropriate boxes. Look for settings like
4 Print Background Colors
4 Print Background Images
4 Print Background Images and Colors
2.4.5
Password Entry
An optional (6.13, p. 129) password may protect against unauthorized or accidental access to advanced settings and commands of your FLIR identiFINDER R300.
If a password is set (6.12, p. 128), you have to enter it in the instrument (see 2.2.7, p. 46) or in the
web interface (Figure 51, p. 61) to gain access.
When entering the FLIR identiFINDER R300 password via the web interface type “L”, “M”, or
“R” (upper case).
identiFINDER® R300/en/2014.4(13623)/Feb2015
59
2.4. The FLIR identiFINDER R300 Web Server
FLIR Detection
Figure 50. Example printout of measurement results
After entering the correct password, access is granted until you switch off your FLIR
identiFINDER R300 (2.6, p. 64).
2.4.6
Administration Access
Special credentials are required to access the administration pages of the web server where you
can access system iles or upload new software.
The credentials set at the factory are
60
Username
Password
admin
admin
identiFINDER® R300/en/2014.4(13623)/Feb2015
FLIR Detection
2. Operating the FLIR identiFINDER R300
.
Figure 51. Entering the password before accessing protected web pages
We recommend to change the password for better protection of your instrument against
unauthorized access (see 8.18, p. 215).
.
Figure 52. Entering the administration password
identiFINDER® R300/en/2014.4(13623)/Feb2015
61
2.5. Starting Up the FLIR identiFINDER R300
2.5
FLIR Detection
Starting Up the FLIR identiFINDER R300
Ô To start up the FLIR identiFINDER R300…
1. Ensure that the instrument is clean and free of visible damages.
2. Ensure that the battery is charged or connect the instrument to an external power source
(see 11.2, p. 230)
3. Press and hold
I
for a moment.
The red LED lashes.
If your variant is equipped with a neutron detector, the blue LED lashes as well.
4. Release the key.
Wait a moment while the FLIR identiFINDER R300
• Identi ies itself (Figure 53, p. 62),
Figure 53. Powering up the FLIR identiFINDER R300: Product identi ication
• goes through start-up procedures (Figure 54, p. 63),
• initializes the software (Figure 55, p. 63).
If the time of the FLIR identiFINDER R300’s internal clock is unreasonable, most probably caused by the battery being empty for some weeks, you will be asked to set the clock
(see 6.10, p. 125).
5. The FLIR identiFINDER R300 switches to the dose rate display (Figure 56, p. 63) and is ready
for operation.
62
identiFINDER® R300/en/2014.4(13623)/Feb2015
FLIR Detection
2. Operating the FLIR identiFINDER R300
Figure 54. Powering up the FLIR identiFINDER R300: Starting up
Figure 55. Powering up the FLIR identiFINDER R300: Initialization
Figure 56. FLIR identiFINDER R300 after powering up.
identiFINDER® R300/en/2014.4(13623)/Feb2015
63
2.6. Shutting Down the FLIR identiFINDER R300
2.6
FLIR Detection
Shutting Down the FLIR identiFINDER R300
Several methods are available to shut down the FLIR identiFINDER R300.
Ô To shut down the FLIR identiFINDER R300 normally…
1. Press and hold
I
.
After a couple of seconds, the shut down screen will be displayed (Figure 57, p. 64).
Figure 57. Shutting down the FLIR identiFINDER R300
2. Press L to con irm the shut down command.
I
or
Keep
depressed and the FLIR identiFINDER R300 will shut down.
or
Press R to cancel the shut down and resume normal operation.
If you shut down the FLIR identiFINDER R300 while an alarm is raised (Figure 58, p. 65), the
end time of the alarm entry is not stored in the database (5, p. 97). Instead, the end time will
re lect that the instrument was shut down before the end of the alarm.
Ô To shut down the FLIR identiFINDER R300 in case of software failure…
1. Press and hold
I
for about 20 seconds until the red LED and the beeper emit six short and
one long signal.
The FLIR identiFINDER R300 should shut down.
64
identiFINDER® R300/en/2014.4(13623)/Feb2015
FLIR Detection
2. Operating the FLIR identiFINDER R300
Figure 58. Shutting down the FLIR identiFINDER R300 during an alarm
2.7
Low Power Conditions
When the battery runs out of power, an appropriate warning will be displayed (Figure 59, p. 65) accompanied by a characteristic sound (Figure 60, p. 65). The green status LED lashes with a higher
frequency (Figure 9, p. 31).
Figure 59. Battery almost empty.
Low Battery
30 s
Empty Battery
30 s
15 s
10 s
Figure 60. Schematic timing of triple beeps indicating low power conditions.
You can Shut Down with R or Continue using the FLIR identiFINDER R300 with L until the battery is completely empty, however, the only remaining operation is the dose rate mode (Figure 61,
p. 66 and 4.1, p. 86).
identiFINDER® R300/en/2014.4(13623)/Feb2015
65
2.8. Resetting the FLIR identiFINDER R300
FLIR Detection
Figure 61. Low Power Dose Rate Mode
If the battery is completely empty, another message (Figure 62, p. 66) will appear accompanied by
a characteristic sound (Figure 60, p. 65).
Figure 62. Battery is empty.
You should switch off the instrument.
Please connect the FLIR identiFINDER R300 to an external power source (see 11.1, p. 229).
2.8
Resetting the FLIR identiFINDER R300
The FLIR identiFINDER R300 can be reset by performing a normal shut down–start up cycle.
All your custom settings remain unchanged by this procedure. To revert the instrument to
the factory defaults, use
66
Reset Factory Settings
(6.15, p. 132).
identiFINDER® R300/en/2014.4(13623)/Feb2015
FLIR Detection
2. Operating the FLIR identiFINDER R300
Ô To reset the FLIR identiFINDER R300…
1. Shut down the instrument (2.6, p. 64)
Should a reset be necessary because the instrument does not react to your input anymore, you might have to use the forced shut down procedure described in section 2.6,
p. 64.
2. Start up the instrument (2.5, p. 62).
identiFINDER® R300/en/2014.4(13623)/Feb2015
67
FLIR Detection
3. Field Operating Guide
Chapter 3
Field Operating Guide
This chapter provides a guide to the basic operating procedures necessary to survey an object and
generate the analyzed results for the survey of that object.
In many cases, your organization or institution will have its own Standard Operating Procedure (SOP). In such a case, you should refer to that SOP.
A typical application of the FLIR identiFINDER R300 is the survey of objects for radioactive radiation and to document the results of the survey. This process involves these fundamental steps:
1. Turn on and check the instrument (see 3.1, p. 70).
2. Observe the dose rate in your environment to detect gamma radiation (see 3.2, p. 70).
3. Locate the source of the radiation (see 3.3, p. 73).
4. Identify the nuclides that gamma radiation is originating from (see 3.4, p. 75).
5. Transfer the results to a local computer for further processing (see 3.5, p. 77).
6. Send the results to a remote service (see 3.6, p. 81).
7. Turn off the instrument (see 3.7, p. 84).
Please familiarize yourself with the names and positions of the FLIR identiFINDER R300’s
parts and the general methods of operation (chapter 2, p. 27) before proceeding with this
chapter.
Chapter 6, p. 103 provides information about all operations and describes the operations mentioned here in more detail. More precise pointers into the reference will be provided with the operation steps outlined below.
The instructions outlined in this chapter assume a variant with a neutron detector (A.1,
p. 237) and with factory settings.
identiFINDER® R300/en/2014.4(13623)/Feb2015
69
3.1. Switching On and Checking the Instrument
3.1
FLIR Detection
Switching On and Checking the Instrument
This description assumes normal operation of the instrument. For a detailed description of the
startup procedure refer to section 2.5, p. 62.
Ô To start up the FLIR identiFINDER R300…
1. Press and hold
I
for a moment until the screen backlight appears.
2. Release the key.
Wait a moment while the FLIR identiFINDER R300
• identi ies itself,
• goes through start-up procedures,
• initializes the software (Figure 63, p. 70).
Figure 63. Powering up the FLIR identiFINDER R300: General system status
3. Verify if there is enough energy in the battery and available space in the memory (Figure 63,
p. 70).
4. The FLIR identiFINDER R300 switches to the dose rate display (Figure 64, p. 71) and is ready
for operation.
3.2
Observing the Environment
The Dose Rate Mode (Figure 64, p. 71) is the basic operation mode of the FLIR identiFINDER R300,
please refer to 4.1, p. 86 for a detailed description.
3.2.1
70
Gamma Radiation Survey
identiFINDER® R300/en/2014.4(13623)/Feb2015
FLIR Detection
3. Field Operating Guide
Current
ent Dose Rate
Alarm Threshold
Logarithmic Scale
Current
ent Dose Rate
Dose Rate Unit
Current
urrent Neutron Rate
Available only for variants equipped
with a neutron detector.
Figure 64. Dose Rate mode
Ô To survey for gamma radiation…
1. Move the instrument around (e.g. Figure 65, p. 72) and observe the display (Figure 64, p. 71).
The current dose rate is shown in large digits and as a bar chart.
For best dose rate calculations the source must not be too close to the instrument (Figure 239, p. 242).
You can change the dose rate unit (see 6.31, p. 159) and the alarm thresholds (see 6.33,
p. 161).
The FLIR identiFINDER R300 continuously compares the radiation to warning and alarm thresholds (see 6.33, p. 161). Should the radiation exceed one of the thresholds, the instrument raises an
alarm which is reported on-screen (Figure 66, p. 72) and optionally by LEDs, beeper, and vibrator
(see 5, p. 97 for details about the beep and vibration patterns).
You can press L
Mute
to silence alarm annunciation by beeper and vibrator.
Press R
Acknowledge after you took notice of the alarm or warning.
The alarm or warning will be reported in the title bar until the radiation drops below the
appropriate threshold (Figure 66, p. 72).
3.2.2
Neutron Radiation Survey
Available only for variants equipped with a neutron detector.
Ô To survey for neutrons…
1. Hold the FLIR identiFINDER R300 close to your body so that the neutron detector (Figure 238,
p. 241) is close to you (Figure 67, p. 73).
identiFINDER® R300/en/2014.4(13623)/Feb2015
71
3.2. Observing the Environment
FLIR Detection
Figure 65. Surveying an object with the FLIR identiFINDER R300.
Title
itle Bar
Available only for variants equipped with a
neutron detector.
Figure 66. Dose rate warning reported on screen
2. Turn around 360° to detect the neutrons regardless of your location relative to the source.
72
identiFINDER® R300/en/2014.4(13623)/Feb2015
FLIR Detection
3. Field Operating Guide
Figure 67. Optimum posture for neutron detection
For tests involving un-moderated neutron sources, a 30 cm × 30 cm × 15 cm PMMA phantom
(Figure 240, p. 243) or equivalent must be placed between the source and the detector in the
FLIR identiFINDER R300 (Figure 238, p. 241) in order to provide adequate moderation of fast
neutrons and to simulate the ield operation instructions given here.
3.3
Locating a Radiation Source
Once you suspect the presence of a radiation source from observing the environment, you should
use the FLIR identiFINDER R300’s Finder Mode (4.2, p. 88) to determine the exact location of the
source.
Ô To locate a radiation source…
1. Move the instrument to a low-radiation position for a background measurement.
2. Press L
Finder to switch from Dose Rate Mode to Finder Mode.
3. Wait until the FLIR identiFINDER R300 inishes the background measurement (Figure 68,
p. 74).
If you are in a hurry, you can R
Exit
the background measurement (not recom-
mended). The instrument will use the most recent background taken after it was
switched on.
4. Move the instrument around to ind the radiation source.
identiFINDER® R300/en/2014.4(13623)/Feb2015
73
3.3. Locating a Radiation Source
FLIR Detection
Current Count Rate
Measuring Duration
Figure 68. Finder mode: Initial background measurement
The FLIR identiFINDER R300 averages the count rate for adjustable intervals (see 6.30,
p. 157) and will guide you with its display (Figure 69, p. 74) but mainly by emitting sounds
indicating the distance to the source. The closer you are to the source, the more “excited” the
beeper and the vibrator get.
Listening to the beeper, you can move around to look for the source while watching your step
instead of the screen.
Beep
eep Threshold
Current Count Rate
Count Rate Exceeded the
Beep Threshold
Count Rate History
Current Neutron Rate
Current
ent Dose Rate
Available only for variants
equipped with a neutron detector.
Figure 69. Finder mode: Continuous measurement
You can change the sensitivity of the beeper (see 6.30, p. 157).
74
identiFINDER® R300/en/2014.4(13623)/Feb2015
FLIR Detection
3.4
3. Field Operating Guide
Identifying a Radiation Source
After you have detected a radiation source by surveying the ambient dose rate (3.2, p. 70) or by
locating its position (3.3, p. 73), you can use the FLIR identiFINDER R300’s Identi ication Mode (4.3,
p. 90) to ind out the nuclide the radiation is originating from.
The FLIR identiFINDER R300 can identify and report a number of nuclides by analyzing the radiation spectrum they emit. You can inspect the library of these nuclides in appendix C, p. 259 or, with
less detail, in the instrument itself by checking the nuclide visibility under
Options Menu (p. 103) ä More Options (p. 103) ä Identi cation Options (p. 103) ä Nuclide Visibility (p. 118)
Depending on your instrument’s settings, you might have to enter a password to access the
list (2.2.7, p. 46).
Ô To identify radionuclides…
1. If the FLIR identiFINDER R300 runs in Dose Rate Mode (Figure 64, p. 71) and Finder Mode
is enabled, then press Finder . If Finder mode is disabled, then Identify will be present so
proceed to the next step.
2. Press Identify to switch to Identi ication Mode (Figure 70, p. 75).
Best Range
Schematic Count Rate
Indicator
Dead Time Relative to
Passed Duration
Current
ent Dose Rate
Duration
uration
Current
ent Count Rate
Advice
Figure 70. Spectrum acquisition in Identi ication Mode
The FLIR identiFINDER R300 begins to acquire a spectrum of the radiation. Normally, there
is a preset acquisition duration, but you can change that to a minimum number of counts set
at the factory (6.4, p. 116).
3. Move the instrument into a good position for optimal data acquisition.
Try to get the current count rate marker into the center of the schematic indicator (Figure 70,
p. 75) by getting closer to or away from the source.
identiFINDER® R300/en/2014.4(13623)/Feb2015
75
3.4. Identifying a Radiation Source
FLIR Detection
Best Range
Current
ent Count Rate
Advice
Figure 71. Finding the position for best measurements
The FLIR identiFINDER R300 assists with advice given on-screen (Figure 71, p. 76).
4. Wait until the preset acquisition duration is over.
The FLIR identiFINDER R300 applies the identi ication algorithm to the acquired data and
shows the result (Figure 72, p. 76). Additionally, the identi ication results including the spectrum and, if required and available, the GPS coordinates are automatically saved in the FLIR
identiFINDER R300’s database.
Nuclide Name
Nuclide Usage
(see p. 259)
Identi cation
ation
Con dence
0: bad
10: excellent
Nuclide Severity,
(Innocent, Suspicious, Threatening,
see p. 259)
Reference Number of
the Saved Data
Figure 72. Identi ication results
Nuclides the identi ication algorithm did not recognize or those recognized but having
their visibility suppressed (see 6.5, p. 118) are reported as “Unknown”.
You can specify whether con idence, usage, or severity are shown, see 6.4, p. 116.
5. If necessary, you can acquire more spectrum data to improve the identi ication by pressing
Continue .
76
identiFINDER® R300/en/2014.4(13623)/Feb2015
FLIR Detection
3. Field Operating Guide
The FLIR identiFINDER R300 will acquire more data for the preset extra duration (see 6.4,
p. 116).
6. You can inspect the spectrum acquired for the identi ication by pressing Skip and Spectrum
(Figure 73, p. 77). Please refer to 6.2, p. 106 for options and commands for spectrum viewing.
Figure 73. Spectrum the identi ication is based upon
3.5
Communicate with a Local Computer
You can access the FLIR identiFINDER R300’s settings and stored data from a computer locally connected to the instrument.
The FLIR identiFINDER R300 acts as a web server so you need no special software other than your
standard web browser. For some computer operating systems, however, you need to install drivers
for the connection. Please refer to section 7, p. 167 for details.
Ô To transfer identi cation results to a local computer…
These instructions assume that your computer is correctly prepared. Consult section 7,
p. 167 or your IT administrator for help.
1. Connect the FLIR identiFINDER R300 to your computer with the included USB cable (refer to
section 7.1, p. 168 for details).
After establishing the connection, the FLIR identiFINDER R300 will display its IP address.
(Figure 74, p. 78)
2. Use your computer’s standard web browser to navigate to the given IP address.
The FLIR identiFINDER R300’s home page opens and displays diverse information regarding
your FLIR identiFINDER R300 (Figure 75, p. 78).
identiFINDER® R300/en/2014.4(13623)/Feb2015
77
3.5. Communicate with a Local Computer
FLIR Detection
Figure 74. Valid IP address after a connection was established
Serial Number
Instrument Type
Main Menu
Figure 75. The FLIR identiFINDER R300’s home page
t
3. Open the table with identi ication records stored in the FLIR identiFINDER R300’s database
(Figure 76, p. 79) via the menu Data
Identi cations .
4. To look for the desired data you can click the sorting button in one of the column titles (Figure 76, p. 79).
5. If many records are stored in the database, you might need to turn pages with the multipage
table navigation (Figure 76, p. 79).
78
identiFINDER® R300/en/2014.4(13623)/Feb2015
FLIR Detection
3. Field Operating Guide
Multi-P Table
Multi-Page
Navigation
Column Titles
with Sorting
Buons
Figure 76. Table of identi ication result records
6. To view a summary of a record, hover the pointer over the table row of the record (Figure 76,
p. 79). (Not available on touch-driven devices without pointer.)
7. To view a detailed report of a record, click
Show .
The details will be shown on separate page (Figure 77, p. 80).
8. To print the report, use your browser’s Print command.
9. To download the identi ication record to your computer in the formats speci ied in the settings (8.6.4, p. 192), click Download and follow the instructions of your web browser.
identiFINDER® R300/en/2014.4(13623)/Feb2015
79
3.5. Communicate with a Local Computer
FLIR Detection
.
Figure 77. Details of an identi ication result record
80
identiFINDER® R300/en/2014.4(13623)/Feb2015
FLIR Detection
3.6
3. Field Operating Guide
Sending Results to a Remote Server
This item is available for FLIR identiFINDER R300 variants with Bluetooth (see A.1, p. 237).
You can transfer identi ication results or spectra to a remote server for further processing or analysis. An ANSI N42.42 ile (p. 269) containing the data is sent from the FLIR identiFINDER R300 to a
cell phone via short range Bluetooth radio and from the phone to the remote server via the Internet.
The connection requires some initial setup on the FLIR identiFINDER R300 and on the mobile
phone, please refer to section 9, p. 219 for details.
Ô To send identi cation result records to a remote server…
These instructions assume that your FLIR identiFINDER R300 and your cell phone are
correctly prepared. Consult section 9, p. 219 or your IT administrator for help.
1. While the identi ication results (for example of section 3.4, p. 75, Figure 72, p. 76) are displayed, press Skip to reveal the command Send (Figure 78, p. 81).
Figure 78. Identi ication results
2. Initiate the data transfer with Send .
A summary of the record is shown (Figure 79, p. 82).
3. Start the data transfer with Send .
During the transfer of data you will be kept posted about the progress of the transmission
steps (Figure 80, p. 82).
If this is the irst time you are sending data since switching on the FLIR identiFINDER R300, you
have to pair it with your Bluetooth phone. Please refer to section 6.23.3, p. 144 for the complete
details.
identiFINDER® R300/en/2014.4(13623)/Feb2015
81
3.6. Sending Results to a Remote Server
FLIR Detection
Figure 79. Identi ication result summary for sending
Figure 80. Data transmission progress
Ô To pair with a Bluetooth device…
1. Press Start Search (Figure 81, p. 83) to have the FLIR identiFINDER R300 search for suitable
Bluetooth devices.
2. Choose the desired Bluetooth device from the list shown (Figure 82, p. 83) with Down .
3. To start the pairing with the chosen device, press Select . Your device might require additional steps like entering a PIN. Use the PIN shown on your FLIR identiFINDER R300 screen
(Figure 83, p. 83).
4. Your FLIR identiFINDER R300 displays some details about the paired device and is ready to
send data.
82
identiFINDER® R300/en/2014.4(13623)/Feb2015
FLIR Detection
3. Field Operating Guide
Figure 81. Ready to search for Bluetooth devices
Figure 82. List of suitable Bluetooth devices detected
Figure 83. Pairing with a Bluetooth device
identiFINDER® R300/en/2014.4(13623)/Feb2015
83
3.7. Switching Off
3.7
FLIR Detection
Switching Off
After you are done with all your measurements, you should shut down the FLIR identiFINDER R300.
The details on shutting down are given in section 2.6, p. 64, the recommended procedure follows:
Ô To shut down the FLIR identiFINDER R300…
1. Press and hold
I
.
After a couple of seconds, the shut down screen will be displayed (Figure 84, p. 84).
Figure 84. Shutting down the FLIR identiFINDER R300
2. Press L to con irm the shut down command.
Store your FLIR identiFINDER R300 in its case while not in use.
84
identiFINDER® R300/en/2014.4(13623)/Feb2015
FLIR Detection
4. FLIR identiFINDER R300 Modes
Chapter 4
FLIR identiFINDER R300 Modes
This chapter provides detailed descriptions of the FLIR identiFINDER R300’s essential measuring
modes for day-to-day procedures.
Dose Rate Mode
Observe the ambient radiation (see 4.1, p. 86)
Finder Mode
Locate radiation sources (see 4.2, p. 88)
Identi cation Mode
Identify radiating nuclides (see 4.3, p. 90)
Automated Mode
Have the unattended instrument identify radiating nuclides at prede ined time intervals (see
4.4, p. 93)
Remotely Controlled Spectrum Acquisition
Acquire spectra via the web interface (see 4.5, p. 95, 8.16, p. 209)
The alarms overriding all other modes and commands are detailed in Chapter 5, p. 97.
identiFINDER® R300/en/2014.4(13623)/Feb2015
85
4.1. Dose Rate Mode
FLIR Detection
Figure 85. Cycling the manual modes Dose Rate, Finder, and Identi ication
Figure 86. While Finder mode is disabled, cycling modes will toggle between Dose Rate and Identi ication
modes
4.1
Dose Rate Mode
The Dose Rate Mode is the basic operation mode of the FLIR identiFINDER R300. It is activated
after starting up the instrument.
Current
ent Dose Rate
Alarm Threshold
Logarithmic Scale
Current
ent Dose Rate
Dose Rate Unit
Current
urrent Neutron Rate
Available only for variants equipped
with a neutron detector.
Figure 87. Dose Rate mode
86
identiFINDER® R300/en/2014.4(13623)/Feb2015
FLIR Detection
4. FLIR identiFINDER R300 Modes
For best dose rate calculations the source must not be too close to the instrument (Figure 239,
p. 242).
The dose rate display (Figure 87, p. 86) shows two representations of the gamma dose rate:
Analog
A colored horizontal bar along a logarithmic axis ranging from 0.001 µSv/h to 10 Sv/h
(1 Sv = 100 rem) across the upper part of the screen.
A vertical line marks the position of dose rate alarm threshold (see 6.33, p. 161 for setting the
threshold).
If the dose rate rises above the threshold, the color of the bar representing the current dose
rate changes.
Digital
Large digits and a dose rate unit in the screen’s center.
The unit is adjusted to the order of magnitude of the dose rate (µSv/h, mSv/h, Sv/h) and
re lects your preferences (see 6.31, p. 159).
If your variant is equipped with a neutron detector, the current neutron rate is shown
below the gamma dose rate.
If the dose rate rises above the overload threshold (see A.1, p. 237), the instrument’s results
are unreliable. This condition is displayed on the screen (Figure 88, p. 87).
We strongly recommend that you retreat from environments with radiation that high.
Figure 88. Detector overload
Move the FLIR identiFINDER R300 to a location with lower radiation and then press Con rm .
identiFINDER® R300/en/2014.4(13623)/Feb2015
87
4.2. Finder Mode
FLIR Detection
Settings and Commands
.
Finder
Switch to Finder mode (see 4.2, p. 88).
.
Options
Inspect and change options (see 6, p. 103).
4.2
Finder Mode
You can use the FLIR identiFINDER R300 in Finder Mode to locate a radiation source. Move the
instrument around the vicinity of a suspected source and monitor the display, the red LED, vibrator,
and beeper of the FLIR identiFINDER R300 for changes. The vibration, and especially the sound,
get more “excited” the closer the instrument is to the source.
Finder mode can be disabled (see 6.30, p. 157).
You can switch off the LED, the vibrator, and the beeper (see 6.32, p. 160).
Immediately after switching to the Finder mode, the FLIR identiFINDER R300 begins a background
measurement (Figure 89, p. 89).
For better results, move the FLIR identiFINDER R300 away from suspected radiation sources
during the background measurement.
The duration of the background measurement is shown below the chart showing the measurements.
If a background was measured since switching on the FLIR identiFINDER R300 and you don’t want
to wait until the background is measured (not recommended), you can cancel the background measurement. The FLIR identiFINDER R300 will then use the most recent previous background measurement.
After the background measurement has inished, the Finder mode screen appears (Figure 90, p. 89).
If your variant is equipped with a neutron detector, the current neutron rate is displayed at
the bottom of the screen.
The current count rate is averaged for a period you can specify (see 6.30, p. 157). The average of
the most recent period is visualized as a wide column along the right edge of the screen.
Narrow columns representing older periods ill the screen’s center from right to left, pushing the
oldest periods off the screen’s left edge.
88
identiFINDER® R300/en/2014.4(13623)/Feb2015
FLIR Detection
4. FLIR identiFINDER R300 Modes
Current Count Rate
Measuring Duration
Figure 89. Finder mode: Initial background measurement
Beep
eep Threshold
Current Count Rate
Count Rate Exceeded the
Beep Threshold
Count Rate History
Current Neutron Rate
Current
ent Dose Rate
Available only for variants
equipped with a neutron detector.
Figure 90. Finder mode: Continuous measurement
The vertical scaling of the chart is adjusted continuously to make best use of the available screen
height. A dashed line above the chart indicates the adjustable (see 6.30, p. 157) threshold for audible feed back. If the count rate rises above this level, you get noti ied by the red LED, the vibrator,
and the beeper. The sound frequency is proportional to the count rate, that is, the closer the instrument gets to the source the higher the tone.
You can mute the sound by pressing
I
for a moment. Muting remains in effect until you
leave and re-enter the Finder mode and the background measurement is repeated.
Settings and Commands
Dose
Switch to Dose Rate mode (see 4.1, p. 86).
identiFINDER® R300/en/2014.4(13623)/Feb2015
89
4.3. Identi cation Mode
FLIR Detection
Identify
Switch to Identi ication mode (see 4.3, p. 90).
Options
Inspect and change options (see 6, p. 103).
4.3
Identi cation Mode
You can switch the FLIR identiFINDER R300 to Identi ication Mode to perform the actions necessary to identify the nuclides gamma radiation is originating from.
The instrument acquires a gamma spectrum for a duration you can specify (6.4, p. 116) and shows
the progress and some parameters of the measurement (Figure 91, p. 90).
The spectrum acquired here overwrites the current contents of the spectrum viewer (6.2,
p. 106). Data acquisition in the spectrum viewer, if any, is stopped.
Best Range
Schematic Count Rate
Indicator
Dead Time Relative to
Passed Duration
Current
ent Dose Rate
Duration
uration
Current
ent Count Rate
Advice
Figure 91. Identi ication Mode: Progress display during time limited data acquisition
The FLIR identiFINDER R300 achieves better identi ication results if the count rate is within a certain range shown in the center of in the indicator. While the current count rate is outside the desired
range, advices are shown so you can shorten (Figure 92, p. 91) or lengthen (Figure 93, p. 91) the
distance between the instrument and the radiation source.
If the acquisition is limited not by the time, but the number of counts (6.4, p. 116), the display looks
slightly different (Figure 94, p. 92).
You should try to move the instrument into a good position although the advice on moving
the instrument in a position for best identi ication is not shown in this mode to make room
for the number of counts relative to the required minimum.
90
identiFINDER® R300/en/2014.4(13623)/Feb2015
FLIR Detection
4. FLIR identiFINDER R300 Modes
Best Range
Current
ent Count Rate
Advice
Figure 92. Identi ication Mode: Count rate too low for best results
Best Range
Current Count Rate
Advice
Figure 93. Identi ication Mode: Count rate too high for best results
The acquisition of data stops after the duration or count criterion (6.4, p. 116) is met or when you
Exit . The FLIR identiFINDER R300 applies the identi ication algorithm and saves and displays the
result (Figure 95, p. 92 and Figure 96, p. 93). If nuclides were identi ied, the results are saved. The
reference number of the saved record is shown so you can refer to it for further processing.
You can specify whether con idence, usage, or severity are shown, see 6.4, p. 116.
Nuclides the identi ication algorithm did not recognize or those recognized but having their
visibility suppressed (see 6.5, p. 118) are reported as “Unknown”.
Settings and Commands
Dose
Switch to Dose Rate mode (see 4.1, p. 86).
identiFINDER® R300/en/2014.4(13623)/Feb2015
91
4.3. Identi cation Mode
FLIR Detection
Best Range
Current
ent Count Rate
Schematic Count Rate
Indicator
Dead Time Relative to
Passed Duration
Current
ent Dose Rate
Duration
uration
Current Count Rate
Registered Counts
Figure 94. Identi ication Mode: Progress display during count limited data acquisition
Reference Number of
the Saved Record
Figure 95. Identi ication Mode: Identi ication was not possible.
Start
Start the identi ication measurement.
Skip
Cycle the list of commands (see 2.2.1, p. 35).
Send
Go to Send Identi cation (see 6.21, p. 137) avoiding the detour around the normal options
menu hierarchy. The current identi ication will be already chosen for sending.
Exit
Return to the previous mode.
92
identiFINDER® R300/en/2014.4(13623)/Feb2015
FLIR Detection
4. FLIR identiFINDER R300 Modes
Nuclide Names
Nuclide Usage
Identi cation
ation Con dence
Nuclide Severity
Reference Number of
the Saved Record
Figure 96. Identi ication Mode: Identi ied radionuclides
Continue
Acquire more data to improve the identi ication. The acquisition continues for the duration
you speci ied (see 6.4, p. 116) no matter whether you limited the duration or the minimum
number of counts for the initial acquisition.
Spectrum
Inspect the acquired spectrum.
This command is available only after you entered the password or if the password protection is off.
Please refer to 6.2, p. 106 for options and commands for spectrum viewing. After you return
from the spectrum, you can Continue to acquire data, or Exit the identi ication mode.
4.4
Automated Mode
In automated mode, the FLIR identiFINDER R300 collects data for a radionuclide identi ication at
speci ied time intervals or in response to a dose rate warning. You can switch this mode on or off
and specify the interval (see 6.20, p. 135).
For each measurement, data will be collected until an instrument-speci ic number of gamma counts
has been registered (cf. “Dynamic” identi ication duration, see 6.4, p. 116).
In low-radiation environments, this can take quite a while, even longer than the interval you
speci ied. The next scheduled measurement will be omitted in such cases.
The start of an automated measurement will be announced 60 s in advance by a countdown shown
instead of the current time on the display of the FLIR identiFINDER R300 (Figure 97, p. 94).
identiFINDER® R300/en/2014.4(13623)/Feb2015
93
4.4. Automated Mode
FLIR Detection
Countdown
Figure 97. Countdown announcing the start of a scheduled measurement
Automatic identi ication measurements override other activities except alarms (see 5, p. 97). Automatic measurements are blocked during:
• Background measurements in Finder Mode (see 4.2, p. 88)
• A running self test (see 6.19, p. 134)
During these conditions, the countdown continues, but “Blocked” is shown instead of the countdown timer. Should the condition end before the scheduled time, the measurement starts. Otherwise, the measurement is omitted and a new attempt is made after the regular interval.
During the measurement, basic radiation data and a small spectrum with logarithmic scaling are
shown (Figure 98, p. 94).
Progress Bar
Figure 98. Automated measurement
94
identiFINDER® R300/en/2014.4(13623)/Feb2015
FLIR Detection
4. FLIR identiFINDER R300 Modes
Settings and Commands
. Off
Switch
Switch off automated mode.
Depending on your variant, this might require entering the password (2.2.7, p. 46).
.
Cancel
Cancel this measurement. The next measurement will start as scheduled.
Detected Nuclides
Once the Automated Mode measurement is complete, the FLIR identiFINDER R300 will report any nuclide(s) identi ied and indicate the reference number assigned to the stored
results.
30. s
Initially, the only available command on the nuclide results screen shows a countdown timer
starting at 30 s. When the timer expires, the FLIR identiFINDER R300 will return to the
screen that was active before the Automated Mode measurement started. Pressing 30. s
. .
prior to the timer expiring will cancel the timer and the command will change to Exit
.
Exit
Only appears if the results countdown timer was cancelled. Press to close the results screen
and return to the screen that was active before the Automated Mode measurement started.
Results Storage
The results of the measurements are saved in the database of the FLIR identiFINDER R300.
They are marked as being results of automated measurements (see 8.11, p. 199).
4.5
Remote-Controlled Spectrum Acquisition
While the FLIR identiFINDER R300 is connected to a computer, you can collect and analyze spectra
via the web interface. This method of data acquisition for spectra interrupts other operations of
the instrument.
Alarms will still be reported, if necessary.
During the acquisition, a message is shown (Figure 99, p. 96). You can stop it on the instrument
. or via the web interface with Stop
. (see 8.16, p. 209).
with Stop
.
After the acquisition, the FLIR identiFINDER R300 resumes the mode it was in before. If the previous operation was interrupted during a time limited task like collecting background or identi ication data, it must start over again.
identiFINDER® R300/en/2014.4(13623)/Feb2015
95
4.5. Remote-Controlled Spectrum Acquisition
FLIR Detection
Figure 99. Message during remote-controlled spectrum acquisition
96
identiFINDER® R300/en/2014.4(13623)/Feb2015
FLIR Detection
5. FLIR identiFINDER R300 Alarms
Chapter 5
FLIR identiFINDER R300 Alarms
If the FLIR identiFINDER R300 detects radiation above certain thresholds you can specify (see 6.33,
p. 161), it raises an alarm. Alarms can be reported via several annunciators:
Main Display
Details of the alarm are always displayed on-screen, no matter which other activity was displayed at the time the alarm condition was met (for example, Figure 101, p. 99).
The screen backlight will be switched on if it timed out (6.9, p. 122).
The alarm details remain on the screen until you dismiss them.
Status Bar
If you dismiss the alarm details, the alarm and warning information is shown in the status
bar along the display’s top edge alternating with the normal information shown there (Figure 100, p. 98).
LED
LEDs (Figure 7, p. 28) lash in several patterns.
Beeper
The beeper emits various sound patterns.
Vibrator
The vibrator shakes the instrument (and adds a little sound).
You can switch the LEDs, the beeper and the vibrator on or off (see 6.32, p. 160).
All alarms are stored in the FLIR identiFINDER R300’s database, including date and time (always)
and GPS coordinates (if switched on and available, see 6.11, p. 127).
You can review saved alarms via the web interface (8.13, p. 206) or delete them (6.17, p. 133)
identiFINDER® R300/en/2014.4(13623)/Feb2015
97
5.1. Gamma Alarms
FLIR Detection
Settings and Commands
Mute
Switch off the beeper and vibrator for the current alarm. The next alarm, if any, reactivates
sound and vibration.
Acknowledge
Acknowledge the alarm.
The beeper and the vibrator are switched off (see “Mute” above) and the screen returns to the
content displayed before the alarm was raised (Figure 100, p. 98). The alarm details, however,
will alternate with the standard information in the title bar until the radiation drops below
the alarm threshold.
Alarm State Info
Alternates with
the Normal Title
Figure 100. Dose rate display with alarm indication
5.1
Gamma Alarms
The FLIR identiFINDER R300 continuously compares the detected gamma radiation against thresholds you can specify for
• dose warning and dose alarm (see 6.33, p. 161)
• dose rate warning and dose rate alarm (see 6.34, p. 162).
When a threshold is exceeded, an appropriate warning or alarm is raised and reported visually
(Figure 101, p. 99 and Figure 102, p. 99). The appropriate behavior of the annunciators is detailed
in Figure 103, p. 100.
98
identiFINDER® R300/en/2014.4(13623)/Feb2015
FLIR Detection
5. FLIR identiFINDER R300 Alarms
Figure 101. Alarm display: Dose rate warning
Figure 102. Alarm display: Dose rate alarm
identiFINDER® R300/en/2014.4(13623)/Feb2015
99
5.1. Gamma Alarms
FLIR Detection
.Warning
.
Red LED
Beeper
Vibrator
Dose or Dose Rate Alarm
.
Red LED
Beeper
Vibrator
Dose + Dose Rate Alarm
.
Red LED
Beeper
Vibrator
clock
1s
1s
1s
Figure 103. Gamma alarms as announced by the red LED, beeper, and vibrator
100
identiFINDER® R300/en/2014.4(13623)/Feb2015
FLIR Detection
5.2
5. FLIR identiFINDER R300 Alarms
Neutron Alarms
Available only for variants equipped with a neutron detector.
The FLIR identiFINDER R300 continuously compares the number of detected neutrons per given
period against thresholds you can specify for warnings and alarms (see 6.35, p. 163).
When a threshold is exceeded, an appropriate warning or alarm is raised and reported visually
(Figure 104, p. 101). The appropriate behavior of the annunciators is detailed in Figure 105, p. 101.
Figure 104. Alarm display: Neutron alarm
Warning
Blue LED
Beeper
Vibrator
Alarm
Blue LED
Beeper
Vibrator
clock
1s
1s
1s
Figure 105. Neutron incidents as announced by the blue LED, beeper, and vibrator
5.3
Sigma Noti cations
The FLIR identiFINDER R300 continuously monitors the radiation level and uses a smart algorithm
to detect unusual increases. These events are announced as “𝜎 noti ication” in the display’s title bar
(Figure 106, p. 102) and, optionally, via beeper and vibrator.
identiFINDER® R300/en/2014.4(13623)/Feb2015
101
5.3. Sigma Noti cations
FLIR Detection
𝜎 noti ications are based on the increase of the radiation level over time. Other than the
alarms described above, they do not depend on the absolute level.
Alarm State Info
Alternates with
the Normal Title
Figure 106. Dose rate display with 𝜎 noti ication
𝜎 noti ications are especially useful while you carry the instrument on your belt because the instrument calls for your attention by beeping and lashing upon the sudden increase of the radiation
level.
You can activate the announcements and control the sensitivity (see 6.34, p. 162, 6.35, p. 163).
102
identiFINDER® R300/en/2014.4(13623)/Feb2015
FLIR Detection
6. FLIR identiFINDER R300 Menu Reference
Chapter 6
FLIR identiFINDER R300 Menu Reference
This chapter provides detailed descriptions of the FLIR identiFINDER R300’s vast number of settings that in luence its behavior, and the commands for expert analyses and advanced operations.
You can access these commands and settings by navigating the menu hierarchy. Depending on your
variant, there are different entry points for the menu hierarchy.
Some FLIR identiFINDER R300 variants provide easy access to a few commands and settings without password. The complete menu listed under 6.1, p. 103 is available as well.
.
Main Menu
⋅
. Menu
Advanced
⋅
.
Clock Settings
⋅
. State
Current Alarm
. . . . . . . . . . . . . . . . . . . . . . . . . . . . . . . . . . . . . . . . . . . . . . . . . . . . . . . . see 6.36, p. 165
⋅
. Options
Connectivity
. . . . . . . . . . . . . . . . . . . . . . . . . . . . . . . . . . . . . . . . . . . . . . . . . . . . . . . . see 6.1, p. 104
6.1
. . . . . . . . . . . . . . . . . . . . . . . . . . . . . . . . . . . . . . . . . . . . . . . . . . . . . . . . . . . . see 6.1, p. 103
. . . . . . . . . . . . . . . . . . . . . . . . . . . . . . . . . . . . . . . . . . . . . . . . . . . . . . . . . . . . see 6.10, p. 125
Complete Option Menus (Outline)
All FLIR identiFINDER R300 variants provide access to the complete set of commands and settings.
Usually, you have to enter a password (see 2.2.7, p. 46) before access.
Options. Menu
⋅
.
More Options
⋅ ⋅
⋅ ⋅ ⋅
⋅ ⋅
.
Spectrum
. . . . . . . . . . . . . . . . . . . . . . . . . . . . . . . . . . . . . . . . . . . . . . . . . . . . . . . . . . . . . . see 6.2, p. 106
.
Calibration
. . . . . . . . . . . . . . . . . . . . . . . . . . . . . . . . . . . . . . . . . . . . . . . . . . . . . . . . . . . see 6.3, p. 115
. Options
Identi cation
⋅ ⋅ ⋅
. Settings
Identi cation
⋅ ⋅ ⋅
.
Nuclide Visibility
⋅ ⋅ ⋅
Nuclide. Usage
⋅ ⋅ ⋅
Nuclide .Severity
. . . . . . . . . . . . . . . . . . . . . . . . . . . . . . . . . . . . . . . . . . . . . . . . . . . see 6.4, p. 116
. . . . . . . . . . . . . . . . . . . . . . . . . . . . . . . . . . . . . . . . . . . . . . . . . . . . . . . see 6.5, p. 118
. . . . . . . . . . . . . . . . . . . . . . . . . . . . . . . . . . . . . . . . . . . . . . . . . . . . . . . . see 6.6, p. 119
. . . . . . . . . . . . . . . . . . . . . . . . . . . . . . . . . . . . . . . . . . . . . . . . . . . . . . . see 6.7, p. 120
identiFINDER® R300/en/2014.4(13623)/Feb2015
103
6.1. Complete Option Menus (Outline)
⋅ ⋅
.
Presets
⋅ ⋅
. SPP ©
Bluetooth
. . . . . . . . . . . . . . . . . . . . . . . . . . . . . . . . . . . . . . . . . . . . . . . . . . . . . . . . . . . . . . . . see 6.8, p. 121
. Status ©
Bluetooth SPP
⋅ ⋅ ⋅
. . . . . . . . . . . . . . . . . . . . . . . . . . . . . . . . . . . . . . . . . . . . . . . see 6.23.1, p. 141
. Settings ©
Bluetooth SPP
⋅ ⋅ ⋅ ⋅
FLIR Detection
. . . . . . . . . . . . . . . . . . . . . . . . . . . . . . . . . . . . . . . . . . . see 6.23.2, p. 142
Advanced. Options
⋅ ⋅
⋅ ⋅ ⋅
General .Options
⋅ ⋅ ⋅ ⋅
.
Display Settings
⋅ ⋅ ⋅ ⋅
.
Clock Settings
. . . . . . . . . . . . . . . . . . . . . . . . . . . . . . . . . . . . . . . . . . . . . . . . . . . . . see 6.10, p. 125
⋅ ⋅ ⋅ ⋅
.
GPS Settings
. . . . . . . . . . . . . . . . . . . . . . . . . . . . . . . . . . . . . . . . . . . . . . . . . . . . . . see 6.11, p. 127
⋅ ⋅ ⋅
. . . . . . . . . . . . . . . . . . . . . . . . . . . . . . . . . . . . . . . . . . . . . . . . . . . . . see 6.9, p. 122
.
Maintenance
.
Change Password
⋅ ⋅ ⋅ ⋅
⋅ ⋅ ⋅ ⋅ ⋅
.
Set Password
⋅ ⋅ ⋅ ⋅ ⋅
.
Clear Password
. . . . . . . . . . . . . . . . . . . . . . . . . . . . . . . . . . . . . . . . . . . . . . . . . . . see 6.12, p. 128
. . . . . . . . . . . . . . . . . . . . . . . . . . . . . . . . . . . . . . . . . . . . . . . . . . see 6.13, p. 129
⋅ ⋅ ⋅ ⋅
.
Show Status
⋅ ⋅ ⋅ ⋅
. Settings
Reset Factory
⋅ ⋅ ⋅ ⋅
Erase.Data
. . . . . . . . . . . . . . . . . . . . . . . . . . . . . . . . . . . . . . . . . . . . . . . . . . . . . . see 6.14, p. 130
. . . . . . . . . . . . . . . . . . . . . . . . . . . . . . . . . . . . . . . . . . . . . . . see 6.15, p. 132
⋅ ⋅ ⋅ ⋅ ⋅
Erase All. Spectra
. . . . . . . . . . . . . . . . . . . . . . . . . . . . . . . . . . . . . . . . . . . . . . . . see 6.16, p. 133
⋅ ⋅ ⋅ ⋅ ⋅
Erase All. Alarms
. . . . . . . . . . . . . . . . . . . . . . . . . . . . . . . . . . . . . . . . . . . . . . . . . see 6.17, p. 133
⋅ ⋅ ⋅ ⋅ ⋅
.
Erase All Screenshots
Self .Test
⋅ ⋅ ⋅ ⋅
⋅ ⋅ ⋅
. . . . . . . . . . . . . . . . . . . . . . . . . . . . . . . . . . . . . . . . . . . . . . . . . . . . . . . . . see 6.19, p. 134
.
Data Logging
. Settings
Automated Mode
⋅ ⋅ ⋅ ⋅
⋅ ⋅ ⋅
. . . . . . . . . . . . . . . . . . . . . . . . . . . . . . . . . . . . . . . . . . . . . see 6.18, p. 134
. . . . . . . . . . . . . . . . . . . . . . . . . . . . . . . . . . . . . . . . . . . . see 6.20, p. 135
. Options
Connectivity
⋅ ⋅ ⋅ ⋅
. ©
Send Data
⋅ ⋅ ⋅ ⋅ ⋅
Send Identi. cation ©
⋅ ⋅ ⋅ ⋅ ⋅
.
Send Spectrum
©
. . . . . . . . . . . . . . . . . . . . . . . . . . . . . . . . . . . . . . . . . . . . . . . . see 6.22, p. 140
⋅ ⋅ ⋅ ⋅
.
Bluetooth Periphery
©
. . . . . . . . . . . . . . . . . . . . . . . . . . . . . . . . . . . . . . . . . . . . . see 6.23.3, p. 144
⋅ ⋅ ⋅ ⋅
. Settings
Remote Server
. . . . . . . . . . . . . . . . . . . . . . . . . . . . . . . . . . . . . . . . . . . . . . see 6.24, p. 149
⋅ ⋅ ⋅ ⋅
.
Mass Storage
⋅ ⋅ ⋅ ⋅
.
Network
⋅ ⋅ ⋅ ⋅
.
Report Settings
⋅ ⋅ ⋅ ⋅
Download. Settings
. . . . . . . . . . . . . . . . . . . . . . . . . . . . . . . . . . . . . . . . . . . . . . . . . . . . . see 6.25, p. 150
. . . . . . . . . . . . . . . . . . . . . . . . . . . . . . . . . . . . . . . . . . . . . . . . . . . . . . . . . see 6.26, p. 152
⋅
. Counters
Gamma, Neutron
⋅
.
Finder Settings
⋅
Dose Rate. Settings
104
. . . . . . . . . . . . . . . . . . . . . . . . . . . . . . . . . . . . . . . . . . . . . see 6.21, p. 137
. . . . . . . . . . . . . . . . . . . . . . . . . . . . . . . . . . . . . . . . . . . . . . . . . . . . see 6.27, p. 153
. . . . . . . . . . . . . . . . . . . . . . . . . . . . . . . . . . . . . . . . . . . . . . . . . see 6.28, p. 154
. . . . . . . . . . . . . . . . . . . . . . . . . . . . . . . . . . . . . . . . . . . . . . . . . . . see 6.29, p. 155
. . . . . . . . . . . . . . . . . . . . . . . . . . . . . . . . . . . . . . . . . . . . . . . . . . . . . . . . . . . see 6.30, p. 157
. . . . . . . . . . . . . . . . . . . . . . . . . . . . . . . . . . . . . . . . . . . . . . . . . . . . . . . . see 6.31, p. 159
identiFINDER® R300/en/2014.4(13623)/Feb2015
FLIR Detection
6. FLIR identiFINDER R300 Menu Reference
.
Alarm Options
⋅
⋅ ⋅
.
Alarm Indicators
⋅ ⋅
Dose Alarm.Thresholds
⋅ ⋅
. Thresholds
Dose Rate Alarm
. . . . . . . . . . . . . . . . . . . . . . . . . . . . . . . . . . . . . . . . . . . . . . . see 6.34, p. 162
⋅ ⋅
Neutron Alarm. Thresholds ©
. . . . . . . . . . . . . . . . . . . . . . . . . . . . . . . . . . . . . . . . . . . . . . . see 6.35, p. 163
⋅ ⋅
. State
Current Alarm
. . . . . . . . . . . . . . . . . . . . . . . . . . . . . . . . . . . . . . . . . . . . . . . . . . . . . . . . see 6.32, p. 160
. . . . . . . . . . . . . . . . . . . . . . . . . . . . . . . . . . . . . . . . . . . . . . . . . . . see 6.33, p. 161
. . . . . . . . . . . . . . . . . . . . . . . . . . . . . . . . . . . . . . . . . . . . . . . . . . . . . see 6.36, p. 165
Legend
Spectrum
Calibration
Identi cation Settings
.
Command (all variants)
Clock Settings
Identi cation Options
Nuclide Visibility
Menu © (some variants)
Command ©
Bluetooth SPP Settings ©
Display Settings
Menu (all variants)
GPS Settings
Set Password
More Options
Presets
(some variants)
Nuclide Usage
Change Password
Clear Password
Show Status
Nuclide Severity
Gamma, Neutron Counters
Bluetooth SPP ©
Erase All Spectra
Reset Factory Settings
Erase All Alarms
Bluetooth SPP Status ©
Erase Data
Erase All Screenshots
General Options
Self Test
Advanced Options
Automated Mode Settings
Options Menu
Maintenance
Finder Settings
Send Identi cation ©
Send Spectrum ©
Send Data ©
Alarm Indicators
Data Logging
Connectivity Options
Dose Rate Settings
Bluetooth Periphery ©
Remote Server Settings
Dose Alarm Thresholds
Mass Storage
Network
Dose Rate Alarm
Thresholds
Report Settings
Alarm Options
Download Settings
Neutron Alarm
Thresholds ©
Current Alarm State
Figure 107. Hierarchy of the FLIR identiFINDER R300 menu
identiFINDER® R300/en/2014.4(13623)/Feb2015
105
6.2. Spectrum
6.2
FLIR Detection
Spectrum
Options Menu (p. 103) ä More Options (p. 103) ä Spectrum
Live Spectrum (p. 209)
This command displays a spectrum and offers access to the settings that in luence the display. You
can acquire data ad hoc or load saved spectra from the database and inspect them with different
scalings.
Startt Coordinate
of Horizontal Axis
End Coordinate of
Horizontal Axis
Count Axis
Chart Seings
Chart
Channel or Energy Axis
Current
ent Dose Rate
Spectrum Information
(Independent of Spectrum)
Figure 108. Anatomy of the spectrum display
The largest part of the screen is used for the spectrum chart (Figure 108, p. 106). Various status
information is shown around the chart (Figure 109, p. 107).
Acquisition Duration
The time passed while acquiring data for the spectrum as real or live time.
Dead Time
The dead time as a percentage of the real time.
Gamma Count
The total gamma counts comprising the spectrum.
Neutron Count
The total number of neutrons counted while acquiring data for the spectrum.
Available only for variants equipped with a neutron detector.
Scaling
The current scaling of the vertical axis (linear, logarithmic, square root, …).
Horizontal Coordinates
The coordinates of the leftmost and rightmost values currently shown on the horizontal axis;
depending on current zoom state and cursor position.
106
identiFINDER® R300/en/2014.4(13623)/Feb2015
FLIR Detection
6. FLIR identiFINDER R300 Menu Reference
Startt Coordinate
of Horizontal Axis
End Coordinate of
Horizontal Axis
Scaling of
Vertical Axis
Chart
Horizontal Scale
(Zoom)
Acquisition Duration
Gamma Counts
Neutron Counts
Current
ent Dose Rate
(Independent of Spectrum)
Dead Time
(Available only for variants
equipped with a neutron
detector.)
Figure 109. Spectrum information around the chart
Settings and Commands
Skip
Cycle the list of commands (see 2.2.1, p. 35).
Press
I
to exit to the superior screen.
Start ⇋ Stop
Start or stop the acquisition of data for the spectrum. The current status is shown in the center of the chart (Figure 110, p. 107), which updates live with the acquired data.
Acquisition Status
Real/Live Time Indicator
Acquisition Duration
Figure 110. Acquiring spectrum data
You cannot start the acquisition if the duration you preset (see 6.8, p. 121) for acquisition
has ended. This is indicated by a remaining acquisition duration (Figure 111, p. 108) of
0. If you try to start nevertheless, your FLIR identiFINDER R300 beeps.
identiFINDER® R300/en/2014.4(13623)/Feb2015
107
6.2. Spectrum
FLIR Detection
The current spectrum is not cleared before recording data, that is, new measurements
are added to the existing spectrum. To record a pristine spectrum, use the Clear command irst (see below).
The acquisition of spectrum data stops in one of the following events:
• You end the acquisition with Stop .
• The end of the real or life duration you speci ied (see 6.8, p. 121) is reached. You know
the duration is preset because of the indicator (Figure 111, p. 108) and the timer is
counting down.
Acquisition Status
Real/Live Time Indicator
Preset Indicator
Remaining Acquisition Duration
Figure 111. Acquiring spectrum data while the duration is preset
• You switch the FLIR identiFINDER R300 to Identi ication Mode (see 4.3, p. 90). This discards the current spectrum and loads the spectrum from the identi ication process into
the spectrum viewer.
• You Exit the spectrum view.
Exit
Return to the superior menu.
If you try to exit during data acquisition, you will be asked to con irm the command
because the acquisition will stop.
Spectrum Cursor
You can place a cursor for detailed inspection along the spectrum’s horizontal axis. The cursor position is represented on screen by a vertical line with a down-pointing triangle on top
(Figure 112, p. 109).
The number of counts at the cursor’s position is shown above the triangle together with the
position as channel number (Figure 112, p. 109) or energy (Figure 113, p. 110).
108
identiFINDER® R300/en/2014.4(13623)/Feb2015
FLIR Detection
6. FLIR identiFINDER R300 Menu Reference
The vertical scaling is adjusted to make best use of the available screen height. If you
zoom in (see below), this may cause vertical rescaling if you move the cursor between
sections with high peaks or noise.
Startt Coordinate
of Horizontal Axis
End Coordinate of
Horizontal Axis
VValues at Cursor Position
Cursor Decoration
Scaling of
Vertical Axis
Horizontal Scale
(Zoom)
Cursor Line
Figure 112. Spectrum with cursor at local peak
¶ Cursor Left
Move the cursor to the left. If you pass the left edge, the cursor wraps around to the right
edge.
Cursor Right ·
Move the cursor to the right. If you pass the right edge, the cursor wraps around to the left
edge.
Region of Interest (ROI)
You can mark a part of a spectrum for closer inspection. The region of interest is de ined by
its left and right boundaries which you can set with the cursor (Figure 113, p. 110).
Mark Channel
De ine a boundary of the ROI at the current cursor position. Up to two boundaries are possible.
It does not matter which boundary of the ROI you mark irst.
1. If this is the irst marker you set, it will be decorated with diamonds (Figure 114, p. 110).
2. If this is the second marker you set, both markers will be decorated with triangles pointing into the de ined ROI (Figure 115, p. 111).
3. If you try to set a third marker, the old marker closest to the current position will be
removed before setting the new marker.
identiFINDER® R300/en/2014.4(13623)/Feb2015
109
6.2. Spectrum
FLIR Detection
Cursor Decoration
Figure 113. ROI Speci ication: Moving the cursor
Cursor Decoration
Marker
er Decoration
Figure 114. ROI Speci ication: Marking the irst ROI boundary
Clear Markers
Clear all markers.
Zoom 3 MeV ⇋ Zoom 1.5 MeV ⇋ Zoom 1:1 ⇋ Zoom ROI
Choose a horizontal display scale and range.
Zoom 3 MeV
All the channels (3 MeV range) of the spectrum scaled to it into the available screen
width (Figure 116, p. 111). If you move the cursor off-screen, it will re-appear on the
other side.
Zoom 1.5 MeV
The irst half of the channels (1.5 MeV range) of the spectrum scaled to it into the
available screen width (Figure 117, p. 112). If you move the cursor off-screen, it will
re-appear on the other side.
110
identiFINDER® R300/en/2014.4(13623)/Feb2015
FLIR Detection
6. FLIR identiFINDER R300 Menu Reference
Cursor Decoration
Marker
er Decoration
Marker Decoration
Figure 115. ROI Speci ication: Marking the second ROI boundary
Startt Coordinate
of Horizontal Axis
End Coordinate of
Horizontal Axis
Horizontal Scale
(Zoom)
Figure 116. Spectrum Scale: Complete spectrum visible
Zoom 1:1
Every spectrum channel is represented by one screen pixel (Figure 118, p. 112). If you
move the cursor off-screen, the spectrum scrolls with the cursor. After the cursor
reaches the end of the spectrum, it will re-appear on the other side.
Zoom ROI
The spectrum is scaled to it the ROI into the available screen width (Figure 119, p. 113).
If you try to move the cursor off-screen, the scale is changed to ensure the cursor remains visible.
Clear
Clear the current spectrum. You have to con irm this command with Clear or change your
mind with Cancel .
identiFINDER® R300/en/2014.4(13623)/Feb2015
111
6.2. Spectrum
FLIR Detection
Startt Coordinate
of Horizontal Axis
End Coordinate of
Horizontal Axis
Horizontal Scale
(Zoom)
Figure 117. Spectrum Scale: First half of spectrum visible
Startt Coordinate
of Horizontal Axis
End Coordinate of
Horizontal Axis
Horizontal Scale
(Zoom)
Figure 118. Spectrum Scale: One display pixel equals the width of one spectral channel
This command clears the current spectrum but does not stop the current acquisition of
data, if any.
Save
Save the current spectrum. The reference number of the saved spectrum will be shown until
you acknowledge it.
If there is not enough free memory to store the spectrum, you will be informed. You can delete
saved spectra (see 6.16, p. 133) if necessary.
Load
Load a saved spectrum.
You can choose from all the saved spectra. While you step through the list, the saving date of
the spectrum is displayed (Figure 120, p. 113) to assist you with making a selection.
112
identiFINDER® R300/en/2014.4(13623)/Feb2015
FLIR Detection
6. FLIR identiFINDER R300 Menu Reference
Startt Coordinate
of Horizontal Axis
End Coordinate of
Horizontal Axis
Horizontal Scale
(Zoom)
Figure 119. Spectrum Scale: The de ined ROI its into the available screen width
Figure 120. Choosing a saved spectrum to be loaded for display
To cancel loading a spectrum, press
I
.
If you load a spectrum while acquiring data, the current spectrum is discarded but the
acquisition is not stopped. That is, fresh data are added to the loaded spectrum.
Identify
Let the FLIR identiFINDER R300 apply its identi ication algorithm to the current spectrum.
A list of identi ied nuclides, if any, is displayed and saved (Figure 121, p. 114).
Nuclides the identi ication algorithm did not recognize or those recognized but having
their visibility suppressed (see 6.5, p. 118) are reported as “Unknown”.
You can specify whether con idence, usage, or severity are shown, see 6.4, p. 116.
Exit
Return to the spectrum display.
identiFINDER® R300/en/2014.4(13623)/Feb2015
113
6.2. Spectrum
FLIR Detection
Nuclide Names
Nuclide Usage
Identi cation
ation Con dence
Nuclide Severity
Reference Number of
the Saved Record
Figure 121. Radionuclides identi ied in the current spectrum
Send
Go to Send Identi cation (see 6.21, p. 137), avoiding the detour around the normal options menu hierarchy. The current identi ication will be already chosen for sending.
Logarithmic ⇋ Linear ⇋ Square Root ⇋ Ymax/2 ⇋ Ymax/4
Cycle the methods for the vertical scaling. The current method is indicated in the status bar
right of the chart (Figure 112, p. 109). The method you get after pressing the key is shown in
the key description.
For logarithmic, linear, and square root scaling the maximum peak is rendered so it makes
best use of the available screen height.
The other scalings stretch the rendering so that only the given bottom fraction of the spectrum
is visible. Higher peaks are cut off.
Energy ⇋ Channel
Cycle the options for the display of horizontal coordinates in the spectrum. The current unit
and range is shown above the chart (Figure 112, p. 109 and Figure 110, p. 107). The variant
you get after pressing the key is shown in the key description.
Calibration
View a detail spectrum to check the calibration. Please refer to 6.3, p. 115 for details.
LT ⇋ RT
Specify the type of display for the duration of data acquisition.
You can specify real or live time display. The current setting is shown below the chart (Figure 110, p. 107).
No matter what you specify here, the dead time (DT) is always shown as a percentage of the
real time.
114
identiFINDER® R300/en/2014.4(13623)/Feb2015
FLIR Detection
6. FLIR identiFINDER R300 Menu Reference
Send
Save the spectrum and go to Send Spectrum (see 6.22, p. 140), avoiding the detour around the
normal options menu hierarchy. The current spectrum will be already chosen for sending.
Preset
Go to the Presets (see 6.8, p. 121), avoiding the detour around the normal options menu hierarchy.
6.3
Calibration
Options Menu (p. 103) ä More Options (p. 103) ä Spectrum (p. 106) ä Calibration
The calibration check screen (Figure 122, p. 116) shows a zoomed spectrum (see 6.2, p. 106) of a
certain peak and some parameters describing the peak. The center of the horizontal axis is positioned at the theoretical peak position and the vertical axis is scaled logarithmically.
Upon entering this screen, a peak of
137
Cs is shown. You can choose other nuclides from a list of
nuclides commonly used for calibration (Table 1, p. 115).
Table 1. Typical Calibration Peaks
Nuclide
137
Cs
40
K
232
Th
22
Na (ANNH)
Peak [keV]
661.65
1460.8
2615
511
Annihilation radiation also originates from other
sources like 11C, 13N, 15O, 18F, 68Ga, or 82Rb.
54
Mn
834.838
Co
1173
241
Am
59.54
238
U (DU)
1001
235
U (HEU)
185.7
Refer to Appendix C, p. 259 for details about the nuclides.
60
Make sure the source selected to be checked is present when using this command.
For best results, move the instrument to a low-radiation environment to check the calibration.
Data for this spectrum are continuously acquired beginning with an empty spectrum upon entering
this screen or after you cleared the data (see below).
Settings and Commands
Nuclide
The nuclide used for the calibration check, refer to Table 1, p. 115.
identiFINDER® R300/en/2014.4(13623)/Feb2015
115
6.4. Identi cation Settings
FLIR Detection
Counts at the Peak’s
Theoretical Position
Boundaries
oundaries of the
Analyzed Region
Figure 122. Checking the calibration
Peak Position
The position of the measured peak (keV).
Uncertainty
The statistical uncertainty of the peak. This value decreases with an increasing number of
counts, you can expect reliable results for values below 0.5 %.
Do not trust the igures alone, watch the spectrum chart to verify the existence of a peak.
Deviation
The measured peak’s position deviation from the theoretical position.
Peak FWHM
The full width at half maximum height of the measured peak.
K-40
⇋ Th-232 ⇋ Na-22 ⇋ Mn-54 ⇋ Co-60 ⇋ Am-241 ⇋
DU ⇋ U-235 ⇋ Cs-137
Cycle through the nuclides available for calibration check. The command description names
the nuclide you get after executing the command, the current nuclide is shown next to the
spectrum chart.
Clear
Clear the acquired data. The acquisition of data is not interrupted.
Exit
Return to the superior menu.
6.4
Identi cation Settings
Options Menu (p. 103) ä More Options (p. 103) ä Identi cation Options (p. 103) ä Identi cation Settings
Settings (p. 180) ä General (p. 184) ä Identi cation (p. 184)
116
identiFINDER® R300/en/2014.4(13623)/Feb2015
FLIR Detection
6. FLIR identiFINDER R300 Menu Reference
This screen (Figure 123, p. 117) groups options that in luence the identi ication of nuclides (see
4.3, p. 90).
Figure 123. Upper items of the identi ication settings
Settings and Commands
Duration
Specify the duration of data acquisition for the nuclide identi ication. Allot more time to the
identi ication measurement if:
• you want to identify a weak source.
• you are at a place with high background radiation.
• you want to identify a mixture of radionuclides.
• you want to identify a shielded source.
You can specify the durations “Dynamic” or from 1 s to 999 s (16 m 39 s).
If you specify a duration of “Dynamic”, the FLIR identiFINDER R300 will collect data until 4800 gamma counts have been registered. This may take a while especially if the
radiation level is near the background level.
Extra Duration
Specify the duration of continued data acquisition for the nuclide identi ication. This duration is applied when you use the Continue command in identi ication mode (see 4.3, p. 90),
no matter whether you speci ied the duration or the minimum number of counts above.
You can specify an extra duration from 1 s to 999 s (16 m 39 s).
Con dence
Specify if you want the level of con idence of a nuclide identi ication shown or hidden in identi ication results. The con idence is expressed on a scale from 0 (poor) to 10 (excellent).
identiFINDER® R300/en/2014.4(13623)/Feb2015
117
6.5. Nuclide Visibility
FLIR Detection
.
Usage
Specify if you want the usage of an identi ied nuclide shown or hidden in identi ication results
(for details refer to 6.6, p. 119 or C, p. 259).
.
Severity
Specify if you want the severity of an identi ied nuclide shown by icons or hidden in identi ication results (for details refer to 6.7, p. 120 or C, p. 259).
I.
Innocent
S.
Suspicious
T.
Threatening
U, .Pu
Specify whether all uranium isotopes and all plutonium isotopes, respectively, should be
identi ied together as element (uranium) or separately as nuclides ( 235U, 238U, etc.).
. , Select
.
Down
Choose and select menu items, see 2.2.2, p. 35 for details.
.
.
+. , -. , Accept
, Cancel
Edit values, see 2.2.3, p. 37 for details.
.
Exit
Return to the superior menu.
6.5
Nuclide Visibility
Options Menu (p. 103) ä More Options (p. 103) ä Identi cation Options (p. 103) ä Nuclide Visibility
Settings (p. 180) ä Nuclides (p. 193)
Built into the FLIR identiFINDER R300 is a library used to identify the nuclides causing gamma radiation. Please refer to Appendix C, p. 259 for further information about the nuclides in this library.
You can specify which nuclides should be included in the display of identi ication results (Figure 124, p. 119).
Settings and Commands
.
Nuclides…
Choose one from the list of nuclides to specify whether you want it to be shown or suppressed
in identi ication results.
Suppressed nuclides are reported as “Unknown” if recognized by the identi ication algorithm.
.
Skip
Cycle the list of commands (see 2.2.1, p. 35).
118
identiFINDER® R300/en/2014.4(13623)/Feb2015
FLIR Detection
6. FLIR identiFINDER R300 Menu Reference
Figure 124. Top of the nuclide list used by the identi ication algorithm
Down , Up , Select
Choose and select menu items, see 2.2.2, p. 35 for details.
+ , - , Accept , Cancel
Edit values, see 2.2.3, p. 37 for details.
Exit
Return to the superior menu.
6.6
Nuclide Usage
Options Menu (p. 103) ä More Options (p. 103) ä Identi cation Options (p. 103) ä Nuclide Usage
Settings (p. 180) ä Nuclides (p. 193)
Built into the FLIR identiFINDER R300 is a library used to identify the nuclides causing gamma radiation. Please refer to Appendix C, p. 259 for further information about the nuclides in this library.
Every nuclide has associated information about its occurrence or ield of application which you can
have shown in identi ication results (Figure 96, p. 93). You can adapt the usage for all the nuclides
in the library according to your needs with this command (Figure 125, p. 120).
Settings and Commands
Nuclides…
Choose one from the list of nuclides to edit the associated usage (see C, p. 259).
Skip
Cycle the list of commands (see 2.2.1, p. 35).
identiFINDER® R300/en/2014.4(13623)/Feb2015
119
6.7. Nuclide Severity
FLIR Detection
Figure 125. Usage information in the nuclide list used by the identi ication algorithm
Down , Up , Select
Choose and select menu items, see 2.2.2, p. 35 for details.
+ , - , Accept , Cancel
Edit values, see 2.2.3, p. 37 for details.
Exit
Return to the superior menu.
6.7
Nuclide Severity
Options Menu (p. 103) ä More Options (p. 103) ä Identi cation Options (p. 103) ä Nuclide Severity
Settings (p. 180) ä Nuclides (p. 193)
Built into the FLIR identiFINDER R300 is a library used to identify the nuclides causing gamma radiation. Please refer to Appendix C, p. 259 for further information about the nuclides in this library.
Every nuclide has associated information about its potential danger which you can have shown in
identi ication results (Figure 96, p. 93). You can adapt the severity for the nuclides in the library
according to your needs with this command (Figure 126, p. 121).
The severity of some nuclides is ixed. This is indicated by a small padlock symbol.
Settings and Commands
Nuclides…
Choose one from the list of nuclides to edit the associated severity.
I
120
Innocent
identiFINDER® R300/en/2014.4(13623)/Feb2015
FLIR Detection
6. FLIR identiFINDER R300 Menu Reference
Locked Seing
Figure 126. Severity information in the nuclide list used by the identi ication algorithm
S
Suspicious
T
Threatening
Skip
Cycle the list of commands (see 2.2.1, p. 35).
Down , Up , Select
Choose and select menu items, see 2.2.2, p. 35 for details.
+ , - , Accept , Cancel
Edit values, see 2.2.3, p. 37 for details.
Exit
Return to the superior menu.
6.8
Presets
Options Menu (p. 103) ä More Options (p. 103) ä Presets
This screen (Figure 127, p. 122) groups options that in luence the data acquisition for spectra (6.2,
p. 106).
You can stop the data acquisition for spectra manually or have it stop automatically after a duration
or a number of counts you specify here.
You can preset either one of these limits. If you try to enter a second preset, the others will
be set to “No Limit”.
Preset limits remain in effect until you change them or switch off your FLIR
identiFINDER R300.
identiFINDER® R300/en/2014.4(13623)/Feb2015
121
6.9. Display Settings
FLIR Detection
Figure 127. Preset times for spectrum data acquisition
Settings and Commands
Real Time
Specify the duration of data acquisition as real time. You can specify durations up to 43200 s
(12 h) or “No Limit”.
Live Time
Specify the duration of data acquisition as live time. You can specify durations up to 43200 s
(12 h) or “No Limit”.
Counts
Specify the number of counts to be acquired. You can specify values from 100 to 9 999 900 in
steps of 100 or “No Limit”.
Down , Select
Choose and select menu items, see 2.2.2, p. 35 for details.
+ , - , Accept , Cancel
Edit values, see 2.2.3, p. 37 for details.
Exit
Return to the superior menu.
6.9
Display Settings
Options Menu (p. 103) ä More Options (p. 103) ä Advanced Options (p. 104) ä General Options (p. 104) ä Display Settings
Settings (p. 180) ä General (p. 184) ä User Interface (p. 186)
This screen groups several options that in luence the display of your FLIR identiFINDER R300 (Figure 128, p. 123).
122
identiFINDER® R300/en/2014.4(13623)/Feb2015
FLIR Detection
6. FLIR identiFINDER R300 Menu Reference
Figure 128. Display settings in daytime colors
Settings and Commands
Colors
Choose a color set for the display.
Daytime
Colors optimized for bright environments (Figure 128, p. 123). Almost all screen shots
in this manual were taken using this color set.
Nighttime
Colors optimized for dazzle-free reading in dark environments (Figure 129, p. 123).
Figure 129. Display settings in nighttime colors
Classic
Colors mimicking the monochrome appearance of outdated instruments (Figure 130,
p. 124).
identiFINDER® R300/en/2014.4(13623)/Feb2015
123
6.9. Display Settings
FLIR Detection
Figure 130. Display settings in classic colors
Backlight
Specify the brightness of the display’s backlight in steps between 1 (dim) and 10 (very bright).
Timeout
Specify the duration of user inactivity after which the display backlight is dimmed to save
energy. You can choose from 15 s – 60 s – 5 min – Never.
The backlight draws a signi icant amount of power, you should let it time out while running on batteries.
After the backlight times out, you can reactivate it by brie ly pressing any key. At this
moment, the usual functions of short key presses are ignored.
Language
Choose a language to be used for the display.
English
English with American spelling
Deutsch
German
…
more languages…
Ensure you understand enough of the language you are changing to. It may be dif icult
to change back if you do not understand the menu language.
Key Functions
Choose a mapping of commands to keys to accommodate your personal preferences (Figures 10–11, p. 33–34).
The actual function of the keys is always displayed on-screen.
124
identiFINDER® R300/en/2014.4(13623)/Feb2015
FLIR Detection
6. FLIR identiFINDER R300 Menu Reference
Normal
Commands are mapped to the L and R keys as shown in this manual.
Swapped
Commands mapped to the L and R keys are exchanged.
Down , Select
Choose and select menu items, see 2.2.2, p. 35 for details.
+ , - , Accept , Cancel
Edit values, see 2.2.3, p. 37 for details.
Exit
Return to the superior menu.
6.10
Clock Settings
Options Menu (p. 103) ä More Options (p. 103) ä Advanced Options (p. 104) ä General Options (p. 104) ä Clock Settings
Settings (p. 180) ä GPS and Clock (p. 186) ä Clock (p. 187)
You can check and change the settings of the FLIR identiFINDER R300’s clock in this screen (Figure 131, p. 125).
If the GPS receiver is switched on (see 6.11, p. 127), the received time sets the clock of the FLIR
identiFINDER R300 and the only setting you have to specify is your time zone.
If the clock setting seems unreasonable when switching on the FLIR identiFINDER R300 (see
2.5, p. 62), for example after the batteries were completely empty for a while, this screen will
show up and you will be asked to enter the correct date, time, and time zone settings.
GPS Status
Editable Only While
GPS is Off
Figure 131. Setting date and time while GPS clock is not available.
identiFINDER® R300/en/2014.4(13623)/Feb2015
125
6.10. Clock Settings
FLIR Detection
If GPS date and time information become available while you edit the date or time, editing
will be cancelled and the GPS clock is used.
Settings and Commands
Time Zone
Select your time zone from the list built into the FLIR identiFINDER R300. Time zones are
speci ied as offset from UTC/GMT (Figures 132–133, p. 126–126).
Periods for daylight savings time, however, might be different for the same offset from UTC in
various regions. To have the FLIR identiFINDER R300 consider the correct daylight savings
time for your time zone, make sure to check the region info when selecting the offset.
GPS Status
Time Zone Offset
GPS Clock is Used to
Set Date and Time
Time Zone Region
Figure 132. Clock Settings: Selecting the time zone
GPS Status
Time Zone Offset
GPS Clock is Used to
Set Date and Time
Time Zone Region
Figure 133. Clock Settings: Selecting the time zone
126
identiFINDER® R300/en/2014.4(13623)/Feb2015
FLIR Detection
6. FLIR identiFINDER R300 Menu Reference
Date
Specify year, month and day of the current date.
Time
Specify hours and minutes of the current time.
The time is speci ied in 24-hour format (ISO 8601).
Down , Select
Choose and select menu items, see 2.2.2, p. 35 for details.
+ , - , Accept , Cancel
Edit values, see 2.2.3, p. 37 for details.
Left , Right
Edit composite values, see 2.2.4, p. 40 for details.
Exit
Return to the superior menu.
6.11
GPS Settings
Options Menu (p. 103) ä More Options (p. 103) ä Advanced Options (p. 104) ä General Options (p. 104) ä GPS Settings
Settings (p. 180) ä GPS and Clock (p. 186) ä GPS (p. 186)
This screen (Figure 134, p. 127) groups settings regarding the FLIR identiFINDER R300’s GPS receiver.
Figure 134. GPS Settings
identiFINDER® R300/en/2014.4(13623)/Feb2015
127
6.12. Set Password
FLIR Detection
Settings and Commands
.
GPS
Switch the GPS receiver On or Off (factory default).
The GPS receiver draws a signi icant amount of power, you should switch it off if you
don’t need it, especially while running on batteries.
If the GPS receiver is on and the reception is good enough, the GPS coordinates of the current
location are stored with alarms, spectra, identi ication results etc.
If the GPS reception is not good enough, for example inside buildings, the current location
cannot be determined. If a location could be determined from GPS data since you switched
on the FLIR identiFINDER R300, the last valid location is used. Otherwise, the position of the
intersection of the Greenwich Meridian with the Equator is used (0° N, 0° E).
Additionally, the clock of the FLIR identiFINDER R300 is set according to the high-precision
time received from the GPS satellites (see 6.10, p. 125).
. , Select
.
Down
Choose and select menu items, see 2.2.2, p. 35 for details.
.
.
+. , -. , Accept
, Cancel
Edit values, see 2.2.3, p. 37 for details.
.
Exit
Return to the superior menu.
6.12
Set Password
Options Menu (p. 103) ä More Options (p. 103) ä Advanced Options (p. 104) ä Maintenance (p. 104) ä Change Password (p. 104) ä Set
Password
The password set at the factory, if any, is LMRLMRL. For better protection against unwanted changes
of the instrument characteristics, you should change the password to something else. If you don’t
need protection but want faster access to the menus, you can remove the password (6.13, p. 129).
Make sure to remember the password you set. There is no way to access the protected options
and commands without it. A password cannot be deciphered at the factory.
This command lets you enter a new password (Figure 135, p. 129) consisting of seven characters
from the pool L M R.
To cancel the entry of the password press
I. .
.
After your entry is complete (Figure 136, p. 129), you can activate the password with Change
or
.
Cancel the password modi ication.
128
identiFINDER® R300/en/2014.4(13623)/Feb2015
FLIR Detection
6. FLIR identiFINDER R300 Menu Reference
Figure 135. Entering a new password
Figure 136. Entering a new password: Con irmation
6.13
Clear Password
Options Menu (p. 103) ä More Options (p. 103) ä Advanced Options (p. 104) ä Maintenance (p. 104) ä Change Password (p. 104) ä Clear
Password
This command clears the password. All commands normally requiring a password to be accessed
will be freely available.
You have to con irm this command with Clear or can change your mind with Cancel (Figure 137,
p. 130).
identiFINDER® R300/en/2014.4(13623)/Feb2015
129
6.14. Show Status
FLIR Detection
Figure 137. Removing the password
6.14
Show Status
Options Menu (p. 103) ä More Options (p. 103) ä Advanced Options (p. 104) ä Maintenance (p. 104) ä Show Status
Home (p. 179) ä Info (p. 181) ä System (p. 181)
Settings (p. 180) ä GPS and Clock (p. 186) ä GPS (p. 186)
This command displays various status and version information for your FLIR identiFINDER R300
on several pages (Figures 138–139, p. 131–131).
Settings and Commands
System ⇋ GPS
Step through the status pages.
System
Various information about your FLIR identiFINDER R300 (Figure 138, p. 131).
Serial Number
The serial number of your FLIR identiFINDER R300.
Available Memory
The capacity remaining to store spectra, alarms, screenshots, etc.
You can free memory by erasing all or some of the data (see 6.16, p. 133) if necessary.
Screenshots
The number of screen shots saved in memory.
IP Address
The IP address of your FLIR identiFINDER R300. You need this address to communicate
with the instrument from a computer (see 6.26, p. 152).
130
identiFINDER® R300/en/2014.4(13623)/Feb2015
FLIR Detection
6. FLIR identiFINDER R300 Menu Reference
Figure 138. FLIR identiFINDER R300 status display: System
Software
The version of the software.
GPS Your current location determined from the GPS data received by the FLIR identiFINDER R300
(Figure 139, p. 131).
Figure 139. FLIR identiFINDER R300 status display: GPS
The GPS status data are shown only if the GPS receiver is switched on (see 6.11, p. 127).
Satellites
The number of satellites currently “visible” to the FLIR identiFINDER R300. The more
satellites, the better the precision of the location data.
If this number drops below 3, the given location is invalid. It is either the most recent valid location, or, if there was no valid location since you switched on the FLIR
identiFINDER R300, the intersection of the Greenwich meridian and the equator.
identiFINDER® R300/en/2014.4(13623)/Feb2015
131
6.15. Reset Factory Settings
FLIR Detection
Latitude
The current location north or south of the equator given in angle degrees, minutes and
seconds.
Longitude
The current location west or east of the prime meridian passing through the Royal Observatory in Greenwich (UK) given in angle degrees, minutes and seconds.
Altitude
The current altitude in meters above or below the mean sea level as de ined by the
WGS84 geoid used by GPS.
Exit
Return to the superior menu.
6.15
Reset Factory Settings
Options Menu (p. 103) ä More Options (p. 103) ä Advanced Options (p. 104) ä Maintenance (p. 104) ä Reset Factory Settings
This command (Figure 140, p. 132) discards all changes you made to any of the FLIR
identiFINDER R300’s settings and reestablishes the settings made at the factory.
The password (see 2.2.7, p. 46), if any, is reset to the factory setting as well.
Figure 140. Reestablishing the factory default settings
Settings and Commands
Reset
Discard all your personal settings and return to the factory default settings.
132
identiFINDER® R300/en/2014.4(13623)/Feb2015
FLIR Detection
6. FLIR identiFINDER R300 Menu Reference
Cancel
Keep the current settings and return to the superior menu.
6.16
Erase All Spectra
Options Menu (p. 103) ä More Options (p. 103) ä Advanced Options (p. 104) ä Maintenance (p. 104) ä Erase Data (p. 104) ä Erase All Spectra
This command (Figure 141, p. 133) deletes all spectra saved in the FLIR identiFINDER R300’s
database, including min/max/average for dose rate and neutron, GPS location, and identi ication,
if any.
Figure 141. Deleting saved spectra
Settings and Commands
Erase
Delete all saved spectra.
Cancel
Keep the saved spectra and return to the superior menu.
6.17
Erase All Alarms
Options Menu (p. 103) ä More Options (p. 103) ä Advanced Options (p. 104) ä Maintenance (p. 104) ä Erase Data (p. 104) ä Erase All Alarms
This command (compare Figure 141, p. 133) deletes all alarms saved in the FLIR
identiFINDER R300’s permanent memory.
identiFINDER® R300/en/2014.4(13623)/Feb2015
133
6.18. Erase All Screenshots
FLIR Detection
Settings and Commands
.
Erase
Delete all saved alarms.
.
Cancel
Keep the saved alarms and return to the superior menu.
6.18
Erase All Screenshots
Options Menu (p. 103) ä More Options (p. 103) ä Advanced Options (p. 104) ä Maintenance (p. 104) ä Erase Data (p. 104) ä Erase All
Screenshots
This command (compare Figure 141, p. 133) deletes all screenshots saved in the FLIR
identiFINDER R300’s permanent memory.
Settings and Commands
.
Erase
Delete all screenshots.
.
Cancel
Keep the screenshots and return to the superior menu.
6.19
Self Test
Options Menu (p. 103) ä More Options (p. 103) ä Advanced Options (p. 104) ä Maintenance (p. 104) ä Self Test
This command tests the display screen and activates all the alarm annunciators to demonstrate
their proper operation.
Settings and Commands
.
Start
Start the test. The display should show several test patterns in the main colors red, green
and blue.
Further tests regard the alarm LEDs, the vibrator, and the beeper. Follow the list of tests
displayed (Figure 143, p. 135) and verify that the annunciators are working.
.
Exit
Return to the superior menu.
134
identiFINDER® R300/en/2014.4(13623)/Feb2015
FLIR Detection
6. FLIR identiFINDER R300 Menu Reference
Figure 142. Starting a self test of the FLIR identiFINDER R300.
Available only for variants equipped with a
neutron detector.
Figure 143. Testing the annunciators.
6.20
Automated Mode Settings
Options Menu (p. 103) ä More Options (p. 103) ä Advanced Options (p. 104) ä Data Logging (p. 104) ä Automated Mode Settings
Settings (p. 180) ä General (p. 184) ä Measurement (p. 184)
This screen (Figure 144, p. 136) groups settings regarding the FLIR identiFINDER R300’s automated identi ication mode (see 4.4, p. 93).
Settings and Commands
Time Interval
Choose one of the available intervals for automated identi ication measurements:
Off, 10 min, 15 min, 30 min, 60 min, On Dose Rate Warning.
The scheduled times will be rounded relative to the full hour.
identiFINDER® R300/en/2014.4(13623)/Feb2015
135
6.20. Automated Mode Settings
FLIR Detection
Figure 144. Automated Mode Settings
Automated identi ication on dose rate warning
This feature can be helpful when used in controlled circumstances such as monitoring
pedestrian low through a controlled choke point where the operator can manage the
“ low” and hold the line until the identi ication measurement is complete. This allows
for hands-free operation and a simpli ied path to the required result.
Use of this feature in uncontrolled situations, however, can generate very confusing and
disorienting information.
Consider, for example, trying to use this feature while in the middle of a crowd with
people moving in multiple directions. The instrument may register a passing warning
and initiate an identi ication measurement on a target that continues to move away. This
target could continue to move away in any direction so as to place the operator in a
dilemma – what to do? It is highly likely that the instrument will fail to complete the
identi ication process so concluding with an inconclusive and useless result.
It is highly recommended that this mode ONLY be used when the situation is controlled
and manageable.
The success of the instrument or operator unit can be adversely affected if this advice is
not followed though there is no fault of either the instrument or the operator.
FLIR Detection, Inc. also wishes to avoid the performance of the instrument being called
into question through no fault of the instrument.
Next Measurement
The scheduled time of the next measurement.
Measurements
The number of measurements recorded since activating automated measurements.
136
identiFINDER® R300/en/2014.4(13623)/Feb2015
FLIR Detection
6. FLIR identiFINDER R300 Menu Reference
Down , Select
Choose and select menu items, see 2.2.2, p. 35 for details.
+ , - , Accept , Cancel
Edit values, see 2.2.3, p. 37 for details.
Exit
Return to the superior menu.
6.21
Send Identi cation
This item is available for FLIR identiFINDER R300 variants with Bluetooth (see A.1, p. 237).
Options Menu (p. 103) ä More Options (p. 103) ä Advanced Options (p. 104) ä Connectivity Options (p. 104) ä Send Data (p. 104) ä Send
Identi cation
This command initiates a multi-step procedure to send a record of identi ication results stored in
the FLIR identiFINDER R300’s database to a remote server (see 9, p. 219).
The procedure to send identi ication results is the same as that for sending spectra. The only
difference is in the contents of the ile sent. This description applies to both this and the Send
Spectrum command (see 6.22, p. 140).
You can choose from the identi ication results available in the database (Figure 145, p. 137). The
date and time of saving the identi ication is displayed while you step through the available data.
Figure 145. Sending Data: Choosing a record of identi ication results
If you entered this command from the Identi ication Mode (see 4.3, p. 90) or the spectrum
display (see 6.2, p. 106), the correct record is already chosen.
identiFINDER® R300/en/2014.4(13623)/Feb2015
137
6.21. Send Identi cation
FLIR Detection
A summary of the chosen identi ication is shown (Figure 146, p. 138) so you can verify your choice
and choose other data if necessary.
The spectrum analyzed to compute the identi ication results is always included with the sent
data.
Figure 146. Sending Data: Identi ication summary
Settings and Commands
Choose
Choose another record for sending (Figure 145, p. 137).
Send
Start sending the chosen data.
Several settings (see 9, p. 219) are required to send data. If any one of these settings is
missing, you will be noti ied (Figure 147, p. 139) and routed to the appropriate screen
to enter the missing setting.
We recommend specifying the required settings before sending data (see 6.24, p. 149
and 6.27, p. 153). The most convenient way to do so is via the web interface (see 8.6.1,
p. 190).
During the transfer of data you will be kept posted about the progress of the transmission
steps (Figure 148, p. 139).
After all data are successfully transferred, you will be noti ied (Figure 149, p. 140) and can
acknowledge the message with OK .
+ , - , Accept , Cancel
Edit values, see 2.2.3, p. 37 for details.
138
identiFINDER® R300/en/2014.4(13623)/Feb2015
FLIR Detection
6. FLIR identiFINDER R300 Menu Reference
Figure 147. Sending Data: Incomplete settings
Figure 148. Sending Data: Transmission progress
Exit
Return to the superior menu.
identiFINDER® R300/en/2014.4(13623)/Feb2015
139
6.22. Send Spectrum
FLIR Detection
Figure 149. Sending Data: Mission accomplished
6.22
Send Spectrum
This item is available for FLIR identiFINDER R300 variants with Bluetooth (see A.1, p. 237).
Options Menu (p. 103) ä More Options (p. 103) ä Advanced Options (p. 104) ä Connectivity Options (p. 104) ä Send Data (p. 104) ä Send
Spectrum
This command initiates a multi-step procedure to send a spectrum stored in the FLIR
identiFINDER R300’s database to a remote server (see 9, p. 219).
The procedure is the same as that for sending identi ication results. The description of the
procedure is not repeated here, please refer to section 6.21, p. 137.
The only difference is in the contents of the ile sent. You can choose from the results available in
the database (Figure 150, p. 141). The date and time of saving the result is displayed while you step
through the available records.
If you entered this command from the spectrum display (see 6.2, p. 106), the correct spectrum
is already chosen.
A summary of the chosen record is shown (Figure 151, p. 141) so you can verify your choice and
choose another one if necessary.
Please refer to section 6.21, p. 137 for a description of the remaining steps to send data to a remote
server.
140
identiFINDER® R300/en/2014.4(13623)/Feb2015
FLIR Detection
6. FLIR identiFINDER R300 Menu Reference
Figure 150. Sending Data: Choosing a spectrum
Figure 151. Sending Data: Spectrum summary
6.23
Bluetooth
This item is available for FLIR identiFINDER R300 variants with Bluetooth (see A.1, p. 237).
The FLIR identiFINDER R300 supports two Bluetooth modes: Bluetooth Serial Port Protocol (SPP)
and Bluetooth Periphery. While Bluetooth SPP Mode is enabled, Bluetooth Periphery Mode is disabled. Bluetooth SPP Mode supports a command set (see A.6, p. 245) for system integrators to
develop custom remote interfaces. These two modes are described in the following sections.
6.23.1
Bluetooth SPP Status
This item is available for FLIR identiFINDER R300 variants with Bluetooth (see A.1, p. 237).
Options Menu (p. 103) ä More Options (p. 103) ä Bluetooth SPP (p. 104) ä Bluetooth SPP Status
identiFINDER® R300/en/2014.4(13623)/Feb2015
141
6.23. Bluetooth
FLIR Detection
This screen (Figure 152, p. 142) shows if the Bluetooth SPP mode is enabled and whether the FLIR
identiFINDER R300 is currently Discoverable.
Figure 152. Bluetooth SPP
Settings and Commands
Status
Indicates whether Enable SPP (see 6.23.2, p. 142) is set to On (Enabled) or Off (Disabled) .
Discoverable
Indicates if the FLIR identiFINDER R300 is currently discoverable or not discoverable via
Bluetooth in SPP Mode.
Settings
View and change the Bluetooth SPP Mode settings.
Exit
Return to the superior menu.
6.23.2
Bluetooth SPP Settings
This item is available for FLIR identiFINDER R300 variants with Bluetooth (see A.1, p. 237).
Options Menu (p. 103) ä More Options (p. 103) ä Bluetooth SPP (p. 104) ä Bluetooth SPP Status (p. 141) ä Bluetooth SPP Settings
Settings (p. 180) ä Bluetooth SPP Settings (p. 192) ä Bluetooth SPP Settings (p. 192)
This screen (Figure 153, p. 143) allows you to con igure the FLIR identiFINDER R300 Bluetooth
Serial Port Protocol mode.
142
identiFINDER® R300/en/2014.4(13623)/Feb2015
FLIR Detection
6. FLIR identiFINDER R300 Menu Reference
Figure 153. Bluetooth SPP
Settings and Commands
Enable SPP
When set to On the FLIR identiFINDER R300 will attempt to connect in SPP mode using the
Bluetooth SPP settings. If set to Off, then Bluetooth Periphery mode can be enabled (see
6.23.3, p. 144).
Timeout
Specify the maximum elapsed time during which the FLIR identiFINDER R300 will be discoverable after discovery is initiated. You can specify values from 0 s to 100000 s. A value of 0 s
will disable discovery timeout.
Disconnect
This speci ies how the FLIR identiFINDER R300 should con igure the Bluetooth SPP Mode
after a Bluetooth connection is lost.
Discover
If a Bluetooth SPP connection is lost, the FLIR identiFINDER R300 will enable Discovery
for the speci ied timeout period.
Off
If a Bluetooth SPP connection is lost, the FLIR identiFINDER R300 will disable Bluetooth.
Down , Select
Choose and select menu items, see 2.2.2, p. 35 for details.
+ , - , Accept , Cancel
Edit values, see 2.2.3, p. 37 for details.
Exit
Return to the superior menu.
identiFINDER® R300/en/2014.4(13623)/Feb2015
143
6.23. Bluetooth
6.23.3
FLIR Detection
Bluetooth Periphery
This item is available for FLIR identiFINDER R300 variants with Bluetooth (see A.1, p. 237).
Options Menu (p. 103) ä More Options (p. 103) ä Advanced Options (p. 104) ä Connectivity Options (p. 104) ä Bluetooth Periphery
This command (Figure 154, p. 144) shows the Bluetooth device your FLIR identiFINDER R300 is
currently paired with, if any, and lets you search the vicinity for other suitable Bluetooth devices
supporting dial-up networking (9, p. 219).
Name of the Currently Paired
Bluetooth Device
Figure 154. Bluetooth Periphery
If SPP Enabled is displayed, then you must irst disable the Bluetooth SPP Mode (6.23.2,
p. 142) before using Bluetooth Periphery Mode.
Figure 155. SPP Enabled
If your FLIR identiFINDER R300 is not currently paired with any Bluetooth device, the
Change Device
144
command (see below) is executed irst.
identiFINDER® R300/en/2014.4(13623)/Feb2015
FLIR Detection
6. FLIR identiFINDER R300 Menu Reference
Settings and Commands
Bluetooth Device Name
The name of the device the FLIR identiFINDER R300 is currently paired with. Selecting this
item shows details about this device (Figure 162, p. 148).
Change Device
Guides you through the steps necessary to pair your FLIR identiFINDER R300 with a Bluetooth device.
Ô To pair with a Bluetooth device…
1. Prepare the Bluetooth device and make sure it can be found (perhaps called “discoverable” or “visible” in the device’s settings).
2. Place the device in the vicinity of the FLIR identiFINDER R300 (up to ca. 10 m (33 ft)).
3. Initiate a search for devices with Start Search (Figure 156, p. 145).
Figure 156. Ready to search for Bluetooth devices
4. Wait a few moments while the FLIR identiFINDER R300 searches for Bluetooth devices
supporting the required protocol (Figure 157, p. 146).
5. You can repeat the search if no device was found (Figure 158, p. 146) with Search .
6. Choose the desired Bluetooth device from the list shown (Figure 159, p. 147) with
Down .
The device names are listed exactly as received from the detected devices. In case
of ambiguous names, you should change the name of the Bluetooth device to something unique (refer to the manuals of your Bluetooth devices on how to achieve
that).
If your desired device is not shown in the list, make sure its setup is correct, press
Exit , select the command
identiFINDER® R300/en/2014.4(13623)/Feb2015
Bluetooth Periphery
again and start another search.
145
6.23. Bluetooth
FLIR Detection
Figure 157. Searching for Bluetooth devices
Figure 158. No devices detected
7. To start the pairing with the chosen device, press Select .
8. Choose the PIN type for a trusted connection (Figure 160, p. 147).
Most devices require the entry of an ad hoc random PIN to establish a trusted connection. Other devices require the usage of a ixed PIN like 0000 or 1234.
For questions refer to the manual that came with your Bluetooth device.
146
identiFINDER® R300/en/2014.4(13623)/Feb2015
FLIR Detection
6. FLIR identiFINDER R300 Menu Reference
Figure 159. List of suitable Bluetooth devices detected
Figure 160. Selecting a PIN for the pairing of Bluetooth devices
identiFINDER® R300/en/2014.4(13623)/Feb2015
147
6.23. Bluetooth
FLIR Detection
9. If your device requires a PIN entry, use the PIN shown on your FLIR identiFINDER R300
screen (Figure 161, p. 148).
Figure 161. Pairing with a Bluetooth device
10. The FLIR identiFINDER R300 shows some information about the Bluetooth device after
a successful pairing (Figure 162, p. 148).
Figure 162. Paired to a Bluetooth device
An error message (Figure 163, p. 149) is displayed if pairing failed. Make sure the
Bluetooth device is correctly con igured, still in the vicinity, and try again.
Your FLIR identiFINDER R300 is now ready to communicate via the Bluetooth device.
Make sure not to move the Bluetooth device more than about 10 m (33 ft) away from the
FLIR identiFINDER R300.
Down , Select
Choose and select menu items, see 2.2.2, p. 35 for details.
148
identiFINDER® R300/en/2014.4(13623)/Feb2015
FLIR Detection
6. FLIR identiFINDER R300 Menu Reference
Figure 163. Pairing to a Bluetooth device failed
+ , - , Accept , Cancel
Edit values, see 2.2.3, p. 37 for details.
Exit
Return to the superior menu.
6.24
Remote Server Settings
Options Menu (p. 103) ä More Options (p. 103) ä Advanced Options (p. 104) ä Connectivity Options (p. 104) ä Remote Server Settings
Settings (p. 180) ä Connectivity (p. 190) ä Remote Server (p. 192)
This screen (Figure 164, p. 149) groups settings that in luence the transfer of FLIR
identiFINDER R300 data to a remote server. Refer to Chapter 9, p. 219 for details of this method.
Figure 164. Upper items of the remote server settings
identiFINDER® R300/en/2014.4(13623)/Feb2015
149
6.25. Mass Storage
FLIR Detection
Settings and Commands
.
User Name
The user name and
.
Password
the password as provided by your cell phone carrier.
This item is available for FLIR identiFINDER R300 variants with Bluetooth (see A.1,
p. 237).
. String
Connection
The connection info as provided by your cell phone carrier.
This item is available for FLIR identiFINDER R300 variants with Bluetooth (see A.1,
p. 237).
.
Phone Number
The phone number to access a data connection as provided by your cell phone carrier or cell
phone vendor.
This item is available for FLIR identiFINDER R300 variants with Bluetooth (see A.1,
p. 237).
HTTP. URI
The address of the server receiving data from the FLIR identiFINDER R300 via Bluetooth or
the web interface.
. , Select
.
Down
Choose and select menu items, see 2.2.2, p. 35 for details.
.
.
+. , -. , Accept
, Cancel
Edit values, see 2.2.3, p. 37 for details.
. , Right
. , Insert
. , Delete
.
Left
Edit composite and text values, see 2.2.4, p. 40 and 2.2.6, p. 43 for details.
.
Exit
Return to the superior menu.
6.25
Mass Storage
Options Menu (p. 103) ä More Options (p. 103) ä Advanced Options (p. 104) ä Connectivity Options (p. 104) ä Mass Storage
This command (Figure 165, p. 151) lets the FLIR identiFINDER R300 behave like a write-protected
USB mass storage device similar to a hard disk or a USB stick. You can connect it to a local computer
(7.2, p. 170) to copy iles from the FLIR identiFINDER R300 to the computer.
150
identiFINDER® R300/en/2014.4(13623)/Feb2015
FLIR Detection
6. FLIR identiFINDER R300 Menu Reference
Figure 165. Starting the USB mass storage mode
Settings and Commands
Start
Start the USB mass storage mode (Figure 166, p. 151).
Figure 166. The FLIR identiFINDER R300 in USB mass storage mode
All of the FLIR identiFINDER R300 network services will stop and after a few moments the
FLIR identiFINDER R300 will be recognized as an external hard disk by the connected computer. Use the ile manager of your computer to inspect, for example, the drivers on the FLIR
identiFINDER R300.
While the FLIR identiFINDER R300 acts as a hard drive, you cannot operate it. Routine jobs like monitoring the radiation for exceeding the alarm thresholds are not interrupted.
identiFINDER® R300/en/2014.4(13623)/Feb2015
151
6.26. Network
FLIR Detection
The FLIR identiFINDER R300 hard drive is write protected, that is, you cannot modify
or add any data.
Exit
Return to the superior menu. The FLIR identiFINDER R300’s network services will be reactivated.
6.26
Network
Options Menu (p. 103) ä More Options (p. 103) ä Advanced Options (p. 104) ä Connectivity Options (p. 104) ä Network
Settings (p. 180) ä Connectivity (p. 190) ä Local Area Network (p. 190)
This screen (Figure 167, p. 152) groups settings related to the connections between your FLIR
identiFINDER R300 and a computer.
Figure 167. Network settings
It is recommended to restart your FLIR identiFINDER R300 after changing network settings.
If the FLIR identiFINDER R300 is currently connected to an external device, you have to
reestablish the connection according to the new settings.
Settings and Commands
Device Name
The name of this FLIR identiFINDER R300 to identify it in communication with other devices.
Spaces are not allowed in this text.
152
identiFINDER® R300/en/2014.4(13623)/Feb2015
FLIR Detection
6. FLIR identiFINDER R300 Menu Reference
USB Subnet
To connect to the FLIR identiFINDER R300 via IP, it must have an IP address. This address is
taken from one of the pools of IP addresses reserved by the IANA for private networks. You
can choose from the listed pools.
Try to avoid subnets already in use in your local area network. Ask your network administrator when in doubt which pool best suits your network environment.
172.* Network
1 048 576 addresses from 172.16.0.0 to 172.31.255.255
10.* Network
16 777 216 addresses from 10.0.0.0 to 10.255.255.255
192.168.* Network
65 536 addresses from 192.168.0.0 to 192.168.255.255
You can choose the subnet but not the IP address. The address is ixed and remains
always the same for a given instrument.
The current IP address is shown on-screen whenever the FLIR identiFINDER R300 detects a connection to a network (Figure 199, p. 178).
Down , Select
Choose and select menu items, see 2.2.2, p. 35 for details.
+ , - , Accept , Cancel
Edit values, see 2.2.3, p. 37 for details.
Exit
Return to the superior menu.
6.27
Report Settings
Options Menu (p. 103) ä More Options (p. 103) ä Advanced Options (p. 104) ä Connectivity Options (p. 104) ä Report Settings
Settings (p. 180) ä Connectivity (p. 190) ä Reports (p. 192)
This screen (Figure 168, p. 154) groups settings specifying the content of reports you can download
via the FLIR identiFINDER R300’s web interface (8, p. 179) or send to remote servers (9, p. 219).
Settings and Commands
Operator Name
Your name and…
Voice Phone
your phone number for inclusion in reports.
identiFINDER® R300/en/2014.4(13623)/Feb2015
153
6.28. Download Settings
FLIR Detection
Figure 168. Report settings
Down , Select
Choose and select menu items, see 2.2.2, p. 35 for details.
+ , - , Accept , Cancel
Edit values, see 2.2.3, p. 37 for details.
Left , Right , Insert , Delete
Edit composite and text values, see 2.2.4, p. 40 and 2.2.6, p. 43 for details.
Exit
Return to the superior menu.
6.28
Download Settings
Options Menu (p. 103) ä More Options (p. 103) ä Advanced Options (p. 104) ä Connectivity Options (p. 104) ä Download Settings
Settings (p. 180) ä Connectivity (p. 190) ä Download Options (p. 192)
This screen (Figure 169, p. 155) lists several ile formats available for transferring recorded data
from the FLIR identiFINDER R300 to a connected computer (8, p. 179). You can accelerate the
downloads by excluding ile types not needed in your work low. For example, the formats *.n42,
*.spc, and *.spe usually contain the same information in different formats.
Some ile formats are not available for all types of data.
Settings and Commands
.n42 (2012)
Files formatted according to the 2012 edition of the ANSI N42.42 Standard.
154
identiFINDER® R300/en/2014.4(13623)/Feb2015
FLIR Detection
6. FLIR identiFINDER R300 Menu Reference
Figure 169. Download settings
.n42 (2006)
Files formatted according to the 2006 edition of the ANSI N42.42 Standard.
…
Other ile formats.
Down , Select
Choose and select menu items, see 2.2.2, p. 35 for details.
+ , - , Accept , Cancel
Edit values, see 2.2.3, p. 37 for details.
Exit
Return to the superior menu.
6.29
Gamma, Neutron Counters
Options Menu (p. 103) ä Gamma, Neutron Counters
This command displays the state of various counters (Figure 170, p. 156). If your variant is
equipped with a neutron detector, its results will be shown as well (Figure 171, p. 156).
The counters for gamma and neutrons (if available) are reset when you switch on the FLIR
identiFINDER R300 or when you reset them explicitly (see below).
The counter for dose keeps accumulating data until you explicitly reset it (see below).
identiFINDER® R300/en/2014.4(13623)/Feb2015
155
6.29. Gamma, Neutron Counters
FLIR Detection
Figure 170. Gamma counter information
Figure 171. Gamma and neutron counter information (Available only for variants equipped with a neutron
detector.)
Settings and Commands
Gamma Counts
The accumulated gamma counts registered by the detector crystals.
Counting Duration
The time frame, in seconds, in which the neutrons shown at the bottom and gamma counts
shown above were measured.
Gamma Dose
The accumulated gamma dose. You can specify the unit used for display, see 6.31, p. 159.
Dose Duration
The time span, in seconds, in which the gamma dose shown above was measured.
156
identiFINDER® R300/en/2014.4(13623)/Feb2015
FLIR Detection
6. FLIR identiFINDER R300 Menu Reference
Neutrons
The accumulated neutron counts.
Available only for variants equipped with a neutron detector.
Neutron Rate
The current neutron rate in counts per second
Available only for variants equipped with a neutron detector.
Reset Dose
Reset both the Gamma Dose and Dose Duration. Measuring is not interrupted, merely the
accumulated values are set to zero.
Stop ⇋ Reset
Stop the accumulation of data for neutrons (if available) and gamma.
To reset the accumulators and timers for neutrons (if available) and gamma counts to zero
and resume accumulating new data, press again.
Exit
Return to the superior menu.
6.30
Finder Settings
Options Menu (p. 103) ä Finder Settings
Settings (p. 180) ä General (p. 184) ä Measurement (p. 184)
This screen (Figure 172, p. 157) groups options that in luence the FLIR identiFINDER R300’s behavior in Finder mode (see 4.2, p. 88).
Figure 172. Finder settings
identiFINDER® R300/en/2014.4(13623)/Feb2015
157
6.30. Finder Settings
FLIR Detection
Settings and Commands
.
Available
Choose “Yes” to enable selection of Finder mode or “No” to disable.
. Time
Integration
Specify the time for which the FLIR identiFINDER R300 should average the measured count
rate.
You can choose from 1 s – 2 s – 5 s.
The smaller the value, the more lively the display; the larger the value, the better the chance
to ind weaker sources.
.
Sensitivity
Specify the sensitivity for audible feedback in Finder mode (see 4.2, p. 88). You can specify
values from 50 to 200 %.
While in Finder mode, the FLIR identiFINDER R300 emits sound when the count rate rises
above a threshold 𝐶 which is represented by the dashed line across the top of the Finder
display (Figure 90, p. 89).
The threshold is related to the average background count rate ⟨𝐵𝐶𝑅⟩ (measured when you enter the Finder mode), its variation 𝜎 =
⟨𝐵𝐶𝑅⟩, and the sensitivity you specify here according
to
𝐶 = ⟨𝐵𝐶𝑅⟩ + 3.5 ∗ 𝜎 ∗
100
Sensitivity [%]
This equation is solved for some common values of the background variation 𝜎 in Table 2,
p. 158. Look up the sensitivity value next to the desired 𝜎 and enter it.
Table 2. Finder Mode: Background variation vs. sensitivity
𝜎
7
6.5
6
5.5
5
4.5
4
3.5
3
2.5
2
1.75
158
Sensitivity [%]
50
54
58
64
70
78
88
100
117
140
175
200
identiFINDER® R300/en/2014.4(13623)/Feb2015
FLIR Detection
6. FLIR identiFINDER R300 Menu Reference
Down , Select
Choose and select menu items, see 2.2.2, p. 35 for details.
+ , - , Accept , Cancel
Edit values, see 2.2.3, p. 37 for details.
Exit
Return to the superior menu.
6.31
Dose Rate Settings
Options Menu (p. 103) ä Dose Rate Settings
Settings (p. 180) ä General (p. 184) ä Measurement (p. 184)
This screen (Figure 173, p. 159) groups options that in luence the display of dose and dose rate
values (see 4.1, p. 86).
Figure 173. Dose rate settings
Settings and Commands
Displayed Unit
Choose the unit for the display of dose rates.
This setting in luences all displays of dose and dose rate values, for example the display
of dose alarm thresholds (see 6.33, p. 161).
Sievert
Sievert is a derived unit according to the International System of Units and the legally
prescribed unit in many jurisdictions.
identiFINDER® R300/en/2014.4(13623)/Feb2015
159
6.32. Alarm Indicators
rem
FLIR Detection
Röntgen equivalent in man. rem is an outdated unit and no longer allowed in many
jurisdictions.
1 Sv = 100 rem.
Down , Select
Choose and select menu items, see 2.2.2, p. 35 for details.
+ , - , Accept , Cancel
Edit values, see 2.2.3, p. 37 for details.
Exit
Return to the superior menu.
6.32
Alarm Indicators
Options Menu (p. 103) ä Alarm Options (p. 105) ä Alarm Indicators
Settings (p. 180) ä Alarm (p. 188) ä Alarm Indicators (p. 188)
The FLIR identiFINDER R300 reports various events with on-screen messages. Additionally, you
can have it report events, especially alarms, with other methods (Figure 174, p. 160). You can switch
each of the annunciation methods independently.
Figure 174. Alarm indication settings
The signals used to report alarms are detailed in chapter 5, p. 97.
Settings and Commands
LEDs
Switch the alarm LEDs on or off.
160
identiFINDER® R300/en/2014.4(13623)/Feb2015
FLIR Detection
6. FLIR identiFINDER R300 Menu Reference
This setting does not affect the power status LED. It cannot be switched off.
Beeper
Switch the beeper on or off.
Vibrator
Switch the vibrator on or off.
Down , Select
Choose and select menu items, see 2.2.2, p. 35 for details.
+ , - , Accept , Cancel
Edit values, see 2.2.3, p. 37 for details.
Exit
Return to the superior menu.
6.33
Dose Alarm Thresholds
Options Menu (p. 103) ä Alarm Options (p. 105) ä Dose Alarm Thresholds
Settings (p. 180) ä Alarm (p. 188) ä Gamma Alarms (p. 189)
This screen (Figure 175, p. 161) groups the thresholds for dose alarms and warnings.
Specify the thresholds by setting a value with a unit. The base unit (Sv or rem) available here re lects
your preferences (see 6.31, p. 159).
You can specify values between 1 nSv and 1 Sv (100 nrem to 100 rem).
For meaningful alerts, specify an alarm threshold above the warning threshold.
Figure 175. Dose alarm threshold settings
identiFINDER® R300/en/2014.4(13623)/Feb2015
161
6.34. Dose Rate Alarm Thresholds
FLIR Detection
Settings and Commands
.
Alarm
The value with unit for the alarm threshold. Use “Off” (the lowest value) to suppress this
alarm. Available units are
nSv – µSv – mSv – Sv (nrem – µrem – mrem – rem)
.
Warning
The value with unit for the warning threshold. Use “Off” (the lowest value) to suppress this
warning. Available units are
nSv – µSv – mSv – Sv (nrem – µrem – mrem – rem)
. , Select
.
Down
Choose and select menu items, see 2.2.2, p. 35 for details.
.
.
+. , -. , Accept
, Cancel
Edit values, see 2.2.3, p. 37 for details.
. , Right
.
Left
Edit composite values, see 2.2.4, p. 40 for details.
.
Exit
Return to the superior menu.
6.34
Dose Rate Alarm Thresholds
Options Menu (p. 103) ä Alarm Options (p. 105) ä Dose Rate Alarm Thresholds
Settings (p. 180) ä Alarm (p. 188) ä Gamma Alarms (p. 189)
This screen (Figure 176, p. 163) groups the thresholds for dose rate alarms and warnings.
Specify the thresholds by setting a value with a unit. The base unit (Sv/h or rem/h) available here
re lects your preferences (see 6.31, p. 159).
You can specify values between 1 nSv/h and 1 Sv/h (100 nrem/h to 100 rem/h).
For meaningful alerts, specify an alarm threshold above the warning threshold.
Settings and Commands
.
Alarm
The value with unit for the alarm threshold. Use “Off” (the lowest value) to suppress this
alarm. Available units are
nSv/h – µSv/h – mSv/h – Sv/h (nrem/h – µrem/h – mrem/h – rem/h)
162
identiFINDER® R300/en/2014.4(13623)/Feb2015
FLIR Detection
6. FLIR identiFINDER R300 Menu Reference
Figure 176. Dose rate alarm threshold settings
Warning
The value with unit for the warning threshold. Use “Off” (the lowest value) to suppress this
alarm. Available units are
nSv/h – µSv/h – mSv/h – Sv/h (nrem/h – µrem/h – mrem/h – rem/h)
𝜎 Alarm
The sensitivity of the detection of unusual gamma radiation increases (see 5.3, p. 101).
You can specify “Off” to suppress the noti ications or a value from 1.1 to 9.9. The lower the
value, the better the sensitivity for radiation increases but the more noti ications you can
expect. Higher values are recommended to reduce false noti ications in environments with
generally low radiation levels.
Down , Select
Choose and select menu items, see 2.2.2, p. 35 for details.
+ , - , Accept , Cancel
Edit values, see 2.2.3, p. 37 for details.
Left , Right
Edit composite values, see 2.2.4, p. 40 for details.
Exit
Return to the superior menu.
6.35
Neutron Alarm Thresholds
This item is available for FLIR identiFINDER R300 variants with a neutron detector (see A.1,
p. 237).
identiFINDER® R300/en/2014.4(13623)/Feb2015
163
6.35. Neutron Alarm Thresholds
FLIR Detection
Options Menu (p. 103) ä Alarm Options (p. 105) ä Neutron Alarm Thresholds
Settings (p. 180) ä Alarm (p. 188) ä Neutron Alarms (p. 190)
This screen (Figure 177, p. 164) groups the thresholds for neutron warnings and alarms.
For meaningful alerts, specify an alarm threshold above the warning threshold.
Figure 177. Neutron alarm threshold settings
Settings and Commands
Alarm
The minimum number of neutrons per minute to trigger an alarm.
You can specify values between 2 and 500.
Warning
The minimum number of neutrons per minute to trigger a warning.
You can specify values between 2 and 500.
𝜎 Alarm
The state of noti ications on unusual increase of neutrons detected (see 5.3, p. 101).
You can specify “On” or “Off”.
Down , Select
Choose and select menu items, see 2.2.2, p. 35 for details.
+ , - , Accept , Cancel
Edit values, see 2.2.3, p. 37 for details.
Exit
Return to the superior menu.
164
identiFINDER® R300/en/2014.4(13623)/Feb2015
FLIR Detection
6.36
6. FLIR identiFINDER R300 Menu Reference
Current Alarm State
Options Menu (p. 103) ä Alarm Options (p. 105) ä Current Alarm State
This screen (Figure 178, p. 165) is identical to the alarm screen always shown when a warning or
an alarm is raised (compare 5, p. 97).
Current
urrent Values
Available only for variants equipped with a
neutron detector.
Figure 178. Current Alarm State
Settings and Commands
Mute
Switch off the beeper and vibrator for the current alarm, if any. The next alarm, if any, reactivates sound and vibration.
Exit
Return to the superior menu.
identiFINDER® R300/en/2014.4(13623)/Feb2015
165
FLIR Detection
7. Connecting the FLIR identiFINDER R300 to a Local Computer
Chapter 7
Connecting the FLIR identiFINDER R300 to a
Local Computer
The FLIR identiFINDER R300 can be connected to a computer via Universal Serial Bus (USB).
The connection between the FLIR identiFINDER R300 and the computer serves two purposes:
Energy Supply
The computer provides external power for running the FLIR identiFINDER R300 or charging
the batteries. Refer to chapter 11, p. 229 for details.
Data Communication
The FLIR identiFINDER R300 supports several methods of data communication via USB
which are explained in this and the following chapter.
Mass Storage Device
The FLIR identiFINDER R300 can behave as a mass storage device to transfer data to
the computer.
This mode is exclusive, that is, no other data communication is possible while the
FLIR identiFINDER R300 behaves as a mass storage device.
Web Server
The FLIR identiFINDER R300 can act as a web server you can access in a web browser
to download data or to operate the FLIR identiFINDER R300 and change its settings
with the enhanced convenience of a large screen and a real keyboard.
The remainder of this chapter explains:
• How to set up the physical connection (7.1, p. 168)
• How to use the FLIR identiFINDER R300 as a mass storage device (7.2, p. 170)
• How to prepare the computer (7.3, p. 171) for accessing the web interface detailed in chapter
8, p. 179.
identiFINDER® R300/en/2014.4(13623)/Feb2015
167
7.1. Plugging and Unplugging
7.1
FLIR Detection
Plugging and Unplugging
The FLIR identiFINDER R300 draws a current of approximately 400 mA. Before connecting to
a computer, please make sure the USB outlet of the computer complies with this requirement.
This might not be the case with some laptops, netbooks or similar battery powered devices.
.
Figure 179. Connecting the FLIR identiFINDER R300 (Mini USB-B connector) and a computer (USB-A
connector)
The USB socket of the FLIR identiFINDER R300 is at the lower end of the instrument. It is covered
by a lap in the rubber boot (Figure 180, p. 168).
.
Figure 180. USB socket covered by a lap in the rubber boot
Use the Mini USB-B to USB-A cable supplied with the FLIR identiFINDER R300 to establish the connection.
You can use any equivalent third-party USB 2.0 cable.
168
identiFINDER® R300/en/2014.4(13623)/Feb2015
FLIR Detection
7. Connecting the FLIR identiFINDER R300 to a Local Computer
Always grab the plug at the strain relief and slide it straight into or out of the receptacle (Figure 181,
p. 169).
Figure 181. Plugging and unplugging the cable
Do not pull at the cable behind the connector and do not bend it when removing it from the FLIR
identiFINDER R300 (Figure 182, p. 169).
Figure 182. Do not bend the cable or the plug!
identiFINDER® R300/en/2014.4(13623)/Feb2015
169
7.2. The FLIR identiFINDER R300 as a Mass Storage Device
7.2
FLIR Detection
The FLIR identiFINDER R300 as a Mass Storage Device
Computers supporting the connection of USB devices usually have a driver for devices identifying
themselves as mass storage, for example USB sticks or USB hard disks. The FLIR identiFINDER R300
supports the same standard.
You can use this mode of operation, for example, to install the drivers for the web interface access
(7.3, p. 171).
Ô To mount the FLIR identiFINDER R300 as USB mass storage…
1. Switch the FLIR identiFINDER R300 to mass storage mode (see
Mass Storage
, 6.25, p. 150).
2. Connect the FLIR identiFINDER R300 to the computer with the included cable.
The mass storage device shows up on your computer after a few moments (Figure 183,
p. 170).
The FLIR identiFINDER R300 hard drive is write protected, that is, you cannot modify
or add any data.
Figure 183. FLIR identiFINDER R300 mounted as mass storage device on a computer running Microsoft
Windows 7
Ô To unmount the FLIR identiFINDER R300 as USB mass storage…
1. Follow the standard procedure for unmounting mass storage devices as recommended by
your operating system. Please refer to the manual or help system that came with your operating system for details.
2. Unplug the connection cable.
3. Press Exit on the FLIR identiFINDER R300 to return from USB mass storage mode to normal
operation (see 6.25, p. 150).
170
identiFINDER® R300/en/2014.4(13623)/Feb2015
FLIR Detection
7.3
7. Connecting the FLIR identiFINDER R300 to a Local Computer
Preparing the USB Network Connection on a Computer
Depending on the operating system of your computer, you might need to install additional software
to access the web interface (see 8, p. 179) of the FLIR identiFINDER R300.
7.3.1
Linux
No special installation is required for recent Linux distributions. Fedora 13, Ubuntu 10.04, Ubuntu
11.04, and Ubuntu 12.04 were tested successfully. There should be a good chance with other modern distributions as well.
Just connect the FLIR identiFINDER R300 to the computer with the included cable and you are ready
to go.
7.3.2
Windows XP
You must install the driver software included within the FLIR identiFINDER R300 before you can
use the USB network connection of the FLIR identiFINDER R300.
This installation requires you to have administrator privileges for your computer. Ask your
IT administrator if in doubt.
The driver installer is included with the FLIR identiFINDER R300, you can access it via the USB
mass storage mode (7.2, p. 170).
Ô To install the driver software…
1. Start the mass storage connection from the FLIR identiFINDER R300 to your computer (see
7.2, p. 170).
2. Open the folder Drivers containing the installer.
3. Start the installer by double-clicking its icon (Figure 184, p. 171).
Figure 184. FLIR RNDIS driver installer
4. Follow the instructions given on-screen (Figure 185, p. 172).
If a FLIR RNDIS driver is already installed on your PC, you will be guided through the
deinstallation before the installation begins.
5. You might get asked whether to install this software (Figure 186, p. 172).
Please click Continue Anyway .
The installation will inish in a few moments (Figure 187, p. 173).
identiFINDER® R300/en/2014.4(13623)/Feb2015
171
7.3. Preparing the USB Network Connection on a Computer
FLIR Detection
Figure 185. Beginning of the installation
Figure 186. Installation warning
6. Stop the mass storage connection from the FLIR identiFINDER R300 to your computer (see
7.2, p. 170).
Whenever you connect a computer and a FLIR identiFINDER R300 which is not in the USB mass
storage mode, the FLIR identiFINDER R300 identi ies itself as an RNDIS device. A computer running
Microsoft Windows XP detecting the device checks whether the device is known and will report the
detection of new hardware if not (Figure 188, p. 173).
172
identiFINDER® R300/en/2014.4(13623)/Feb2015
FLIR Detection
7. Connecting the FLIR identiFINDER R300 to a Local Computer
Figure 187. End of the installation
Figure 188. Windows XP reporting new hardware at the noti ication area.
Ô To install the software for new hardware…
Windows launches the wizard for new hardware (Figure 189, p. 173).
Figure 189. Windows XP New Hardware Wizard
1. Click
No, not this time to avoid searching the Internet for a driver.
identiFINDER® R300/en/2014.4(13623)/Feb2015
173
7.3. Preparing the USB Network Connection on a Computer
FLIR Detection
2. Proceed to the following page (Figure 190, p. 174) by clicking Next .
Figure 190. Specifying a driver source
3. Click
Install the software automatically (Recommended) to have the system search for the driver
you installed as described above.
4. Proceed to the following page by clicking Next .
5. You might get asked whether to install this software (Figure 191, p. 174).
Please click Continue Anyway .
Figure 191. Installation warning
174
identiFINDER® R300/en/2014.4(13623)/Feb2015
FLIR Detection
7. Connecting the FLIR identiFINDER R300 to a Local Computer
The installation will inish in a few moments and you get noti ied in the noti ication area
(Figure 192, p. 175).
Figure 192. End of the installation
6. You are now ready to use the web interface of your FLIR identiFINDER R300 (see 8, p. 179).
You will have to repeat these steps for every FLIR identiFINDER R300 you connect to
your computer, sometimes even if you connect the same instrument to a different USB
port of your computer.
Ô To remove the driver software…
1. Open the Windows System Control Panel.
2. Open Add/Remove Software .
3. Select the FLIR RNDIS Driver from the list by clicking its entry.
4. Click Remove and follow the instructions given on-screen.
7.3.3
Windows Vista, Windows 7
You must install the driver software included within the FLIR identiFINDER R300 before you can
use the USB network connection of the FLIR identiFINDER R300.
Microsoft Windows Vista and Windows 7 behave virtually identical regarding this installation. The following screenshots are taken from Windows 7.
This installation requires you to have administrator privileges for your computer. Ask your
IT administrator if in doubt.
The driver installer is included with the FLIR identiFINDER R300, you can access it via the USB
mass storage mode (7.2, p. 170).
Ô To install the driver software…
1. Start the mass storage connection from the FLIR identiFINDER R300 to your computer (see
7.2, p. 170).
2. Open the folder Drivers containing the installer.
3. Start the installer by double clicking its icon (Figure 193, p. 176).
identiFINDER® R300/en/2014.4(13623)/Feb2015
175
7.3. Preparing the USB Network Connection on a Computer
FLIR Detection
Figure 193. FLIR RNDIS driver installer
Figure 194. Installation warning
4. You will be asked whether you want to allow the installation of software (Figure 194, p. 176).
Please click Yes .
5. Follow the instructions given on-screen (Figure 195, p. 177).
If a FLIR RNDIS driver is already installed on your PC, you will be guided through the
deinstallation before the installation begins.
The installation will inish in a few moments (Figure 196, p. 177).
6. Stop the mass storage connection from the FLIR identiFINDER R300 to your computer (see
7.2, p. 170).
Whenever you connect a computer and a FLIR identiFINDER R300 which is not in the USB mass
storage mode, the FLIR identiFINDER R300 identi ies itself as an RNDIS device. A computer running
Microsoft Windows Windows 7 detecting the device checks whether the device is known and will
report the detection of new hardware if not (Figure 197, p. 177).
176
identiFINDER® R300/en/2014.4(13623)/Feb2015
FLIR Detection
7. Connecting the FLIR identiFINDER R300 to a Local Computer
Figure 195. Beginning of the installation
Figure 196. End of the installation
Figure 197. Windows 7 reporting and con iguring new hardware
The system installs the driver software for the device and reports when the device is ready to use
in the noti ication area (Figure 198, p. 178).
You are now ready to use the web interface of your FLIR identiFINDER R300 (see 8, p. 179).
identiFINDER® R300/en/2014.4(13623)/Feb2015
177
7.4. Using the Network Connection
FLIR Detection
Figure 198. End of the installation
Ô To remove the driver software…
1. Open the Windows System Control Panel.
2. Open Program\Programs and Features .
3. Select the FLIR RNDIS Driver from the list by clicking its entry.
4. Click Uninstall and follow the instructions given on-screen.
7.4
Using the Network Connection
When you connect the FLIR identiFINDER R300 to an appropriately con igured computer (see 7.3,
p. 171), it will show its addresses (Figure 199, p. 178).
Figure 199. Valid addresses of the FLIR identiFINDER R300 after a connection to a computer was established
One address contains the serial number of your FLIR identiFINDER R300, the other is an IP address
according to the current settings (see 6.26, p. 152). To access the FLIR identiFINDER R300’s web interface, simply point your web browser to one of the given addresses, for example to the IP address
http://172.16.0.1
Not all computers can use the address comprising the instrument’s serial number. Please use
the IP address in this case.
178
identiFINDER® R300/en/2014.4(13623)/Feb2015
FLIR Detection
8. Using the FLIR identiFINDER R300 Web Server
Chapter 8
Using the FLIR identiFINDER R300 Web Server
In principle, the web interface provides all the settings and commands you know from the FLIR
identiFINDER R300 itself, but with the added convenience of a larger screen and a real keyboard.
Point your web browser to the address given after establishing a network connection (see 7.4,
p. 178). Please refer to section 2.4, p. 51 for the principle operation of the web pages outlined below.
The main menu offers the following groups of web pages:
.
Home
Inspect general information about the FLIR identiFINDER R300
.
Settings
Inspect and edit settings of the FLIR identiFINDER R300
.
Data
Inspect and download data from the FLIR identiFINDER R300’s database
.
Live Screen
Remote control the screen and buttons of the FLIR identiFINDER R300
.
Live Spectrum
Acquire and analyze gamma spectra with the FLIR identiFINDER R300
.
Administration
Manage the FLIR identiFINDER R300 and install software updates
The complete hierarchy of web pages in the main and secondary menus and their sections is shown
in the following list. References point to the manual sections explaining the listed items in more
detail.
.
Home
⋅
.
Info
. . . . . . . . . . . . . . . . . . . . . . . . . . . . . . . . . . . . . . . . . . . . . . . . . . . . . . . . . . . . . . . . . . . see 8.1, p. 181
⋅ ⋅
.
System
. . . . . . . . . . . . . . . . . . . . . . . . . . . . . . . . . . . . . . . . . . . . . . . . . . . . . . . . . . . . . . . see 8.1, p. 181
⋅ ⋅
.
Service
. . . . . . . . . . . . . . . . . . . . . . . . . . . . . . . . . . . . . . . . . . . . . . . . . . . . . . . . . . . . . . . see 8.1, p. 181
identiFINDER® R300/en/2014.4(13623)/Feb2015
179
8. Using the FLIR identiFINDER R300 Web Server
.
Resources
⋅
FLIR Detection
. . . . . . . . . . . . . . . . . . . . . . . . . . . . . . . . . . . . . . . . . . . . . . . . . . . . . . . . . . . . . see 8.2, p. 182
⋅ ⋅
. Software
Open-Source
⋅ ⋅
.
Data Schemata
. . . . . . . . . . . . . . . . . . . . . . . . . . . . . . . . . . . . . . . . . . . . . . . . . . see 8.2, p. 182
. . . . . . . . . . . . . . . . . . . . . . . . . . . . . . . . . . . . . . . . . . . . . . . . . . . . . . . . . see 8.2, p. 183
.
Settings
.
General
⋅
. . . . . . . . . . . . . . . . . . . . . . . . . . . . . . . . . . . . . . . . . . . . . . . . . . . . . . . . . . . . . . . . see 8.3, p. 184
⋅ ⋅
.
Measurement
. . . . . . . . . . . . . . . . . . . . . . . . . . . . . . . . . . . . . . . . . . . . . . . . . . . . . . . . see 8.3.1, p. 184
⋅ ⋅
Identi . cation
. . . . . . . . . . . . . . . . . . . . . . . . . . . . . . . . . . . . . . . . . . . . . . . . . . . . . . . . . see 8.3.2, p. 184
⋅ ⋅
.
User Interface
. . . . . . . . . . . . . . . . . . . . . . . . . . . . . . . . . . . . . . . . . . . . . . . . . . . . . . . . see 8.3.3, p. 186
. Clock
GPS and
⋅
. . . . . . . . . . . . . . . . . . . . . . . . . . . . . . . . . . . . . . . . . . . . . . . . . . . . . . . . . . see 8.4, p. 186
⋅ ⋅
.
GPS
. . . . . . . . . . . . . . . . . . . . . . . . . . . . . . . . . . . . . . . . . . . . . . . . . . . . . . . . . . . . . . . . . . see 8.4, p. 186
⋅ ⋅
.
Clock
. . . . . . . . . . . . . . . . . . . . . . . . . . . . . . . . . . . . . . . . . . . . . . . . . . . . . . . . . . . . . . . . . see 8.4, p. 187
.
Alarm
⋅
. . . . . . . . . . . . . . . . . . . . . . . . . . . . . . . . . . . . . . . . . . . . . . . . . . . . . . . . . . . . . . . . . see 8.5, p. 188
⋅ ⋅
.
Alarm Indicators
⋅ ⋅
Gamma. Alarms
⋅ ⋅
Neutron .Alarms ©
.
Connectivity
⋅
. . . . . . . . . . . . . . . . . . . . . . . . . . . . . . . . . . . . . . . . . . . . . . . . . . . . . . see 8.5.1, p. 188
. . . . . . . . . . . . . . . . . . . . . . . . . . . . . . . . . . . . . . . . . . . . . . . . . . . . . . . see 8.5.2, p. 189
. . . . . . . . . . . . . . . . . . . . . . . . . . . . . . . . . . . . . . . . . . . . . . . . . . . . . see 8.5.3, p. 190
. . . . . . . . . . . . . . . . . . . . . . . . . . . . . . . . . . . . . . . . . . . . . . . . . . . . . . . . . . . . see 8.6, p. 190
⋅ ⋅
Local Area. Network
⋅ ⋅
Remote. Server
⋅ ⋅
.
Reports
. . . . . . . . . . . . . . . . . . . . . . . . . . . . . . . . . . . . . . . . . . . . . . . . . . . see 8.6.1, p. 190
. . . . . . . . . . . . . . . . . . . . . . . . . . . . . . . . . . . . . . . . . . . . . . . . . . . . . . . see 8.6.2, p. 192
. . . . . . . . . . . . . . . . . . . . . . . . . . . . . . . . . . . . . . . . . . . . . . . . . . . . . . . . . . . . . see 8.6.3, p. 192
.
Download Options
. . . . . . . . . . . . . . . . . . . . . . . . . . . . . . . . . . . . . . . . . . . . . . . . . . . . see 8.6.4, p. 192
⋅ ⋅
. Settings ©
Bluetooth SPP
⋅
. Settings ©
Bluetooth SPP
⋅ ⋅
. . . . . . . . . . . . . . . . . . . . . . . . . . . . . . . . . . . . . . . . . . . . . . . . . see 8.7, p. 192
. . . . . . . . . . . . . . . . . . . . . . . . . . . . . . . . . . . . . . . . . . . . . . see 8.7.1, p. 192
⋅
.
Nuclides
. . . . . . . . . . . . . . . . . . . . . . . . . . . . . . . . . . . . . . . . . . . . . . . . . . . . . . . . . . . . . . . see 8.8, p. 193
⋅
.
Backup
. . . . . . . . . . . . . . . . . . . . . . . . . . . . . . . . . . . . . . . . . . . . . . . . . . . . . . . . . . . . . . . . see 8.9, p. 194
⋅ ⋅
.
Backup
. . . . . . . . . . . . . . . . . . . . . . . . . . . . . . . . . . . . . . . . . . . . . . . . . . . . . . . . . . . . . . . see 8.9, p. 196
⋅ ⋅
.
Restore
. . . . . . . . . . . . . . . . . . . . . . . . . . . . . . . . . . . . . . . . . . . . . . . . . . . . . . . . . . . . . . . see 8.9, p. 196
.
Data
.
Bulk Download
⋅
. . . . . . . . . . . . . . . . . . . . . . . . . . . . . . . . . . . . . . . . . . . . . . . . . . . . . . . . see 8.10, p. 197
⋅ ⋅
.
Date Selection
⋅ ⋅
Data .Types
. . . . . . . . . . . . . . . . . . . . . . . . . . . . . . . . . . . . . . . . . . . . . . . . . . . . . . . . see 8.10, p. 197
. . . . . . . . . . . . . . . . . . . . . . . . . . . . . . . . . . . . . . . . . . . . . . . . . . . . . . . . . . . see 8.10, p. 197
⋅
Identi .cations
⋅
.
Spectra
. . . . . . . . . . . . . . . . . . . . . . . . . . . . . . . . . . . . . . . . . . . . . . . . . . . . . . . . . . . . . . see 8.12, p. 202
⋅
.
Alarms
. . . . . . . . . . . . . . . . . . . . . . . . . . . . . . . . . . . . . . . . . . . . . . . . . . . . . . . . . . . . . . . see 8.13, p. 206
⋅
.
Screenshots
.
Live Screen
180
. . . . . . . . . . . . . . . . . . . . . . . . . . . . . . . . . . . . . . . . . . . . . . . . . . . . . . . . . see 8.11, p. 199
. . . . . . . . . . . . . . . . . . . . . . . . . . . . . . . . . . . . . . . . . . . . . . . . . . . . . . . . . . . see 8.14, p. 207
. . . . . . . . . . . . . . . . . . . . . . . . . . . . . . . . . . . . . . . . . . . . . . . . . . . . . . . . . . . . . see 8.15, p. 208
identiFINDER® R300/en/2014.4(13623)/Feb2015
FLIR Detection
8. Using the FLIR identiFINDER R300 Web Server
. . . . . . . . . . . . . . . . . . . . . . . . . . . . . . . . . . . . . . . . . . . . . . . . . . . . . . . . . . . see 8.16, p. 209
Live Spectrum
Administration
⋅
Software Update
⋅
Password
⋅
System Files
⋅ ⋅
8.1
. . . . . . . . . . . . . . . . . . . . . . . . . . . . . . . . . . . . . . . . . . . . . . . . . . . . . . . see 8.17, p. 215
. . . . . . . . . . . . . . . . . . . . . . . . . . . . . . . . . . . . . . . . . . . . . . . . . . . . . . . . . . . . . see 8.18, p. 215
. . . . . . . . . . . . . . . . . . . . . . . . . . . . . . . . . . . . . . . . . . . . . . . . . . . . . . . . . . see 8.19, p. 216
Available Files
. . . . . . . . . . . . . . . . . . . . . . . . . . . . . . . . . . . . . . . . . . . . . . . . . . . . . . . see 8.19, p. 216
Info (Web Page)
Home (p. 179) ä Info
This web page displays diverse information regarding your FLIR identiFINDER R300 (Figure 200,
p. 182).
System
This section (Figure 200, p. 182) contains information about the FLIR identiFINDER R300 and
its con iguration.
Home (p. 179) ä Info (p. 181) ä System
Options Menu (p. 103) ä More Options (p. 103) ä Advanced Options (p. 104) ä Maintenance (p. 104) ä Show Status (p. 130)
You should have this information ready when contacting our service (see 8.1, p. 181 or
B.4, p. 257).
Service
This section (Figure 200, p. 182) contains the addresses of our service for various communication methods like traditional mail, fax, etc.
Home (p. 179) ä Info (p. 181) ä Service
If you click the link to a service e-mail address, your standard e-mail software will open
with a new message already containing the relevant data of the FLIR identiFINDER R300
like serial number, versions etc.
identiFINDER® R300/en/2014.4(13623)/Feb2015
181
8.2. Resources (Web Page)
FLIR Detection
.
Figure 200. Info web page
8.2
Resources (Web Page)
Home (p. 179) ä Resources
This web page (Figure 201, p. 183) provides access to various resources stored on the FLIR
identiFINDER R300.
. Software
Open-Source
This section (Figure 201, p. 183) provides information about the open-source libraries used
in the software of the FLIR identiFINDER R300.
Home (p. 179) ä Resources (p. 182) ä Open-Source Software
182
identiFINDER® R300/en/2014.4(13623)/Feb2015
FLIR Detection
8. Using the FLIR identiFINDER R300 Web Server
Figure 201. Resources web page
Download
Download the license or the source code of a library from the FLIR identiFINDER R300
to your computer.
Data Schemata
This section (Figure 201, p. 183) offers the XML schemata describing the *.xml iles you can
download or send from your FLIR identiFINDER R300.
Home (p. 179) ä Resources (p. 182) ä Data Schemata
The schemata help you to interpret the iles and to develop your own software for further
processing the iles.
identiFINDER® R300/en/2014.4(13623)/Feb2015
183
8.3. General (Web Page)
FLIR Detection
Download
Download a schema from the FLIR identiFINDER R300 to your computer.
8.3
General (Web Page)
Settings (p. 180) ä General
This web page (Figure 202, p. 185) provides access to various settings of the FLIR
identiFINDER R300 for inspection or editing.
To transfer your changes to the FLIR identiFINDER R300, click Save .
8.3.1
Measurement
Settings (p. 180) ä General (p. 184) ä Measurement
This web page section (Figure 202, p. 185) lets you inspect or edit settings related to the measurement of gamma radiation.
You can access these settings on the instrument as well. Please ind the details about the settings
in chapter “FLIR identiFINDER R300 Reference” under
Options Menu (p. 103) ä Dose Rate Settings (p. 159)
Options Menu (p. 103) ä Finder Settings (p. 157)
Options Menu (p. 103) ä More Options (p. 103) ä Advanced Options (p. 104) ä Data Logging (p. 104) ä Automated Mode Settings (p. 135)
8.3.2
Identi cation
Settings (p. 180) ä General (p. 184) ä Identi cation
This web page section (Figure 202, p. 185) lets you inspect or edit settings regarding measurement
and presentation of identi ication results.
You can access these settings on the instrument as well. Please ind the details about the settings
in chapter “FLIR identiFINDER R300 Reference” under
Options Menu (p. 103) ä More Options (p. 103) ä Identi cation Options (p. 103) ä Identi cation Settings (p. 116)
184
identiFINDER® R300/en/2014.4(13623)/Feb2015
FLIR Detection
8. Using the FLIR identiFINDER R300 Web Server
.
Figure 202. General Settings web page
identiFINDER® R300/en/2014.4(13623)/Feb2015
185
8.4. GPS and Clock (Web Page)
8.3.3
FLIR Detection
User Interface
Settings (p. 180) ä General (p. 184) ä User Interface
This web page section (Figure 202, p. 185) lets you inspect or edit settings regarding the screen and
keyboard of the FLIR identiFINDER R300.
You can access these settings on the instrument as well. Please ind the details about the settings
in chapter “FLIR identiFINDER R300 Reference” under
Options Menu (p. 103) ä More Options (p. 103) ä Advanced Options (p. 104) ä General Options (p. 104) ä Display Settings (p. 122)
8.4
GPS and Clock (Web Page)
Settings (p. 180) ä GPS and Clock
This settings web page lets you inspect and specify GPS location and clock settings of the FLIR
identiFINDER R300.
.
GPS
This web page section (Figure 203, p. 187) lets you inspect and edit GPS settings of the FLIR
identiFINDER R300.
Settings (p. 180) ä GPS and Clock (p. 186) ä GPS
Options Menu (p. 103) ä More Options (p. 103) ä Advanced Options (p. 104) ä General Options (p. 104) ä GPS Settings (p. 127)
Options Menu (p. 103) ä More Options (p. 103) ä Advanced Options (p. 104) ä Maintenance (p. 104) ä Show Status (p. 130)
. GPS
.
Switch the GPS receiver On or Off.
If the GPS receiver is on and the reception is good enough, the GPS coordinates of the
current location are stored with measurement results.
If the GPS reception is not good enough, for example inside buildings, the current location cannot be determined. If a location could be determined from GPS data since you
switched on the FLIR identiFINDER R300, the last valid location is used. Otherwise, the
position of the intersection of the Greenwich Meridian with the Equator is used (0° N,
0° E).
Additionally, the clock of the FLIR identiFINDER R300 is set according to the highprecision time received from the GPS satellites.
.
Save
.
Transfer your changes to the FLIR identiFINDER R300.
.
GPS Coordinates
The current location of the FLIR identiFINDER R300, if GPS is on and receives satellite
data.
186
identiFINDER® R300/en/2014.4(13623)/Feb2015
FLIR Detection
8. Using the FLIR identiFINDER R300 Web Server
.
Figure 203. The GPS and Clock settings web page
. GeoHack
Look Up with
.
Sends the shown GPS coordinates to the GeoHack page on the Wikimedia
Toolserver, a free service of Wikimedia Deutschland e.V. (Internet access required).
The service links to international servers of maps, satellite images, aerial photographs etc. which cover the coordinates saved with your record.
identiFINDER® R300/en/2014.4(13623)/Feb2015
187
8.5. Alarm (Web Page)
FLIR Detection
.
Clock
This web page section (Figure 203, p. 187) lets you inspect and edit settings for the clock of
the FLIR identiFINDER R300.
Settings (p. 180) ä GPS and Clock (p. 186) ä Clock
Options Menu (p. 103) ä More Options (p. 103) ä Advanced Options (p. 104) ä General Options (p. 104) ä Clock Settings (p. 125)
. t
Time Zone
.
Select your time zone from the list built into the FLIR identiFINDER R300. Time zones
are speci ied as offset from UTC/GMT.
Periods for daylight savings time, however, might be different for the same offset from
UTC in various regions. To have the FLIR identiFINDER R300 consider the correct daylight savings time for your time zone, make sure to check the region info when selecting
the offset.
.
Save
.
Transfer your changes to the FLIR identiFINDER R300.
. Time
Current
The current time of the FLIR identiFINDER R300 and your computer.
. to Computer Time
Set Instrument Clock
.
If the FLIR identiFINDER R300 does not get the current time via GPS, you can set
the internal clock by setting it to the current time of your computer.
8.5
Alarm (Web Page)
Settings (p. 180) ä Alarm
This web page (Figure 204, p. 189) provides access to alarm settings of the FLIR identiFINDER R300
for inspection or editing.
. .
To transfer your changes to the FLIR identiFINDER R300, click Save
.
8.5.1
Alarm Indicators
Settings (p. 180) ä Alarm (p. 188) ä Alarm Indicators
This web page section (Figure 204, p. 189) lets you switch the alarm indicators of the FLIR
identiFINDER R300 on or off.
You can access these settings on the instrument as well. Please ind the details about the settings
in chapter “FLIR identiFINDER R300 Reference” under
Options Menu (p. 103) ä Alarm Options (p. 105) ä Alarm Indicators (p. 160)
188
identiFINDER® R300/en/2014.4(13623)/Feb2015
FLIR Detection
8. Using the FLIR identiFINDER R300 Web Server
Available only for variants equipped with a neutron detector.
Av
Figure 204. Alarm Settings web page
8.5.2
Gamma Alarms
Settings (p. 180) ä Alarm (p. 188) ä Gamma Alarms
This web page section (Figure 204, p. 189) lets you inspect or set the thresholds for gamma alarms
and warnings.
identiFINDER® R300/en/2014.4(13623)/Feb2015
189
8.6. Connectivity (Web Page)
FLIR Detection
You can access these settings on the instrument as well. Please ind the details about the settings
in chapter “FLIR identiFINDER R300 Reference” under
Options Menu (p. 103) ä Alarm Options (p. 105) ä Dose Alarm Thresholds (p. 161)
Options Menu (p. 103) ä Alarm Options (p. 105) ä Dose Rate Alarm Thresholds (p. 162)
8.5.3
Neutron Alarms
This item is available for FLIR identiFINDER R300 variants with a neutron detector (see A.1,
p. 237).
Settings (p. 180) ä Alarm (p. 188) ä Neutron Alarms
This web page section (Figure 204, p. 189) lets you inspect or set the thresholds for neutron alarms
and warnings.
You can access these settings on the instrument as well. Please ind the details about the settings
in chapter “FLIR identiFINDER R300 Reference” under
Options Menu (p. 103) ä Alarm Options (p. 105) ä Neutron Alarm Thresholds (p. 163)
8.6
Connectivity (Web Page)
Settings (p. 180) ä Connectivity
This web page (Figure 205, p. 191) comprises various settings of the FLIR identiFINDER R300 related to local and remote network connections.
. .
To transfer your changes to the FLIR identiFINDER R300, click Save
.
8.6.1
Local Area Network
Settings (p. 180) ä Connectivity (p. 190) ä Local Area Network
This web page section (Figure 205, p. 191) lets you con igure the connection of the FLIR
identiFINDER R300 to a local area network.
You can access these settings on the instrument as well. Please ind the details about the settings
in chapter “FLIR identiFINDER R300 Reference” under
Options Menu (p. 103) ä More Options (p. 103) ä Advanced Options (p. 104) ä Connectivity Options (p. 104) ä Network (p. 152)
It is recommended to restart your FLIR identiFINDER R300 after changing network settings.
If the FLIR identiFINDER R300 is currently connected to an external device, you have to
reestablish the connection according to the new settings.
190
identiFINDER® R300/en/2014.4(13623)/Feb2015
FLIR Detection
8. Using the FLIR identiFINDER R300 Web Server
.
Figure 205. Connectivity Settings web page
identiFINDER® R300/en/2014.4(13623)/Feb2015
191
8.7. Bluetooth SPP Settings (Web Page)
8.6.2
FLIR Detection
Remote Server
Settings (p. 180) ä Connectivity (p. 190) ä Remote Server
This web page section (Figure 205, p. 191) lets you con igure the connection of the FLIR
identiFINDER R300 to a remote server via Bluetooth Dial-Up Networking.
You can access these settings on the instrument as well. Please ind the details about the settings
in chapter “FLIR identiFINDER R300 Reference” under
Options Menu (p. 103) ä More Options (p. 103) ä Advanced Options (p. 104) ä Connectivity Options (p. 104) ä Remote Server Settings (p. 149)
8.6.3
Reports
Settings (p. 180) ä Connectivity (p. 190) ä Reports
This web page section (Figure 205, p. 191) lets you con igure the contents of reports generated by
the FLIR identiFINDER R300.
You can access these settings on the instrument as well. Please ind the details about the settings
in chapter “FLIR identiFINDER R300 Reference” under
Options Menu (p. 103) ä More Options (p. 103) ä Advanced Options (p. 104) ä Connectivity Options (p. 104) ä Report Settings (p. 153)
8.6.4
Download Options
Settings (p. 180) ä Connectivity (p. 190) ä Download Options
This web page section (Figure 205, p. 191) lets you specify the type of the iles to be downloaded
from the FLIR identiFINDER R300 to a connected computer.
You can access these settings on the instrument as well. Please ind the details about the settings
in chapter “FLIR identiFINDER R300 Reference” under
Options Menu (p. 103) ä More Options (p. 103) ä Advanced Options (p. 104) ä Connectivity Options (p. 104) ä Download Settings (p. 154)
8.7
Bluetooth SPP Settings (Web Page)
This item is available for FLIR identiFINDER R300 variants with Bluetooth (see A.1, p. 237).
Settings (p. 180) ä Bluetooth SPP Settings
This section automatically forwards to the Bluetooth SPP Options web page (see 8.7.1, p. 192).
8.7.1
Bluetooth SPP Settings (Web Page)
This item is available for FLIR identiFINDER R300 variants with Bluetooth (see A.1, p. 237).
Settings (p. 180) ä Bluetooth SPP Settings (p. 192) ä Bluetooth SPP Settings
192
identiFINDER® R300/en/2014.4(13623)/Feb2015
FLIR Detection
8. Using the FLIR identiFINDER R300 Web Server
This web page (Figure 206, p. 193) allows you to enable and con igure the Bluetooth SPP mode.
.
Figure 206. Bluetooth Settings web page
. then selecting
If Enable SPP. Protocol is set to On
. Now
Discover
.
will make the FLIR
identiFINDER R300 discoverable over Bluetooth for the Discovery. timeout period.
SPP .PIN displays the current PIN for connecting to the FLIR identiFINDER R300 via Bluetooth SPP
mode. The PIN may be edited.
. after disconnect is set to Off
. then discovery of the FLIR
If Enable discovery mode
identiFINDER R300 via Bluetooth will be disabled after a connection is terminated.
. .
To transfer your changes to the FLIR identiFINDER R300, click Save
.
You can access these settings on the instrument as well. Please ind the details about the settings
in chapter “FLIR identiFINDER R300 Reference” under
Options Menu (p. 103) ä More Options (p. 103) ä Bluetooth SPP (p. 104) ä Bluetooth SPP Status (p. 141) ä Bluetooth SPP Settings (p. 142)
8.8
Nuclides (Web Page)
Settings (p. 180) ä Nuclides
This web page (Figure 207, p. 194) lets you inspect and change nuclide data.
identiFINDER® R300/en/2014.4(13623)/Feb2015
193
8.9. Backup (Web Page)
FLIR Detection
Figure 207. Nuclide Settings web page
You can access these settings on the instrument as well. Please ind the details about the settings
in chapter “FLIR identiFINDER R300 Reference” under
Options Menu (p. 103) ä More Options (p. 103) ä Identi cation Options (p. 103) ä Nuclide Visibility (p. 118)
Options Menu (p. 103) ä More Options (p. 103) ä Identi cation Options (p. 103) ä Nuclide Usage (p. 119)
Options Menu (p. 103) ä More Options (p. 103) ä Identi cation Options (p. 103) ä Nuclide Severity (p. 120)
The severity of some nuclides is ixed. In these cases, the menu to set the severity is inactive.
To transfer your changes to the FLIR identiFINDER R300, click Save .
8.9
Backup (Web Page)
Settings (p. 180) ä Backup
This web page (Figure 208, p. 195) lets you backup and restore the complete settings of the FLIR
identiFINDER R300.
194
identiFINDER® R300/en/2014.4(13623)/Feb2015
FLIR Detection
8. Using the FLIR identiFINDER R300 Web Server
.
Figure 208. Backup web page
The instrument’s settings are saved in an *.xml ile. You can inspect or edit this ile with common
text editors supporting UTF-8 or with specialized XML editors.
The settings in the ile are grouped into several categories and embedded comments help you ind
your way around.
1
2
3
4
5
6
7
8
9
10
11
12
13
14
15
16
17
18
19
20
21
<?xml version=”1.0” encoding=”utf-8”?>
<settings modelnumber=”nanoRaider ZH” serialnumber=”103156000000”>
<category name=”Display”>
...
</category>
<category name=”Alarm Indications”>
<!--Are warnings and alarms reported by the beeper?-->
<setting name=”SoundAlarmIndication” value=”True” />
<!--Are warnings and alarms reported by the vibrator?-->
<setting name=”VibratorAlarmIndication” value=”True” />
<!--Are warnings and alarms reported by LEDs?-->
<setting name=”LightsAlarmIndication” value=”True” />
</category>
<category name=”Feedback”>
...
</category>
<category name=”Nuclide”>
<setting name=”Ag-110m” value=”True” />
<setting name=”Ag-110m-Usage” value=”IND” />
<setting name=”Ag-110m-Severity” value=”Innocent” />
<setting name=”Am-241” value=”True” />
to be continued…
identiFINDER® R300/en/2014.4(13623)/Feb2015
195
8.9. Backup (Web Page)
FLIR Detection
22
<setting name=”Am-241-Usage” value=”IND” />
23
<setting name=”Am-241-Severity” value=”Threatening” />
24 ...
25
<setting name=”Xe-133” value=”True” />
26
<setting name=”Xe-133-Usage” value=”MED” />
27
<setting name=”Xe-133-Severity” value=”Innocent” />
28
</category>
29 </settings>
You can use this ile, for example, to
• backup the settings and restore them after you experiment with various settings on the instrument,
• document the settings used in your team, or
• distribute identical settings to several instruments used in your team.
Uploaded settings iles may be incomplete, that is, they may contain only some settings. Using
this method, you can distribute some settings to several instruments while other settings
remain unchanged on the individual instrument.
.
Backup
The name of a settings ile starts with the serial number of the instrument.
.
… Settings.xml
.
Download the settings ile to your computer.
.
Restore
Specify a settings ile to be uploaded to your FLIR identiFINDER R300.
Settings .File […]
.
Enter the path to the settings ile.
.
Browse…
.
Use your computer’s standard method to choose a settings ile.
.
Upload
.
Transfer the ile to the FLIR identiFINDER R300.
The software of the FLIR identiFINDER R300 will check the formal integrity of the ile
you uploaded.
If the uploaded ile contains, for example, syntax errors or unknown settings, the
complete ile will be rejected and the settings of the instrument will remain unchanged.
In other words: you cannot damage the FLIR identiFINDER R300 by uploading a wrong
or corrupt ile. You can, however, upload a ile with settings making no sense for your
ield of application.
196
identiFINDER® R300/en/2014.4(13623)/Feb2015
FLIR Detection
8. Using the FLIR identiFINDER R300 Web Server
If the settings ile contains data for settings not supported on your FLIR
identiFINDER R300, the setting will be accepted but is obviously meaningless.
You will be informed about success or failure after the upload.
Reset Factory Settings
Discard all changes you made to any of the FLIR identiFINDER R300’s settings and reestablish
the settings made at the factory.
The password (see 2.2.7, p. 46), if any, is reset to the factory setting as well.
8.10
Bulk Download (Web Page)
Data (p. 180) ä Bulk Download
This web page lets you download all or a selection of the data saved in your FLIR
identiFINDER R300’s database to your computer (Figure 209, p. 198). The records matching certain criteria will be wrapped into a *.zip archive and downloaded.
Date Selection
Limit the records to be downloaded by their saving date (in ISO 8601 notation).
A pop-up calendar helps you to enter the dates.
Several buttons are available to enter common date combinations ( Today , Last Week ,
etc.).
Start Date […]
The date of the oldest record to be downloaded. Leave this ield empty to get the oldest
record available in the database of the FLIR identiFINDER R300.
End Date […]
The date of the youngest record to be downloaded. Leave this ield empty to get the
youngest record available in the database of the FLIR identiFINDER R300.
Data Types
Limit the records to be downloaded by their type.
The actual collection of available types depends on the variant of your FLIR
identiFINDER R300.
4 Identi cations
Include identi ication results in the archive.
4 Spectra
Include spectra in the archive.
4…
Include other data types in the archive.
identiFINDER® R300/en/2014.4(13623)/Feb2015
197
8.10. Bulk Download (Web Page)
FLIR Detection
Figure 209. Bulk download web page
After you have checked a box, the number of records matching the data selection
criteria is shown.
Download
Initiate the download.
The name of the downloaded *.zip archive begins with the serial number
of the FLIR identiFINDER R300 followed by the type of contents, for example
103156000000 Bulk Download.zip
Depending on the con iguration of your web browser, the archive will be downloaded to your
standard download folder or your browser will ask you to name a destination folder and a
ile name.
The downloaded archive contains folders for every data type. These folders contain folders for
the available ile formats of that type. The actual data iles have the same names as if they were
downloaded individually.
198
identiFINDER® R300/en/2014.4(13623)/Feb2015
FLIR Detection
8. Using the FLIR identiFINDER R300 Web Server
1 103156000000 Bulk Download:
2
Alarms:
3
Alarms.txt
4
Identifications:
5
ANSI N42.42 2006:
6
Identification 1002.ANSI N42.42 2006.n42
7
Identification 1003.ANSI N42.42 2006.n42
8
ANSI N42.42 2012:
9
Identification 1002.ANSI N42.42 2012.n42
10
Identification 1003.ANSI N42.42 2012.n42
11
spc:
12
Identification 1002.Measurement.spc
13
Identification 1003.Measurement.spc
14
spe:
15
Identification 1002.Measurement.spe
16
Identification 1003.Measurement.spe
17
Screenshots:
18
IdentifyScreen_D20121227_T224932+00_00.png
19
DoseRateScreen_D20121227_T224900+00_00.png
20
Spectra:
21
ANSI N42.42 2006:
22
Spectrum 1010.ANSI N42.42 2006.n42
23
Spectrum 1014.ANSI N42.42 2006.n42
24
ANSI N42.42 2012:
25
Spectrum 1010.ANSI N42.42 2012.n42
26
Spectrum 1014.ANSI N42.42 2012.n42
27
spc:
28
Spectrum 1010.Measurement.spc
29
Spectrum 1014.Measurement.spc
30
spe:
31
Spectrum 1010.Measurement.spe
32
Spectrum 1014.Measurement.spe
8.11
Identi cations (Web Page)
Data (p. 180) ä Identi cations
This web page (Figure 210, p. 200) tabulates the identi ication results stored in the FLIR
identiFINDER R300’s database (For the navigation of tables refer to section 2.4.2, p. 55).
The table shows several columns for every record:
Nº.
The arbitrary reference number of the record.
. on
Saved
The date and time of storage of the record.
.
Type
The trigger of the identi ication measurement.
Manual
You saved the measurement manually (see 4.3, p. 90).
Auto The measurement was triggered by the automated mode (see 4.4, p. 93).
identiFINDER® R300/en/2014.4(13623)/Feb2015
199
8.11. Identi cations (Web Page)
FLIR Detection
Available only for
Av
variants equipped with
a neutron detector.
Figure 210. Table of identi ication result records
Neutron Alarm ©
Shows whether a neutron alarm was raised during the measurement this identi ication result
is based upon.
Available only for variants equipped with a neutron detector.
Show
Open a page showing details (see 8.11.1, p. 200) of the record.
8.11.1
Identi cation Details (Web Page)
Details of a single record are shown on an individual page (Figure 211, p. 201) which you can open
from the table of records (Figure 210, p. 200) by clicking
Show .
For the navigation of records and other common elements of record pages refer to section 2.4.3,
p. 56.
200
identiFINDER® R300/en/2014.4(13623)/Feb2015
FLIR Detection
8. Using the FLIR identiFINDER R300 Web Server
Available only for variants equipped with a neutron detector.
Figure 211. Details of an identi ication result record
To download the shown record, click Download and follow the directions given by your web
browser.
identiFINDER® R300/en/2014.4(13623)/Feb2015
201
8.12. Spectra (Web Page)
FLIR Detection
The name of the downloaded *.zip archive begins with the serial number of the FLIR
identiFINDER R300 followed by the type and the reference number of the record, for example
103156000000 Identification 4711.zip
The downloaded archive contains iles in several formats. The ile names comprise the type of data
and the reference number of the record.
Identification 4711.ANSI N42.42 2006.n42
An XML ile according to ANSI N42.42 2006 (p. 269) containing instrument information, the
identi ication result, and the measured spectrum.
Identification 4711.ANSI N42.42 2012.n42
An XML ile according to ANSI N42.42 2012 (p. 269) containing instrument information, the
identi ication result, and the measured spectrum.
Identification 4711.Measurement.spc
A text ile containing instrument information, the identi ication result and the measured
spectrum.
Identification 4711.Measurement.spe
A text ile containing instrument information, the identi ication result and the measured
spectrum.
8.12
Spectra (Web Page)
Data (p. 180) ä Spectra
This web page (Figure 212, p. 203) tabulates the spectra stored in the FLIR identiFINDER R300’s
database (For the navigation of tables refer to section 2.4.2, p. 55).
The table shows several columns for every record:
Nº
The arbitrary reference number of the record.
Start Time
The beginning of data acquisition of the spectrum.
Saved on
The date and time of storage of the record.
Real Time
The real time of data acquisition of the spectrum.
Show
Open a page showing details (see 8.12.1, p. 203) of the record.
202
identiFINDER® R300/en/2014.4(13623)/Feb2015
FLIR Detection
8. Using the FLIR identiFINDER R300 Web Server
Figure 212. Table of spectrum records
8.12.1
Spectrum Details (Web Page)
Details of a single record are shown on an individual page (Figure 213, p. 205) which you can open
from the table of records (Figure 212, p. 203) by clicking
Show .
For the navigation of records and other common elements of record pages refer to section 2.4.3,
p. 56.
To download the shown record, click Download and follow the directions given by your web
browser.
The name of the downloaded *.zip archive begins with the serial number of the FLIR
identiFINDER R300 followed by the type and the reference number of the record, for example
103156000000 Spectrum 4711.zip
The downloaded archive contains iles in several formats. The ile names comprise the type of data
and the reference number of the record.
identiFINDER® R300/en/2014.4(13623)/Feb2015
203
8.12. Spectra (Web Page)
FLIR Detection
Spectrum 4711.ANSI N42.42 2006.n42
An XML ile according to ANSI N42.42 2006 (p. 269) containing instrument information and
the measured spectrum.
Spectrum 4711.ANSI N42.42 2012.n42
An XML ile according to ANSI N42.42 2012 (p. 269) containing instrument information and
the measured spectrum.
Spectrum 4711.Measurement.spc
A text ile containing instrument information and the measured spectrum.
Spectrum 4711.Measurement.spe
A text ile containing instrument information and the measured spectrum.
204
identiFINDER® R300/en/2014.4(13623)/Feb2015
FLIR Detection
8. Using the FLIR identiFINDER R300 Web Server
Available only for variants equipped with a neutron detector.
Figure 213. Details of a spectrum record
identiFINDER® R300/en/2014.4(13623)/Feb2015
205
8.13. Alarms (Web Page)
8.13
FLIR Detection
Alarms (Web Page)
Data (p. 180) ä Alarms
This web page (Figure 214, p. 206) tabulates the alarms and warnings stored in the FLIR
identiFINDER R300’s database (For the navigation of tables refer to section 2.4.2, p. 55).
.
Figure 214. Table of alarm records
The table shows several columns for every record:
Nº.
The arbitrary reference number of the record.
.
Beginning
The date and time the alarm was raised.
.
Duration
The duration of the alarm. If the instrument was switched off during the alarm, the duration
is not given.
206
identiFINDER® R300/en/2014.4(13623)/Feb2015
FLIR Detection
8. Using the FLIR identiFINDER R300 Web Server
Type
The type of alarm or warning.
Value
The quantity which increased above the alarm threshold.
Show
Open a page showing details (see 8.13.1, p. 207) of the record.
8.13.1
Alarm Details (Web Page)
Details of a single record are shown on an individual page (Figure 215, p. 207) which you can open
from the table of records (Figure 214, p. 206) by clicking
Show .
For the navigation of records and other common elements of record pages refer to section 2.4.3,
p. 56.
Figure 215. Details of an alarm record
8.14
Screenshots (Web Page)
Data (p. 180) ä Screenshots
This web page (Figure 216, p. 208) lists the screenshots saved in the database of the FLIR
identiFINDER R300 (see 2.2.8, p. 49, cf 7.2, p. 170).
identiFINDER® R300/en/2014.4(13623)/Feb2015
207
8.15. Live Screen (Web Page)
FLIR Detection
.
Figure 216. Table of screenshots
After you hold the pointer over the name of a screenshot ile for a moment, the screenshot will
appear in an overlay.
To download a screenshot ile to your computer, click its name and follow the directions given by
your web browser.
8.15
Live Screen (Web Page)
Live Screen
This web page re lects the screen of your FLIR identiFINDER R300 (Figure 217, p. 209). The image
is updated every 2 seconds.
You can operate your FLIR identiFINDER R300 with the instrument keyboard (see 2.2, p. 32) or by
clicking the buttons in the web page image.
208
identiFINDER® R300/en/2014.4(13623)/Feb2015
FLIR Detection
8. Using the FLIR identiFINDER R300 Web Server
Figure 217. The FLIR identiFINDER R300’s screen live in the web interface
Be patient when clicking or pressing buttons. Your actions are recognized but the image is
refreshed only every other second.
8.16
Live Spectrum (Web Page)
Live Spectrum
Options Menu (p. 103) ä More Options (p. 103) ä Spectrum (p. 106)
The main feature of this web page (Figure 218, p. 210) is the live spectrum chart.
The live spectrum shown here is independent from the spectrum you can view on the FLIR
identiFINDER R300 (see 6.2, p. 106).
Buttons above the chart provide commands to acquire and manage spectra, buttons below the chart
in luence the display of the data.
identiFINDER® R300/en/2014.4(13623)/Feb2015
209
8.16. Live Spectrum (Web Page)
FLIR Detection
Available only for variants
equipped with a neutron
detector.
Figure 218. Empty live spectrum page
210
identiFINDER® R300/en/2014.4(13623)/Feb2015
FLIR Detection
8. Using the FLIR identiFINDER R300 Web Server
.
Start
.
Starts the acquisition of data.
The FLIR identiFINDER R300 interrupts other operations during the acquisition. You
will be noti ied on the instrument’s screen (see 4.5, p. 95).
The spectrum chart and the information shown below the chart are updated every second
(Figure 219, p. 213).
The current spectrum is not cleared before recording data, that is, new measurements
. comare added to the existing spectrum. To record a pristine spectrum, use the Clear
.
mand irst (see below).
The acquisition of spectrum data does not stop if you navigate to another web page or even
disconnect the FLIR identiFINDER R300 from the computer. The acquisition of spectrum data
stops in one of the following events:
. .
• You end the acquisition with Stop
.
. (see 4.5, p. 95).
• You end the acquisition on the instrument with Stop
We recommend to stop data acquisition before you exit the live spectrum to relieve the
FLIR identiFINDER R300 from processing spectrum data.
.
Stop
.
Stops the acquisition of data.
.
Clear
.
Clears the spectrum.
This command clears the current spectrum but does not stop the current acquisition of
data, if any.
.
Identify
.
Applies the identi ication algorithm to the current spectrum. The result is shown above the
chart (Figure 220, p. 214).
The identi ication result is stored in the FLIR identiFINDER R300’s database. The reference
numbers of identi ication results saved during this live spectrum session are shown in a section below the chart.
.
Save
.
Saves the current spectrum into the database of the FLIR identiFINDER R300. The reference
numbers of spectra saved during this live spectrum session are shown in a section below the
chart.
. Logarithmic
.
Switches to logarithmic scaling along the vertical axis of the spectrum chart.
identiFINDER® R300/en/2014.4(13623)/Feb2015
211
8.16. Live Spectrum (Web Page)
FLIR Detection
. Linear
.
Switches to linear scaling (the default) along the vertical axis of the spectrum chart.
. Square Root
.
Switches to square root scaling along the vertical axis of the spectrum chart.
212
identiFINDER® R300/en/2014.4(13623)/Feb2015
FLIR Detection
8. Using the FLIR identiFINDER R300 Web Server
!!Acquisition Status
Available only for variants
equipped with a neutron
detector.
Figure 219. Live spectrum page during data acquisition
identiFINDER® R300/en/2014.4(13623)/Feb2015
213
8.16. Live Spectrum (Web Page)
FLIR Detection
Available only for variants
equipped with a neutron
detector.
Figure 220. Identi ication results of a live spectrum
214
identiFINDER® R300/en/2014.4(13623)/Feb2015
FLIR Detection
8.17
8. Using the FLIR identiFINDER R300 Web Server
Software Update (Web Page)
Administration (p. 181) ä Software Update
This web page (Figure 221, p. 215) lets you load iles onto your FLIR identiFINDER R300 for software updates. The FLIR identiFINDER R300 will recognize the uploaded ile and process it as described in B.2, p. 255.
.
Figure 221. File upload web page
Software. Update
Specify the ile to be uploaded.
Selected. File […]
.
Enter the path to the ile.
.
Browse…
.
Use your computer’s standard method to choose a ile.
.
Upload
.
Upload the ile to the FLIR identiFINDER R300.
8.18
Password (Web Page)
Administration (p. 181) ä Password
You can change the administrator password (see 2.4.6, p. 60) on this web page (Figure 222, p. 216).
Password .of user “x”
Enter the current password for the given user and the new password twice.
identiFINDER® R300/en/2014.4(13623)/Feb2015
215
8.19. System Files (Web Page)
FLIR Detection
Figure 222. Web page to change the administrator password
Save
Transfer your changes to the FLIR identiFINDER R300.
8.19
System Files (Web Page)
Administration (p. 181) ä System Files
This web page (Figure 223, p. 217) lets you download or delete log iles from your FLIR
identiFINDER R300. These logs are created in certain circumstances and might help our service
and support personnel to identify problems.
Available Files
This section (Figure 223, p. 217) lists the available iles.
The collection of available iles depends on the history of your instrument. Not all of the
iles shown in Figure 223, p. 217 are always available on all instruments.
Delete
Delete the listed system ile from the FLIR identiFINDER R300.
Download
Download the listed system ile to your computer.
216
identiFINDER® R300/en/2014.4(13623)/Feb2015
FLIR Detection
8. Using the FLIR identiFINDER R300 Web Server
.
Figure 223. System iles web page
identiFINDER® R300/en/2014.4(13623)/Feb2015
217
FLIR Detection
9. Sending Data to a Remote Server
Chapter 9
Sending Data to a Remote Server
The FLIR identiFINDER R300 can transfer data via the Internet to a remote server for further processing like reachback analysis, archival or whatever process is implemented on the server, see
Figure 224, p. 219 for a possible scenario.
REMOTE SERVER
ANSI N42.42 Data
*.n42 File
process
archive
s
ces
pro
ard
forw
Database
Formatted Reports
(*.pdf, *.html, …),
*.spc Spectra Files,
Charts, Summaries
I N T E R N E T
HTTP POST
E-Mail
Browse
Figure 224. A possible scenario for remote handling of FLIR identiFINDER R300 data
identiFINDER® R300/en/2014.4(13623)/Feb2015
219
9.1. Internet Connection
FLIR Detection
The FLIR identiFINDER R300 uploads data in a ile formatted according to ANSI N42.42
2006 (p. 269) via a standard HTTP POST command, so all a server has to do is to process this ile.
You can develop your own server software (ask us (see B.4, p. 257) for the technical details and a
reference example) or have us build server software tailored to your needs.
The HTTP URI (e.g. http://n42.example.com/reachback ) of the remote server running the
software to accept and handle the data sent by the FLIR identiFINDER R300 has to be stored in the
instrument’s settings under
Options Menu (p. 103) ä More Options (p. 103) ä Advanced Options (p. 104) ä Connectivity Options (p. 104) ä Remote Server Settings (p. 149)
Settings (p. 180) ä Connectivity (p. 190) ä Remote Server (p. 192)
The protocol (http) is part of the URI, that is, you can change it to https for secure transfer
if required.
https connections require a trusted SSL certi icate on the server.
Protocols other than http or https are not supported.
The FLIR identiFINDER R300 will transfer data to this address with a HTTP POST command using
these parameters:
serialnumber
The serial number of the FLIR identiFINDER R300
reachbackfile
The ANSI N42.42-formatted data ile
To check the ile contents locally, you can download a ile with the same contents via the
web interface (see 8, p. 179).
To verify proper reception of the data sent, the instrument checks for a success message (a X-
ReachbackSuccess HTTP header) or an error message (a X-ReachbackError HTTP header with
the error message as the header’s value).
In case of an error, the FLIR identiFINDER R300 shows this message on the screen.
9.1
Internet Connection
You can connect the FLIR identiFINDER R300 to the Internet via a computer already connected (see
8, p. 179) or by tethering your cell phone to the FLIR identiFINDER R300 (Figure 225, p. 221), which
is possible if
• your cell phone supports Dial-Up Networking (DUN) via Bluetooth,
220
identiFINDER® R300/en/2014.4(13623)/Feb2015
FLIR Detection
9. Sending Data to a Remote Server
Server
Internet
Cell Phone with Dial-Up
Networking Support
Computer
connected to
the Internet
FLIR identiFINDER R300
Figure 225. Connection for uploading FLIR identiFINDER R300 data to a remote server
• your phone carrier provides the necessary infrastructure and data plan.
To set up the connection you need the correct credentials and access information provided by your
cell phone carrier, in particular
User Name
The user name and
Password
the password for the dial up connection. Both can be omitted with some carriers which use
other means for authentication, for example your SIM card.
Connection String
Settings specifying the connection, for example
+CGDCONT=1,”IP”,”web.example.com”.
Phone Number
The number for data connections, for example *99***1#.
Ô To con gure your FLIR identiFINDER R300 for sending data to a remote server…
These steps are required once for a given combination of cell phone carrier and remote
server.
1. Collect the required setup information (see above) from your cell phone carrier or your IT
administrator.
2. Enter the setup information into the FLIR identiFINDER R300 (see 6.24, p. 149)
3. Enter the operator’s (your) name and voice phone in the FLIR identiFINDER R300 (see 6.27,
p. 153) so they can be included in reports to be sent.
identiFINDER® R300/en/2014.4(13623)/Feb2015
221
9.1. Internet Connection
FLIR Detection
Entering these values is much more convenient via the web interface (see 8, p. 179).
Ô To prepare for sending data…
These steps are required before actually sending data for the irst time after you switch
on your FLIR identiFINDER R300.
1. Place you cell phone in the vicinity of your FLIR identiFINDER R300.
2. Pair your cell phone with the FLIR identiFINDER R300 (see 6.23.3, p. 144).
All the settings mentioned above are necessary to send data to a remote server. If any item is
missing, you will be prompted to enter it when you actually want to send data.
222
identiFINDER® R300/en/2014.4(13623)/Feb2015
FLIR Detection
10. Connecting via Satellite Phone
Chapter 10
Connecting via Satellite Phone
The FLIR identiFINDER R300 can also transmit data using a Bluetooth™ DUN connection with a
satellite phone. In order to utilize this method of transport, the FLIR identiFINDER R300 must be
paired to a Bluetooth-to-Serial converter that is connected to the satellite phone and con igured to
properly connect to the phone and a reachback server.
10.1
Pairing the FLIR identiFINDER R300 to a Satellite Phone
Currently, the Iridium™ 9505A satellite phone with Iridium data adapter and Parani SD1000
Bluetooth-to-Serial adapter have been veri ied with the FLIR identiFINDER R300 but other satellite
phones and adapters may also work. Contact our service department for more information.
Ô To pair with the satellite phone…
1. Connect the Parani SD1000 Bluetooth-to-Serial adapter connected to the Iridium 9505A
satellite phone.
2. Using a pin, press and hold the adapter’s recessed Pairing button for two seconds then release.
While the LED is lashing in a triple lash pattern, the adapter is discoverable.
3. Place the device in the vicinity of the FLIR identiFINDER R300. The maximum range is 10 m
(33 ft) but could be less depending on the environment.
4. From Dose Rate mode on the FLIR identiFINDER R300, press the right button to access the
Options menu then navigate to Bluetooth Periphery and select it:
Options Menu (p. 103) ä More Options (p. 103) ä Advanced Options (p. 104) ä Connectivity Options (p. 104) ä Bluetooth Periphery
Note: If the ”SPP Enabled” screen appears then you must irst disable Bluetooth SPP
mode at:
Options Menu (p. 103) ä More Options (p. 103) ä Bluetooth SPP (p. 104) ä Bluetooth SPP Status (p. 141) ä Bluetooth SPP
Settings
Once Bluetooth SPP is disabled (if necessary), return to Bluetooth Periphery using the
irst part of this step before continuing.
identiFINDER® R300/en/2014.4(13623)/Feb2015
223
10.1. Pairing the FLIR identiFINDER R300 to a Satellite Phone
FLIR Detection
5. If the FLIR identiFINDER R300 has not yet been paired with any Bluetooth device, it will begin the search immediately so continue to the next step. If the FLIR identiFINDER R300 has
previously been paired with another device, then the Bluetooth device selection screen will
appear (Figure 226, p. 224). Select Change device then select Search from the next screen
(Figure 227, p. 224) to initiate a search for discoverable Bluetooth devices.
Figure 226. Select ”Change Device” if an unwanted device is paired
Figure 227. ”Prepare your Bluetooth devices…” appears after selecting ”Change device”
6. Wait a few moments while the FLIR identiFINDER R300 searches for Bluetooth devices supporting the required protocol (Figure 228, p. 224).
Figure 228. Searching for Bluetooth devices
224
identiFINDER® R300/en/2014.4(13623)/Feb2015
FLIR Detection
10. Connecting via Satellite Phone
If the FLIR identiFINDER R300 is unable to detect any compatible Bluetooth devices it
will report ”Search Failed” (Figure 228, p. 224). Ensure the SD1000 LED is still lashing in a triple lash pattern and that the devices are within the maximum range. If the
devices are more than a few meters apart then move them closer, if possible. Select
Search to restart the search for discoverable Bluetooth devices and repeat this step.
Figure 229. No Bluetooth devices detected
7. Once the Search completes with at least one compatible Bluetooth device selected it will
report the identi ication screen of all detected devices (Figure 230, p. 225). Choose the
SD1000…
device from the list (Figure 230, p. 225) with Down then press Select to pair.
The device names are listed exactly as received from the detected devices and the name
of the SD1000 may differ from what is shown in the screenshot.
Figure 230. Detected SD1000 device entry chosen
8. Choose the
Choose 1234
PIN option (Figure 231, p. 226) then press Select to pair.
identiFINDER® R300/en/2014.4(13623)/Feb2015
225
10.1. Pairing the FLIR identiFINDER R300 to a Satellite Phone
FLIR Detection
Figure 231. Selecting a PIN for the pairing of Bluetooth devices
9. An information screen (Figure 232, p. 226) will be shown for a short time while pairing is in
progress.
Figure 232. Bluetooth Periphery Information: Pairing is in progress...
If pairing fails then an error message (Figure 233, p. 226) will be displayed. Make sure
the satellite phone and SD1000 are powered on, correctly con igured, and still within
range of the FLIR identiFINDER R300, then try again.
Figure 233. Pairing to a Bluetooth device failed
10. After a successful pairing, the FLIR identiFINDER R300 will display information about the
paired Bluetooth device in the Device Details screen (Figure 234, p. 227). Verify that the
FLIR identiFINDER R300 has established the Connection as ”Dial-Up Network” as shown in
226
identiFINDER® R300/en/2014.4(13623)/Feb2015
FLIR Detection
10. Connecting via Satellite Phone
this screen then select Exit . The FLIR identiFINDER R300 is now connected to the satellite
phone via the paired SD1000.
Figure 234. The Device Details indicates successfull pairing
Keep the satellite phone (and SD1000) and the FLIR identiFINDER R300 within 10 m (33 ft)
of each other during use. In some environments, the devices may need to be kept even closer
than this limit to maintain the pairing.
10.2
Con guring Remote Server Settings for the Satellite Phone
Although the previous section connected the FLIR identiFINDER R300 to the satellite phone, settings must still be established for accessing the satellite phone and the reachback server. These
settings are in the Remote Server Settings and may be established on the instrument directly (see
6.24, p. 149) or, more ef iciently, through the web interface (see 8.6.2, p. 192).
Options Menu (p. 103) ä More Options (p. 103) ä Advanced Options (p. 104) ä Connectivity Options (p. 104) ä Remote Server Settings (p. 149)
Settings (p. 180) ä Connectivity (p. 190) ä Remote Server (p. 192)
User Name:
directinternet
Password:
directinternet
Connection String:
Connection string for satellite phone service provider
Phone Number:
DUN Access Number for the satellite phone (from the service provider)
identiFINDER® R300/en/2014.4(13623)/Feb2015
227
10.2. Con guring Remote Server Settings for the Satellite Phone
FLIR Detection
HTTP. URI:
URI (web address) of a reachback server
The protocol (http) is part of the URI, that is, you can change it to https for secure
transfer if required.
https connections require a trusted SSL certi icate on the server.
Protocols other than http or https are not supported.
228
identiFINDER® R300/en/2014.4(13623)/Feb2015
FLIR Detection
11. Powering the FLIR identiFINDER R300
Chapter 11
Powering the FLIR identiFINDER R300
The FLIR identiFINDER R300 comes with a rechargeable battery as internal power source which
can be replaced only by our service (B.4, p. 257).
11.1
External Power Sources
You can connect the FLIR identiFINDER R300 to external power sources via the Mini-USB-B connector (Figure 5, p. 26), for example to a
• wall mounted power supply (use the Mini-USB-B to USB-A cable included with the FLIR
identiFINDER R300, Figure 1, p. 21)
• USB port of a computer (use the Mini-USB-B to USB-A cable included with the FLIR
identiFINDER R300, Figure 1, p. 21)
• car adapter (use the Mini-USB-B to USB-A cable included with the FLIR identiFINDER R300,
Figure 1, p. 21)
Please refer to section 7.1, p. 168 for information about plugging and unplugging cables.
The FLIR identiFINDER R300 draws a current of approximately 400 mA. Before connecting to
a computer, please make sure the USB outlet of the computer complies with this requirement.
This might not be the case with some laptops, netbooks or similar battery powered devices.
While the FLIR identiFINDER R300 is connected to an external power source, the green LED (Figure 5, p. 26) is on. You can run the instrument from external power and charge the batteries.
Compared to a USB power source, charging the FLIR identiFINDER R300 is a lot faster when
you use the power supply of the FLIR identiFINDER R300 because it supplies a much higher
current than a host conforming to the USB standard.
identiFINDER® R300/en/2014.4(13623)/Feb2015
229
11.2. Charging the FLIR identiFINDER R300
11.1.1
FLIR Detection
Wall Mounted Power Supply
The power supply can handle common international AC voltages and frequencies. It features a
swappable adaptor for various international receptacles (Figure 235, p. 230, Figure 236, p. 230)
Press Here
Figure 235. Power Supply: Removing the international adapter
Figure 236. Power Supply: Attaching an international adapter
11.2
Charging the FLIR identiFINDER R300
You can charge the built-in battery by connecting the FLIR identiFINDER R300 to an external power
source.
230
identiFINDER® R300/en/2014.4(13623)/Feb2015
FLIR Detection
11. Powering the FLIR identiFINDER R300
Ô To charge the batteries in the FLIR identiFINDER R300…
1. Use the power supply to connect the FLIR identiFINDER R300 to a wall outlet or equivalent
power source.
or
Use the auto adapter to connect the FLIR identiFINDER R300 to an appropriate power source.
or
Connect the FLIR identiFINDER R300 to a computer.
Charging is a lot faster when you use the power supply of the FLIR identiFINDER R300
because it supplies a much higher current than a host conforming to the USB standard.
2. Observe the power indicator (see 2.1, p. 29) if the FLIR identiFINDER R300 is running while
charging.
11.2.1
Charging Durations
Shortest charging durations are achieved with
• the FLIR identiFINDER R300 switched off and
• the FLIR identiFINDER R300 connected to the wall mounted power supply shipped with the
FLIR identiFINDER R300.
Under these conditions, charging takes about 3 hours.
We recommend leaving the power supply connected for a longer time, for example over night,
if circumstances allow.
Charging the batteries will take longer, if
• the FLIR identiFINDER R300 is switched on, or
• the FLIR identiFINDER R300 is powered by a USB-connected computer because the power
supply of the FLIR identiFINDER R300 supplies a much higher current than a host conforming
to the USB standard.
If the batteries are completely discharged, we recommend to charge them while the FLIR
identiFINDER R300 is switched off. Wait at least 15 min after connecting the power adapter
before you switch on the instrument.
When reliable batteries with higher capacity become available, we will build them into our
products. This will increase the run time and also the charging duration.
11.3
Battery Power Saving Tips
In order to prolong the runtime of the FLIR identiFINDER R300’s batteries, you can avoid certain
operations or optimize some settings for reduced power consumption.
identiFINDER® R300/en/2014.4(13623)/Feb2015
231
11.3. Battery Power Saving Tips
FLIR Detection
This section lists those features of your FLIR identiFINDER R300 that need a lot of energy but might
not be necessary all the time or for all ields of application.
The list begins with the more energy-demanding features and proceeds to the frugal ones.
Backlight Brightness and Timeout
The backlight of the screen draws a signi icant amount of power. Reduce the backlight brightness (see 6.9, p. 122) to what you really need in your environment.
Let the backlight time out after the shortest period of inactivity (see 6.9, p. 122) convenient
for your work low.
A status icon on the screen keeps you posted about the current energy saving options
(see 2.1, p. 30).
GPS Receiver
Switch off the GPS receiver (see 6.11, p. 127) if you don’t need coordinates to be saved with,
for example, identi ication results or spectra.
Switch off the GPS receiver while you work at places with poor or no GPS reception (inside
buildings, in mines, etc.).
Communication via Bluetooth
Send data to remote servers (see 9, p. 219) only when necessary.
The Bluetooth hardware draws power only while you communicate with remote servers.
You don’t have to explicitly switch it off.
Finder Mode
Return to the Dose Rate Mode from the Finder Mode when you don’t need it anymore (see
4.2, p. 88).
Spectrum Acquisition
Stop the data acquisition for spectra (see 6.2, p. 106) when you don’t need it anymore.
Other functions draw extra power as well, but are irrelevant in this context. The web server,
for example, is active only while the FLIR identiFINDER R300 is connected to an external
power source anyway.
232
identiFINDER® R300/en/2014.4(13623)/Feb2015
FLIR Detection
12. Accessories for the FLIR identiFINDER R300
Chapter 12
Accessories for the FLIR identiFINDER R300
This chapter gives an overview of the various accessories available for the FLIR identiFINDER R300;
some are included with certain variants, others are sold separately.
12.1
Source Set
The source set (sold separately) is a collection of radiation sources for calibration, testing or training purposes.
.
Figure 237. Source set (sold separately)
Source sets are available in the variants shown in the table below, each set comprising 8 plastic
disks containing radionuclides bonded as chloride.
identiFINDER® R300/en/2014.4(13623)/Feb2015
233
12.1. Source Set
FLIR Detection
Nuclide
Activity [Bq]
Peaks of Interest [MeV]
1
133 Ba
37000
0.081 0.276 0.303 0.356 0.384
2
152 Eu
37000
0.121 0.244 0.344 0.562 0.826
RSS8
0.963 1.082 1.109 1.408
3
137 Cs
37000
0.662
4
22 Na
37000
0.511 1.275
5
54 Mn
37000
0.835
6
57 Co
37000
0.122 0.136
7
60 Co
37000
1.173 1.333
137 Cs
18500
0.662
65 Zn
37000
0.511 1.115
1
133 Ba
37000
0.081 0.276 0.303 0.356 0.384
2
152 Eu
37000
0.121 0.244 0.344 0.562 0.826
3
137 Cs
9250
4
22 Na
37000
0.511 1.275
5
54 Mn
37000
0.835
6
57 Co
37000
0.122 0.136
7
60 Co
37000
1.173 1.333
8
109 Cd
37000
0.088
8
Mix
RSS8EOD2
0.963 1.082 1.109 1.408
0.662
RSS8EOD3
1
133 Ba
37000
0.081 0.276 0.303 0.356 0.384
2
152 Eu
37000
0.121 0.244 0.344 0.562 0.826
3
137 Cs
3700
4
22 Na
37000
0.511 1.275
5
54 Mn
37000
0.835
6
57 Co
37000
0.122 0.136
7
60 Co
37000
1.173 1.333
8
109 Cd
37000
0.088
0.963 1.082 1.109 1.408
0.662
RSS8EOD4
1
133 Ba
37000
0.081 0.276 0.303 0.356 0.384
2
152 Eu
37000
0.121 0.244 0.344 0.562 0.826
0.963 1.082 1.109 1.408
to be continued…
234
identiFINDER® R300/en/2014.4(13623)/Feb2015
FLIR Detection
12. Accessories for the FLIR identiFINDER R300
… continuation
Nuclide
Activity [Bq]
3
137 Cs
Peaks of Interest [MeV]
3700
4
22 Na
37000
0.511 1.275
5
54 Mn
37000
0.835
6
57 Co
37000
0.122 0.136
7
60 Co
37000
1.173 1.333
8
109 Cd
37000
0.088
0.662
RSS8EOD5
1
133 Ba
37000
0.081 0.276 0.303 0.356 0.384
2
152 Eu
18500
0.121 0.244 0.344 0.562 0.826
3
137 Cs
3700
4
22 Na
18500
0.511 1.275
5
54 Mn
37000
0.835
6
57 Co
37000
0.122 0.136
7
60 Co
18500
1.173 1.333
8
109 Cd
37000
0.088
0.963 1.082 1.109 1.408
0.662
identiFINDER® R300/en/2014.4(13623)/Feb2015
235
FLIR Detection
A. Info Pool
Appendix A
Info Pool
A.1
identiFINDER R 300: Speci cations
Several variants of this product are available.
A. identiFINDER R 300 nanoRaider Z
Cadmium zinc telluride (CdZnTe) detector
B. identiFINDER R 300 nanoRaider ZH
Cadmium zinc telluride (CdZnTe) detector; 3He tube
Speci ications relevant for certain variants only are labeled with the variant.
Detectors
Gamma: CdZnTe
Three crystals; 15 mm (0.59 in) × 13 mm
(0.51 in) × 5 mm (0.20 in); ±5 %
Neutrons: 3He Proportional Counter Tube
B.
15 mm (0.59 in) × 54 mm (2.13 in); net: 14 mm
GPS
66-channel MediaTek MT3329 receiver;
(0.55 in) × 29 mm (1.14 in); 8 atm (8.106 bar)
sensitivity >-165 dBm
Performance
Energy Range (Gamma); Dose Rate Channel
51 keV – 3 MeV
Energy Range (Gamma); Identi ication
30 keV – 3 MeV
Channel
Throughput; Dose Rate Channel
≤250 kcps
Throughput; Identi ication Channel
≤180 kcps
Sensitivity ( 137Cs); Identi ication Channel
≥0.47 cps per 10 nSv/h
Sensitivity (
137
Cs); Dose Rate Channel
Gamma Spectrum
≥0.81 cps per 10 nSv/h
1024 channels; 3 MeV
to be continued…
identiFINDER® R300/en/2014.4(13623)/Feb2015
237
A.1. identiFINDER R 300: Speci cations
FLIR Detection
… continuation
Dose Rate Range
≤100 nSv/h – 10 mSv/h (≤10 μrem/h –
1.0 rem/h);
Dose Rate Accuracy (
137
±30 %
Cs)
Overload Threshold
Neutron Sensitivity
5 mSv/h
B.
2.6 cps/nv; ±20 %
Nuclide Identi ication
According to ANSI N42.48
Typical Resolution
≤3.5 % FWHM at 662 keV at 25 °C (77 °F)
ambient temperature
Service
Recommended Interval
5a
Physical
Dimensions (W × D × H)
70.3 mm (2.77 in) × 33.8 mm (1.33 in) ×
125.5 mm (4.94 in)
Weight
A.
340 g (11.99 oz)
Weight
B.
370 g (13.05 oz)
Housing Material
Aluminium
Environmental
Operating Temperature
-20 °C – +50 °C (-4 °F – +122 °F)
Storage Temperature
+10 °C – +35 °C (+50 °F – +95 °F)
Temperature Change
Temperature change must not exceed 8.4 °C
(15.1 °F)/min
Relative Humidity
10 % – 93 %, non condensing
Shock Resistance
According to ANSI N42.48-2008
Protection Rating
IP63 according to IEC 60529
Battery
Type
Internal (Li-ion, single cell, rechargeable)
Capacity
1950 mAh; 3.7 V; 25 °C (77 °F)
Battery Life
300 – 500 full charge-discharge cycles; 3 a – 5 a
Charging Duration
≤3 h at 25 °C (77 °F) when instrument off and
connected to AC power charger and >5.5 h when
powered via USB.
Operating Duration
≥24 h at 25 °C (77 °F) in dose rate mode with
dimmed display back light and GPS switched off
Display
Type
Trans lective color LCD
to be continued…
238
identiFINDER® R300/en/2014.4(13623)/Feb2015
FLIR Detection
A. Info Pool
… continuation
Size
55.88 mm (2.20 in); 320 pixel × 240 pixel
Central Luminance
400 cd/m2 typically
Annunciators
Blue LED
B.
Neutron detection and alarm
Red LED
Gamma alarm
Green LED
Power status
Vibrator
Alarm reporting
Beeper
Alarm reporting
Memory
Data Storage Capacity
2 GB internal memory; 1800 MB available for the
user
Identi ications incl. Spectrum
≈600000
Screenshots
≈2500
Alarms
≈1000000
Input, Output
USB
USB 2.0; mini-B socket
Bluetooth
≤50 m (164.04 ft) range
Software
Embedded Software
Microsoft Windows CE Operating System
Web Interface
TCP/IP emulated via USB
IPv4
DHCP server included; subnet con igurable
IPv6
ULA routing pre ix fde6:e89e:44bc::/48 with
device speci ic subnet
Download File Formats
ANSI N42.42 and spc iles compatible with
third-party analysis software applications such
as GADRAS, Cambio, or PeakEasy
Reachback
ANSI N42.42 data via HTTP
Accessories
DC Power Adapter, Charger
AC in: 100 V – 230 V; 50 Hz – 60 Hz; DC out: 5 V;
2A
Car Power Adapter, Charger
DC in: 12 V – 24 V; DC out: 5 V; 2 A
Connection Cable
Mini USB-B – USB-A; 1.83 m (6.00 ft)
Holster
60 g (2.12 oz)
Carrying Case
Included
to be continued…
identiFINDER® R300/en/2014.4(13623)/Feb2015
239
A.1. identiFINDER R 300: Speci cations
FLIR Detection
… continuation
Standards
ANSI N42.48
Performance Requirements for Spectroscopic
Personal Radiation Detectors (SPRDs) for
Homeland Security
IEC 60529
Degrees of Protection Provided by Enclosures
(IP Code)
EMC - Directive 2004/108/EC
Regulations concerning electromagnetic
compatibility
FCC Part 15
Regulations concerning electromagnetic
compatibility
ANSI N42.42 2006
Data format standard for radiation detectors
used for Homeland Security
240
identiFINDER® R300/en/2014.4(13623)/Feb2015
FLIR Detection
A.2
A. Info Pool
Detector Positions
Detector Crystals ( )
Optional 3He Tube (Neutrons)
Figure 238. Position of the detector centers of the FLIR identiFINDER R300
identiFINDER® R300/en/2014.4(13623)/Feb2015
241
A.3. Optimum Illumination of Detector Crystals
A.3
FLIR Detection
Optimum Illumination of Detector Crystals
15 cm
(6 in)
Source
Detector Crystals ( )
Figure 239. Optimal dose rate calculation needs a uniform illumination of the three detector crystals, for which
the source to detector distance should be at least 15 cm (6 in) (drawn to scale).
242
identiFINDER® R300/en/2014.4(13623)/Feb2015
FLIR Detection
A.4
A. Info Pool
Unmanned Neutron Detection
For unmanned measurements involving un-moderated neutron sources, a 30 cm × 30 cm ×
15 cm PMMA phantom (Figure 240, p. 243) or equivalent must be placed between the source
and the detector in the FLIR identiFINDER R300 (Figure 238, p. 241) in order to provide adequate moderation of fast neutrons and to simulate ield operation instructions in section
3.2.2, p. 71.
.
Figure 240. Recommended setup for unmanned measurements of fast neutrons
identiFINDER® R300/en/2014.4(13623)/Feb2015
243
A.5. Certi cates
FLIR Detection
A.5
Certi cates
A.5.1
FLIR identiFINDER R300: Manufacturer’s declaration of conformity (CE)
.
244
identiFINDER® R300/en/2014.4(13623)/Feb2015
FLIR Detection
A.6
A. Info Pool
Bluetooth Serial Port Pro le (SPP) Communication Overview
While the FLIR identiFINDER R300 has Bluetooth Serial Port Pro ile (SPP) enabled (see 6.23.1,
p. 141) and is connected to a compatible device it will respond to properly formatted queries and
can also stream data. This allows integrators to design custom interfaces and for operators to use
such interfaces to either listen for or inquire about current instrument status. The following is a
description of the FLIR identiFINDER R300 SPP data format.
The following does not apply to Bluetooth Periphery mode and only applies to Bluetooth SPP
mode.
A.6.1
Bluetooth Device Name and PIN
A unique Bluetooth device name for each FLIR identiFINDER R300 is set during manufacture and
can be provided upon request. Each FLIR identiFINDER R300 will also have a unique PIN (see
6.23.1, p. 141) made up of 16 characters selected from lower-case English alphabet characters (a-z)
and numerals (0-9).
A.6.2
Data Format
The FLIR identiFINDER R300 is capable of responding to commands from a device connected via
a Bluetooth SPP connection. In addition, the FLIR identiFINDER R300 can be con igured to stream
data in response to an environmental or user trigger. The commands and triggers are explained in
the following sections.
A.6.3
Conventions and Usage Notes
The format of the commands and responses make up a complete and well-formatted XML document, including the XML declaration. The character encoding of these messages shall be UTF-8 and
shall not include a byte order marker (BOM).
The NUL character is represented in this document’s example listings in C-style notation as
\0. It is a single standard byte with the character value of zero.
For the purposes of this speci ication, any number of NUL (\0) bytes contained within the XML message is illegal, since NUL is used as the message delimiter after the completed XML. Every message
shall be terminated with the NUL character.
XML tags are case sensitive.
identiFINDER® R300/en/2014.4(13623)/Feb2015
245
A.6. Bluetooth Serial Port Pro le (SPP) Communication Overview
FLIR Detection
Only one command should be sent before receiving a response. If no response is received after 15
seconds, it can be assumed the command was lost or the FLIR identiFINDER R300 is in an unresponsive state.
The example listings use colored text and other font effects for emphasis. This is not part
of the XML message. Line breaks and indentation are also for ease of reading and are not
required.
The XML messages make extensive use of AttributeName=AttributeValue pairs. Each AttributeName in the de ined messages is ixed and will be shown verbatim in the example listings.
However, there is typically more than one possible value for an AttributeValue. Listings will sometimes show placeholder text for an AttributeValue in blue similar to: (PlaceholderText). In actual
usage, placeholder text will be replaced with the appropriate text or numerical value.
When a literal value is used in an example instead of placeholder text, it will be shown in red text
such as in this attribute pair: encoding=”utf-8” (See Listing A.1). However, keep in mind that
the literal value shown may be only one of several possible values for that AttributeValue. In many
cases, other possible values will be enumerated in the description after the listing.
A.6.4
General Command Format
Command messages are sent to the FLIR identiFINDER R300 and will be of the general format
shown in Listing A.1:
Listing A.1. General Command Format
1
2
3
4
5
< ? xml v e r s i o n = ” 1.0 ” e n c o d i n g = ” utf -8 ” ? >
< C o m m a n d n a m e = ”(CommandName)” >
< A r g u m e n t n a m e = ”(ArgName)” v a l u e = ”(ArgValue)” / >
…
< / C o m m a n d >\0
Line 1: XML Declaration
The XML declaration is the same for all messages and should be verbatim as shown on Line
1.
Line 2: Command element
A command message will contain one Command element as the root element. How a command
message will be parsed and what (if any) Argument child elements will be expected and interpreted are determined by the name attribute of the Command element, shown in the example
with the (CommandName) placeholder value.
246
identiFINDER® R300/en/2014.4(13623)/Feb2015
FLIR Detection
A. Info Pool
Lined 3: Argument element(s)
A command message may contain zero, one or multiple Argument elements as children to the
root element. Any Argument elements will each have two attribute speci ications in the form
of attribute name, attribute value pairs.
ArgName
Each Argument element will have a name attribute, shown in the example with the
(ArgName) placeholder value.
ArgValue
Each Argument element will also have a value attribute, shown in the example with
the (ArgValue) placeholder value.
Line 4
The ellipsis in this example are not part of the actual message and serve to indicate additional
Argument elements may be allowed for a command.
Line 5
The root Command element is closed, completing the XML portion of the message.
The message is then terminated with the NUL character at the end of line 5. This is not part of
the XML speci ication, but is required by the FLIR identiFINDER R300 as a message delimiter.
A.6.5
General Update Format
Update messages are sent from the FLIR identiFINDER R300 as a response to a command or triggered by an event or user setting and will be of the following general format:
Listing A.2. General Update Format
1
2
3
4
5
< ? xml v e r s i o n = ” 1.0 ” e n c o d i n g = ” utf -8 ” ? >
< U p d a t e n a m e = ”(CommandName)” t y p e = ”nanoRaider” id = ”(SerialNumber)” >
< P r o p e r t y n a m e = ”(PropertyName)” v a l u e = ”(PropertyValue)”
u n i t s = ”(PropertyUnits)” / >
…
< / U p d a t e >\0
Line 1: XML Declaration
The XML declaration is the same for all messages.
Line 2: Update element
The message will will contain one Update element as the root element.
identiFINDER® R300/en/2014.4(13623)/Feb2015
247
A.6. Bluetooth Serial Port Pro le (SPP) Communication Overview
FLIR Detection
name
What Property child elements will be present are determined by the name attribute,
shown in the example with the (CommandName) placeholder value. Update messages
will contain the same (CommandName) as the command message they are in response
to.
type The type attribute indicates the device class sending the message. For the FLIR
identiFINDER R300 this will be ”nanoRaider” .
id
The id attribute, shown in the example with the (SerialNumber) placeholder, will contain the unique serial number of the FLIR identiFINDER R300 sending the message.
The id attribute value may contain non-numerical characters. For example, the
serial number may contain a dash.
Line 3
An Update message may contain zero, one or multiple Property elements as children to the
root element. Property elements will normally have have two or three attribute speci ications in the form of attribute name, attribute value pairs.
name
Each Property element will have a name attribute, shown in the example with the
(PropertyName) placeholder value.
value
Each Property element will also have a value attribute, shown in the example with
the (PropertyValue) placeholder value.
units Some Property elements will also have a units attribute, shown in the example with
the (PropertyUnits) placeholder value.
Line 4
The ellipsis in this example are not part of the actual message and serve to indicate additional
Argument elements may be allowed for an Update message.
Line 5
The root Update element is closed, completing the XML portion of the message.
The message is then terminated with the NUL character at the end of line 5. This is not part of
the XML speci ication, but is required by the FLIR identiFINDER R300 as a message delimiter.
A.6.6
General Error Format
Error messages sent from the FLIR identiFINDER R300 will be of the following general format:
Listing A.3. General Error Format
1
< ? xml v e r s i o n = ” 1.0 ” e n c o d i n g = ” utf -8 ” ? >
248
identiFINDER® R300/en/2014.4(13623)/Feb2015
FLIR Detection
2
A. Info Pool
< E r r o r n a m e = ”(CommandName)” t y p e = ”nanoRaider” id = ”(SerialNumber)”
d e s c r i p t i o n = ”(ErrorDescription)” / >\0*
Line 1: XML Declaration
The XML declaration is the same for all messages.
Line 2: Error element
The message will will contain one Error element as the root element.
name
An error message will contain the same (CommandName) present in the command
message it is in response to. This is true even if the (CommandName) was invalid.
This may also be ”(unknown)” if the FLIR identiFINDER R300 was unable to parse a
command element from the XML message.
type The type attribute indicates the device class sending the message. For the FLIR
identiFINDER R300 this will be ”nanoRaider” .
description
The description attribute, shown in the example with the (ErrorDescription) placeholder, will contain a brief textual description of the error condition and/or cause. The
following are examples of some actual error descriptions:
”Unknown command.”
”Malformed XML message received.”
”Spectra id 416 does not exist.”
A.7
SPP Commands and Updates
A.7.1
Ping
The Ping command will generate a Ping update from the FLIR identiFINDER R300. This can be used
to verify SPP communication is functional and to determine the device serial number.
Listing A.4. Ping Command
1
2
< ? xml v e r s i o n = ” 1.0 ” e n c o d i n g = ” utf -8 ” ? >
< C o m m a n d n a m e = ” P i n g ” / >\0
The Ping command should be verbatim as shown in the listing.
Listing A.5. Ping Update
1
2
< ? xml v e r s i o n = ” 1.0 ” e n c o d i n g = ” utf -8 ” ? >
< U p d a t e n a m e = ” P i n g ” t y p e =”nanoRaider” id = ”(SerialNumber)” / >\0
*
Test footnote.
identiFINDER® R300/en/2014.4(13623)/Feb2015
249
A.7. SPP Commands and Updates
FLIR Detection
Line 1: XML Declaration
The XML declaration is the same for all messages.
Line 2: Update element
The message will will contain one Update element as the root element.
name
A Ping update will always report ”Ping”” as the name attribute.
type The type attribute indicates the device class sending the message. For the FLIR
identiFINDER R300 this will be ”nanoRaider” .
The root Update element is closed, completing the XML portion of the message.
The message is then terminated with the NUL character at the end of line 2. This is not part
of the XML speci ication, but is required by the FLIR identiFINDER R300 as a message delimiter.
A.7.2
Status
A Status update message can be queried through the command speci ied below or is periodically
transmitted during the presence of a radiation or low battery alarm.
Listing A.6. Status Command
1
2
< ? xml v e r s i o n = ” 1.0 ” e n c o d i n g = ” utf -8 ” ? >
< C o m m a n d n a m e = ” S t a t u s ” / >\0
Listing A.7. Example Status Update
1
2
3
4
5
6
7
8
9
10
11
12
13
14
15
16
17
< ? xml v e r s i o n = ” 1.0 ” e n c o d i n g = ” utf -8 ” ? >
< U p d a t e n a m e = ” S t a t u s ” t y p e = ”nanoRaider” id = ”(SerialNumber)” >
< P r o p e r t y n a m e = ” B a t t e r y L e v e l ” v a l u e = ” 53 ” u n i t s = ” pct ” / >
< Property name =” Stabilization ” value =” true ” / >
< Property name =” GMMode ” value =” true ” / >
< P r o p e r t y n a m e = ” D o s e R a t e ” v a l u e = ” 10 ” u n i t s = ” µ r e m / h ” / >
< P r o p e r t y n a m e = ” C o u n t s ” v a l u e = ” 100 ” u n i t s = ” c o u n t s ” / >
< P r o p e r t y n a m e = ” N e u t r o n R a t e ” v a l u e = ” 10 ” u n i t s = ” cps ” / >
< Property name =” OperatingMode ” value =” Finder ” / >
< P r o p e r t y n a m e = ” D o s e R a t e W a r n i n g T h r e s ” v a l u e = ” 27 ” u n i t s = ” µ r e m / h ” / >
< Property name =” DoseRateAlarmThres ” value =” 20000 ” units =” µrem /h” / >
< P r o p e r t y n a m e = ” D o s e W a r n i n g T h r e s ” v a l u e = ” 27 ” u n i t s = ” m r e m ” / >
< Property name =” DoseAlarmThres ” value =” 20000 ” units =” mrem ” / >
< P r o p e r t y n a m e = ” N e u t r o n R a t e W a r n i n g T h r e s ” v a l u e = ” 27 ” u n i t s = ” cps ” / >
< P r o p e r t y n a m e = ” N e u t r o n R a t e A l a r m T h r e s ” v a l u e = ” 2 0 0 0 0 ” u n i t s = ” cps ” / >
< Property name =” GPSValid ” value =” true ” / >
< P r o p e r t y n a m e = ” L o n g i t u d e ” v a l u e = ” - 8 4 . 2 6 2 5 ” u n i t s = ” deg ” / >
250
identiFINDER® R300/en/2014.4(13623)/Feb2015
FLIR Detection
18
19
20
21
22
23
24
25
26
27
28
29
30
< Property
< Property
< Property
< Property
< Property
< Property
< Property
< Property
< Property
< Property
< Property
< Property
< / U p d a t e >\0
A. Info Pool
n a m e = ” L a t i t u d e ” v a l u e = ” 3 6 . 0 1 3 3 3 3 ” u n i t s = ” deg ” / >
n a m e = ” L a s t S p e c t r u m N u m b e r ” v a l u e = ” 53 ” / >
name =” BatteryLow ” value =” false ” / >
name =” Overload ” value =” false ” / >
name =” Alarm ” value =” false ” / >
name =” DoseRateWarning ” value =” false ” / >
name =” DoseRateAlarm ” value =” false ” / >
name =” DoseAlarm ” value =” false ” / >
name =” NeutronCountRateWarning ” value =” false ” / >=
name =” NeutronCountRateAlarm ” value =” false ” / >
name =” SigmaGammaAlarm ” value =” false ” / >
name =” SigmaNeutronAlarm ” value =” false ” / >
Property Elements
As shown, there are multiple Property elements in a Status update.
name
For reliability and future compatibility, a parser should not rely on the order of the
Property elements but should parse the name attribute of each Property element.
value
For each Property element in a status update, the value attribute will be either textual
or numerical. Many of those elements with a textual value attribute indicate a boolean
state with the value being either ”true” or ”false” .
units A units attribute will be included when necessary to interpret a numerical value at-
tributes. Only some Property elements have units.
Line 2:
The (SerialNumber) placeholder in the example will be replaced with the unique serial number of the FLIR identiFINDER R300 sending the message.
Stabilization (Line 4):
Stabilization is only available on models without LED stabilization.
Dose and Dose Rate units
Any dose units will be in either rem or Sievert (Sv) scaled units as required by the FLIR
identiFINDER R300 settings (see 6.31, p. 159). The speci ied base unit for some properties
will be dynamically scaled according to the property value while others are statically scaled
in the FLIR identiFINDER R300 settings.
identiFINDER® R300/en/2014.4(13623)/Feb2015
251
A.7. SPP Commands and Updates
FLIR Detection
Dose units (Lines 12 and 13)
DoseWarningThres and DoseAlarmThres use dose units. The possible scaled rem units
are ”rem” , ”mrem” , ”µrem” , and ”nrem” . The possible scaled Sievert units are ”Sv” ,
”mSv” , ”µSv” , and ”nSv” .
Dose rate units (Lines 6, 10 and 11):
DoseRate, DoseRateWarningThres, and DoseRateAlarmThres use dose rate units. The
possible scaled rem per hour units are ”rem/h” , ”mrem/h” , ”µrem/h” , and ”nrem/h”
. The possible scaled Sieverts per hour units are ”Sv/h” , ”mSv/h” , ”µSv/h” , and
”nSv/h” .
Operating Mode (Line 9):
OperatingMode indicates the current mode the FLIR identiFINDER R300 is operating in. Possible values include: ”DoseRate” , ”Finder” , ”Identify” , or ”Other” .
Neutron Information (Lines 14, 15, 26, 27, and 29):
NeutronRateWarningThres, NeutronRateAlarmThres, NeutronCountRateWarning, NeutronCountRateAlarm, and SigmaNeutronAlarm are only available on instruments that contain an He-3 tube.
Sigma Alarms (Lines 28 and 29):
Sigma alarms are currently available only on R300 products.
A.7.3
Get Spectra
The ”GetSpectra” information can be queried through the command speci ied below or is automatically transmitted upon selection of ”send” on the user interface of the device.
Listing A.8. GetSpectra Command
1
2
3
4
< ? xml v e r s i o n = ” 1.0 ” e n c o d i n g = ” utf -8 ” ? >
< Command name =” GetSpectra ” >
< A r g u m e n t n a m e = ” N u m b e r ” v a l u e = ”(SpectrumNumber)” / >
< / C o m m a n d >\0
Line3: Spectrum Number
If the GetSpectra command has an Argument element then it must contain a name attribute
with a value of ”Number” and a value attribute with a numerical value specifying the record
number of the spectrum to send.
Omit the Argument element to retrieve highest spectrum number.
Listing A.9. GetSpectra Update
1
< ? xml v e r s i o n = ” 1.0 ” e n c o d i n g = ” utf -8 ” ? >
252
identiFINDER® R300/en/2014.4(13623)/Feb2015
FLIR Detection
2
3
4
A. Info Pool
< U p d a t e n a m e = ” G e t S p e c t r a ” t y p e = ”nanoRaider” id = ”(SerialNumber)” >
< P r o p e r t y n a m e = ” S p e c t r a ” v a l u e = ”(base64 encoded n42 file)” / >
< / U p d a t e >\0
Line 3: Spectra
The GetSpectra update will contain a base64 encoded string which can be decoded into an
ANSI N42.42 2006 (p. 269) ile of the requested spectra. The encoded data is represented
in the example listing with the (base64 encoded n42 ile) placeholder. Base64 decoding is
outside the scope of this document.
All commands and updates below this point provide properties that are already contained in
the Status update message. These are to be used if additional granularity is required.
A.7.4
Counts
Listing A.10. Counts Command
1
2
< ? xml v e r s i o n = ” 1.0 ” e n c o d i n g = ” utf -8 ” ? >
< C o m m a n d n a m e = ” C o u n t s ” / >\0
Listing A.11. Counts Update
1
2
3
4
< ? xml v e r s i o n = ” 1.0 ” e n c o d i n g = ” utf -8 ” ? >
< U p d a t e n a m e = ” C o u n t s ” t y p e = ”nanoRaider” id = ”(SerialNumber)” >
< P r o p e r t y n a m e = ” C o u n t s ” v a l u e = ” 100 ” u n i t s = ” c o u n t s ” / >
< / U p d a t e >\0
A.7.5
Dose Rate
Listing A.12. DoseRate Command
1
2
< ? xml v e r s i o n = ” 1.0 ” e n c o d i n g = ” utf -8 ” ? >
< C o m m a n d n a m e = ” D o s e R a t e ” / >\0
Listing A.13. DoseRate Update
1
2
3
4
< ? xml v e r s i o n = ” 1.0 ” e n c o d i n g = ” utf -8 ” ? >
< U p d a t e n a m e = ” D o s e R a t e ” t y p e = ”nanoRaider” id = ”(SerialNumber)” >
< P r o p e r t y n a m e = ” D o s e R a t e ” v a l u e = ” 10 ” u n i t s = ” µ r e m / h ” / >
< / U p d a t e >\0
A.7.6
Neutron Rate
Neutron properties are only available on instruments that contain an He-3 tube.
identiFINDER® R300/en/2014.4(13623)/Feb2015
253
A.7. SPP Commands and Updates
FLIR Detection
Listing A.14. NeutronRate Command
1
2
< ? xml v e r s i o n = ” 1.0 ” e n c o d i n g = ” utf -8 ” ? >
< C o m m a n d n a m e = ” N e u t r o n R a t e ” / >\0
Listing A.15. NeutronRate Update
1
2
3
4
< ? xml v e r s i o n = ” 1.0 ” e n c o d i n g = ” utf -8 ” ? >
< U p d a t e n a m e = ” N e u t r o n R a t e ” t y p e = ”nanoRaider” id = ”(SerialNumber)” >
< P r o p e r t y n a m e = ” N e u t r o n R a t e ” v a l u e = ” 10 ” u n i t s = ” cps ” / >
< / U p d a t e >\0
A.7.7
Serial Number
Listing A.16. SerialNumber Command
1
2
< ? xml v e r s i o n = ” 1.0 ” e n c o d i n g = ” utf -8 ” ? >
< C o m m a n d n a m e = ” S e r i a l N u m b e r ” / >\0
Listing A.17. SerialNumber Update
1
2
< ? xml v e r s i o n = ” 1.0 ” e n c o d i n g = ” utf -8 ” ? >
< U p d a t e n a m e = ” S e r i a l N u m b e r ” t y p e = ”nanoRaider” id = ”(SerialNumber)” / >\0
A.7.8
Other Commands and Updates
Other command and update implementations can be considered upon request. Please feel free to
contact FLIR Detection with any questions or comments.
254
identiFINDER® R300/en/2014.4(13623)/Feb2015
FLIR Detection
B. Maintenance
Appendix B
Maintenance
B.1
Field Maintenance
The FLIR identiFINDER R300 requires neither ield maintenance nor ield calibration. Under no
circumstances should any part of the housing be penetrated or removed.
If necessary, clean the instrument with a dry lint-free cloth.
After certain service intervals (see A.1, p. 237) you should send the FLIR identiFINDER R300
to a service organization (see B.4, p. 257) for preventive maintenance and performance optimization.
B.2
Software Installation
Software like irmware or application updates can be uploaded to the FLIR identiFINDER R300 via
the administration page of the web server (see 8.17, p. 215).
The FLIR identiFINDER R300 accepts uploaded iles only with correct digital signature.
The FLIR identiFINDER R300 displays a message after it received a ile (Figure 241, p. 256). Press
Ignore to discard the ile or Install to install it.
The display keeps you posted about the processing of the ile and the FLIR identiFINDER R300 will
restart after the successful installation.
identiFINDER® R300/en/2014.4(13623)/Feb2015
255
B.3. Storage
FLIR Detection
Figure 241. After uploading a software package
B.3
Storage
The FLIR identiFINDER R300 should be stored in a dry and clean location. If possible, it should be
stored at room temperature.
256
identiFINDER® R300/en/2014.4(13623)/Feb2015
FLIR Detection
B.4
B. Maintenance
After Sales Service and Support
Please keep the serial number and the version information (Figure 3, p. 23, Figure 138, p. 131)
ready when contacting our customer support.
FLIR Detection has service centers throughout the world. To locate your local service center please
refer to the website (detectionsupport.com/radiation/).
FLIR Detection, Inc.
100 Midland Road
Oak Ridge, TN 37830
USA
T + 1.865.220.8700
v + 1.865.220.7181
identiFINDER® R300/en/2014.4(13623)/Feb2015
257
FLIR Detection
C. Nuclide Library
Appendix C
Nuclide Library
The FLIR identiFINDER R300 can identify and report some special radiation sources and a number
of radionuclides as listed in this appendix.
The usage and severity association given in the table represents the factory defaults. You can
adapt the association of nuclides with usage (6.6, p. 119) and severity (6.7, p. 120) to your
particular demands.
The table is sorted by element names and lists the following properties of radiation sources.
• Nuclide name in standard notation
• Nuclide name in simpli ied notation
• Half life
• Severity
I
Innocent
S
Suspicious
T
Threatening
• Usage
NORM: Naturally occurring radioactive material
MED: Medically used material
IND: Industrially used material
SNM: Special nuclear material
NUC: Former name for SNM
• Remarks on occurrence or application
identiFINDER® R300/en/2014.4(13623)/Feb2015
259
C. Nuclide Library
FLIR Detection
Annihilation Radiation
I. Industrially used material
Annihilation
Annihilation radiation is released by the electron-positron extermination caused by the beta+ decay. It has a ixed energy of 511 keV
and is caused by all beta+ radiators. Common examples are 18F (used
for medical applications) or 22Na which also emits gamma radiation.
I. Naturally occurring radioactive material
Background
The ubiquitous background radiation is emitted from a variety of
mostly natural and some arti icial sources such as unstable nuclides
contained in most chemical elements comprising the lithosphere, biosphere, and atmosphere; cosmic radiation from outer space; and
applications of nuclear technology for weapons, power plants and
medicine. The background recorded by an instrument is, of course,
spoiled by non-natural sources present while measuring the background.
T. Special nuclear material
Neutrons
Neutron radiation can have different origins, the most common types
are spontaneous ission sources (e. g.
252
Cf) and alpha emitters
packaged in a low-Z elemental matrix (e. g. Americium-Beryllium,
Americium-Lithium or Plutonium-Beryllium). Both types have a wide
range of applications, including industrial and medical ields. Neutrons can also occur in the vicinity of nuclear power plants driven by
neutrons that collide with the ission material, typically using one of
the above sources.
S. Unknown nuclear material
Unknown
An unknown source of radiation. Further investigations are necessary.
Americium
241
95Am
Am-241
433 a
T. Industrially used material
Most commonly used in smoke detectors and to measure levels of
toxic lead in paint samples. Also used to ensure uniform thickness in
rolling processes like steel and paper production. May be combined
with beryllium or lithium to produce a neutron source.
to be continued…
260
identiFINDER® R300/en/2014.4(13623)/Feb2015
FLIR Detection
C. Nuclide Library
… continuation
Barium
133
56Ba
10.75 a
Ba-133
I. Industrially used material
Used in nuclear medicine for patient attenuation correction during an
imaging technique (i.e. S.P.E.C.T. imaging) for yielding 3D information
of the patient’s internal organs, etc.
Bismuth
207
83Bi
38 a
Bi-207
I. Industrially used material
Principle use is for research and may be found as a by-product of proton reactions with lead.
Cadmium
109
48Cd
463 d
Cd-109
I. Industrially used material
Used to analyze metal alloys when checking stock and also sorting
scrap.
Cesium
134
55Cs
2.07 a
Cs-134
I. Industrially used material
Used as a tracer for radiation leaks. This nuclide is a ission product
in nuclear reactors. It can occur in the radioactive fall-out resulting
137
55Cs
30.07 a
Cs-137
from hazardous incidents in nuclear power plants.
I. Industrially used material
Used as radiotracers to measure and control the liquid low in oil
pipelines and to tell researchers whether oil wells are plugged by
sand. Utilized in density and ill height sensors to ensure the correct
ill level for food, drugs and other products. This nuclide is a ission
product in nuclear reactors. It can occur in the radioactive fall-out
resulting from hazardous incidents in nuclear power plants.
Chromium
51
24Cr
27 d 17 h
Cr-51
I. Industrially used material
Used in research in red blood cell survival studies.
Cobalt
57
27Co
Co-57
272 d
I. Industrially used material
Included in medical in-vitro diagnostic kits, it is commonly used as a
radiological “marker” to estimate organ size.
to be continued…
identiFINDER® R300/en/2014.4(13623)/Feb2015
261
C. Nuclide Library
FLIR Detection
… continuation
60
27Co
5.3 a
Co-60
I. Industrially used material
Used to sterilize surgical instruments and to improve the safety and
reliability of industrial fuel oil burners. Also used in cancer treatment,
food irradiation, industrial gauges and radiography.
Europium
152
63Eu
13.5 a
Eu-152
I. Industrially used material
Used in nuclear reactor control rods. In some countries this nuclide
has been substituted in place of 60Co for radiation therapy.
Gallium
67
31Ga
3d 6h
Ga-67
I. Medically used material
Used to pinpoint infections and tumors. Also used in PET scans for
studying the brain and the heart functions.
Holmium
166m
67Ho
1200 a
Ho-166m
I. Industrially used material
Used in physics experiments and research and can also be used in nuclear control rods used in reactors.
Indium
111
49In
2 d 19 h
In-111
I. Medically used material
Used for special diagnostic studies, e.g. brain studies, infection and
colon transit studies.
Iodine
123
53I
13 h
I. Medically used material
I-123
Used to diagnose thyroid function/dysfunction. Also used in PET
125
53I
scans for studying the brain and the heart functions.
I. Medically used material
60 d
I-125
Used in a medical procedure for detecting hormone levels in the
blood. Used for cancer treatment of the brain and prostate. It is also
used to diagnose deep vein blood clots in the leg, and certain kinds of
131
53I
I-131
8d
kidney maladies.
I. Medically used material
Used for therapy such as imaging the thyroid and treating its related
cancers. Also used to diagnose abnormal liver function, kidney blood
low and urinary tract obstruction. This nuclide is a ission product
in nuclear reactors. It can occur in the radioactive fall-out resulting
from hazardous incidents in nuclear power plants.
to be continued…
262
identiFINDER® R300/en/2014.4(13623)/Feb2015
FLIR Detection
C. Nuclide Library
… continuation
Iridium
192
77Ir
74 d
Ir-192
I. Industrially used material
Temporarily implanted in wire form for use as an internal radiotherapy source in cancer treatment. Also used to test the integrity of
pipeline welds, boilers and aircraft parts.
Manganese
54
25Mn
312 d
Mn-54
I. Industrially used material
Used to study and predict the behavior of heavy metal pollutants
within the out low of waste water from mining operations.
Molybdenum
99
42Mo
2 d 18 h
I. Industrially used material
Used for generating 99mTc.
Mo-99
Neptunium
237
93Np
2.14 Ma
T. Special nuclear material
No major commerical uses except in the production of 238Pu.
Np-237
Plutonium
mix
94Pu
6561 a; 24100 a
Plutonium
T. Special nuclear material
A mixture of
with low
240
Pu and
239
Pu in various concentrations. Mixtures
240
Pu concentration are used to build most nuclear ission
weapons, bombs, and warheads.
Potassium
40
19K
1.277 Ga
K-40
I. Naturally occurring radioactive material
There are no speci ic commercial or medical uses for this isotope of
potassium, but it is occurring naturally. Typical concentrations found
in food deliver 140 μSv/a–180 μSv/a. Higher 40K concentrations can
present a considerable cancer inducing risk.
Radium
226
88Ra
Ra-226
1600 a
I. Naturally occurring radioactive material
A decay product of uranium and thorium, it occurs in virtually all rock,
soil, and water in low concentrations. 20 % of the
226
Ra that is in-
gested via food and water is deposited into the bone. Although this
makes the nuclide dangerous itself, it presents its greatest risk when
it decays into
222
Ra, which is an odorless, tasteless, radioactive gas
that can be inhaled into the lungs.
to be continued…
identiFINDER® R300/en/2014.4(13623)/Feb2015
263
C. Nuclide Library
FLIR Detection
… continuation
Samarium
153
62Sm
47 h
Sm-153
I. Industrially used material
Pharmaceutically marketed as “Quadramet”, it is used for relieving
pain caused by secondary cancers within the bone. Also used for
treating prostate and breast cancer.
Selenium
75
34Se
120 d
Se-75
I. Industrially used material
In the form of seleno-methionine this nuclide is used to investigate
enzyme production in the digestive tract.
Silver
110m
47Ag
249 d 19 h
Ag-110m
I. Industrially used material
Used as a radiotracer for biological and industrial research.
Sodium
22
11Na
2.6 a
Na-22
I. Industrially used material
Used to study the sodium-potassium exchange-dynamic of nerve axons within the nervous systems of living organisms. Also used to locate leaks in industrial pipe lines and in oil well studies.
Technetium
99m
43Tc
6h 1m
Tc-99m
I. Medically used material
Used for imaging the heart muscle, lungs, brain, and the skeletal system. Other uses include imaging the kidney, liver, thyroid, spleen, gall
bladder, salivary and lacrimal glands, and the heart blood pool. It is
also used to investigate other medical issues, like certain types of infections. Also used for tracing sewage and liquid waste movements
within city infrastructures. This nuclide is a ission product in nuclear reactors. It can occur in the radioactive fall-out resulting from
hazardous incidents in nuclear power plants.
Thallium
201
81Tl
Tl-201
3d 1h
I. Medically used material
Used for diagnosing coronary artery disease and other heart problems.
to be continued…
264
identiFINDER® R300/en/2014.4(13623)/Feb2015
FLIR Detection
C. Nuclide Library
… continuation
Thorium
232
90Th
14.05 Ga
232
Th or 232U
I. Naturally occurring radioactive material
Th-232/U-232
Found naturally occurring in abundance within the earth crust, it is
not issile itself, but can be used to generate the issile element 233U.
232
Th is used in gas lantern mantles and WIG welding rods. The spec-
tra of 232Th and 232U are very similar.
Uranium
232
92U
68.9 a
U or 232Th
T. Special nuclear material
U-232/Th-232
233
92U
232
160 ka
U-233
The spectra of 232Th and 232U are very similar.
T. Special nuclear material
Used in nuclear power generators.
Although the United States
demonstrated/detonated in 1955 a 233U based bomb core, the use of
233
U within a weapon is not as viable of a choice for a weapon when
235
92U
704 Ma
U-235
compared to 235U.
T. Special nuclear material
Can be effectively used to manufacture a nuclear ission weapon, and
is a primary concern because the design complexity required is far
238
92U
4.468 Ga
U-238
mix
92U
704 Ma; 4.468 Ga
Uranium
less than that required for a 239Pu based weapon.
T. Special nuclear material
Used as a base material for generating 239Pu.
T. Special nuclear material
A mixture of
238
U and
to highly enriched
235
U in various concentrations from depleted
235
U. Can be effectively used to manufacture a nu-
clear ission weapon, and is a primary concern because the design
complexity required is far less than that required for a
239
Pu based
weapon.
Xenon
133
54Xe
Xe-133
5d 6h
I. Medically used material
133
Xe is used for blood low measurements and to image the heart,
lungs, and brain, for example, by means of tomography.
identiFINDER® R300/en/2014.4(13623)/Feb2015
265
FLIR Detection
D. Glossary
Appendix D
Glossary
This glossary lists terms, units, and abbreviations used throughout this document and provides
a brief explanation. For detailed information consult a textbook or an encyclopedia.
12-Hour Clock
A historic convention in which the 24 hours of the day are split into two halves called ante
meridiem (a.m., “before mid day”) and post meridiem (p.m., “after mid day”). Each half comprises 12 hours numbered: 12 (acting as zero), 1, 2, 3, 4, 5, 6, 7, 8, 9, 10, and 11. (see Table 4,
p. 287, Ú24-Hour Clock)
Table 3. The 12- and 24-hour clock notation.
12-Hour Clock
midnight (begin of day) 12:00 a.m.
12:01 a.m.
12:59 a.m.
1:00 a.m.
2:00 a.m.
⋯
11:00 a.m.
11:59 a.m.
noon 12:00 p.m.
12:01 p.m.
12:59 p.m.
1:00 p.m.
2:00 p.m.
⋯
11:00 p.m.
11:59 p.m.
midnight (end of day)
identiFINDER® R300/en/2014.4(13623)/Feb2015
24-hour Clock
00:00
00:01
00:59
01:00
02:00
⋯
11:00
11:59
12:00
12:01
12:59
13:00
14:00
⋯
23:00
23:59
00:00 (of next day)
267
D. Glossary
FLIR Detection
24-Hour Clock
The ÚISO 8601 convention of time keeping dividing the day running from midnight to midnight into 24 hours. The notation indicates the hours passed since midnight from 0 to 23. (cf
Ú12-Hour Clock)
Also known as: Army Time, Military Time, Astronomical Time, Radio Time, Railway Time,
Continental Time
A
ÚMass Number
𝛼 Particle
ÚAlpha Particle
𝛼 Radiation
ÚAlpha Radiation
Absorbed Dose
The amount of energy deposited in matter by ÚIonizing Radiation given in ÚGray. In contrast
to the ÚEquivalent Dose, the absorbed dose does not differentiate the biological effects of
the ionizing radiation.
Acrylic Glass
ÚPolymethyl Methacrylate
Activity
The number of disintegrations of an excited state in a ÚNucleus per duration given in
ÚBecquerel.
Activity Concentration
ÚSpeci ic Activity
Adjustment
ÚCalibration
Alarm
An audible, visual, or other signal activated when an instrument reading or response exceeds
a preset value or falls outside of a preset range.
Alpha Particle
Two ÚProtons and two ÚNeutrons, strongly bound together. It is the ÚNucleus of the helium
atom 42He. Alpha (𝛼) particles are commonly emitted during the ÚDecay of heavy ÚNuclei.
Also known as: 𝛼 Particle
Alpha Radiation
A ÚParticle Radiation of ÚAlpha Particles. Alpha radiation has a short range in matter, due
to its positive charge and heavy mass, being relatively easy to shield, for example by a sheet
of paper (Figure 245, p. 283). However, it poses a great health hazard when alpha radiators
are ingested by organisms.
268
identiFINDER® R300/en/2014.4(13623)/Feb2015
FLIR Detection
D. Glossary
Also known as: 𝛼 Radiation
American National Standards Institute (ANSI)
An organization that oversees the development of voluntary consensus standards for products, services, processes, systems, and personnel in the USA.
ANSI ÚAmerican National Standards Institute
ANSI N42.42
An ÚXML-based data format standard for radiation detectors used for homeland security.
Sometimes a version is speci ied with the year of release, for example, ANSI N42.42 2006.
ANSI N42.42 formatted iles can be processed and analyzed with third-party software including, for example, applications provided by public institutions such as Cambio and GADRAS
(Sandia National Laboratories, USA, http://www.sandia.gov ), or PeakEasy (Los Alamos
National Laboratory, USA, http://www.lanl.gov ).
Also known as: N42
Army Time
Ú24-Hour Clock
Astronomical Time
Ú24-Hour Clock
Atom The basic unit of matter consisting of a ÚNucleus surrounded by a cloud of ÚElectrons.
Atomic Mass
The mass of a speci ic ÚIsotope, sum of the masses of all ÚProtons, ÚNeutrons (ÚMass Number), and ÚElectrons.
Atomic Mass Number
ÚMass Number
Atomic Number (Z)
The number of ÚProtons in the ÚNucleus of an ÚAtom.
Also known as: Proton Number
𝛽 Particle
ÚBeta Particle
𝛽 Radiation
ÚBeta Radiation
identiFINDER® R300/en/2014.4(13623)/Feb2015
269
D. Glossary
FLIR Detection
Background Radiation
The ubiquitous radiation in the environment, emitted from a variety of mostly natural and a
few man-made sources. Natural sources are terrestrial (ÚDecay of ÚRadionuclides like 235U
or 232Th abundant in the Earth crust) or cosmic (high-energy ÚProtons originating primarily from the Sun interact with the upper Earth atmosphere creating a shower of secondary
radiation).
Becquerel (Bq)
The becquerel is the ÚSI derived unit of radioactivity. One Bq is de ined as the ÚActivity of a
quantity of radioactive material in which one ÚNucleus decays per second. (ÚCurie)
1 Bq =
1
s
Beta Particle
High-energy, high-speed ÚElectrons (𝛽 ) or ÚPositrons (𝛽 ) emitted as ÚBeta Radiation.
The ÚDecay of ÚNeutrons to ÚProtons emits beta particles and antineutrinos.
Also known as: 𝛽 Particle
Beta Radiation
A ÚParticle Radiation of ÚBeta Particles. Beta Radiation can usually be shielded by a sheet of
metal, for example, Al foil (Figure 245, p. 283). Beta radiation ionizes the surface of organisms
and can lead to severe burns with long-term sequelae like skin cancer.
Also known as: 𝛽 Radiation
Bluetooth
A standardized open wireless technology for data communication over short distances using
radio waves.
Bq
ÚBecquerel
(C2 H4 )n
ÚPolyethylene
(C5 H8 O2 )n
ÚPolymethyl Methacrylate
Cadmium Zinc Telluride (CZT, CdZnTe)
An alloy of cadmium telluride and zinc telluride, a substance to build ÚSemiconductor Radiation Detectors usable at room temperature.
Calibration
A de ined procedure for the comparison of the reading of an instrument to the value conventionally accepted as correct (a “standard”).
270
identiFINDER® R300/en/2014.4(13623)/Feb2015
FLIR Detection
D. Glossary
In less strict use of the term, calibration is regarded as including the adjustment of the reading
of the instrument to agree with the standard, within a speci ied accuracy.
Also known as: Adjustment
CBRNE
Acronym for chemical, biological, radiological, nuclear, and explosive. It refers to incidents
or weapons presenting any of these hazards.
CdZnTe
ÚCadmium Zinc Telluride
Cesium Lithium Yttrium Chloride (CLYC, Cs2 LiYCl6 :Ce)
Substance to build ÚScintillation Counters usable for gamma spectroscopy and the detection
of thermal ÚNeutrons.
Chemical Element
ÚElement
CLYC ÚCesium Lithium Yttrium Chloride
CONOPS, CONOPs, ConOps
A Concept of Operations is a document describing the characteristics of a system from the
viewpoint of an individual user of that system. CONOPS are widely used in the US military or
government services.
Continental Time
Ú24-Hour Clock
Coordinated Universal Time (UTC)
A time standard based on International Atomic Time. Time zones are speci ied as positive or
negative offsets from UTC.
Count
A single detected event registered by a detection system.
Cs2 LiYCl6 :Ce
ÚCesium Lithium Yttrium Chloride
Curie
The curie is an older, non-ÚSI unit of radioactivity. (ÚBecquerel)
1 Ci = 3.7 × 10
CZT
Bq; 1 Bq = 2.70 × 10
Ci
ÚCadmium Zinc Telluride
Dead Time (DT)
The dead time of a detection system is the time after each event during which the system is
busy and hence is not able to record another event if it happens. An everyday analogon is the
time you have to wait after taking a photo with lash to recharge the lash for the next photo.
identiFINDER® R300/en/2014.4(13623)/Feb2015
271
D. Glossary
FLIR Detection
Decay
The process by which an unstable ÚNuclide (parent) loses energy by emitting ÚIonizing
Radiation and transforming to another nuclide (daughter). Decay of a single nuclide is spontaneous, that is, it neither needs external triggering nor is it predictable. The average decay
rate of a large number of nuclides, however, is predictable and usually given as ÚHalf Life.
Also known as: Disintegration, Radioactive Decay
Deutsches Institut für Normung (DIN)
The German national organization for standardization, represents Germany in the ÚISO.
DHS Department of Homeland Security (USA)
Dial-Up Networking (DUN)
A ÚBluetooth communications pro ile to access the Internet or other dial-up services.
DIN
ÚDeutsches Institut für Normung
Dirty Bomb
ÚRadiological Dispersion Device
Disintegration
ÚDecay
DNDO
Domestic Nuclear Detection Of ice of the ÚDHS (USA)
Dose A measure of the ÚIonizing Radiation energy transfer to, for example, tissue (ÚSievert).
Dose Rate
The quotient of ÚDose given in ÚSievert and time.
DT
ÚDead Time
DUN ÚDial-Up Networking
Electromagnetic Radiation
Self-propagating waves comprising electric and magnetic ield components. The ÚSpectrum
ranges from low-frequent radio waves (longer waves), microwaves, visible light, ultraviolet
radiation, X-rays up to high-frequent ÚGamma Radiation (shorter waves).
Electron
A subatomic particle with a negative electric charge, counterpart of the ÚPositron. It is emitted as ÚBeta Radiation.
Electron Volt (eV)
The electron volt is a non-ÚSI unit of energy (ÚJoule) employed in radiation physics. It is
equal to the amount of kinetic energy gained by a single unbound electron when it accelerates
through an electrostatic potential difference of one volt.
1 eV ≈ 1.602177 × 10
272
J
identiFINDER® R300/en/2014.4(13623)/Feb2015
FLIR Detection
D. Glossary
Element
Pure substance consisting of ÚNuclides having the same number of ÚProtons (also known
as ÚAtomic Number) sharing the same chemical properties. The nuclear properties differ if
the number of ÚNeutrons varies in the nuclides (ÚIsotope).
Also known as: Chemical Element
Equivalent Dose
A measure of the radiation ÚDose absorbed by tissue where an attempt has been made to
consider the different relative biological effects of different types of ÚIonizing Radiation.
The equivalent dose is calculated by weighting the ÚAbsorbed Dose with a factor selected for
the type and energy of the radiation. The weighting factor ranges from 1 for ÚGamma Radiation and ÚBeta Radiation to higher values for ÚAlpha Radiation, ÚProtons, and ÚNeutrons.
eV
ÚElectron Volt
Extensible Markup Language
ÚXML
False Alarm
An ÚAlarm not caused by a radioactive source under the speci ied background conditions.
False Alarm Rate (FAR)
The number of ÚFalse Alarms per duration.
FAR
ÚFalse Alarm Rate
Fast Neutron
ÚNeutron Temperature
FGPu ÚFuel-Grade Plutonium
Fission
An exothermic nuclear process in which a ÚNucleus is usually absorbing a ÚNeutron and two
ission fragments and a few ission neutrons emerge.
Also known as: Nuclear Fission
Fuel-Grade Plutonium (FGPu)
A mixture of 239Pu, 240Pu and other ÚIsotopes, which contains between 7 % and 19 % 240Pu.
Further grades are ÚReactor-Grade Plutonium and ÚWeapons-Grade Plutonium.
Full Width at Half Maximum (FWHM)
The full width at half maximum height of a ÚPeak in a ÚSpectrum (Figure 242, p. 274).
identiFINDER® R300/en/2014.4(13623)/Feb2015
273
D. Glossary
FLIR Detection
( )
FWHM
Figure 242. Full width at half maximum height of a peak
Fusion
An exothermic nuclear process in which two or more light ÚNuclei are con ined together
forming a heavier nucleus. The magnetic con inement is usually realized in plasma devices
as e.g. a Tokamak or a Stellarator. A Tokamak is a toroidal chamber surrounded by magnetic
coils. It can be seen as a huge current transformator, which produces enough potential to
ignite a plasma inside the chamber. Contrary to the symmetric appearance of a Tokamak, a
Stellarator has a non-symmetric, highly complex ield and chamber design.
Also known as: Nuclear Fusion
FWHM
ÚFull Width at Half Maximum
𝛾 Radiation
ÚGamma Radiation
Gamma Radiation
Gamma (𝛾) radiation is energetic (typically >100 keV) ÚElectromagnetic Radiation of high
frequency (typically >10
Hz) and very short wavelength (typically <10
m).
Gamma radiation originating from ÚDecay typically carries energies from a few hundred keV
to about 10 MeV and is ÚIonizing Radiation.
Gamma radiation penetrates deeply and is dif icult to stop. It can be stopped by a suf iciently
thick layer of material with high ÚAtomic Number, such as 82Pb (lead, Figure 245, p. 283).
Also known as: 𝛾 Radiation
Gamma Ray Detection
Gamma rays can be detected by observing their interaction with matter. Some materials emit
visible light when hit by gamma rays (ÚScintillator), some gases are ionized and conduct
electricity (ÚGeiger–Müller Tube), or some semiconductors (ÚSemiconductor Radiation
Detector) change electric conductivity when exposed to gamma radiation.
Ge
274
ÚGermanium
identiFINDER® R300/en/2014.4(13623)/Feb2015
FLIR Detection
D. Glossary
Geiger–Müller Tube (GM Tube)
A device to detect ÚIonizing Radiation consisting of a tube illed with low-pressure noble and
halogene gas in a strong electric ield. Incident radiation produces ÚIons which can be measured as electric current between the electrodes.
Germanium (Ge)
A substance used in high-precision ÚSemiconductor Radiation Detectors for ÚGamma Radiation.
Global Positioning System (GPS)
A constellation of satellites sending microwave signals which enable receivers to determine
the time, their location, speed, and direction.
Also known as: Navstar Global Positioning System
GM Tube
ÚGeiger–Müller Tube
GMT ÚGreenwich Mean Time
GPS ÚGlobal Positioning System
Gray (Gy)
The gray is the ÚSI derived unit of ÚAbsorbed Dose due to ÚIonizing Radiation. One gray is
the absorption of one joule of energy, in the form of ionizing radiation, by one kilogram of
matter.
1 Gy = 1
J
m
=1
kg
s
For ÚGamma Radiation, these are the same base units as the ÚSievert. To avoid confusion,
do no not use J/kg but always Gy for the absorbed dose and Sv for the ÚEquivalent Dose.
Greenwich Mean Time (GMT)
Originally the mean solar time at the Royal Observatory in Greenwich, London. It is commonly
but imprecisely used synonymously with ÚCoordinated Universal Time when referring to
time zones.
Gy
ÚGray
Half Life
The duration it takes for a substance undergoing ÚDecay to decrease by half.
HAZMAT, Hazmat, HazMat
Hazardous materials and items, dangerous goods.
identiFINDER® R300/en/2014.4(13623)/Feb2015
275
D. Glossary
3
FLIR Detection
He Detector
A device to detect thermal ÚNeutrons (ÚNeutron Detection) consisting of a tube illed with
3
He and other gases under high pressure in a strong electric ield. Incident neutrons react
with the helium yielding an electrical charge in the gas which can be detected similar as in a
ÚGeiger–Müller Tube.
HPGe
High-Purity ÚGermanium.
HPRDS
Human Portable Radiation Detection System
HTTP
ÚHypertext Transfer Protocol
Hypertext Transfer Protocol (HTTP)
A networking protocol for distributed, collaborative, hypermedia information systems, essential for data communication in the World Wide Web.
IANA
ÚInternet Assigned Numbers Authority
International Organization for Standardization
ÚISO
International System of Units
ÚSI
Internet Assigned Numbers Authority (IANA)
An organization responsible for the allocation of globally-unique names and numbers that
are used in Internet protocols.
Internet Protocol (IP)
A protocol used for data communication between devices in a network.
Intrinsic Activity
The inner ÚActivity of a radiation instrument, without contribution from the environment
or other sources.
Ion
A ÚNucleus whose number of ÚElectrons differs from the number of ÚProtons resulting in a
net negative or positive electric charge.
Ionizing Radiation
ÚParticle Radiation or ÚElectromagnetic Radiation energetic enough to detach ÚElectrons
from atoms or molecules, thus converting them to ÚIons.
276
identiFINDER® R300/en/2014.4(13623)/Feb2015
FLIR Detection
D. Glossary
Ionization depends on the energy of radiation, not on the number of particles or the wavelength. Roughly speaking, particles or photons with energies above a few ÚElectron Volts are
ionizing.
.
Figure 243. Ionizing radiation warning symbol (ISO 21482)
Ionizing Radiation can cause serious damage when absorbed by living tissue, and is
therefore a health hazard.
IP
ÚInternet Protocol
IP Address
A unique numerical label that is assigned to devices participating in an ÚInternet Protocolbased computer network. Usually it is a 32-bit number written in four 8-bit bytes, for example
192.168.10.199. It is used to identify hosts or network interfaces and to address locations.
IrOBEX
ÚOBject EXchange
ISO (International Organization for Standardization)
The world’s largest developer and publisher of International Standards. ISO is a network of
the national standards institutes of countries around the world.
Isobar
40
72
Different ÚNuclides having the same ÚMass Number, for example 40
18Ar and 19K or 36Kr and
72
34Se.
Isomer
An excited state in a ÚNucleus having a very long ÚHalf Life compared to other excited states:
at least a µs or ms. Some isomers expose a much longer half life so they are called metastable
(m), for example 99mTc with a half life of about 6 h.
identiFINDER® R300/en/2014.4(13623)/Feb2015
277
D. Glossary
FLIR Detection
Isotone
Different ÚNuclides having the same number of ÚNeutrons, for example
40
20Ca
36 38
39
16S, 18Ar, 19K,
and
with 20 neutrons each but a different ÚAtomic Number.
Isotope
Different ÚNuclides having the same number of ÚProtons (also known as ÚAtomic Number)
235
238
belonging to the same chemical ÚElement, for example 234
92U, 92U and 92U.
J
ÚJoule
Joule (J)
The ÚSI derived unit of energy (ÚElectron Volt). It is the energy required to apply a force of
one newton through a distance of one meter (1 N⋅m) or the work required to produce one
watt of power for one second (1 W⋅s).
1J = 1N ⋅ m = 1
KCl
kg ⋅ m
⋅ m = 1W ⋅ s
s
ÚPotassium Chloride
LaBr3
ÚLanthanum Bromide
Lanthanum Bromide (LaBr3 )
Substance to build ÚScintillation Counters.
LED
Light Emitting Diode
LED Stabilization
Method to adjust for the drift of a ÚPhoto Multiplier Tube by measuring the light of a known
reference ÚLED.
Linearization
Measurements relying on ÚScintillation require ways to transfer and amplify light. This is
typically done by using a crystal mounted to a ÚPhoto Multiplier Tube. Unfortunately, the
physics of this assembly introduces a non-proportionality between the input gamma ray
energies and the processed electronic output signals. For high precision spectroscopy applications it is therefore inevitable to carefully gauge the assembly to map the non-proportional
deviating energies on to the correct incident values. This process is referred to as Linearization.
Live Time (LT)
A detection system is able to record events during the live time, that is, while not being busy
processing events in the ÚDead Time (cf ÚReal Time).
Local Maximum
ÚPeak
278
identiFINDER® R300/en/2014.4(13623)/Feb2015
FLIR Detection
D. Glossary
Low Self-Discharge Nickel-Metal Hydride (LSD NiMH)
The type of rechargeable batteries built into the FLIR powerPACK ultra.
LSD NiMH
ÚLow Self-Discharge Nickel-Metal Hydride
LT
ÚLive Time
MAC Address
ÚMedia Access Control Address
Mass Number (A)
The total number of ÚProtons and ÚNeutrons (together known as ÚNucleons) in an atomic
ÚNucleus.
Also known as: Atomic Mass Number, Nucleon Number
MCS ÚMulti Channel Scaling
Media Access Control Address (MAC Address)
A unique identi ier assigned to most network adapters or network interface cards by the
manufacturer for identi ication in a network.
Metric Pre xes
ÚUnit Pre ixes
Military Time
Ú24-Hour Clock
Moderator
A medium with a high content of hydrogen (e.g. ÚPolyethylene) reducing the speed of
fast ÚNeutrons, thus turning them into thermal neutrons. Used for example, to enhance
ÚNeutron Detection sensitivity for systems which can detect thermal neutrons only.
Multi Channel Scaling (MCS)
An acquisition mode for discrete ÚSpectra. All counts 𝑁 registered during a period Δ𝑡 are
stored in one channel. After that period, all counts are stored in the next channel, and so on
(Figure 244, p. 280).
N42
ÚANSI N42.42
*.n42
Common ile name suf ix for ÚANSI N42.42 iles.
NaI
ÚSodium Iodide
Naturally Occurring Radioactive Material (NORM)
ÚRadionuclides occurring in the Earth lithosphere or atmosphere, for example, potassium,
uranium and their daughter products.
identiFINDER® R300/en/2014.4(13623)/Feb2015
279
D. Glossary
FLIR Detection
(
)
(
)
(
)
( )
Channel
Figure 244. Multi Channel Scaling
Navstar Global Positioning System
ÚGlobal Positioning System
Neutron
A subatomic particle with no electric charge, usually found in the ÚNucleus of atoms. Neutrons bound in nuclei are stable, free neutrons, however, undergo beta ÚDecay with a mean
lifetime of about 12 minutes. Free Neutrons having different energies are categorized by the
ÚNeutron Temperature.
Neutron Detection
Thermal neutrons (ÚNeutron Temperature) can be detected by observing their interaction with ÚNuclei like 3He (Ú3 He Detector), 6Li,
10
B, or
157
Gd. These interactions produce
ÚParticle Radiation or ÚGamma Radiation which is subsequently detected. To detect fast
neutrons (ÚNeutron Temperature), a ÚModerator must be applied.
Neutron Temperature
An energy scale for free ÚNeutrons. The most important categories are fast neutrons, having
an energy substantially above 1 eV, slow Neutrons, with an energy below 0.4 eV and thermal
neutrons yielding an energy about 0.025 eV. Fast neutrons are deccelerated or thermalized
by a ÚModerator.
Nickel-Metal Hydride (NiMH)
The type of rechargeable batteries built into the FLIR powerPACK plus.
NID
Nuclide Identi ication
NiMH
ÚNickel-Metal Hydride
NORM
ÚNaturally Occurring Radioactive Material
Nuclear Fission
ÚFission
280
identiFINDER® R300/en/2014.4(13623)/Feb2015
FLIR Detection
D. Glossary
Nuclear Fusion
ÚFusion
Nucleon
Collective name for ÚNeutrons and ÚProtons, two subatomic particles building an atomic
ÚNucleus.
Nucleon Number
ÚMass Number
Nucleus
The nucleus is a component of an ÚAtom, carrying the majority of the net mass and an electric
charge that is equal to the charge of all ÚElectrons that orbit the nucleus. A nucleus consists
of ÚNeutrons and ÚProtons, which are therefore also called ÚNucleons.
Nuclide
A nuclide is a ÚNucleus with a speci ied number of protons and neutrons, that is, having speci ic nuclear properties.
Nuclides are speci ied by the name of the chemical ÚElement which implies the ÚAtomic
Number and the ÚMass Number, for example,
40
18Ar
or
40
19K.
Where sub- and superscripting
are not possible or too challenging, nuclides are often written as Ar-40 or K-40.
OBEX
ÚOBject EXchange
OBject EXchange (OBEX)
A communications protocol for the exchange of binary objects between devices. It is maintained by the Infrared Data Association but has also been adopted by the Bluetooth Special
Interest Group and the SyncML wing of the Open Mobile Alliance.
Also known as: IrOBEX
Pairing
A mechanism to establish a trusted connection between two devices communicating via Bluetooth requiring user interaction only during the irst connection of two particular devices.
PAN ÚPersonal Area Networking
Particle Radiation
A type of ÚRadiation, whose emission components carry a inite rest mass. ÚAlpha Radiation
and ÚBeta Radiation are examples for Particle Radiation.
PE
ÚPolyethylene
Peak The place where a function or a measurement (or a graphic rendering thereof) is higher than
in the close vicinity (Figure 242, p. 274).
Also known as: Local Maximum
identiFINDER® R300/en/2014.4(13623)/Feb2015
281
D. Glossary
FLIR Detection
Personal Area Networking (PAN)
A ÚBluetooth communications pro ile to connect a small number of devices over usually short
distances.
Also known as: Piconet
PHA ÚPulse Height Analyzer
Photo Multiplier Tube (PMT)
An extremely sensitive light detector used, for example, in conjunction with a ÚScintillator
to register ÚIonizing Radiation.
Piconet
ÚPersonal Area Networking
PIN
Personal Identi ication Number
PMMA
ÚPolymethyl Methacrylate
PMT ÚPhoto Multiplier Tube
Polyethene
ÚPolyethylene
Polyethylene (PE, (C2 H4 )n )
A substance usable as ÚModerator for fast ÚNeutrons.
Also known as: Polyethene, Polymethylene, Polythene
Polymethyl Methacrylate (PMMA, (C5 H8 O2 )n )
A substance usable as ÚModerator for fast ÚNeutrons.
Also known as: Acrylic Glass
Polymethylene
ÚPolyethylene
Polythene
ÚPolyethylene
Positron
A subatomic particle with a positive electric charge, counterpart of the ÚElectron. It is emitted as ÚBeta Radiation.
Potassium Chloride (KCl)
A salt containing natural 40K used to calibrate radiation detection systems.
Proton
A subatomic particle with a positive electric charge. It builds the ÚNucleus of each atom,
along with ÚNeutrons. A proton is also stable by itself and has a second identity as the
hydrogen ÚIon, H+ .
282
identiFINDER® R300/en/2014.4(13623)/Feb2015
FLIR Detection
D. Glossary
Proton Number
ÚAtomic Number
Pulse Height Analyzer (PHA)
An instrument which accepts electronic pulses of varying heights from particle and event detectors, digitizes the pulses’ heights, and saves them in channels for spectral analysis.
Radiation
The propagation of energetic particles (ÚParticle Radiation) or electromagnetic waves
(ÚElectromagnetic Radiation) through a medium or space. Examples are ÚAlpha Radiation, ÚBeta Radiation, ÚGamma Radiation, ÚNeutrons but also X-rays, radio waves, light,
microwaves or heat.
The word “Radiation” commonly is used as an abbreviation for ÚIonizing Radiation.
Neutrons
P
Paper
Metal Foil
Lead ( 82Pb)
W
Water
Figure 245. Shielding of ionizing radiation (not to scale)
Radio Time
Ú24-Hour Clock
Radioactive Decay
ÚDecay
Radiological Dispersal Device
ÚRadiological Dispersion Device
Radiological Dispersion Device (RDD)
A weapon designed to spread radioactive material with the intent to kill or cause disruption.
identiFINDER® R300/en/2014.4(13623)/Feb2015
283
D. Glossary
FLIR Detection
Also known as: Radiological Dispersal Device, Dirty Bomb
Radionuclide
A radioactive ÚNuclide.
Railway Time
Ú24-Hour Clock
RDD ÚRadiological Dispersion Device
Reachback
The process of transmitting information from a ield deployed instrument to a lab or other
facility for further analysis.
Reactor-Grade Plutonium (RGPu)
Reactor-Grade Plutonium is a special mixture of
contains ≥19 %
240
Pu.
239
Pu,
Pu and other ÚIsotopes, which
240
240
Pu has a high rate of spontaneous ission leading to an increased
number of ÚNeutrons and bears the risk of premature starting chain reactions. Further
grades are ÚFuel-Grade Plutonium and ÚWeapons-Grade Plutonium.
Real Time (RT)
The real or total time of a detection system comprises the ÚLive Time and the ÚDead Time.
Also known as: Total Time, True Time
Region of Interest (ROI)
A selected subset of samples within a ÚSpectrum identi ied for a particular purpose.
rem
ÚRöntgen Equivalent in Man
Remote Network Driver Interface Speci cation (RNDIS)
A Microsoft-proprietary protocol providing a virtual Ethernet connection used mostly via
ÚUSB.
Resolution
In spectroscopical application, the resolution gives a useful measure to estimate how well
two or more ÚPeaks can be distinguished. It is consequently de ined as the width of a peak
– usually the most prominent line at 661.65 keV of 137Cs. Because there are various ways to
judge a peak width, it is a convention to use the ÚFull Width at Half Maximum.
RGPu
ÚReactor-Grade Plutonium
RID
ÚRadionuclide Identifying Device
RNDIS
ÚRemote Network Driver Interface Speci ication
ROI
284
ÚRegion of Interest
identiFINDER® R300/en/2014.4(13623)/Feb2015
FLIR Detection
D. Glossary
Röntgen Equivalent in Man (rem)
The röntgen equivalent in man is an old unit of radiation ÚDose. (ÚSievert)
100 rem = 1 Sv
The continued use of rem is “strongly discouraged” by the U.S. National Institute of Standards
and Technology.
RT
ÚReal Time
Scintillation Counter
A device to measure ÚIonizing Radiation by amplifying the light emitted from a ÚScintillator
with a ÚPhoto Multiplier Tube and quantifying the result.
Scintillator
A material emitting a lash of light when it absorbs ÚIonizing Radiation.
Semiconductor Radiation Detector
A semiconductor (for example ÚGermanium or ÚCadmium Zinc Telluride) placed between
two electrodes registering electric pulses resulting from the travel of free electrons produced by incident ÚGamma Radiation. The number of free electrons is proportional to the
radiation’s energy.
SI (Système International d’Unités)
A metric and decimal system of units, standardized by the Bureau International des Poids et
Mesures (International Bureau of Weights and Measures).
Also known as: International System of Units
SI Pre xes
ÚUnit Pre ixes
Sievert (Sv)
The ÚSI derived unit of dose equivalent. It attempts to re lect the biological effects of
ÚIonizing Radiation as opposed to the physical aspects, which are characterized by the
ÚAbsorbed Dose (ÚGray).
1 Sv = 1
J
m
=1
kg
s
For ÚGamma Radiation, these are the same base units as the ÚGray. To avoid confusion, do
not use J/kg but always Gy for the absorbed dose and Sv for the dose equivalent.
SIM
Subscriber Identity Module, used for example in mobile phones.
Sodium Iodide (NaI)
Substance to build ÚScintillation Counters.
SOP ÚStandard Operating Procedure
identiFINDER® R300/en/2014.4(13623)/Feb2015
285
D. Glossary
FLIR Detection
Source Stabilization
Method to continuously adjust for the drift of a detection system by measuring the radiation
of a known reference source.
*.spc
A ile format used by former measuring instruments to store spectrum data. Was replaced
by the more versatile and standardized ÚANSI N42.42 format.
Speci c Activity
The ÚActivity in ÚBecquerel per amount of substance. The amount is usually given as mass
for solid matter (Bq/kg, “speci ic activity” sensu stricto) or as volume for liquids (Bq/l, activity concentration).
Also known as: Activity Concentration
Spectrum
The continuous arrangement of the components of ÚRadiation in a progressive series according to a characteristic quantity such as wavelength, frequency, energy, charge, mass etc.
Using this arrangement as one axis, another quantity, e.g. intensity, can be plotted along a
perpendicular axis
Digital spectra are discrete, that is they collect the plotted quantity into separate channels
representing a (small) range of the characteristic quantity.
Standard Operating Procedure (SOP)
A set of instructions for a procedure to be executed always in exactly the same manner.
Also known as: Standing Operating Procedure
Standing Operating Procedure
ÚStandard Operating Procedure
Sv
ÚSievert
Système International d’Unités
ÚSI
Technologically Enhanced Naturally Occurring Radioactive Material (TENORM)
ÚNaturally Occurring Radioactive Material as used in, for example, oil and gas exploration,
development and production operations.
TENORM
ÚTechnologically Enhanced Naturally Occurring Radioactive Material
Tethering
Using a mobile device such as a mobile phone to supply Internet access for another device
which is otherwise unconnected, using the mobile device as a modem. This can be done
through, for example, ÚBluetooth wireless technology or cables (such as ÚUSB).
286
identiFINDER® R300/en/2014.4(13623)/Feb2015
FLIR Detection
D. Glossary
Thermal Neutron
ÚNeutron Temperature
Total Time
ÚReal Time
Trickle Charging
Charging a battery to balance its intrinsic self discharge thus maintaining the full capacity of
the battery.
True Time
ÚReal Time
Uniform Resource Identi er (URI)
A string of characters used to identify a name or a resource on the Internet.
Unit Pre xes
Pre ixes for ÚSI units (Table 4, p. 287)
Table 4. Pre ixes for units according to the Système International d’Unités (International System of Units)
10
10
10
10
10
10
10
10
10
10
10
10
10
10
10
10
10
10
10
10
10
Pre ix
yotta
zetta
exa
peta
tera
giga
mega
kilo
hecto
deca
Symbol
Y
Z
E
P
T
G
M
k
h
da
deci
centi
milli
micro
nano
pico
femto
atto
zepto
yocto
d
c
m
µ
n
p
f
a
z
y
Decimal
1 000 000 000 000 000 000 000 000
1 000 000 000 000 000 000 000
1 000 000 000 000 000 000
1 000 000 000 000 000
1 000 000 000 000
1 000 000 000
1 000 000
1 000
100
10
1
0.1
0.01
0.001
0.000 001
0.000 000 001
0.000 000 000 001
0.000 000 000 000 001
0.000 000 000 000 000 001
0.000 000 000 000 000 000 001
0.000 000 000 000 000 000 000 001
Also known as: Metric Pre ixes, SI Pre ixes
identiFINDER® R300/en/2014.4(13623)/Feb2015
287
D. Glossary
FLIR Detection
Units of Time
The ÚSI base unit for time is the second. It may be pre ixed with the usual SI ÚUnit Pre ixes
to express smaller or larger quantities.
Units known from everyday life (Table 5, p. 288) are often used for larger quantities.
Table 5. Units of time
Unit
Second
Minute
Hour
Day
Year
Symbol
sec, s
min, m
h
d
a
Relation
60 sec
60 min
24 h
365.25 d
The Year is often pre ixed (see Table 4, p. 287) to express very large quantities like 1.3 Ga for
1.3 billion years (the ÚHalf Life of 40K).
Universal Serial Bus
ÚUSB
URI
ÚUniform Resource Identi ier
USB (Universal Serial Bus)
A speci ication to establish communication between various types of devices and a host controller, usually a personal computer.
UTC
ÚCoordinated Universal Time
Weapons-Grade Plutonium (WGPu)
A mixture of 239Pu, 240Pu and other ÚIsotopes, which contains less than 7 % 240Pu. Due to its
reduced amount of the spontaneous ission source 240Pu, the risk of a premature chain reaction start is decreased so that this blend of Plutonium is used for the weapon head assemblies.
Further grades are ÚFuel-Grade Plutonium and ÚReactor-Grade Plutonium.
WGPu
ÚWeapons-Grade Plutonium
WGS84
ÚWorld Geodetic System
World Geodetic System (WGS84)
A standard for use in cartography, geodesy, and navigation comprising a coordinate system
for the Earth, a reference surface for raw altitude data, and a geoid de ining the nominal sea
level.
The WGS release of 1984 with later revisions is used by ÚGlobal Positioning System.
288
identiFINDER® R300/en/2014.4(13623)/Feb2015
FLIR Detection
D. Glossary
XML (Extensible Markup Language)
A gratis open standard for encoding arbitrary data with their structure in textual iles.
Z
ÚAtomic Number
identiFINDER® R300/en/2014.4(13623)/Feb2015
289
FLIR Detection
INDEX
Index
- [key function], 35, 41, 42, 44, 118–122, 125,
Alarm [web page], 180
127, 128, 137, 138, 143, 149, 150, 153–155,
Alarm Indicators [command], 105, 160
159–164
Alarm Indicators [web section], 180
𝜎 Alarm [setting], 163, 164
Alarm Options (menu), 105
+ [key function], 35, 38, 39, 41, 42, 44,
Alarms, 97
118–122, 125, 127, 128, 137, 138, 143, 149,
⋅ Gamma, 98
150, 153–155, 159–164
⋅ Neutrons, 101
12-Hour Clock, 267
Alarms [web page], 180
24-Hour Clock, 267
Alpha Particle, 268
30 s [key function], 95
Alpha Radiation, 268
… [setting], 155
Altitude [property], 132
Am-241 [key function], 116
A
A, 268
𝛼 Particle, 268
𝛼 Radiation, 268
Absorbed Dose, 268
Accept [key function], 35, 39, 41, 42, 45, 47,
118–122, 125, 127, 128, 137, 138, 143, 149,
150, 153–155, 159–164
Acknowledge [key function], 71, 98
Acquisition Duration [property], 106
Acrylic Glass, 268
Activity, 268
Activity Concentration, 268
Adjustment, 268
Administration [web menu], 181
Advanced Menu [command], 103
Advanced Options (menu), 104
American National Standards Institute (ANSI),
269
ANSI, 269
ANSI N42.42, 269
Army Time, 269
Astronomical Time, 269
Atom, 269
Atomic Mass, 269
Atomic Mass Number, 269
Atomic Number (Z), 269
Automated Mode, 93
Automated Mode Settings [command], 104,
135
Available [setting], 158
Available Files [web section], 181
Available Memory [property], 130
Alarm, 268
B
Alarm [setting], 162, 164
𝛽 Particle, 269
identiFINDER® R300/en/2014.4(13623)/Feb2015
291
INDEX
FLIR Detection
𝛽 Radiation, 269
Change [key function], 128
Background Radiation, 269
Change device [key function], 224
Backlight, 232
Change Device [setting], 145
Backlight [setting], 124
Change Password (menu), 104
Backup [web page], 180
Channel [key function], 114
Backup [web section], 180
Chemical Element, 271
Battery, 29
Choose [key function], 138
Becquerel (Bq), 270
Clear [key function], 108, 111, 116, 129
Beeper [setting], 161
Clear Markers [key function], 110
Beginning [property], 206
Clear Password [command], 104, 129
Beta Particle, 270
Clock, 29, 125, 128, 186
Beta Radiation, 270
Clock [web section], 180
Bluetooth, 232, 270
Clock Settings [command], 103, 104, 125
Bluetooth [command], 141
CLYC, 271
Bluetooth Device Name [setting], 145
Co-60 [key function], 116
Bluetooth Periphery © [command], 104
Bluetooth SPP Settings © [command], 104
Bluetooth SPP Settings © [web page], 180
Bluetooth SPP Settings © [web section], 180
Bluetooth SPP Status © [command], 104
Bluetooth SPP © (menu), 104
Bq, 270
Bulk Download [web page], 180
Colors [setting], 123
Commands
⋅ Advanced Menu, 103
⋅ Alarm Indicators, 105, 160
⋅ Automated Mode Settings, 104, 135
⋅ Bluetooth, 141
⋅ Bluetooth Periphery ©, 104
⋅ Bluetooth SPP Settings ©, 104
⋅ Bluetooth SPP Status ©, 104
C
(C2 H4 )n , 270
⋅ Calibration, 103, 115
(C5 H8 O2 )n , 270
⋅ Clear Password, 104, 129
Cadmium Zinc Telluride (CZT, CdZnTe), 270
⋅ Clock Settings, 103, 104, 125
Calibration, 270
⋅ Connectivity Options, 103
Calibration [command], 103, 115
⋅ Current Alarm State, 103, 105, 165
Calibration [key function], 114
⋅ Display Settings, 104, 122
Cancel [key function], 35, 39, 41, 43, 46, 47, 95,
⋅ Dose Alarm Thresholds, 105, 161
111, 118–122, 125, 127–129, 133, 134, 137,
⋅ Dose Rate Alarm Thresholds, 105, 162
138, 143, 149, 150, 153–155, 159–164
⋅ Dose Rate Settings, 104, 159
CBRNE, 271
⋅ Download Settings, 104, 154
CdZnTe, 271
⋅ Erase All Alarms, 104, 133
Cesium Lithium Yttrium Chloride (CLYC,
⋅ Erase All Screenshots, 104, 134
Cs2 LiYCl6 :Ce), 271
292
⋅ Erase All Spectra, 104, 133
identiFINDER® R300/en/2014.4(13623)/Feb2015
FLIR Detection
INDEX
⋅ Finder Settings, 104, 157
Cs2 LiYCl6 :Ce, 271
⋅ Gamma, Neutron Counters, 104, 155
Cs-137 [key function], 116
⋅ GPS Settings, 104, 127
Curie, 271
⋅ Identi ication Settings, 103, 116
Current Alarm State [command], 103, 105, 165
⋅ Mass Storage, 104, 150
Cursor Right · [key function], 109
⋅ Network, 104, 152
CZT, 271
⋅ Neutron Alarm Thresholds, 163
⋅ Neutron Alarm Thresholds ©, 105
D
⋅ Nuclide Severity, 103, 120
Data [web menu], 180
⋅ Nuclide Usage, 103, 119
Data Logging (menu), 104
⋅ Nuclide Visibility, 103, 118
Data Schemata [web section], 180
⋅ Presets, 104, 121
Data Types [web section], 180
⋅ Remote Server Settings, 104, 149
Date, 29, 125, 128, 186
⋅ Report Settings, 104, 153
Date [setting], 127
⋅ Reset Factory Settings, 104, 132
Date Selection [web section], 180
⋅ Self Test, 104, 134
Dead Time (DT), 271
⋅ Send Identi ication, 137
Dead Time [property], 106
⋅ Send Identi ication ©, 104
Decay, 272
⋅ Send Spectrum, 140
Delete [key function], 44, 150, 154
⋅ Send Spectrum ©, 104
Deutsches Institut für Normung (DIN), 272
⋅ Set Password, 104, 128
Deviation [property], 116
⋅ Show Status, 104, 130
Device Name [setting], 152
⋅ Spectrum, 103, 106
DHS, 272
Con idence [setting], 117
Dial-Up Networking (DUN), 272
Con irm [key function], 87
DIN, 272
Connection String [setting], 150
Dirty Bomb, 272
Connection String: [property], 227
Disconnect [setting], 143
Connectivity [web page], 180
Discoverable [property], 142
Connectivity Options (menu), 104
Disintegration, 272
Connectivity Options [command], 103
Display Settings [command], 104, 122
CONOPS, CONOPs, ConOps, 271
Displayed Unit [setting], 159
Continental Time, 271
DNDO, 272
Continue [key function], 65, 76, 93, 117
Dose, 272
Coordinated Universal Time (UTC), 271
Dose [key function], 89, 91
Count, 271
Dose Alarm Thresholds [command], 105, 161
Counting Duration [property], 156
Dose Duration [property], 156
Counts [setting], 122
Dose Rate, 272
identiFINDER® R300/en/2014.4(13623)/Feb2015
293
INDEX
Dose Rate Alarm Thresholds [command], 105,
162
FLIR Detection
F
False Alarm, 273
Dose Rate Mode, 86
False Alarm Rate (FAR), 273
Dose Rate Settings [command], 104, 159
FAR, 273
Down [key function], 36–38, 82, 118–122, 125,
Fast Neutron, 273
127, 128, 137, 143, 145, 148, 150, 153–155,
FGPu, 273
159–164, 225
File Types
Download Options [web section], 180
⋅ *.n42, 154, 202, 204
Download Settings [command], 104, 154
⋅ *.spc, 154, 202, 204
DT, 272
⋅ *.spe, 154, 202, 204
DU [key function], 116
⋅ *.xml, 183, 195
DUN, 272
Duration [property], 206
Duration [setting], 117
⋅ *.zip, 56, 197, 198, 202, 203
Finder [key function], 73, 75, 88
Finder Mode, 88, 232
Finder Settings [command], 104, 157
Fission, 273
E
Fuel-Grade Plutonium (FGPu), 273
Electromagnetic Radiation, 272
Full Width at Half Maximum (FWHM), 273
Electron, 272
Fusion, 273
Electron Volt (eV), 272
FWHM, 274
Element, 273
Enable SPP [property], 142
Enable SPP [setting], 143
Energy [key function], 114
Equivalent Dose, 273
Erase [key function], 133, 134
G
𝛾 Radiation, 274
Gamma Alarms [web section], 180
Gamma Count [property], 106
Gamma Counts [property], 156
Gamma Dose [property], 156
Erase All Alarms [command], 104, 133
Gamma Radiation, 274
Erase All Screenshots [command], 104, 134
Gamma Ray Detection, 274
Erase All Spectra [command], 104, 133
Gamma, Neutron Counters [command], 104,
Erase Data (menu), 104
155
eV, 273
Ge, 274
Exit [key function], 36, 73, 91–93, 95, 108,
Geiger–Müller Tube (GM Tube), 274
113, 116, 118–122, 125, 127, 128, 132, 134,
General [web page], 180
137, 139, 142, 143, 145, 149, 150, 152–155,
General Options (menu), 104
157, 159–165, 227
Germanium (Ge), 275
Extensible Markup Language, 273
Global Positioning System (GPS), 275
Extra Duration [setting], 117
GM Tube, 275
294
identiFINDER® R300/en/2014.4(13623)/Feb2015
FLIR Detection
GMT, 275
INDEX
International Organization for
Standardization, 276
GPS, 29, 30, 125, 232, 275
GPS [key function], 130
International System of Units, 276
GPS [property], 131
Internet Assigned Numbers Authority (IANA),
276
GPS [setting], 128
GPS [web section], 180
Internet Protocol (IP), 276
GPS and Clock [web page], 180
Intrinsic Activity, 276
GPS Settings [command], 104, 127
Ion, 276
Gray (Gy), 275
Ionizing Radiation, 276
Greenwich Mean Time (GMT), 275
IP, 277
Gy, 275
IP Address, 277
IP Address [property], 130
H
IrOBEX, 277
Half Life, 275
ISO (International Organization for
HAZMAT, Hazmat, HazMat, 275
3
He Detector, 275
Standardization), 277
Isobar, 277
Home [web menu], 179
Isomer, 277
Horizontal Coordinates [property], 106
Isotone, 278
HPGe, 276
Isotope, 278
HPRDS, 276
HTTP, 276
J
HTTP URI [setting], 150
J, 278
HTTP URI: [property], 228
Joule (J), 278
Hypertext Transfer Protocol (HTTP), 276
K
I
K-40 [key function], 116
IANA, 276
KCl, 278
Identi ication [web section], 180
Key Functions
Identi ication Mode, 90
⋅ +, 35, 38, 39, 41, 42, 44, 118–122, 125, 127,
Identi ication Options (menu), 103
128, 137, 138, 143, 149, 150, 153–155,
Identi ication Settings [command], 103, 116
159–164
Identi ications [web page], 180
⋅ -, 35, 41, 42, 44, 118–122, 125, 127, 128,
Identify [key function], 75, 90, 113
137, 138, 143, 149, 150, 153–155,
Ignore [key function], 255
159–164
Info [web page], 179
⋅ 30 s, 95
Insert [key function], 45, 150, 154
⋅ Accept, 35, 39, 41, 42, 45, 47, 118–122, 125,
Install [key function], 255
127, 128, 137, 138, 143, 149, 150,
Integration Time [setting], 158
153–155, 159–164
identiFINDER® R300/en/2014.4(13623)/Feb2015
295
INDEX
FLIR Detection
⋅ Acknowledge, 71, 98
⋅ Left, 35, 41–43, 127, 150, 154, 162, 163
⋅ Am-241, 116
⋅ Linear, 114
⋅ Calibration, 114
⋅ Load, 112
⋅ Cancel, 35, 39, 41, 43, 46, 47, 95, 111,
⋅ Logarithmic, 114
118–122, 125, 127–129, 133, 134, 137,
⋅ LT, 114
138, 143, 149, 150, 153–155, 159–164
⋅ M, 47
⋅ Change, 128
⋅ Mark Channel, 109
⋅ Change device, 224
⋅ Mn-54, 116
⋅ Channel, 114
⋅ Mute, 71, 98, 165
⋅ Choose, 138
⋅ ¶ Cursor Left, 109
⋅ Clear, 108, 111, 116, 129
⋅ Na-22, 116
⋅ Clear Markers, 110
⋅ OK, 47
⋅ Co-60, 116
⋅ Options, 88, 90
⋅ Con irm, 87
⋅ Preset, 115
⋅ Continue, 65, 76, 93, 117
⋅ Presets, 115
⋅ Cs-137, 116
⋅ R, 47
⋅ Cursor Right ·, 109
⋅ Reset, 132, 157
⋅ Delete, 44, 150, 154
⋅ Reset Dose, 157
⋅ Dose, 89, 91
⋅ Right, 35, 41–43, 127, 150, 154, 162, 163
⋅ Down, 36–38, 82, 118–122, 125, 127, 128,
⋅ RT, 114
137, 143, 145, 148, 150, 153–155,
⋅ Save, 112
159–164, 225
⋅ Search, 145, 224, 225
⋅ DU, 116
⋅ Select, 36, 38–41, 43, 46, 82, 118–122, 125,
⋅ Energy, 114
127, 128, 137, 143, 146, 148, 150,
⋅ Erase, 133, 134
153–155, 159–164, 225
⋅ Exit, 36, 73, 91–93, 95, 108, 113, 116,
⋅ Send, 81, 92, 114, 115, 138
118–122, 125, 127, 128, 132, 134, 137,
⋅ Send Identi ication, 92, 114
139, 142, 143, 145, 149, 150, 152–155,
⋅ Send Spectrum, 115
157, 159–165, 227
⋅ Settings, 142
⋅ Finder, 73, 75, 88
⋅ Shut Down, 65
⋅ GPS, 130
⋅ Skip, 35, 39, 41–43, 45–47, 77, 81, 92, 107,
⋅ Identify, 75, 90, 113
118, 119, 121
⋅ Ignore, 255
⋅ Spectrum, 77, 93
⋅ Insert, 45, 150, 154
⋅ Square Root, 114
⋅ Install, 255
⋅ Start, 92, 107, 134, 151
⋅ K-40, 116
⋅ Start Search, 82, 145
⋅ L, 47
⋅ Stop, 95, 107, 108, 157, 211
296
identiFINDER® R300/en/2014.4(13623)/Feb2015
FLIR Detection
INDEX
⋅ Switch Off, 95
LSD NiMH, 279
⋅ System, 130
LT, 279
⋅ Th-232, 116
LT [key function], 114
⋅ U-235, 116
⋅ Up, 119–121
⋅ Ymax/2, 114
⋅ Ymax/4, 114
⋅ Zoom 1.5 MeV, 110
⋅ Zoom 1:1, 110
⋅ Zoom 3 MeV, 110
⋅ Zoom ROI, 110
Key Functions [setting], 124
M
M [key function], 47
MAC Address, 279
Main Menu (menu), 103
Maintenance (menu), 104
Mark Channel [key function], 109
Mass Number (A), 279
Mass Storage [command], 104, 150
MCS, 279
L
Measurement [web section], 180
L [key function], 47
Measurements [property], 136
LaBr3 , 278
Media Access Control Address (MAC Address),
Language [setting], 124
279
Lanthanum Bromide (LaBr3 ), 278
Menus
Latitude [property], 132
⋅ Advanced Options, 104
LED, 278
⋅ Alarm Options, 105
LED Stabilization, 278
⋅ Bluetooth SPP ©, 104
LEDs [setting], 160
⋅ Change Password, 104
Left [key function], 35, 41–43, 127, 150, 154,
⋅ Connectivity Options, 104
162, 163
⋅ Data Logging, 104
Linear [key function], 114
⋅ Erase Data, 104
Linearization, 278
⋅ General Options, 104
Live Screen [web page], 180
⋅ Identi ication Options, 103
Live Spectrum [web page], 181
⋅ Main Menu, 103
Live Time (LT), 278
⋅ Maintenance, 104
Live Time [setting], 122
⋅ More Options, 103
Load [key function], 112
⋅ Options Menu, 103
Local Area Network [web section], 180
⋅ Send Data ©, 104
Local Maximum, 278
Metric Pre ixes, 279
Location, 29, 30
Military Time, 279
Logarithmic [key function], 114
Mn-54 [key function], 116
Longitude [property], 132
Moderator, 279
Low Self-Discharge Nickel-Metal Hydride (LSD
More Options (menu), 103
NiMH), 279
identiFINDER® R300/en/2014.4(13623)/Feb2015
Multi Channel Scaling (MCS), 279
297
INDEX
FLIR Detection
Mute [key function], 71, 98, 165
Nuclide Severity [command], 103, 120
¶ Cursor Left [key function], 109
Nuclide Usage [command], 103, 119
Nuclide Visibility [command], 103, 118
N
N42, 279
.n42 (2006) [setting], 155
Nuclides [web page], 180
Nuclides… [setting], 118–120
.n42 (2012) [setting], 154
O
*.n42 [ ile type], 154, 202, 204
*.n42, 279
OBEX, 281
Na-22 [key function], 116
OK [key function], 47
NaI, 279
Open-Source Software [web section], 180
Naturally Occurring Radioactive Material
Operator Name [setting], 153
(NORM), 279
OBject EXchange (OBEX), 281
Options [key function], 88, 90
Navstar Global Positioning System, 280
Options Menu (menu), 103
Network [command], 104, 152
Overload, 87
Neutron, 280
Neutron Alarm © [property], 200
P
Neutron Alarm Thresholds [command], 163
Pairing, 281
Neutron Alarm Thresholds © [command], 105
PAN, 281
Neutron Alarms © [web section], 180
Particle Radiation, 281
Neutron Count [property], 106
Password [setting], 150
Neutron Detection, 280
Password [web page], 181
Neutron Rate [property], 157
Password: [property], 227
Neutron Temperature, 280
PE, 281
Neutrons [property], 157
Peak, 281
Next Measurement [property], 136
Peak FWHM [property], 116
Nickel-Metal Hydride (NiMH), 280
Peak Position [property], 116
NID, 280
Personal Area Networking (PAN), 282
NiMH, 280
PHA, 282
Nº [property], 199, 202, 206
Phone Number [setting], 150
NORM, 280
Phone Number: [property], 227
Nuclear Fission, 280
Photo Multiplier Tube (PMT), 282
Nuclear Fusion, 281
Piconet, 282
Nucleon, 281
PIN, 282
Nucleon Number, 281
PMMA, 282
Nucleus, 281
PMT, 282
Nuclide, 281
Polyethene, 282
Nuclide [property], 115
Polyethylene (PE, (C2 H4 )n ), 282
298
identiFINDER® R300/en/2014.4(13623)/Feb2015
FLIR Detection
Polymethyl Methacrylate (PMMA, (C5 H8 O2 )n ),
282
INDEX
⋅ Next Measurement, 136
⋅ Nº, 199, 202, 206
Polymethylene, 282
⋅ Nuclide, 115
Polythene, 282
⋅ Password:, 227
Positron, 282
⋅ Peak FWHM, 116
Potassium Chloride (KCl), 282
⋅ Peak Position, 116
Power Saving, 231
⋅ Phone Number:, 227
Preset [key function], 115
⋅ Real Time, 202
Presets [command], 104, 121
⋅ Satellites, 131
Presets [key function], 115
⋅ Saved on, 199, 202
Properties
⋅ Scaling, 106
⋅ Acquisition Duration, 106
⋅ Screenshots, 130
⋅ Altitude, 132
⋅ Serial Number, 130
⋅ Available Memory, 130
⋅ Software, 131
⋅ Beginning, 206
⋅ Start Time, 202
⋅ Connection String:, 227
⋅ Status, 142
⋅ Counting Duration, 156
⋅ System, 130
⋅ Dead Time, 106
⋅ Type, 199, 207
⋅ Deviation, 116
⋅ Uncertainty, 116
⋅ Discoverable, 142
⋅ Dose Duration, 156
⋅ Duration, 206
⋅ Enable SPP, 142
⋅ Gamma Count, 106
⋅ User Name:, 227
⋅ Value, 207
Proton, 282
Proton Number, 283
Pulse Height Analyzer (PHA), 283
⋅ Gamma Counts, 156
R
⋅ Gamma Dose, 156
R [key function], 47
⋅ GPS, 131
Radiation, 283
⋅ Horizontal Coordinates, 106
Radio Time, 283
⋅ HTTP URI:, 228
Radioactive Decay, 283
⋅ IP Address, 130
Radiological Dispersal Device, 283
⋅ Latitude, 132
Radiological Dispersion Device (RDD), 283
⋅ Longitude, 132
Radionuclide, 284
⋅ Measurements, 136
Railway Time, 284
⋅ Neutron Alarm ©, 200
RDD, 284
⋅ Neutron Count, 106
Reachback, 219, 284
⋅ Neutron Rate, 157
Reactor-Grade Plutonium (RGPu), 284
⋅ Neutrons, 157
Real Time (RT), 284
identiFINDER® R300/en/2014.4(13623)/Feb2015
299
INDEX
FLIR Detection
Real Time [property], 202
Screenshots [web page], 180
Real Time [setting], 122
SD1000… [setting], 225
Region of Interest (ROI), 284
Search [key function], 145, 224, 225
rem, 284
Select [key function], 36, 38–41, 43, 46, 82,
Remote Network Driver Interface Speci ication
(RNDIS), 284
118–122, 125, 127, 128, 137, 143, 146, 148,
150, 153–155, 159–164, 225
Remote Server [web section], 180
Self Test [command], 104, 134
Remote Server Settings [command], 104, 149
Semiconductor Radiation Detector, 285
Report Settings [command], 104, 153
Send [key function], 81, 92, 114, 115, 138
Reports [web section], 180
Send Data © (menu), 104
Reset, 66
Send Identi ication [command], 137
Reset [key function], 132, 157
Send Identi ication [key function], 92, 114
Reset Dose [key function], 157
Send Identi ication © [command], 104
Reset Factory Settings [command], 104, 132
Send Spectrum [command], 140
Resolution, 284
Send Spectrum [key function], 115
Resources [web page], 180
Send Spectrum © [command], 104
Restore [web section], 180
Sensitivity [setting], 158
RGPu, 284
Serial Number [property], 130
RID, 284
Service [web section], 179
Right [key function], 35, 41–43, 127, 150, 154,
162, 163
RNDIS, 284
ROI, 284
Röntgen Equivalent in Man (rem), 285
RT, 285
RT [key function], 114
Set Password [command], 104, 128
Settings
⋅ 𝜎 Alarm, 163, 164
⋅ Alarm, 162, 164
⋅ Available, 158
⋅ Backlight, 124
⋅ Beeper, 161
S
⋅ Bluetooth Device Name, 145
Satellites [property], 131
⋅ Change Device, 145
Save [key function], 112
⋅ Colors, 123
Saved on [property], 199, 202
⋅ Con idence, 117
Saving Energy, 231
⋅ Connection String, 150
Saving Power, 231
⋅ Counts, 122
Scaling [property], 106
⋅ Date, 127
Scintillation Counter, 285
⋅ Device Name, 152
Scintillator, 285
⋅ Disconnect, 143
Screenshot, 49
⋅ Displayed Unit, 159
Screenshots [property], 130
⋅ Duration, 117
300
identiFINDER® R300/en/2014.4(13623)/Feb2015
FLIR Detection
INDEX
⋅ Enable SPP, 143
SI (Système International d’Unités), 285
⋅ Extra Duration, 117
SI Pre ixes, 285
⋅ GPS, 128
Sievert (Sv), 285
⋅ HTTP URI, 150
SIM, 285
⋅ Integration Time, 158
Skip [key function], 35, 39, 41–43, 45–47, 77,
⋅ Key Functions, 124
81, 92, 107, 118, 119, 121
⋅ Language, 124
Sodium Iodide (NaI), 285
⋅ LEDs, 160
Software [property], 131
⋅ Live Time, 122
Software Update [web page], 181
⋅ .n42 (2006), 155
SOP, 285
⋅ .n42 (2012), 154
Source Stabilization, 286
⋅ Nuclides…, 118–120
⋅ Password, 150
*.spc, 286
*.spc [ ile type], 154, 202, 204
*.spe [ ile type], 154, 202, 204
⋅ Phone Number, 150
Speci ic Activity, 286
⋅ Real Time, 122
Spectra [web page], 180
⋅ SD1000…, 225
Spectrum, 286
⋅ Sensitivity, 158
Spectrum [command], 103, 106
⋅ Severity, 118
Spectrum [key function], 77, 93
⋅ Time, 127
Spectrum Acquisition, 232
⋅ Time Interval, 135
Square Root [key function], 114
⋅ Time Zone, 126
Standard Operating Procedure (SOP), 286
⋅ Timeout, 124, 143
Standing Operating Procedure, 286
⋅ U, Pu, 118
Start [key function], 92, 107, 134, 151
⋅ Usage, 118
Start Search [key function], 82, 145
⋅ USB Subnet, 153
Start Time [property], 202
⋅ User Name, 150
Starting Up, 62
⋅ …, 155
Status [property], 142
⋅ Vibrator, 161
Stop [key function], 95, 107, 108, 157, 211
⋅ Voice Phone, 153
Sv, 286
⋅ Warning, 162–164
Switch Off [key function], 95
Settings [key function], 142
Switching Off, 64
Settings [web menu], 180
Switching On, 62
Severity [setting], 118
System [key function], 130
Show Status [command], 104, 130
System [property], 130
Shut Down [key function], 65
System [web section], 179
Shutting Down, 64
System Files [web page], 181
⋅ Operator Name, 153
identiFINDER® R300/en/2014.4(13623)/Feb2015
301
INDEX
Système International d’Unités, 286
FLIR Detection
Vibrator [setting], 161
Voice Phone [setting], 153
T
Technologically Enhanced Naturally Occurring
Radioactive Material (TENORM), 286
W
Warning [setting], 162–164
TENORM, 286
Warnings, 97
Tethering, 286
⋅ Gamma, 98
Th-232 [key function], 116
⋅ Neutrons, 101
Thermal Neutron, 287
Weapons-Grade Plutonium (WGPu), 288
Time, 29, 125, 128, 186
Web Menus
Time [setting], 127
⋅ Administration, 181
Time Interval [setting], 135
⋅ Data, 180
Time Zone [setting], 126
⋅ Home, 179
Timeout [setting], 124, 143
⋅ Settings, 180
Total Time, 287
Web Pages
Trickle Charging, 287
⋅ Alarm, 180
True Time, 287
⋅ Alarms, 180
Type [property], 199, 207
⋅ Backup, 180
U
U, Pu [setting], 118
U-235 [key function], 116
Uncertainty [property], 116
Uniform Resource Identi ier (URI), 287
Unit Pre ixes, 287
Units of Time, 287
Universal Serial Bus, 288
Up [key function], 119–121
URI, 288
Usage [setting], 118
USB (Universal Serial Bus), 288
USB Subnet [setting], 153
User Interface [web section], 180
User Name [setting], 150
User Name: [property], 227
UTC, 288
⋅ Bluetooth SPP Settings ©, 180
⋅ Bulk Download, 180
⋅ Connectivity, 180
⋅ General, 180
⋅ GPS and Clock, 180
⋅ Identi ications, 180
⋅ Info, 179
⋅ Live Screen, 180
⋅ Live Spectrum, 181
⋅ Nuclides, 180
⋅ Password, 181
⋅ Resources, 180
⋅ Screenshots, 180
⋅ Software Update, 181
⋅ Spectra, 180
⋅ System Files, 181
Web Sections
⋅ Alarm Indicators, 180
V
⋅ Available Files, 181
Value [property], 207
⋅ Backup, 180
302
identiFINDER® R300/en/2014.4(13623)/Feb2015
FLIR Detection
INDEX
⋅ Bluetooth SPP Settings ©, 180
⋅ Clock, 180
⋅ Data Schemata, 180
⋅ Data Types, 180
⋅ Date Selection, 180
⋅ Download Options, 180
⋅ Gamma Alarms, 180
⋅ GPS, 180
⋅ Identi ication, 180
⋅ Local Area Network, 180
⋅ Measurement, 180
⋅ Neutron Alarms ©, 180
⋅ Open-Source Software, 180
⋅ Remote Server, 180
⋅ Reports, 180
⋅ Restore, 180
⋅ Service, 179
⋅ System, 179
⋅ User Interface, 180
WGPu, 288
WGS84, 288
World Geodetic System (WGS84), 288
X
XML (Extensible Markup Language), 289
*.xml [ ile type], 183, 195
Y
Ymax/2 [key function], 114
Ymax/4 [key function], 114
Z
Z, 289
*.zip [ ile type], 56, 197, 198, 202, 203
Zoom 1.5 MeV [key function], 110
Zoom 1:1 [key function], 110
Zoom 3 MeV [key function], 110
Zoom ROI [key function], 110
identiFINDER® R300/en/2014.4(13623)/Feb2015
303
Europe, Africa, Middle East
Americas
Asia Paci c
FLIR Detection, Inc.
FLIR Detection, Inc.
FLIR Detection, Inc.
Luxemburgstraat 2
100 Midland Road
3 Pickering Street #03-49
2321 Meer
Belgium
Oak Ridge, TN 37830
Nankin Row
USA
Singapore 048660
T + 32 (0) 3665.5106
T + 1.865.220.8700
T + 65.6822.1595
v + 32 (0) 3303.5624
v + 1.865.220.7181
k radiation.support@ ir.com
m detectionsupport.com/radiation/