1
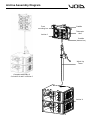
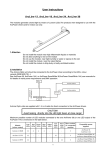
OWNER'S MANUAL
ARCLINE 6
OWNER'S MANUAL
ARCLINE 6
Arcline
Arcline
Features
Close tolerance and durable components provide increased reliability and greater output.
Accurately machined multi laminate birch plywood cabinets for superior strength.
120 degree wide dispersion for maximum coverage.
Self contained flyware system with tilt adjustment in 2 degree steps.
Components emanate from a single point to form a virtual arc, increasing HF extension and throw.
Built in Electronic protection device for the HF drivers.
Tough kick proof grills with foam filters protect the components from the heaviest of abuse.
Three year warranty and guarantee.
System Connections
Arcline 6 has two inputs on its rear panel. When using an Arcline 6 with Arcline X subs, connect the
Arcline X to an amplifier or amplifiers that use pins +1, -1 for the low output and pins +2, -2 for the mid hi
output. Use a short cable wired +2, -2 to +2, -2 to connect from the Arcline X to the connector marked
INPUT on the Arcline 6. If a separate cable is used from an amplifier to connect directly to an Arcline 6,
use a cable wired +1, -1 to +1, -1 and connect to the input marked INPUT on the Arcline 6.
When linking two Arcline 6's, connect via the INPUT and LINK OUT connectors on both speakers. A
cable wired +1, -1 to +1, -1 must be used when linking via the INPUT and LINK OUT connectors.
Each Arcline 6 has a nominal impedance of 8 ohms. An amplifier capable of delivering between 750 to
900 watts rms to each Arcline 6 is recommended.
System Assembly
Place an Arcline X into its desired position and place another Arcline X on top. Insert the winch up tower
though both Arcline X subs making sure the winder handle faces rearwards. Next mount the craddle on
to the top of the winch up stand. Extend the front mounting bars and insert the locking pins on one of the
Arcline 6 enclosures. Lift the Arcline 6 on to the cradles bottom bar then lift the Arcline 6 until both front
mounting bars are lined up with the cradles front mounting points. Insert both locking pins. Fit the rear
mounting bar, adjust the tilt and then insert the locking pins. If a single Arcline 6 is to be used in a craddle
insert 2 locking pins into the cradles telescopic tubes. If a further Arcline 6 is to be used, push the Arcline
6 up vertically until the telescopic tubes are fully extended and insert both locking pins. A further Arcline 6
can now be mounted under the top Arcline 6 by use of the mounting bars and locking pins.
During transit the locking pins can be store in the holes marked 'transit lock'. Doing so will stop any
movement of the connecting bars during transit and reduce the risk of losing the locking pins.
Precautions
Please consider the following precautions during use :
1. Install Arcline 6 in a dry environment, do not expose the cabinet to rain or moisture.
2. When flying or mounting Arcline 6 ensure safe working practices and follow the recommended
rigging guidelines. Check the flying system regularly for any defects or lose bolts and replace any
worn or damaged pins.
Page 3
Reference Manual
Arcline
TECHNICAL SPECIFICATIONS
Frequency Response :
Arcline 6
60 Hz - 20 KHz -3dB
Sensitivity :
101 dB 1w/1m
Impedance :
8 ohms
Power Handling :
800 watts rms
Maximum Output :
129 dB cont
132 dB peak
Dispersion :
120 h x 12 v
Crossover Point :
900Hz passive
Driver Configuration :
4 x 6.5" neo 3 x 1" neo
Protection :
HF - Electronic device
Rigging, Mounting :
Wind up fly system with 2 degree tilt
adjustment 0 - 10 degrees.
Construction :
15 mm multi laminate birch plywood
Finish :
Textured polyurethane
Connectors :
2 x 4 pole speakon
Dimensions :
538 mm wide
395 mm high
355 mm deep
Weight :
28.2 Kg net
31.6 Kg shipping
Page 4
Reference Manual
Arcline
Service
This unit has very sophisticated circuitry and should only be serviced by a fully trained
technician.
No user serviceable parts inside
Refer servicing to a qualified technician
Worldwide Service
Service may be obtained from your local authorised service centre. To obtain service,
simply present your sales receipt as proof of purchase along with the defective unit to
an authorised service centre. They will handle the necessary paperwork and repair.
Remember to transport your unit in the original factory packaging.
1. When sending an Arcline Series product to an authorised service centre for service,
please write a detailed description of the fault and list any other equipment used in
conjunction with the faulty product. Send the fault description with the faulty product,
do not send it separately.
2. Ensure safe transportation of your unit to the authorised service centre. Ship it in the
original factory packaging if possible.
3. Do not ship the unit in any kind of rack. Ignoring this warning may result in extensive
damage to the unit and the equipment rack. Accessories are not needed. Do not
send the instruction manual, cables or any other hardware.
4. Before returning your faulty product for repair, please remember to get a return
authorisation number from the dealer whom you purchased your product from.
Failure to do so could delay the repair of your product.
Warranty Registration
Please take time to fill out the warranty registration form at the back of this manual and
return it to Void Acoustics.
Environmental
WEEE Mark
If you want to dispose of this product, do not mix with general
household waste. There are separate collection systems for used
electronic products in accordance with legislation under the WEEE
Directive (Directive 2002/96/EC) and is effective only within the
European Union.
This product is Rohs compliant
Page 5
Pb
Reference Manual
Arcline
LIMITED WARRANTY
THE WARRANTY
For a period of three (3) years from the date of delivery to the original purchaser (as shown
on the original invoice or sales receipt), Void Acoustics (hereinafter "Void") warrants to the
ORIGINAL OWNER of each new Arcline Series product (provided it was purchased at an
Authorised Void Dealer) that it is free of defects in materials and workmanship and that each
product will meet or exceed all factory published specifications for each respective model.
Void agrees to repair or replace (at its discretion) all defective parts at no charge for labour or
materials; subject to following provisions:
WARRANTY VIOLATIONS
Void shall take no responsibility for repair or replacement as specified under this warranty, if
the damaged product has been subject to misuse, accident, neglect or failure to comply with
normal maintenance procedures; or if the serial number has been defaced, altered or
removed. Nor will Void accept responsibility for, or resulting from, improper alterations or
unauthorised parts or repairs. This warranty does not cover any damage to speakers or any
other consequential damage resulting from breach of any written or implied warranty.
VOID WARRANTY PROVISIONS
Void will remedy any defect, regardless of the reason for failure (except as excluded) by
repair, or replacement. Void will remedy the defect and ship the product within a reasonable
time after receipt of the defective product at an Void Authorised Service Centre.
TO OBTAIN WARRANTY SERVICE
In the event that a Void product requires service, the Owner must contact Void or an
Authorised Void Service Centre to receive an R.A.N. (Return Authorisation Number) and
instructions on how to return the product to the Void Authorised Service Centre, or to the
factory. Void (or its Authorised Service Centre) will initiate corrective repairs upon receipt of
the returned product. Please save the original carton and all the packing materials in case
shipping is required. All products being returned to the factory or service centre for repairs
must be shipped prepaid.
If the repairs made by Void or the Void Authorised Service Centre are not satisfactory, the
Owner is instructed to give written notice to Void. If the defect or malfunction remains after a
reasonable amount of attempts by Void to remedy the defect or malfunction, the Owner shall
then have the option to elect either a refund or replacement of said Void product free of
charge. The refund shall be an amount equal to but not greater than the actual purchase
price, not including any taxes, interest, insurance, closing costs and other finance charges
(minus reasonable depreciation on the product). If a refund is necessary, the Owner must
make the defective or malfunctioning product available to Void free and clear of all liens or
other restrictions.
MODIFICATIONS OF EQUIPMENT
Void reserves the right to modify or change equipment (in whole or part) at any time prior to
delivery thereof, in order to include therein electrical or mechanical improvements deemed
appropriate by Void, but without incurring any liability to modify or change any equipment
previously delivered, or to supply new equipment in accordance with any earlier
specifications.
DISCLAIMER OF CONSEQUENTIAL AND INCIDENTAL DAMAGES
YOU, THE OWNER, ARE NOT ENTITLED TO RECOVER FROM VOID ANY INCIDENTAL
DAMAGES RESULTING FROM ANY DEFECT IN THE VOID PRODUCT. THIS INCLUDES
ANY DAMAGE TO ANOTHER PRODUCT OR PRODUCTS RESULTING FROM SUCH A
DEFECT.
WARRANTY ALTERATIONS
No person has the authority to enlarge, amend, or modify this Warranty. This Warranty is not
extended by the length of time which the Owner is deprived of the use of product. Repairs
and replacement parts provided pursuant to the Warranty shall carry only the non-expired
portion of the Warranty.
THIS STATEMENT OF WARRANTY SUPERSEDES ALL OTHERS CONTAINED IN THIS
MANUAL
Technical and design specifications are subject to change without notice
Page 6
Reference Manual
Unit 10B, Dawkins Road Ind Est, Poole, Dorset, BH15 4JD
Tel: +44 (0)870 1651 332 Fax: +44 (0)870 1651 352
Void Acoustics
This warranty in no way affects your statutory rights.
Carriage costs to Void Acoustics will be returned to the
customer if warranty work proves necessary. Packing,
insurance and freight on the return journey will be paid by
Void Acoustics or its authorised dealers.
Do not send goods to Void Acoustics without first obtaining
a return authorisation number.
4. That the product has not suffered damage in transit.
3. That the product has not been modified, disassembled
or tampered with by any person other than Void Acoustics
technical staff.
Tel :
Model
Void Acoustics, Unit 10B, Dawkins Road Ind Est, Poole,
Dorset, BH15 4JD, UK.
Return the product (preferably in its original box) to :
Contact the dealer from whom you purchased the product
and get a return authorisation number.
What to do if your Void product needs repair
Post code :
Suppliers name and address
Serial number
1. This warranty is only valid in the country of purchase.
2. That the product has not been abused or operated in
conjunction with unsuitable or faulty apparatus.
Date of purchase
Warranty Copy
Owner's
This Void Acoustics product is guaranteed against defects
due to faulty materials or workmanship for a period of 3
years from the date of original purchase, subject to the
following restrictions.
Warranty
Void Acoustics
Void Acoustics
Unit 10B
Dawkins Road Ind Est
Poole
Dorset
BH15 4JD
UK
Post code :
Post code :
Tel :
Your name and address
Tel :
Suppliers name and address
Serial number
Date of purchase
Model
Thank you for purchasing this Void product. Please
complete this warranty registration card and cut off this
part and send it to the address overleaf.
Warranty Registration
Arcline 6
Getting Started
1. Carefully unpack all the speaker cabinets.
2. Place an Arcline X into its desired position and place another Arcline X on top. Insert the winch up tower though
both Arcline X subs making sure the winder handle faces rearwards. Next mount the craddle on to the top of the
winch up stand. Extend the front mounting bars and insert the locking pins on one of the Arcline 6 enclosures. Lift
the Arcline 6 on to the cradles bottom bar then lift the Arcline 6 until both front mounting bars are lined up with the
cradles front mounting points. Insert both locking pins. Fit the rear mounting bar, adjust the tilt and then insert the
locking pins. If a single Arcline 6 is to be used in a craddle, insert 2 locking pins into the cradles telescopic tubes. If
a further Arcline 6 is to be used, push the Arcline 6 up vertically until the telescopic tubes are fully extended and
insert both locking pins. A further Arcline 6 can now be mounted under the top Arcline 6 by use of the mounting bars
and locking pins.
3. (Connection Method 1. Using two Infinite 8's (X or V2 models) and the cables supplied in the accessory pack)
Each side of the system uses one amplifier. The connections for both left and right sides are identical. Connect the
outputs of a Digidrive to the inputs of an amplifier. CH 1 on the amplifier will be bass and CH 2 will be mid hi. Connect
one of the thick (4 way) 8 meter speaker cables to output CH 1 on the amplifier. Connect the other end of this cable to
one of the speakons on the bottom Arcline X. Both speakons on an Arcline X are wired in parallel, so you can connect
to either speakon. Link from the bottom to top Arcline X sub by using the 1 meter (4 way) link cable. Use the 3 meter
(2 way) cable to connect from the top Arcline X to the speakon marked INPUT on the Arcline 6. Repeat the same
connections for the other side of the system.
(Connection Method 2. Using separate amplifiers for Arcline X and Arcline 6 and an adaptor cable)
This connection method use's the same connections as method 1, but requires an adaptor to be made to connect the
outputs of both amplifiers into the 4 way cable. The adaptor is made from two speakon plugs and one speakon
socket. Wire a short length of cable to pins +1 and -1 on a speakon socket. The other end of this cable gets attached
to a speakon plug wired +1, -1. Wire another short length of cable to pins +2, -2 on the speakon scoket. The other
end of this cable gets attached to a speakon plug wired +1, -1. The plug wired +1, -1 should be connected to the
bass amplifier and the plug wired +2,-2 should be connected to the mid hi amplifier. The speakon socket should be
connected to the end of the think (4 way) 8 meter cable that would normally be connected to CH 1's output on an
Infinite 8.
(Connection Method 3. Using separate amplifiers for Arcline X and Arcline 6)
Connect one of the thick 8 meter speaker cables to one channel of the bass amplifier. Connect the other end of this
cable to one of the speakons on the bottom Arcline X. Both speakons on an Arcline X are wired in parallel, so you
can connect to either speakon. Link from the bottom to top Arcline X subs by using the 1 meter link cable. Use a 10
meter cable (not supplied) wired +1, -1 to +1, -1 and connect one end to the mid hi amplifier. Connect the other end
to the speakon marked INPUT on the Arcline 6. Repeat the same connections for the other channel of the
system.
4. When using two Arcline 6's per side, link via the LINK OUT and INPUT speakons on the rear of the Arcline 6's with a
2 way cable wired +1, -1 to +1, -1.
Precautions
Only connect an Arcline 6 to an Arcline X with a cable wired +2, -2 to +2, -2. If a cable wired +1, -1 to +1, -1 is
used the Arcline 6 will receive the same signal as the Arcline X.
Warranty Registration
Please take time to fill out the warranty registration form at the back of the manual and return it to Void Acoustics
Arcline Assembly Diagram
Front
mounting bar
Arcline 6
Craddle
Telescopic
tube
Craddle
(bottom bar)
Winch Up
Tower
Complete assembly of
2 x Arcline X and 2 x Arcline 6
Arcline X