1
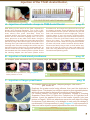
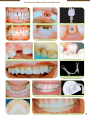
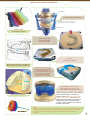
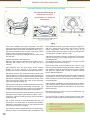
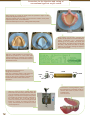
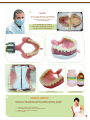
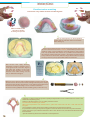
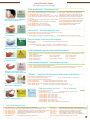
Manual Pressing Dental
2009 (EN)
THE J-100 EVOLUTION SYSTEM
INSTRUCTIONS FOR USE
8 PRODUCTS AVAILABLE
T.S.M. Acetal Dental 1
The.r.mo. Free
2
The.r.mo.Bridge
3
Corflex Orthodontic
4
Corflex Plastulene
5
Conventional hot acrylic resin
6
FLexi-J (Nylon)
7
F.J.P. (Compoud) 8
1
2
3
4
5
6
7
8
What is the J-100 Evolution System?
The J-100 Evolution is a multipurpose injection system,
with the ability to inject 8 different products,
suitable for many different applications:
from aesthetic clasps to elastic prostheses,
to gum shields for sports activities.
In addition, the system allows the user to inject
all acrylic resins hot, and to cure them
in just 30 minutes, under constant pressure.
Ë
Ë
Ë
Ë
CONTENTS
Multifunctional electronic panel
30 Programs
Pre-injection alarm
Flask cooling
P. 3 Ë TSM Acetal Dental
•A Injection of aesthetic clasps
•B Injection of middle-sized prostheses
•C Injection of larger prostheses
P. 4 • Positioning of sprues
• Bonding
• Staining of TSM Acetal Dental or
The.r.mo.bridge
Manual
operation of the
heating chamber
P. 6 Ë
The.r.mo. Free
P. 7 Ë
The.r.mo. Bridge
P. 8 Ë Corflex Orthodontic
• Splints and gum shields for
sports activities
P. 9 • Injection of Corflex Orthodontic
P.10 Ë Corflex Plastulene
• Soft base on complete prostheses
and obturators
Entry into
the Program area
P.12 Ë
Exit from the
Program area
Program
start
Program
selection
Program
cancellation
Hot Acrylic Resins
P.14 Ë Flexi-J (Nylon)
• Injection of the Flexi-J
P.15 • Finishing and polishing
• Repairs and Rebases -Clinical cases
P.16 Ë F.J.P. (Compound)
P.18 Ë
List of product codes
The J-100 Evolution Programs
Program
Temperature
Timer 1
Pre-injection
Timer 2
Timer 3
°C.
Pre-injection
Allarm
Injection with
cooling under
heating
pressure
Ventilation
Pressure
Injection
On / Off
Bar
speed
01
TSM Acetal Dental “A”
220 °C.
20 minutes
ON
02 minutes
20 minutes
ON
4,0 Bar
Slow
02
TSM Acetal Dental “B”
220 °C.
20 minutes
ON
03 minutes
30 minutes
ON
4,0 Bar
Slow
03
TSM Acetal Dental “C”
220 °C.
20 minutes
ON
03 minutes
40 minutes
ON
4,0 Bar
Slow
04
The.r.mo. Free
220 °C.
13 minutes
ON
02 minutes
30 minutes
ON
5,0 Bar
Fast
05
The.r.mo. Bridge
227 °C.
08 minutes
ON
02 minutes
30 minutes
ON
5,0 Bar
Fast
ON
00 minutes
20 minutes
ON
4,0 Bar
Slow
06
Corflex Orthodontic
165 °C.
20 minutes
08
Corflex Plastulene 80 Sh.
180 °C.
20 minutes
ON
00 minutes
20 minutes
ON
4,0 Bar
Slow
10
Acrilic resin H
150 °C.
00 minutes
OFF
15 minutes
15 minutes
OFF
3,0 Bar
Slow
11
Flexi-J type 1
260 °C.
12 minutes
ON
01 minutes
10 minutes
ON
5,5 Bar
Fast
12
Flexi-J type 2 (or a mix)
265 °C.
12 minutes
ON
01 minutes
10 minutes
ON
5,5 Bar
Fast
14
from 15 to 30
2
D e s c r iption
Manually
Parameters
F. J. P.
230 °C.
15 minutes
ON
02 minutes
15 minutes
ON
5,0 Bar
Slow
Free program ex.
220 °C.
20 minutes
ON
02 minutes
20 minutes
ON
--
--
Injection of the T.S.M. Acetal Dental
te flon
TSM
Ace tal
Dental
Cartridge
AESTHETIC CLASP
COLOUR SCALE with 20 shades available
A - Injection of aesthetic clasps in TSM Acetal Dental
After boiling out the wax from the flask, separate the
plaster using Pressing Separator. Turn on the J-100,
and select the required Program number (see Program
chart, above), then press ‘Auto-Start’. Place the
required amount and correct shade of Acetal Resin
buttons into the aluminium cartridge tube. On top of
these, place one or two white Teflon disks. Using the
supplied pliers, pinch all the way around the open end of
the tube to seal in the buttons. Apply a small amount of
Pressing Red Tube Lubricant around the middle of the
cartridge tube. Place the cartridge tube all the way into
the brass injector cylinder from the unthreaded end, so
that the closed end of the cartridge tube sits flush with
the threaded end of the brass injection cylinder. Screw
the centring adapter into the brass cylinder at the
prog. 01
threaded end, and insert the cylinder all the way into
the heating chamber. Place the flask so the injection
hole fits down onto the cylinder. Slide the vice over the
flask, and screw down to ensure a tight grip. The preinjection alarm (if set) will sound 5 minutes before
injection begins. Ensure you have the flask in place by
this time. Press the ‘Auto-Start’ button once more to
silence the alarm. The machine will automatically
inject and cool down. When the Program has finished,
an alarm will sound, and the machine will shut down.
Remove the flask (using a cloth, as it will still be hot),
and cool it down by running it under cold water. Deflask, trim using diamond or green stones. Polish with
felt wheels and polishing paste.
B - Injection of mid-sized prostheses
prog. 02
For example: space maintainers with 1 or 2 elements, inlays, pin stumps, splints, etc…
Space maintainer
Splint
Aesthetic clasps
Follow the above procedure A, using Program 2,
with a pressure of 4 bar.
Pin Stumps
Onlay
Inlay
WARNING:
Never remove items from a flask while it is still hot.
Always wait until the flask has reached room temperature.
C - Injection of larger prostheses
prog. 03
For example: partial or full plates - temporary bridges – bite raisers –
gum shields, etc.
Duplicate the master model using silicone, then cast the duplicate in
Marble Stone. This plaster has a higher expansion than standard plaster,
which will compensate for the larger contraction of Acetal Resin.
For cleaner casting, use Gyplux as a separator, instead of Pressing
Separator. Place under UV light in the ‘Complex Lux S-8’ light box for 8
minutes. Invest the appliance close to the smaller injection hole (see
picture on Page 4). When set, attach wax sprues to each side of the ridge
for dentures (5 mm diameter), or for bridges, to each unit of the bridge (3
mm diameter). Follow procedure A, using Program 03, with a pressure of
4 bar, and a slow injection speed (adjustable at the rear of the machine).
Orthoptic bite
Gingival mask
Partial prosthesis
WARNING:
Never remove items from a flask while it is still hot. Always
wait until the flask has reached room temperature.
Position of Sprues
Ø 4 mm, slightly tapered at the point
of contact with the appliance.
The wax appliance can be completely submerged in the plaster, up to the edges of the wax,
from which the sprues must be connected to the entry of the flask.
Full Plates
Bite Frameworks
Procedure for bonding TSM Acetal Dental to
the acrylic using Acelux bonding agent
Lower Frameworks
Upper
Procedure for the staining
of TSM Acetal Dental and The.r.mo.Bridge
A - In the LaboratorySand-blast the part
concerned with 50μ aluminium dioxide. Clean with a
steam jet. Apply the Primer Lux Clea (only for TSM Acetal
Dental), and allow to dry. Mix the Acelux with the
appropriate stain colour. Apply with a brush to the
surface. Place under UV light for 2 minutes in the
‘Complex Lux S-8’ light box. When the desired colour is
achieved, apply a further layer of Acelux, and place under
UV light for a further 7 minutes.
A - In the Laboratory
Sand-blast the surface with 50μ white aluminium dioxide.
Clean with a steam jet. Apply the Primer Lux Clea, and
allow to dry. Apply a very thin layer of Acelux, blow off
excess product using compressed air to obtain a thin
Acelux film. Cure under UV light for 7 minutes in the
‘Complex Lux S-8’ light box.
Mini Colour System
Staining Kit
B - In the
Dental
Surgery
It is now possible to
use a composite
new-generation
adhesive to obtain
efficient bonding with
TSM Acetal Dental.
Preparation should
be carried out
according to the
manufacturer’s
instructions.
Kit for the staining of acetal and acrylic resins
Available versions:
Colour System (wooden box complete with 16 stains, code 00300)
Vita mini colour system (”Vita” col. shade stain base, code 00299-V)
Ivoclar mini colour system (”Ivoclar” col. shade stain base, code 00299-I)
USA mini colour system (pre-mixed stain base with ref. Vita, code 00297)
Examples of TSM Acetal Dental appliances
Before
Gum profile after extraction
Aesthetic clasps
Post core coated with TSM A.D.
After
Crochet esthétique
of the single healing cap
Pin stump with diverging roots
Space maintainer
crochet
acétal clasp
dentalonsur
un squelété
Aesthetic
framework
Bite Raisers
Partial prosthesis
Active appliance in the oral cavity
Injection of The.r.mo.Free
Monomer-free acrylic resin for partial or total prostheses
View of the sprues for an
upper total prosthesis
View of the sprues for a
lower total prosthesis
View of the sprues for a
partial prosthesis
Invest the waxed up appliance in the flask, using Class III or IV stone, also a Class III or
IV plaster is recommended for the model.
Run the sprues (ø 5mm) from the injection hole to each side of the appliance, and one to
the middle of the appliance. Sprues must extend over the appliance for at least 10mm.
Top up the flask. Boil out the wax, apply a first layer of Pressing Separator while the
plaster is hot, and allow to cool. Apply a second layer of Pressing Separator once cooled.
Fill the aluminium cartridge tube with the required amount of The.r.mo.Free, place the
Teflon button on top, and using the supplied pliers, pinch all the way around the open end
of the tube to seal in the button. Apply a small amount of Pressing Red Tube Lubricant
around the middle of the cartridge tube. Place the cartridge tube all the way into the
brass injector cylinder from the unthreaded end, so that the closed end of the cartridge
tube sits flush with the threaded end of the brass injector cylinder. Screw the centring
adapter into the brass cylinder at the threaded end, and insert the cylinder all the way into
the heating chamber. Select Program 04, and press the ‘Start’ button. While the J-100 is
heating, close the flask, screwing down the bolts, and place into boiling water, with the
open injection hole out of the water. Leave for 10-15 minutes. Place the flask so the
injection hole fits down onto the cylinder. Set the injection speed at its maximum (the
speed adjuster located at the rear of the J-100 should be completely open). Slide the vice
over the flask, and screw down to ensure a tight grip. The pre-injection alarm (if set) will
sound 5 minutes before injection begins. Ensure you have the flask in place by this time.
Press the ‘Auto-Start’ button once more to silence the alarm. The machine will
automatically inject and cool down. When the Program has finished, an alarm will sound,
and the machine will shut down. Remove the flask (using a cloth, as it will still be hot),
and cool it down by running it under cold water.
De-flask, trim using standard acrylic trimmers and polishers.
ADVANTAGES:
- No free monomer
- Excellent adhesion with the same polymer
- Excellent adhesion with conventional acrylic resin
- Excellent precision fit
Note: for re-lines and repairs, use only cold cure acrylic.
Injection of The.r.mo.Bridge
Acrylic resin for partial bridges and bites
Staining
Kit
Available in 17 shades
Including transparent
Duplicate the model in silicone, and cast the impression twice (using Class IV
plaster). Place the model in the flask, ensuring the vestibular part of the front
teeth face the injection hole. Wax up the bridge, invest in a flask, close to the
injection hole. Attach the sprues to the incisal edge of all front teeth. For
posteriors, place 2 sprues, or more for larger bridges. Sprue diameter should
be approx. 4mm, and the length of the sprue from the runner bar should be
approx. 3mm. The runner bar and sprues to the injection hole should be
approx. 5mm in diameter. Fill the aluminium cartridge tube with the required
amount of The.r.mo.Bridge. Add the Teflon button. Apply a small amount of
Pressing Red Tube Lubricant around the middle of the cartridge tube. Place
the cartridge tube all the way into the brass injector cylinder from the
unthreaded end, so that the closed end of the cartridge tube sits flush with the
threaded end of the brass injector cylinder. Screw the centring adapter into
the brass cylinder at the threaded end, and insert the cylinder all the way into
the heating chamber. Select Program 05, and press the ‘Start’ button.
While the J-100 is heating, screw down the bolts to lock the flask, top up the
flask, and allow to set. Place into boiling water, with the open injection hole
out of the water, and leave it for 10-15 minutes. Apply a layer of Pressing
Separator while the plaster is hot. Use a compressed air jet to remove excess
Separator. Warning: the product The.r.mo.Bridge sticks to plaster, like a
conventional acrylic resin. Place the flask so the injection hole fits down onto
the cylinder. Set the injection speed at its maximum (the speed adjuster
located at the rear of the J-100 should be completely open). Set the injection
pressure at 5 bar. Slide the vice over the flask, and screw down to ensure a
tight grip. The pre-injection alarm (if set) will sound 5 minutes before injection
begins. Ensure you have the flask in place by this time. Press the ‘Auto-Start’
button once more to silence the alarm. The machine will automatically inject
and cool down. When the Program has finished, an alarm will sound, and the
machine will shut down. Remove the flask (using a cloth, as it will still be hot),
and cool it down by running it under cold water. De-flask, trim using standard
acrylic trimmers and polishers. During the polishing phase, pay attention not
to overheat the material.
Staining:
Use Acelux, do not use Lux Clea, and do
not sand-blast the surface (see page 4).
Photopolymerising lacquer
Splints and Gum Shields in
Corflex Orthodontic
The current concept of the tailor-made gum shield
The functions of the tailor-made gum shield have evolved considerably since its inception. According to recent studies,
in addition to acknowledging its usefulness in preventing dental-maxillary traumas, researchers attribute to the gum
shield a fundamental role in preventing brain and spinal column trauma.
Dr Poisson (AHU of the UFR of Dentistry of the University of Bordeaux 2, and an expert dentist who works with the French
Boxing Federation) has recently published a thesis on the use of gum shields.
Analysis of international studies has led towards the determination of a temporal-mandibulary and maxillo-mandibulary
relation with regards to the use of gum shields.
Dr Poisson’s research paper also proposed a tailor-made gum shield, featuring optimal thicknesses, and a shape that
fosters ventilation, even when the jaw is shut tight. This gum shield is manufactured using the high-temperature, highpressure injection technique, with a material called “CORFLEX ORTHODONTIC”. The technique requires a mould to be
taken, which allows precise definition of the edges and thicknesses of the gum shield. In addition, the nature of the material
used - a copolymer, based on ethylene and vinyl acetate - has for a long time proved its capability to absorb shocks.
The results of all these works led to the creation of an individual gum shield that combines mouth ventilation with the ability
for the jaw to shut tight, thereby ensuring extreme comfort for athletes. This gum shield, which is effective in preventing
dento-maxillary traumas, also plays a role in supporting the head and the neck, increasing cervical muscular activity when
athletes move with their jaws shut tight. Therefore, the advantages in terms of endurance - both for the jaw and cervical
bones - coupled with an effective ventilation, contributes to preventing brain and spinal column trauma.
Within the framework of a Hospital Program of Clinical Research (PHRC), a new set of studies is currently being
conducted by the CHU in Bordeaux (Dentistry and Mouth Health Clinic - headed by Professor Dorignac), with the aim of
clarifying the mechanism acting on the cervical muscular region when an athlete clasps the tailor-made gum shield in their
jaw.
The procedure for manufacturing a tailor-made gum shield, established by Dr Poisson, consists of 5 steps (3
in the dental surgery, 2 in laboratory).
- STEP 1 (dental surgery)
Removal of any prostheses, maxillary and mandibulary
impressions taken by the dentist.
- STEP 2 (laboratory)
Casting of models and preparation of bite registration
showing temporal-mandibulary and maxillary relation, and
colour chosen for the gum shield.
- STEP 3 (dental surgery)
Determination of the temporal-mandibulary and maxillary
relation, and choice of colour for the gum shield.
- STEP 4 (laboratory)
Manufacture of the gum shield with high-temperature and
high-pressure injection, using CORFLEX
ORTHODONTIC.
- STEP 5 (dental surgery)
Fitting and adjustment of the gum shield, and advice given
for its cleaning and maintenance.
Injection of Corflex Orthodontic
border line
1
Wax up the gum shield.
minimum height of 4mm from the edge of the
upper incisive at the limit of breathing space
Ventilation space
Colour scale
10 shades available
2
Invest in flask with
an 8mm diameter
injection canal.
4mm minimum
3
Profile
of the gum shield.
Advice for the perfect trimming
of your gum shield or positioner.
4
After boiling out the wax,
allow the mould to dry,
and then to obtain a
gloss surface, apply a film of
light curing resin Gyplux,
and place in a UV
light box for 8 minutes.
5
Cool the flask down to room
temperature, then inject the
Corflex Orthodontic (Program 06).
Calibration spheres
After trimming the device to the desired
thickness and shape, use the felt
polishers from the Poly–Corflex kit to
obtain a satin finish. Use a flame to
obtain a smooth and shiny surface, or
alternatively use a recommended
solvent. Leave the device in water for
at least 10 minutes.
Note:
At the end of the Program, check that there is still some material left in the
cartridge. If there is not, then insufficient material may have been used,
so we recommend re-injecting with some additional material in the
hot flask.
Injection of Corflex Plastulene
Placing Plastulene 80 Shore A into the flask
For the manufacturing of
soft bases on total
prostheses, or surgical
obturators
Once wax modelling has been completed, and after
performing the final test, define the height forecast for the
Plastulene with a wax thread of a different colour (fig. 1).
Place the prosthesis in the first part of the flask, paying
attention not to cover the wax thread (fig. 2).
Insert the metal thickness between the two parts (code
RJ-100 739).
Cast the impression. Boil out the wax.
Make 2 x 6mm sprues at the level of 36/37/46/47 (fig. 3).
Separate with Gyplux and cure in a light box for 8
minutes.
Press and bolt the flask. Cure under UV light in a light box,
and then, starting with cold water, heat it until it reaches
boiling temperature (100°C), and allow to boil for 30
minutes. Before this time expires, prepare a cartridge with
2-3 Plastulene cylinders and Teflon caps.
Lubricate the cartridge externally, and place it into the brass
cylinder, screwing the centring device with the thermoinsulating washer.
Use Program 08 of the J-100 Evolution, at 4 Bar. Pre-heat
the cartridge for 20 minutes at 180° C.
The separator must be used during all the working
phases, up to the removal of the silicone spacer.
Roughen the surface of the teeth, and separate as usual.
Remove the flask from the boiling water, open it using
thermo-insulating gloves. Rapidly remove the Teflon sheet,
any residues of foglio R (sheet R) and the “silicone” spacer,
and clean the sprues well, so that no plaster residues
remain. Bolt the flask shut.
Placing the spacer: we recommend using silicone SilLabor 95 Shore to make the spacer, which is required to
keep the space that must be obtained afterwards with the
Plastulene. Alternatively, a thermoformed sheet, 1mm
thick may be used, leaving the areas of the retromolar
trigones free (picture B page 11).
All the phases described above must be performed as fast
as possible, to prevent the flask from cooling; otherwise
there would be a loss of the heat required to aid adhesion of
the two materials.
Fill the sprues with silicone and keep under pressure until
the silicone has hardened. Prepare the acrylic resin, e.g.
Idobase or Meadway (the type of resin is very important,
in order to obtain a better binding with the Plastulene).
When the resin has reached the right density, press it onto
the spacer. Place under a hydraulic press, about 2.5 bar.
Press for 2-3 times until the exceeding amount has been
totally removed.
Put a small amount of resin (discarded from the first
pressing) on the back area, to increase resin density.
Spread the 128 adhesive evenly on the resin and let the
solvent evaporate for 3-4 minutes.
You will notice that the superficial layer is no longer bright.
Place the sheet “R” (Plastulene) onto the Adhesive 128
Inject the flask, and allow to cool under pressure for about 1
hour, until the heating chamber temperature reaches 40°C.
Take out the flask and place in cold water for 10-15 minutes,
before opening it.
Roughen and trim the resin as usual. For Plastulene, use
Poly-corflex felts (page 11).
For the trimming of edges, Corflex Polish may be used,
whereas for polishing, the flame should be used, with care.
Note: in the case of a very thin crest (knife
blade), we recommend adding two additional
sprues, running
behind the retromolar spaces and connecting
them at the level of 36-37-46-47.
Examples of Preparation Phases
A
Definition of the Plastulene
edge height with the aid
of a wax thread
Example of a thermo-formed
spacer, 1mm thickness,
leaving the retromolar
spaces free
Instructions for the cleaning and maintenance of Corflex Plastulene
Clean the surfaces daily and gently with a toothbrush, using a
toothpaste and cold water (< 42°C).
Never use effervescent tablets to clean the prosthesis.
Never use soaps or detergents, or other detergent products.
Recommendations:
- If you notice abnormal tartar deposits on the prosthesis, take it
to your dental technician for cleaning.
- We recommend using a small ultrasound device for daily
cleaning.
- If you notice a little colour change on the surface of the
material, this may be caused by the mouth pH (acidity), or dyes
contained in coffee, in tea, tobacco, etc.
These possible marks do not affect in any case the physical
properties of the material, or its endurance.
Poli-Corflex felts
for the finishing
of Plastulene edges
Procedure for the injection and curing of
conventional type hot acrylic resins
After waxing up, invest as usual, with the posterior region of the
denture facing the injection hole.
After the plaster has set, clean and smooth the surface, then place
injection sprues of 8-10 mm diameter.
Place an outlet sprue of 4 mm, ending within the plaster.
After boiling out the wax, roughen the
surface of the teeth to increase retention.
Apply separator (e.g. Separating
Pressing) to the plaster, first while the
surface is hot, then after it has cooled. Bolt
the flask, and place the flask in boiling
water for 15 minutes, leaving the injection
hole out of the water.
Set the J-100 Evolution to Program 10,
adjust the pressure to 3 bar, and start
manual heating by pressing the ‘Heating
On/Off’ button (NOT the ‘Auto Start’ button)
and heat to 150°C.
4
Mix the acrylic as normal, to a
dough-like consistency.
Roll into a sausage shape, and place into
the brass tube used for acrylic injection.
Screw on the centring adapter, and place a
brass button with a rubber seal into the
open end.
A20
AOR2
A19R
AOR1
40 TA
40 TAOR
14F1OR
6
With the J-100 at 150°C, quickly place the
brass tube into the heating chamber. Slide the
vice over the flask, and screw down to ensure a
tight grip. Close the door and inject the product
by pressing the ‘Piston Up’ button, followed by
the ‘Auto’ button. The J-100 will remain at
150°C for 15 minutes, then a cooling phase will
follow for a further 15 minutes (until end of
cycle). Take the flask out, and allow to cool to
room temperature.
Unscrew the centring adapter, place
the brass tube in cold water, and then
use the blue tube to press out the
residual resin.
Trim as normal.
NOTE:
Using a Type 200 flask (code 00025),
it is possible to inject and cure two
prostheses at the same time
in just 30 minutes.
It is possible to inject
and cure all acrylic resins
in the J-100 Evolution.
Assessment of precision
Rapid finishing
CONCLUSION
Using the J-100 Evolution injection system generates superior
results when compared with the conventional pressing method.
?
?
?
?
superior mechanical resistance
no raised bite, with a more compact resin
superior dimensional stability
no porosity
ex. of acrylic resin
Injection of Flexi-J
the flexible prosthesis
Excellent colour matching
colours are very similar to those of natural gums
Flexi-J colour scale
7 shades available
including transparent
Wax up the appliance on the duplicated
model. Drill the retention holes on the teeth
while setting up.
Place into the flask with the rear part facing the injection hole. The
sprues must have a minimum ø of 5mm, and must be placed on the
posterior region of the prosthesis, connecting them to the injection
hole. Top up the flask with class-III or IV plaster. Fill the aluminium
tube with the required amount of Flexi-J, and place into the machine
to dry at 90°C for 45 minutes, without using a Teflon button. It should
be dry by the time you top up the flask and boil out the wax.
Boil out the wax, apply Pressing
Separator or Gyplux, and then cure in
a UV light box for 8 minutes. Gyplux
will make the surface of the resin
smoother after injection. If the teeth
become loose after boiling out the
wax, re-affix them with glue.
Before it cools, place a Teflon and brass button (code A-21) into the
aluminium tube. Pinch the end of the cartridge with the pliers, and put
it into the brass cylinder, and into the J-100, with the threaded end of
the aluminium tube protruding 2-3 mm. out of the brass tube.
Screw the centring adapter into the insulating part (code a-20 IC+II).
Adjust the J-100 to maximum injection speed (the adjustment screw located at the rear of the J-100
should be completely open).
Set the J-100 to Program 11 or 12, with a pressure of 5 bar.
Press the Manual Heating On’ button.
When the temperature has reached 255°C, place the brass tube into the J-100 and start the
Program.
The cold flask must be placed in the heating chamber 5 minutes before injection.
It is possible to use the pre-injection Program to sound an alarm when it is time to place the flask.
At the end of the cycle, take the flask out of the J-100, allow to cool, and break off the brass tube
from the flask.
Open the flask only when it has reached room temperature.
Procedure for trimming and polishing with
Flexi-J
TRIMMING
1 Use green silicone carbide stone for resin, at a slow speed (1000-1500 rpm), so as
not to overheat the product.
2
Use silicone polishers for pre-polishing to obtain a smooth appearance.
3
Use a scalpel to trim thin edges.
POLISHING
TO USE THE SPEEDS
BRUSHES' REDUCED
Super Polish
Use polishing brushes
with plenty of pumice
to keep the product cool.
For high gloss, use a hi-lustre
polishing compound.
New universal polishing paste
for the F.J.P. resin.
It can be used also with all
nylon bases resins.
Polisonix
Indispensable for the
cleaning of Flexi-J
Procedure
for repairing or re-lining with Flexi-J
It is necessary to follow the traditional procedure and place the prostheses
into the flask, with the parts to reconstruct remodelled using wax.
Then clean the flask according to the known technique.
Make the surface of the Flexi-J rough in the area concerned,
to increase mechanic retention and ensure a good adhesion with
the new material that shall be injected.
Insulate with Gyplux lacquer
and polymerise for 8 minutes.
Prepare the cartridge with the material
needed and start the programme of
J-100 Evolution (see page 14, point 4).
Leave the boiling hot flask open for about
4 minutes, to allow the product Primer
Flexi-J time to act;
Close the flask, place it on the injector
and inject the new material.
Put in boiling water the flask
containing the device in Flexi-J that
has to be repaired or rebased..
Take the flask out of boiling
water 7 minutes before
injection, remove the water
residues using compressed
air.
Spread Primer Flexi-J “P”
on the whole surface that
has to be repaired or
rebased.
(Note: the product must not
be placed on teeth)
Flexi-J
Clinical Cases
LABORATOIRE GAVALDA (ALBI)
BEFORE
AFTER
LABORATOIRE CHAUVIN (LA CROIX FALGARDE)
BEFORE
AFTER
ADVANTAGES OF FLEXI-J (Nylon)
Natural Translucency
Monomer-Free
Lightness and Flexibility
Virtually Unbreackable
No metal clasps
Exellent colour matching to natural gums
Ability to add or repair elements
DENTAL CONCEPT MÉDITERRANÉ (NICE)
AFTER
Crochet esthétique
LABORATOIRE GAVALDA (ALBI)
LABORATOIRE IMPACT DENTAIRE (NICE)
BEFORE
BEFORE
AFTER
AFTER
Crochet esthétique
Flexi-J
Clinical Cases
LABORATOIRE IMPACT DENTAIRE (NICE)
LABORATOIRE GAVALDA (ALBI)
DENTAL CONCEPT MÉDITERRANÉ (NICE)
BEFORE
BEFORE
BEFORE
AFTER
AFTER
AFTER
New
F. J. P.
The Innovation
The thermoplastic injection resin F. J. P. is the result of years of research and experimentation led by
Pressing Dental of San Marino.
For many years, materials based on Polyamide (nylon) have been used in the manufacturing of
prostheses, such as “ Val-plast” (by Val-plast, USA), “ Flexite “ (by Flexite USA) and Flexi-J, produced by
Pressing Dental.
The success of these materials is due to the mechanical properties of the resin, resulting in great comfort
recognized by patients, and most of all, an excellent aesthetic result.
Starting from the basis of these products, and being aware of their limits, Pressing Dental has created
a compound that improves their features, while maintaining the same advantages.
Objective
Creating an alternative compound to nylon, with these features:
Moderately elastic
Low liquid absorbing (one third of nylon)
Adhesion with acrylic resin (by using a primer)
No after-fusion bubbles, even with remarkable thickness
Can be polished with conventional techniques
Reusable (if used with J-100 and J-200 Pressing machines)
Procedure for
the injection
of F.J.P. resin
Code:
A, B, C, D, E – 00900
-
Program 14:
Temperature °C. :
230 °C
Timer 1 pre-injection:
15 Min.
Timer 2 injection with heating ON: 02 Min.
Timer 3 Cooling under pressure:
15 Min.
Ventilation:
ON
Pressure:
5 bar
Injection speed:
Slow
Semi-transparent
No need for exsiccation
High precision
Easy processing
Good colour stability
Sterilize at 120 C.
Super Polish
New universal polishing paste
for the F.J.P. resin.
It can also be used with all
nylon- based resins.
List of products codes
Flasks
Type 50
COD. 00030
Type 100
COD. 00020
COD. 00050
Tube lubricant
type red
Rj100 0018A
Screw for flasks
Type 200
COD. 00025
A-20 II
Thermal washer
for J-100 Evolution
Centring device
A-20 IC with insulating part
A-20 II
+ A-20 II 2
Mini colour system
System for the staining
of acetal and acrylic resins
Light curing
trays
(50 pieces)
COD 14001 Neutral
COD 14002 Pink
COD 14003 Blue
Insulating
washer
for J-100 Evolution
+reinforcing element
A-19
Injector for
thermoplastic resins
(e.g. TSM Acetal Dental)
RJ100-0014 G1 +G2
for J-100 (mod. ‘95)
00040 Tube type J-100
(containing 60 tubes + 60 caps)
00041 Tube type J-100
(containing 75 tubes)
4 Neon,
type 71
Halogen
Es. 00800 B
Resin Flexi-J colour B(Nylon)
4 Neon,
type 78
Teflon cap
Metal
cap
A-21
(indispensable for Flexi-J)
00040 T
Complex Lux S-8
Universal light curing lamp (320/550 NM)
Pneumatic drill
for bolting flasks
Filwax
White Wax for channels
Available Ø2, 3, 4, 5, and 9 mm.
COD 00082 Acecril
Chemical bonding of TSM Acetal
Dental and acrylic resins
COD 00302/2
Lux Clea
2x10 cc.
Primer for
Acelux
COD
00095 Acelux 30 cc.
000301/2 2 x 10 cc.
COD
00090 Gyplux 30 cc.
00091 Gyplux 50 cc.
Light curing lacquer
for the staining of
TSM Acetal Dental
Light curing
insulating material
for plaster models
Sil- Labor
Polycondensation
elastomer silicone
Type classic and hard
85 and 95 shore A
Sil- Labor “Gemini”
Addition silicone 1 : 1
Type 82 Sh.A colour Pink
Type 90 Sh.A colour Light blue
COD
S-500
Separating Pressing
Special insulating
material.
Contents: 500 ml
COD 00084-E
Marble Stone
(Evolution)
Special plaster for TSM
Acetal Dental models
Contents: Kg. 3
COD E-M
Expomodel
500gr.+100 gr.B
Sil- Press
Addition silicone 1 : 1
Type 10, 21 or 28
shore A
A simple solution for your
exhibition moulds
Epoxy Resin compound
And more...... see details on the web-pages or ask to the Pressig Dental dealer.
List of Product Codes
The compete range, see the web pages
T.S.M. Acetal Dental – Thermoplastic resin –
1
Aesthetic clasps, space maintainers,
bites, partial prostheses, etc.
2
Code. 00549 T.S.M. Acetal Dental Colour scale
Code. 00550 Assorted package, 1.150kg divided in 20
colours (8 disks per colour) + colour scale
Code. 00551-00570 500gr package ref. “Vita” A-A1-A2A3-A4-B-B1-B2-B3-B4-C1-C2-C3-C4-D2-D3-D4 pink
F1-F2-F3
Code. 00313 Colour system replacement - Magenta Red
for gum colouring
Code. 00084E Marble Stone Evolution, 3kg package
Code. 00095 Acelux, 30 cc package
Code. 00301/2 Acelux, 2 x 10cc package
Code. 00302/2 Lux Clea, 2 x 10cc package
Code. 00300 Colour System, complete wooden box:
16 pigments – white, black, yellow, Magenta red,
cyan blue, purple, green, orange, neutral brown,
reddish brown, opaque grey, translucent grey, blue
translucent grey, ochre, red orange, red purple +
Acelux 10ml, Lux Clea, 2 brushes and mixing plate
Code. 00299-I Mini Colour System “Ivoclar" base
Code. 00299-V Mini Colour System “Vita" base
Code. 00299-USA Mini Colour System with
premixed pigments on “Vita” base
The.r.mo.Free – Thermoplastic acrylic resin –
Acrylic resin for prostheses without
liquid monomer
Code. 00649 The.r.mo.Free and The.r.mo.Bridge Colour scale
Code. 00601 Transparent colour, 500gr
Code. 00602 Pink colour without fibres, 500gr
Code. 00603 Pink colour with fibres, 500gr
3
The.r.mo. Bridge - Resin acrylic thermoplastic Code. 00649
The.r.mo.Free and The.r.mo.Bridge Colour scale
From Code:
Code. 00650 to 00666 200 gr. package - colours: 00650 transparent,
00651 to 00666 ref. Vita base A, A1, A2, A3, B, B1, B2, B3, C, C1, C2, C3, D, D2, D3, D4
Monomer-free acrylic resin for
temporary bridges, bites, etc.
4
Corflex Orthodontic (type 80) - Resin vinyl thermoplastic -
Resin for positioners and gum
shields for sports
5
Code. 00997 Colour scale Code. 01000 Assorted package, 600gr (excluding colours black and white)
400gr packages
Code. 01001 Transparent
Code. 01002 White
Code. 01003 Yellow
Code. 01004 Green
Code. 01005 Pink
Code. 01006 Red
Code. 01007 Fuchsia
Code. 01008 Light Blue
Code. 01009 Blue
Code. 01010 Black
Corflex Plastulene (type 80) – Thermoplastic vinyl resin –
Code. 01001 Single colour pink, 200gr package
Code. K Teflon sheets 30pcs package
Code. R-sheets Plastulene sheets, 10 pcs package
Code. 00085 Poly-Corflex (felts for the finishing of Corflex vinyl resins), 11pcs package
Resin for “soft” bases on total
prostheses and surgical obturators
“IDO Base” – Acrylic resin for direct polymerisation on the J-100 Evolution –
6
Conventional hot acrylic resin with
polymerisation after injection
This product is available only upon request
Code. 21397 Idobase polymer, 900gr
Code. 21398 Idobase monomer, 500ml
Spare O-ring for injection kit for acrylic resins
O-ring for centring device /acrylic OR1, 10 pcs
Code. RJ100 A Or1
O-ring for centring device /acrylic OR2, 10 pcs
Code. RJ100 A OR2
Code. RJ100-0014 F1 OR O-ring for conventional centring device, 10 pcs.
O-ring for centring device /acrylic cap 00040TA, 10 pcs
Code. 00040 TA-OR
Flexi-J (Thermoplastic nylon resin) -
7
8
Resin for flexible prostheses
F. J. P. (Compound)
Code.00799 colour Scale
Code.00900-A F.J.P. white/transparent colour
(250g Packungen:)
Code.00900-B F.J.P. pink colour
Code.00800-A Type 1 white/transparent colour
Code.00800-B Type 1 pink colour
Code.00800-C Type 1 pink colour
Code.00800-D Type 1 pink colour
Code.00800-F Type 2 transparent colour
Code.00800-G Type 2 pink colour
Code.00800-H Type 2 pink colour
Code.00800-P Flexi-J Primer adhesive for polyamides
Accessories and spare parts
Code. Rj100-0014 F1
Code.RJ100-0014 F1 OR
Code. RJ100-0014 G
Code. RJ100-0014 G1
Code. RJ100-0014 G2
Code. RJ100-0013 A
Code. RJ100-0101
Non-insulated centring device J-100 mod. 95
O-ring for centring device (J-100 mod. 95 and Evolution), 10 pcs
Insulated centring device (J-100 mod. 95 – insulating part not included)
Insulating part for centring device mod. 0014G (J-100 mod. 95)
Reinforcing ring for insulating part 0014g1 (J-100 mod. 95)
Flask-locking knob
Complete solenoid valve unit (J-100 mod. 95)
Code. A-20
Code. A-20 IC
Code. A-20 II
Code. A-20 II 2
Code. A-19
Code. A-19R
Code. RJ100-0103
Non-insulated centring device J-100 mod. Evolution
Insulated centring device J-100 mod. Ev. (insulating part excluded)
Insulating part for centring device mod. A-20IC
Reinforcing element for insulating part A-20II
Tube Container – injection mod. J-100 Evolution
Tube Container for acrylic resin mod. J-100 Evolution
Pressure control unit (J-100 mod. 95)
PRESSING DENTAL SRL
is a company constantly looking for innovative
materials and techniques, with the aim of replacing
acrylic resins and metals with advanced technopolymers.
All our products are clinically tested
and certified according to Rule 93/42.
The production quality of materials and their traceability
are guaranteed in conformity with
UNI EN ISO 13875.2004.
Over 80 scientific publications confirm the validity of products and injection
systems of the J-100 and J-200 Evolution range.
The products manufactured by
Pressing Dental have long been present
all over the world, including:
the US, Canada, Argentina, Mexico, Brazil,
Dominican Republic, Korea, Thailand,
the Philippines, Egypt, Morocco, Russia,
Belorussia, Ukraine, Estonia, Germany,
the Netherlands, Belgium, Poland,
Luxembourg, England, Croatia, Switzerland,
Spain, Italy, Portugal, Israel, Syria, etc.
? SIMPLER
? CHEAPER
? MORE ERGONOMIC
The J-100 Evolution
is the most complete pressure-injection system,
as acknowledged by thousands of users.
PRESSING DENTAL Srl
Via Edoardo Collamarini 5d,
47891 Dogana (Repubblica di San Marino)
Tel dall’Italia 0549 909948 - fax 0549 909958
From other countries
Tel++ 378 909948 - fax ++ 378 909958
[email protected]
www.pressing-dental.com
Elaboration in
collaboration with
Thank’s to Dr. Poisson and Prof. Dorignac (s. 8-9) for theirs precious collaboration, also to
Labors Gavalda, Chauvin, Impact Dentaire, Dental Concept Méditerranée and Rohr (S. 16-17).
Cod. 098053 / ENG Rev. 1
I.P.
It is the only injection system that can be used
with 7 thermoplastic and acrylic materials.
0546