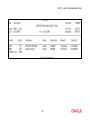
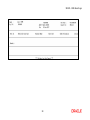
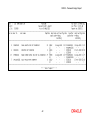
1
Oracle FLEXCUBE Core Banking Security Management Reports Manual Release 11.5.0.0.0 Part No. E52876-01 July 2014 Security Management Reports Reports Manual July 2014 Oracle Financial Services Software Limited Oracle Park Off Western Express Highway Goregaon (East) Mumbai, Maharashtra 400 063 India Worldwide Inquiries: Phone: +91 22 6718 3000 Fax: +91 22 6718 3001 www.oracle.com/financialservices/ Copyright © 2014, Oracle and/or its affiliates. All rights reserved. Oracle and Java are registered trademarks of Oracle and/or its affiliates. Other names may be trademarks of their respective owners. U.S. GOVERNMENT END USERS: Oracle programs, including any operating system, integrated software, any programs installed on the hardware, and/or documentation, delivered to U.S. Government end users are “commercial computer software” pursuant to the applicable Federal Acquisition Regulation and agencyspecific supplemental regulations. As such, use, duplication, disclosure, modification, and adaptation of the programs, including any operating system, integrated software, any programs installed on the hardware, and/or documentation, shall be subject to license terms and license restrictions applicable to the programs. No other rights are granted to the U.S. Government. This software or hardware is developed for general use in a variety of information management applications. It is not developed or intended for use in any inherently dangerous applications, including applications that may create a risk of personal injury. If you use this software or hardware in dangerous applications, then you shall be responsible to take all appropriate failsafe, backup, redundancy, and other measures to ensure its safe use. Oracle Corporation and its affiliates disclaim any liability for any damages caused by use of this software or hardware in dangerous applications. This software and related documentation are provided under a license agreement containing restrictions on use and disclosure and are protected by intellectual property laws. Except as expressly permitted in your license agreement or allowed by law, you may not use, copy, reproduce, translate, broadcast, modify, license, transmit, distribute, exhibit, perform, publish or display any part, in any form, or by any means. Reverse engineering, disassembly, or decompilation of this software, unless required by law for interoperability, is prohibited. The information contained herein is subject to change without notice and is not warranted to be error-free. If you find any errors, please report them to us in writing. This software or hardware and documentation may provide access to or information on content, products and services from third parties. Oracle Corporation and its affiliates are not responsible for and expressly disclaim all warranties of any kind with respect to third-party content, products, and services. Oracle Corporation and its affiliates will not be responsible for any loss, costs, or damages incurred due to your access to or use of third-party content, products, or services. Security Management Reports Manual Table of Contents 1. Preface ........................................................................................................................................ 4 2. Security Management Reports ................................................................................................. 6 2.1. Adhoc Reports...................................................................................................................... 7 2.1.1. SMS Daily Reports........................................................................................................ 8 SM103 - User Access Rights Report .................................................................................. 9 SM120 - SMS Event Logs ................................................................................................ 12 SM125 - Users Created / Deleted .................................................................................... 16 SM104 - User Inactivity Report......................................................................................... 20 SM112 - List Of Disabled Users ....................................................................................... 24 2.2. Batch Reports..................................................................................................................... 26 2.2.1. SMS DAILY REPORTS .............................................................................................. 31 SM117 - User Profile Maintained Today .......................................................................... 32 SM120 – SMS Event Logs ............................................................................................... 36 SM105 - Password Expiry Report .................................................................................... 40 SM108a - SECURITY MANAGER DAILY ACTIVITY REPORT ....................................... 44 Preface 1. Preface 1.1. Intended Audience This document is intended for the following audience: Customers Partners 1.2. Documentation Accessibility For information about Oracle's commitment to accessibility, visit the Oracle Accessibility Program website at http://www.oracle.com/pls/topic/lookup?ctx=acc&id=docacc. 1.3. Access to OFSS Support https://support.us.oracle.com 1.4. Structure This manual is organized into the following categories: Preface gives information on the intended audience. It also describes the overall structure of the Reports Manual Introduction provides brief information on the overall functionality covered in the Reports Manual Chapters are dedicated to individual reports and its details, covered in the Reports Manual 4 Preface 1.5. Related Information Sources For more information on Oracle FLEXCUBE Core Banking Release11.5.0.0.0, refer to the following documents: Oracle FLEXCUBE Core Banking Licensing Guide 5 Security Management Reports 2. Security Management Reports A report is a document that is illustrated with the help of information, and tailored to a given situation and audience. The primary purpose of a report is to provide information. However, reports may also include additional information, such as suggestions or conclusions that indicate possible future actions which the report reader might take. Reports can be public or private. Advice is generally a written proof of a service performed, funds transferred, or a payment that is received or made. It can also be a recommendation that advises a customer about specific investment asset allocations based on age and circumstances. Oracle Flexcube supports report generation in PDF, HTML and Excel formats. Based on the system configuration the reports can be generated in any of the above mentioned format. Note 1: Reports can be generated by using the Report Request (Fast Path: 7775) option. Reports can be viewed/printed using the Advice/Report Status Inquiry (Fast Path: 7778) option. The above screens can be accessed by navigating through the following path: Transaction Processing > Internal Transactions > Reports. Note 2: Report Codes precede the Report Names. Unlike the User Manual where the Fast Path preceding the Topic Title indicates the access for the screen, the Report Code is simply a unique code for the report. Reports are categorized under: Adhoc Reports Batch Report 6 Adhoc Reports 2.1. Adhoc Reports Adhoc reports are generated on demand or on request. Reports and advices can be requested from the Report Request screen. Adhoc reports can be viewed and generated using the teller login or the system operator login. List of Adhoc Reports: SMS DAILY REPORTS 7 SMS Daily Reports 2.1.1. SMS Daily Reports The SMS Daily Reports includes reports specific to the user profiles that are maintained daily. List of Customer Information Reports: SM103 - User Access Rights Report SM106 - User List SM120 - SMS Event Logs SM125 - Users Created / Deleted SM104-User Inactivity Report SM112 - List Of Disabled Users 8 SM103 - User Access Rights Report SM103 - User Access Rights Report Access rights are provided to various FLEXCUBE users depending on the business requirement and control mechanism. Branch users carry out various activities which depend on the user level, rights and category assigned to them. This report is a list of user access rights for the given range of User IDs. Each column in this report provides information about the Task ID, Task Description, Parent Code, Parent Description, Category, User ID, User Level, Name, and Branch Details are grouped User ID wise. To generate the User Access Rights Report 1. Access the Report Request (Fast Path: 7775) screen. 2. Ensure that the Adhoc Reports button is selected. 3. Navigate through Security Management > SMS Daily Reports > SM103 - User Access Rights Report. 4. The system displays the SM103 - User Access Rights Report screen. Field Description Field Name Description From User ID [Mandatory, Alphanumeric, Nine] Type the valid From User Id which the report needs to be generated. This Id should not be greater than the To User Id. 9 SM103 - User Access Rights Report Field Name Description To User ID [Mandatory, Alphanumeric, Nine] Type the valid To User Id till which the report needs to be generated. Waived Service Charge [Optional, Check Box] Select the check box to waive the service charge. 5. Enter the appropriate parameters in the SM103 - User Access Rights Report screen. 6. Click the Generate button. 7. The system displays the message “Report Request Submitted”. Click the OK button. 8. The system generates the User Access Rights Listing Report. For reference, a specimen of the report generated is given below: 10 SM103 - User Access Rights Report 11 SM120 - SMS Event Logs SM120 - SMS Event Logs Bank required to have very strict control and vigilance in terms of access to the system. It is imperative for a bank to ensure that access to various modules/ transactions in is well controlled. To facilitate this control an Audit trail can be maintained for any task / transaction accessed by the user along with the terminal/machine where it has been performed. A log is then recorded and can be accessed by the bank at any future date. Each column of the report provides information on User Id, Event Date and Time, Machine Name, Task Code, Task Description, and Action. Details are grouped branch wise. To generate the SMS Event Logs Report 1. Access the Report Request (Fast Path: 7775) screen. 2. Ensure that the Adhoc Reports button is selected. 3. Navigate through Security Management > SMS DAILY REPORTS > SM120 - SMS Event Logs. 4. The system displays the SM120 - SMS Event Logs screen. 12 SM120 - SMS Event Logs Field Description Field Name Description From User ID [Mandatory, Alphanumeric, Nine] Type the valid From User Id which the report needs to be generated. This Id should not be greater than the To User Id. To User ID [Mandatory, Alphanumeric, Nine] Type the valid To User Id till which the report needs to be generated. Waived Service Charge [Optional, Check Box] Select the check box to waive the service charge. 5. Enter the appropriate parameters in the SM120 - SMS Event Logs screen. 6. Click the Generate button. 7. The system displays the message “Report Request Submitted”. 8. Click the OK button. 9. The system generates the SMS Event Logs Report. To view and print the SMS Event Logs Report 1. Access the Advice/Report Status Enquiry (Fast Path: 7778) screen. 2. Select the check box corresponding to SM120 - SMS Event Logs. 3. Click the View button to view the report. 4. The system displays the SMS Event Logs Report screen. 13 SM120 - SMS Event Logs 14 SM120 - SMS Event Logs 5. On the File menu, click Print. 6. The system displays the Print dialog box. 7. Select the appropriate parameters and click the OK button. 15 SM125 - Users Created / Deleted SM125 - Users Created / Deleted Users are created in the system to perform various financial and non financial activities. According to the business requirement and control mechanism, user profiles are assigned to the tellers. Branches also delete users from the system in case of retirement, etc. This report is a list of users created/deleted by maker, and authorised by checker. This is a list of users created or deleted for the given period. Each column of the report provides information about User Number, User ID, User Name, Action, Action Date, Maker ID and Checker ID. To generate the Users Created / Deleted Report 1. Access the Report Request (Fast Path: 7775) screen. 2. Ensure that the Adhoc Reports button is selected. 3. Navigate through Security Management > SMS DAILY REPORTS > SM125 - Users Created / Deleted. 4. The system displays the SM125 - Users Created / Deleted screen. Field Description Field Name Description From Date[DD/MM/YYYY] [Mandatory, dd/mm/yyyy] Type the valid start date for the report. This date should not be greater than To Date. 16 SM125 - Users Created / Deleted Field Name Description To Date[DD/MM/YYYY] [Mandatory, dd/mm/yyyy] Type the valid end date for the report. Waived Service Charge [Optional, Check Box] Select the check box to waive the service charge. 5. Enter the appropriate parameters in the SM125 - Users Created / Deleted screen. 6. Click the Generate button. 7. The system displays the message “Report Request Submitted”. 8. Click the OK button. 9. The system generates the Users Created / Deleted Report. To view and print the Users Created / Deleted Report 1. Access the Advice/Report Status Enquiry (Fast Path: 7778) screen. 2. Select the check box corresponding to SM125 - Users Created / Deleted. 3. Click the View button to view the report. 4. The system displays the Users Created / Deleted Report screen. 17 SM125 - Users Created / Deleted 18 SM125 - Users Created / Deleted 5. On the File menu, click Print. 6. The system displays the Print dialog box. 7. Select the appropriate parameters and click the OK button. 19 SM104 - User Inactivity Report SM104 - User Inactivity Report This report is a list of users who are inactivate for a period of time. Each column in this report provides information about the Branch, User ID, User Name, Last Sign On and Remarks. To generate the User Inactivity Report 1. Access the Report Request (Fast Path: 7775) screen. 2. Ensure that the Adhoc Reports button is selected. 3. Navigate through Security Management > SMS Daily Reports > SM104 - User Inactivity Report. 4. The system displays the SM104 - User Inactivity Report screen. Field Description Field Name Description Enter No. of Days [Optional, Numeric, Nine] Type the number of days to generate the user inactivity report. Waived Service Charge [Optional, Check Box] Select the check box to waive the service charge. 20 SM104 - User Inactivity Report 5. Enter the appropriate parameters in the SM104 - User Inactivity Report screen. 6. Click the Generate button. 7. The system displays the message “Report Request Submitted”. Click the OK button. 8. Click the OK button. 9. The system generates the SMS Event Logs Report. To view and print the User Inactivity Report 1. Access the Advice/Report Status Enquiry (Fast Path: 7778) screen. 2. Select the check box corresponding to SM104 - User Inactivity Report. 3. Click the View button to view the report. The system displays the User Inactivity Report screen. 21 SM104 - User Inactivity Report 22 SM104 - User Inactivity Report 4. On the File menu, click Print. 5. The system displays the Print dialog box. 6. Select the appropriate parameters and click the OK button. 23 SM112 - List Of Disabled Users SM112 - List Of Disabled Users The system may disable certain user ID's due to wrong entry of password. This report is used by the systems administrator to keep track of such occurrences. Each column in this report provides information about the User Number, User ID, User Name, and Cost Center. To generate the List Of Disabled Users 1. Access the Report Request (Fast Path: 7775) screen. 2. Ensure that the Adhoc Reports button is selected. 3. Navigate through Security Management > SMS Daily Reports > SM112 - List Of Disabled Users. 4. The system displays the SM112 - List Of Disabled Users screen. 5. By default, the Waived Service Charge check box is selected. Clear the check box if you want to apply the service charge for the report. 6. Click the Generate button. 7. The system displays the message “Report Request Submitted”. Click the OK button. 8. The system generates the List Of Disabled Users. For reference, a specimen of the report generated is given below: 24 SM112 - List Of Disabled Users 25 Batch Reports 2.2. Batch Reports Batch reports are automatically generated at the end of day (EOD) or beginning of day (BOD). Reports and advices can be requested from the Report Request (Fast Path - 7775) screen. Batch reports can only be generated using the system operator login. The operator must run the cut-off process at the end of every day, before starting the end of the day for that day. This is to ensure that all transactions done through the on-line delivery channels are handed over to a log for batch processing. A fresh log is created for the next day’s transactions. Here it is important to note that while the processing date from the point of view of EOD processing is still today, the on-line processing date has moved to the next processing date and the online transactions done after cut-off will be processed in the next day’s EOD. EOD refers to the processing required to be done for each functional module of FLEXCUBE Retail as well as some files that are generated for updating data in other local offices. The EOD Client option is used to take care of the system related batch processes of cutoff, BOD, EOD, monthly report generation and printing, file hand off, eligibility of the Relationship Pricing (RP), etc. Beginning of the Day (BOD) process opens a new transaction day for the Bank. BOD as a process depends on EOD process for the previous working day. This means, if the EOD is not completed for a day, system will not allow the BOD for the next day to start. List of Batch Reports: SMS DAILY REPORTS Access Fast Path: EOD10 Operator Process > EOD/BOD Operations > EOD Processing To generate batch reports 1. Take Pre Cutoff Backup before processing the EOD. 2. Log in to the FLEXCUBE Retail application with a valid System Operator Login ID. 3. The FLEXCUBE Retail window appears. 4. Access the EOD Client (Fast Path: EOD10) screen. 26 Batch Reports Field Description Field Name Description Process Category [Mandatory, Drop-Down] Select the category of the process to be performed. The options are: End of Day: It is a process where a fixed set of shell or functionality are processed. A proper handoff of GL's to FLEXCUBE Corporate, Consolidation etc. is done in the EOD process. Interest related processing, GL Updations, Draw-Down, Sweep-Outs, TD part redemption due to Sweep-In instructions, report related processing are done during the EOD processing. Beginning Of Day: It is process where in some predefined functions are processed. The user can login in the system after the BOD is completed. The validation for BOD is that the previous day EOD should be completed. For e.g. TD Maturity, Standing Instruction (SI) Execution, etc. Cutoff: It is a process where the process date of the system is changed to the next working day as maintained in the bank calendar. All the transactions entered in the system, till the point of cutoff, are picked up for EOD processing. The validation for cutoff is that the previous day BOD should be completed. 27 Batch Reports Field Name Description Transfer DB Scripts: This process was used earlier. Apply DB Scripts: This process was used earlier. Process CIF Handoff: This process is used to download the customers and related tables which are opened in other branch to the base branch of the customer. The validation for CIF handoff is that the previous day BOD should be completed. Schedule Extracts: It is a processed to extract specific schedule and to have a proper handoff to the interface. MONTHLY STATEMENTS: This process is used to generate the customer monthly statement in order to stream line the time during the actual EOM process. This process is run separately. This process can be run even after the BOD process next day. Handoff After EOD: It is a processed to extract specific schedule and to have a proper handoff to the interface. Elig Evaluation: It is a processed to evaluate the eligibility of the RVT schemes. File Handoff: It is a processed to extract specific schedule and to have a proper handoff to the interface. Automatic EFS for Converted Loan: This process is used to close the loan accounts with Automatic EFS Date falling on running day. If running of this process is skipped on a particular day, such accounts falling due for automatic closure on that day will be picked on next working day process. Future dated closure or back dated closure is not be supported. If the automatic closure date falls on a holiday, then such accounts will be picked up on the next working days process. All accounts attempted for such system initiated closure will be marked as Tried for both successful and failure cases. The accounts which are marked as Tried will not be picked up for further retries when the process is attempted at the later dates. Mark for Write Off: In this process system displays the “Accounts marked for write off are pending processing. Cannot proceed” message for the account which are marked for write off for which the write off process has not been executed. If there are no accounts marked for write off, FLEXCUBE will start the process of marking accounts for write off based on the parameters defined. The system displays the message "SUCCESS MESSAGE" after the process is completed. Automatic Write Off: In this process system displays the “No accounts marked for write off, Cannot Proceed” message if no account is write off for which the write off process. Accounts manually marked for write off will be fully written off irrespective of the present Credit Risk 28 Batch Reports Field Name Description Rating (CRR) status or the days past due. If the accounts are marked for write off, FLEXCUBE will write off the accounts if the accounts meet the eligibility criteria as on the date of write off. Accounting entries including off balance sheet entries will be passed by the system pertaining to written off accounts. The system displays the message "SUCCESS MESSAGE" after the process is completed. Category Status [Mandatory, Drop-Down] This field displays the status of the selected category. The status can be as follows: Process Date Yet to Start Started Aborted Completed [Mandatory, Pick List, dd/mm/yyyy] Select the process date from the calendar. By default, this field displays the current process date for the selected process. Next Process Date [Mandatory, Pick List, dd/mm/yyyy] Select the next process date from the calendar. By default, this field displays the next logical working day on which the process has to be run. Column Name Description State [Display] This column displays a different colour for different process state. The different colour displayed are: Process Name Green - Run Red - Aborted Default - Other Status (Complete, Yet to Start) [Display] This column displays the name of different processes which are performed. Module Code [Display] This column displays the code of the module on which the process is performed. 29 Batch Reports Column Name Description Status [Display] This column displays the status of the process performed. The status can be as follows: Duration Yet to Start Started Aborted Completed [Display] This column displays the duration for which the process was running, or when was the process completed. 5. Select Cutoff from the Process Category drop-down list. 6. Select the appropriate parameters in the EOD Client screen. 7. Click the Start button to start the cutoff process. 8. On successful completion of cutoff process, the system displays the message “Category Successfully Completed”. 9. Click the OK button. 10. Select End of Day from the Process Category drop-down list. 11. Click the Start button to start the EOD process. 12. On successful completion of EOD process, the system displays the message “Category Successfully Completed” and saves the reports in a folder in an appropriate location. For e.g. /home/wasadmin/USGapsSTR1/flexcube/host/runarea/rjsout. Note: Once this is done, the operator should logout completely out of the system and login again. After the EOD Console is brought up again, the operator must check the process date displayed at the bottom right hand corner of the status bar below. The date should have moved to the next process date. 13. Take POSTEOD Backup for that process date before processing the BOD. 14. Select Beginning of Day from the Process Category drop-down list. 15. Click the Start button to start the EOD process. 16. On successful completion of BOD process, the system displays the message “Category Successfully Completed” and saves the reports in a folder in an appropriate location. For e.g. /home/wasadmin/USGapsSTR1/flexcube/host/runarea/rjsout. 17. Click the OK button. 18. Take POSTBOD Backup after executing the BOD. 30 SMS DAILY REPORTS 2.2.1. SMS DAILY REPORTS The SMS Daily Reports includes reports specific to the user profiles that are maintained daily. List of SMS Daily Reports SM117 - User Profile Maintained Today SM120 – SMS Event Logs 31 SM117 - User Profile Maintained Today SM117 - User Profile Maintained Today To carry out various activities in the system, users are added by the bank. Similarly, user profile modification/deletion is also performed according to the defined roles and business requirement. Any changes performed to the user profiles are logged and are reported end of the day. This report is a list of user profiles maintained for the day. The lists of users along with the actions performed are listed in this report. Each column in this report provides information about User Number, User ID, User Name, Action, Action Date, Maker ID, and Checker ID. Frequency Daily (EOD) To view and print User Profile Maintained Today Report 1. Access the Report Request (Fast Path: 7775) screen. 2. Select the Batch Reports button. 3. Navigate through Security Management > SMS DAILY REPORTS > SM117 - User Profile Maintained Today. 4. The system displays the SM117 - User Profile Maintained Today screen. 32 SM117 - User Profile Maintained Today Field Description Field Name Description Process Date[DD/MM/YYYY] [Mandatory, dd/mm/yyyy] Type the date for which the report is processed. By default, the system displays the current process date. Branch Code [Mandatory, Drop-Down] Select the code of the branch for which the report needs to be viewed from the drop-down list. 5. Enter the appropriate parameters in the SM117 - User Profile Maintained Today screen. 6. Click the View button to view the report. 7. The system displays the User Profile Maintained Today Report screen. 33 SM117 - User Profile Maintained Today 34 SM117 - User Profile Maintained Today 8. Select the Print option from the File menu. 9. The system displays the Print dialog box. 10. Select the appropriate parameters and click the OK button. 35 SM120 – SMS Event Logs SM120 – SMS Event Logs Bank required to have very strict control and vigilance in terms of access to the system. It is imperative for a bank to ensure that access to various modules/ transactions in is well controlled. To facilitate this control an Audit trail can be maintained for any task / transaction accessed by the user along with the terminal/machine where it has been performed. A log is then recorded and can be accessed by the bank at any future date. Each column of the report provides information on User Id, Event Date and Time, Machine Name, Task Code, Task Description, and Action. Details are grouped branch wise. Frequency Daily (EOD) To view and print SMS Event Logs Report 1. Access the Report Request (Fast Path: 7775) screen. 2. Select the Batch Reports button. 3. Navigate through Security Management > SMS DAILY REPORTS > SM120 – SMS Event Logs. 4. The system displays the SM120 – SMS Event Logs screen. 36 SM120 – SMS Event Logs Field Description Field Name Description Process Date[DD/MM/YYYY] [Mandatory, dd/mm/yyyy] Type the date for which the report is processed. By default, the system displays the current process date. Branch Code [Mandatory, Drop-Down] Select the code of the branch for which the report needs to be viewed from the drop-down list. 5. Enter the appropriate parameters in the SM120 – SMS Event Logs screen. 6. Click the View button to view the report. 7. The system displays the SMS Event Logs Report screen. 37 SM120 – SMS Event Logs 38 SM120 – SMS Event Logs 8. On the File menu, click Print. 9. The system displays the Print dialog box. 10. Select the appropriate parameters and click the OK button. 39 SM105 - Password Expiry Report SM105 - Password Expiry Report This report displays the list of users whose primary or secondary password has expired. This will be used by the system administrator to alert the respective users and to keep a log of updates. Each column in this report provides information about User Number, User ID, User Name, Template, Employee Code, Last Password Change Date Primary/ Secondary, Inputter, Next Password Change Date Primary/ Secondary, Department Code, and Authoriser. Frequency Daily (EOD) To view and print Password Expiry Report 1. Access the Report Request (Fast Path: 7775) screen. 2. Select the Batch Reports button. 3. Navigate through Security Management > SMS DAILY REPORTS > SM105 - Password Expiry Report. 4. The system displays the SM105 - Password Expiry Report screen. 40 SM105 - Password Expiry Report Field Description Field Name Description Process Date[DD/MM/YYYY] [Mandatory, dd/mm/yyyy] Type the date for which the report is processed. By default, the system displays the current process date. Branch Code [Mandatory, Drop-Down] Select the branch for which the report needs to be viewed from the drop-down list. 5. Enter the appropriate parameters in the SM105 - Password Expiry Report screen. 6. Click the View button to view the report. 7. The system displays the Password Expiry Report screen. 41 SM105 - Password Expiry Report 42 SM105 - Password Expiry Report 8. Select the Print option from the File menu. 9. The system displays the Print dialog box. 10. Select the appropriate parameters and click the OK button. 43 SM108a - SECURITY MANAGER DAILY ACTIVITY REPORT SM108a - SECURITY MANAGER DAILY ACTIVITY REPORT The systems administrator needs to access certain system logs to track transactions performed across branches for compliance and related activities. This report is a log of the following activities. 1. Template Profile Add/ Amend/Cancel/Delete/Authorise 2. User Profile Add/Modify/Delete/Amend/Cancel/Authorize 3. Template Access Rights Selected Delete SM063 4. Template Access Rights Add 5. User Class Access Rights Add This report provides details on - User ID, User No., User Name, Emp Code, Department Code, Date, Key Field, Task Code, Task Description Frequency Daily EOD To view and print SECURITY MANAGER DAILY ACTIVITY REPORT 1. Access the Report Request (Fast Path: 7775) screen. 2. Select the Batch Reports button. 3. Navigate through Security Management > SMS DAILY REPORTS > SM108a SECURITY MANAGER DAILY ACTIVITY REPORT. 4. The system displays the SM108a - SECURITY MANAGER DAILY ACTIVITY REPORT screen. 44 SM108a - SECURITY MANAGER DAILY ACTIVITY REPORT Field Description Field Name Description Process Date[DD/MM/YYYY] [Mandatory, dd/mm/yyyy] Type the date for which the report is processed. By default, the system displays the current process date. Branch Code [Mandatory, Drop-Down] Select the code of the branch for which the report needs to be viewed from the drop-down list. 5. Enter the appropriate parameters in the SM108a - SECURITY MANAGER DAILY ACTIVITY REPORT screen. 6. Click the View button to view the report. 7. The system displays the SECURITY MANAGER DAILY ACTIVITY REPORT screen. 45 SM108a - SECURITY MANAGER DAILY ACTIVITY REPORT 46 8. Select the Print option from the File menu. 9. The system displays the Print dialog box. 8. Select the appropriate parameters and click the OK button. 47