1
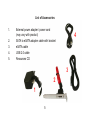
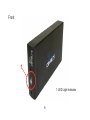
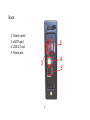
User's Manual
CAXT Series
Preface
Copyright
Please respect copyrighted content. Duplication or modification of this publication in whole or in
part is prohibited without express or written authorization.
Usage
Strong impacts or dropping the product may cause damage. Only allow qualified personnel to
repair this product. Disassembling or opening this product will void your warranty.
Disclaimer
Cavalry is not liable for compensation for data loss which may result from a malfunction of the
product or from changes due to improper use, repairs, defects, or battery change. Please back
up your data to avoid unexpected losses. Cavalry reserves the right to make changes to the
content of this manual without notice. The most current manuals and software are available for
download at our download page: www.cavalrystorage.com/su_download.htm
2
Thank you for choosing Cavalry.
We at Cavalry extend our sincere gratitude for your purchase of this product.
We hope our dedication to delivering high quality products with excellent
customer service will ensure your continued interest in our products.
This manual will assist in the operation of the product. To optimize your
experience with this product, we recommend reading this entire manual
before usage. Please keep this manual for future reference.
3
Table of Contents
Preface ....................................................................................................
List of Accessories .............................................................................
Product Illustrations ...........................................................................
Features .............................................................................................
Setup Instructions ..............................................................................
Troubleshooting .................................................................................
Warranty and Contact ........................................................................
4
2
5
6
8
9
13
15
List of Accessories
1.
2.
3.
4.
5.
External power adapter / power cord
(may vary with product)
SATA to eSATA adapter cable with bracket
eSATA cable
USB 2.0 cable
Resources CD
4
3
2
1
5
Front
1
1. LED Light Indicator
6
Back
2. Power switch
3. eSATA port
4. USB 2.0 port
5. Power jack
2
4
3
5
7
Features
Plug-and-play for Mac OS v9.x and newer
USB 2.0 and eSATA interface
Pre-formatted in Mac OS X Extended
Exceptional heat dissipating ability
Hard drive activity LED
Nearly silent operation
Slim and lightweight stackable design
Designed for use with a Mac, formattable for use with a PC
8
Setup Instructions
Follow the steps below to successfully set up your Cavalry External Hard
Drive with your computer.
Step 1. Start your computer and wait for the Mac OS to load completely.
Step 2. Connect the power adapter to the drive. (Fig.
1) Then plug the power adapter into an electrical
outlet.
Fig. 1
9
Step 3. Connect the square end of the USB cable to the hard drive. (Fig. 2)
Then connect the flat end of the USB cable to the USB port on your
computer. (Fig. 3)
Step 4. Turn the power switch on.
USB Cable Plug
USB Port
Fig. 3
Fig. 2
NOTE: SATA users: install the bracket when the computer is off. Then connect the
drive to the bracket. Turn on the drive then turn on the computer. For a guide to
installing the eSATA bracket, see the "Contents/CAXT" folder of the Resources CD.
NOTE: Connect the USB cable to the drive before connecting the cable to the
computer. To disconnect, remove the cable from the computer first.
10
Step 5. Installing drivers for the Cavalry External Hard Drive.
Mac OS
This drive is preformatted to be plug-and-play for Mac OS 9.x and
above. No formatting or drivers should be needed.
Windows 2000/XP/Vista
Reformat according to the "Formatting Instructions" PDF file found in
the "Contents" folder of the Resources CD or online at:
www.cavalrystorage.com/su_download.htm.
After that, your drive is plug-and-play: no device drivers or
configuration required. The computer will detect the USB External
Hard Drive as a new USB device and display messages on the
bottom-right corner reading "USB Mass Storage Device Detected"
and "Your new hardware is installed and ready to use."
11
Windows 98/Me
1. Make sure Windows 98/Me is fully updated. Follow the
"Formatting Instructions" PDF (in the "Contents" folder of the CD.)
2. Download drivers from www.cavalrystorage.com/su_download.htm
Click on "Windows 98 Driver" to download file. Extract the file.
3. Navigate the device manager.
4. Right-click on the yellow question mark (unknown storage device).
5. When the device driver wizard starts, click on the "Browse" button
to select the search directory to find drivers.
6. Find the USB 2.0-98 driver in the extracted file.
7. Click "Next" to continue.
Step 6. Your external hard drive is now ready to use.
NOTE: When the hard drive is on, a blue LED light (page 6) will appear on
the front of the drive. The LED light will flicker to indicate drive activity.
12
Troubleshooting
LED light indicator does not turn on
Make sure the power adapter is securely connected to a working electrical
outlet. Secondly, make sure the USB / SATA cable is inserted correctly into
the hard drive and the computer. Turn on the power switch (page 7).
Computer does not detect hard drive
Make sure the USB / eSATA cables are securely connected. If this still does
not work, attach another known working device and working cable into the
USB / eSATA port on the computer. If the known working device is not
detected, the problem could be your computer's USB / eSATA port. If the port
and cable both work and the hard drive is still undetected, contact customer
support.
13
Loud noises coming from external hard drive
In most cases, loud noises coming from the drive suggest a defective drive
or a loose part. We apologize for any inconvenience this may cause. Please
contact customer service for assistance.
Hard drive will not work with my PC
This drive needs to be reformatted for PC. Go to the "Contents" folder of the
Resources CD and click on "Formatting Instructions". Follow the guide to
format the drive for your PC.
If you have more questions, please refer to the Frequently Asked
Questions section online at: www.cavalrystorage.com/su_faq.htm For
further inquiries, you may contact Bason/Cavalry tech support at
[email protected].
14
Warranty
This product comes with a one year warranty from the date of purchase.
Please register your product at www.cavalrystorage.com/prodreg.htm to
activate the warranty. Please have your Serial Number and Model Number
ready. We are not responsible for any loss of data. Please back up your data
often to avoid unexpected losses.
Contact
Cavalry Storage, Inc.
555 E. Easy St.
Simi Valley, CA 93065
[email protected]
www.cavalrystorage.com
15
CA1193
061208