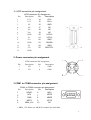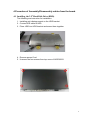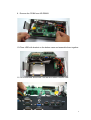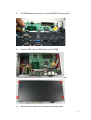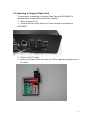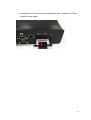
1
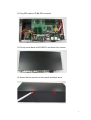
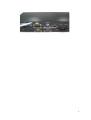
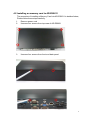
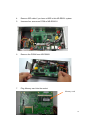
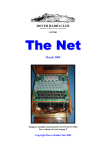
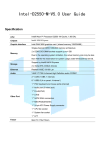
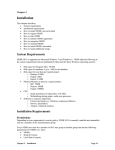
AR-ES0631
User Manual
1
Contents
1
2
3
4
LVDS connector pin assignment…………………………………….. 3
Power connector pin assignment……………………………………. 3
COM1 to COM4 connector pin assignment………………………… 3
Procedure of Assembly/Disassembly cables from the board…….. 4
4-1 Installing the 2.5”Hard Disk Drive(HDD)………………………... 4
4-2 Installing an memory card to AR-ES0631……………………… 9
4-3 Inserting a Compact Flash Card………………………………… 13
2
1. LVDS connector pin assignment
Pin
1
2
3
4
5
6
7
8
9
10
11
12
13
LVDS connector Pin Assignment
Pin
Description
Description
14
CLKVCC
15
CLK+
VCC
16
GND
NC
17
NC
NC
18
NC
Y019
NC
Y0+
20
VCC12
GND
21
VCC12
Y122
GND
Y1+
23
BKLEN
GND
24
GND
Y225
BKLTCTL
Y2+
GND
2. Power connector pin assignment
Pin
1
2
LVDS connector Pin Assignment
Description
Pin
Description
12V
3
GND
12V
4
GND
3 COM1 to COM4 connector pin assignment
COM1 to COM4 connector pin assignment
Pin
Description
Pin
Description
NDCD
NRX
1
6
NTX
NDTR
2
7
GND
NDSR
3
8
NRTS
NCTS
4
9
NRIA_12V
NC
5
10
* NRIA_12V: Please see AR-B1631 manual for detail data.
3
4.Procedure of Assembly/Disassembly cables from the board.
4-1 Installing the 2.5”Hard Disk Drive(HDD)
The following are instruction for installation.
1. Installing anti-vibategrommet on the HDD bracket
2. Connect IDE cable to HDD
3. Place HDD into HDD bracket and screw them together
4. Remove power Cord
5. Unscrew the four screws from top cover of AR-ES0631
4
6. Unscrew the four screws from front panel and back panel
7. Remove top cover of AR-ES0631
8. Unscrew four screw from PCBA of AR-ES0631
5
9. Remove the PCBA from AR-ES0631
10. Place HDD with bracket on the bottom case and assemble them together
11. Put PCBA back and screw it on the AR-ES0631 bottom case
6
12. Plug IDE cable to PCBA IDE connector
13. Put top cover back to AR-ES0631 and screw four screws
14. Screw the four screws on front panel and back panel
7
8
4-2 Installing an memory card to AR-ES0631
The procedure of installing a Memory Card into AR-ES0631 is detailed below,
Please follow these steps carefully.
1.
Remove power cord
2.
Unscrew four screws from top case of AR-ES0631
3.
Unscrew four screws from front and back panel
9
4.
5.
Remove IDE cable if you have a HDD in this AR-ES631 system.
Unscrew four screws on PCBA of AR-ES0631
6.
Remove the PCBA from AR-ES0631
7.
Plug Memory card into the socket
Memory card
10
8.
Put PCBA back and screw it on the AR-ES0631 bottom case
9.
Connect IDE cable to IDE socket on the PCBA
10.
Put top cover back to AR-ES0631 and screw four screws
11.
Screw the four screws on front panel and back panel
11
12
4-3 Inserting a Compact Flash Card
The procedure of installing a Compact Flash Card into AR-ES0631 is
detailed below, Please follow these steps carefully.
1. Remove power Cord
2. Unscrew the two screw from the CF door located on rear plate of
AR-ES0631
3. Remove the CF carrier
4. Placing a Compact Flash card with your OS or application program into a
CF carrier
13
5. Inserting the CF carrier back and assembling with 2 screws to CF door
located on rear panel.
14