1
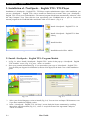
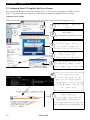
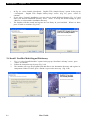
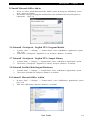
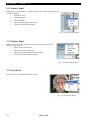
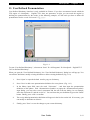
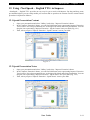
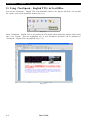
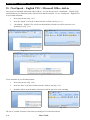
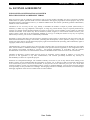
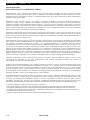
NextSpeak - English TTS
NextSpeak - English TTS
User Guide
User Guide
P.1
NextSpeak - English TTS
Table of Content
1. Introduction.....................................................................................3
2. Installation of <NextSpeak - English TTS> TTS Player....................................4
2.1 Install <NextSpeak - English TTS> Program Module.........................4
2.2 NeoSpeech Paul (US English) End User License...............................6
............................................................................................7
2.3 Install <NextSpeak - English TTS> Sample Library...........................7
2.4 Install NextDict Multi-lingual Dictionary......................................8
2.5 Install Microsoft Office Add-in...................................................9
2.6 Uninstall <NextSpeak - English TTS> Program Module......................9
2.7 Uninstall <NextSpeak - English TTS> Sample Library.......................9
2.8 Uninstall NextDict Multi-lingual Dictionary....................................9
2.9 Uninstall Microsoft Office Add-in..............................................9
3. <NextSpeak - English TTS> User Interface................................................10
3.1 Large View Mode.................................................................10
3.2 Minimized Mode..................................................................10
3.3.1 Library Panel...................................................................12
3.3.2 Playlist Panel...................................................................12
3.3.3 Icon Panel.......................................................................12
4. <NextSpeak - English TTS> Settings........................................................13
5. <NextSpeak - English TTS> Menu...........................................................14
5.1 File Menu..........................................................................14
5.2 View Menu........................................................................14
5.3 Tool Menu.........................................................................15
5.4 Help Menu.........................................................................15
6. Library Management..........................................................................16
6.1 Create a New Library............................................................16
7. Playback of Library Content.................................................................17
8. Play Text Content.............................................................................18
9. NextDict Multi-lingual Dictionary...........................................................18
9.1 NextDict User Interface.........................................................19
10. Playback of Websites........................................................................20
11. User Defined Pronunciation................................................................21
12. Using <NextSpeak - English TTS> in Impress............................................23
12.1 Speak Presentation Content..................................................23
12.2 Speak Presentation Notes.....................................................23
13. Using <NextSpeak - English TTS> in NextOffice........................................24
14. Using <NextSpeak - English TTS> with Microsoft Office...............................25
15. <NextSpeak - English TTS > Microsoft Office Add-in...................................26
16. LICENSE AGREEMENT ........................................................................27
NextSpeak - English TTS Copyright 2006 Well Develop International Limited. Made in Hong Kong #MP30003*
Windows, XP, Vista, Word, Excel, Outlook are registered trademarks of Microsoft.
P.2
User Guide
NextSpeak - English TTS
Service Support Serial No & NeoSpeech Voice (English US) License :
This license is issued by Well Develop International Limited for the right of the licensee to
install and to use <NextSpeak - English TTS> on one single PC. By registering to Well
Develop International Limited within 14 Days after purchase, the licensee can enjoy 90-day
hotline and email support services (long-distance telephone fees have to be borne by the licensee).
1. Introduction
<NextSpeak - English TTS> is a Text-To-Speech player designed for professional language learner. It is
bundled with the Paul-16 US English SAPI 5 compliant male voice licensed from NeoSpeech. Sophisticated
functions include:
•
•
•
•
•
•
•
•
•
•
•
•
•
•
Pitch, Rate and Volume. Users can adjust the pace according to his/her level.
Lip-sync with character animation so that you can easily follow the pronunciation.
Text zoom-in/zoom-out that help to enhance the usability for senior and visually impaired users.
Export to MP3 to allow frequent commuter to best utilize their traveling time.
Unicode compliant and supporting English, Chinese Simplified and Traditional.
Support "Speech" and "Word by Word" play mode to address different needs of advanced learner
who would like to further improve their speeching by emulating professional intonation and new
learners who need to learn the exact pronunciation of each word.
Library and content management function to make practice as easy as possible. Frequently access
content can be grouped into different category for easy playback.
Support Random/Sequential Loop playback so that you can practice without hand-on control.
Support speaking out of website content
Support Clipboard capture so that you can easily cut-and-paste content from different
applications, such as Word, Powerpoint .. into <NextSpeak - English TTS> for speaking out.
Closely integrate with NextOffice. Now you can simply drag the "<NextSpeak - English TTS>"
icon from gallery into your presentation slide.
Support user-defined pronunciation definition.
Bundle with NextDict to facilitate you to search the word meanings in your document.
Use SAPI 5 Interface. You can add your own SAPI compliant voice.
<NextSpeak - English TTS> is comprised of 3 modules:
•
<NextSpeak - English TTS> Program module including the NeoSpeech Paul-16 TTS engine.
•
<NextSpeak - English TTS> Library containing sample documents which are to be installed
under the user Application Data directory.
•
NextDict multi-lingual dictionaries.
•
<NextSpeak - English TTS> Word Add-in to allow you to easily access <NextSpeak - English
TTS> and NextDict with Word .
User Guide
P.3
NextSpeak - English TTS
2. Installation of <NextSpeak - English TTS> TTS Player
Installation of <NextSpeak - English TTS> TTS Player requires administrator rights. After installation, you
can run <NextSpeak - English TTS> with a normal (or limited) user account. Place your <NextSpeak English TTS> CD in your CD-ROM drive. The autorun program should start automatically, otherwise, click
the "My Computer" icon. Then click the icon representing your CD-ROM drive to open it. Locate the
autorun program in the CD-ROM folder and double click on it to start it. (Fig. 2-1)
Install <NextSpeak - English TTS> 2.0
Install <NextSpeak - English TTS> Data
Library
Install NextDict
Install Microsoft Office Add-in
Fig. 2-1
2.1 Install <NextSpeak - English TTS> Program Module
1.
2.
In Fig. 2-1, select “Install <NextSpeak - English TTS>” option. In the pop-up “<NextSpeak - English
TTS> Installer” screen (Fig. 2-2), press <Next> to continue.
Enter your personal information (Fig. 2-3) to personalize your copy of <NextSpeak - English TTS>.
You can find your Support Serial Number (consists of 20 digits) on the back cover of this installation
guide.
Fig. 2-2
3.
4.
P.4
Fig. 2-3
Select your desired language version to install (Fig. 2-4). You can view and input CJK characters even
if you have installed an English version.
In the “<NextSpeak - English TTS> 2.0 Setup” screen, Study the license statements by scrolling
through the whole document (Fig. 2-5) , select “I accept the terms of the Agreement” and press
<Next> to continue.
User Guide
NextSpeak - English TTS
Fig. 2-4
5.
6.
Fig. 2-5
The Installer will then install and register the core components in your hard disk . This step usually
takes 10 to 15 minutes. When it is done, press <Finish> to continue. (Fig. 2-6)
The last step is to register your copy of <NextSpeak - English TTS>. Select an option and press <Next>
to continue. You will be entitled 90-day free telephone and email support service upon registration. (Fig.
2-7)
Fig. 2-6
7.
8.
9.
Fig. 2-7
NextOffice is found in your PC, a dialog will then pop-up to prompt you to install Impress Extension,
choose <OK> to install or <Cancel> to skip this step. (Fig 2-8)
If you have chosen <OK>, you will be prompted to delete your personal profile of NextOffice 9 in order
for the Impress Extension to be effective. Press <OK> to continue. (Fig 2-9)
Impress Extension will be copied to the designed folder. Upon completion of installation, press
<Finish> and restart your computer.
Fig. 2-8
Fig. 2-9
User Guide
P.5
NextSpeak - English TTS
2.2 NeoSpeech Paul (US English) End User License
After successfully installed <NextSpeak - English TTS>, you need to use the NeoSpeech CD-Key printed
in the 3rd page of this manual to register for a valid NeoSpeech Paul (US English) End User License.
Acquiring a New License
Follow the following instructions to acquire a new license of NeoSpeech Paul (US English) Voice.
2
1
Run the "NextSpeak – English TTS"
1
program
2
Select "Help" ->
"Apply NeoSpeech Voice End User License"
Fill in the CD-Key from Page 3
of the User Manual, then click
3
"Get License"to download the
activation file (verification.txt).
Click "Next" to continue,
4
and at the same time,
please prepare your MAC address.
There are 2 methods for you to check
5
your MAC address: Method 1: Select
"Start" -> "Run" -> key in "cmd" -> "OK"
6
In the command prompt, enter
"ipconfig /all" command, and then
press enter. The "Physical Address"
is the MAC address. Go back to the page,
fill in the MAC address, then click the
"Get License" button.
7
Method 2: Click the link of
"Check Mac address – Only Win32 System"
to install a program, when the program run,
the MAC address field will be automatically filled.
Notes: The program should be unzipped before use.
P.6
User Guide
NextSpeak - English TTS
Lastly, click "Save to File"
to download the license file
8
(verification.txt).
Notes: Suggest to save it to desktop.
9
After the activation of the program,
a message box would be popped up,
click "Yes" to select the license file
(verification.txt) that you saved before.
After that, the NeoSpeech Paul (US English)
End User License would be registed.
《 NextSpeak – English TTS 》
After the download, please place your "verification.txt" under the folder of:
C:\Program Files\NextSpeakEng2.1\program\
Paul\data-common\verify\
(* Attention: the license file can only be redistributed 3 times, so we strongly
recommended that you should backup the verification.txt file. )
2.3 Install <NextSpeak - English TTS> Sample Library
<NextSpeak - English TTS> include sample text documents from public domain. There could be errata in
the included documents. Therefore, text library will be installed separately per user. In case of necessity, you
can modify your own copy of text library. Text library will be installed in the directory "Documents and
Setting\<User>\Application Data\ NextSpeakEng-2.0"
User Guide
P.7
NextSpeak - English TTS
1.
2.
3.
In Fig. 2-1, select “Install <NextSpeak - English TTS> Sample Library” option. In the pop-up
“<NextSpeak - English TTS> Sample Library Setup” screen (Fig. 2-1), press <Next> to
continue.
If you select “Custom" installation, you can select to install different libraries (Fig. 2-17) and
select your desired installation directory. Press <Next> to accept the default settings or press
<Browse> to select another installation directory.
The Installer will then install and register the text library in your hard disk . When it is done,
press <Finish> to continue. (Fig 2-18)。
Fig. 2-18
Fig. 2-17
2.4 Install NextDict Multi-lingual Dictionary
1.
2.
3.
Fig. 2-1, select “Install NextDict ” option. In the pop-up “NextDict 2.0 Setup” screen , press
<Next> to continue.
Follow the instruction step by step. (Fig. 2-19)
The installer will copy the programs and data files to the destination directory and register its
components. When it is done, press <Finish> to proceed to next step. (Fig. 2-20)
Fig. 2-19
P.8
Fig. 2-20
User Guide
NextSpeak - English TTS
2.5 Install Microsoft Office Add-in
1.
2.
In Fig. 2-1, select “Install Microsoft Office Addin” option. In the pop-up “MSASetup” screen,
press <Next> to continue.
The installer will copy the programs and data files to the destination directory and register its
components. (Fig 2-21)
Fig.2-21
2.6 Uninstall <NextSpeak - English TTS> Program Module
1.
2.
In menu “Start” → “Settings” → “Control Panel”, select “Add/Remove Applications” option.
(Fig. 2-22)
Then select “<NextSpeak - English TTS> 2.0” and press <Remove> to confirm.
2.7 Uninstall <NextSpeak - English TTS> Sample Library
1.
2.
In menu “Start” → “Settings” → “Control Panel”, select “Add/Remove Applications” option.
Then select “<NextSpeak - English TTS> Library” and press <Remove> to confirm.
2.8 Uninstall NextDict Multi-lingual Dictionary
1.
2.
In menu “Start” → “Settings” → “Control Panel”, select “Add/Remove Applications” option.
Then select “NextDict 2.0” and press <Remove> to confirm.
2.9 Uninstall Microsoft Office Add-in
1.
2.
In menu “Start” → “Settings” → “Control Panel”, select “Add/Remove Applications” option.
(Fig. 2-22)
Then select “MSASetup” and press <Remove> to confirm.
Fig. 2-22
User Guide
P.9
NextSpeak - English TTS
3. <NextSpeak - English TTS> User Interface
3.1 Large View Mode
To start <NextSpeak - English TTS>, select menu “Start” Æ “All Programs” Æ“NextSpeak - English TTS”
Æ“NextSpeak - English TTS”. Large View mode shows all the <NextSpeak - English TTS> Panels. (Fig.
3-1) The following is a brief description.
Sequential Loop
Playback Mode
Toggle
Random Loop Playback
Mode
Play List Panel
Zoom-Out Button
Zoom-In Button
Find Button
Fonts
Library
Panel
Text Panel
Icon Panel
Stop
Play/Pause/ Resume
Minimize Button
Jump Backward
Volume Control Slider Bar
Jump Forward
Rate Control Slider Bar
Pitch Control Slider Bar
Fig. 3-1 Large View Mode
3.2 Minimized Mode
Minimized mode is well suited for working with other application because its small size. (Fig. 3-2)
Jump Backward
Stop
Jump Forward
Play/Pause/
Resume
Restore
Fig. 3-2 Minimized Mode
P.10
User Guide
NextSpeak - English TTS
UI
Description
Play List Panel
Contains play list items. Play list items can be playback using "Loop/Random
Playback" mode. You can add new item to the current playback by double clicking an it
or by selecting menu "File" Æ "Open" to insert existing document into play list.
Library Panel
Allow you to group contents into different categories, e.g., you can group your favorite
poems into a category called "Poem". Library content can be a plain text document in
different character encodings (Unicode, Big5, GB2312, ASCII) or a URL.
Icon Panel
Show different icon animation. If your selected voice support SAPI 5 feedback events,
you can see the character's mouth movement during the pronunciation of the content.
Note: not all SAPI 5 complaint voice supports feedback events.
Text Panel
Contains the current text content selected for playback.
Toogle Font
Use this button to toggle between 2 pre-defined fonts. One is usually for display CJK
characters and should be assigned with a CJK typeface. Another is usually for
displaying Roman characters and should be assigned with a Roman typeface.
Minimize Button Click on this button to minimize <NextSpeak - English TTS> UI to a small floating
panel. This mode is designed to support integration with NextOffice.
Zoom-In Button
Press this button to zoom-in the content in the text panel.
Zoom-Out
Button
Press this button to zoom-out the content in the text panel.
Find Button
Press this button to locate a specified text in the current text panel.
Toggle
Press this button to toggle between Text Panel and the URL panel.
Play/Pause/Resu
me
Press this button to start speak out the content in the Text Panel. This is a multifunction button. If you press this button during speak out, the speaking will be paused.
Press this button again will resume the speaking. The speaking of text content could be:
1. If text is highlighted, the highlighted content will be spoken out.
2. If no text is highlighted, the speaking will start either from the beginning of the text
panel or from current cursor position depending on the status of the checkbox "Always
Start Speaking from beginning" in the <NextSpeak - English TTS> Setting Panel.
Stop
Stop the speaking of the current content.
Jump Forward
This button applies only to “Sequential/Random” Loop Playback mode. Press this
button will skip the speaking of the current document and jump to the next document.
Jump Backward
This button applies only to “Sequential/Random” Loop Playback mode. Press this
button will skip the speaking of the current document and jump to the previous one.
Sequential Loop
Playback Mode
Sequential Loop playback mode allow your to Loop playback the documents listed in
the Play List Panel. Documents will be playback one by one in sequential order.
Random Loop
Playback Mode
Random Loop Playback Mode allows you to loop playback the documents listed in the
Play List Panel. Documents will be playback in random order.
Rate Control
Use this slider bar to adjust the speaking rate.
Volume Control
Use this slider bar to adjust the speaking volume.
Pitch Control
Use this slider bar to adjust the speaking pitch. Note that not all voice support pitch
control. If a selected voice does not support pitch control, change will be ignored.
User Guide
P.11
NextSpeak - English TTS
3.3.1 Library Panel
Right click on an item under a category will pop up a menu. In the menu you
can find option to:
•
Insert new item
•
Rename the item
•
Delete the item
•
Specify the encoding of the item.
•
Insert the item into the playlist
Fig. 3-3 Library Panel Menu
3.3.2 Playlist Panel
Right click on an item in the play list panel to popup a menu. In the
menu you can select to:
•
Move up the current item
•
Move down the current item
•
Remove the current item from the playlist
•
Remove all items from the playlist
Fig. 3-4 Playlist Panel Menu
3.3.3 Icon Panel
Allows you to select different character icons.
Fig. 3-5 Icon Panel Menu
P.12
User Guide
NextSpeak - English TTS
4. <NextSpeak - English TTS> Settings
<NextSpeak - English TTS> provides sophisticated control on the playback.
(Fig. 4-1)
Fig. 4-1 Settings
Function
Description
Voice
Specify the default English voice
Chinese Voice
Specify the default Chinese voice
Chinese Font
Specify the default font for displaying the content in the Content Panel. It is usually
set to a Chinese typeface for displaying CJK characters.
Alternative Font
Specify another default font for displaying the content in the Content Panel. It is
usually set to a Roman typeface or displaying Roman characters.
Always use Native
Language
Specify the desired treatment when speaking out content with mix English and
Chinese. Chinese voice comes with support on English but they usually sound
strange in tone to native English speaker but appear more consistent. Check this
checkbox to force playback of English content using the default English voice.
Line Break
Interpretation
You can specify how to interpret a line break by adding N seconds of silence. This
will make the content more pleasant when being spoken out.
Rate Control
Controls the default speaking rate.
Volume Control
Controls the default speaking volume.
Pitch Control
Controls the default speaking pitch. Note that not all voices support pitch control.
Default UI language
You can set the default UI of <NextSpeak> to English, Chinese Traditional or
Chinese Simplified. Or you can set <NextSpeak> to follow the UI setting of
NextOffice. In this case, check the "Follow NextOffice UI setting" checkbox
Follow NextOffice
UI Setting
Ask <NextSpeak> to use NextOffice's default UI language settings.
Always start
speaking from the
beginning
Specify when the "Play" button is pressed whether to start speaking from the
beginning of the Text Panel or the current cursor position.
Clipboard Capture
Enable or disable Clipboard Capture. Clipboard Capture allows <NextSpeak> to be
registered as a Clipboard Viewer and listens to the clipboard events.
Automatic Close at
N seconds
If "Clipboard Capture" is enabled and the filtering criteria is satisfied, the user will
be prompted whether to append or insert the clipboard content into the Text Panel.
Ignore content less
than N characters
If "Clipboard Capture" is enabled, this filtering criteria allows you to ignore
clipboard cut-and-paste of small amount of content. Cut-and-paste of small amount
of content is usually common during editing of a document .
User Guide
P.13
NextSpeak - English TTS
5. <NextSpeak - English TTS> Menu
5.1 File Menu
Fig. 5-1 File Menu
Fig. 5-2 View Menu
Menu
Description
New ÆText
Clear the Text Panel and ready for new input
New ÆLibrary
Create a new text library
Open ÆText
Open an existing text document. The document will be automatically inserted into
Play List Panel
Open ÆLibrary
Open an existing library. The library will be automatically loaded into the Library
Panel.
Open ÆURL
Allow you to specify an URL and open it in the content panel.
Save
Save the current document in Text Panel
Save As Text
Save the current document as another text file.
Save As Wav
Save the current document as Wav. Note that "Save As Wav" will cause the
<NextSpeak - English TTS> engine to voice synthesis the content and could take
quite a long time.
Save As MP3
Save the current document as MP3. Note that "Save As MP3" will cause the
<NextSpeak - English TTS> engine to voice synthesis the content and could take
quite a long time. We are using LAME encoder to do the MP3 encoding.
Exit
Quit the <NextSpeak - English TTS> Application.
5.2 View Menu
Menu
Windows Layout
Description
Allow you to adjust the layout of the panel, show/hide some panels.
Character
Allow you to select different character icons.
Zoom-In
Zoom-in the content in the Text Panel
Zoom-Out
Zoom-out the content in the Text Panel.
P.14
User Guide
NextSpeak - English TTS
5.3 Tool Menu
Fig. 5-3 Tool Menu
Menu
Description
Settings
Adjust the default setting of <NextSpeak - English TTS>. See Section 2 "Setting
Panel" for detail.
Playground Music
Check to disable background music on playback or select the desired background
music.
Speak Out Mode
The "Speech" mode will speak out the content in the Text Panel in a tone emulating
a human speech.
The "Word by Word" mode is designed for language learning where the audience
would like to listen carefully how each word is pronounced.
Note: some voices may not support the "Word by Word" mode.
Clipboard Capture
Enable or disable clipboard capture. See Section 2 "Settings Panel" for detail.
5.4 Help Menu
Fig. 5-4 Help Menu
Menu
Description
Help
Show the product information of <NextSpeak - English TTS>
Content
Display the help content of <NextSpeak - English TTS>
User Guide
P.15
NextSpeak - English TTS
6. Library Management
You can group your frequently access text document into <NextSpeak - English TTS> library. Each library
contains an indexing file with extension *.lib and and the corresponding text documents. <NextSpeak English TTS> comes with a text libraries:
Library Name
VOA Health Report.lib
Description
Language
VOA Health Report
US English
To open an existing library, select menu "File" Æ "Open" Æ "Library"
6.1 Create a New Library
You can create your own library. Documents in library must be pure text with file extension(*.txt). For
example, you can group poems in a folder named as "Tong" and others from the Song Dynasty in a folder
named as "Song". First create a folder called "Chinese Literature", in "Chinese Literature" create the "Tong"
folder and "Song" folder, copy the corresponding poems into the two folders. Finally, in <NextSpeak English TTS>, select menu "New" → "Library" (Fig. 6-1), in the pop-up dialog, press the <Pick> button to
pick the previously created "Chinese Literature" folder and then enter a valid library file name, such as
"c_literature" and press <OK>. A new library named as "c_literature" will be created and automatically
loaded into the library panel. You can use Notepad on any text editor to examine the content of the library
file (Fig. 6-2)
Fig. 6-1
Fig.6-2
P.16
User Guide
NextSpeak - English TTS
7. Playback of Library Content
<NextSpeak - English TTS> comes with several libraries including New Testament, Old Testament,
Chinese Literature (All in Chinese Traditional). To listen to the library content, first select and open the
desired library. For example, if you would like to listen to the New Testament library, follow the following
steps:
1.
2.
Select menu "File" Æ "Open" Æ "Library" (Fig. 7-1)
In the "Open" dialog box, select VOA Health Report.lib representing the VOA Health Report
Library, then press <OK> (Fig. 7-2)
Fig. 7-2
Fig. 7-1
3.
4.
The Library Panel on the left will display the available chapters. Simply select the chapter you
are interested and double click on it to load its content. Then press the <Play> button to start
playing its content. You can highlight a section of text and then right click to pop-up a menu. In
the pop-up menu, select "Speak" to play only the highlighted content. (Fig. 7-3)
You can optionally select to play the content starting from the current cursor position instead of
always from the beginning. Select menu "Tools" Æ "Setting" to open the <NextSpeak - English
TTS> Configuration dialog and uncheck the "Always starts from the beginning" checkbox. See
Section "<NextSpeak - English TTS> Configuration" for detail. (Fig. 7-4)
Fig. 7-3
Fig. 7-4
User Guide
P.17
NextSpeak - English TTS
8. Play Text Content
<NextSpeak - English TTS> comes with a few libraries. Library is a collection of text documents. Users can
simply load the documents and start get familiar with the functions of <NextSpeak - English TTS>. Play
Text Content is very similar to Play Library. The detail procedure is depicted as follows:
1.
2.
3.
Select menu "File" Æ"Open" Æ"Text" (Fig. 8-1)
In the Open dialog, pick your desired text document and press <Open>
Then the selected file will be loaded into the Content Panel and a reference of it will be inserted
into the Playlist Panel (Fig. 8-2)
Fig. 8-1
Fig. 8-2
Then, the way to playback text content is the same as that described in "Playback library".
9. NextDict Multi-lingual Dictionary
If you have installed NextDict, you can use NextDict (Fig. 9-2) to lookup the words displayed in your
content panel. First, select the desired words, then right click and in the pop-up menu, select "Dictionary"
(Fig. 9-1)
Fig. 9-1
Fig. 9-2
NextDict multi-lingual dictionaries include "English/Chinese", "Chinese/English and "English/English
dictionaries.
P.18
User Guide
NextSpeak - English TTS
9.1 NextDict User Interface
Clear the history list
Previous searched
word explanation
Next searched
word explanation
Stop the Speaking
Search Internet for
related information
Input Field
Speak out the
explanation
Speak out the word
List Panel
Content
Display help
instructions
Minimize
Setup
Fig. 9-3 NextDict User Interface
UI
Input Field
Description
Enter the word you desired in this field. NextDict support * and ? Wild character.
Clear Search History The input field contains a pull down menu recording all your previous valid search.
To clear this history list, press this button.
Display Previous
search
Traverse the history list and display the previous valid search result.
Display Next Search Traverse the history list and display the next valid search result.
Search Internet
Search Internet for information related to the input word(s)
Stop
Stop any outstanding TTS operation
Speak Content
Speak out the explanation of the lookup word(s)
Speak
Speak out the word(s)
List Panel
Display the first 50 word or phrase matching the input entered in the Input Field.
Content
Display the content of the lookup word(s) or phrase.
Minimize
Minimize the NextDict as an icon in the systray
Settings
Allow you to configure the TTS settings, such as volume, rate and pitch
Display Help
Display the phonetic symbols guide
User Guide
P.19
NextSpeak - English TTS
10. Playback of Websites
Operating procedure for Speaking out of website content will be slightly different from that of a text file.
First of all, you have to add a website into the library. (Fig. 10-1)
Fig. 10-1 Playback Website
To speak out a text section, simply highlight the section, right click to pop-up a menu. In the pop-up menu,
select "Speak". (Fig. 10-2)
Fig. 10-2 Select Text to Speak
The selected content will then be copied to the text panel for speaking out. You can use the "Toggle" button
to toggle between Browser View and "Text Panel" View.
P.20
User Guide
NextSpeak - English TTS
11. User Defined Pronunciation
User Defined Dictionary Interface is only available in Chinese. If you have encountered words which the
TTS engine of <NextSpeak - English TTS> does not pronounce it right, you can teach the engine by
defining the pronunciation for the words. In the following example, we will teach you how to define the
pronunciation for the word “Voiceware” (Fig. 11-1):
Fig. 11-1
To start “User Defined Dictionary”, select menu “Start” Æ “All Programs” Æ“NextSpeak - English TTS”
Æ“User Defined Dictionary”.
When you open the "User Defined Dictionary", the "User Defined Dictionary" dialog box will pop up. You
can add new definition, modify existing definition or delete existing definition. (Fig. 11-2)
1.
Press "Open" to open the default userdict_eng.csv dictionary.
2.
Press "New" to add a new pronunciation definition for a new phrase. (Fig. 11-3)
3.
In the Phrase input field, enter the word “Voiceware” , and then input the pronunciation
definition of this phrase. Pick <Pronunciation Symbol> to popup the <Pronunciation Symbol>
input dialog, you can select vowel, consonants and the tone from the dialog. In our example,
select the consonant "b" and the vowel "a". You can listen the your definition by press the "Read"
button. Finally, press <OK> to confirm.
4.
The newly added pronunciation definition will appear in the list box on the left. If necessary, you
can modify its definition or delete it.
5.
Finally, press "Save" to save the change to your current dictionary.
User Guide
P.21
NextSpeak - English TTS
Fig. 11-3
Fig. 11-2
UI
Description
Open
Press to open an existing dictionary. By default, the userdict_eng.csv is opened. All
user defined pronunciation definition is stored in a dictionary.
Save
Store the changes to the current open dictionary
Save As
Store the current dictionary under another name
Close
Close current dictionary
Add New Phrase
Create a new pronunciation definition of a new phrase.
Modify Phrase
Modify the pronunciation definition of the selected phrase.
Read Phrase
Listen to the pronunciation definition of the selected phrase.
Delete Phrase
Delete the pronunciation definition of the selected phrase.
P.22
User Guide
NextSpeak - English TTS
12. Using <NextSpeak - English TTS> in Impress
<NextSpeak - English TTS> provides an easy way for you to work with Impress. By drag and drop some
pre-installed clipart, you can easily enable your current slide to speak out its content or notes content. Detail
procedure is depicted as follows:
12.1 Speak Presentation Content
1.
2.
3.
Open your presentation and select "Gallery" and select "Impress Extension" theme.
In the "Impress Extension" theme, you can find 4 different icons representing Impress Extension.
Two icons are for color presentation, two are designed for black and white presentation. You can
drag the icon representing "Impress Extension – Speak Content" into your slide (Fig.12-1)
Then, when you press "Impress Extension – Speak Content" icon in your slide.
Fig. 12-1
12.2 Speak Presentation Notes
1.
2.
3.
Open your presentation and select "Gallery" and select "Impress Extension" theme.
In the "Impress Extension" theme, you can find 4 different icons representing Impress Extension.
Two icons are for color presentation, two are designed for black and white presentation. You can
drag the icon representing "Impress Extension – Speak Notes" into your slide (Fig. 12-2)
Then, when you press "Impress Extension – Speak Notes" icon in your slide
Fig. 12-2
User Guide
P.23
NextSpeak - English TTS
13. Using <NextSpeak - English TTS> in NextOffice
You can use <NextSpeak - English TTS> with NextOffice Writer, Calc, Impress and Draw. You can find
the <Speak> icon in your NextOffice toolbar. (Fig. 13-1)
Fig. 13-1
When <NextSpeak - English TTS> is first started, the TTS engine will be loaded into memory which could
take a few seconds . Then the highlighted text in your NextOffice document will be submitted to
<NextSpeak - English TTS> for playback. (Fig. 13-2)
Fig. 13-2
P.24
User Guide
NextSpeak - English TTS
14. Using <NextSpeak - English TTS> with Microsoft Office
You can use the "Clipboard Capture" function of <NextSpeak - English TTS> with applications like
Word 、 Excel 、 PowerPoint. When working with MS Office, if you would like to have <NextSpeak English TTS> speak out some of the content in your MS Office document, you can enable the "Clipboard
Capture" function. The following is an example:
1.
2.
In <NextSpeak - English TTS>, select menu "Tool". Check "Clipboard Capture" or your can
enable "Clipboard Capture" in menu "Tool" Æ "Settings". Check "Clipboard Capture" and press
<OK> (Fig. 14-1)
Open the Microsoft Word document which you would like to work on, select the desired text and
then menu "Edit" Æ "Copy" (Fig.14-2)
Fig. 14-2
Fig. 14-1
3.
4.
Then the "Clipboard Capture" dialog pops up. You are prompted to "Insert" or "Replace" the
content in the Content Panel with your clipboard content. Select "Insert" to insert the clipboard
content at the current cursor position or "Replace" to replace the whole content with the clipboard
content. If you choose <Cancel> or do not respond within the specified period, the clipboard
action will be canceled. (Fig. 14-3)
Using "Replace" selection as an example, the text you copied from Word will now replace the
content in your Content Panel. You can press the <Play> button to play the text content. (Fig. 144)
Fig.14-3
Fig.14-4
User Guide
P.25
NextSpeak - English TTS
15. <NextSpeak - English TTS > Microsoft Office Add-in
After your have installed “Microsoft Office Add-in”, you can directly access <NextSpeak - English TTS>
and NextDict in your Microsoft Office (Word, Excel and PowerPoint). To use <NextSpeak - English TTS>
in your Word document:
1.
First select the text (Fig. 15-1)
2.
Press the “Speak” icon in the toolbar from the "Add-in" tab (Fig. 15-2)
3.
<NextSpeak - English TTS> will be invoked and the selected text will be passed to it for
speaking out. (Fig. 15-3)
Fig. 15-2
Fig. 15-1
Fig. 15-3
To use NextDict in your Word document:
1.
First select the text (Fig. 15-4)
2.
Press the “Dict” icon in the toolbar from the "Add-in" tab (Fig. 15-5)
3.
NextDict will be invoked and the selected text will be passed to it for searching.
Fig.15-4
Fig. 15-5
The use of "Add-in" function is the same in working on Excel and PowerPoint.
P.26
User Guide
NextSpeak - English TTS
16. LICENSE AGREEMENT
WELL DEVELOP INTERNATIONAL LIMITED
END-USER LICENSE AGREEMENT TERMS.
Grant of License. You are granted a non-exclusive right to use the Product (including any Error Corrections, standard
enhancements or updates provided under Licensor's maintenance and support program) for internal purposes only at the
designated location (“Designated Location”), in machine-readable form. This license specifically prohibits redistribution,
transfer or resale of the Product.
Limitations on Use. You may not use, copy, modify, or distribute the Product or output of product (electronically or
otherwise), or make any copy, adaptation, transcription, or merge any portion thereof, except as expressly authorized by
Licensor in a separate written agreement signed by Licensor. You may not reverse assemble, reverse compile, or otherwise
translate the Product. Your license may not be transferred, leased, assigned, or sub-licensed without Licensor's prior
written consent, which will not be unreasonably withheld. If you copy or modify the Product in any way not expressly
authorized by Licensor, your license is automatically terminated.
Ownership. Licensor shall have sole and exclusive ownership of the Product, in both object code and source code, all
media and documentation relating to the Product, (including their development, or their operation, testing or use, and all
reports and copies thereof), and all intellectual property rights associated therewith (including, without limitation, rights to
copyrights, trade secrets, or know-how).
Limited Warranty. Licensor warrants for a period of thirty (90) days after Live Processing of the Product for your benefit
alone, that the Product or Modified Product, as applicable, when operated with the equipment, in the configuration and in
the operating environment specified by Licensor , will perform substantially in accordance with the end-user
documentation. Licensor does not warrant that the Product or Modified Product will be error-free in all circumstances.
Limitation on Warranty. Licensor makes and you receive no warranties, express, implied, or statutory, or in any other
provision of this agreement or any other communication; and Licensor specifically disclaims any warranty of
merchantability or fitness for a particular purpose.
Exclusion of Consequential Damages. The cumulative liability of Licensor to you for any and all claims relating to the
Product, and any services rendered under this Agreement, in contract, tort, or otherwise, shall not exceed the total amount
of all License Fees paid to Licensor for the Product, or fees paid for services within the prior year. In no event shall
Licensor be liable to you for any consequential, indirect, special, or incidental damages, even if Licensor has been advised
of the possibility of such potential loss or damage. The foregoing limitation of liability and exclusion of certain damages
shall apply regardless of the success or effectiveness of other remedies.
User Guide
P.27
NextSpeak - English TTS
NEOSPEECH INC.
END-USER LICENSE AGREEMENT TERMS.
Grant of License. You are granted a non-exclusive right to use the Product (including any Error Corrections, standard
enhancements or updates provided under Licensor's maintenance and support program) for internal purposes only at the
designated location (“Designated Location”), in machine-readable form. This license specifically prohibits redistribution,
transfer or resale of the Product.
Limitations on Use. You may not use, copy, modify, or distribute the Product or output of product (electronically or
otherwise), or make any copy, adaptation, transcription, or merge any portion thereof, except as expressly authorized by
Licensor in a separate written agreement signed by Licensor . You may not reverse assemble, reverse compile, or otherwise
translate the Product. Your license may not be transferred, leased, assigned, or sub-licensed without Licensor 's prior
written consent, which will not be unreasonably withheld. If you copy or modify the Product in any way not expressly
authorized by Licensor , your license is automatically terminated.
Ownership. Licensor shall have sole and exclusive ownership of the Product, in both object code and source code, all
media and documentation relating to the Product, (including their development, or their operation, testing or use, and all
reports and copies thereof), and all intellectual property rights associated therewith (including, without limitation, rights to
copyrights, trade secrets, or know-how).
Limited Warranty. Licensor warrants for a period of thirty (30) days after Live Processing of the Product for your benefit
alone, that the Product or Modified Product, as applicable, when operated with the equipment, in the configuration and in
the operating environment specified by Licensor , will perform substantially in accordance with the end-user
documentation. Licensor does not warrant that the Product or Modified Product will be error-free in all circumstances. As
your exclusive remedy for any defect or Material Error in the Product or Modified Product or its media covered by such
warranty, and as Licensor's entire liability in contract, tort, or otherwise, Licensor agrees to correct such Material Error or
defect at Licensor 's facility by issuing corrected instructions, a restriction, or a bypass. If Licensor is unable to correct such
defect or Material Error after a reasonable opportunity Licensor shall refund the License Fees paid for such Product or
Modified Product. However, Licensor is not responsible for any defect or Material Error not reported during the warranty
period or any defect or Material Error in a Product or Modified Product you have modified, misused, or damaged.
Limitation on Warranty. Licensor makes and you receive no warranties, express, implied, or statutory, or in any other
provision of this agreement or any other communication; and Licensor specifically disclaims any warranty of
merchantability or fitness for a particular purpose
Exclusion of Consequential Damages. The cumulative liability of Licensor to you for any and all claims relating to the
Product, and any services rendered under this Agreement, in contract, tort, or otherwise, shall not exceed the total amount
of all License Fees paid to Licensor for the Product, or fees paid for services within the prior year. In no event shall
Licensor be liable to you for any consequential, indirect, special, or incidental damages, even if Licensor has been advised
of the possibility of such potential loss or damage. The foregoing limitation of liability and exclusion of certain damages
shall apply regardless of the success or effectiveness of other remedies.
“Confidential Information” means any data or information, oral or written, treated as confidential that relates to either
party's past, present, or future research, development or business activities, including any unannounced products and
service(s), and including any information relating to services, developments, inventions, processes, plans, financial
information, customer lists, forecasts, and projections. Confidential Information shall also include the terms of this
Agreement. Notwithstanding the foregoing, Confidential Information shall not be deemed to include information that:
1) is publicly available or in the public domain at the time disclosed;
2) is or becomes publicly available or enters the public domain through no fault of the party receiving such information;
3) is rightfully communicated to the recipient by persons not bound by confidentiality obligations with respect thereto;
4) is already in the recipient's possession free of any confidentiality obligations with respect thereto at the time of disclosure;
5) is independently developed by the recipient; or
6) is approved for release or disclosure by the disclosing party without restriction.
P.28
User Guide