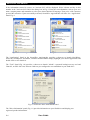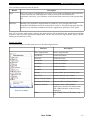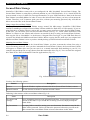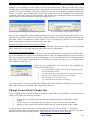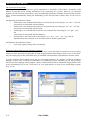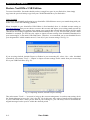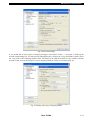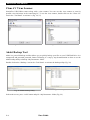
1
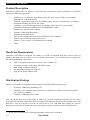
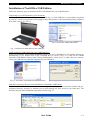
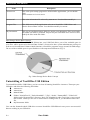
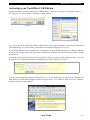
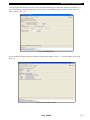
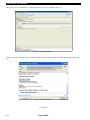
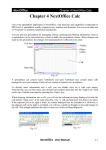
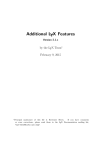
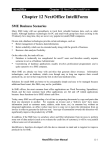
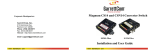
NextOffice USB Edition
Product Description
NextOffice USB Edition is a product of Well Develop International Limited. NextOffice USB Edition
includes the following applications:
•
•
•
•
•
•
•
•
•
•
NextWriter, a text processor, for handling (open, edit, save, export to PDF) text documents
including files in WORD1 format.
NextCalc, a spreadsheet application, for handling (open, edit, save, export to PDF) spreadsheet
documents including files in EXCEL format.
NextImpress, a presentation application, for handling (open, edit, save, export to PDF)
presentation documents including files in POWERPOINT format.
NextDraw for general vector drawings.
NextDict, a multi-lingual dictionary.
NextMail for handling emails
TrueCrypt for management of the secured data area in your USB drive.
Abakt for general backup backup and recovery
ClamAV, a virus scanner, for on demand virus scanning.
Others...
Hardware Requirements
NextOffice USB Edition is designed for running on a USB 2.0 compliant flash drive and for usage on
Windows XP/2000/Vista. In order to achieve reasonable performance, your USB drive has to comply with
the following minimum requirements:
•
•
•
•
•
USB 2.0 compliant with read/write speed at least 12 Mbits/sec.
1G capacity or higher with at least 450 MB free space.
Mass storage compliant USB drive
Hot plug (Plug and Play) via USB port
Support Universal USB device ID.
Distribution Package
Inside your NextOffice USB Edition retail package you should find the following items:
•
•
•
NextOffice USB Edition Installation CD
NextOffice 9 User Manual printed in Chinese. A valid license number is printed on the inside
cover of the User Manual
NextOffice USB Edition User Guide
First, you should check your retail package to make sure you have everything listed above. If not, contact
your retailer for package replacement. Each NextOffice USB Edition is licensed to be installed in one USB
flash drive. You are required to provide the unique ID of your USB flash drive during the software
activation process (after activation, the same serial number cannot be used for another USB flash drive).
1
P.2
Word, Excel, Powerpoint are registered trademarks of Microsoft Corporation
User Guide
NextOffice USB Edition
Installation of NextOffice USB Edition
Follow the following steps to install NextOffice USB Edition into your USB flash drive.
Connecting Your USB Flash Drive to PC/Notebook
Attach your USB flash drive to a USB port of your PC (Fig. 1). If the USB drive is successfully recognized
by your PC, it will be recognized as a hot-plugged "Mass Storage Drive" and automatically being assigned a
drive letter, such as “E” (Fig. 2).
Fig. 2 NextOffice USB Edition Drive
Fig. 1 Connect your Flash Drive to the USB port
Install NextOffice USB Edition into your USB Flash Drive
Insert your NextOffice USB Edition Installation CD into your PC's CD-ROM drive, the installer will pop-up
automatically. If not, double click on the CD-ROM drive to open it (Fig. 3-1). Click on the "Install
NextOfifce USB Edition" button, in the "Winzip Self-Extractor" screen (Fig. 3-2), click <Browse> button to
select your USB drive to install the programs into your USB drive. .
Fig. 3-1 NextOffice USB Edition Installation Menu
Fig 3-2. NextOffice Installation
Flash Drive Directory Structure after Installation of NextOffice USB Edition
The NextOffice USB Edition installation includes application programs, Secured Data Volume and preconfigured directory structure to facilitate you to easily manage the files stored in your flash drive. The
directory structure after installation is depicted as follow (Fig. 4) :
Fig. 4 USB Flash Drive Directory Structure
User Guide
P.3
NextOffice USB Edition
Name
Description
Autorun.exe
This is the quick startup program for all NextOffice applications, you can double
click
on the autorun.exe icon to start it.
Autorun.inf
This is the information file referred by autorun.exe. You should not modify it.
Program Files
This folder stores all the applications relevant to NextOffice USB Edition and
also the Secured Data Volume. You should not modify its content.
My Documents
This is a pre-configured empty folder for storing your documents. Files stored under
this folder will NOT be protected. Anyone has your USB flash drive can access and
modify the files inside this folder.
Mass Storage Device Basic Concept
After you have installNextOffice USB Edition into your USB Flash Drive, part of the available space in
your drive will be preserved as Secured Data Volume. (You need to have system administrator privilege in
order to use Secured Data Volume related functions). NextOffice programs occupy around 350 MB storage.
The rest of the available space in your flash drive is the unprotected data area. (Fig. 5)
Fig. 5 Mass Storage Device Basic Concept
Uninstalling of NextOffice USB Edition
To uninstall NextOffice USB Edition, you have to close all running NextOffice instances. Then open your
USB drive and delete the following file/folders:
● Autorun.exe
● Autorun.ini
● Manual folder
● Folders "NextOffice9.2", "PocketNextMail", "7-Zip", "Abakt", "SumatraPDF", "VideoLAN"
folders under "Program Files" directory. Note: File NextMail.tc under TrueCrypt is your secured
data volume. Unless you are sure no useful data is residing inside it, you should not remove this
file.
● My Documents folder
User can also format the whole USB drive to remove NextOffice USB Edition in case you are sure no useful
data are residing in your USB drive.
P.4
User Guide
NextOffice USB Edition
Activating your NextOffice USB Edition
Double click on the icon representing your USB Flash Drive to browse its content. Then double click on
the "autorun.exe" icon to start the NextOffice 9 AppLauncher.
Fig. 6-1
Fig. 6 NextOffice AppLauncher
If it is your first time starting NextOffice USB Edition, you will be prompted to activate your NextOffice
USB Edition (Fig. 6-1) and to choose your default user interface language. See Fig. 6-2.
If your USB flash drive has an Unique ID, it will be shown in the USB SN field. Many 2 nd quality USB flash
drives do not support Unique ID, NextOffice USB Edition CANNOT be activated on these drives without
Unique ID(s).
Activation is done on-line via Internet by pressing the <Register> button in the dialog box above. You will
be directed to our registration website to complete the activation procedure. See Fig. 7.
Fig. 7 Activation SN Input Screen
First, key in the Support SN printed in the inside cover of your NextOffice User Guide in the "Product SN"
field, then key in the USB SN displayed in the dialog box in Fig. 7 in "USB SN" field. Then press <Submit>
button to submit your information.
Fig. 8 Activation Code Result Screen
User Guide
P.5
NextOffice USB Edition
If the information entered is correct, an "Activate SN" will be displayed. Write it down and key in this
number in the "Activate SN" field in the dialog box in Fig. 6. Enter the rest information, such as your user
name, company name and remember to select your desired default UI language. Then press <OK> button to
proceed the activation. Upon successfully activated, NextOffice AppLauncher will show the “Application”
Panel. Fig. 9.
Fig. 9 NextOffice Application Panel
Fig. 10 NextOffice Tool Panel
The "Application” Panel in the NextOffice AppLauncher provides a short-cut to launch NextWriter,
NextCalc, NextImpress, NextDraw, NextDict and NextMail. Simply highlight your desired application and
double click on it to launch it.
The "Tool” Panel (Fig. 10) provides a short-cut to launch "Abakt" a personal backup/recovery tool and
ClamAV, an GPL anti-virus software. Both are pre-configured to run standalone in your flash drive.
Fig. 11 NextOffice Drive Information Panel
The "Drive Information" panel (Fig. 11) provides information on your flash drive and display your
registered product information.
P.6
User Guide
NextOffice USB Edition
You can find two buttons below the panels:
Button
Description
Eject
Before you remove your flash drive, press this <Eject> button to dismount all Secured Data
Volume owned by the USB Flash Drive. Beware to close all started NextOffice
applications, otherwise, your USB drive will be locked from removal to protect against data
loss.
Minimize
Minimize your NextOffice AppLauncher in system tray. You can right click on the
NextOffice USB Edition icon in the system tray to restore it. The quick start menu provides
quick access to functions normally found in the "Application" panel and "Tool" panel.
Press [X] to quit the AppLauncher. Quitting the AppLauncher will not dismount any mounted Secured Data
Volume, it only closes the AppLauncher application. You can also invoke the AppLauncher again by double
clicking on the autorun.exe icon.
System Tray Menu
The system tray menu provides quick access to the following functions:
Function
Description
Show AppLauncher
Restore AppLauncher
NextWriter
Launch NextWriter
NextCalc
Launch NextCalc
NextWriter
Launch NextImpress
NextDraw
Launch NextDraw
NextDict
Launch NextDict
NextMail
Launch NextMail
Backup
Launch Abakt, personal backup utility
Anti-Virus
Launch ClamAV virus scanner
Mount Secured Volume
Mount "NextMail" Secured Data Volume
Unmount All Volume
Unmount all Secured Data Volumes
Ready for removal
Attempt to close all NextOffice
applications, unmount all volumes make
your USB Flash Drive ready for being
unplugged.
Others
Such as PDF Viewer, FTP client, 7-zip,
etc.
System Tray Menu
User Guide
P.7
NextOffice USB Edition
Secured Data Storage
NextOffice USB Edition comes with a pre-configured 100 MB "NextMail" Secured Data Volume. The
Secured Data Volume is acting like a protected partition in your USB Flash Drive. It is a virtual NTFS file
system created on top of a data file (\truecrpyt\nextmail.rc) in your USB Flash Drive. Data in the Secured
Data Volume is normally hidden. In order to access this Secured Data Volume, you have to first mount the
volume. Therefore, even if someone picks your drive, without your mounting password, they will still not
able to access the files in the Secured Data Volume.
Using a larger Secured Data Volume
The programs of NextOffice USB Edition occupy around 350 MB storage. NextOffice USB Edition
includes a 100MB pre-configured Secured Data Volume suitable for flash drive of 1GB capacity. If you are
using flash drive of higher capacity, such as 4G, you may want to configure a larger Secured Data Volume.
In this case, you can create your own Secured Data Volume (On Fig. 3-1, select "Demo NextOffice USB
Edition" to connect to our website and reference our tutorial on how to setup your Secured Data Volume),
then copy the file as “NextMail.tc” to the directory “Program Files\TrueCrypt” in your USB Flash Drive to
overwrite the default 100 MB Secured Data Volume. Before copying the file, make sure your original 100
MB Secured Data Volume is new or you have already backup your data in that Secured Data Volume.
Mounting Secured Data Volume
Before you can access any data in the Secured Data Volume, you have to mount the volume first using a
correct mounting password. After you have mounted the Secured Data Volume, the Secured Data Volume
will appear as another drive and you can treat it as a normal removable disk attaching to your PC, for
example, drag and drop files to copy them to/from that removable drive (Fig. 9). You can check the assigned
drive letter in the “Drive Information” Panel in AppLauncher (Fig. 13).
Fig. 13 Drive Information
Fig. 14 Secured Data Volume Mounted as Drive "F"
You have the following options:
Button
Description
Browse
Open the Windows explorer to browse the drive (Secured Data Volume) content.
Mount/Unmount
Provide shortcut to mount or unmount secured volume.
Following is the structure of the secured data volume (Fig. 14):
Name
Description
Documents and
Settings
Stores NextMail related account information and data. You should not change the
content of this folder. If you would like to backup your mail, simply backup the
whole folder.
My Documents
An empty folder created for storing your own documents. Documents stored in this
folder will be protected. Unless you know the password, otherwise you will not be
able to mount the secured data volume to browse documents in this folder.
P.8
User Guide
NextOffice USB Edition
NextMail is pre-configured to store emails in the Secured Data Volume. When you double click on the
NextMail icon in the "Application" panel in AppLauncher, the Secured Data Volume will be automatically
mounted if it is not yet mounted. You will be prompted to enter the correct mounting password to mount the
volume. If you have never changed this password, the default password is "NextMail". Since this default
"Nextmail" password is known to all NextOffice USB Edition users reading this manual, this password is
insecure and you will be prompted to change this password. Fig. 15.
Fig. 10 Mounting Secured Data Volume
Fig. 15 Prompting to Change Password
After you have changed the default mounting password, key-in the new password from then on (Fig. 16) to
mount the Secured Data Volume. Note that after your have changed your default mounting password, no one
other than yourself can mount the secured volume. If you ever forget this password, even our Customer
Service Representatives will not be able to recover your data.
Copying Documents To/From Secured Data Volume
Under "My Computer", you will find a new icon representing the Secured Data Volume in your USB Flash
Drive. Simply use it as a normal removable hard disk to store your documents.
Dismounting Secured Data Volume
When you are done with your USB Flash Drive, you should dismount the Secured Data Volume so that if
you ever accidentally lose your drive and someone picks it, with your mounting password, he/she will not be
able to access the data stored in the Secured Data Volume. If any of your files in the Secured Data Volume is
still being accessed during dismounting, an error dialog box will pop up when you try to dismount the
Secured Data Volume (Fig. 17).
In this case, you should select <No> to avoid to force dismount the
Secured Data Volume. Then:
•
•
Fig. 17 Dismount Error
•
•
close all NextOffice applications that could possibly accessing files
in the Secured Data Volume.
close all other Windows applications that could possibly accessing
files in the Secured Data Volume, such as File Explorer.
close NextMail if it is currently opened.
try to dismount the Secured Data Volume again.
If you have chosen <Yes> to force dismount , Windows file system will ignore locked files in your Secured
Data Volume and force a dismount. This could result in data loss.
Change Secured Data Volume Size
The pre-configured Secured Data Volume in NextOffice USB Edition is set to100MB, if you would like to
change it size, follow the following procedure:
1.
2.
3.
First mount your existing secured data volume and then backup the existing data to other
location.
Use TrueCrypt.exe in "Program Files\TrueCrpyt" to create a new secured data volume.
Mount you newly created secured data volume and copy your backup data to this volume.
For detail of how to setup secured data volume with TrueCrypt.exe, you can, on Fig. 3-1 NextOffice
Installation Menu, select "Demo NextOffice USB Edition" to connect to our website to referrence our online
tutorial or input the following URL directly : http://nextoffice.net/cht/usb_demo_fdisk.php
User Guide
P.9
NextOffice USB Edition
File Extensions Associations
Mounting Secured Data Volume has special implication to NextOffice USB Edition. NextOffice USB
Edition in principal avoids writing information to the connecting PC's registry. However, for enhanced
usability, the file extension association is setup automatically during the mounting of Secured Data Volume
and is restored automatically during the dismounting of the Secured Data Volume. Here are the rules to
apply:
On Mounting Secured Data Volume:
•
If MS Word is not found and NextOffice is not found in the connecting PC, set ".doc", ".dot" file
extensions to be associated with NextWriter.
•
If MS Excel is not found and NextOffice is not found in the connecting PC, set ".xls", ".xlt" file
extensions to be associated with NextCalc.
•
If MS Impress is not found and NextOffice is not found in the connecting PC, set ".ppt", ".pot"
file
extensions to be associated with NextImpress.
•
If NextOffice is not found in the connecting PC, set ".sxw", ".sxc", ".sxi, ".sxg" and all
OpenDocument file extension to be associated with NextOffice applications.
On Dismount Secured Data Volume:
•
Cancel any registry change done in mounting
Switching Among different User Interface Language
NextOffice USB Edition is designed for highly mobile users. It provides them a convenience of not carrying
along with their notebooks but still able to bring along documents and emails so that in case of necessite,
they can simply plug in their USB flash drive pre-installed with NextOffice USB Edition to do their works.
In some situations, these mobile users may be borrowing someone’s PC running a different Windows
language version. Since NextOffice USB Edition is conforming Unicode standard, you can always switch
the user interface language among English, Chinese Traditional and Chinese Simplified. Simply double click
on the NextSettings icon in the “Tool Panel” in your AppLauncher to bring up the NextSetting program
(Fig. 18, 19).
Fig. 19 Switching UI Language
Fig.18 Next Settings
P.10
User Guide
NextOffice USB Edition
Disconnecting Your Flash Drive from PC/Notebook
First, close all NextOffice applications, then select button <Eject> in the AppLauncher or the "Ready for
Removal" sub-menu in the system tray menu.
Then right click on the "Mobile Device Manager" icon at your system tray to bring up a menu and select
"remove mobile device". In the pop-up dialog (Fig. 20), select "disconnect mobile drive" option to
disconnect your USB Flash Drive. When your device is disconnected from your Windows, you can safely
detach it from the USB port of your PC.
Fig. 21 Dismount Error
Fig. 20 Dismount Flash Drive
If any of your files in the flash drive is still being accessed, an error dialog box will pop up when you try to
dismount the Secured Data Volume (Fig. 21). In this case, you should:
•
•
Close all NextOffice applications that could possibly accessing files in the Secured Data Volume.
•
•
•
Dismount all Secured Data Volumes.
Close all other Windows application that could possibly accessing files in the Secured Data
Volume, such as File Explorer.
Close NextMail if it is currently in active.
Try to dismount the USB Flash Drive again via the "Mobile Device Manager" (Fig. 20).
Open, Save, Edit your Office Document
If you have mounted the Secured Data Volume, you can double click on an Office document to open it.
Otherwise, open your Office document using the following procedure:
To open an Office document: 1) simply start the right application in NextOffice AppLauncher or 2) Select
menu "File" -> "Open" and pick your target file. NextOffice will automatically recognize the file type and
open it using the right application.
To save your Office document under NextOffice, simply select menu "File" -> "Save As" and pick MS
Office and the target file type.
Exporting your Office doucments as PDF format
To export your Office documents under NextOffice as PDF format, select menu "File" -> "Export As PDF"
and key in a valid output file name.
Backup your NextOffice USB Edition Data
If you ever need to delete your NextOffice to free the space in your USB Flash Drive for other purposes,
follow the following procedure
1.
2.
Backup all the data in your flash drive to a CD/DVD/hard disk.
Delete the backup data to reclaim free space
User Guide
P.11
NextOffice USB Edition
Restore NextOffice USB Edition
To restore NextOffice, first make should you have enough free space in your flash drive, then simply
copy/store the previous backup copy from your CD/DVD/hard disk to your flash drive.
Using NextMail
You can use the NextMail application in your NextOffice USB Edition to move your emails along with you.
In this case, stick to the following guidelines:
When NextMail in your NextOffice USB Edition is first launched, there is a default account setting as
[email protected]. But you can choose to remove this account and import your existing email accounts by
first ensure NextMail is not running, then mount your secured data volume and then delete all files under
"Documents and Settings\Application Data\PocketNextMail\profile" in your Secured Data Volume. When
NextMail is restarted, you will have the option to import account settings from NextMail/Thunderbird in
your connecting PC to the attach USB Flash Drive. Therefore, we recommend you to start NextMail first in
your designated PC which contains most of, if not all, of your account settings. See Fig. 22.
Fig. 22 Copy NextMail Account Settings from host
If you are using Outlook, Outlook Express or Eudora in your connecting PC, select <No>. After NextMail
is launched, select menu "Tool" -> "Import" to import account settings and/or emails from your connecting
PC to your USB Flash Drive (Fig. 23).
Fig. 23 Importing Outlook, Outlook Express Settings
Then select menu "Tools" -> "Account" to bring up the account setting menu. In each account setting, check
the "Retain Message in server for 7 day" (See Fig. 24). In this case, only copies of emails will be transferred
to your USB Flash Drive. When you are back to your working PC, you can always select to download the
original messages back to your PC within the checked period.
P.12
User Guide
NextOffice USB Edition
Fig. 24 Account Settings
If you would like to keep copies of outgoing messages. select menu "Tools" -> "Account" to bring up the
account setting dialog box. In each account setting dialog box, click on the "Copy and Folder" option, check
the "copy mail to the following address field" and then key-in valid email name to copy email to another
account so that you can obtain copies of your outgoing emails as if they are incoming (Fig. 25).
Fig. 25 Setting Auto-copy of Outgoing Mails
User Guide
P.13
NextOffice USB Edition
Clam AV Virus Scanner
NextOffice USB Edition comes along with a virus scanner. You can use this virus scanner to scan for
possible virus infections in the connecting PC. To use the virus scanner, double click on the “Clam AV”
icon in the “Tool Panel” to activate it. (Fig. 26, 27)
Fig. 26 ClamAV Virus Scanner
Fig. 26 ClamAV Virus Scanner
Abakt Backup Tool
Abakt is a powerful backup tool that allows you to quickly backup your files to your USB Flash Drive in a
compressed and password protected format. Following is a step by step demonstration on how to use the
Abakt backup utility to backup <My Document> folder.
Double click on the <Backup> icon in the <Tool Panel> to activate the backup utility (Fig. 28)
Fig. 29 Backup Source
Fig. 28 Abakt Backup Utility
In the main screen, press <Add> button and pick <My Document> folder (Fig. 29)
P.14
User Guide
NextOffice USB Edition
You can define the filtering criteria to select only files matching your selection criteria to be backup, e.g.,
you can include or exclude certain types of file, such as executable programs. In the tool bar, select <2 –
Filter> button. (Fig. 30)
Fig. 30 Defining Filter
If you need other actions (such as a different compression mode), select <3 – Action> button to set it up.
(Fig. 31)
Fig. 31 Select Other Actions
User Guide
P.15
NextOffice USB Edition
Then select <F10 – Destination> to specify where to store your backup. (Fig. 32)
Fig 32 Select Destination
Finally, press the <Execute Action> button in the top right corner to start executing the backup action. (Fig.
33)
Fig. 33 Execute Action
*** End ***
P.16
User Guide