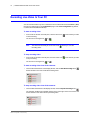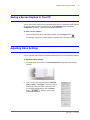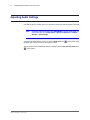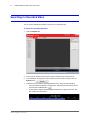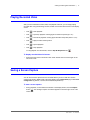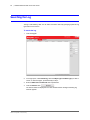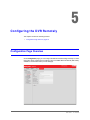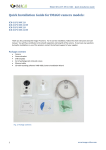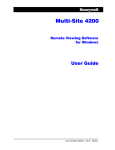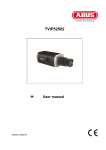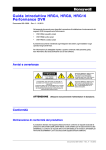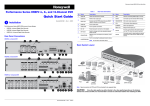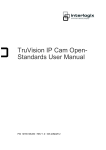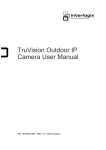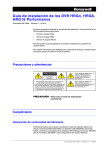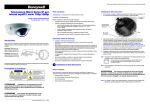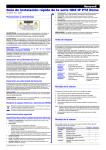
1
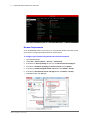
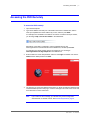
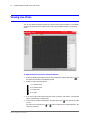
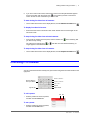
HRGX Performance Series 4/8/16-Channel Embedded DVR NTSC HRGX45 HRGX41 HRGX85 HRGX81 PAL HRGX82 HRGX161 HRGX162 HRGX164 HRGX45X HRGX41X HRGX85X HRGX81X HRGX82X HRGX161X HRGX162X HRGX164X Remote Web Access User Guide Document 800-18321 – Rev A – 06/2014 Revisions Issue Date Revisions A 06/2014 New document. About This Document This document describes how to access Honeywell’s HRGX Performance Series embedded DVR remotely using a browser-based web client. This document is intended primarily for remote users. Overview of Contents This document contains the following chapters: • Chapter 1, Connecting to the DVR • Chapter 2, Viewing and Recording Live Video • Chapter 3, Viewing and Saving Recorded Video • Chapter 4, Working with Log Files • Chapter 5, Configuring the DVR Remotely 800-18321 - A - 06/2014 4 | HRGX DVR Remote Web Access User Guide Related Documents For more information about using the HRGX DVR, refer to the following documents: Document title Part number HRGX DVR Getting Started Guide 800-16693 HRGX DVR User Manual 800-16694 HRGX DVR Apple Device Mobile App User Guide 800-18322 HRGX DVR Android Device Mobile App User Guide 800-18323 Multi-Site 4200 User Guide for Windows 800-12064V2 Multi-Site 4200 User Guide for Mac 800-13101 * These part numbers are subject to change. Please consult the HRGX Performance Series DVR product webpage for the latest versions of these documents. www.honeywell.com/security 1 Connecting to the DVR 1 This chapter contains the following sections: • Before You Begin, page 5 • Accessing the DVR Remotely, page 7 Before You Begin Before you begin, ensure that the following system, network, and browser requirements have been met. System Requirements Your PC must meet the following minimum system requirements: Operating System Windows 7 or later CPU Pentium 4, 3.0 GHz or faster System Memory (RAM) 1 GB or more Display 1024 × 768 resolution or higher Browser Internet Explorer 8 or later Network Requirements Your PC should be connected to the same local area network (LAN) as the DVR you want to access. To access the DVR over a wide area network (WAN), you will need to set up port forwarding on the DVR’s router. Contact your network administrator or the router manufacturer for assistance. Write down the DVR’s IP address and HTTP port number (the default HTTP port setting is 8001). You can find this information by logging on to the DVR and going to Menu > Settings > Network > General. 800-18321 - A - 06/2014 6 | HRGX DVR Remote Web Access User Guide Browser Requirements To run the HRGX web client in your browser, you must install an ActiveX control. Ensure that your browser is configured to download and run ActiveX controls. To configure your browser to download and run ActiveX controls: 1. Open Internet Explorer. 2. Click Tools > Internet Options > Security > Custom level. 3. Scroll down the Security Settings list until you see ActiveX controls and plug-ins. 4. Scroll down to Automatic prompting for ActiveX controls and click Enable. 5. Scroll down to Download signed ActiveX controls and click Enable or Prompt. 6. Scroll down to Run ActiveX controls and plug-ins and click Enable or Prompt. 7. Click OK, and then click OK again. www.honeywell.com/security Connecting to the DVR | 7 Accessing the DVR Remotely To access the DVR remotely: 1. Open Internet Explorer. 2. Type the IP address and HTTP port of the DVR in the browser’s address bar, with the HTTP port separated from the IP address by a colon, and then press Enter. For example, if the IP address of the DVR is 164.178.45.172 and the HTTP port is 8001, you would type http://164.178.45.172:8001 in the address bar. Alternatively, if the DVR is configured to use the hrgDDNS service, type www.hrgdvr-ddns.com/dvrdomainname in the address bar, and then press Enter. For example, if the DVR’s domain name is hrg-sample-dvr, you would type www.hrgdvr-ddns.com/hrg-sample-dvr in the address bar. 3. Enter the DVR user name and password, and then click Login. The default user name is admin and the default password is 12345. 4. The first time you access the DVR with the browser you will be prompted to download and install the WebComponents.exe plug-in. Click the message in the center of the screen and then follow the on-screen instructions. Note If you receive an error message, your browser may not be configured to download and run ActiveX controls. See Browser Requirements, page 6. 800-18321 - A - 06/2014 8 | HRGX DVR Remote Web Access User Guide www.honeywell.com/security 2 Viewing and Recording Live Video 2 This chapter contains the following sections: • Live View Page Overview, page 9 • Viewing Live Video, page 10 • Controlling PTZ Cameras, page 11 • Recording Live Video to Your PC, page 12 • Saving a Screen Capture to Your PC, page 13 • Adjusting Video Settings, page 13 • Adjusting Audio Settings, page 14 Live View Page Overview On the Live View page, you can do the following: • • • view live video control PTZ cameras record live video to PC • • • save screen captures to PC configure video settings for each camera configure audio settings for each camera 800-18321 - A - 06/2014 10 | HRGX DVR Remote Web Access User Guide Viewing Live Video You can view real-time streaming video from cameras connected to the DVR. You can display video from a single camera in single-screen mode or from multiple cameras in multi-screen mode. To start viewing live video from selected cameras: 1. Select the display mode that you want to use by clicking the display mode button the toolbar at the bottom of the display window. 2. Select one of the following options: on 1×1 (4ch/8ch/16ch) 2×2 (4ch/8ch/16ch) 3×3 (8ch/16ch) 4×4 (16ch) 3. If you are in multi-screen mode, select the screen you want to view video in. The selected screen is indicated by a yellow border. 4. From the list of cameras in the left pane, click the camera icon to view. The camera icon changes from screen you selected. www.honeywell.com/security to of the camera you want and live video from the camera appears in the Viewing and Recording Live Video | 11 5. If you are in multi-screen mode, click another screen so that the yellow border appears around it, and then click the camera icon of the camera you want to view in that screen. Do this for each camera that you want to view. To start viewing live video from all cameras: • On the toolbar at the bottom of the display window, click the Start All Live View button . To display live video full-screen: • Double-click the screen to enter full-screen mode. Double-click the screen again to exit full-screen mode. To stop viewing live video from selected cameras: • From the list of cameras in the left pane, click the camera icon you want to stop viewing. The camera icon changes from to longer appears in the selected screen. of the camera(s) that and video from the selected camera(s) no To stop viewing live video from all cameras: • On the toolbar at the bottom of the display window, click the Stop All Live View button . Controlling PTZ Cameras You can control PTZ cameras remotely from your browser using the PTZ control interface in the right pane. Direction Buttons/ Auto-Cycle Button Zoom +, Zoom – Focus +, Focus – Iris +, Iris – Speed Light On/Off To call a preset: • Wiper On/Off Call Set Select a preset from the list of presets, and then click the Call button. To set a preset: • Select a preset from the list of presets, and then click the Set button. 800-18321 - A - 06/2014 12 | HRGX DVR Remote Web Access User Guide Recording Live Video to Your PC You can record live video to your PC’s hard drive. The recorded video is saved in MPEG-4 (MP4) format to the folder listed on the Configuration page under Local Configuration (by default, C:\Users\username\Web\RecordFiles). To start recording video: • From the list of cameras in the left pane, click the record icon to start recording. The record icon changes from Note to of the camera you want . The camera must already be in live view mode recording video. before you can start To stop recording video: • From the list of cameras in the left pane, click the record icon to stop recording. The record icon changes from to of the camera you want . To start recording video from all the cameras: • On the toolbar at the bottom of the display window, click the Start All Recording button . All the cameras in live view mode start recording video. To stop recording video from all the cameras: • On the toolbar at the bottom of the display window, click the Stop All Recording button . The message "All Record succeeded" appears in the lower right corner of the screen and all the cameras in live view mode stop recording video. www.honeywell.com/security Viewing and Recording Live Video | 13 Saving a Screen Capture to Your PC You can save a screen capture from the live video feed to your PC’s hard drive. Screen captures are saved in JPEG format to the folder listed on the Configuration page under Local Configuration (by default, C:\Users\username\Web\CaptureFiles). To save a screen capture: • On the toolbar at the bottom of the display window, click the Capture button . The message "Capture succeeded" appears in the lower right corner of the screen. Adjusting Video Settings You can adjust the video settings of a selected camera based on the current lighting conditions. To adjust the video settings: 1. In the right pane, at the bottom, click Video parameters to expand the video settings interface. 2. Click one of the pre-configured options (standard, indoor, outdoor, or dimLight) or adjust the settings manually by moving the slider or entering a value. To restore the default settings, click the Default button , and then, at the prompt, click OK. 800-18321 - A - 06/2014 14 | HRGX DVR Remote Web Access User Guide Adjusting Audio Settings If the DVR is set up to monitor sound, you can listen to audio from and send audio to the DVR. Note A camera’s video type must be set to Video&Audio to send an audio signal. To set the video type, go to Configuration > Remote Configuration > Camera Settings > Video Settings. The audio is muted by default. To turn it on, click the Audio On button the slider right or left to increase or decrease the volume. on the toolbar. Drag The microphone feature is disabled by default. To enable it, click the Start Two-way Audio button on the toolbar. www.honeywell.com/security 3 Viewing and Saving Recorded Video 3 This chapter contains the following sections: • Playback Page Overview, page 15 • Searching for Recorded Video, page 16 • Playing Recorded Video, page 17 • Saving a Screen Capture, page 17 • Saving a Video Clip, page 18 • Saving Recorded Video Files, page 18 Playback Page Overview On the Playback page, you can do the following: • • • search for recorded video files play back recorded video files save screen captures to PC • • • create video clips save video clips to PC archive recorded video files to PC 800-18321 - A - 06/2014 16 | HRGX DVR Remote Web Access User Guide Searching for Recorded Video You can use the calendar and timeline to search for recorded video files. To search for recorded video files: 1. Click the Playback tab. 2. From the list of cameras in the left pane, click the camera that you want to search. 3. In the calendar in the right pane, click the date you want to search, and then click the Search button . 4. Indicate the time you want to start playing back from by doing one of the following: • In the time field at the bottom of the right pane, manually enter the time (hh:mm:ss), and then click the Go to button . • On the timeline, drag the desired playback start time to the yellow center line, and then release the mouse button. www.honeywell.com/security Viewing and Saving Recorded Video | 17 Playing Recorded Video After you have selected the camera, date, and playback start time, you can begin playing recorded video using the following controls, located on the toolbar at the bottom of the display screen: • Click to start playback. • Click to speed up playback. Clicking again increases the speed (up to 4×). • Click to slow down playback. Clicking again decreases the speed (down to 1/4×). • Click to play the video frame-by-frame. • Click to pause playback. • Click to stop playback. To stop playback from all cameras, click the Stop All Playback button . To display recorded video full-screen: • Double-click the screen to enter full-screen mode. Double-click the screen again to exit full-screen mode. Saving a Screen Capture You can save a screen capture from the recorded video to your PC’s hard drive. Screen captures are saved in JPEG format to the folder listed on the Configuration page under Local Configuration (by default, C:\Users\username\Web\PlaybackPics). To save a screen capture: • During playback, on the toolbar at the bottom of the display window, click the Capture button . The message "Capture succeeded" appears in the lower right corner of the screen. 800-18321 - A - 06/2014 18 | HRGX DVR Remote Web Access User Guide Saving a Video Clip You can create and save a video clip to your PC’s hard drive when playing back recorded video. The clip is saved in MPEG-4 (MP4) format to the folder listed on the Configuration page under Local Configuration (by default, C:\Users\username\Web\PlaybackFiles). To create and save a video clip: 1. During playback, at the time you want to start the clip, click the Start clipping button on the toolbar. 2. To end the clip, click the Stop clipping button appears in the lower right corner of the screen. . The message "Clip succeeded" Saving Recorded Video Files You can save recorded video to your PC’s hard drive for later viewing. The file is saved in MPEG-4 (MP4) format to the folder listed on the Configuration page under Local Configuration (by default, C:\Users\username\Web\DownloadFiles). To save a recorded video file: 1. On the Playback page, in the right pane, click the date you want to save video from. 2. Click the Download button 3. Select the file(s) you want to save, and then click Download. . A list of recorded video files is displayed. The progress of the download is displayed in the Progress column. A confirmation message appears when the download is complete. To stop the download, click Stop, and then, at the prompt, click OK. www.honeywell.com/security 4 Working with Log Files 4 This chapter contains the following sections: • Log Page Overview, page 19 • Searching the Log, page 20 • Viewing a Log Entry, page 21 • Saving a Log Entry, page 21 Log Page Overview On the Log page, you can view and save the activity log entries for the DVR. The log entries are classified into the following major and minor types: Major Type Minor Type Alarm Alarm Input, Alarm Output, Start/Stop Motion Detection, Start/Stop Tamper-proof Exception Video Signal Loss, Illegal Login, HDD Full, HDD Error, Network Disconnected, Record/Capture Error, IP Address Conflicted, Video Signal Exception, Input/Output Video Standard Mismatch, IP Camera Disconnect, IP Address of IPC Conflict, Resolution Mismatch Operation Power On, Local and Remote Settings (various), Establish Transparent Channel, Disconnect Transparent Channel, Start/Stop Two-way Audio Information HDD Information, Start/Stop Record, Delete Expired Video File, NetHDD Information, S.M.A.R.T. Information, Start/Stop Capture, RAID 800-18321 - A - 06/2014 20 | HRGX DVR Remote Web Access User Guide Searching the Log The log is searchable by date. You can further narrow the search by specifying a particular log type and/or time to search. To search the log: 1. Click the Log tab. 2. In the right pane, under Search Log, select the Major Type and Minor Type you want to search. To search all types, proceed directly to step 3. 3. Enter the Start Time and End Time search parameters. 4. Click the Search button . The search results are displayed in the main window and the message "Searching log finished" appears. www.honeywell.com/security Working with Log Files | 21 Viewing a Log Entry Log search results are displayed in the main window in a numbered list under the following headings: Time, Major Type, Minor Type, Channel No., Local/Remote User, and Remote Host IP. Scroll down the list to view all the entries. If more than one page of search results is displayed, use the navigation controls in the lower right corner of the screen (First Page, Prev Page, Next Page, Last Page) to move between pages. Saving a Log Entry You can save a log entry to your PC’s hard drive. To save a log entry: 1. In the main window, click the log entry you want to save. The entry is highlighted red. 2. In the right pane, click Save Log. 3. In the Save As window, navigate to the directory where you want to save the file, enter a name for the file in the File Name field, select the file type in the Save as type field (Text file or Excel file), and then click Save. 800-18321 - A - 06/2014 22 | HRGX DVR Remote Web Access User Guide www.honeywell.com/security 5 Configuring the DVR Remotely 5 This chapter contains the following sections: • Configuration Page Overview, page 23 Configuration Page Overview On the Configuration page, you can configure the DVR and camera settings remotely. For more information about configuring these settings, refer to the HRGX DVR User Manual (800-16694), available for download from the product webpage. 800-18321 - A - 06/2014 24 | HRGX DVR Remote Web Access User Guide www.honeywell.com/security Honeywell Security Products Americas (Head Office) 2700 Blankenbaker Pkwy, Suite 150 Louisville, KY 40299, USA www.honeywell.com/security +1 800 323 4576 Honeywell Security Northern Europe Ampèrestraat 41 1446 TR Purmerend, The Netherlands www.honeywell.com/security/nl +31 (0) 299 410 200 Honeywell Security Europe/South Africa Aston Fields Road, Whitehouse Industrial Estate Runcorn, WA7 3DL, United Kingdom www.honeywell.com/security/uk +44 (0) 1928 754 028 Honeywell Security Deutschland Johannes-Mauthe-Straße 14 72458 Albstadt, Germany www.honeywell.com/security/de +49 (0) 7431 801-0 Honeywell Security Products Americas Caribbean/Latin America 9315 NW 112th Ave. Miami, FL 33178, USA www.honeywell.com/security/clar +1 305 805 8188 Honeywell Security France Immeuble Lavoisier Parc de Haute Technologie 3-7 rue Georges Besse 92160 Antony, France www.honeywell.com/security/fr +33 (0) 1 40 96 20 50 Honeywell Security Asia Pacific 35F Tower A, City Center, 100 Zun Yi Road Shanghai 200051, China www.asia.security.honeywell.com +86 21 2219 6888 Honeywell Security Italia SpA Via della Resistenza 53/59 20090 Buccinasco Milan, Italy www.honeywell.com/security/it +39 (0) 2 4888 051 Honeywell Security Middle East/N. Africa Emaar Business Park, Sheikh Zayed Road Building No. 2, Office No. 301 Post Office Box 232362 Dubai, United Arab Emirates www.honeywell.com/security/me +971 (0) 4 450 5800 Honeywell Security España Avenida de Italia, n° 7, 2a planta C.T. Coslada 28821 Coslada, Madrid, Spain www.honeywell.com/security/es +34 902 667 800 www.honeywell.com/security +1 800 323 4576 (North America only) https://www.honeywellsystems.com/ss/techsupp/index.html Document 800-18321 – Rev A – 06/2014 © 2014 Honeywell International Inc. All rights reserved. No part of this publication may be reproduced by any means without written permission from Honeywell. The information in this publication is believed to be accurate in all respects. However, Honeywell cannot assume responsibility for any consequences resulting from the use thereof. The information contained herein is subject to change without notice. Revisions or new editions to this publication may be issued to incorporate such changes.