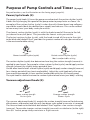
1
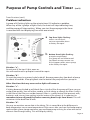
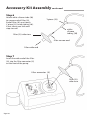
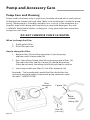
breast pumps
Congratulations on your selection of PJ's multi-user electric breast pump.
We are certain you will be pleased with your purchase and find it an
invaluable aid in providing your infant with the finest nutrition available:
your own milk.
Limerick,Inc.,is proud that PJ's breast pumps are designed by breastfeeding
mothers for breast-feeding mothers. Our company is owned by a mother
daughter team who are certified lactation consultants with over 20 years
of experience assisting mothers who use our pumps in the workplace.
We want you to get the best results from your new breast pump.
This manual is designed to help you operate it efficiently and safely.
Should you have any questions or concerns, our trained staff will be
pleased to assist you. Please find our contact information on page 28
or on the back cover.
Best Wishes,
Patricia and Joan
Before operating your new PJ’s Comfort hospital grade,
multi user electric breast pump
or your new PJ’s Bliss multi user electric breast pump
please read the instructions completely.
View instructional DVD on Limerick’s web site
www.limerickinc.com
The Food and Drug Administration also known as the FDA has designated
breast pumps as either multiple user or a single user pump. Most retail electric
breast pumps are single-user. Single-user pumps can never be shared, borrowed
or even returned to a retailer. Potentially infectious particles may survive in
the breast pump and or its accessories for a surprisingly long time and cause
disease in the next baby or mom. Only multi-user breast pumps like PJ's breast
pumps are specifically designed to decrease the risk of contamination and
re-infection, and are safe to be used by more than one person in the hospital
setting, at work or at home.The designation of “hospital grade” in not recognized
by the FDA but is an industry termed.
The following is a definition of terms:
Multi – User electric breast pump: This is an FDA designation indicating that
this type of breast pump prevents contamination from a back flow of breast milk,
infectious particles and organisms between different users (cross contamination)
due to the pump’s filter/design. Different women using the same multi – user
pump should have their own individual, personal use Sof- touch™ kit which
contains a filter to prevent cross contamination. Multi – user designed pumps
are also used by a single-user as their personal pump because they provide
an extra level of safety.
Hospital Grade/ Rental-Grade Electric pump: These breast pumps are utilized
in the hospital setting and by rental after discharge. There is an implication
that these types of breast pumps are intended for multiple, different users for
mother-infant dyads facing significant medical challenges.
Limerick’s definition of hospital grade, multi user breast pump –
PJ’s Comfort hospital grade breast pump is research proven to initiate a milk
supply in the most challenged of mothers such as mothers of very low birth weight
infants or premature infants. PJ’s Comfort is a safe closed system with a filter on
the Sof – touch™ kit that prevents milk, infectious particles and organisms from
entering the pump thus minimizing the risk for cross contamination. (Limerick’s
Sof – touch™ kit includes a 1 – micron filter that has a study to validate it prevents
bacteria virus and fluid from passing through the filter.) PJ’s Comfort motor is
more robust and has a life expectancy of at least 3 years. When used in a hospital
setting a power cord meeting hospital requirements is supplied.
The Owner’s Manual and Instructional DVD can also be found on the Limerick Inc website
Para instrucciones de vídeo, por favor visite nuestro sitio web en:
www.l imericki nc.com
To be in compliance with the World Health Organization (WHO) we are not sending
nipples with our storage containers. Any standard size nipple will work with the cap.
An overview of how to use your new multi-user breast pump
1. Sanitize storage containers, caps and gaskets . . . . See page 10
2. Learn use of pump controls . . . . . . . . . . . . . . . . . . . . . . See page 12
3. Accessory kit assembly . . . . . . . . . . . . . . . . . . . . . . . . . . See page 18
Some part may already be assembled
4. Attach power cord to back of pump . . . . . . . . . . . . . . See page 12
5. Express milk . . . . . . . . . . . . . . . . . . . . . . . . . . . . . . . . . . . . . See page 22
6. Store milk properly . . . . . . . . . . . . . . . . . . . . . . . . . . . . . . See page 23
7. Cleaning accessory kit . . . . . . . . . . . . . . . . . . . . . . . . . . . See page 27
* This oveview is not intended to provide complete user instructions.
Read the entire manual before operating pump.
Caution: If the accessory kit is not labeled sterile
see page 10 for instructions on sanitizing the accessory
kit. Sanitizing the accessory kit needs to be done before
the first time you use it. After the first time you use
the pump, the accessory kit will only need a simple
cleaning procedure found on page 27.
Owners Manual revision: May 2014
Page 2
breast pumps
Contents
Health and Safety Information. . . . . . . . . . . . . . . . . . . . . . . . . . . . . . . . . . . . . . . . . . .4
Important safeguards
Pump and Accessory Kit Component identification. . . . . . . . . . . . . . . . . . . . . .6
Introduction to Breast Pumps. . . . . . . . . . . . . . . . . . . . . . . . . . . . . . . . . . . . . . . . . . . . 8
Purpose of PJ’s multi –user electric breast pump
Reasons to use a breast pump
Benefits of using PJ’s multi –user electric breast pump
Accessory Kit Sanitizing (before first use) . . . . . . . . . . . . . . . . . . . . . . . . . . . . . . 10
Controls and Assembly. . . . . . . . . . . . . . . . . . . . . . . . . . . . . . . . . . . . . . . . . . . . . . . . . . 12
Pump assembly
Purpose of pump controls and timer
Accessory kit assembly
Double pumping setup
Single pumping setup
Expressing your Milk . . . . . . . . . . . . . . . . . . . . . . . . . . . . . . . . . . . . . . . . . . . . . . . . . . . 22
Preparation for expressing breast milk
Expressing breast milk
Storage of milk at home
Ways to use PJ's breast pumpto express milk
Multiple user instructions
Pump and Accessory Care . . . . . . . . . . . . . . . . . . . . . . . . . . . . . . . . . . . . . . . . . . . . . 26
Pump care and cleaning
When and how to change the filter
Accessory kit cleaning instructions (after each use)
Troubleshooting and Customer Service . . . . . . . . . . . . . . . . . . . . . . . . . . . . . . . . 28
Ordering Replacement Parts or Optional Accessories . . . . . . . . . . . . . . . . . 31
Warranty. . . . . . . . . . . . . . . . . . . . . . . . . . . . . . . . . . . . . . . . . . . . . . . . . . .. . . . . . . . . . . . . 32
Index . . . . . . . . . . . . . . . . . . . . . . . . . . . . . . . . . . . . . . . . . . . . . . . . . . . . . . . . . . . . . . . . . . 35
Health and Safety
IMPORTANT SAFEGUARDS
When using your PJ’s Comfort® multi–user hospital grade breast pump
and PJ’s Bliss™ multi–user electric breast pump, basic safety precautions
should always be followed, including the following:
READ ALL INSTRUCTIONS BEFORE USE
WARNING Every electrical devise has a potential for danger. To reduce the
risk of burns, electrocution, fire, injury or infection to persons:
1.
2.
3.
4.
5.
6.
7.
8.
9.
10.
11.
12.
13.
Page 4
Always unplug your PJ's Comfort ® or PJ's Bliss™ breast pump immediately
after using. Unplugging the breast pump is the only way to assure the
power is disconnected.
Do not use while bathing or showering.
Do not place ordrop motor unit (pump)or power supply into water
or other liquid. If either part falls into water, unplug from wall, then
remove it from the water. Do not use pump or power supply again;
the pump and power supply cannot be repaired after being in water.
Do not store or use your breast pump where it can fall or be pulled
into a tub, sink or other water container.
To avoid damaging the power cord do not wrap/wind power cord
around the power adapter.
Never operate your pump if it has a damaged power supply cord or plug.
Only use the electric power supply/cord that comes with the
PJ's Comfort ® or PJ's Bliss™ electric breast pump.
The breast cup/ storage container Accessory Kits are personal care items
designed to be used by one woman only.
They are not to be shared between mothers.
The filter needs to be replaced if it gets wet.
Make sure the outlet power is compatible with the pump. If you plan
to use this pump in another country where voltage and outlet plugs
may differ, a plug adapter may be required. Please contact Limerick Inc.,
for recommendations.
Do not use while sleeping or when overly drowsy.
Supervision is needed when using pump near children.
In the rare occasion the amount of suction becomes strong enough
to cause pain, immediately pull the filter (part #9 on page15) off
the pump’s filter connector (#5) and turn pump off. Should the cup
remain stuck with suction to your breast after you have removed the
continued on next page
WARNING continued
WARNING, continue d
filter and turned off the power, insert your finger between the cup and
your breast to break the seal.
14. If the Accessory Kit is not marked sterile see pages 10 -11 for sanitizing
accessories before first use and pages 26-27 for cleaning after each use.
CAUTION: To reduce the likelihood of malfunction, pump failure,
damage to pump or damage to other property:
1. Your PJ's Comfort ® or PJ's Bliss™ breast pump should never be left
unattended when plugged into an electric outlet.
2. Use the pump only for its intended use as described in this manual.
3. Use ONLY Accessory Kits manufactured by Limerick,Inc. Your PJ's Comfort ®
or PJ's Bliss™ breast pump operates differently than other pumps, so other
kits will not work properly with it. Use of incorrect parts voids warranty.
4. Use the pump only in an upright position.
5. Never operate your pump if it is not working properly.
6. Do not use outdoors or where pump could get wet.
7.
Keep the cord and all components away from heated surfaces.
8. If the filter becomes plugged, replace the filter.
Do not tamper with the filter.
9. DO NOT ATTEMPT TO REPAIR PJ's Comfort ® or PJ's Bliss™ multi-user
electric breast pump. There are no user-serviceable parts inside.
10. Your pump has a temperature sensor that shuts it off if the
temperature inside gets to high. In the unlikely event that this
sensor should fail, and the pump begins to smell hot, turn it off
immediately, and call Limerick, Inc., to return it for the repair.
11. In the unlikely event that the pump motor should stop running or
cycling and the power is still connected, turn it off immediately and
call Limerick, Inc., to return it for repair.
Page 5
Pump Component Identification
timer 10 & 20 min. (4)
timer 1-9 ( 3)
power/cycle
knob (1)
filter connector ( 5)
vacuum
adjustment
knob ( 2)
storage
container
holder
slot ( 7 )
storage
container
holder ( 6)
storage container holder ( 6)
power supply ( 8 )
The pump, power supply and storage container holders may be shared by
two or more women. See page 25 for details
Page 6
Accessory Kit Components
silicone breast cup (15)
clear tubes (12)
filter ( 9 )
tube
connector
(13)
breast cup
brace (16)
storage container
cap (14 )
for breast cup
assembly
Y piece (11)
white
silicone
tubing (10)
breast cup
brace (16)
storage
container
cap gasket
(17)
storage
container
(18)
tube
connector
(13)
silicone breast cup (15)
clear
tubes (12)
storage container cap (14 )
for breast cup assembly
storage container
cap gasket (17)
cleaning brush (22)
clamp (19)
storage
container
(18)
storage container
cap (20)
for milk storage
and feeding
storage container
cap insert ( 21)
for milk storage
This Accessory Kit with filter has been designed for single-person use and
should not be shared between mothers.
Use ONLY Limerick parts; other brands will not work properly with this pump.
The use of other brands of accessories will void the warranty.
Page 7
Introduction to Breast Pumps
Purpose of PJ’s Comfort®multi-user hospital grade breast
pump and PJ’s Bliss™ multi-user breast pump.
The purpose of the breast pump is to express and collect breast milk. Milk can
be collected from both breasts at the same time (double pumping) or from just
one breast (single pumping). Specific instructions appear on page 21 and in
the “Expressing Milk” section beginning on page 22.
Multiple users: The pump can be used by several women (at different times).
For safety, it is important that each woman have her own accessory kit with filter.
See page 25 for instructions.
Reasons to use a breast pump
Breast milk is the best possible nutrition you can give your baby. Breast-feeding
allows you to give your baby the best possible start in life. While putting your
baby to the breast is one way the baby will receive breast milk, there are several
reasons for pumping and feeding your baby expressed breast milk.
For information on reasons to use a breast pump,
please go to: www.bfmed.org
or find this book at your library or bookstore:
Lawrence, RA, Lawrence, RM: Breastfeeding: A Guide for the Medical Profession,
ed 7, Missouri, 2005, Mosby.
Page 8
breast pumps
Benefits of using PJ’s Comfort®multi-user hospital grade
breast pump and PJ’s Bliss™ multi user breast pump.
•
•
•
•
Maintain milk production by emptying the breast if breast-feeding is
temporarily interrupted
Increase milk production
•
Optional accessories are available to facilitate pumping away
from home:
Continue to provide infant with breast milk when mother and
infant are separated
This portable, lightweight multi-user pump can easily be carried
by the mother when she must be separated from her baby.
✔ A stylish tote bag can be worn over one shoulder or as
a backpack and is roomy enough for the pump, accessory
kit and a cooler for the storage containers.
✔ An insulated cooler has room for 4 five-ounce storage containers
and 3 ice packs to keep milk cold on the road.
✔ Extra storage containers for storage of milk
✔ Ice packs to keep milk cold
✔ On the road? No problem! The PJ's Comfort ® or PJ's Bliss™
breast pump can be used in any vehicle with a lighter plug.
A special 12-volt adapter allows you to pump while traveling.
✔ No outlet? No Problem! A rechargeable battery pack can be
purchased for times when electricity is not available.
Page 30 has a list of optional accessories and replacements parts.
For a free catalog visit www.limerickinc.com
Page 9
Accessory Kit Sanitizing
Caution: Unless there is a label stating sterile on the kit the accessory
kit is not supplied sterile. It is not necessary that the parts be sterile,
but some must be sanitized before the first time you use it. After the
first time you use the pump, the accessories will only need a
simple cleaning procedure found on page 27 .
Before using the accessory kit for the first time:
DO NOT BOIL THESE PIECES
Y piece (11)
white
silicone
tubing (10)
filter ( 9)
clear tubes (12)
tube connectors (13)
1.
clamp (19)
Remove filter and white tube connector/clear tubing assembly (9-13)
from both breast cup storage containers assemblies (14-18).
DO NOT BOIL THE FILTER (9), TUBING (10 & 12 ), Y PIECE (11)
OR CONNECTORS (13).
These parts do not need cleaning, as they do not come in contact
with your milk, if properly used.
Page 10
Disassemble the following parts as shown and boil them
according to the instructions below
Breast cup/storage container
cap assembly
(parts 14-16)
There is no need
to take these apart.
breast cup brace (16)
silicone breast cup (15)
storage container (14 )
storage container cap gasket (17)
storage container (18)
2.
Unscrew storage container (18 ) from storage container caps (14 ).
3.
Remove the storage container cap gaskets (17 ).It is not necessary to remove
the breast cups (15) and breast cup braces (16) from the storage container caps(14)
4.
Place breast cup / storage container cap units (14-16 ), cap gaskets (17 ),
and storage container (18 ) in a 4-5 quart pan.
5.
Fill pan with water to about one inch from the top of pan,
making sure all parts are covered with water.
6.
Place pan on stove and bring to boil.
7.
Reduce heat and boil for 5-15 minutes maximum.
8.
Drain water and remove parts from pan using tongs
9.
Place on a clean towel and allow to air dry.
Page 11
Controls and Assembly
Pump Assembly
1. Place pump on a level surface.
2. Make sure the power/cycle knob (1) is turned off - all the way to the left.
3. Turn vacuum adjustment knob ( 2 ) all the way to the left.
4
Insert the two storage container holders (6) into the storage container holder slots
( 7 ) on either side of the base of the pump.
5. Connect the power supply cord (8) to the back of the pump and the wall outlet.
timer 10 & 20 min. (4 )
storage
container
holder ( 6)
power/cycle
knob (1)
storage
container
holder ( 6)
storage
container
holder
slot ( 7 )
power supply ( 8 )
Page 12
Insert this plug
into back of pump
timer 1-9 ( 3)
vacuum adjustment
knob ( 2)
Purpose of Pump Controls and Timer (5 pages)
For part locations, see the illustration on the facing page ( page 12 ).
Power/cycle knob (1):
The power/cycle knob (1) turns the pump on and controls the suction rhythm (cycle).
It does this by changing the speed of the pump motor to pump faster or slower. An
example of the suction rhythm (cycle) is when the soft silicone breast cup collapses
around the areola (dark area behind your nipple) and releases. This can be related
to how many times your baby sucks per minute.
The slowest suction rhythm (cycle) is with the knob turned all the way to the left,
just above the on/off point. This provides the fewest sucks per minute.
The fastest suction rhythm (cycle), with the knob turned all the way to the right
to the black dot labeled "Start", provides the greatest number of sucks per minute and
is the most comfortable setting.
Slowest suction rhythm (cycle)
Fastest suction rhythm (cycle)
Most comfortable setting
The suction rhythm (cycle) also determines how long the suction strength (vacuum) is
applied to your breast. For example a slow suction rhythm (cycle), would apply suction
strength (vacuum) for slightly longer period of time.
On the other hand a faster suction rhythm (cycle) would apply suction strength (vacuum)
for a shorter period of time (most comfortable). Adjust the cycle knob only after you
have used the pumped 2-3 times and feel comfortable with your PJ’s breast pump.
The cycle knob is used to fine tune the suction rhythm to best mimic your baby’s suckling.
Vacuum adjustment knob (2 ):
Lower suction strength
Faster Cycle
Stronger suction strength
Slower Cycle
The vacuum adjustment knob ( 2) controls the suction strength (vacuum) for balancing
effectiveness and comfort and also will slow down cycle speed as vacuum is increased.
The Vacuum knob set to the black dot labeled "Start" applies a low suction strength
(vacuum). To provide stronger suction strength (vacuum) turn clockwise (to the right).
Your PJ's breast pump always maintains a slight vacuum.
Page 13
Purpose of Pump Controls and Timer (con’t)
How to use the controls:
Since each mother/baby couple’s breast-feeding experience is different,
the adjustment of these knobs will be an individual choice. The goal is to adjust
the suction rhythm (cycle) to what best mimics your baby’s sucking pattern and
to adjust the suction strength (vacuum) to a comfortable setting.
Note that the vacuum knob adjustment will also affect the suction rhythm (cycle).
Increasing vacuum level (turning knob to right) will decrease the number of cycles
per minute (slow cycles).
Adjusting the cycle speed will
not change the vacuum level
Cycle knob is independent of vacuum strength
When you begin to use PJ's electric breast pump, it is recommended that you use
a fast suction rhythm (cycle) and low suction strength (vacuum). This will allow for
a comfortable setting so you can get used to the pump. To do this, turn the power/cycle
knob clockwise to the black dot labeled "Start" and turn the vacuum adjustment knob
to the black dot labeled "Start". ( See picture )
You will feel a flutter-like sensation.
Power/cycle knob ( 1 )
Start at the black dot
Vacuum adjustment knob ( 2 )
Start at the black dot
After 1 to 2 minutes of pumping, increase the suction strength (vacuum) by turning
the vacuum knob clockwise (to the right) to a suction strength that feels comfortable
to you and similar to your baby's suck.
To slow cycle down:
•
Increase vacuum (turn knob to right) to slow the number
of cycles per minute
•
If the vacuum is comfortable – turn the cycle knob to the left
to slow down the cycles per minute
Page 14
Purpose of Pump Controls and Timer (con’t)
Recommended settings for1st time user
•
Setting for Cycle turn knob all the way to the right
to the start dot.
•
Setting for Vacuum turn knob to the left
on the start dot.
•
•
Adjust vacuum only
Pump for the first minute or two before adjusting
the vacuum. Recommend increasing the vacuum
by turning the knob to the right in small increments
up to the level that feels comfortable to you.
Recommended pumping time is about 15 - 20 minutes
or for 2 minutes after milk stops to flow.
Turn off pump prior to removing the breast cups
from breast.
Please Note: In the event of a problem or malfunction, it is possible to
experience a higher than normal suction strength (vacuum). Should you feel
pain, immediately pull the filter (part 9 in drawing below) off the pump’s filter
connector ( 5 ). Turn off the pump. Should the cup remain stuck with suction
to your breast after you have removed the filter and turned off the power,
insert your finger between the cup and your breast to break the seal.
To remove the filter ( 9 )
from the filter connector ( 5)
pull outward.
filter connector ( 5)
filter ( 9 )
side view
Page 15
Purpose of Pump Controls and Timer
(con’t)
Timer Functions
Minute timer:
The two-timer indicators ( 3 & 4 ) allow a woman to know how many
minutes she has been pumping. This is especially useful for mothers who
work away from home and express milk on their breaks.
After 1 minute of pumping the 1-minute light will be on ( 3 ). After 2
minutes the 2-minute light will be on and the 1-minute light will be off.
This pattern will continue for10 minutes. Then the 10-minute light ( 4 )only will be
on. After 11-minutes the 1-minute light will again be on ( 3 ) and the 10-minute ( 4 )
light will stay on. The minute lights will repeat the sequence above while the
10-minute light stays on. After 20-minutes the 10-minute light will turn off and the
20-minute light only will turn on.
At 21 minutes the 1-minute light turns on ( 3 ) and the 20-minute light ( 4 ) stays on.
The minute lights will repeat the sequence above while the
20-minute light stays on. After 30 minutes the 20-minute light turns off
and no lights will be on. At 31 minutes the 1-minute light will be on and
the process will start over again.
It is recommended that you only pump for15 to 20 minutes or for 2 minutes after milk
stops to flow. The pump will not automatically turn off. It is recommended that you
turn off pump first before removing breast cups from breast and place storage
containers in storage container holders.
Timer 10 & 20 min. ( 4 )
Timer 1-9 min. ( 3)
Page 16
Purpose of Pump Controls and Timer
(con’t)
Timer Functions (con’t)
Problem indication:
A group of 3 flashing lights on the minute timer (3) indicates a problem.
When any of the 3 groups of lights flash, the timer will stop indicating time,
and the pump will stop working. When you start the pump again the timer
is reset and will start displaying time after one minute.
a
b
Top three lights flashing:
excess vacuum level;
not user repairable; return
to factory for repair.
Bottom three lights flashing:
pump has overheated;
turn pump off and allow to cool
for fifteen minutes; resume use.
If this happens often, return pump
to the factory for repair.
Situation “a”:
Do not reset if the top 3 lights come on.
You will need to return pump to Limerick for repair.
Situation “ b”:
To reset the pump, turn power/cycle knob off. Remove power plug from back of pump
for about 30 seconds. Place plug back into the back of the pump and turn pump on.
Other Situations that may occur and no lights will come on
Situation “ c”:
If tubing becomes kinked or milk back flows into the filter the pump will lose vacuum
and pulsate quickly. You will either need to un-kink tubing or change the filter if milk is
in the filter as the filter can not be cleaned. (filter is a safety feature that prevents milk,
bacterias and viruses from getting into the motor of the pump.) It is important to
remember to turn off pump first before removing breast cups from breast. This will
minimize risk for back flow of milk.
Situation “ d”:
You may see moisture accumulate in the tubing. This is normal due to the difference in
body temperature versus room temperature. If this occurs after you have finished pumping
remove tubing from storage container caps and keep pump running for a few minutes to
allow air flow through tubing. This will help dry tubing.
Page 17
Accessory Kit Assembly (4 pages)
Caution: Use only Accessory Kits made by Limerick, Inc.
The PJ's Comfort ® or PJ's Bliss™ pump operates differently than other
pumps so other kits manufactured by another company will not
work properly with PJ’s breast pumps and will void warranty.
Wash your hands thoroughly with soap and water
before assembling pumping accessories.
storage
container
cap (14 )
gasket ridge
bottom view
Step 1
Insert storage container cap gaskets (17)
into storage container caps (14).
The ridge on the outer edge
of gasket should face outward,
towards storage container.
storage
container cap
gasket (17)
storage
container
cap (14 )
Step 2
Screw storage container (18) tightly
onto storage container caps (14)
to prevent air leaks.
NOTE: some parts
may already be
assembled when you
purchase the pump.
storage container (18)
Warning: The Accessory Kits are personal care items
and are not to be shared between mothers. If two or more
women wish to share a pump, each must purchase her own
Accessory Kit with Filter. See page 30 for ordering information.
Page 18
white silicone
tubing (10)
Step 3
Attach white silicone tube (10)
to bottom of the “Y” piece (11)
Push in securely.
Y piece (11)
Step 4
Attach the ends of the
long clear tubes (12) to
ends of “Y” piece (11)
as shown
clear tubes (12)
tube connector (13)
white silicone
tubing (10)
tube connector (13)
Y piece (11)
clear tubes (12)
Step 5
Attach a white tube connector (13)
to the other end of each of the
long clear tubes (12)
NOTE: Once parts 10-13 (shown on this page) have been assembled, you should not
have to take these pieces apart again. If milk gets into tubing, remove filter, rinse with
cool water, and then rinse with warm water. Shake tubing to remove water droplets.
May flush tubes with 70% rubbing alcohol to help dry tubing. Hang over chair to air dry.
Continued on the next two pages
Page 19
Accessory Kit Assembly continued
Step 6
Attach white silicone tube (10)
to narrow end of filter ( 9).
End of filter ( 9) must touch
Y piece (11) inside tubing (10).
If not, tubing can kink and
stop vacuum.
Y piece (11)
filter ( 9) side view
white
silicone
tubing (10)
filter narrow end
filter wide end
Step 7
Insert the wide end of the filter
( 9) into the filter connector (5)
on the front of the pump.
filter connector ( 5)
filter ( 9)
side view
Page 20
Double Pumping Setup
Expressing milk from both breasts
The amount of time to double
or single pump is given page 24.
Step 8
Attach white tube
connectors (13)
to the storage
container caps (14).
tube connector (13)
clear tubes (12)
storage
container
cap (14 )
tube connector
(13)
white
silicone
tubing (10)
storage
container
cap (14 )
Place storage container in
storage container holders
on the sides of the pump
until you are ready to
express your milk.
clear tubes (12)
Single Pumping Setup
Expressing milk from one breast at a time
Step 8
tube connector (13)
Attach one white
tube connector (13)
to a bottle cap (14)
storage
container
cap (14 )
clear tubes (12)
clamp
(19)
white
silicone
tubing (10)
clear tubes (12)
tube
connector
(13)
Detail of
clamp in place
Step 9
Open clamp wide (19).
Put over connector (13)
and clear tube (12).
Squeeze until it clicks
closed.
Page 21
Expressing your milk
Preparation for expressing breast milk
✓
✓
✓
✓
✓
✓
✓
✓
✓
The environment and your frame of mind are very important
when you are getting ready to express your breast milk.
Wash your hands thoroughly with soap and water before
expressing your milk.
Bring water to drink while you are pumping.
Find a quiet, comfortable room (not to cold or too warm).
Sit in a comfortable chair.
Relax...close your eyes and take several slow deep breaths.
A picture of your baby or a piece of clothing that smells like your baby
will help your milk let-down.
May help to record sounds of baby orvideo tape baby on electronic device
and play back while pumping or listen to favorite music while pumping.
Massage, compress or stroke your breast before and during pumping session.
Test Vacuum Cycling and Suction before pumping:
Hold the two cups together (as shown on our web site) and turn both
the power/cycling and vacuum knob to the 12 o’clock position.
Observe soft cups collapse and then inflate in rhythmic motion.
If they only collapse, there is an air leak. Make sure the gaskets are
inserted properly (ridge should face the storage container) then tighten
the storage container and the other connections.
Expressing breast milk
Assemble pump and accessories as instructed on pages 12 - 21.
1. Plug cord into outlet.
2. Set Vacuum control knob (2) to the black dot labeled Start.
3. Center the breast cups over the nipples and turn the pump on
by turning the power/cycle knob (1) clockwise.
Set the power/cycle knob (1) to the black dot labeled Start.
4. Once pumping begins, you may adjust the vacuum ( knob 2) and
cycling speed (knob1) to a comfortable setting. (See pages13-15)
Power/cycle knob ( 1):
Start at the black dot labeled Start.
Vacuum adjustment knob (2):
Start at the black dot labeled Start.
You will find a more detailed explanation
of the pump controls on page 13-15
Page 22
5.
6.
Hold one storage container in the crook
of your arm and the other in your hand.
Now one hand is free to adjust pump
settings, rock the cradle or answer
the phone.
When finished pumping, turn off pump
then remove breast cups from breast.
Carefully set storage containers into holders
(#6, page 6) to prevent tipping over
and milk spilling into tubing.
Caution: Turn off pump first before
removing breast cups from breast.
Do not tip storage containers or allow them
to overfill or milk will enter tubing and filter.
If this happens remove filter, rinse tubing
with cool and then warm water. Air dry.
The filter must be replaced if it gets wet.
See page 19.
Holding storage container
Storage of milk at home or away
from home for term infants
Your PJ's breast pumps are equipped with storage containers for collection and
storage of milk. Also supplied are caps to hold the white seal for storage of breast milk
(parts 20-21 on page7). See page 30 for information on purchasing additional storage
containers and accessories.
✓
✓
✓
✓
✓
✓
✓
Label container with date time and infants name if taking to daycare.
Freshly expressed milk is safe at room temperature (16 -29°C/60 –85°F) for <_ 6 hours
Use fresh milk when ever possible.
Refrigerate milk if going to use in the near future.
(Milk is good in the refrigerator for 4 – 8 days).
Use Limerick’s cold packs and insulated cooler (supplied as part of the
PJ’s breast pump package) if you are expressing milk while away from home.
Freshly expressed milk can be stored safely for up to 24 hours in in Limerick’s
cooler when all 3 frozen gel packs are used.
Freeze milk immediately if not going to be using or shipping within 48 –72 hours.
Use milk stored in a self-defrosting freezer(separate from refrigerator)
Ideal: 3 months. Optimal: 6 months
Acceptable: 12 months in a deep freezer (-20°C/ - 4°F)
Page 23
Ways to Use PJ’s Breast Pump
to Express Milk
Follow one of these pumping patterns unless otherwise prescribed by your
physician or health care professional.
Double pumping
(pumping both breasts at the same time
is recommended as it yields higher milk volume):
See kit assembly for double pumping page 21.
Express milk from both breasts at the same time,
which takes approximately 15 to 20 minutes.
Single pumping
(pumping one breast at a time):
See kit assembly for single pumping page 21.
a. If the infant has suckled on breast, or one breast does not need pumping
for some other reason, milk may be expressed from the second breast
continuously, which takes approximately 15 to 20 minutes.
b. If both breasts are to be pumped, express milk from one breast at a time,
switching sides as indicated below.
This method takes approximately 30 minutes.
Pump first breast for 7 minutes.
Pump second breast for 7 minutes.
Go back to the first breast for 5 minutes
Then go to 2nd breast for 5 minutes.
Go back to first breast for 3 minutes.
Then pump 2nd breast for 3 minutes.
Caution: Do not allow collection containers to overfill !
If overfilled, milk can enter the tubing and filter. Filter must be replaced
(see page 26.) Tubing can usually be cleaned: rinse tubing with cool and
then warm water. Air dry.
Page 24
Multiple User Instructions
The PJ's Comfort ® and PJ's Bliss™ electric breast pump can be shared by multiple
women, for example, in a hospital or a workplace.
(Only one woman can use the pump at any one time.
Multiple users cannot pump simultaneously.)
WARNING: ON LY THE PUMP ITSELF IS TO BE SHARED.
The breast cup / storage container / tubing assembly and filter are
personal care items designed to be used by one person only.
EACH WOMAN MUST HAVE HER OWN ACCESSORY KIT WITH FILTER
(pictured below).
Contact your retail merchant or Limerick, Inc., to purchase additional accessory kits
with filters. Limerick, Inc. contact information is on pages28 and on back of cover.
Instructions for changing the filter and for cleaning the pump between users are
on the following page.
tube connector (13)
filter ( 9)
clear tubes (12)
white
silicone
tubing (10)
storage
container
(18 )
tube
connector
(13)
Y piece (11)
clear tubes (12)
silicone
breast cup (15)
breast cup
brace (16)
storage container cap (14 )
[ storage container cap
gasket (17 ) is inside]
Donot share these parts.
Page 25
Pump and Accessory Care
Pump Care and Cleaning
Pumps used in the home or by a single user should be cleaned with a small amount
of detergent on a damp (not wet) cloth. Make sure no liquid gets inside the pump
casing. When pump is shared by multiple users, such as in the workplace or a
hospital, wipe with a damp cloth containing a germicidal detergent. Dry with
a softcloth. Wash bottle holders in detergent, using germicide when more than
one person uses them.
DO NOT IMMERSE PUMP IN WATER.
When to change the f ilter
1. If milk enters filter
2. If the filter gets wet.
How to change the f ilter
1. Remove filter ( 9) from filter connector ( 6 ) on the pump
and from white silicone tube (10).
2. Press short white silicone tube (10) onto narrow end of filter ( 9).
The end of the filter and the Y piece (11) should be touching.
If they do not touch, the tubing could kink and stop the vacuum.
3. Insert large end of new filter ( 9 ) into filter connector ( 6).
Reminder: The large diameter end of the filter should face the
connector on pump and be inserted into pump connector under
the label: “INSERT FILTER”.
filter
connector
( 6)
Y piece (11)
white
silicone
tubing (10)
filter( 9)
[side view]
Page 26
Accessory Kit Cleaning Instructions
Before the first time you use your pump ,follow the sanitizing instructions on pages 10-11.
After each use:
1. Remove tube connector/clear tubing assembly 10-13 from both
breast cup storage container assemblies (14-16 ). DO NOT WASH FILTER
( 9 ), TUBING (10 &12 ), Y PIECE (11) or TUBE CONNECTOR (13 ).
2. Unscrew storage container (18 ) from cap (14) and remove clear cap gasket (17 ).
It is not necessary to remove breast cups (15 )
and braces (16 ) from storage container caps (14 ).
3. Rinse with cool water to remove milk residue
4. Wash breast cup/cap units (14- 16) and storage container cap gaskets(17)
in warm soapy water. Breast cups are dishwasher safe but it is not recommended because of residue left from dishwasher.
5. Use cleaning brush (see 24, page 7 ) to clean inside lid of cap (14).
6. Rinse in warm water.
7. Place parts on a clean towel and let air dry. Cover after dry.
8. If milk spills on outside of tubing, wipe with a clean lightly soaped
damp cloth and then with a plain clean damp cloth.
9. Storage container, cap and insert (18, 20, 21 page 7 ) are dishwasher safe.
Wash these
pieces:
the breast cup
storage container
assembly
(parts 14-16)
and gasket (17).
Do not put in
dishwasher.
filter( 9)
tube
connector
(13)
Never
wash
filter!
breast cup
brace (16)
silicone breast cup(15)
storage container cap (14 )
clear tubes (12)
[ not shown in proportion]
Y piece (11)
white
silicone
tubing (10)
storage container
cap gasket (17)
Don’t Wash
pieces 9 -13
If outside of pieces
10 -13 gets dirty,
wipe with a damp
lightly soaped cloth.
If milk gets inside,
see instructions on
page 24.
Page 27
Troubleshooting
Your PJ's Comfort ® and PJ's Bliss™ breast pump are designed for ease of use, effectiveness and
safety. Our high standards are the result of our certified lactation consultants’ experience
with thousands of mothers expressing milk for their infants. If you have any questions about
the use or assembly of your PJ's breast pump:
✓ Check the instructions on pages 18-21 and/or go to www.limerickinc.com to make sure
you have assembled the accessory kit properly.
Problem
Instruction
A Not turning on, no lights at all Indication of a Possible Power Adapter Failure
1 Insure adapter power jack is inserted fully and
dosent feel to be loose.
2 Unplug the power adater completely from the
pump and wall outlet, inspect the cords for any
signs of damage.
3 Try plugging power adapter into another wall outlet
4 Do you have a Limerick car adapter or battery
pack to try in place of the power adapter. If pump
works you will need a new power adapter.
5 Call Limerick Customer Service.
B Not cycling, suction but
no release (indication of air
leak in tubing kit or
possible pump failure)
1 Remove filter with all it's tubing from pump entirely.
2 Turn pump on and rotate both knobs all the way to
the right, clockwise.
3 Pump should be making a steady sound of pumping,
but not a cycling on and off sound.
4 Place finger over the small vacuum hole where
the filter goes.(make sure you get a good seal over
small opening in white connector for filter)
5 You should now hear the pump sound change to
cycling on and off.
6 Disconnect the tube ends from both storage containers.
7 Put filter and tubing back into filter holder on
pump. (see item 1 above)
8 Put your thumbs over both of the tube ends.
(make sure there is a tight seal)
9 You should now hear the pump sound change to
cycling on and off.
10 Unscrew the storage containers from the the storage
container caps.
11 Inside the storage container caps are the silicone gaskets,
insure that the gaskets are seated well, outer ridge on
gasket should be facing you as you place into the storage
container cap, push them down using your finger.
12 Screw the storage container back on, just snug, don't
over tighten.
13 Put the tubes back onto the storage containers caps.
14 With pump still running, place both of the breast cups
onto a hard smooth surface, such as a table top.
15 Both cups should be compressing and releasing.
16 If pump is still not working call Limerick Customer Service.
TIP: Download a copy of this owner’s manual from the web site in case you lose yours. Our catalog is also online.
Problem
Instruction
C Suction has become weak
1
2
3
4
D Pump is loud
1 Ok to use, but needs to be serviced
Is there milk/fluid in the filter?
When did you replace the filter last?
Does the pump sound any louder then before?
Check for vacuum leaks, step B10 thru B16
✓ If pump caused pain or discomfort, immediately pull the filter (9)on page 15) off
of the pump to release the vacuum, then turn the power/cycle knob off.
Should the cup remain stuck with suction to your breast after you have removed
the filter and turned off the power insert your finger between the cup and your
breast to break the seal.
✓
✓
✓
If pump suddenly stops, check outlet plug to be sure it is securely plugged in the
electrical outlet. Also check to be sure the plug is inserted properly into the back
of the pump.
If pressure decreases and suction is poor, change filter.
For other difficulties, contact Limerick, Inc. for assistance.
You may also try calling the location where you obtained your breast feeding product.
Customer Service
Limerick, Inc
2150 N. Glenoaks Blvd.
Burbank, CA 91504
www.limerickinc.com
877-Limeric (877-546-3742)
between 8:30 AM and 5:00 PM
Pacific Standard Time
Page 29
The 1-9 minute timer also functions
as an indicator of problems:
Problem indication:
A group of 3 flashing lights on the minute timer (3) indicates a problem.
When any of the 3 groups of lights flash, the timer will stop indicating time, and the
pump will stop working. When you start the pump again the timer is reset and will
start displaying time after one minute.
a
b
Top three lights flashing:
excess vacuum level;
not user repairable; return
to factory for repair.
Bottom three lights flashing:
pump has overheated;
turn pump off and allow to cool
for fifteen minutes; resume use.
If this happens often, return pump
to the factory for repair.
Situation “a”:
Do not reset if the top 3 lights come on.
You will need to return pump to Limerick for repair.
Situation “ b”:
To reset the pump, turn power/cycle knob off. Remove power plug from back of pump
for about 30 seconds. Place plug back into the back of the pump and turn pump on.
Other Situations that may occur and no lights will come on
Situation “ c”:
If tubing becomes kinked or milk back flows into the filter the pump will lose vacuum
and pulsate quickly. You will either need to un-kink tubing or change the filter if milk is
in the filter as the filter can not be cleaned. (filter is a safety feature that prevents milk,
bacterias and viruses from getting into the motor of the pump.) It is important to
remember to turn off pump first before removing breast cups from breast. This will
minimize risk for back flow of milk.
Situation “ d”:
You may see moisture accumulate in the tubing. This is normal due to the difference in
body temperature versus room temperature. If this occurs after you have finished pumping
remove tubing from storage container caps and keep pump running for a few minutes to
allow air flow through tubing. This will help dry tubing.
Page 30
Ordering Replacement Parts
or Optional Accessories
Replacement parts can be ordered from Limerick, Inc.
For a Catalog, call 877-546-3742 or visit www.limerickinc.com
Refer to the diagram on pages 6-7 to identify parts.
filters
short white silicon tubes
Y pieces
long clear tubes
white tube connectors
silicone breast cups
breast cup braces
cleaning brushes
five-ounce storage containers
storage container caps for feeding
storage container cap inserts
(white disks to seal caps)
storage container caps
clamps (for single pumping)
power supply (cord)
instruction books
Optional Accessories:
A stylish tote bag can be worn over one shoulder or as a backpack and is roomy
enough for the pump, accessory kit and a cooler for the milk storage containers.
An insulated cooler has room for 4 five-ounce storage containers and 3 ice packs
to keep milk cold on the road.
Extra five-ounce storage container for storage of milk. ( A total of four are supplied
with the PJ's breast pump package.)
Ice packs to keep milk cold.
On the road ? No problem! PJ's Comfort ® and PJ's Bliss™ breast pump can be used
in any vehicle that has a lighter plug. A special 12-volt adapter allows you to pump
while traveling.
No outlet? No Problem! A rechargeable battery is also available for times when
electricity is not available.
More fashionable totes designed for the PJ's breast pumps may be seen
at www. limerickinc.com
Page 31
Warranty
A three year warranty is applicable to PJ's Comfort pump motor and internal parts.
A one year warranty applies to the PJ's Bliss pump motor and internal parts.
Warranty applies to original owner and is non - transferable.
This product is warranted by Limerick Inc. to the original purchaser to be free from defects
in material and workmanship. In the event of a defect, Limerick will repair, or at Limerick’s
option, replace this product, without charge for such replacement parts or labor. Purchaser
shall bear all expense for returning these products to Limerick. This warranty does not apply
to any product which has been subjected to misuse, abuse or alteration.
If you wish to make a claim under this warranty, please call Limerick’s Customer Service
toll-free number: 877-LIMERIC (546-3742) for a Return Merchandise Authorization number.
Package the breast pump securely and enclose your dated bill of sale or other proof of
purchase and a brief statement of the problem. Please send package, prepaid, to the
following address:
Limerick Inc. Service Dept.
2150 N. Glenoaks Blvd.
Burbank, CA 91504
Page 32
Index
accessories, optional 9, 31
accessory kit
assembly 18-21
cleaning 27, 10-11
components, identifying 7
ordering kit or parts 31
for pumping both breasts 21
for pumping one breasts 21
sanitizing before first use 10-11
battery pack 31
bottles (see storage containers)
breast pumps
benefits of using 9
purpose of 8
reasons to use 8
catalog of parts & accessories 9, 31
clamp, use of 21
cleaning
accessory kit 10-11, 27
pump 26
tubing 23, 24, 27
controls 12-15, 22
cooler 31
customer service 28, 32
cycle adjustment 13-15, 22
double pumping 21, 23, 24
filters
inserting/changing 20, 26
ordering 31
lighter plug 12-volt adapter 31
lights flashing (blinking) 17, 30,
Limerick, Inc., contact information 29
milk expression
preparation for 22
pumping both breasts 21, 23, 24
pumping a single breast 21, 24
reasons for using a pump 8
use of a pump 13-15, 22-25
milk storage 23
multiple users 25
parts
identifying 6-7
ordering 31
power
12 volt adapter 31
battery pack 31
rechargeable battery pack 31
safety 4
power/cycling knob 12, 13-15, 22
pump
assembly 12, 18-21
care and cleaning 26
components 6, 31
repairing and/or returning 5, 32
pumping milk, see milk expression
replacement parts 31
returning pump 29, 32
safety information 4-5, 28-29
sanitizing accessory kit 10-11
sharing the pump 25
single pumping 21, 24
storage coontainer
dishwasher-safe 27
holding while pumping 23
ordering 31
storing milk 23
testing vacuum and cycling 22
timer, purpose of 16-17, 30
timer warning lights 17, 30
tote bag 31
traveling
accessories for 31
storing milk away from home 23
troubleshooting 28-29, 30
tubing
assembling 18-21
cleaning 19, 23, 24, 27
vacuum adjustment 13-15, 22
warning lights 17, 30
warnings (safety) 4-5
warranty 32
working mothers
accessories for 31
storing milk away from home 23
Page 33
Page 34