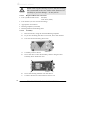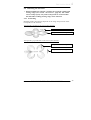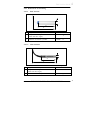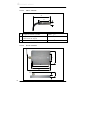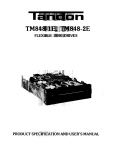
1
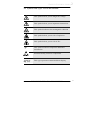
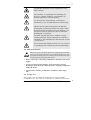
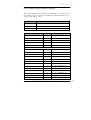
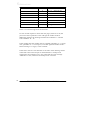
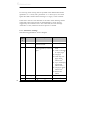
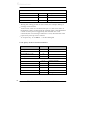
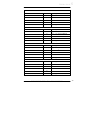
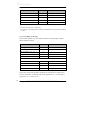
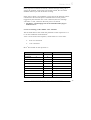
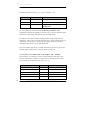
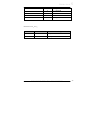
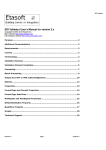
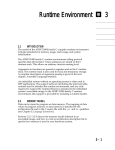
User Manual
RS232 Transponder Reader
(Serial/ASC-I1)
ID040022
Rev 09-2004
Printed in Germany
Subject to modifications
© 2004 BROOKS Automation (Germany) GmbH
RFID Division
Gartenstrasse 19
D-95490 Mistelgau
Germany
Tel: +49 9279 991 910
Fax: +49 9279 991 900
E-mail: [email protected]
2
RS232-Transponder Reader (ASC-I1-Protocol), Release 2.1
TABLE OF CONTENTS
1
INTRODUCTION
6
1.1 About this Device ..................................................................6
1.2 About this Manual .................................................................7
2
SAFETY INSTRUCTIONS
8
2.1 Symbols and Types Used in this Manual ................................9
2.2 General Safety Instructions .................................................. 10
2.3 ESD Instructions.................................................................. 11
2.4 Proper Use ........................................................................... 11
2.5 Qualified Personnel ............................................................. 12
2.6 Declaration of Conformity ................................................... 12
2.6.1 USA – Federal Communications Commission (FCC) ..... 12
2.6.2 Europe – CE Conformity ............................................... 13
3
PRODUCT DESCRIPTION
16
3.1 Indicating and Operating Elements....................................... 16
3.2 Inside View ......................................................................... 17
3.3 Description .......................................................................... 18
3.4 Labeling Information ........................................................... 20
3.5 Technical Data..................................................................... 20
3.5.1 Transponder Reader ...................................................... 20
3.5.2 Power Supply and Current Input .................................... 21
3.5.3 Antenna Cable............................................................... 22
3.6 Contents of Delivery ............................................................ 23
3.7 Warranty and Liability ......................................................... 23
4
INSTALLATION
24
4.1 Installation Environment ...................................................... 24
4.2 Qualified Installation Personnel ........................................... 25
4.3 Unpacking ........................................................................... 25
4.3.1 Disposal of Packing Material ......................................... 25
4.4 Mounting the Transponder Reader ....................................... 25
4.4.1 Dimensions for Planning ............................................... 26
4.4.2 Standard Housing Using Enclosed Assembly Material
(Recommended) ............................................................ 26
4.4.3 Housing without Mounts ............................................... 27
4.5 Installing the Antenna .......................................................... 29
4.5.1 Positioning .................................................................... 29
4.5.2 Available Antenna Types............................................... 30
4.5.3 Dimensions for Planning ............................................... 31
4.6 Connecting the Transponder Reader ..................................... 33
4.6.1 Antenna ........................................................................ 33
RS232 Transponder Reader (ASC-I1 Protocol), Release 2.1
3
4.7
4.8
4.9
4
Power Connection................................................................33
Terminal Connection............................................................34
Starting Up ..........................................................................35
4.9.1 Required Operating Conditions......................................35
4.9.2 Tuning ..........................................................................35
5
OPERATION
36
5.1 Operating Personnel.............................................................36
5.2 Structure of Communication Protocol...................................36
5.2.1 Package Contents ..........................................................36
5.2.2 Package Header .............................................................36
5.2.3 Message Structure .........................................................37
5.2.4 End of Package..............................................................37
5.3 Commands of Protocol.........................................................38
5.3.1 Commands Terminal to Reader ......................................38
5.3.2 Commands Reader to Terminal ......................................39
5.3.3 Hardware Reset .............................................................40
5.3.4 External Input Triggers Reading of the Tag ...................40
5.3.5 Terminal Triggers Reading of the Tag ............................43
5.3.6 Write Tag ......................................................................45
5.3.7 Parameter Settings.........................................................46
5.3.8 Query of the Current Parameters....................................48
5.3.9 Heartbeat.......................................................................51
5.3.10 Reset of Separate Devices..............................................52
5.3.11 External Input had been changed ...................................52
5.3.12 Failure Codes ................................................................53
5.3.13 Locking of the Tag ........................................................54
5.3.14 Set Tuning of the TIRIS – RF - Module .........................55
5.3.15 Query the Calibration of the TIRIS – RF - Module.........56
5.3.16 Interrogate Version........................................................58
5.4 Examples for Packages ........................................................59
6
SERVICE AND ERROR HANDLING
61
6.1 General ................................................................................61
6.2 Qualified Error Handling Personnel .....................................61
6.3 Safety Instructions ...............................................................62
6.4 Errors Indicated by the LEDs ...............................................62
6.4.1 Power LED Not Illuminated ..........................................62
6.4.2 Error LED Illuminated (in Test Mode) ...........................63
6.5 Reader Does Not Respond or Transmit or Cannot be
Controlled by the Host ........................................................63
6.6 Reset ...................................................................................63
6.7 Power Cut............................................................................64
6.8 Software Releases ................................................................64
6.9 Customer Service.................................................................65
RS232-Transponder Reader (ASC-I1-Protocol), Release 2.1
7
DEINSTALLATION AND STORAGE
66
7.1 Deinstallation ...................................................................... 66
7.2 Storage ................................................................................ 66
8
TRANSPORTATION AND DISPOSAL
67
8.1 Transportation ..................................................................... 67
8.2 Disposal .............................................................................. 67
9
ACCESSORIES
68
9.1 Antennas ............................................................................. 68
9.1.1 Available Types ............................................................ 68
9.1.2 Reading and writing Ranges .......................................... 69
9.2 Plugs ................................................................................... 77
9.3 Cables ................................................................................. 77
9.4 Power Supply ...................................................................... 78
RS232 Transponder Reader (ASC-I1 Protocol), Release 2.1
5
1 I NTRODUCTION
1 INTRODUCTION
1.1 About this Device
The BROOKS Transponder Reader System is a high-frequency
identification system that uses FM transmission.
The basic item is a transponder that works as a forgery-proof electronic
identity disk.
The reading unit of the system sends an energy impulse via the
antenna. The capacitor of the passive, battery-free transponder is
charged by this impulse. After that, the transponder returns a signal
with the stored data.
The total reading cycle takes less than 100 ms.
As a sight connection between the transponder and the reader is not
absolutely necessary, the transponder can also be identified through
non-metallic material.
The data received by the transponder reader are transmitted via the
serial interface.
6
RS232-Transponder Reader (ASC-I1-Protocol), Release 2.1
I NTRODUCTION
1
1.2 About this Manual
This manual contains information about installing, operating and error
handling the BROOKS RS232 Transponder Reader. It consists of eight
chapters:
Introduction
Safety Instructions
Product Description
Installation
Operation
Service and Error Handling
Deinstallation and Storage
Transportation and Disposal
Accessories
RS232 Transponder Reader (ASC-I1 Protocol), Release 2.1
7
2 S AFETY I NSTRUCTIONS
2 SAFETY INSTRUCTIONS
This product is manufactured in accordance with state of the art
technology and corresponds to recognized safety regulations.
Nevertheless, there are dangers associated with the use of the
equipment even for its intended purpose. You should therefore read the
following safety information carefully and keep it in mind.
Only install and operate this equipment if it is in perfect condition and
with reference to this manual. Do not use the equipment if it is
damaged.
8
RS232-Transponder Reader (ASC-I1-Protocol), Release 2.1
S AFETY I NSTRUCTIONS
2
2.1 Symbols and Types Used in this Manual
This symbol alerts you to dangerous voltage
This symbol alerts you to important instructions
This symbol indicates electromagnetic radiation
This symbol alerts you to risk of explosion
This symbol alerts you to risk of fire
This symbol indicates important additional
information
Electrostatically sensitive components
13:44:33
Incoming:
ENQ (05)
This type represents transmitted data display
RS232 Transponder Reader (ASC-I1 Protocol), Release 2.1
9
2 S AFETY I NSTRUCTIONS
2.2 General Safety Instructions
1 Read and understand all safety and operating instructions
before installing and operating the device.
2 This instruction is designed for specially trained personnel.
This device is NOT intended for use by the “general
population” in an uncontrolled environment. Installation,
operation and error handling the device shall be carried out by
specially trained personnel only (see additional information
on pages 12, 25, 36, and 61).
3 Keep these instructions. Store this manual in a place that can
be accessed at any time by all persons involved in installing,
operating and error handling the device.
4 Heed all warnings. Follow all warnings on and inside the
device and operating instructions.
5 Install in accordance with the manufacturer's instructions
only.
6 Only use attachments, accessories and connecting cables
supplied by the manufacturer.
7 All error handling other than the error handling listed in
chapter 6 of this manual must be carried out by the
manufacturer.
8 People with hearing aids should remember that radio signals
transmitted by the device might cause a very unpleasant
buzzing noise in their hearing aids.
9 Do not connect the device to any kind of power supply such
as a standard household power supply. The device should be
connected to a power supply of the type described in these
instructions only.
10 When you disconnect a cable, pull on its conductor and not on
the cable itself. Keep the connector evenly aligned to avoid
bending any connector pins. When you connect a cable,
ensure that the connector pins are positioned correctly.
11 Never over bend the antenna cable or expose it to mechanical
loads.
12 When replacement parts are required, use the replacement
parts specified by the manufacturer only. Unauthorized
substitutions may result in fire, electric shock, or other
hazards.
10
RS232-Transponder Reader (ASC-I1-Protocol), Release 2.1
S AFETY I NSTRUCTIONS
2
All antenna resonant circuit components carry
high voltage!
The installer is responsible for installing the
device to comply with FCC requirements of
human exposure to radio frequency.
To prevent fire, shock hazard, or annoying
interference, use recommended accessories only.
When removing the housing lid, note that the
housing lid is connected to the case with a cable.
Remove the lid carefully to prevent damage - do
not pull it! Do not operate the device when the
housing lid is removed!
Do NOT operate this device without a proper
antenna attached. Proper antennas are antennas
supplied by the manufacturer and listed in section
„Accessories“.
Never locate the antenna so that it is very close to
or touching parts of the body while transmitting.
2.3 ESD Instructions
Static electricity can harm electronic components inside the
device. All persons who install or maintain the device must
be trained in ESD protection. ESD protection measures must
be observed when opening the device.
Before removing or inserting components, disconnect the power
supply.
To prevent electrostatic damage, static electricity must be
discharged from the body and tools before touching components
inside the device.
Touch electro sensitive components carefully at their edges
only.
2.4 Proper Use
This product was developed for reading and writing the TIRIS®
transponder only. Any other use of this device would constitute abuse
RS232 Transponder Reader (ASC-I1 Protocol), Release 2.1
11
2 S AFETY I NSTRUCTIONS
and would render the user’s authority to install and operate the device
invalid.
This product is designed to be mounted and operated in an industrial
environment as a built-in-device only. It is not designed to be used as a
stand-alone or a portable device or in a non-industrial environment,
such as a household, vehicle or open-air environment.
2.5 Qualified Personnel
This manual is designed for specially trained personnel only. This
device must be installed and maintained by the manufacturer or its
specially trained representatives.
Intervention or error handling not expressively approved in this manual
must be carried out by the manufacturer’s personnel only. If you are
unsure about the qualifications that are actually required, contact the
manufacturer.
Unqualified interventions may result in personal injury or
damage to the device!
2.6 Declaration of Conformity
2.6.1 USA – Federal Communications Commission (FCC)
This device complies with Part 15 of the FCC Rules. Operation is
subject to the following two conditions:
1) This device may not cause harmful interference and
2) This device must accept any interference received, including
interference that may cause undesired operation.
This equipment has been tested and found to comply with the
limits for a Class B digital device, in accordance with part 15 of
the FCC Rules. These limits are designed to provide reasonable
protection against harmful interference in a residential
installation.
This equipment generates, uses and can radiate radio frequency
energy and, if not installed and used in accordance with the
instructions, may cause harmful interference to radio
communications. However, there is no guarantee that
interference will not occur in a particular installation. If this
equipment does cause harmful interference to radio or
television reception – this can be determined by turning the
equipment off and on – the user is encouraged to try to correct
12
RS232-Transponder Reader (ASC-I1-Protocol), Release 2.1
S AFETY I NSTRUCTIONS
2
the interference using one or more of the following measures:
—Reposition or relocate the receiving antenna.
—Increase the distance between the equipment and the
receiver.
—Connect the equipment to an outlet to a circuit other than
the one to which the receiver is connected.
—Consult the dealer or an experienced radio/TV technician
for assistance.
FCC ID: N5GTSG
Compliance with:
FCC Code of Federal Regulations, Part 15 Subpart C, Section §15.205
FCC Code of Federal Regulations, Part 15 Subpart C, Section §15.209
Changes or modifications not expressly approved by the
party responsible for compliance may void the user’s
authority to operate the equipment.
2.6.2 Europe – CE Conformity
Konformitätserklärung gemäß dem Gesetz über Funkanlagen und
Telekommunikationsendeinrichtungen (FTEG) und der Richtlinie
1999/5/EG (R&TTE)
Declaration of Conformity in accordance with the Radio and
Telecommunications Terminal Equipment Act (FTEG) and Directive
1999/5/FC (R&TTE Directive)
Hersteller / Verantwortliche Person
Manufacturer / responsible person
BROOKS Automation
(Germany) GmbH /
Herr Dittrich
erklärt, dass das Produkt
declares that the product
TLG RS232
Type (ggf. Anlagenkonfiguration mit
Angabe der Module):
Type (if applicable, configuration
including the modules)
RS232 Transponder Reader (ASC-I1 Protocol), Release 2.1
13
2 S AFETY I NSTRUCTIONS
5 Telekommunikations(Tk-)endeinrichtung
Telecommunications terminal
equipment
Funkanlage
Verwendungszweck
lntended purpose
Identification system
Geräteklasse / Equipment class
2
Radio equipment
bei bestimmungsgemäßer Verwendung den grundlegenden
Anforderungen des § 3 und den übrigen einschlägigen
Bestimmungen des FTEG (Artikel 3 der R&TTE) entspricht.
complies with the essential requirements of §3 and the other relevant
provisions of the FTEG
(Article 3 of the R&TTE Directive), when used for its intended
purpose.
Gesundheit und Sicherheit gemäß § 3 (1) 1. (Artikel 3 (1) a))
Health and safety requirements pursuant to
§ 3 (1) 1. (Article 3(1) a))
angewendete harmonisierte Normen
Harmonized standards applied
EN 60950
Einhaltung der grundlegenden
Anforderungen auf andere Art und
Weise (hierzu verwendete Standards/
Spezifikationen)
Other means of proving conformity
with the essential requirements
(standards/specifications used)
BMPT Decree No. 306/97
Schutzanforderungen in Bezug auf die elektromagnetische
Verträglichkeit (§ 3 (1) 2, Artikel 3 (1) b)
Protection requirements concerning electromagnetic compatibility §
3(1)(2), (Article 3(1)(b))
angewendete harmonisierte Normen
Harmonized standards applied
14
ETS 300 683
RS232-Transponder Reader (ASC-I1-Protocol), Release 2.1
S AFETY I NSTRUCTIONS
2
Einhaltung der grundlegenden
Anforderungen auf andere Art und
Weise (hierzu verwendete Standards /
Spezifikationen)
Other means of proving conformity
with the essential requirements
(standards/specifications used)
Maßnahmen zur effizienten Nutzung des
Funkfrequenzspektrums
Measures for the efficient use of the radio frequency spectrum
Luftschnittstelle bei Funkanlagen gemäß § 3(2) (Artikel 3(2))
Air interface of the radio systems pursuant to § 3(2) (Article 3(2))
Angewendete harmonisierte Normen
Harmonized standards applied
Einhaltung der grundlegenden
Anforderungen auf andere Art und
Weise (hierzu verwendete Standards /
Schnittstellenbeschreibungen)
Other means of proving conformity
with the essential requirements
(standards/interface specifications
used)
I-ETS 300 330
BROOKS Automation (Germany)
GmbH
Gartenstr. 19
D-95490 Mistelgau
Germany
Phone +49 9279 991 910
Fax +49 9279 991 900
Mistelgau, 15.09.2004
Gerald Dittrich
(Place and date of issue)
(Name and signature)
RS232 Transponder Reader (ASC-I1 Protocol), Release 2.1
15
3 P RODUCT D ESCRIPTION
3 PRODUCT DESCRIPTION
3.1 Indicating and Operating Elements
Output
-
LED
Antenna
-
LED
Input - LED
Tuning / LED
Tuning button
Read / LED
Read button
Test / LED
Status LEDs
Test mode button
Write / LED
Write button
Power - LED
RXT - LED
16
TXT -LED
RS232-Transponder Reader (ASC-I1-Protocol), Release 2.1
P RODUCT D ESCRIPTION
3
3.2 Inside View
Plug for antenna
External input
External output
Assembly hole
Assembly hole
Tuning LEDs
HF module
Read LED
Reset button
Prog. port
Tuning button
Power LED
RS232 interface
9 contacts Sub-D
female plug
Fuse
Assembly hole
Assembly hole
RS232 interface
Power connector
RS232 Transponder Reader (ASC-I1 Protocol), Release 2.1
17
3 P RODUCT D ESCRIPTION
3.3 Description
Power LED
If the device is connected to a power supply, the LED is illuminated
green and the reader is ready for use.
HF module
The HF module is the analog part of the device. It triggers the antenna
and transmits the received data to the controller.
Six tuning LEDs
The six tuning LEDs show the switch status of the adjustment relays
RS232 interface
The data are passed down serially to one of the two RS232 interfaces
(9 contact Sub-D female plug) with the different protocols. Baud rates
of 300 Bd up to 115.2 kBd are possible.
Tuning pushbutton
The reader starts an automatic antenna tuning.
Read LED
The read LED is illuminated green for a short while if the device tries
to read or write.
Programming port
The programming port is scheduled for service purposes.
External output
The external output, usually a LED, shows the switch status of the
device (software-dependent).
External input
A sensor (such as an optical sensor) can be connected to the external
input.
Fuse
TR5 housing, 500 mA T (low breaking).
Tuning LED
The antenna’s efficiency is optimized by pushing the automatic
calibration key. The LED is illuminated during the calibration process
and subsequently goes out when tuning is successful. If a fault occurs,
the LED remains on until the next calibration process is successful.
18
RS232-Transponder Reader (ASC-I1-Protocol), Release 2.1
P RODUCT D ESCRIPTION
3
Possible faults could be caused by a defect antenna or a strong metallic
surrounding at the antenna.
Antenna LED
If the antenna sends HF signals (to load a transponder or send data, for
example), the LED is activated for this period.
Input LED
The input LED indicates that the external sensor was initiated or that
an external potential-free contact was actuated.
Output LED
If the external output is set, the LED is on; if not, the LED is not
illuminated.
RXT and TXT LED
When data are transmitted via the RS232-interface, the corresponding
transmit or receive LED is illuminated.
TXT-LED (transmit):
Data are transmitted from the reader to the
terminal.
R→T
RXT-LED (receive):
Data from the terminal are received in the
reader.
R←T
Test LED
The test mode is used to check the most important reader features
(reading or writing), which are operated by pushing the corresponding
key in test mode.
To switch the reader to test mode, press the test key for longer than 5
seconds. The test LED is flashing when the reader is in test mode.
Push the test key again to leave the mode.
Read and Write LED
If the test mode is activated, you can make the reader read or write
(polling) permanently by pressing the read or write key. This state is
indicated by a LED next to Read or Write.
By pressing the key that is not activated currently, the device changes
its state from Read to Write and vice versa.
If you press the key that is already activated, this exits polling mode
and the Read or Write LED goes out.
If the reader is in one of these two states, the status LEDs display
whether the process was successful (green OK) or not (red ERROR).
RS232 Transponder Reader (ASC-I1 Protocol), Release 2.1
19
3 P RODUCT D ESCRIPTION
If the reader attempts to write and both LED’s (the green ‘OK’ LED
and the red ‘ERROR’ LED) are on, the reader would be able to write
but the transponder is locked.
External Output (LED)
Normally, a LED is connected to the external output that is only
relevant when combined with a read or write action.
The LED remains until the read operation is complete. The LED
goes out if the reader receives a confirmation that the page was
read, or if an error message occurs.
If the host does not return a confirmation after the page was read,
the LED remains on until either a new read process is started and
successfully completed, or until the device is reset.
3.4 Labeling Information
Federal
Communications
Commision’s
identification number
Serial number
Type
3.5 Technical Data
3.5.1 Transponder Reader
Parameter
Operation temperature
Stock temperature
0°C to +50°C
32°F to 122°F
-25°C to +70°C
-13°F to +158°F
Permissible humidity @ 50C°
25 - 80 %
Transmitter frequency
134.2 kHz
Max. transmitting level in 3m distance
Typ. period of charging impulse
20
Value
104 dBµV/m
50ms
Max. repeat of reading
4/s
Max. repeat of programming
1/s
RS232-Transponder Reader (ASC-I1-Protocol), Release 2.1
P RODUCT D ESCRIPTION
Protection mode
IP 40
Housing material
ABS (UL94-V0)
Weight (with rod antenna and presence sensor)
about 440g / 15.4
oz
Fuse type TR5
3
500mA (T)
Serial interface RS232
300 Bd – 115,2
kBd
3.5.2 Power Supply and Current Input
Description
Voltage (proof against connecting
to the wrong terminal)
Current with/without presence
sensor
Min Type
18
24
Max Unit
30
VDC
30 / 55
mA
Rod antenna without/with presence
sensor
160 / 185
mA
Micro antenna without/with
presence sensor
140 / 165
mA
(starting process excluded)
Reading/writing impulse
RS232 Transponder Reader (ASC-I1 Protocol), Release 2.1
21
3 P RODUCT D ESCRIPTION
3.5.3 Antenna Cable
3.5.3.1
Cable of Rod Antenna and Frame Antenna
Standard cable:
Diameter:
Bending radius:
Material:
Approvals:
5.6 mm
84.0 mm,
If the cable is bent only once and
then laid fix a bending radius of 33
mm is allowed
PVC
VDE, IEC
Highly flexible cable (suitable for energy chains):
Diameter:
6 mm
Bending radius:
60 mm
Material:
PVC
Approvals:
VDE, IEC, UL
3.5.3.2
Cable of Mini Antenna and Micro Antenna
Standard cable:
Diameter:
Bending radius:
Material:
Approvals:
4.1mm
41 mm,
If the cable is bent only once and
then laid fix a bending radius of 20.5
mm is allowed
PVC
VDE, IEC, UL
Highly flexible cable (suitable for energy chains):
Diameter:
5 mm
Bending radius:
50 mm
Material:
PVC
Approvals:
VDE, IEC, UL
Special antennas with other highly flexible cables are available upon
request.
22
RS232-Transponder Reader (ASC-I1-Protocol), Release 2.1
P RODUCT D ESCRIPTION
3
3.6 Contents of Delivery
Number
Description
1
RS232 Transponder Reader
1
Mounting set
1
Instruction manual
1
Accompanying letter
For available or required accessories, e.g. antennas, adapters
and cables, see section “Accessories” on page 68 in this manual.
3.7 Warranty and Liability
The warranty period is 24 months and begins with the moment of
delivery of the device as proved by an invoice or other documents.
The warranty includes the repair of all damages to the device that
occur within the warranty period, and which are evidently caused by
faults of the material or production defects.
The warranty does not include damages caused by incorrect
connection, inappropriate handling and non-observance of the
technical reports.
RS232 Transponder Reader (ASC-I1 Protocol), Release 2.1
23
4 I NSTALLATION
4 INSTALLATION
4.1 Installation Environment
This device is designed for use in an indoor
industrial environment only. Installation is only
permitted in an environmental indoor climate with
a constant temperature of between 0°C and +50°C /
32°F and 122°F, humidity between 25% and 80%,
and a maximum temperature of +50°C / 122°F.
Do not install or use this device in or near water.
Never spill liquids of any kind onto the device.
Should spillage occur, unplug the device and have
it checked by a technician.
Do not install near heat sources such as radiators,
heat registers, stoves, or other apparatus (including
amplifiers) that produce heat. Do not install the
device in a flammable environment.
Never expose the device to intense changes in
temperature, otherwise condensation can develop
inside the device and cause damages.
Do not locate the device near overhead power lines
or other electric lights, or power circuits or where
it can encounter such circuits. When installing the
device, take extreme care not to encounter such
circuits as they can cause serious injury or death.
The device should not be used in the immediate
vicinity of electrical units (such as medical units,
monitors, telephones, televisions and energy-saver
lamps), magnetic data carriers, or metallic objects.
This could result in reduced reading/writing ranges.
Never use the device in potentially explosive areas
(such as paint shops).
Do not position the device in a location where it
can suffer from vibration or shock.
24
RS232-Transponder Reader (ASC-I1-Protocol), Release 2.1
I NSTALLATION
4
When the device is installed, the installation
location must be adequately illuminated.
Do not install the device during periods of
lightning.
Ensure the installation location complies with FCC
requirements for human exposure to radio
frequency.
When determining the assembly location, consider
the length of the antenna cable that will be used,
and the reading and writing range. See section
„Accessories/Antennas“ for further information.
4.2 Qualified Installation Personnel
The installation shall be carried out by specially trained personnel
only. If you are uncertain about the qualification, contact the
manufacturer.
Operating the device without special skills can result in
damage to the reader and/or connected devices!
4.3 Unpacking
This device and its accessories were packed under clean room
conditions. To preserve these conditions, the device must be unpacked
under clean room conditions.
4.3.1 Disposal of Packing Material
The packing material consists of cardboard and film. Dispose of these
materials separately in accordance with the relevant legislation in your
country.
4.4 Mounting the Transponder Reader
The mounting surface must be stable, non-flammable, dry and
clean. If necessary, clean it before installing the device.
RS232 Transponder Reader (ASC-I1 Protocol), Release 2.1
25
4 I NSTALLATION
4.4.1 Dimensions for Planning
110mm / 42/5”
95mm / 33/4”
space for
plugs *
4x∅4,2mm / /32”
Fixing holes (4xØ4,2mm)
5
80mm / 31/8”
62mm / 27/16”
152mm / 6”
space for
plugs *
90mm / 33/5”
75mm / 3”
172mm / 63/4”
43mm / 13/4”
* Keep space free for plugs. Dimensions
for straight cable plugs. Angled cable plugs
decrease space
Connectors for
ext. input
RS232Interface
antenna
Connector for
power
ext. output
4.4.2 Standard Housing Using Enclosed Assembly
Material (Recommended)
4.4.2.1
Required Materials and Tools
Enclosed mounting set, containing two mounts, four expanding
rivets and a drilling template
Four cylinder head screws:
M4 (EU)
UNC 8/32 (USA)
Four dowels (in case of wall mounting)
Appropriate screwdriver
Drilling machine with fitting drill
26
RS232-Transponder Reader (ASC-I1-Protocol), Release 2.1
I NSTALLATION
4.4.2.2
4
Assembly
1
Drill four holes, using the enclosed drilling template.
2
When mounting the device on a wall, insert four dowels.
3
Insert four expanding rivets to the two mounts as shown on the
image.
4
Plug the mounts into the four mounting holes of the device as
shown on the picture.
press
click
press
press
press
click
5
Screw the device onto the assembly surface.
6
Connect the device as described in section “Connecting” (page
33).
4.4.3 Housing without Mounts
If you intend to install the device without mounts, you will have to
remove the housing lid.
Static electricity can harm electronic components
inside the device. Follow the ESD instructions (see
page 11) when you open the device!
RS232 Transponder Reader (ASC-I1 Protocol), Release 2.1
27
4 I NSTALLATION
When removing the housing lid, note that the housing
lid is connected to the case with a cable. Remove lid
carefully to prevent damage – do not pull it!
4.4.3.1
Required Materials and Tools
Four cylinder head screws:
M4 (EU)
UNC 8/32 (USA)
Four dowels (in case of wall mounting)
Appropriate screwdriver
Drilling template (enclosed)
Drilling machine with fitting drill
4.4.3.2
28
Assembly
1
Drill four holes, using the enclosed drilling template.
2
If you are mounting the device on a wall, insert four dowels.
3
Unscrew the four housing lid screws.
4
Carefully remove the lid.
5
Screw the device onto the assembly surface using the four
assembly holes inside the case.
6
Screw the housing lid back onto the device.
7
Connect the device as described in section 4.6.
RS232-Transponder Reader (ASC-I1-Protocol), Release 2.1
I NSTALLATION
4
4.5 Installing the Antenna
When installing the antenna, consider the required reading and
writing ranges (see section “Accessories”, page 68). The reader
can be used properly only if the transponder is located within
the individual reading/writing range of the antenna!
4.5.1 Positioning
Reliable reading and writing depends on the range and position of the
transponder to the antenna.
Transponder parallel to the axis of the antenna:
Transponder is out of range
Transponder is within range
Transponder perpendicular to the axis of the antenna:
Transponder is within range
Transponder is out of range
RS232 Transponder Reader (ASC-I1 Protocol), Release 2.1
29
4 I NSTALLATION
Parallel
The illustration
shows the optimal
position of the
transponder if it is
positioned parallel
to the axis of the
antenna.
Perpendicular
The illustration
shows the optimal
position of the
transponder if it is
perpendicular to
the axis of the
antenna.
Transponder
Antenna
Transponder
45°
Antenna
Perpendicular
(frame
antenna)
The illustration
shows the optimal
position of the
transponder if it is
perpendicular to
the axis of the
frame antenna.
Transponder
Transponder
Antenna
4.5.2 Available Antenna Types
For the antennas that are available, see chapter „Accessories“, page
68).
30
RS232-Transponder Reader (ASC-I1-Protocol), Release 2.1
I NSTALLATION
4
4.5.3 Dimensions for Planning
4.5.3.1
Rod Antenna
b1
a1
a2
a1
Length of antenna cylinder
125mm / 4 9/10″
a2
Complete mounting dimensions
(cable with 90° angle)
150mm / 5 9/10″
b1
Diameter of antenna cylinder
23.0mm / 9/10″
4.5.3.2
Mini Antenna
b1
a1
a2
a1
Length of antenna cylinder
68mm / 27/10″
a2
Complete mounting dimensions
(cable with 90° angle)
85mm / 3 1/3″
b1
Diameter of antenna cylinder
10.0mm / 2/5″
RS232 Transponder Reader (ASC-I1 Protocol), Release 2.1
31
4 I NSTALLATION
4.5.3.3
Micro Antenna
a2
a1
b1
a1
Length of antenna cylinder
40mm / 13/5″
a2
Complete mounting dimensions
(cable with 90° angle)
60mm / 2 2/5″
b1
Diameter of antenna cylinder
10.0mm / 2/5″
4.5.3.4
Frame Antenna
b1
b2
a1
a2
a3
c1
32
c2
RS232-Transponder Reader (ASC-I1-Protocol), Release 2.1
I NSTALLATION
a1
Distance between the mounting holes
(length)
148mm / 5 9/10″
a2
Length frame antenna
161mm / 61/3″
a3
Complete mounting dimensions length
(cable screwing at the side)
210mm / 8 1/3″
b1
Distance between the mounting holes
(width)
70mm / 2 3/4″
b2
Width frame antenna
120mm / 43/4″
c1
Height frame antenna
19mm / 3/4″
c2
Complete mounting dimensions height
(cable screwing at the top)
70mm / 2 3/4″
4
4.6 Connecting the Transponder Reader
4.6.1 Antenna
Connect the antenna to the antenna plug (see illustration page 17).
4.7 Power Connection
Built-in male plug, plastic (power supply)
PIN
1
2
3
4
5
Signal
+24V
0V
NC
NC
NC
4
5
1
3
2
The device can be connected to an interior DC power circuit or to a DC
adapter (see section “Accessories”, page 78).
Note the required voltage (see technical data, page 21). Use
cables, plugs and adapters provided by the manufacturer
only!
RS232 Transponder Reader (ASC-I1 Protocol), Release 2.1
33
4 I NSTALLATION
Once the device is connected to the power supply, the power LED is
illuminated (see illustration page 16). If it is not illuminated, see
section 6 for help.
4.8 Terminal Connection
Built-in female plug, metal (RS232 interface #1)
PIN
1
2
3
4
Signal
NC
GND
RxD
TxD
1
4
2
3
Sub-D female plug (RS232 interface #2)
The serial interface is also carried out with the Sub-D female plug (9
contacts); a serial connection line (switched 1:1) can be used.
PIN
1
2
3
4
5
6
7
8
9
34
DB9
NC
TXD
RxD
NC
GND
NC
NC
NC
NC
RS232-Transponder Reader (ASC-I1-Protocol), Release 2.1
I NSTALLATION
Ext. Input
Pin
Signal
1 GND
+ 24V DC
3 IN npn
Output Q
positive
logic
Signal
1 Antenna“+”
2 Antenna “-”
3 NC
Ext. Output
Pin
Floating
contact
GND
2 +24V
Antenna
Pin
Sensor
type:
4
Signal
1 +5V
2 OUT LED
The ext. output
is dimensioned
for connecting
a LED (without
resistor).
4.9 Starting Up
4.9.1 Required Operating Conditions
To operate the reader, the following requirements must be met:
An antenna must be connected correctly to the reader.
The power supply must be connected.
The transponder must be located within the individual
reading/writing range of the antenna.
4.9.2 Tuning
Before the reader can be operated, it must be calibrated so that it can
communicate with the transponder.
Press the Tuning button (see illustration page 16). The Tuning LED
lights up and goes out again. A blinking LED indicates a malfunction.
See page 62 for details.
RS232 Transponder Reader (ASC-I1 Protocol), Release 2.1
35
5 O PERATION
5 OPERATION
5.1 Operating Personnel
The RS232 Transponder Reader is designed to be operated
by specially trained personnel only. If you have doubts about
the qualification required, contact the manufacturer.
Operating the device without special skills can result in
damage to the reader and/or connected devices!
5.2 Structure of Communication Protocol
General remarks:
•
The communication will be done with ASCII - packages.
•
Each reader represents a transponder reader with RS232interface to which an address from 0 to E can be assigned.
When the reader is delivered the address is 0.
•
After each command to the reader a defined response is sent.
We recommend to wait for this response before sending a new
command.
5.2.1 Package Contents
Each package includes a package header (three signs), a message (two
or more signs) and the end of package (five signs).
package header
message
end of package
5.2.2 Package Header
The header includes the start sign (one sign) and the package length
(two signs).
package header
start
36
length 1
length 2
RS232-Transponder Reader (ASC-I1-Protocol), Release 2.1
O PERATION
start:
...start sign (ASCII-sign ´S´)
length 1:
´0´..´F´
...highbyte package length (hexadecimal) - ASCII-sign
length 2:
´0´..´F´
...lowbyte package length (hexadecimal) - ASCII- sign
5
The message length describes the number of character of a message.
5.2.3 Message Structure
The message includes a command, a target address and a source
address as well as information.
message
command
address
information
Command:
ASCII-sign (refer to the ‘Command’ chapter)
Address:
target/ source address; ASCII sign ‘0’...’E’ for the
reader 1)
Information:
depends on the command (includes none, one or more
ASCII signs ‘0’...’F’)
1)
The reader is pre-assigned with 0 when delivered.
5.2.4 End of Package
The end of package includes an end sign (one sign) and a checksum
(four signs).
end of package
end
End:
checksum 1 checksum 2
checksum 3 checksum 4
end sign ASCII sign no. 13 (hexadecimal 0D)
RS232 Transponder Reader (ASC-I1 Protocol), Release 2.1
37
5 O PERATION
Checksum 1:
highbyte – XOR logic of all data (package header,
message and end sign); ASCII ‘0’..’F’
Checksum 2:
lowbyte – XOR logic of all data (package header,
message and end sign); ASCII ‘0’..’F’
Checksum 3:
highbyte - addition of all data (package header,
message and end sign); ASCII ‘0’..’F’
Checksum 4:
lowbyte - addition of all data (package header,
message and end sign); ASCII ‘0’..’F’
5.3 Commands of Protocol
5.3.1 Commands Terminal to Reader
Command
38
Description
’r’
acknowledge after reading a page (automatically read)
‘X’
start an externally triggered read
‘W’
write tag
‘G’
require parameter
‘P’
change parameter
‘H’
start heartbeat
‘N’
start software reset
‘a’
acknowledge to the ‘carrier removed’ command
‚L‘
lock one page
’I’
set tuning
’J’
interrogate tuning
’V’
version query
RS232-Transponder Reader (ASC-I1-Protocol), Release 2.1
O PERATION
5
5.3.2 Commands Reader to Terminal
Command
Description
‘R’
data from a page (automatically read)
‘x’
data from a page (externally triggered read)
‘w’
response after write to tag
‘p’
response during parameter setting
‘g’
response to read parameters
‘h’
response after heartbeat
‘n’
response after software or hardware reset
‘e’
failure message
‘A’
carrier removed from equipment I/O port (presence
sensor)
‚l‘
feedback at locking of one page
’i’
acknowledgement when setting the tuning
’j’
acknowledgement when interrogating the tuning
’v’
acknowledgement of the version query
RS232 Transponder Reader (ASC-I1 Protocol), Release 2.1
39
5 O PERATION
5.3.3 Hardware Reset
If the power at the device had been turned on (hardware reset) the
terminal will be informed about it.
terminal
direction
reader
package head
‘n’ command
‘0’...’E’ source address
package end
5.3.4 External Input Triggers Reading of the Tag
The reading is automatically triggered by a sensor respectively floating
contact connected to the external input. Depending on the readmode
configuration (parameter 1: readmode) the reader will read the
following pages:
40
readmode = page (0):
sequential read for different pages (parameter
2: readpage)
readmode = tag (1):
read a tag until the end sign (‘E’ - end sign or
‘F’ empty) in IDbit0…3
readmode = whole (2):
read the whole tag (all pages)
RS232-Transponder Reader (ASC-I1-Protocol), Release 2.1
O PERATION
terminal
direction
5
reader
package header
‘R’ command
‘0’..’E’ source address
‘01...’17’ page
‘0’...’F’ ID bit 60..63
‘0’...’F’ ID bit 56..59
‘0’...’F’ ID bit 52..55
‘0’...’F’ ID bit 48..51
‘0’...’F’ ID bit 44..47
‘0’...’F’ ID bit 40..43
‘0’...’F’ ID bit 36..39
‘0’...’F’ ID bit 32..35
‘0’...’F’ ID bit 28..31
‘0’...’F’ ID bit 24..27
‘0’...’F’ ID bit 20..23
‘0’...’F’ ID bit 16..19
‘0’...’F’ ID bit 12..15
‘0’...’F’ ID bit 8..11
‘0’...’F’ ID bit 4..7
‘0’...’F’ ID bit 0..3
package end
package header
command ‘r’
target address ‘0’..’E’
package end
RS232 Transponder Reader (ASC-I1 Protocol), Release 2.1
41
5 O PERATION
Reading more pages (readmode “tag” or “whole”): protocol will be
repeated. The end sign includes the command ‘R’ and the source
address ‘0’...’E’
No acknowledge from the terminal: information will be repeated with
following parameters (parameter 5: RS232 delay time; parameter 6:
RS232 maxrepeat)
Reading not possible: repeated read - time frame (parameter 3: r/w
delay time; parameter 4:r/w maxrepeat).
Reading not possible again: tag sends a failure message no tag (4) to
the terminal.
The delay time for the presence sensor is configurable (parameter 0:
sensor delay)
An automatic reading is only possible if all messages that have to be
confirmed had been confirmed by the previous read or if the waiting
period (rs232 repeattime) is expired after the last sending (rs232
maxrepeat).
If the sensor check is activated the circuit state of the floating contact
connected to the external input is checked before a read-process
triggered by the terminal. If it is not connected, the error message
“NOTAG” is sent, otherwise the read-process is started.
42
RS232-Transponder Reader (ASC-I1-Protocol), Release 2.1
O PERATION
5
5.3.5 Terminal Triggers Reading of the Tag
The read is initiated by the terminal via command ‚X’. On the basis of
the transfer value you are able to configure whether the whole tag or
only a certain page is read.
Value
Description
‘01’ to ‘17’
read page#
‘98’
read more pages until end sign or empty sign
‘99’
read whole tag
terminal
direction
reader
package header
command ‘X’
target address ‘0’..’E’
value i.e.’05’
package end
package header
‘x’ command
‘0’.. ‘E’ source address
i.e.: ‘05’ page
‘0’.. ‘F’
ID bit 60..63
‘0’.. ‘F’
ID bit 56..59
‘0’.. ‘F’
ID bit 52..55
‘0’.. ‘F’
ID bit 48..51
‘0’.. ‘F’
ID bit 44..47
‘0’.. ‘F’
ID bit 40..43
‘0’.. ‘F’
ID bit 36..39
‘0’.. ‘F’
ID bit 32..35
‘0’.. ‘F’
ID bit 28..31
RS232 Transponder Reader (ASC-I1 Protocol), Release 2.1
43
5 O PERATION
‘0’.. ‘F’
ID bit 24..27
‘0’.. ‘F’
ID bit 20..23
‘0’.. ‘F’
ID bit 16..19
‘0’.. ‘F’
ID bit 12..15
‘0’.. ‘F’
ID bit 8..11
‘0’.. ‘F’
ID bit 4..7
‘0’.. ‘F’
ID bit 0..3
package end
There is no acknowledge from the terminal.
In case of read request for more than one page (value 98 or 99) the
protocol will be repeated. For the end sign the reader sends an
additional package; the message includes the command ‘x’ and the
source address ‘0’...’E’.
If the reading fails the reading will be repeated (parameter 3: r/w delay
time; parameter 4: r/w maxrepeat). If it fails again the reader sends a
failure message ‘no tag(4)’ to the terminal.
If the sensor check is activated the circuit state of the floating contact
connected to the external input is checked before a read-process
triggered by the terminal. If it is not connected, the error message
“NOTAG” is sent, otherwise the read-process is started.
44
RS232-Transponder Reader (ASC-I1-Protocol), Release 2.1
O PERATION
5
5.3.6 Write Tag
The terminal will send following information to the reader with the
corresponding target address: page# and data.
terminal
direction
reader
Package header
command
‘W’
target address
‘0’..’E’
page
‘01’.. ‘17’
‘0’.. ‘F’ ID bit 60..63
‘0’.. ‘F’ ID bit 56.. 59
‘0’.. ‘F’ ID bit 52..55
‘0’.. ‘F’ ID bit 48..51
‘0’.. ‘F’ ID bit 44..47
‘0’.. ‘F’ ID bit 40..43
‘0’.. ‘F’ ID bit 36..39
‘0’.. ‘F’ ID bit 32..35
‘0’.. ‘F’ ID bit 28..31
‘0’.. ‘F’ ID bit 24..27
‘0’.. ‘F’ ID bit 20..23
‘0’.. ‘F’ ID bit 16..19
‘0’.. ‘F’ ID bit 12..15
‘0’.. ‘F’ ID bit 8....11
‘0’.. ‘F’ ID bit 4
7
‘0’.. ‘F’ ID bit 0
3
Package end
package header
‘w’ command
‘0’..‘E’ source address
package end
RS232 Transponder Reader (ASC-I1 Protocol), Release 2.1
45
5 O PERATION
If ‘write tag’ fails writing will be repeated in the defined time frame
(parameter 3: r/w delay time; parameter 4: r/w maxrepeat). If it fails
again the reader sends a failure message ‘no tag(4)’ to the terminal.
If the sensor check is activated the circuit state of the floating contact
connected to the external input is checked before a write-process
triggered by the terminal. If it is not connected, the error message
“NOTAG” is sent, otherwise the write-process is started.
5.3.7 Parameter Settings
The following parameters can be changed:
Parameter
#
0
1
Name
Description
sensor delay operation delay for the
presence sensor
readmode
Valid Values
‘01’.. ‘99’ ( 1/10 s)
readmode for automatic ‘00’ only one page
read triggered by external
read
input
‘01’ read to end sign
or empty sign 3)
‘02’ all pages
‘10’ read only one
page check
sensor first2)
‘11’ up to end/empty
sign check
sensor first2) 3)
‘12’ all pages check
sensor first2)
‘99’ deactivate
sensor
2
3
46
readpage
page for readmode ‘00’
r/w repeattime time between two
di
ii
‘01’.. ‘17’
‘01’.. ‘99’ ( 1/10 s)
RS232-Transponder Reader (ASC-I1-Protocol), Release 2.1
O PERATION
5
readings or writings
4
r/w maxrepeat max. number of tries to
read or write
‘01’.. ‘99’
5
RS232
repeattime
waiting period1) for a
confirmation; if no
confirmation has been
received, the message
will be repeated (see
RS232 maxrepeat)
6
RS232
maxrepeat
max. numbers of tries to ‘00’ (never ending)
send data to the terminal ‘01’.. ‘99’
(RS232)
7
watchport
message to the terminal ‘00’ not activated
that the floating contact ‘01’ activated
connected to the external
input has been opened
F
reader
currently adjusted address ‘00’..’14’ ≙ 0 .. E
of the reader
address
‘01.. ‘99’ ( 1/10s)
Default: 0 ≙ ’00’
terminal
direction
reader
Package header
command
‘P’
target address
‘0’..’E’
parameter # ‘0’..’7’; ‘F’
value
‘00’..’99’
Package end
RS232 Transponder Reader (ASC-I1 Protocol), Release 2.1
47
5 O PERATION
package header
‘p’
command
‘0’.. ‘E’
source address
package end
1)
During the waiting period no new actions (for example reading or
writing) can be started.
2)
If the sensor check is activated (first byte is 1) the circuit state of
the floating contact connected to the external input is checked before
a read- or write-process triggered by the terminal. If it is not
connected, the error message “NOTAG” is sent, otherwise the readrespectively write-process is started.
3)
‘E’ respectively ‘F’ in IDBit0…3 of the reading ID.
5.3.8 Query of the Current Parameters
terminal
direction
reader
package header
command ‘G’
target address ‘0..E’
package end
package header
‘g’ command
‘0’.. ‘E’ source address
‘0’ value number
‘01’.. ‘99’ value
package end
48
RS232-Transponder Reader (ASC-I1-Protocol), Release 2.1
O PERATION
5
package header
‘g’ command
‘0’.. ‘E’ source address
‘1’ value number
‘00’.. ‘02’ value
package end
package header
‘g’ command
‘0’.. ‘E’ source address
‘2’ value number
‘01’.. ‘17’ value
package end
package header
‘g’ command
‘0’.. ‘E’
1)
source address
‘3’ value number
‘01’.. ‘99’ value
package end
package header
‘g’ command
‘0’.. ‘E’ source address
‘4’ value number
‘01’.. ‘99’ value
package end
RS232 Transponder Reader (ASC-I1 Protocol), Release 2.1
49
5 O PERATION
package header
‘g’ command
‘0’.. ‘E’ source address
‘5’ value number
‘01’.. ‘99’ value
package end
package header
‘g’ command
‘0’.. ‘E’ source address
‘6’ value number
‘01’.. ‘99’ value
package end
package header
‘g’ command
‘0’.. ‘E’ source address
‘7’ value number
‘00’.. ‘01’ value
package end
package header
‘g’ command
‘0’.. ‘E’ source address
‘F’ value number
‘00’.. ‘14’ value
package end
50
RS232-Transponder Reader (ASC-I1-Protocol), Release 2.1
O PERATION
5
package header
‘g’ 2) command
‘0’.. ‘E’ source address
Package end
2)
end sign includes the command ‘g’ and the source address ‘0’..’E’
5.3.9 Heartbeat
This command offers the possibility to find out from the terminal
whether the connection to the reader is still activated.
terminal
direction
reader
package header
Command ‘H’
target address ‘0’..’E’
1)
package end
package header
‘h’ command
‘0’..’E’ 1) source address
‘0000’...’FFFF’ reader ID
’0000’ return code
package end
Meaning of the reader ID:
Every reader has an unique 16 bit reader ID after installation. Every ID
is only used once.
1)
Because of compatibility to separated systems the heartbeat is also
allowed with the address ‘F’.
RS232 Transponder Reader (ASC-I1 Protocol), Release 2.1
51
5 O PERATION
5.3.10 Reset of Separate Devices
The command carries out a hard- and software reset in the reader.
terminal
direction
reader
package header
command ‘N’
target address ‘0’..’E’
package end
package header
‘n’ command
‘0’.. ‘E’ source address
package end
5.3.11 External Input had been changed
If the reader’s parameter watchport is activated (‘01’), the reader will
report to the terminal that the signal from the external input (for
example floating contact was opened) had been changed.
terminal
direction
reader
package header
‘A’
‘0’.. ‘E’
source address
package end
package header
command ‘a’
target address‘0’..’E’
package end
52
RS232-Transponder Reader (ASC-I1-Protocol), Release 2.1
command
O PERATION
5
If the terminal does not send an acknowledge, the message will be
repeated (value 6: RS232 maxrepeat) in the defined time frame (value
5: RS232 delay time).
5.3.12 Failure Codes
The failure codes have following meanings:
Failure
Code
Name
Description
0
none
without failure
1
auto fail
automatic reading is not possible1) 2)
2
ex fail
read or write initiated from the terminal
respectively other actions cannot be carried
out 1) 2)
3
write fail
data transfer to the tag not possible1) 2)
4
no tag
no tag or antenna installed
5
invalid
invalid parameter or command
6
unknown
unknown failure
7
unconfig
the device is not configured
8
check
parity or/ and checksum failure
9
void ackn
no valid acknowledge
A
locked
Locked Page cannot be written
:
msg len
message too long
;
invalid
invalid parameter or command
B
no ackn
the message which has to be confirmed has
been sent maximally (rs232 maxrepeat) and
has not been confirmed by the terminal within
the defined time frame (see parameter 5)
RS232 Transponder Reader (ASC-I1 Protocol), Release 2.1
53
5 O PERATION
terminal
direction
reader
package header
‘e’ command
‘0’.. ‘E’ source address
‘0’..’B’ failure code
package end
1)
because the device is still busy
2)
or because a message has not been confirmed by the previous read up
to now
5.3.13 Locking of the Tag
The terminal hands over the reader its address and the page number
which shall be locked.
terminal
direction
reader
package header
Command ‘L’
target address ‘0’..’E’
page ‘01’.. ‘17’
package end
package header
‘l’ command
‘0’..‘E’ source address
package end
If the page of the transponder could not be locked, the writing action
will be repeated in a defined time frame (parameter 3: r/w delaytime)
(parameter 4: r/w maxrepeat).
54
RS232-Transponder Reader (ASC-I1-Protocol), Release 2.1
O PERATION
5
If the page still could not be locked, a failure message NoTag (4) is
sent to the terminal. If the page was already locked, the successful
feedback follows just like at the first locking.
If the sensor check is activated the circuit state of the floating contact
connected to the external input is checked before a lock-process
triggered by the terminal. If it is not connected, the error message
“NOTAG” is sent, otherwise the lock-process is started.
Attention: A locked page can not be unlocked. This page is
locked forever!
5.3.14 Set Tuning of the TIRIS – RF - Module
The terminal delivers the reader the parameter of the capacitors C0 to
C5 for the calibration of the antenna.
A bit is reserved for each capacitor, which shows its circuit state.
•
0 for not connected
•
1 for connected
Bit 2 0 here stands for the capacitor C0.
terminal
direction
Reader
package header
command
‘I’
target address
‘0’..’E’
C0 to C5
‘00’.. ‘40’
package end
package header
‘i’ command
‘0’..‘E’ source address
package end
RS232 Transponder Reader (ASC-I1 Protocol), Release 2.1
55
5 O PERATION
Parameter structure from C0 to C5 (also valid for 3.15):
hex.-value
bin.-value
Meaning
00
0000 0000
no capacitor is set
3F
0011 1111
all capacitors are set
40
0100 0000
triggering of the automatic
calibration
For the calibration of the antenna exclusively parameter ‚40’
(automatic calibration) should be used as in this case the antenna sends
and receives optimally, that means with maximal range.
For special cases (for example reading- and writing-range shall be
reduced) it can be necessary that the efficiency of the antenna has to be
reduced by connecting or disconnecting single capacitors. But this
should be carried out only by qualified staff.
If no reasonable calibration is found, the failure “Invalid” will be sent
instead of the confirmation, and all jumpers will be set.
5.3.15 Query the Calibration of the TIRIS – RF - Module
The currently set capacitors can be queried with this function. The
answer contains the currently set capacitors in hexadecimal format.
The structure corresponds to the one in 5.3.14.
terminal
direction
reader
package header
command
‘J’
target address
‘0’..’E’
package end
56
RS232-Transponder Reader (ASC-I1-Protocol), Release 2.1
O PERATION
5
package header
‘j’ command
‘0’..‘E’ source address
‘00’.. ‘3F’ C0 to C5
package end
Structure of C0 to C5:
hex.-value
bin.-value
meaning
00
0000 0000
no capacitor is set
3F
0011 1111
all capacitors are set
RS232 Transponder Reader (ASC-I1 Protocol), Release 2.1
57
5 O PERATION
5.3.16 Interrogate Version
With this function the program-ID can be queried. The program-ID
consists of 8 signs which are stored in ASCII-code.
terminal
direction
reader
package header
command
‘V’
target address
‘0’..’E’
package end
package header
‘v’ command
‘0’..‘E’ source address
’00..FF’ 1. ASCII
’00..FF’ 2. ASCII
’00..FF’ 3. ASCII
’00..FF’ 4. ASCII
’00..FF’ 5. ASCII
’00..FF’ 6. ASCII
’00..FF’ 7. ASCII
’00..FF’ 8. ASCII
package end
Example (S12v0525356312E302E31,1ABC):
command
58
values 1 to 8
v0
52
53
56
31
2E
30
2E
31
answer
R
S
V
1
.
0
.
1
RS232-Transponder Reader (ASC-I1-Protocol), Release 2.1
O PERATION
5
5.4 Examples for Packages
ASCII
HEX
Description
‘S’
53
start sign
‘0’
30
highbyte message length
‘2’
32
lowbyte message length
‘H’
48
first sign message: value
‘0’
30
second sign message: target address
CR
0D
end sign
‘2’
32
highbyte checksum XOR
‘4’
34
lowbyte checksum XOR
‘3’
33
highbyte checksum addition
‘A’
41
lowbyte checksum addition
Calculation for the XOR checksum:
53 XOR 30 XOR 32 XOR 48 XOR 30 XOR 0D = 24
‘2’ ‘4’
Calculation for the addition checksum:
53 + 30 + 32 + 48 + 30 + 0D = 13A
Only low significant byte will be used:
3A
‘3’ ‘A’
RS232 Transponder Reader (ASC-I1 Protocol), Release 2.1
59
5 O PERATION
Other example:
60
ASCII (‘.’ = CR)
Description
S02r0.1E64
read confirmation reader0
S05P0101.0BD7
setting readmode reader0 on tag
S04X001.33AD
explicit read reader0 page 1
S04X098.33BD
explicit read reader0 tag
S04X099.32BE
explicit read reader0 whole
S02G0.2B39
question about parameter of reader0
S05P0701.0DDD
setting parameter reader0 watchport activated
S02a0.0D53
confirmation on ‚floating contact at the
external input was opened‘
S02N0.2240
reset reader0
RS232-Transponder Reader (ASC-I1-Protocol), Release 2.1
6 S ERVICE AND E RROR H ANDLING
6 SERVICE AND ERROR HANDLING
6.1 General
The transponder reader and its components must be serviced by
the manufacturer only.
If errors occur, follow the instructions in this section. Do not
carry out any error eliminating measures other than the ones
described in this section.
If you are uncertain about errors and their handling, contact
the manufacturer (see the contact information on page 65 of this
manual). Have the serial number of the transponder reader
ready as shown on the label (see page 20) when contacting the
manufacturer.
6.2 Qualified Error Handling Personnel
Error handling shall be carried out by specially trained personnel only.
If you are uncertain about the qualifications that are required, contact
the manufacturer.
Error handling the device without the special skills required
and unqualified interference with the device can result in
personal injury and damage to the reader and/or connected
devices!
61
RS232-Transponder Reader (ASC-I1-Protocol), Release 2.1
6 S ERVICE AND E RROR H ANDLING
6.3 Safety Instructions
All antenna resonant circuit components carry high
voltages!
When replacement parts are required, use
replacement parts specified by the manufacturer
only. Unauthorized substitutions may result in fire,
electric shock, or other hazards.
Static electricity can harm electronic components
inside the device. ESD protection measures must
be observed when opening the device (see page
11).
When removing the housing lid, note that the
housing lid is connected to the case with a cable.
Remove the lid carefully to prevent damage – do
not pull it! Do not operate the device when the
housing lid is removed!
Do not short-circuit the fuse. This may result in
fire or damage to the device. When changing fuses,
use fuses specified by the manufacturer only.
6.4 Errors Indicated by the LEDs
6.4.1 Power LED Not Illuminated
1
Check the power supply and the connection cables.
2
Remove the housing lid as described on page 28 and check if
the second power LED inside the reader is illuminated (see
illustration on page 17). If it is on, the outside power LED is
defect. Contact the manufacturer.
3
If neither the outside LED nor the inside LED is illuminated,
disconnect the device from the power supply and carefully
remove the fuse (see illustration page 17). Test the fuse. If it is
faulty, replace it by a fuse specified by the manufacturer.
If the above measures do not solve the problem, leave the reader
disconnected and contact the manufacturer.
62
RS232-Transponder Reader (ASC-I1-Protocol), Release 2.1
S ERVICE
AND
E RROR H ANDLING
6
6.4.2 Error LED Illuminated (in Test Mode)
1
Press the tuning button.
4
If the tuning LED is not illuminated, the transponder is not
within the reading/writing range of the antenna. Install the
antenna closer to the transponder (see individual antenna
ranges, page 69). If this does not solve the problem, contact the
manufacturer.
2
If the tuning LED blinks,
Check if the antenna is located too near to a strong metallic
surrounding. Relocate the antenna with more distance.
Check if the antenna and the antenna cable are connected
correctly. Use another antenna cable if available.
If these measures do not solve the problem, contact the manufacturer.
6.5 Reader Does Not Respond or Transmit or Cannot be
Controlled by the Host
1
Check if the interface connection cable is undamaged and
correctly connected to both reader and host.
2
Check the status as indicated by the LEDs (see section 0).
3
Download the test software from the Internet
(www.carmas.com
Products). Follow the instructions.
If these measures do not solve the problem, contact the manufacturer.
6.6 Reset
In the case of software errors, a power reset can be carried out by
stopping and restarting the power supply.
After the reset, the reader implements a self-test. The self-test can
continue up to five seconds. As the first step in these self-tests, all
LEDs of the membrane keyboard light up. In the second step, the
reader displays the key states of the membrane keyboard. If a LED is
illuminated, the button specified is active. The output LED signalizes
the SECS2 protocol. If the test was successful, all LEDs except the
power LED, are extinguished.
RS232-Transponder Reader (ASC-I1-Protocol), Release 2.1
63
6 S ERVICE AND E RROR H ANDLING
6.7 Power Cut
After a power cut, the reader carries out a reset with self-test. The selftest can continue for up to five seconds. In the first step of these selftests, all LEDs of the membrane keyboard are illuminated. In the
second step, the reader displays the key states of the membrane
keyboard. If a LED is on, the specified button is active. The output
LED signalizes the SECS2 protocol.
If the test was successful, all LEDs, except for the power LED, are
extinguished.
6.8 Software Releases
Release Date
10/27/2000
11/21/2000
12/04/2000
03/06/2001
04/04/2001
06/05/2001
06/22/2001
09/04/2001
09/17/2001
10/25/2001
06/05/2002
64
Version
Description
First version. (without membrane
RIV2.1.0
keyboard)
RIV2.2.0
RIV2.2.1 Some modifications for the firmware
upgrade mode
RIV2.3.0 First version with membrane keyboard
RIV2.4.0 Some modifications for the firmware
upgrade mode
After reset the reader performs a keyboard
test (this takes some time)
RIV2.5.0 The capability to write to page 1 is enabled
as default behavior
RIV2.5.1 Tuning button is enabled in every mode
RIV2.6.0 On software reset no keyboard test will be
performed
While the hardware reset is performing the
keyboard test, the Input LED indicates the
reader protocol
RIV2.6.1 No protocol changes
RIV2.6.2 Increased reading and writing ranges
RIV2.7.0 Tag can be read and written in normal
mode (8 bytes data and 2 bytes checksum
per page) or in free mode (10 bytes data
without checksum per page)
RS232-Transponder Reader (ASC-I1-Protocol), Release 2.1
S ERVICE
AND
E RROR H ANDLING
6
6.9 Customer Service
BROOKS Automation (Germany) GmbH
RFID Division
Gartenstraße 19
D-95490 Mistelgau
Germany
Tel: +49 9279 991 910
Fax: +49 9279 991 900
E-mail: [email protected]
24 hour technical support hotline (Brooks): +1 978 262 2900
RS232-Transponder Reader (ASC-I1-Protocol), Release 2.1
65
7 D EINSTALLATION AND S TORAGE
7 DEINSTALLATION AND STORAGE
7.1 Deinstallation
1
Disconnect the power supply.
2
Disconnect all cables.
3
Loosen and remove the mounting screws.
4
Remove the reader from its installation surface.
7.2 Storage
Store the reader and its components in a clean and dry environment
with the power supply disconnected. Make sure the contacts remain
clean. Observe the necessary storage conditions (for technical data, see
page 20).
66
RS232-Transponder Reader (ASC-I1-Protocol), Release 2.1
T RANSPORTATION
AND
D ISPOSAL
8
8 TRANSPORTATION AND DISPOSAL
8.1 Transportation
For transportation purposes such as mailing, use a firm cardboard box.
Use adequate padding material to protect the device on all sides.
8.2 Disposal
The transponder reader and its components consist of different
materials. Dispose of these materials separately in accordance with the
relevant legislation in your country. Do not throw them away with
everyday household trash.
Separate the interior electronic components from the case. Dispose of
The case as plastic trash
The electronic components, antennas and cables as electronic trash.
RS232-Transponder Reader (ASC-I1-Protocol), Release 2.1
67
9 A CCESSORIES
9 ACCESSORIES
9.1 Antennas
(Special antenna types are available on request)
9.1.1 Available Types
Type
Part-No.
Micro antenna (xx = cable length)
ANT-1Mxx
Mini antenna (xx = cable length)
ANT-1Kxx
Rod antenna (xx = cable length)
ANT-1Sxx
Frame antenna (xx = cable length)
ANT-1Rxx
xx = cable length
05
500 mm (19 2/3″)
10
1000 mm (39 1/3″)
20
2000 mm (78 3/4″)
30
3000mm (118 1/10″)
Picture
and so on
68
RS232-Transponder Reader (ASC-I1-Protocol), Release 2.1
A CCESSORIES
9
9.1.2 Reading and writing Ranges
9.1.2.1
Reading Range Rod Antenna
Transponder:
32 mm / 1 1/4″ glass transponder (read only, read/write,
multipage).
If you use a multipage transponder, this diagram is
valid for page 1 of the multipage transponder only.
Antenna:
BROOKS rod antenna (up to 1000mm / 39 1/3″ lead)
________
Transponder parallel to antenna
--------
Transponder 90° to antenna
RS232-Transponder Reader (ASC-I1-Protocol), Release 2.1
69
9 A CCESSORIES
9.1.2.2
70
Writing Range Rod Antenna
Transponder:
32 mm / 1 1/4″ multipage glass transponder
Antenna:
BROOKS rod antenna
(up to 1000mm / 39 1/3″ lead)
________
Transponder parallel to antenna
--------
Transponder 90° to antenna
RS232-Transponder Reader (ASC-I1-Protocol), Release 2.1
A CCESSORIES
9.1.2.3
9
Reading Range Mini Antenna
Transponder:
32 mm / 1 1/4″ glass transponder (read only, read/write,
multipage).
If you use a multipage transponder, this diagram is
valid for page 1 of the multipage transponder only.
Antenna:
BROOKS mini antenna (up to 1000mm / 39 1/3″ lead)
________
Transponder parallel to antenna
--------
Transponder 90° to antenna
RS232-Transponder Reader (ASC-I1-Protocol), Release 2.1
71
9 A CCESSORIES
9.1.2.4
72
Writing Range Mini Antenna
Transponder:
32 mm / 1 1/4″ multipage glass transponder
Antenna:
BROOKS mini antenna
(up to 1000mm / 39 1/3″ lead)
________
Transponder parallel to antenna
--------
Transponder 90° to antenna
RS232-Transponder Reader (ASC-I1-Protocol), Release 2.1
A CCESSORIES
9.1.2.5
9
Reading Range Micro Antenna
Transponder:
32 mm / 1 1/4″ glass transponder (read only, read/write,
multipage)
If you use a multipage transponder, this diagram is
valid for page 1 of the multipage transponder only.
Antenna:
BROOKS micro antenna
(up to 1000mm / 39 1/3″ lead)
________
Transponder parallel to antenna
--------
Transponder 90° to antenna
RS232-Transponder Reader (ASC-I1-Protocol), Release 2.1
73
9 A CCESSORIES
9.1.2.6
74
Writing Range Micro Antenna
Transponder:
32 mm / 1 1/4″ multipage glass transponder
Antenna:
BROOKS micro antenna
(up to 1000mm / 39 1/3″ lead)
________
Transponder parallel to antenna
--------
Transponder 90° to antenna
RS232-Transponder Reader (ASC-I1-Protocol), Release 2.1
A CCESSORIES
9.1.2.7
9
Reading Range Frame Antenna
Transponder:
32 mm / 1 1/4″ glass transponder (read only, read/write,
multipage)
If you use a multipage transponder, this diagram is
valid for page 1 of the multipage transponder only.
Antenna:
BROOKS frame antenna
(up to 1000mm / 39 1/3″ lead)
________
Transponder parallel to antenna
--------
Transponder 90° to antenna
RS232-Transponder Reader (ASC-I1-Protocol), Release 2.1
75
9 A CCESSORIES
9.1.2.8
76
Writing Range Frame Antenna
Transponder:
32 mm / 1 1/4″ multipage glass transponder
Antenna:
BROOKS frame antenna
(up to 1000mm / 39 1/3″ lead)
________
Transponder parallel to antenna
--------
Transponder 90° to antenna
RS232-Transponder Reader (ASC-I1-Protocol), Release 2.1
A CCESSORIES
9
9.2 Plugs
Type
Part-No.
Female power plug, straight
KBV-GK
Female power plug, angled
KBV-WK
Shielded male plug, straight
(RS232)
KSRS-GM
Cable plug, ext. sensor, metal
KS-SENS1
Cable plug, ext. output, metal
KS-LED1
Picture
9.3 Cables
Type
Part-No.
Serial cable (cable length:
1000 mm / 39 1/3″)
RSK9-10
Power supply cable (cable
length: 1000 mm / 39 1/3″)
KBV24-10
Picture
RS232-Transponder Reader (ASC-I1-Protocol), Release 2.1
77
9 A CCESSORIES
9.4 Power Supply
Type
Power supply 1.5A (IN:
110/230V OUT: 24VDC)
78
Part-No.
Picture
SVG1.5
RS232-Transponder Reader (ASC-I1-Protocol), Release 2.1