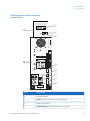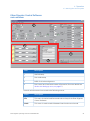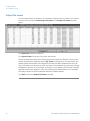
1
Ettan™ Digester
Operating Instructions
Original instructions
Page intentionally left blank
Table of Contents
Table of Contents
1
Introduction ..........................................................................................................
1.1
1.2
1.3
1.4
1.5
5
Important user information .............................................................................................................
Regulatory information ......................................................................................................................
Instrument ...............................................................................................................................................
Control software ....................................................................................................................................
User documentation ...........................................................................................................................
6
8
11
17
18
Safety instructions ...............................................................................................
19
2.1
2.2
2.3
2.4
2.5
Safety instructions ..............................................................................................................................
Labels .........................................................................................................................................................
Emergency procedures ......................................................................................................................
Recycling information .........................................................................................................................
Declaration of Hazardous Substances (DoHS) ........................................................................
20
27
29
30
31
Installation ............................................................................................................
34
3.1
3.2
3.3
3.4
3.5
3.6
3.7
3.8
Site requirements ..................................................................................................................................
Unpacking ................................................................................................................................................
Transport ..................................................................................................................................................
Reinstalling the Ettan Digester .......................................................................................................
Connections ............................................................................................................................................
Hardware alignment ...........................................................................................................................
Reinstalling the Ettan Digester Control Software ..................................................................
Spare parts and accessories ...........................................................................................................
35
36
37
39
40
42
48
49
Operation ..............................................................................................................
50
4.1
4.2
4.3
4.4
4.5
4.6
4.7
4.8
4.9
Operation overview .............................................................................................................................
Starting the instrument ......................................................................................................................
Starting the control system .............................................................................................................
Setting up a run .....................................................................................................................................
Editing a method ...................................................................................................................................
Preparations before start ..................................................................................................................
Performing a run ...................................................................................................................................
Procedures after a run .......................................................................................................................
Software tools ........................................................................................................................................
51
52
53
57
59
66
70
74
75
Maintenance .........................................................................................................
77
5.1
5.2
5.3
Service .......................................................................................................................................................
Replacement procedures ..................................................................................................................
Cleaning before planned service ...................................................................................................
78
81
86
6
Troubleshooting ...................................................................................................
87
7
Reference information ........................................................................................
93
7.1
94
2
3
4
5
Health and Safety Declaration Form ...........................................................................................
Ettan Digester Operating Instructions 28964985 AB
3
Table of Contents
Index .......................................................................................................................
4
96
Ettan Digester Operating Instructions 28964985 AB
1 Introduction
1
Introduction
Purpose of this manual
The Operating Instructions provide you with the instructions needed to install, operate
and maintain the product in a safe way.
Prerequisites
In order to operate Ettan Digester safely and according to the intended purpose the
following prerequisites must be met:
•
You should be acquainted with the use of general laboratory equipment and with
handling of biological materials.
•
You should understand the concepts of electrophoresis.
•
You must read the Safety Instructions in Chapter 2 of these Operating Instructions.
•
The system should be installed according to the instructions in Chapter 3 of these
Operating Instructions.
In this chapter
This chapter contains important user information and a general description of Ettan
Digester and its intended use.
Section
See page
1.1 Important user information
6
1.2 Regulatory information
8
1.3 Instrument
11
1.4 Control software
17
1.5 User documentation
18
Ettan Digester Operating Instructions 28964985 AB
5
1 Introduction
1.1 Important user information
1.1
Important user information
Read this before operating the
product
All users must read the entire Operating Instructions before installing, operating or
maintaining the product.
Always keep the Operating Instructions at hand when operating the product.
Do not operate the product in any other way than described in the user documentation.
If you do, you may be exposed to hazards that can lead to personal injury and you may
cause damage to the equipment.
Intended use
Ettan Digester is designed to digest whole proteins in polyacrylamide gel pieces, then
extract the resultant peptides prior to analysis by MALDI-TOF mass spectrometry.
Ettan Digester is intended for research use only, and shall not be used in any clinical
procedures, or for diagnostic purposes.
Safety notices
This user documentation contains safety notices (WARNING, CAUTION, and NOTICE)
concerning the safe use of the product. See definitions below.
WARNING
WARNING indicates a hazardous situation which, if not avoided,
could result in death or serious injury. It is important not to proceed
until all stated conditions are met and clearly understood.
CAUTION
CAUTION indicates a hazardous situation which, if not avoided,
could result in minor or moderate injury. It is important not to proceed until all stated conditions are met and clearly understood.
6
Ettan Digester Operating Instructions 28964985 AB
1 Introduction
1.1 Important user information
NOTICE
NOTICE indicates instructions that must be followed to avoid
damage to the product or other equipment.
Notes and tips
Note:
A note is used to indicate information that is important for trouble-free and
optimal use of the product.
Tip:
A tip contains useful information that can improve or optimize your procedures.
Typographical conventions
Software items are identified in the text by bold italic text. A colon separates menu levels,
thus File:Open refers to the Open command in the File menu.
Hardware items are identified in the text by bold text (for example, Power).
Ettan Digester Operating Instructions 28964985 AB
7
1 Introduction
1.2 Regulatory information
1.2
Regulatory information
This section lists the directives and standards that are fulfilled by Ettan Digester.
Manufacturing information
The table below summarizes the required manufacturing information. For further information, see the EC Declaration of Conformity (DoC) document.
Requirement
Content
Name and address of manufacturer
GE Healthcare Bio-Sciences AB,
Björkgatan 30, SE 751 84 Uppsala,
Sweden
Conformity with EU Directives
This product complies with the European directives listed in the table, by fulfilling the
corresponding harmonized standards.
A copy of the EC Declaration of Conformity is available on request.
Directive
Title
2006/42/EC
Machinery Directive (MD)
2004/108/EC
Electromagnetic Compatibility (EMC) Directive
2006/95/EC
Low Voltage Directive (LVD)
International standards
8
Standard
Description
Notes
EN 61010-1, IEC
61010-1, UL 61010-1,
CAN/CSA-C22.2 No.
61010-1
Safety requirements for electrical
equipment for measurement, control
and laboratory use
EN 61326-1
EN 61326-1 EMC emissions and immunity requirements for electrical equipment
measurement, control and laboratory
use
Harmonized with
2004/108/EC
Ettan Digester Operating Instructions 28964985 AB
1 Introduction
1.2 Regulatory information
Standard
Description
Notes
EN-ISO 12100
Safety of machinery - General principles
for design - Risk assessment and risk
reduction
Harmonized with
2006/42/EC
FCC statement
Ettan Digester complies with FCC 47 CFR Part 15b.
Note:
This equipment has been tested and found to comply with the limits for a Class
A digital device, pursuant to part 15 of the FCC Rules. These limits are designed
to provide reasonable protection against harmful interference when the
equipment is operated in a commercial environment. This equipment generates,
uses and can radiate radio frequency energy and, if not installed and used in
accordance with the instruction manual, may cause harmful interference to
radio communications. Operation of this equipment in a residential area is
likely to cause harmful interference in which case the user will be required to
correct the interference at his own expense.
CE marking
The CE marking and the corresponding EC Declaration of Conformity is valid for the instrument when it is:
•
used as a stand-alone unit, or
•
connected to other products recommended or described in the user documentation,
and
•
used in the same state as it was delivered from GE, except for alterations described
in the user documentation.
Ettan Digester Operating Instructions 28964985 AB
9
1 Introduction
1.2 Regulatory information
Regulatory compliance of
connected equipment
Any equipment connected to Ettan Digester should meet the safety requirements of EN
61010-1/IEC61010-1 or relevant harmonized standards and should be installed and
used according to the manufacturer's instructions. Within the European Union, connected
equipment must be CE-marked.
10
Ettan Digester Operating Instructions 28964985 AB
1 Introduction
1.3 Instrument
1.3
Instrument
About this chapter
This chapter contains a general description of Ettan Digester.
General description
The Ettan Digester instrument is designed to digest whole proteins in polyacrylamide
gel pieces, then extract the resultant peptides prior to analysis by MALDI-TOF mass
spectrometry. When used in conjunction with Ettan Spot Picker, the samples can be
tracked (in a microplate) from spot excision through the digestion process. Samples are
processed in 96-well microplates. Up to 4 microplates (384 samples) can be simultaneously digested.
System components
The Ettan Digester system comprises the following:
•
The Ettan Digester instrument:
-
8-needle Liquid handler
-
8-channel valve
•
Ettan Digester Control Software
•
PC
•
Protective hood (optional)
Ettan Digester technique
Ettan Digester is a robotic system designed to prepare gel plugs for enzymatic digestion
of proteins and subsequent extraction of peptides. The instrument has a sample needles
head that can move in the X, Y and Z directions.
The sample needles head is connected to an 8-channel multi-probe dilutor. An 8-channel
valve with a common outlet is used to select the different liquid solvents.
The rinse station has two positions for rinsing; one for shallow rinsing of the needles,
and one for deep rinsing. The shallow rinse station is used for all rinse procedures except
the rinse following after enzyme dispense.
Ettan Digester Operating Instructions 28964985 AB
11
1 Introduction
1.3 Instrument
System description
11
10
9
1
8
7
6
5
2
4
3
12
Part
Description
Part
Description
1
Front panel
7
X-arm
2
Multi-probe dilutor
8
Rinse station
3
Base plate
9
Sample needles head
4
Y-arm
10
Z-arm
5
Microplates
11
8-channel valve
6
Enzyme container
Ettan Digester Operating Instructions 28964985 AB
1 Introduction
1.3 Instrument
Front panel
Part
Description
1
Start button
2
Power light indicator
3
LED display
4
Stop button
Indicators on the front panel
Indicator
Color
Function
Power (unmarked)
green
Lights when mains power is connected
to the instrument and the Power switch
on the rear panel is on (in the I position).
Start
yellow
Lights when the Start button is pressed
to home the picker head.
LED display
yellow text
Shows the current status of the Ettan
Digester and any error codes as they are
encountered.
Ettan Digester Operating Instructions 28964985 AB
13
1 Introduction
1.3 Instrument
Buttons on the front panel
Button
Function
Start
When the Start button is pressed, the multiple probe head moves
to home position. The yellow LED lights as long as the button is
pressed.
The Start button can be used to home the multiple probe head
when the Liquid handler is first powered up or when the motors for
the multiple probe head have been relaxed.
Stop
When this button is touched, the instrument immediately ceases
movement and all motors are de-energized.
When the Stop button is pressed, the yellow LED in the Start button
is turned off.
Note that the Stop button is very sensitive, do not touch it unnecessarily during a run.
14
Ettan Digester Operating Instructions 28964985 AB
1 Introduction
1.3 Instrument
Electrical and communication
connections
1
A
0449
2
3
250
J
B
4
5
6
7
8
Part
Description
A
8-channel valve
1
GSIOC port for connection to Liquid handler
2
Power inlet, 24V DC
3
ROTATE/HOME (Contact Connection) - not used
Ettan Digester Operating Instructions 28964985 AB
15
1 Introduction
1.3 Instrument
Part
Description
B
Liquid handler
4
GSIOC port for connection to 8-channel valve
5
Mains fuse drawer
6
Power switch
7
RS-232 port for connection to PC
8
Power inlet
Connecting the PC
Connect the supplied communication cable between the RS-232 connector on the Liquid
handler and the COM1 port on the PC.
Communication settings label
Check that the switches SW1 and SW2 are set as shown below.
Switch
Label
Value
2
SW1
Unit ID = 22
SW2
Baud rate = 19200
6
16
Mode = GSIOC Master
Ettan Digester Operating Instructions 28964985 AB
1 Introduction
1.4 Control software
1.4
Control software
Ettan Digester Control Software is a complete software for control and supervision of
Ettan Digester. The software runs under Microsoft® Windows® operating system.
For more information about Ettan Digester Control Software, refer to Ettan Digester
Instrument Handbook or Ettan Digester User Manual.
Ettan Digester Operating Instructions 28964985 AB
17
1 Introduction
1.5 User documentation
1.5
18
User documentation
User documentation
Content
Ettan Digester Operating
Instructions (this manual)
All instructions needed to operate the instrument in a
safe way, including brief system description, installation,
and maintenance.
Ettan Digester User
Manual
Detailed system description. Comprehensive user instructions, method creation, operation, advanced maintenance and troubleshooting.
Ettan Digester Instrument
Handbook
Provides technical information and basic operating instructions for the system. In addition, maintenance
schedules, instructions for troubleshooting and user
maintenance are included.
EC Declaration of Conformity for Ettan Digester
Document whereby the manufacturer ensures that the
product satisfies and is in conformity with the essential
requirements of the applicable directives.
Ettan Digester Operating Instructions 28964985 AB
2 Safety instructions
2
Safety instructions
About this chapter
This chapter describes safety compliance, safety labels, general safety precautions,
emergency procedures, power failure and recycling of Ettan Digester system.
In this chapter
Section
See page
2.1 Safety instructions
20
2.2 Labels
27
2.3 Emergency procedures
29
2.4 Recycling information
30
2.5 Declaration of Hazardous Substances (DoHS)
31
Ettan Digester Operating Instructions 28964985 AB
19
2 Safety instructions
2.1 Safety instructions
2.1
Safety instructions
Introduction
Ettan Digester system is powered by mains voltage and handles liquids that may be
hazardous. Before installing, operating or maintaining the system, you must be aware
of the hazards described in this manual. Follow the instructions provided to avoid personal injury or damage to the equipment.
The safety precautions in this section are grouped into the following categories:
•
General precautions
•
Using flammable liquids
•
Personal protection
•
Installing and moving the instrument
•
System operation
•
Maintenance
General precautions
WARNING
Do not operate the product in any other way than described in the
Ettan Digester user documentation.
WARNING
Only properly trained personnel may perform operation and user
maintenance of the product.
WARNING
Do not use any accessories not supplied or recommended by GE.
20
Ettan Digester Operating Instructions 28964985 AB
2 Safety instructions
2.1 Safety instructions
WARNING
Do not use Ettan Digester if it is not working properly, or if it has
suffered any damage, for example:
•
damage to the power cord or its plug
•
damage caused by dropping the equipment
•
damage caused by splashing liquid onto it
WARNING
The instrument covers must not be opened by the user. The instrument contains electrical circuits which can give a lethal electric
shock. Service and planned maintenance shall be performed by
personnel authorized by GE.
CAUTION
Waste tubes and containers must be secured and sealed to prevent
accidental spillage.
Using flammable liquids
WARNING
Fire Hazard. Before starting the system, make sure that there is
no leakage.
WARNING
A fume hood or similar ventilation system shall be installed when
flammable or noxious substances are used.
Ettan Digester Operating Instructions 28964985 AB
21
2 Safety instructions
2.1 Safety instructions
Personal protection
WARNING
Always use appropriate Personal Protective Equipment (PPE) during
operation and maintenance of this product.
WARNING
Hazardous substances and biological agents. When using hazardous chemical and biological agents, take all suitable protective
measures, such as wearing protective glasses and gloves resistant
to the substances used. Follow local and/or national regulations
for safe operation and maintenance of Ettan Digester.
WARNING
Spread of biological agents. The operator has to take all necessary
actions to avoid spreading hazardous biological agents. The facility
must comply with the national code of practice for biosafety.
Installing and moving the
instrument
WARNING
Supply voltage. Before connecting the power cord, make sure that
the supply voltage at the wall outlet corresponds to the marking
on the instrument.
WARNING
Protective ground. The product must always be connected to a
grounded power outlet.
22
Ettan Digester Operating Instructions 28964985 AB
2 Safety instructions
2.1 Safety instructions
WARNING
Power cord. Only use power cords with approved plugs delivered
or approved by GE.
WARNING
Access to power switch and power cord with plug. Do not block
access to the power switch and power cord. The power switch
must always be easy to access. The power cord with plug must
always be easy to disconnect.
CAUTION
Heavy object. Ettan Digester weighs approx. 40 Kg. Two people
are required to lift the instrument.
NOTICE
Do not use the X- or Y-arms as handles when moving the Ettan
Digester. Always lift the instrument from the base.
NOTICE
If an Ettan Digester configured for 100–120 V is connected to
220–240 V, the instrument can be severely damaged. Make sure
that the correct fuse drawer for the voltage range is installed.
NOTICE
Any computer used with the equipment must comply with IEC
60950 and be installed and used according to the manufacturer's
instructions.
Ettan Digester Operating Instructions 28964985 AB
23
2 Safety instructions
2.1 Safety instructions
System operation
WARNING
Hazardous biological agents during run. When using hazardous
biological agents, run System CIP and Column CIP to flush the
entire system tubing with bacteriostatic solution (e.g. NaOH) followed by a neutral buffer and finally distilled water, before service
and maintenance.
WARNING
Avoid spilling liquids on the body of the instrument. If large volumes
of liquid have penetrated the casing of the instrument and come
into contact with the electrical components, immediately switch
off the instrument and contact an authorized service technician.
WARNING
Over-pressure. Never block the outlet tubing with, for instance,
stop plugs, since this will create over-pressure and might result in
injury.
WARNING
Use ONLY Tubing kits supplied by GE to ensure that the pressure
specifications of the tubing are fulfilled.
WARNING
Under no circumstances should you place hands or fingers underneath the sample probe during instrument operation. The sample
probe has the capacity to puncture skin.
CAUTION
The needles will move over the entire working area of the Liquid
handler. Remove all loose items placed on the Ettan Digester unit.
24
Ettan Digester Operating Instructions 28964985 AB
2 Safety instructions
2.1 Safety instructions
CAUTION
Moving parts. When Ettan Digester begins the homing process,
the needles, syringes and X/Y/Z arm will all move. Make sure that
you are clear of all these moving parts to avoid any risk of injury.
NOTICE
Always verify all positions (plates, rinse stations, enzyme holder)
on the instrument using System Setup after performing the Home
phase operation.
NOTICE
Be careful when moving the sample needles. If the needles hit an
obstacle, the motor will shut off immediately to avoid serious
damage to the instrument. However, the needles themselves may
become damaged if they impact on an obstacle.
Maintenance
WARNING
Do not remove the main cover of the instrument. There are no userserviceable components inside, and you can be exposed to high
voltage.
WARNING
Disconnect power. Always disconnect power from the instrument
before replacing fuses.
WARNING
For continued protection from fire hazard, replace only with same
type and rating of fuse.
Ettan Digester Operating Instructions 28964985 AB
25
2 Safety instructions
2.1 Safety instructions
WARNING
Only spare parts and accessories that are approved or supplied
by GE may be used for maintaining or servicing the product.
WARNING
Hazardous chemicals during run. When using hazardous chemicals, flush the entire system tubing with distilled water, before service and maintenance.
CAUTION
To avoid injury while changing any parts on the pump unit, always
press the Stop button on the instrument front panel and disconnect
from the main power after lowering the syringe. When work is
complete, re-connect to the power supply and click the Initialize
instrument button to home the syringe.
CAUTION
Always shut down Ettan Digester and the PC before disconnecting
or connecting cables.
NOTICE
Cleaning. Keep the instrument dry and clean. Wipe regularly with
a soft damp tissue and, if necessary, a mild cleaning agent. Let the
instrument dry completely before use.
26
Ettan Digester Operating Instructions 28964985 AB
2 Safety instructions
2.2 Labels
2.2
Labels
This section describes the safety labels and labels concerning hazardous substances
that are attached to the Ettan Digester system. For information about marking of the
computer equipment, refer to the manufacturer’s instructions.
Labels on the instrument
The illustration below shows an example of the identification label that is attached to
the Ettan Digester instrument.
XX-XXXX-XX
Code No:
Serial No
Mfg Year:
XXXXXXXX
XXXXXXX
2009
Ettan xxxx
Voltage:
Frequency:
Power max:
Fuse:
N12406
Made in Sweden GE Healthcare Bio-Sciences AB
751 84 Uppsala Sweden
28952336aa
Symbols used in safety labels
Label
Meaning
Warning! Read the user documentation before using the system. Do
not open any covers or replace parts unless specifically stated in the
user documentation.
The system complies with the requirements for electromagnetic compliance (EMC) in Australia and New Zealand.
Risk for body parts getting caught between two parts of the system.
Care must be taken to avoid injury.
Ettan Digester Operating Instructions 28964985 AB
27
2 Safety instructions
2.2 Labels
Label
Meaning
The system complies with applicable European directives.
Labels concerning hazardous
substances
Label
Meaning
This symbol indicates that the waste of electrical and electronic equipment must not be disposed as unsorted municipal waste and must be
collected separately. Please contact an authorized representative of
the manufacturer for information concerning the decommissioning of
equipment.
This symbol indicates that the product contains hazardous materials in
excess of the limits established by the Chinese standard SJ/ T113632006 Requirements for Concentration Limits for Certain Hazardous
Substances in Electronics.
28
Ettan Digester Operating Instructions 28964985 AB
2 Safety instructions
2.3 Emergency procedures
2.3
Emergency procedures
This section describes how to do an emergency shutdown of the Ettan Digester system.
The section also describes the result in the event of power failure.
Emergency procedures
In an emergency situation, do as follows to stop the run:
Step
Action
1
In the event of an emergency, press the Stop button on the Ettan Digester
front panel. The instrument immediately ceases movement and all motors
are de-energized.
2
If required, press the power switch to the 0 position.
3
Turn off the 8-channel valve by pulling the power plug from the power
socket/outlet.
Power failure
Power failure to...
will result in...
Ettan Digester
•
The run is interrupted immediately, in an undefined state.
•
The data collected up to the time of the power failure is
available in Ettan Digester Control Software
•
The Ettan Digester Control Software computer shuts down
in an undefined state.
•
The run is interrupted immediately, in an undefined state.
Computer
The result of a power failure depends on which unit that is affected.
Restart procedure
In the event of system shutdown due to power failure, emergency stop or process interruption, malfunctions must be rectified before the Ettan Digester is restarted.
To restart the Ettan Digester, follow the start-up instructions in Section 4.2 Starting the
instrument, on page 52.
Ettan Digester Operating Instructions 28964985 AB
29
2 Safety instructions
2.4 Recycling information
2.4
Recycling information
The equipment shall be decontaminated before decommissioning and all local regulations
shall be followed with regard to scrapping of the equipment.
Disposal, general instructions
When taking Ettan Digester out of service, the different materials must be separated
and recycled according to national and local environmental regulations.
Recycling of hazardous
substances
Ettan Digester contains hazardous substances. Detailed information is available from
your GE representative.
Disposal of electrical
components
Waste of electrical and electronic equipment must not be disposed as unsorted municipal
waste and must be collected separately. Please contact an authorized representative
of the manufacturer for information concerning the decommissioning of equipment.
30
Ettan Digester Operating Instructions 28964985 AB
2 Safety instructions
2.5 Declaration of Hazardous Substances (DoHS)
2.5
Declaration of Hazardous Substances (DoHS)
Introduction
The following product pollution control information is provided according to SJ/T113642006 Marking for Control of Pollution caused by Electronic Information Products.
根据SJ/T11364-2006《电子信息产品污染控制标识要求》特提供如下有关污染 控制
方面的信息
Symbols used in pollution control
label
电子信息产品污染控制标志说明
Label
Meaning
This symbol indicates the product contains hazardous materials in excess of the limits established by the Chinese standard SJ/T11363-2006
Requirements for Concentration Limits for Certain Hazardous Substances in Electronic Information Products. The number in the symbol
is the Environment-friendly Use Period (EFUP), which indicates the period
during which the toxic or hazardous substances or elements contained
in electronic information products will not leak or mutate under normal
operating conditions so that the use of such electronic information
products will not result in any severe environmental pollution, any
bodily injury or damage to any assets. The unit of the period is “Year”.
In order to maintain the declared EFUP, the product shall be operated
normally according to the instructions and environmental conditions
as defined in the product manual, and periodic maintenance schedules
specified in Product Maintenance Procedures shall be followed strictly.
Consumables or certain parts may have their own label with an EFUP
value less than the product. Periodic replacement of those consumables
or parts to maintain the declared EFUP shall be done in accordance
with the Product Maintenance Procedures.
This product must not be disposed of as unsorted municipal waste,
and must be collected separately and handled properly after decommissioning.
Ettan Digester Operating Instructions 28964985 AB
31
2 Safety instructions
2.5 Declaration of Hazardous Substances (DoHS)
Label
Meaning
该标志表明本产品含有超过SJ/T11363-2006《电子信息产品中有毒
有害物质的限 量要求》中限量的有毒有害物质。标志中的数字为本
产品的环保使用期,表明本 产品在正常使用的条件下,有毒有害物
质不会发生外泄或突变,用户使用本产品 不会对环境造成严重污染
或对其人身、财产造成严重损害的期限。单位为年。
为保证所申明的环保使用期限,应按产品手册中所规定的环境条件
和方法进行正 常使用,并严格遵守产品维修手册中规定的期维修和
保养要求。
产品中的消耗件和某些零部件可能有其单独的环保使用期限标志,
并且其环保使 用期限有可能比整个产品本身的环保使用期限短。应
到期按产品维修程序更换那 些消耗件和零部件,以保证所申明的整
个产品的环保使用期限。
本产品在使用寿命结束时不可作为普通生活垃圾处理,应被单独收
集妥善处理
List of hazardous substances and
their concentrations
产品中有毒有害物质或元素的名称及含量
Indication for each major part if substance exceeds limit
Value
Meaning
O
Indicates that this toxic or hazardous substance contained in all of the
homogeneous materials for this part is below the limit requirement in
SJ/T11363-2006.
表示该有毒有害物质在该部件所有均质材料中的含量均在SJ/T113632006 标准规定的限量要 求以下
X
Indicates that this toxic or hazardous substance contained in at least
one of the homogeneous materials used for this part is above the limit
requirement in SJ/T11363-2006.
•
Data listed in the table represents best information available at the
time of publication
表示该有毒有害物质至少在该部件的某一均质材料中的含量超出
SJ/T11363-2006 标准规定的
限量要求
•
32
此表所列数据为发布时所能获得的最佳信息
Ettan Digester Operating Instructions 28964985 AB
2 Safety instructions
2.5 Declaration of Hazardous Substances (DoHS)
List of hazardous substances
Component
name
Hazardous substance
有毒有害物质或元素
部件名称
Ettan Digester 1
1
Pb
Hg
Cd
Cr6+
PBB
PBDE
铅
汞
镉
六价铬
多溴联苯
多溴二苯醚
X
O
O
O
O
O
The product has not been tested as per the Chinese standard SJ/T11363-2006 Requirements
for Concentration Limits for Certain Hazardous Substances in Electronic Information Product.
Ettan Digester Operating Instructions 28964985 AB
33
3 Installation
3
Installation
The Ettan Digester system is installed and tested by GE service personnel after delivery.
This chapter provides instructions for reinstallation, if you should need to move the instrument to another location.
Any equipment connected to Ettan Digester must fulfill applicable standards and local
regulations.
For detailed information on installation, see Ettan Digester Instrument Handbook.
In this chapter
Section
34
See page
3.1 Site requirements
35
3.2 Unpacking
36
3.3 Transport
37
3.4 Reinstalling the Ettan Digester
39
3.5 Connections
40
3.6 Hardware alignment
42
3.7 Reinstalling the Ettan Digester Control Software
48
3.8 Spare parts and accessories
49
Ettan Digester Operating Instructions 28964985 AB
3 Installation
3.1 Site requirements
3.1
Site requirements
Introduction
NOTICE
If an Ettan Digester configured for 100–120 V is connected to
220–240 V, the instrument can be severely damaged. Make sure
that the correct fuse drawer for the voltage range is installed.
Site requirements
Before installation or moving Ettan Digester, check that the new location fulfils the site
requirements listed below.
Parameter
Requirement
Electrical power
•
100-120 V~ ±10% 50/60 Hz, single phase
•
220-240 V~ ±10% 50/60 Hz, single phase
Ambient temperature
+15°C to +32°C
Placement
Place the instrument on a stable and level laboratory
bench.
Humidity
Maximum relative humidity 80% (non-condensing).
Location
Indoor use only.
Note:
Ensure easy access to the mains power switch on the rear panel of the instrument.
Ettan Digester Operating Instructions 28964985 AB
35
3 Installation
3.2 Unpacking
3.2
Unpacking
•
Check the equipment for damage before starting assembly and installation.
•
Document any damage and contact your local GE representative.
Remove straps and packing material and stand equipment upright before starting installation.
36
Ettan Digester Operating Instructions 28964985 AB
3 Installation
3.3 Transport
3.3
Transport
CAUTION
Heavy object. Ettan Digester weighs approx. 40 Kg. Two people
are required to lift the instrument.
NOTICE
Do not use the X- or Y-arms as handles when moving the Ettan
Digester. Always lift the instrument from the base.
Relocation
Follow the instructions below to move the system to another room:
Step
Action
1
Shut down the Ettan Digester and the PC.
2
Disconnect all cables.
3
To prevent mechanical damage, install the armlock securing the Y-arm, see
Installing the mechanical armlock, on page 38.
4
Carefully place the instrument, the PC and the monitor on a trolley.
5
Move the system to the new location.
The mechanical armlock
1
4
3
2
2
6
5
Ettan Digester Operating Instructions 28964985 AB
37
3 Installation
3.3 Transport
Part
Function
1
Armlock
2
Securing screws
3
Tensioning screw
4
Y-arm
Installing the mechanical
armlock
Follow the instructions below to install the armlock.
38
Step
Action
1
Mount the tensioning screw that immobilizes the Y-arm.
2
Mount the two securing screws that hold the armlock in place.
Ettan Digester Operating Instructions 28964985 AB
3 Installation
3.4 Reinstalling the Ettan Digester
3.4
Reinstalling the Ettan Digester
Place the instrument
Step
Action
1
Select a place for the Ettan Digester where it is possible to access the mains
power switch on Liquid handler.
2
Remove the armlock.
If you need to reinstall the Ettan Digester Control Software, see Section 3.7 Reinstalling
the Ettan Digester Control Software, on page 48.
Power-up check
To verify the function of the Ettan Digester at the new location:
Step
Action
1
Switch on the mains power at the rear of Liquid handler and make sure that
the 8-channel valve is receiving power through a dedicated 24V DC adapter.
2
Check that the Power indicator lights up.
3
Switch on the mains power to the PC.
4
To start the Ettan Digester Control Software, select All Programs:GE
Healthcare:Ettan Digester Control Software from the Windows Start menu.
5
Click on OK in the Homing screen to start the homing procedure, where the
Ettan Digester Control Software needles move to home position.
6
From the service window under Tools/Service, run the Home Phase.
Shutdown
Follow the instructions below to shut down Ettan Digester and Ettan Digester Control
Software.
Step
Action
1
Close down the Ettan Digester Control Software by choosing File:Exit.
2
Switch off mains power on the Liquid handler.
Ettan Digester Operating Instructions 28964985 AB
39
3 Installation
3.5 Connections
3.5
Connections
Communication
Connect the Ettan Digester according to the electrical drawings in Electrical and communication connections, on page 15.
Ensure that Ettan Digester Control Software is installed on the computer. For further information on software installation, see Section 3.7 Reinstalling the Ettan Digester Control
Software, on page 48.
NOTICE
Any computer used with the equipment must comply with IEC
60950 and be installed and used according to the manufacturer's
instructions.
Electrical power
Connect the power cord to a grounded power outlet specified in Section 3.1 Site requirements, on page 35.
During the original installation, the Ettan Digester is configured for one voltage range
by installing the appropriate fuse drawer. Before reinstalling the instrument, make sure
that the correct fuse drawer is installed for the mains voltage at the new location. If you
need to change the mains voltage configuration, see instructions in Replacing the mains
fuses, on page 83 for installing mains fuses.
Hardware setup
Before using Ettan Digester for the first time, the system setup must be verified. The
system setup is performed at two levels.
1
Hardware alignment, see Section 3.6 Hardware alignment, on page 42.
2
System setup from Ettan Digester Control Software, Section 4.3 Starting the control
system, on page 53.
The system setup should also be verified:
40
•
If any moving parts (such as the probe needles) have been replaced.
•
If a new version of Ettan Digester Control Software has been installed.
•
After a power failure.
Ettan Digester Operating Instructions 28964985 AB
3 Installation
3.5 Connections
•
If Ettan Digester has been moved to a new location.
•
After running the Home phase tool.
Ettan Digester Operating Instructions 28964985 AB
41
3 Installation
3.6 Hardware alignment
3.6
Hardware alignment
At first the hardware has to be aligned, i.e. the base plate has to be aligned with the X/
Y-arm, and the sample needles have to be aligned with the base plate. These steps are
performed before the instrument power is turned on and the Ettan Digester Control
Software is started.
Base plate alignment overview
The base plate rests on three adjustable supports. The leftmost support (marked A in
the following figure) shall not be adjusted to ensure that the height of the base plate is
not altered. The height of the supports can be adjusted by turning the thumb-wheel after
loosening the screw in the center of the support.
Main parts of the base plate assembly
The base plate with level adjustment supports A-C, the ‘tilt axis’, and the calibration tool
positions marked:
4
1
C
2
3
42
5
+
+
A
B
+
Part
Function
1
Position for calibration tool (3 positions) (+)
2
Microplate groove (8 positions)
3
Adjustment support A
4
Base plate
5
Tilt axis
Ettan Digester Operating Instructions 28964985 AB
3 Installation
3.6 Hardware alignment
The calibration tool assembly
Part
Function
1
Calibration tool
2
Calibration tool holder
3
Calibration rod
4
Locking screw
5
Base plate
6
Thumb-wheel
Base plate alignment procedure
The base plate alignment procedure consists of 2 steps:
•
Calibrating the height of the Z-arm.
•
Adjusting the height of support B and C.
Ettan Digester Operating Instructions 28964985 AB
43
3 Installation
3.6 Hardware alignment
Calibrating the height of the Z-arm
Step
Action
1
Make sure that the mains power is turned off.
2
Loosen the screws that lock adjustment supports A and B.
3
Move the Z-arm so that the calibration tool holder is above and approx. 5
cm to the left of adjustment support A.
4
Insert the calibration tool in its holder and loosen the screw so that the calibration rod can move freely and rests on the base plate at the 'tilt axis' Main
parts of the base plate assembly on Base plate alignment overview, on
page 42.
Note:
The flat end of the calibration rod shall be towards the base plate surface.
44
5
Secure the screw again to establish the height of the Z-arm above the base
plate. The distance to the base plate is now given by the locked calibration
tool is used when adjusting support B and C.
6
Remove the calibration tool from the holder.
Ettan Digester Operating Instructions 28964985 AB
3 Installation
3.6 Hardware alignment
Adjusting the height of support B and C
Step
Action
1
Move the Z-arm to a position close to adjustment support B along the 'tilt
axis'.
2
Insert the calibration tool again and check that its tip is somewhere along
the 'tilt axis'.
3
Turn the thumb-wheel on support B so that the calibration tool rests simultaneously with its tip on the base plate and with its brass bushing on the
calibration tool holder on the Z-arm.
4
Remove the calibration tool from the holder.
5
Move the Z-arm so that the locking screw on support B can be tightened.
6
Move the Z-arm to the position on the microplate groove in front of the
support C, see Base plate alignment overview, on page 42, and insert the
calibration tool again.
7
Adjust the height of support C.
8
Remove the calibration tool and tighten the screw of support C.
Ettan Digester Operating Instructions 28964985 AB
45
3 Installation
3.6 Hardware alignment
Needle height alignment
The second step in the hardware setup is to align the individual sample needles to the
previously aligned base plate. Each needle has its own retaining screw in the needle
head and can therefore be adjusted individually.
1
2
3
Part
Function
1
Allen key, 1.5 mm
2
Needle head
3
Z-arm
Needle alignment procedure
46
Step
Action
1
Make sure that the instrument power is turned off.
2
Loosen the eight hex screws that locks the needles (see Needle height
alignment, on page 46).
Ettan Digester Operating Instructions 28964985 AB
3 Installation
3.6 Hardware alignment
Step
Action
3
Manually move the Z-arm to a position of one of the microplate grooves on
the base plate.
4
Lower the needle head so that the needles touch the base plate lightly, see
figure below.
Note:
The third needle from the right needs adjustment.
5
Lock all the needles in position by tightening the hex-screws. Make sure that
all of them are still touching the base plate.
6
Raise the needle head and move the X/Y-arm to the home position.
The tips of the needles are now aligned to the base plate.
The instrument power can now be turned on, and the remaining steps of system setup
can be performed from within the instrument control software.
Ettan Digester Operating Instructions 28964985 AB
47
3 Installation
3.7 Reinstalling the Ettan Digester Control Software
3.7
Reinstalling the Ettan Digester Control Software
The instrument is shipped with all necessary software installed. If Ettan Digester Control
Software has to be re-installed (for example after a hard disk failure), follow the steps
below.
Installation procedure
Perform the procedures in this order:
•
Installing Instrument software
•
Installing Ettan Digester Control Software
For more information, refer to Ettan Digester Instrument Handbook.
48
Ettan Digester Operating Instructions 28964985 AB
3 Installation
3.8 Spare parts and accessories
3.8
Spare parts and accessories
For correct up to date information on spare parts and accessories visit:
www.gelifesciences.com/2DE
Ettan Digester Operating Instructions 28964985 AB
49
4 Operation
4
Operation
About this chapter
This chapter contains information on how to operate Ettan Digester.
WARNING
For relevant safety warnings and cautions, refer to Section 2.1
Safety instructions , on page 20.
In this chapter
Section
50
See page
4.1 Operation overview
51
4.2 Starting the instrument
52
4.3 Starting the control system
53
4.4 Setting up a run
57
4.5 Editing a method
59
4.6 Preparations before start
66
4.7 Performing a run
70
4.8 Procedures after a run
74
4.9 Software tools
75
Ettan Digester Operating Instructions 28964985 AB
4 Operation
4.1 Operation overview
4.1
Operation overview
The typical workflow in Ettan Digester, after turning on the system, can be divided into
the following steps:
Step
Action
1
Assigning the valve positions
2
Choosing method parameters
3
Preparing the system before start
4
Choosing type of run mode
5
Performing the digestion run
Refer to Ettan Digester User Manual for digestion protocols.
Ettan Digester Operating Instructions 28964985 AB
51
4 Operation
4.2 Starting the instrument
4.2
Starting the instrument
WARNING
Under no circumstances should you place hands or fingers underneath the sample probe during instrument operation. The sample
probe has the capacity to puncture skin.
52
Step
Action
1
Turn on the 8-needle Liquid handler by pressing the Power switch to the I
position.
2
Turn on the 8-channel valve by inserting the power plug into the power
socket/outlet.
Ettan Digester Operating Instructions 28964985 AB
4 Operation
4.3 Starting the control system
4.3
Starting the control system
Step
Action
1
Turn on the monitor, computer and optional printer according to the manufacturer’s instructions. Wait for the computer to start up.
2
Start the Ettan Digester Control Software from the Windows Start menu,
All Programs:GE Healthcare:Ettan Digester
Result:
•
A splash screen appears for a few seconds while the program is starting.
The splash screen shows the software version number as well as copyright information.
•
After the splash screen an instrument initialization dialog appears:
Ettan Digester Operating Instructions 28964985 AB
53
4 Operation
4.3 Starting the control system
Step
Action
3
Click OK to start the Homing procedure.
CAUTION
Moving parts. When Ettan Digester begins the homing
process, the needles, syringes and X/Y/Z arm will all
move. Make sure that you are clear of all these moving
parts to avoid any risk of injury.
Result:
1
2
3
54
Ettan Digester Control Software main window is shown with the default
method parameters loaded. For more information on default methods,
see Saving a method, on page 57.
Ettan Digester Operating Instructions 28964985 AB
4 Operation
4.3 Starting the control system
Ettan Digester Control Software
main window
1
2
4
3
Item
Description
1
Method setup
2
Run mode setup
3
Buffer line/valve assignment
4
Run control and instrument status information (for more details see
Section 4.4 Setting up a run, on page 57)
The main window menu bar contains the following menus:
Menu
Description
File
This menu is used to load/save methods and to quit the Ettan Digester
Control Software.
Mode
This menu is used to switch between batch and manual mode.
Ettan Digester Operating Instructions 28964985 AB
55
4 Operation
4.3 Starting the control system
Menu
Description
Setup
This menu contains only one item, System Setup, which opens the
System Setup window.
Tools
From this menu it is possible to view methods, output files, prime Ettan
Digester, show system information and perform basic maintenance
tasks.
About
This menu shows the splash screen and copyright information.
For detailed information about the main window menu bar, refer to Ettan Digester User
Manual.
56
Ettan Digester Operating Instructions 28964985 AB
4 Operation
4.4 Setting up a run
4.4
Setting up a run
Assigning the valve positions
All of the steps in the digestion process have a specific valve position that they use. The
buffer that flows from each valve position can be designated in the Valve Position Assignment area of the main window. This information is saved along with a method,
prompting the user to place buffer lines into the appropriate solutions.
Saving a method
Once a method has been defined in the main window, it may be saved, to be accessed
easily at a future date.
Step
Action
1
Choose File:Save Method.
Result: A Save dialog box appears.
2
Enter a suitable file name for the method. Click Save.
Result: The method is saved with a *.dig file extension.
Ettan Digester Operating Instructions 28964985 AB
57
4 Operation
4.4 Setting up a run
Saving a default method
It is possible to save the method on display in the main window as the default method.
This method will automatically be displayed in the main window the next time the Ettan
Digester Control Software is started.
Step
Action
1
Choose File:Save Method.
Result: A message box asks for confirmation to over-write the default method.
2
Click to confirm.
Result: The file is now automatically saved with the file name default.dig.
Opening a method
To open a previously saved method file follow the steps below:
Step
Action
1
Choose File:Save Method.
Result: An Open dialog box appears.
2
Locate the required method file. Click Open.
Result: The method appears in the main window.
58
Ettan Digester Operating Instructions 28964985 AB
4 Operation
4.5 Editing a method
4.5
Editing a method
The method that is displayed in the main window is the method that will be used when
the Run button is pressed. It is therefore important to ensure that the method is correct
before setting the instrument running.
There are a number of method steps that will run in the order shown in the table below.
It is possible to skip any number or combination of these steps during the method.
Method step
Description
Remove liquid
Removes a liquid left with the plug after spot
picking.
Wash 1, 2, 3
Destains and equilibrates the plug prior to enzyme
addition and digestion.
Dry
Waiting time to let the gel plug dry before digestion to enhance enzyme entry into the plug.
Digest
Sample
Enzyme
Trypsin added to the gel plug.
Add Buffer
Possibility to add more/different buffer.
Transfer
A sample of the digestion mix may be transferred
directly to extract plate and taken for analysis.
Step 1, 2, 3
Active extraction can be used to extract peptides
from gel plug. At any stage, sample may be removed from sample plate to extract plate to
analysis.
Transfer
Hold
There are also four Hold check boxes in the
method setup. When the method reaches a Hold
that has been checked, Ettan Digester will go into
an indefinite pause until the Continue button is
pressed.
Each step of the method run is explained in more detail in the following sections.
Remove liquid
This method step removes any liquid left in the microplates from spot picking.
Ettan Digester Operating Instructions 28964985 AB
59
4 Operation
4.5 Editing a method
Software
Description
command
Skip
Skips/includes the remove liquid step.
Valve Pos
Sets the valve position used as wash and hydraulic liquid when aspirating liquid from the wells.
Volume
Sets the volume to remove from each microplate well. Valid range is
0 to 350 μl.
Wash 1, 2 and 3
The wash steps are used primarily to destain the gel plugs. Each wash step may use a
different liquid and can be repeated up to 10 times. An optional Hold check box may be
selected to pause the instrument between the Remove Liquid and Wash step.
Software
Description
command
Skip
Skips/includes the wash step. Each step may be skipped/included
individually.
Note:
The step is skipped if the box is selected.
60
Cycles
Selects the number of cycles to perform the individual wash steps.
Volume
Selects the volume of wash liquid to dispense into each well.
Time
Selects the time to incubate the gel plug in the wash liquid before
removing it from the well.
Valve Pos
Selects which valve position to use when dispensing wash liquid.
Ettan Digester Operating Instructions 28964985 AB
4 Operation
4.5 Editing a method
Dry
This is the step after washing. An optional Hold check box may be selected to pause the
instrument between the Wash and Dry step.
This step is used for drying the gel plugs before adding enzyme. This step may be done
in one of two ways:
•
Using a liquid with high content of organic solvent (e.g. 100% Acetonitrile) as final
wash protocol and then leaving the microplates in situ on Ettan Digester and allowing
them to air dry. Typical drying time is 60 to 90 minutes depending on local temperature and humidity conditions (1 mm gel thickness)
•
Perform drying in external drying equipment, for example a vacuum centrifuge.
Software
Description
command
Skip
Skips/includes the dry step.
Note:
The step is skipped if the box is selected.
Time
Selects the time to wait for the gel plugs to dry. It is possible to abort
drying (by pressing the Continue button) if manual inspection of the
microplates shows that the gel plugs have been dried sufficiently.
Ettan Digester Operating Instructions 28964985 AB
61
4 Operation
4.5 Editing a method
Digest
This is the step after the drying step. An optional Hold check box may be selected to halt
the instrument between the Dry and Digest step.
In this step, enzyme is added to the gel plugs. If the enzyme is added in an inactive form,
it may be activated by adding an appropriate buffer. It is also possible to transfer all or
a portion of the digest solution from the sample plate to the extract plate.
Software
Description
command
Skip
Skips/includes the entire digest step.
Enzyme
Selects the volume of enzyme to add to each well. The enzyme may
be added in a buffer where the enzyme is active (such as 20 mM
ammonium bicarbonate for Trypsin) or in a buffer which keeps the
enzyme inactive (such as 1mM HCl).
Time
Selects the incubation time after adding enzyme to all wells. This is
most important when the enzyme is being added to the gel plugs in
a buffer that renders the enzyme inactive. The time set here is the
time that the gel plugs will have to fully rehydrate with the enzyme.
(Enzyme)
Valve Pos.
(Enzyme)
62
Selects the buffer liquid to use as hydraulic liquid when enzyme is
transferred from the enzyme container to the wells. If the enzyme is
being added to the gel plugs in an inactive form, then it is important
that the enzyme solution is not contaminated with an activating
buffer.
Ettan Digester Operating Instructions 28964985 AB
4 Operation
4.5 Editing a method
Software
Description
command
Add Buffer
Skips/includes additional buffer. If the enzyme has been added to
the gel plug in a solution where it is already activated, then there is
no need to add further activating buffer.
Note:
If this check box is selected, then buffer will be added to the gel plug.
Volume
Selects the volume of buffer liquid to add to each well.
(Add Buffer)
Valve Pos.
Selects which valve position to use when adding enzyme buffer.
(Add Buffer)
Time
Selects the incubation time for digestion.
(Add Buffer)
Transfer
Skips/includes transfer of digest from sample to extract plate.
Volume
Sets the volume of liquid to transfer from sample plate wells to extract
plate wells.
(Transfer)
Note:
If this check box is selected, then sample will be transferred to the extract microplate.
Valve Pos.
(Transfer)
Selects the hydraulic liquid when moving digest from the sample
plate to extract plate.
Ettan Digester Operating Instructions 28964985 AB
63
4 Operation
4.5 Editing a method
Sample transfer
This is last step. An optional Hold check box may be selected to pause the instrument
between the Digest and Sample Transfer step.
In this step, peptides are extracted from the gel plugs after the enzyme reaction. The
extraction process is performed in the sample plate. The resultant peptide solution can
then either be left in the sample plate or transferred to the extract plate.
Software
Description
command
Skip
Skips/includes the entire sample transfer step.
Cycles
Selects the number of times to repeat the entire sample transfer
process.
For the individual transfer steps, the following parameters may be specified:
Step 1, 2, 3
Skips/includes the step (each step 1, 2 and 3 may be skipped/ included
individually).
Note:
In this case, checking the check box will cause the step to be performed.
Volume
Selects the volume of buffer to add to the gel plug.
(Add)
Valve Pos.
64
Selects which buffer to add.
Ettan Digester Operating Instructions 28964985 AB
4 Operation
4.5 Editing a method
Software
Description
command
Time
Sets the incubation time after adding liquid.
Mix Cycles
Selects a number of mix cycles. Along with the mix volume setting,
this is used to mix the combination of liquids in the microplate well.
If no mixing is required, set this value to 0.
Mix volume
Sets the volume of liquid to be displaced during each mix cycle.
Transfer
If this box is checked, a specified volume of liquid will be transferred
from the sample plate to the extract plate.
Volume
Sets the volume of liquid to transfer from sample to extract plate.
Cycles
Selects the number of cycles that the individual extract steps will
perform.
Ettan Digester Operating Instructions 28964985 AB
65
4 Operation
4.6 Preparations before start
4.6
Preparations before start
Solutions
It is recommended that each solution to be used during digestion is filtered through a
sterile 0.2 μm filter into a clean bottle, recently rinsed with Milli-Q™ (or equivalent). This
will greatly reduce the risk of dust (and therefore keratins) being present in the digestion
mix and being visible on the mass spectrometry spectrum.
It is also necessary to ensure that there is sufficient solution present for the gel plugs to
be processed. The following formula may be used to calculate the minimum volume of
solution required for a digestion run (all values in μl).
Wash buffers:
4000 × (Number of priming strokes)
+[(Dispense volume × 8) × (Columns to run) × (Number of cycles)]
= Total volume used during method (μl)
Enzyme buffer and Sample transfer (extract) buffers:
4000 × (Number of priming strokes)
+[(Dispense volume × 8) × (Columns to run)]
+ 2 × [(Rinse volume × 8) × (Number of rinse strokes) × (Columns to run)]
= Total volume used during method (μl)
This volume represents the minimum volume of each buffer that will be consumed during
the digestion method. A greater volume than this will be required to cover the airstone
on the end of each buffer line and for priming the system.
Enzyme volume
The enzyme volume required to run a batch will be calculated by the software and presented to the user when the Start button is activated, see Section 4.7 Performing a run,
on page 70.
The volume is calculated according to the following formula:
Min. volume for Enzyme vessel (μl):
[(Enzyme volume × 8) × Columns to run] × Enzyme volume + 500]
Min. volume for Enzyme tube (μl):
(Enzyme volume × Columns to run) + Enzyme volume
66
Ettan Digester Operating Instructions 28964985 AB
4 Operation
4.6 Preparations before start
Placing microplates
All microplates on Ettan Digester should be placed on the position plate so that column 1
is facing the left (see also the diagram in the System Setup window, accessed from the
Setup menu). If the sample microplates have an adhesive aluminium lid on them, this
should be removed prior to digestion.
The sample in well A1 of sample plate 1 will be digested and the peptides extract will be
placed into well A1 of extract plate 1, well B1 of sample plate 1 will be extracted into well
B1 of extract plate 1, and so on. It is therefore recommended that the extract plates are
labelled prior to placing them on Ettan Digester so that the user is able to easily discriminate samples.
1
2
Item
Description
1
Sample microplates
2
Extract microplates
Priming the system
To ensure that no air is present in the tubing and that all tubing seals are correctly fitted,
it is recommended that complete priming of the system is performed before each method
run.
Step
Action
1
Place each buffer line into the appropriate solution.
Ettan Digester Operating Instructions 28964985 AB
67
4 Operation
4.6 Preparations before start
Step
Action
2
Select Tools:Prime.
Result: The Prime Valve and Syringes dialog opens.
3
Select the first and last valve positions that are to be used during the intended
protocol.
4
In Pumpstrokes per Valve Position, enter the number of priming strokes (10
priming strokes are recommended) for each valve.
5
Click Prime.
6
Click Stop to interrupt the priming.
7
Click Exit when the priming is complete.
Selecting Run mode
Once a method has been set in the main window, it is necessary to define the wells to
be digested and the number of microplates to be processed. This can be done in batch
fashion, or manually selected. Which process is used depends on the run mode chosen
in the Mode menu. Choosing the different mode options will alter the appearance of the
main application window in the lower-left corner.
68
Ettan Digester Operating Instructions 28964985 AB
4 Operation
4.6 Preparations before start
Manual Mode
To include a plate location in a digestion run, select the Run box. Once a plate has been
included, it is possible to set the start and end column for the plate.
Batch Mode
When the Batch Mode has been selected, click in the large yellow boxes (1, 2, 3 and 4)
to load the picker results file, which will specify the number of wells in the microplate to
be processed.
After clicking on the yellow box, an Open dialog box will appear. Locate the file that
corresponds to the microplate in that position and click Open. The file created by Ettan
Spot Picker has the extension *.apb.
Once a plate file has been opened, Ettan Digester Control Software will automatically
calculate the number of wells, and therefore, columns to be processed on that microplate.
Ettan Digester Operating Instructions 28964985 AB
69
4 Operation
4.7 Performing a run
4.7
Performing a run
Final checks before start
Once a method has been defined or opened and the run mode for all the plates to be
processed has been correctly set, it is wise to make the following final checks:
•
Check that the buffer lines are all in the correct solutions.
•
If there are air-bubbles in any of the buffer lines, it is recommended to prime those
buffer lines.
•
Check that there is sufficient of each buffer for the defined digestion protocol.
•
Check that all microplates are correctly positioned.
•
Check that there is nothing that will interfere with the movement of either the sample
needles or the syringes.
Starting a run
Start the method by clicking Run. Once the instrument is running, it becomes impossible
to edit the method. There is one exception to this that is described in Hold and edit, on
page 72.
As soon as Run is pressed a message is shown stating how much enzyme that is needed.
70
Ettan Digester Operating Instructions 28964985 AB
4 Operation
4.7 Performing a run
Monitoring a run
It is possible to track the progress of the method when the instrument is running. The
method step currently in progress will be shown in a larger, red font.
Detailed information on the progress and status of the method is also displayed above
the Run/Pause/Stop buttons.
Stopping or pausing a run
Once the method is running, two buttons will become available, Pause and Stop.
If the Pause is clicked, the system will complete the current movement and pause. Click
the Continue button again to resume the method.
To abort the current method, click the Stop button. The current batch run will be aborted
and the system re-initialized.
Note:
After a stop, it is not possible to resume the batch run.
Ettan Digester Operating Instructions 28964985 AB
71
4 Operation
4.7 Performing a run
Hold and edit
The Hold check boxes makes it possible to pause the method between most steps. While
the system is on hold, it is possible to edit parts of the method that have not yet run.
When the method progress reaches a hold step, this will be shown in large, red letters.
The Edit button will become active. Clicking Edit will unlock the method parameters for
editing. When ready, click Continue to resume the method.
If the method reaches a hold, but editing is not required, simply click Continue to resume
method progress.
72
Ettan Digester Operating Instructions 28964985 AB
4 Operation
4.7 Performing a run
End of method
When the method has finished running, the following message box will appear:
Click OK to re-initialize the instrument.
Ettan Digester Operating Instructions 28964985 AB
73
4 Operation
4.8 Procedures after a run
4.8
Procedures after a run
When the run is finished, remove the extract plates from Ettan Digester. Cover the extract
plates with a sealing foil and store the plates at -15ºC to -30ºC until analysis.
74
Ettan Digester Operating Instructions 28964985 AB
4 Operation
4.9 Software tools
4.9
Software tools
Method file viewer
To review a method and/or export the method to a text (ASCII) file, choose the menu bar
command Tools:Method viewer. The Method File Viewer window opens.
The current method in the main application window will automatically be displayed in
the Method File Viewer window. Click Open File to view another method than the current.
The method will load and display in the Method File Viewer without changing the method
currently in the main application window.
Click Export Data to export the method to a text file. This text file may be viewed in a
number of word-processing software packages. The first 6 lines in the exported file
contain information about Ettan Digester Control Software (version number) and when
the method was exported. The method itself is in plain text. Click Exit to close the Method
viewer.
Ettan Digester Operating Instructions 28964985 AB
75
4 Operation
4.9 Software tools
Output file viewer
To view output files from a batch run (or before including them in a batch run), choose
the menu bar command Tools:Output File Viewer. The Output File Viewer window
opens.
Click Open File to import a plate file.
Click Export Data to write the file in plain text format.
As well as data about the picking of the spots from the gel, this file also contains information regarding the digestion status (Dig. State) of the gel plug. The information displayed shows the last step of the digestion process that was completed for each gel
plug. This feature can be used to track the status of microplates only part way through
the digestion process. If, for example, the plugs in a microplate had only been washed
and then stored until digestion, when the tracking file is loaded back on, the software
will notify the user that these samples had been washed already.
Click Exit to close the Output File Viewer window.
76
Ettan Digester Operating Instructions 28964985 AB
5 Maintenance
5
Maintenance
About this chapter
This chapter provides instructions for user maintenance and service operations, and a
schedule for preventive maintenance.
In this chapter
Section
See page
5.1 Service
78
5.2 Replacement procedures
81
5.3 Cleaning before planned service
86
Ettan Digester Operating Instructions 28964985 AB
77
5 Maintenance
5.1 Service
5.1
Service
To view system information and perform basic maintenance tasks, choose the menu
bar command Tools:Service. The Digester Service Functions window opens. This function
will display information about the software and hardware in the Ettan Digester Control
Software system.
Software information
78
Information
Description
Version
The software version number.
Application path
Shows where Ettan Digester is installed.
Operating System
The operating system version.
Ettan Digester Operating Instructions 28964985 AB
5 Maintenance
5.1 Service
Hardware information
Information
Description
Liquid handler version
The instrument hardware version.
X Travel (km)
The total distance travelled in the X (left/right) direction.
Y Travel (km)
The total distance travelled in the Y (forward/ backward)
direction.
Z Travel (km)
The total distance travelled in the Z (up/down) direction.
Z Clamp Height
Shows how the Z arm is mounted on the Y-arm.
Z Tower Height
Shows the height of the Z arm.
Pump strokes
Shows how many times the pump has performed a
stroke.
Syringe size
The size of each of the installed syringes.
Valve version
The hardware version number of the 8-channel valve
unit.
Valve turns
Shows how many times the 8-channel valve has turned.
Service functions
From the Digester Service Functions window, it is also possible to perform basic maintenance tasks.
Refresh values
Updates the hardware information.
Initialize
Homes the Liquid handler probe and 8-channel valve.
Lower syringe
Lowers all the syringes to their lowest possible value. This
function is useful when replacing syringe pistons or seals.
CAUTION
To avoid injury while changing any parts on the pump unit, always
press the Stop button on the instrument front panel and disconnect
from the main power after lowering the syringe. When work is
complete, re-connect to the power supply and click the Initialize
instrument button to home the syringe.
Ettan Digester Operating Instructions 28964985 AB
79
5 Maintenance
5.1 Service
Raise syringe: Raises the syringes to their maximum height.
Home phase: If a home phase error occurs when initializing the system, run this tool to
correct the problem. It is also recommended that the Home Phase tool is run after the
instrument has been moved.
CAUTION
The needles will move over the entire working area of the Liquid
handler. Remove all loose items placed on the Ettan Digester unit.
NOTICE
Always verify all positions (plates, rinse stations, enzyme holder)
on the instrument using System Setup after performing the Home
phase operation.
Scan GSIOC: Checks the communication link between PC and instruments. If either the
Liquid handler or 8-channel valve are not found, check the connections between PC and
instruments.
80
Ettan Digester Operating Instructions 28964985 AB
5 Maintenance
5.2 Replacement procedures
5.2
Replacement procedures
Ettan Digester Control Software should be installed by GE service personnel. However,
during the use of the instrument, some components may need to be replaced/added to
the machine.
Sample needles replacement
To replace the sample needles, do as follows:
Step
Action
1
Turn off mains power to Ettan Digester and disconnect the mains power
cord from the power outlet.
2
Loosen the eight hex stop screws with an 1.5 mm Allen key, see figure below.
3
Replace the sample needles as follows:
4
Loosen and remove the retaining nuts on top of the needle carrier.
5
Remove the worn needles.
6
Carefully insert the new needles.
7
Let the needles drop down through the holes in the needle guide.
8
Attach the retaining nuts with its tubing.
9
Finger tighten the retaining nuts.
10
For alignment instructions, refer to Ettan Digester Instrument Handbook.
Ettan Digester Operating Instructions 28964985 AB
81
5 Maintenance
5.2 Replacement procedures
1
2
3
4
5
6
7
8
Part
Function
1
Tubing
2
Retaining nut
3
Hex stop screw
4
Allen key, 1.5 mm
5
Needle head
6
Z-arm
7
Sample needles
8
Needle guide
Note:
82
Be careful not to lose the tubing end ferrules.
Ettan Digester Operating Instructions 28964985 AB
5 Maintenance
5.2 Replacement procedures
Replacing the mains fuses
A blown fuse may indicate the existence of another problem in the instrument. If the
replacement fuse blows, don't try others. Contact your local GE representative.
WARNING
Disconnect power. Always disconnect power from the instrument
before replacing fuses.
WARNING
For continued protection from fire hazard, replace only with same
type and rating of fuse.
To replace the Liquid handler mains fuses:
1
Disconnect the mains power cord from the power outlet and from the rear panel
socket.
2
Locate the fuse drawer on the rear panel.
Ettan Digester Operating Instructions 28964985 AB
83
5 Maintenance
5.2 Replacement procedures
Insert a small screwdriver into the notch next to the fuse drawer.
4
Twist the screwdriver to open and remove the fuse drawer.
250J 0449
3
The Liquid handler fuse drawer contains one 2.5 A “T” slow-blow fuse (5 x 20 mm
size) for a 100-120 voltage selection. It contains two 2.5 A “T” fuses for a 220-240
voltage selection.
84
5
Remove the old fuse(s) and insert the new fuse(s).
6
Insert the fuse drawer into its receptacle on the rear panel.
Ettan Digester Operating Instructions 28964985 AB
5 Maintenance
5.2 Replacement procedures
Buffer tubing
The lines that supply buffer to the 8-channel valve unit may require replacement. To install/replace a buffer line, simply screw the plastic nut around the line into the appropriate
position on the 8-channel valve unit. It is recommended that PTFE tape is used to ensure
an airtight buffer line. Once the line is attached to the buffer 8-channel valve, attach the
frit filter to the buffer end and place into buffer.
Note:
Now test that the seal between the nut and the 8-channel valve is airtight by
priming that valve position. If air bubbles are seen in the line that runs from
the 8- channel valve from to the syringe assembly, this indicates that the seal
is not completely air tight.
It is recommended that each of the buffer lines is primed (refer to Ettan Digester User
Manual) in turn with water. This process allows the user to determine which buffer line
corresponds to which valve position. The buffer lines can then be labelled so that the
buffer line can be placed into the correct buffer during a method run.
Ettan Digester Operating Instructions 28964985 AB
85
5 Maintenance
5.3 Cleaning before planned service
5.3
Cleaning before planned service
Cleaning before planned
maintenance/service
To ensure the protection and safety of service personnel, all equipment and work areas
must be clean and free of any hazardous contaminants before a Service Engineer starts
maintenance work.
Please complete the checklist in the On Site Service Health and Safety Declaration Form
or the Health and Safety Declaration Form for Product Return or Servicing, depending on
whether the instrument is going to be serviced on site or returned for service, respectively.
Copy the form you need from Section 7.1 Health and Safety Declaration Form, on page 94
or print it from the PDF file available on the User Documentation CD.
86
Ettan Digester Operating Instructions 28964985 AB
6 Troubleshooting
6
Troubleshooting
Introduction
This chapter provides basic diagnostic and troubleshooting guides. The diagnostic guide
is based on the error messages that are displayed by Ettan Digester Control Software
(see Diagnostics, on page 87). The basic troubleshooting guide focuses on error symptoms
related to instrument operation (see Troubleshooting, on page 91).
For errors related to method runs, refer to the Troubleshooting chapter in Ettan Digester
User Manual.
Error messages
The following figure shows an example of an error message. It is possible to hide/show
details about the message by pressing the Hide/Details button. The detailed information
may be useful if GE support assistance is required. Note that all of the details may not
be visible. Use the scrollbar to view the complete details of the message if that is the
case.
Diagnostics
Error
number
001
Details/Possible
cause
Corrective action
Failed to reset the instrument.
Check instrument connection cable from the
PC to the Gilson 215.
Ensure that the instrument is switched on.
Ettan Digester Operating Instructions 28964985 AB
87
6 Troubleshooting
Error
Corrective action
number
Details/Possible
cause
002
Homing failed.
Check instrument connection cable from the
PC to the Gilson 215.
Failed to home Gilson
215 probe.
003
Check that nothing is blocking the probe.
Homing failed.
Run the Home Phase tool in the Service
Failed to home Gilson
215 probe.
function. If that fails, use the Home Phase tool
in the Gilson 215 Setup Utilities.
The X-axis ‘Home
Phase’ is invalid
004
Homing failed.
Run the Home Phase tool in the Service
Failed to home Gilson
215 probe.
function. If that fails, use the Home Phase tool
in the Gilson 215 Setup Utilities
The X and Y-axis
Home Phase is invalid.
005
Homing failed.
Failed to home Gilson
215 probe.
Run the Home Phase tool in the Service function. If that fails, use the Home Phase tool in the
Gilson 215 Setup Utilities.
The X and Y-axis
Home Phase is invalid.
006
Homing failed.
The Gilson 215 dilutor
homing failed.
007
Move failed.
Target outside travel
range.
Check instrument connection cable from the
PC to the Gilson 215.
Check that the syringes are installed properly.
Use System Setup to change X/Y/Z locations
to valid values (see Ettan Digester Instrument
Handbook).
The Gilson 215 probe
failed to move to a location on the instrument because it was
outside the probe
travel range.
008
STOP pressed.
The STOP button on
the front panel was
pressed.
88
The STOP button stops the Gilson 215 probe
and dilutor immediately.
Restart the software to re-initialize the instruments.
Ettan Digester Operating Instructions 28964985 AB
6 Troubleshooting
Error
Corrective action
number
Details/Possible
cause
009
Move Failed.
There might be a problem with the instrument
hardware. Try to restart the software and instruments. If the problem persists, contact GE.
Failed to move Gilson
215 Probe.
010
Move Timeout.
A timeout occurred
when trying to move
the Gilson 215 Probe
(after 10 seconds).
There might be a problem with the instrument
hardware. Try to restart the software and instruments. If the problem persists, contact GE Service.
011
Dilutor operation
failed.
There might be a problem with the instrument
hardware. Try to restart the software and instruments. If the problem persists, contact GE Service.
012
Dilutor timeout.
013
014
A timeout occurred
when trying to move
the Gilson 215 Dilutor
(after 30 seconds).
Try to change dilutor flow rates. A very low flow
rate may cause the dilutor to move too slow.
015
No connection.
Failed to read syringe
contents.
016
No connection.
Failed to read probe
X/Y location.
017
No connection.
Failed to read probe Z
location.
018
No connection.
Failed to read hardware version information from the Gilson
215.
019
No connection.
Failed to read Gilson
215 Dilutor maximum
flow rate.
Ettan Digester Operating Instructions 28964985 AB
If the problem persists, contact GE Service.
Check instrument connection cables and reinitialize the instrument.
Check instrument connection cables and reinitialize the instrument.
Check instrument connection cables and reinitialize the instrument.
Check instrument connection cables and reinitialize the instrument.
Check instrument connection cables and reinitialize the instrument.
89
6 Troubleshooting
Error
Corrective action
number
Details/Possible
cause
020
No connection.
Check instrument connection cables and reinitialize the instrument.
Failed to read Gilson
215 Probe X/ Y/Z travel range
021
No connection.
Failed to reset the 8channel valve
(VALVEMATE).
022
No connection.
Make sure the valve is installed properly and
that instrument cables are correctly connected.
023
Set valve pos.
If it is possible to set the valve position manually
(on the front panel) then there is connection
problems from the PC.
Failed to home the 8channel valve
(VALVEMATE) valve.
024
Set valve position
timeout.
A timeout occurred
when trying to
change the 8-channel
valve (VALVEMATE)
valve position.
100
File export error.
An error occurred
while exporting the
method.
101
Method read error.
An error occurred
while reading the
method from file.
102
File error.
The file SystemSetup.ini is damaged.
90
Check instrument connection cables. Note that
the 8-channel valve (VALVEMATE) is connected
from the Gilson 215 unit.
Make sure the valve is installed properly and
that instrument cables are correctly connected.
There might be a problem with the instrument
hardware. Try to restart the software and instruments. If the problem persists, contact GE Service.
Ensure that the file is not write protected and
that there is sufficient space on the drive where
the file was to be saved.
The file may be damaged or contain bad
method parameters.
Reinstall Ettan Digester Control Software to get
a new SystemSetup.ini.
Run System Setup after the installation is
complete (see Ettan Digester Instrument
Handbook).
Ettan Digester Operating Instructions 28964985 AB
6 Troubleshooting
Error
Corrective action
number
Details/Possible
cause
103
File error.
Make sure that it is not write protected. If the
problem persists, reinstall Ettan Digester Control
Software.
The file SystemSetup.ini cannot be updated.
104
File error.
Failed to export file.
105
200
File error.
Run System Setup after the installation is
complete (see Ettan Digester Instrument
Handbook).
Make sure you have access to the specified location and that it is not write protected.
Failed to import file.
Make sure you have access to the specified location.
Method run error.
Try to run the method again.
Error during method
run.
If the problem persists, contact GE Service.
Troubleshooting
Problem
Possible cause
Corrective action
Start-up.
Check the cause of the error message in Diagnostics, on page 87.
Take the described corrective action.
When the OK button is
pressed to start instrument Homing, nothing
happens and an error
message is displayed.
Ettan Digester Operating Instructions 28964985 AB
91
6 Troubleshooting
Problem
Possible cause
Corrective action
The software exits unexpectedly without displaying an error message.
Incompatible operating
system and/or third-party
software.
Use the specified operating system ONLY, and do
not re-install the operating
system without reinstalling Ettan Digester
Control Software.
If problem appears after
installing another thirdparty software, un-install that
software first and then install the Ettan Digester
Control Software.
Note:
The computer connected
to the Ettan Digester system is primarily intended
for running Ettan Digester
Control Software. Please
do not install any additional software on this computer.
The software displays an
error message that begins
with Runtime error X.
Other problems.
92
Unhandled software error
in the Ettan Digester
Control Software.
If the problem persists,
contact GE service.
Call your GE service representative.
Ettan Digester Operating Instructions 28964985 AB
7 Reference information
7
Reference information
Specifications
Parameter
Value
Ingression protection
IP20
Supply voltage
•
100-120 V~ ±10% 50/60 Hz, single phase
•
220-240 V~ ±10% 50/60 Hz, single phase
Power consumption:
•
8-channel valve
•
120 VA
•
Liquid handler
•
240 VA
Dimensions (H × W × D)
690 × 910 × 610 mm
Weight, Liquid handler
incl. 8-channel valve
53 kg
Weight, Protective hood
25 kg
Ambient temperature
+15°C to +32°C
Relative humidity tolerance
≤ 80% (non-condensing)
Altitude
≤ 2000 m
Acoustic noise level
< 70 dB A
Overvoltage catergory
II
Pollution degree
2
Ordering information
For ordering information, visit www.gelifesciences.com.
Ettan Digester Operating Instructions 28964985 AB
93
7 Reference information
7.1 Health and Safety Declaration Form
7.1
Health and Safety Declaration Form
On site service
DOC1149542
GE Services
On Site Service Health &
Safety Declaration Form
Service Ticket #:
To ensure the mutual protection and safety of GE Healthcare service personnel and our customers, all equipment and work
areas must be clean and free of any hazardous contaminants before a Service Engineer starts a repair. To avoid delays in the
servicing of your equipment, please complete this checklist and present it to the Service Engineer upon arrival. Equipment and/
or work areas not sufficiently cleaned, accessible and safe for an engineer may lead to delays in servicing the equipment and
could be subject to additional charges.
Yes
No
Please review the actions below and answer “Yes” or “No”. Provide explanation for any “No” answers
in box below.
Instrument has been cleaned of hazardous substances.
Please rinse tubing or piping, wipe down scanner surfaces, or otherwise ensure removal of any dangerous
residue. Ensure the area around the instrument is clean. If radioactivity has been used, please perform a
wipe test or other suitable survey.
Adequate space and clearance is provided to allow safe access for instrument service, repair
or installation.
In some cases this may require customer to move equipment from normal operating location prior
to GE arrival.
Consumables, such as columns or gels, have been removed or isolated from the instrument and from
any area that may impede access to the instrument.
All buffer / waste vessels are labeled. Excess containers have been removed from the area to
provide access.
Provide
explanation
for any “No”
answers here:
Equipment type / Product No:
Serial No:
I hereby confirm that the equipment specified above has been cleaned to remove any hazardous substances and that the area
has been made safe and accessible.
Name in Capital letters:
Company or institution:
Position or job title:
Date (Year/month/date):
200000/00000/00000
Signed:
GE, imagination at work and GE monogram are trademarks of General Electric Company.
GE Healthcare Bio-Sciences Corp, 800 Centennial Avenue, P.O. Box 1327, Piscataway,
NJ 08855-1327, USA.
© 2010-12 General Electric Company—All rights reserved. First published April 2010.
28-9800-26 AB 05/2012
94
Ettan Digester Operating Instructions 28964985 AB
7 Reference information
7.1 Health and Safety Declaration Form
Product return or servicing
DOC1149544
GE Services
Health & Safety Declaration Form
for Product Return or Servicing
Return authorization number:
and/or Service Ticket/Request:
To ensure the mutual protection and safety of GE Healthcare personnel, our customers, transportation personnel and our
environment, all equipment must be clean and free of any hazardous contaminants before shipping to GE Healthcare. To avoid
delays in the processing of your equipment, please complete this checklist and include it with your return.
1. Please note that items will NOT be accepted for servicing or return without this form
2. Equipment which is not sufficiently cleaned prior to return to GE Healthcare may lead to delays in servicing the equipment
and could be subject to additional charges
3. Visible contamination will be assumed hazardous and additional cleaning and decontamination charges will be applied
Please specify if the equipment has been in contact with any of the following:
Yes
No
Radioactivity (please specify):
Yes
No
Infectious or hazardous biological substances (please specify)
Yes
No
Other Hazardous Chemicals (please specify)
Equipment must be decontaminated prior to service / return. Please provide a telephone number where GE Healthcare can
contact you for additional information concerning the system / equipment.
Telephone No:
Liquid and/or gas in equipment is:
Liquid Nitrogen
Water
Ethanol
None, empty
Argon, Helium, Nitrogen
Other, please specify:
Equipment type / Product No:
Serial No:
I hereby confirm that the equipment specified above has been cleaned to remove any hazardous substances and that the area
has been made safe and accessible.
Name in Capital letters:
Company or institution:
Position or job title:
Date (Year/month/date):
200000/00000/00000
Signed:
To receive a return authorization number or service
number, please call local technical support or
customer service.
Ettan Digester Operating Instructions 28964985 AB
GE, imagination at work and GE monogram are trademarks of General Electric Company.
GE Healthcare Bio-Sciences Corp, 800 Centennial Avenue, P.O. Box 1327, Piscataway,
NJ 08855-1327, USA.
© 2010-12 General Electric Company—All rights reserved. First published April 2010.
28-9800-27 AB 05/2012
95
Index
Index
8
8-channel valve
connections, 15
A
Armlock, 38
B
Base plate
alignment, 42
assembly, 42
C
Hardware
alignment, 42
information, 79
setup, 40
L
Liquid handler
connection to, 15
fuse drawer, 84
specifications, 93
start, 52
Calibration tool, 43
CE
Conformity, 8
CE marking, 9
Control software
error message, 92
main window, 55
reinstalling, 48
shutdown, 39
system information, 78
unexpected exit, 92
M
D
Needle height alignment, 46
Notes and tips, 7
Digest, 62
Dry, 61
Main fuses, 83
Manufacturing information, 8
Mechanical armlock, 37
Method
default, 58
edit, 59
open, 58
save, 57
N
O
E
Ordering information, 93
Enzyme
container, 12
digest, 62
volume, 66
Error messages, 87
P
F
File viewer, 75
Front panel, 13
Fuse drawer, 16
G
General description, 11
96
H
PC connection, 16
Power failure, 29
Precautions
flammable liquids, 21
general, 20
installing and moving instrument, 22
maintenance, 25
personal protection, 22
system operation, 24
Priming, 67
Purpose of this manual, 5
Ettan Digester Operating Instructions 28964985 AB
Index
R
System components, 11
Restart procedure, 29
Run
end, 73
hold and edit, 72
monitor, 71
start, 70
stop or pause, 71
Run mode
batch, 69
manual, 69
T
S
W
Safety
notices, 6
Sample needles replacement, 81
Solutions, 66
Specifications, 93
Wash, 60
Ettan Digester Operating Instructions 28964985 AB
Technique, 11
Typographical conventions, 7
U
User information, important, 6
V
Valve positions, 57
Z
Z-arm
calibrating the height of, 44
97
Page intentionally left blank
For local office contact information, visit
www.gelifesciences.com/contact
GE Healthcare UK Limited
Amersham Place
Little Chalfont
Buckinghamshire, HP7 9NA
United Kingdom
www.gelifesciences.com/2DE
GE and GE monogram are trademarks of General Electric Company.
Ettan is a trademark of General Electric Company or one of its subsidiaries.
Microsoft and Windows are registered trademarks of Microsoft Corporation.
Milli-Q is registered trademark of Merck KGaA.
All other third party trademarks are the property of their respective owner.
© 2009-2014 General Electric Company – All rights reserved.
First published Nov. 2009.
All goods and services are sold subject to the terms and conditions of sale of
the company within GE Healthcare which supplies them. A copy of these terms
and conditions is available on request. Contact your local GE Healthcare representative for the most current information.
GE Healthcare Bio-Sciences AB
Björkgatan 30, 751 84 Uppsala, Sweden
GE Healthcare Europe GmbH
Munzinger Strasse 5, D-79111 Freiburg, Germany
GE Healthcare Bio-Sciences Corp.
800 Centennial Avenue, P.O. Box 1327, Piscataway, NJ 08855-1327, USA
GE Healthcare Japan Corporation
Sanken Bldg. 3-25-1, Hyakunincho Shinjuku-ku, Tokyo 169-0073, Japan
28964985 AB 08/2014 a1793