1
SendSuite® Shipping
SendSuite® Shipping Solutions for Desktop Shipping
Administrator Guide
U.S. English Edition
Pitney Bowes, in its continuing product improvement program, has made every reasonable effort to
eliminate errors from its manuals and software products. As always, our aims are quality, reliability,
and ease of operation. However, Pitney Bowes assumes no liability for any such errors, misuse, or
misapplication of its operating manuals and products.
This manual may not be reproduced, in whole or in part, without the express written consent of Pitney
Bowes Inc. These materials and the related software are confidential and proprietary property of Pitney
Bowes Inc. and may not be lent, sold, hired out, or made available to others in any form, or be disposed of
by way of trade in any form, without the express written consent of Pitney Bowes Inc. The data used in the
screen examples in this manual are fictitious unless otherwise noted, and are designed solely to document
proper use of the software.
This document (SVTS9117 Rev J) defines many of the features in SendSuite Shipping version 6.50.
SendSuite® Shipping
Administrator Guide
SVTS9117 Rev. J
December 2010
Copyright Notice
©2010 Pitney Bowes Inc.
All Rights Reserved.
Pitney Bowes Inc.
One Elmcroft Road
Stamford, Connecticut 06926-0700
SendSuite® Shipping contains barcode components licensed from IDAutomation.com, Inc. These products may
only be used as part of and in connection with SendSuite® .
SendSuite is a trademark of Pitney Bowes Inc. Other company and product names mentioned herein
may be the trademarks of their respective owners.
Table of Contents
1 • SendSuite Shipping Server
IIS Settings ........................................................................... 1-2
Time Out ......................................................................... 1-2
Logo................................................................................ 1-4
SendSuite Database Maintenance ....................................... 1-5
SQL Server Agent........................................................... 1-6
Creating a Database Maintenance Plan ......................... 1-8
Setting Up the System Maintenance Plan ................ 1-9
Setting Up the SendSuite Database Maintenance
Plan......................................................................... 1-13
Editing the Database Maintenance Plan................. 1-20
Viewing History of the Database Maintenance
Plan......................................................................... 1-20
Understanding the Transaction Log .............................. 1-21
Backing Up other Critical Information ........................... 1-22
Restoring the SendSuite Database .................................... 1-23
Restoring the SQL Database ........................................ 1-23
2 • Supporting Data
Consignee Data .................................................................... 2-4
Adding a Consignee ....................................................... 2-4
Country Data ........................................................................ 2-6
Modifying Country Data .................................................. 2-7
Commodity Data ................................................................... 2-8
Adding a Commodity Code............................................. 2-8
Product Data......................................................................... 2-9
Adding a Product ............................................................ 2-9
Product Fields ......................................................... 2-10
International Products ..............................................2-11
Remark Codes.................................................................... 2-12
Adding a Remark Code ................................................iii 2-12
SVTS9117 Rev. J
SendSuite® Shipping
Administrator Guide
iii
Table of Contents
Standard Carrier Alpha Codes (SCAC) .............................. 2-13
Shipper Alert ....................................................................... 2-14
Creating a Shipper Alert ............................................... 2-14
Deleting a Shipper Alert ................................................ 2-15
Shipper Handling Fees ....................................................... 2-16
Setting up PRO Numbers and Tracking Numbers .............. 2-18
Rate Shop Groups .............................................................. 2-20
Creating Rate Shop Groups ......................................... 2-20
Dual Rating ................................................................... 2-21
Routing Instructions ............................................................ 2-22
Setting up Routing Instructions..................................... 2-22
Applying Routing Instructions to a Consignee, Agent, or
Shipper ......................................................................... 2-24
Setting Routing Instruction Priority ............................... 2-25
Adding a Route ID Field to the Shipment Processing
Screen .......................................................................... 2-25
Batch Rating ....................................................................... 2-26
Groups .......................................................................... 2-26
Plan Shipments ............................................................ 2-26
Batch Labeling .............................................................. 2-27
Accounting Features........................................................... 2-28
Configuring Accounts and Account Sets ...................... 2-28
Creating Accounts .................................................. 2-28
Creating Account Sets ............................................ 2-28
Account Validation ........................................................ 2-29
Using the Accounting Fields ......................................... 2-29
Additional Supporting Data ................................................. 2-30
System Configuration ................................................... 2-30
Auto Numbers ......................................................... 2-30
Privacy Statement and Legal Notice....................... 2-31
Proxy Server ........................................................... 2-31
iv
SVTS9117 Rev. J
SendSuite® Shipping
Administrator Guide
iv
Table of Contents
Workstation Configuration ............................................ 2-32
Email Setup ............................................................ 2-32
Peripheral Setup ..................................................... 2-32
E-Track Setup ......................................................... 2-33
Account ................................................................... 2-33
Currency Exchange ................................................ 2-33
Data .............................................................................. 2-33
Department ............................................................. 2-34
Distance .................................................................. 2-34
Division ................................................................... 2-35
Dock Hours ............................................................. 2-35
Export Licence ........................................................ 2-36
Freight Class........................................................... 2-36
Geograph ................................................................ 2-37
HTS......................................................................... 2-38
Letter of Credit ........................................................ 2-39
Mode Code ............................................................. 2-39
Ports ....................................................................... 2-40
Units........................................................................ 2-40
Unit Conversion ...................................................... 2-40
Manifest Setup ........................................................ 2-41
Airborne Commission ............................................. 2-41
Carrier & Labels............................................................ 2-41
Configure StreetSmart Data ................................... 2-42
ONTR (OnTrac Communication) ............................ 2-42
EANC (Load EANC Rates) ..................................... 2-42
UPS ........................................................................ 2-42
USPS ...................................................................... 2-43
Tariff Setup ............................................................. 2-43
Carrier Setup .......................................................... 2-43
Binary Carrier Data ................................................. 2-43
v
SVTS9117 Rev. J
SendSuite® Shipping
Administrator Guide
v
Table of Contents
Rates ............................................................................ 2-43
Package Type ......................................................... 2-44
Labels ..................................................................... 2-44
Rate Shop Group .................................................... 2-45
Routing Instructions ................................................ 2-45
Route Priority .......................................................... 2-45
Shipment Planning Setup ............................................. 2-45
Selection Criteria .................................................... 2-46
Default Settings ...................................................... 2-46
3 • Shipping
E-Track ................................................................................. 3-2
Data ................................................................................ 3-2
Tracking Shipments ........................................................ 3-2
International Documents....................................................... 3-4
Overview ......................................................................... 3-4
Using these Instructions ........................................... 3-5
Single values ............................................................ 3-5
Multiple Values ......................................................... 3-6
Calculated Values ..................................................... 3-6
Multiple Lines ............................................................ 3-6
Commercial Invoice ........................................................ 3-7
Certificate of Origin ........................................................3-11
NAFTA Certificate of Origin .......................................... 3-14
SED .............................................................................. 3-17
Shipping Screens ............................................................... 3-21
Creating a Custom Screen ........................................... 3-21
Configuring the Appearance of the Shipping Screen.... 3-22
Delete Fields ........................................................... 3-23
Add Fields ............................................................... 3-23
Move Fields ............................................................ 3-23
vi
SVTS9117 Rev. J
SendSuite® Shipping
Administrator Guide
vi
Table of Contents
Changing the Field Labels ...................................... 3-24
Creating Hot Keys................................................... 3-24
Setting Properties on the Screen Tab ..................... 3-25
Field Properties ............................................................ 3-25
Setting Properties on the Defaults Tab ......................... 3-28
Processing Events ........................................................ 3-29
Sub Event Descriptions .......................................... 3-31
Exporting and Importing Screens ................................. 3-40
Exporting Shipping Screens ................................... 3-40
Importing Shipping Screens.................................... 3-41
Allowing User Access ................................................... 3-42
Single Use Recipients ........................................................ 3-43
Field Edit Control .......................................................... 3-45
4 • Reports
Running SendSuite Shipping Reports .................................. 4-2
Running a Report in SendSuite Shipping Format........... 4-2
Creating and Saving Report Filters ................................ 4-2
Creating Custom Reports ..................................................... 4-4
Selecting a Report to Modify .......................................... 4-4
Modifying the Report Data .............................................. 4-4
Modifying Data Groups ................................................... 4-6
Modifying Total Columns ................................................ 4-7
Saving a Custom Report ................................................ 4-7
Importing External Reports ................................................... 4-8
Availability of Data .......................................................... 4-8
Current List of Tables and Views Supported............. 4-8
Data Available ........................................................... 4-9
Exporting a Report from Crystal Reports...................... 4-10
Importing the Report into SendSuite Shipping ............. 4-10
Using the Report........................................................... 4-10
vii
SVTS9117 Rev. J
SendSuite® Shipping
Administrator Guide
vii
Table of Contents
Creating Custom Reports for the Shipping Workstation ......4-11
General Report Process ................................................4-11
Creating a New Thin Client Report ............................... 4-12
Converting a Crystal Reports Document ................ 4-12
Creating a New Report from Scratch ...................... 4-14
Defining Data .......................................................... 4-15
Headers and Footers .............................................. 4-17
Grouping ................................................................. 4-18
Summary Fields ...................................................... 4-19
Scripting on the Report ........................................... 4-20
Toolbar Buttons ....................................................... 4-21
Modifying Sample Scripts ....................................... 4-23
Importing the Script................................................. 4-23
Writing VB Script .......................................................... 4-23
Running the Report ...................................................... 4-24
Accounting Reports ............................................................ 4-25
Account Summary Report ............................................ 4-25
Transactions by Account Report ................................... 4-26
5 • Tools
Configuring Groups and Users ............................................. 5-2
Setting Up Groups .......................................................... 5-2
Setting Up Users ............................................................ 5-4
Setting the User's Defaults ....................................... 5-5
Editing the User Properties and Permissions ................. 5-5
User Data Visibility.................................................... 5-6
Account Visibility ....................................................... 5-7
Adding a User to a Group ......................................... 5-8
Assigning Individual User Rights .............................. 5-9
Security Permissions .................................................... 5-14
Administrative Workstation Permissions................. 5-14
viii
SVTS9117 Rev. J
SendSuite® Shipping
Administrator Guide
viii
Table of Contents
The Text File ........................................................... 5-15
Importing Into SendSuite ........................................ 5-15
Importing Users ............................................................ 5-15
Simple Database Queries................................................... 5-17
Tools Module Simple Query.......................................... 5-17
Advanced Database Queries.............................................. 5-19
Tools Module Advanced Query ..................................... 5-19
Task Scheduler ................................................................... 5-20
Available Tasks ............................................................. 5-20
Create a Task Group .................................................... 5-23
Add a Task to the Group ............................................... 5-24
Schedule When Task Groups Will Run......................... 5-25
Start the Task Scheduler .............................................. 5-26
Modifying a Scheduler .................................................. 5-26
Terminating the Task Scheduler ................................... 5-27
Setting Up Purge Shipment .......................................... 5-27
Small Package Manifest Setup..................................... 5-28
Creating the Windows Task .................................... 5-29
Running Tasks From Windows Task Scheduler ........... 5-29
Testing the Task ...................................................... 5-33
Purging Database Records ................................................ 5-34
Purge Feature............................................................... 5-34
Empty Customer Data .................................................. 5-36
Customize ............................................................... 5-36
Empty Tables .......................................................... 5-36
User Authentication ............................................................ 5-37
6 • Tariffs
Creating a Custom Parcel Tariff from Scratch ...................... 6-2
SCAC Code .................................................................... 6-2
Address Record ..............................................................
6-3
ix
SVTS9117 Rev. J
SendSuite® Shipping
Administrator Guide
ix
Table of Contents
Tariff Setup ..................................................................... 6-4
Tariff Header Tab ...................................................... 6-4
Zone/RBN Tab .......................................................... 6-5
Rates Tab ................................................................. 6-9
Creating a Custom LTL Tariff from Scratch .........................6-11
SCAC Code ...................................................................6-11
Address Record ............................................................ 6-12
Tariff Setup ................................................................... 6-13
Tariff Header Tab .................................................... 6-13
Zone/RBN Tab ........................................................ 6-14
Rates Tab ............................................................... 6-17
Carrier Setup ...................................................................... 6-19
Tariff Accessorials............................................................... 6-23
Tariff Discounts ................................................................... 6-26
Carrier Service Days .......................................................... 6-28
Tariff FAK ............................................................................ 6-30
Tariff Absolute Minimums ................................................... 6-32
Tariff Accessorial Incompatibility......................................... 6-34
Temporary Tariff Increase ................................................... 6-35
Borrowing a Tariff ............................................................... 6-37
Clone a Carrier Setup ................................................... 6-37
Create the Carrier Address Record .............................. 6-39
Set Up Carrier PRO Numbers or Tracking Numbers .... 6-40
Select or Create a Label ............................................... 6-40
Add Carrier to Rate Shop Group and/or Routing Instr.. 6-40
Manual Rating .................................................................... 6-41
Creating the Manual Carrier ......................................... 6-41
Creating the VB Script .................................................. 6-47
Modifying the Sub-event ......................................... 6-49
Associating the VB Script with a Shipping Screen ....... 6-49
Adding Fields to the Shipping Screen..................... 6-50
Processing a Shipment Using Manual Rates ...............x 6-51
SVTS9117 Rev. J
SendSuite® Shipping
Administrator Guide
x
Table of Contents
Zero-Rate Carrier ............................................................... 6-52
Creating the SCAC ....................................................... 6-52
Creating the Tariff ......................................................... 6-52
Setting Up the Tariff ................................................ 6-52
Setting the Zone Details ......................................... 6-53
Setting the Class Rates .......................................... 6-54
Configuring the Carrier ........................................... 6-55
Creating an Address Record ........................................ 6-56
7 • Labels
Label Configuration .............................................................. 7-2
Label Setup .................................................................... 7-2
Selecting a Label .................................................................. 7-5
Label Printing Options .......................................................... 7-6
Graphic Labels ..................................................................... 7-7
Setting the Windows Font Size ....................................... 7-7
Graphic Label File Information ....................................... 7-8
8 • Integration
Data Mapper ......................................................................... 8-3
Preparation ..................................................................... 8-3
General Instructions ....................................................... 8-3
Data Map Settings .......................................................... 8-4
General Tab .............................................................. 8-4
In Tab ........................................................................ 8-6
Host File Properties .................................................. 8-7
SendSuite Table Properties In ................................ 8-10
Out Tab ....................................................................8-11
Filtering Records..................................................... 8-13
Mapping the Fields ....................................................... 8-14
xi 8-14
Adding Host Fields..................................................
SVTS9117 Rev. J
SendSuite® Shipping
Administrator Guide
xi
Table of Contents
Mapping Fields ....................................................... 8-15
Host Field Properties — In ........................................... 8-16
Host Field Properties — Out......................................... 8-16
SendSuite Shipping Field Properties ............................ 8-17
Mapping to tblIntlLine ................................................... 8-18
Considerations for Data on the Host File ................ 8-18
Shipment Header Map ............................................ 8-19
International Detail Line Map .................................. 8-19
Running Data Mapper .................................................. 8-20
Creating a DSN .................................................................. 8-22
Verifying that the ODBC Driver for Database Is
Installed ........................................................................ 8-23
Creating the Data Source ............................................. 8-24
ODBC Integration in SendSuite Shipping ........................... 8-26
Preparing for Integration ............................................... 8-26
Creating a New ODBC Map ......................................... 8-27
ODBC Toolbar .............................................................. 8-30
Adding the Host Tables................................................. 8-30
Mapping the Fields ....................................................... 8-31
Host Field Properties .................................................... 8-32
SendSuite Shipping Field Properties ............................ 8-34
Selection Criteria .......................................................... 8-35
Using Sendsuite Shipping Supplied Scripting Tools 8-36
Manually Writing an SQL WHERE Clause Using
Free Text ................................................................. 8-37
Updating a WHERE Clause .................................... 8-37
XML In Integration .............................................................. 8-38
Preparation ................................................................... 8-38
General Instructions ..................................................... 8-39
XML Map Settings ........................................................ 8-40
General Tab ............................................................ 8-40
xii
SVTS9117 Rev. J
SendSuite® Shipping
Administrator Guide
xii
Table of Contents
Server XML File Properties..................................... 8-40
In Tab ...................................................................... 8-41
Mapping the Fields ....................................................... 8-43
Adding Host Fields.................................................. 8-43
Mapping Fields ....................................................... 8-45
Host Field Properties — XML In ................................... 8-46
SendSuite Shipping Field Properties ............................ 8-47
General Instructions ..................................................... 8-48
XML Map Settings ........................................................ 8-49
General Tab ............................................................ 8-49
Out Tab ................................................................... 8-50
Mapping the Fields ....................................................... 8-51
Adding Host Fields.................................................. 8-51
XML Out Integration ........................................................... 8-53
Mapping the Fields ....................................................... 8-53
Mapping Fields ....................................................... 8-53
SendSuite Shipping Field Properties ............................ 8-54
XML Integration: File Link ................................................. 8-55
File Link Setup .............................................................. 8-55
Modifying the Shipping Screen for XML File Link ......... 8-56
Conditional Logic Scripting ................................................. 8-57
SendSuite Shipping Toolset.......................................... 8-58
Conditional Logic Operations ...................................... 8-59
VBScript Conditional Logic Properties.......................... 8-60
Writing a Script ............................................................. 8-61
Parsing a Script ............................................................ 8-61
Attaching the Script to a Shipping Screen .............. 8-61
Attaching a Script to an Integration Map................. 8-61
Importing Data From Ascent ............................................... 8-62
Importing Address Data ................................................ 8-62
Extracting the Data From Ascent ............................ 8-62
xiii
SVTS9117 Rev. J
SendSuite® Shipping
Administrator Guide
xiii
Table of Contents
Importing the Ascent Data into SendSuite Shipping 8-63
Verifying the Results ............................................... 8-64
A • Supported Peripherals
Supported Peripherals in SendSuite Shipping ..................... A-2
Manuals for Peripherals........................................................ A-3
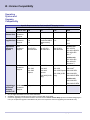
B • Version Compatibility
Operating System and Upgrade Compatibility ..................... B-2
SendSuite Desktop Compatibility ......................................... B-3
Index
xiv
SVTS9117 Rev. J
SendSuite® Shipping
Administrator Guide
xiv
1
SendSuite® Shipping Server
IIS Settings ........................................................................... 1-2
Time Out ......................................................................... 1-2
Logo................................................................................ 1-4
SendSuite Database Maintenance ....................................... 1-5
SQL Server Agent........................................................... 1-6
Creating a Database Maintenance Plan ......................... 1-8
Setting Up the System Maintenance Plan ................ 1-9
Setting Up the SendSuite Database Maintenance
Plan......................................................................... 1-13
Editing the Database Maintenance Plan................. 1-20
Viewing History of the Database Maintenance
Plan......................................................................... 1-20
Understanding the Transaction Log .............................. 1-21
Backing Up other Critical Information ........................... 1-22
Restoring the SendSuite Database .................................... 1-23
Restoring the SQL Database ........................................ 1-23
SVTS9117 Rev. J
SendSuite® Shipping
Administrator Guide
1-1
1 • SendSuite® Shipping Server
IIS Settings
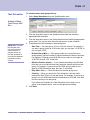
The SendSuite® Shipping workstations connect to the server through Microsoft
Internet Information Services (IIS).
Time Out
Once the internet server has been installed, there are several default settings
that can be modified.
Because you do not want users tying up system resources indefinitely, IIS will
disconnect a user after a period of time if the user has not performed any actions
during that time period. The default time-out setting is 20 minutes.
Follow the instructions below to change the time-out setting:
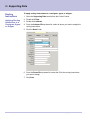
1. From the Windows® Start menu, click Settings > Control Panel.
2. Double click Administrative Tools.
3. Double click Internet Services Manager.
4. Expand the icon for your server.
5. Double-click on Default Web Site.
6. Right-click on eQuest, and select Properties.
7. On the Virtual Directory tab, click the Configuration button.
1-2
SVTS9117 Rev. J
SendSuite® Shipping
Administrator Guide
SendSuite® Shipping Server • 1
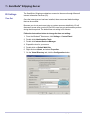
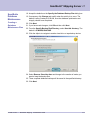
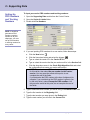
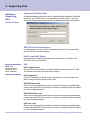
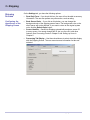
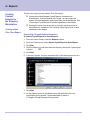
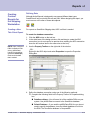
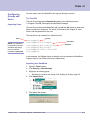
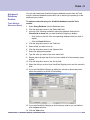
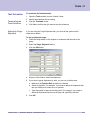
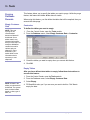
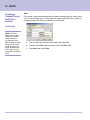
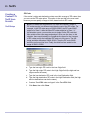
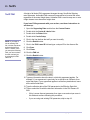
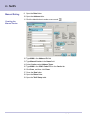
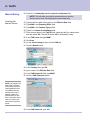
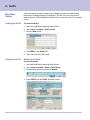
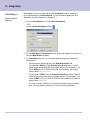
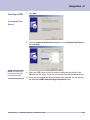
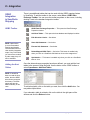
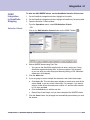
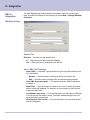
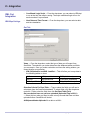
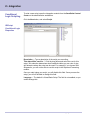
8. On the App Options tab, change the Session timeout.
IIS Settings
Time Out
NOTE: Do NOT remove
the checkmark next to
Enable session state.
The user must maintain
a session in order to
communicate with the
SendSuite Shipping
components.
SVTS9117 Rev. J
SendSuite® Shipping
Administrator Guide
1-3
1 • SendSuite® Shipping Server
IIS Settings
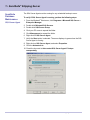
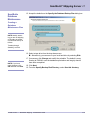
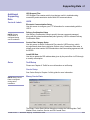
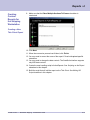
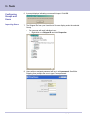
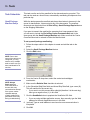
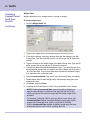
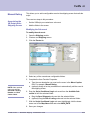
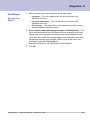
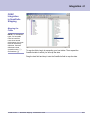
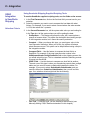
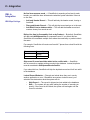
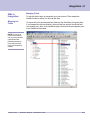
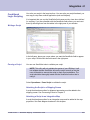
In the upper left corner of all screens, a logo is displayed. The Pitney Bowes logo
is automatically installed with the product.
Logo
You may change the logo as desired. The new graphic you use must meet the
following conditions:
•
It must be a gif file.
•
To look normal, it must be in proportion with 180 by 44 pixels.
If you use a graphic of a different size, it will be resized to fit into a 180x44
space. For example, a 360x88 file will shrink and fit in the space, looking
fairly normal. However, a 200x30 file will shrink one direction and stretch the
other direction, making it look too tall and slim.
To replace the Pitney Bowes graphic:
1. Rename your logo and call it leftlogo.gif or logoright.gif.
NOTE: If users do
not see the new logo,
they may need to clear
the old one from their
cache. They can do this
by deleting their temporary Internet files from
Internet Explorer. To
delete these files, follow
the instructions to the
right.
NOTE: Upon installation, logoleft.gif is the Pitney
Bowes logo and there is no logoright.gif. Pitney Bowes
recommends you use logoright.gif for a customer's logo.
2. Copy your logo file and place it in the following directory:
~/Inetpub/wwwroot/eQuest/Images/
3. If you are prompted to the existing .gif file, click Yes.
4. Users will see the graphic the next time they refresh their screens.
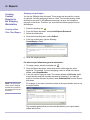
a. On the Shipping Workstation, select the Tools menu.
b. Select Internet Options.
c. In the Temporary internet Files box, click the Delete Files... button.
d. Check the box to Delete all offline content.
e. Click OK to delete the temporary files.
f.
1-4
Click OK to close the Internet Options window.
SVTS9117 Rev. J
SendSuite® Shipping
Administrator Guide
SendSuite® Shipping Server • 1
SendSuite
Database
Maintenance
As a critical system in your operation, it is important that you regularly maintain
the SendSuite Database. This includes backing up the data, optimizing the
storage of the data, and truncating the transaction log.
You can schedule a backup of the entire database and the transaction log. The
frequency of this backup is a decision your company must make based on your
shipping volume and data storage policies. You also may want to perform a onetime backup prior to applying a rate change or a software update. Performing a
one-time backup is also a good idea before purging records from the database.
All SendSuite installations should have the following:
•
A backup of the Master Database
•
A database maintenance plan, including a schedule for the plan
•
•
A Database Maintenance Plan to back up and truncate the Transaction Log
•
SVTS9117 Rev. J
Make sure that MS SQL Server Agent is running and set it to
automatically start.
The SQL Server backup of the transaction log truncates the log. Without
truncation, the transaction log can grow to an enormous size. So, even
if you back up the entire drive nightly, you will still want to have a SQL
Server plan backup and truncate the transaction log. See Understanding
the Transaction Log on page 1-21.
SendSuite® Shipping
Administrator Guide
1-5
1 • SendSuite® Shipping Server
SendSuite
Database
Maintenance
SQL Server Agent
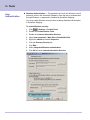
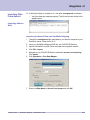
The SQL Server Agent must be running for any scheduled backup to occur.
To verify if SQL Server Agent is running, perform the following steps:
1. From the Windows® Start menu, click Programs > Microsoft SQL Server >
Enterprise Manager.
2. Double-click Microsoft SQL Servers.
3. Double-click SQL Server Group.
4. Click your PC name to expand the folder.
5. Click Management to expand the folder.
6. Right-click on SQL Server Agent.
7. Verify the Start option is selected. The arrow displays in green when the SQL
Server Agent is running.
8. Right-click on SQL Server Agent, and select Properties.
9. Click the Advanced tab.
10. Check the box next to Auto restart SQL Server Agent if it stops
unexpectedly.
1-6
SVTS9117 Rev. J
SendSuite® Shipping
Administrator Guide
SendSuite® Shipping Server • 1
SendSuite
Database
Maintenance
SQL Server Agent
11. Click OK.
12. You will be prompted to restart the SQL Server Agent. Click Yes.
13. Close the Enterprise Manager.
14. Open the SQL Server Manager in the system tray in the lower right
corner of your screen.
15. Click the drop-down in the Services field and select SQL Server
Agent.
16. Check the box next to Auto-start service when OS starts.
SVTS9117 Rev. J
SendSuite® Shipping
Administrator Guide
1-7
1 • SendSuite® Shipping Server
SendSuite
Database
Maintenance
Creating a
Database
Maintenance Plan
The Database Maintenance Plan Wizard is used to help you set up the core
maintenance tasks necessary to ensure that your database performs well, is
regularly backed up in case of system failure and is checked for inconsistencies.
Using the Database Maintenance Plan, you can:
•
Update distribution statistics
•
Back up database and transaction log files
•
System databases are special databases that cannot be backed up.
Since transaction log backups cannot be done on the system databases,
we recommend two separate DB Maintenance plans — one for the
system databases and one for the ConquestDB.
NOTE: Both maintenance plans assume the PC running the
backups is on 24 by 7. If this is not the case, recommended
times will need to change. The recommended times would
be appropriate even if a second shift is run, since each
task should complete in less than two minutes. Change the
recommended times only if the database is very large and
heavily used.
1-8
SVTS9117 Rev. J
SendSuite® Shipping
Administrator Guide
SendSuite® Shipping Server • 1
SendSuite
Database
Maintenance
Setting Up the System Maintenance Plan
•
You should ensure that there is enough disk space to store the backups
generated. The amount of disk space needed depends on the present size
and estimated future size.
Creating a
Database
Maintenance Plan
•
The backup should be written to a drive other than the drive that contains the
SQL database. The default is C:\MSSQL\BACKUP. This can be changed to
write to another local drive or local tape backup device. It is recommended
that you keep the default directory name and change the drive letter if
necessary.
•
The PC configured to do the backup must be on in order to run the backup
scheduled.
NOTE: This maintenance plan backs up
the system databases.
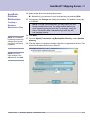
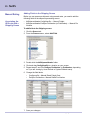
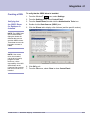
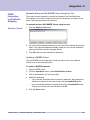
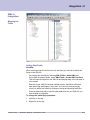
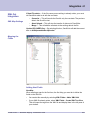
To set up the system maintenance plan:
1. From the Windows® Start menu, click Programs > Microsoft SQL Server >
Enterprise Manager.
2. Double-click Microsoft SQL Servers.
3. Double-click SQL Server Group.
4. Click your PC name to expand the folder.
5. Click Management to expand the folder.
6. Right-click Database Maintenance Plans and select New Maintenance
Plan.
7. From the Welcome to the Database Maintenance Plan Wizard, click Next.
8. To backup all the databases, click the All user databases option button and
click Next.
SVTS9117 Rev. J
SendSuite® Shipping
Administrator Guide
1-9
1 • SendSuite® Shipping Server
SendSuite
Database
Maintenance
Creating a
Database
Maintenance Plan
Alternatively, select the individual databases to be backed up and click Next.
•
Master
•
Model
•
MSDB
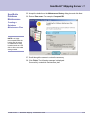
9. From the Update Data Optimization Information dialog box, leave the
default settings selected. Do not make any changes to the options on this
dialog box.
10. Accept the default selection of Change free space per page percentage
to...
NOTE: When viewing
the Maintenance Plan
History, you may see
Not Completed for databases that have had
no modifications. For
example, Model.
11. If necessary, click Change and modify when the activity is to occur. The
default is every Sunday at 1:00 AM.
12. Click Next.
13. If you have made changes, click OK and then click Next.
14. From the Database Integrity Check dialog box, leave the default settings
selected. Do not make any changes to the options on this dialog box.
15. If necessary, click Change and modify when the activity is to occur. The
default is every Sunday at 12:00 AM.
16. Click Next.
17. If you have made changes, click OK and then click Next.
1-10
SVTS9117 Rev. J
SendSuite® Shipping
Administrator Guide
SendSuite® Shipping Server • 1
SendSuite
Database
Maintenance
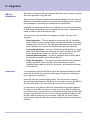
18. Accept the defaults on the Specify the Database Backup Plan dialog box.
Creating a
Database
Maintenance Plan
20. Click Next.
19. If necessary, click Change and modify when the activity is to occur. The
default is every Sunday at 2:00 AM, once the database optimization and
integrity checks have completed.
21. If you have made changes, click OK and then click Next.
22. From the Specify Backup Disk Directory, select Use this directory. The
default is C:\MSSQL\BACKUP.
23. Click the ellipsis to navigate to another local drive or tape backup device.
24. Select Remove files older than and change to the number of weeks you
want to keep the backup files.
25. Three complete database backups will be saved in the specified directory.
26. Click Next.
SVTS9117 Rev. J
SendSuite® Shipping
Administrator Guide
1-11
1 • SendSuite® Shipping Server
SendSuite
Database
Maintenance
28. Select a tape drive from the drop-down menu.
•
Alternatively, you can save to your local hard drive by selecting Disk.
Creating a
Database
Maintenance Plan
29. Click Next.
30. From the Reports to Generate dialog box, deselect all options and click
Next.
1-12
SVTS9117 Rev. J
SendSuite® Shipping
Administrator Guide
SendSuite® Shipping Server • 1
SendSuite
Database
Maintenance
34. Accept the defaults on the Maintenance History dialog box and click Next.
35. Enter a Plan name. For example, System.
Creating a
Database
Maintenance Plan
NOTE: It is highly
recommended that the
backup file be saved
or transferred to other
locations such as a ZIP
disk or other removable
storage media.
NOTE: This plan will
back up the SendSuite
database as well as the
transaction log.
36. Scroll through the screen to review the summary.
37. Click Finish. The following message is displayed:
Successfully created the maintenance plan.
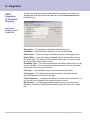
Setting Up the SendSuite Database Maintenance Plan
1. From the Windows® Start menu, click Programs > Microsoft SQL Server >
Enterprise Manager.
2. Double-click Microsoft SQL Servers.
3. Double-click SQL Server Group.
4. Click your PC name to expand the folder.
5. Click Management to expand the folder.
6. Right-click Database Maintenance Plans and select New Maintenance
Plan.
7. From the Welcome to the Database Maintenance Plan Wizard, click Next.
SVTS9117 Rev. J
SendSuite® Shipping
Administrator Guide
1-13
1 • SendSuite® Shipping Server
SendSuite
Database
Maintenance
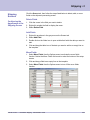
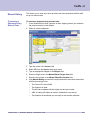
8. Select ConquestDB as the database to be backed up and click Next.
Creating a
Database
Maintenance Plan
9. From the Update Data Optimization Information dialog box, deselect all
options and click Next.
NOTE: If you have
made changes, click
OK and then click Next.
1-14
13. From the Database Integrity Check dialog box, leave the default settings
selected. Do not make any changes to the options on this dialog box.
14. Click Next.
SVTS9117 Rev. J
SendSuite® Shipping
Administrator Guide
SendSuite® Shipping Server • 1
SendSuite
Database
Maintenance
15. Accept the defaults on the Specify the Database Backup Plan dialog box.
Creating a
Database
Maintenance Plan
NOTE: Ideally, assuming you are not shipping
on Sunday, the schedule should be set up as
follows:
Tuesday through
Saturday, at 2 A.M.
16. Select a tape drive from the drop-down menu.
Alternatively, you can save to your local hard drive by selecting Disk.
NOTE: If you have
made changes, click
OK and then click Next.
SVTS9117 Rev. J
17. If necessary, click Change and modify the schedule. The default is every
Sunday at 2:00 AM, once the database optimization and integrity checks
have been completed.
18. Click Next.
19. From the Specify Backup Disk Directory, select Use this directory.
SendSuite® Shipping
Administrator Guide
1-15
1 • SendSuite® Shipping Server
SendSuite
Database
Maintenance
20. Click the ellipsis to navigate to another local drive or tape backup device.
Creating a
Database
Maintenance Plan
21. Select Remove files older than and change to the number of weeks you
want to keep these backups.
22. Click Next.
23. From the Specify the Transaction Log Backup Plan dialog box, select Back
up the transaction log as part of the maintenance plan and Verify the
integrity of the backup when complete.
1-16
SVTS9117 Rev. J
SendSuite® Shipping
Administrator Guide
SendSuite® Shipping Server • 1
SendSuite
Database
Maintenance
Creating a
Database
Maintenance Plan
24. Select a tape drive from the drop-down menu.
Alternatively, you can save to your local hard drive by selecting Disk.
25. If necessary, click Change and modify the schedule. The default is every day
at 12:00 AM.
NOTE: In a high volume operation, you may want to run this
backup several times a day. You might consider backing up
more frequently during the work day. For example, every two
hours. This would create 4 transaction logs each day with
one complete backup.
26. Click Next.
NOTE: The transaction
log backups contain any
changes since the last
complete or transaction
log backup.
27. From the Specify Transaction Log Backup Disk Directory, select Use this
directory.
28. Click the ellipsis to navigate to another local drive or tape backup device. This
should be the same directory as in Step 20.
NOTE: If you have
made changes, click
OK and then click Next.
SVTS9117 Rev. J
SendSuite® Shipping
Administrator Guide
1-17
1 • SendSuite® Shipping Server
SendSuite
Database
Maintenance
Creating a
Database
Maintenance Plan
1-18
29. Select Remove files older than and change to the number of days you want
to keep the backups.
30. Click Next.
31. From the Reports to Generate dialog box, deselect all options and click
Next.
SVTS9117 Rev. J
SendSuite® Shipping
Administrator Guide
SendSuite® Shipping Server • 1
SendSuite
Database
Maintenance
35. Accept the defaults on the Maintenance History dialog box and click Next.
36. Enter a Plan name. For example, Conquest DB.
Creating a
Database
Maintenance Plan
NOTE: It is highly
recommended that the
backup files be saved
or transferred to other
locations such as a ZIP
disk or other removable
storage media.
37. Scroll through the screen to review the summary.
38. Click Finish. The following message is displayed:
Successfully created the maintenance plan.
SVTS9117 Rev. J
SendSuite® Shipping
Administrator Guide
1-19
1 • SendSuite® Shipping Server
SendSuite
Database
Maintenance
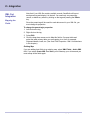
Editing the Database Maintenance Plan
1. From the Windows® Start menu, click Programs > Microsoft SQL Server >
Enterprise Manager.
2. Double-click Microsoft SQL Servers.
Creating a
Database
Maintenance Plan
3. Double-click SQL Server Group.
4. Click your PC name to expand the folder.
5. Click Management to expand the folder.
6. Right-click Database Maintenance Plans. The plan displays in the right
pane.
7. Right-click the plan and select Properties.
The plan is displayed for editing. Anything selected during setup can be
changed on this screen.
Viewing History of the Database Maintenance Plan
1. From the Windows® Start menu, click Programs > Microsoft SQL Server >
Enterprise Manager.
2. Double-click Microsoft SQL Servers.
3. Double-click SQL Server Group.
4. Click your PC name to expand the folder.
5. Click Management to expand the folder.
6. Right-click Database Maintenance Plans. The plan displays in the right
pane.
7. Right-click the plan and select Maintenance Plan History.
This is useful for troubleshooting problems with the backup procedure.
1-20
SVTS9117 Rev. J
SendSuite® Shipping
Administrator Guide
SendSuite® Shipping Server • 1
SendSuite
Database
Maintenance
Understanding the
Transaction Log
The transaction log is a record of all modifications — inserts, updates, and
deletes — that have occurred in the database. The transaction log is used in
case a database is badly damaged. A user could recover all or most of the
same data using the transaction log. (The user could restore the previous day's
database, apply the transaction log, and have no data lost.) The transaction log
is also used for debugging purposes. Because changes to the database are
not necessarily written to disk immediately, this log is the only means whereby
transactions can be recovered in the event of a system failure.
If a data file is damaged and must be restored from backup, all of the
transactions that have occurred on that data file must be replayed to recover
the database to the point just before the failure. Because the transaction log is
critical for this process and has limited space, transaction log backups must be
performed. You must save all of the transaction log data that has been generated
since the last backup to recover the database.
The default setting is to Automatically Grow file by 10 Percent with unrestricted
file growth.
Depending on the number of changes to your database, with the default setting,
the transaction log can grow to be quite large. Because the transaction log is
a finite set of one or more files, it will eventually be filled and therefore must be
truncated periodically. The log is automatically truncated at the completion of a
log backup.
Although the log is truncated during the backup, its physical size is not affected.
For example, if you allow the transaction log to grow to 600MB, then truncate it,
its file space being used might be 20MB, but it still takes up 600MB of space on
the disk. You can shrink the size of the log file. Refer to on-line help on Microsoft
SQL Server for additional instructions.
It is important that you set up the database maintenance plan in order to
control the disk space usage. Do not delete log files. See Creating a Database
Maintenance Plan on page 1-8. You also can refer to Microsoft SQL Books
Online for information on Optimizing Transaction Log Performance.
SVTS9117 Rev. J
SendSuite® Shipping
Administrator Guide
1-21
1 • SendSuite® Shipping Server
SendSuite
Database
Maintenance
Backing Up
Other Critical
Information
1-22
Some critical data is not stored in the database. Make sure you have a backup of
the following directories as well:
•
C:\Documents and Settings\All Users\Pitney Bowes\SendSuite Shipping\
Rates — This directory, with its sub-directories, contains binary rate tables
used for rating shipments.
•
C:\Documents and Settings\All Users\Pitney Bowes\SendSuite Shipping\
dat — This directory contains files used to calculate expected delivery dates,
geographic locations, and carrier label formats.
•
C:\Documents and Settings\All Users\Pitney Bowes\SendSuite Shipping\rpt
— This directory contains the format files needed to print SendSuite reports
and .rpx files used for any Active X reports.
•
C:\Documents and Settings\All Users\Pitney Bowes\SendSuite Shipping\rpx
— This directory contains any custom reports that you create.
SVTS9117 Rev. J
SendSuite® Shipping
Administrator Guide
SendSuite® Shipping Server • 1
Restoring the
SendSuite
Database
Restoring the SQL
Database
If necessary, you can restore the SendSuite Database from a backup file.
Restoring the database may be necessary for a number of reasons, but it should
only be done when other options have been exhausted.
When you restore the SQL database, you replace all the current records with
what is in the backup file. That means, if you entered new data since the last
backup, when you restore the database, you will lose that new information.
Complete the steps below to restore your backup data using SQL 2000.
This procedure restores the database that holds the shipment processing
records, in addition to other data stored in the SendSuite Database.
This procedure does not restore the SendSuite setup data, which includes
the system’s carrier rates, report formats, and other data, find and restore
those folders. See Backing up other Critical Information on page 1-22 for more
information.
To restore the SQL database:
1. Copy the backup file to the MSSQL Backup folder. For example, C:\
MSSQL7\Backup\MyBackup.bak.
2. From the Windows® Start menu, click Programs > Microsoft SQL Server >
Enterprise Manager.
3. Double-click Microsoft SQL Servers.
4. Double-click SQL Server Group.
5. Click the + sign next to the Server Name and highlight the server name.
6. Click the + sign next to the Databases folder.
7. Select ConquestDB.
8. From the Tools menu, select Restore Database.
SVTS9117 Rev. J
SendSuite® Shipping
Administrator Guide
1-23
1 • SendSuite® Shipping Server
Restoring the
SendSuite
Database
9. Select From device.
Restoring the SQL
Database
10. Click the Select Devices button to specify the device and its path.
11. From the Choose Restore Devices dialog box, click Add.
12. Select the Restore destination by clicking
to search for the file name.
13. From the Backup Device Location dialog box, enter the appropriate file name
in the File name field and click OK. For example, MyBackup.bak.
The Device name should display on the Choose Restore Destination dialog
box.
14. Click OK.
15. From the Choose Restore Devices dialog box, click OK.
1-24
SVTS9117 Rev. J
SendSuite® Shipping
Administrator Guide
SendSuite® Shipping Server • 1
Restoring the
SendSuite
Database
16. Click the Options tab and review the restore options.
Restoring the SQL
Database
17. Click OK. The Restore process begins.
When the backup process is complete, the following message is displayed:
Restore of database ‘ConquestDB’ completed successfully.
18. Click OK to clear the message box.
19. From the Tools menu, select SQL Query Analyzer.
20. Click the Open button.
21. Find DBSync.sql.
22. This file resets the users on the ConquestDB and Master databases. The file
can be found in C:\Program Files\PBTranscape\Conquest\CQAttach\. Open
the file and execute it.
22. Close the Query Analyzer and Enterprise Manager.
SVTS9117 Rev. J
SendSuite® Shipping
Administrator Guide
1-25
1 • SendSuite® Shipping Server
This Page Intentionally Blank
1-26
SVTS9117 Rev. J
SendSuite® Shipping
Administrator Guide
2
Supporting Data
Consignee Data .................................................................... 2-4
Adding a Consignee ....................................................... 2-4
Country Data ........................................................................ 2-6
Modifying Country Data .................................................. 2-7
Commodity Data ................................................................... 2-8
Adding a Commodity Code............................................. 2-8
Product Data......................................................................... 2-9
Adding a Product ............................................................ 2-9
Product Fields ......................................................... 2-10
International Products ..............................................2-11
Remark Codes.................................................................... 2-12
Adding a Remark Code ................................................ 2-12
Standard Carrier Alpha Codes (SCAC) .............................. 2-13
Shipper Alert ....................................................................... 2-14
Creating a Shipper Alert ............................................... 2-14
Deleting a Shipper Alert ................................................ 2-15
Shipper Handling Fees ....................................................... 2-16
Setting Up PRO Numbers and Tracking Numbers ............. 2-18
Rate Shop Groups .............................................................. 2-20
Creating Rate Shop Groups ......................................... 2-20
Dual Rating ................................................................... 2-21
Routing Instructions ............................................................ 2-22
Setting Up Routing Instructions .................................... 2-22
Applying Routing Instructions to a Consignee, Agent, or
Shipper ......................................................................... 2-24
Setting Routing Instruction Priority ............................... 2-25
Adding a Route ID Field to the Shipment Processing
Screen .......................................................................... 2-25
Batch Rating ....................................................................... 2-26
Groups .......................................................................... 2-26
Plan Shipments ............................................................ 2-26
Batch Labeling .............................................................. 2-27
Accounting Features........................................................... 2-28
Configuring Accounts and Account Sets ...................... 2-28
Creating Accounts .................................................. 2-28
SVTS9117 Rev. J
®
SendSuite Shipping
Administrator Guide
2-1
2
Supporting Data
Creating Account Sets ............................................ 2-28
Account Validation ........................................................ 2-29
Using the Accounting Fields ......................................... 2-29
Additional Supporting Data ................................................. 2-30
System Configuration ................................................... 2-30
Auto Numbers ......................................................... 2-30
Privacy Statement and Legal Notice....................... 2-31
Proxy Server ........................................................... 2-31
Workstation Configuration ............................................ 2-32
Email Setup ............................................................ 2-32
Peripheral Setup ..................................................... 2-32
E-Track Setup ......................................................... 2-33
Account ................................................................... 2-33
Currency Exchange ................................................ 2-33
Data .............................................................................. 2-33
Department ............................................................. 2-34
Distance .................................................................. 2-34
Division ................................................................... 2-35
Dock Hours ............................................................. 2-35
Export Licence ........................................................ 2-36
Freight Class........................................................... 2-36
Geograph ................................................................ 2-37
HTS......................................................................... 2-38
Letter of Credit ........................................................ 2-39
Mode Code ............................................................. 2-39
Ports ....................................................................... 2-40
Units........................................................................ 2-40
Unit Conversion ...................................................... 2-40
Manifest Setup ........................................................ 2-41
Airborne Commission ............................................. 2-41
Carrier & Labels............................................................ 2-41
Configure StreetSmart Data ................................... 2-42
ONTR (OnTrac Communication) ............................ 2-42
EANC (Load EANC Rates) ..................................... 2-42
SVTS9117 Rev. J
SendSuite® Shipping
Administrator Guide
2-2
2
Supporting Data
UPS ........................................................................ 2-42
USPS ...................................................................... 2-43
Tariff Setup ............................................................. 2-43
Carrier Setup .......................................................... 2-43
Binary Carrier Data ................................................. 2-43
Rates ............................................................................ 2-43
Package Type ......................................................... 2-44
Labels ..................................................................... 2-44
Rate Shop Group .................................................... 2-45
Routing Instructions ................................................ 2-45
Route Priority .......................................................... 2-45
Shipment Planning Setup ............................................. 2-45
Selection Criteria .................................................... 2-46
Default Settings ...................................................... 2-46
SVTS9117 Rev. J
SendSuite® Shipping
Administrator Guide
2-3
2 • Supporting Data
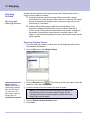
Consignee Data
Adding a
Consignee
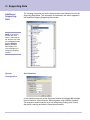
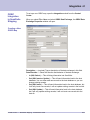
In SendSuite, the Consignee represents the party that the shipment is going to.
Consignee information is stored in tblAddress. The information also may display
on the shipping screen, although the shipping screen is using vConsignee.
Complete the following steps to add a consignee while in the Supporting Data
module.
To add a consignee:
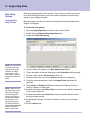
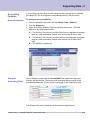
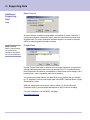
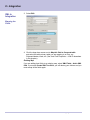
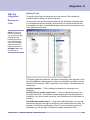
1. Open the Data folder in the Supporting Data Selection window.
2. Double-click Address.
3. Click the blank record icon.
4. Type the new consignee’s I.D. in the Address ID field.
5. Check the box to the left of Consignee.
6. Click the Address tab.
7. Type the new consignee’s address information in the appropriate fields.
8. Click the Detail 1 tab.
9. Populate the appropriate fields on the Detail 1 tab.
10. Click the Detail 2 tab.
11. Populate the appropriate fields on the Detail 2 tab.
12. Click the Message tab.
13. If necessary, type an alert message to be displayed when shipping to this
consignee.
14. Click the Consignee tab.
15. Populate the appropriate fields on the Consignee tab.
16. Click the Save button.
2-4
SVTS9117 Rev. J
SendSuite® Shipping
Administrator Guide
Supporting Data • 2
Consignee Data
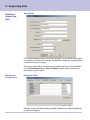
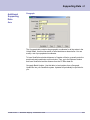
17. If this consignee has an account with a specific carrier, then:
a. Click the Carrier Accounts button.
Adding a
Consignee
b. Click the drop-down arrow in the Payee ID field.
c. Type the consignee’s account number with that carrier in the Account
Number field.
NOTE: You must install
the carrier before setting up its accounts.
See SVTS9129 for
more information on
installing carriers.
d. Click the Save button.
e. Click the blank record icon and repeat steps a through Step d to add any
additional carrier accounts.
18. Click the Save button in the Address window.
SVTS9117 Rev. J
SendSuite® Shipping
Administrator Guide
2-5
2 • Supporting Data
Country Data
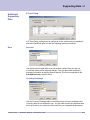
The Country table contains all the known 2-character ISO country codes. These
codes link to all addresses used for shipping. Most of this data is pre-populated
by Pitney Bowes and should not be modified.
NOTE: You can override the number of copies by printing the documents to the screen and
changing the number of
copies.
You can make the following changes on the country table:
•
You can identify which documents need to be printed for each country. To do
so, type 1 in the field for the number of copies (see below).
When you do this, there is no need to check the document boxes on the
shipping screen. The system will look at vConsignee.ConsISOCountryCode
and relate that to the flag on tbl.Country.
•
You can specify the number of copies of each document you want to print.
This process only works with if the Print International Docs event or subevent is set to print to the printer. See Processing Events in Chapter 3 of this
guide.
2-6
SVTS9117 Rev. J
SendSuite® Shipping
Administrator Guide
Supporting Data • 2
Country Data
To modify country data:
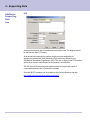
1. On the Administrative Workstation, open the Supporting Data module.
Modifying Country
Data
2. Double-click the Data folder.
3. Double-click Country.
4. Select the country.
•
Type the 2-digit ISO country code in the field provided, then press Tab.
- OR -
•
From the drop-down, select the country you want to modify.
5. In the # of Copies Documents Required box, type the default number of
copies for each type of document.
6. Click Save.
SVTS9117 Rev. J
SendSuite® Shipping
Administrator Guide
2-7
2 • Supporting Data
Commodity
Data
Adding a
Commodity Code
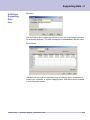
The commodity code is stored in tblCommodity. The commodity code is related
to a value on tblFreightClass. SendSuite uses the freight class to query LTL
tariffs.
In order to use LTL class tariffs, each line on the shipping screen must have a
commodity code.
When SendSuite prints the bill of lading, it references tblCommodity by the
Commodity Code, then imports the description and freight class to the bill of
lading. The commodity code does not appear on the bill of lading. If you want the
code to appear, then you can make it part of the Description.
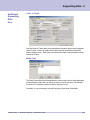
To add a commodity while in the Supporting Data module:
1. Open the Data folder in the Supporting Data Selection window.
2. Double-click Commodity.
3. Click the blank record icon.
4. Populate the following fields:
•
Commodity Code
•
Description/Hazard Info
•
Freight Class
•
Division
5. If necessary, populate the other fields listed in the Commodity window.
6. Click Save.
2-8
SVTS9117 Rev. J
SendSuite® Shipping
Administrator Guide
Supporting Data • 2
Product Data
Product information is used when printing export documentation. Product fields
are found on tblShipmentLine and tblIntlLine.
Adding a Product
Product information can be stored in SendSuite in tblProduct. The data in this
table is linked to the tables used in shipping.
You can set up your integration with SendSuite to map data directly to
tblProduct, but it is not necessary to do so. All export documents will print using
the data on tblIntlLine.
Adding product information to SendSuite is optional. Adding these records allows
you to quickly insert information into shipping lines when you are processing
a shipment. When you select a product, other line item fields may populate
automatically, saving time and minimizing data entry errors.
When processing international shipments, a great deal of product information is
required. By populating the product table, you can save valuable time.
To add a product while in the Supporting Data module:
1. Open the Data folder in the Supporting Data Selection window.
2. Double-click Product.
3. Click the blank record icon.
4. Type the product name or number in the Product # field.
5. Input other fields as necessary (see Chapter 2 of this guide).
6. Click Save.
SVTS9117 Rev. J
SendSuite® Shipping
Administrator Guide
2-9
2 • Supporting Data
Product Data
Adding a Product
2-10
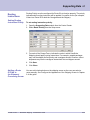
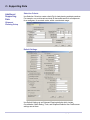
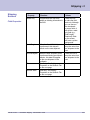
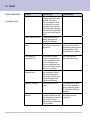
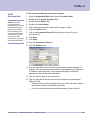
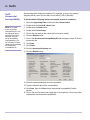
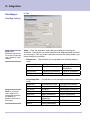
Product Fields
The only required field to input a product is the Product # field. The following
fields will be brought over to the shipping line when the product number is
entered in the shipment processing screen. To bring these fields over, the
shipment processing screen must be set up to retrieve information from
tblProduct. (See Field Properties in Chapter 3 of this guide.)
tblProduct
tblShipmentLine
Description
ItemDescription
CommodityCode
CommodityCode
Weight
Weight
Length
Length
Width
Width
Height
Height
Volume
Volume
SVTS9117 Rev. J
SendSuite® Shipping
Administrator Guide
Supporting Data • 2
Product Data
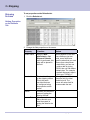
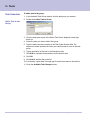
International Products
Adding a Product
For international shipments, the following fields will be brought over into shipping
if the product number is input in the International Detail window.
SVTS9117 Rev. J
tblProduct
tblIntlLine
ProductNr
ProductNr
Description
ProductDescription
ISOCountryCode
CountryMfg
UnitPrice
UnitPrice
PricingUnit
PricingUnit
Weight
NetWeight (this is the product of
product weight * quantity)
WeightUnit
WeightUnit
ECCN
ECCN
HTSNr
HTSNr
HTSDescription
HTSDescription
HTSQuantityUnits
HTSQuantityUnits1
HTSQuantityUnits2
HTSQuantityUnits2
LicensedProduct
LicensedProduct
NAFTALevel
NAFTALevel
NAFTANetBeginDate
NAFTANetBeginDate
NAFTANetEndDate
NAFTANetEndDate
NAFTAPrefCrit
NAFTAPrefCrit
NAFTANetCost
NAFTANetCost
SEDLicense
SEDLicense
SendSuite® Shipping
Administrator Guide
2-11
2 • Supporting Data
Remark Codes
Adding a Remark
Code
On the shipping screen SendSuite, you can type a code that will import remarks
to print on the bill of lading. These codes are stored in tblRemarks.
To add a remark code:
1. Open the Supporting Data module from the Control Center.
2. Open the Data folder in the Supporting Data Selection window.
3. Double-click Remarks.
4. Click View Remarks Type.
5. Select BOL.
6. Click OK.
7. Type a unique code to identify the new remark in the Remarks Code field.
8. Type the specific remark in the Remarks field.
9. Click Save.
2-12
SVTS9117 Rev. J
SendSuite® Shipping
Administrator Guide
Supporting Data • 2
Standard
Carrier Alpha
Codes (SCAC)
SendSuite carrier tariff records and address records require a Standard Carrier
Alpha Code (SCAC). These values are saved on tblCarrierSCAC.
To input a new SCAC:
1. Open the Supporting Data module from the Control Center.
2. Double-click the Carrier & Labels folder.
3. Double-click SCAC Codes.
4. Click the New button on the tool bar.
5. Type the SCAC code in the SCAC Code field.
NOTE: MAC certification is used by the
United States Postal
Service for manifesting,
analysis, and certification purposes.
6. Type the carrier’s name in the Carrier Name field.
7. Optional: You can add the carrier’s URL. This information links to the Web
Track feature on the shipping screen.
8. Optional: You can add information for the carrier's MAC certification.
9. Optional:Select Display Pending Transmission Status Message to enable
pending transmission messages on the thin-client workstation (for this SCAC
code only).
10. Click Save.
SVTS9117 Rev. J
SendSuite® Shipping
Administrator Guide
2-13
2 • Supporting Data
Shipper Alert
Creating a Shipper
Alert
A shipper alert is a message that will appear in the shipping screen when a
specific consignee is selected. The shipper alert must be part of the consignee
address record before the user accesses the record. For example, if you bring
consignee data as part of an ODBC integration script, the consignee data is
written at the same time the shipment is written. Therefore, the user is not
selecting the consignee record, and the shipper alert will not display.
If you add a shipper alert to an address record following the instructions below,
SendSuite will overwrite the alert when a new ODBC script is run. To retain a
shipper alert message with ODBC integration, the message must be part of the
data map.
To manually attach or remove a message from a consignee address record:
1. Open the Supporting Data Module from the Control Center.
2. Double-click Address.
3. Click the drop-down arrow in the Address ID field and select the consignee.
4. Click the Message tab.
NOTE: There is no
override in the shipping
screen to allow a shipment to be processed.
To process shipments
for that consignee, you
must click the Allow
process to continue
circle or delete the shipper alert. See Deleting a
Shipper Alert in Chapter
2 of this guide.
5. Type your message in the Message Alert Text field.
6. If you want SendSuite to display the message and prevent the shipping
operator from further processing the shipment, then click the circle next to Do
NOT allow process to continue.
7. Click Save.
2-14
SVTS9117 Rev. J
SendSuite® Shipping
Administrator Guide
Supporting Data • 2
Shipper Alert
To delete a shipper alert:
1. Open the Supporting Data Module from the Control Center.
Deleting a Shipper
Alert
2. Click the drop-down arrow in the Address ID field and select the consignee.
3. Click the Message tab.
4. Click the Clear Message Alert button.
5. Click Save.
SVTS9117 Rev. J
SendSuite® Shipping
Administrator Guide
2-15
2 • Supporting Data
Shipper
Handling Fees
Handling charges are referred to as shipper charges. Handling charges can be
set up to be applied globally or can be set up to specific consignees. There are
many ways a shipper may want to apply a handling fee.
For example:
NOTE: When you
process shipments,
the handling charge
displays in the Shipper
Costs field of the
Freight Costs tab.
•
If the carrier is ABC and the service is GRD, apply a 5% handling fee to the
gross freight charge.
•
If the carrier is ABC and the service is NAM, apply a 10% handling fee to the
net freight charge.
•
If the commodity 123 is ordered and the dollar amount of the order is less
than $100, apply a $5 handling fee.
•
If the commodity 123 is ordered and the dollar amount of the order is
between $100 and $500, apply a $10 handling fee.
To set up a handling fee:
1. Click Setup > Data… > Shipper Handling Fees.
2. Click the Lookup icon
shipper record.
next to the Shipper ID and select the appropriate
NOTE: A series of records can be entered so that different handling
charges can be assessed to different consignees. This indicates that
this is the global handling charge to be applied to all consignees.
There can be only one global record for each shipper. For a global
record, you do not select a Consignee ID.
If you want to make the handling charge consignee specific, from
the Consignee ID list, select the consignee.
3. Type a name in the Handling ID field.
4. If appropriate, enter a Minimum Handling Charge. The minimum handling
charge is applied if the shipment doesn’t meet the select criteria specified.
2-16
SVTS9117 Rev. J
SendSuite® Shipping
Administrator Guide
Supporting Data • 2
Shipper
Handling Fees
5. From the Apply For drop-down list, select the application type.
•
P — criteria and action evaluated per piece
•
S — criteria and action evaluated for shipment totals
6. After entering the header information, click Save
.
7. Build a table of criteria ranges and the associated handling charge.
NOTE: You can also
specify handling
charges to be a
percentage of the cost
of goods instead of a
flat dollar amount.
You can enter the information directly on the grid or you can click Detail
and enter the information on the Shipper Handling Fee Detail screen.
Example: If the cost of goods is between 1.00 and 49.99 dollars, apply an
additional 10.00 dollar handling charge. If the cost of goods is between 50.00
and 99.99 dollars, apply a 20.00 dollar handling charge.
Field Definitions
Goto Tag
Identifies this location as the start of a subset of handling
rules.
Criteria
Identifies which shipment information will be used to
make comparisons for handling decisions. For example,
COST OF GOODS.
Units
Used to further specify information about the criteria for
weight types.
Low Value
Low comparison value for range-based criteria or exact
match for text criteria.
High Value
High comparison value for range-based criteria only.
Action
Defines an action that is to be performed if the criterion
evaluates to true. This may be used to calculate a
handling charge or to skip to a section defined by a TAG.
For example, Flat Amount.
Parameter
This is a flat amount or percentage used to compute
the handling charge, or a TAG to refine the handling
instructions.
8. Click Save to save any entries or changes you have made.
SVTS9117 Rev. J
SendSuite® Shipping
Administrator Guide
2-17
2 • Supporting Data
Setting Up
PRO Numbers
and Tracking
Numbers
To input your carrier PRO numbers and tracking numbers:
1. Open the Supporting Data module from the Control Center.
2. Open the Carrier & Labels folder.
3. Double-click Pro Numbers.
NOTE: If SendSuite
generates a PRO
number or tracking
number for all your
shipments, you must
set up PRO numbers
or tracking numbers for
every carrier.
4. If you are inputting PRO numbers for a new carrier, follow these steps:
a. Click the New button.
b. Click the binoculars button and select the shipper.
c. Type or select the carrier ID in the Carrier ID field.
d. Type or select the service that the pro numbers will to in the Service field.
e. Click the drop-down arrow in the Check Digit Algorithm field and select
the configuration that meets your carrier and service.
NOTE: If you do not need PRO numbers or tracking numbers
for this carrier, then select No pro number for this carrier/
service. You may save the record at this point; do not
complete the rest of the fields.
If you determine the PRO number at the time of shipment (for
example, if you use labels or the PRO number is given to you
by the truck driver), select Prompt for PRO numbers. You
may save the record at this point; do not complete the rest of
the fields.
5. Type or select the block number you will be using in the Block in Use field.
6. Type the first number in the Beginning field.
7. Type the last number you were given in the Ending field.
8. Type the next number you will use in the Current field.
2-18
SVTS9117 Rev. J
SendSuite® Shipping
Administrator Guide
Supporting Data • 2
Setting Up
PRO Numbers
and Tracking
Numbers
9. If you want SendSuite to warn you when you are getting low on numbers,
type the warning number in the Warning field.
10. In the Roll Over field, select an option that will tell SendSuite what to do
when it reaches the ending number in that block.
•
Roll over to other block — When the last number is used, SendSuite
will start using the numbers in the other block.
•
Roll over and reset — When used for Block 2, SendSuite will notify you
that you have depleted your numbers in both blocks. If you input new
numbers in Block 1, SendSuite will automatically roll over and start using
those numbers.
•
Start over at block’s beginning — When the last number is used,
SendSuite will go back and start from the beginning number. SendSuite
will re-use the numbers in the block.
•
Stop — When the last number is used, SendSuite will alert you that you
have used the last number and will not allow you to process another
shipment for that carrier until new numbers are input.
11. Click the Save button.
12. Click the Close button.
SVTS9117 Rev. J
SendSuite® Shipping
Administrator Guide
2-19
2 • Supporting Data
Rate Shop
Groups
Creating Rate
Shop Groups
Rate shop grouping allows you to specify a set of carriers or carrier services to
be used in the rating process. You can also add a drop-down list of rate shop
groups to your shipping template.
Rate shop groups can also be used with routing instructions associated with a
shipper or consignee.
To create rate shop groups:
1. Open the Supporting Data module from the Control Center.
2. Double-click the Shipment Planning Setup folder.
3. Double-click Rate Shop Group.
NOTE: It is a good idea
to describe your rate
shop group for future
reference. Including
a description of the
logic used to create the
group will be helpful for
others.
4. Type the name of the group in the Rate Shop Group ID field.
5. Type a description of the rate shop group in the Description field (optional).
6. Select a carrier from the Carrier ID drop-down list.
7. Select the carrier service from the Service drop-down list (optional).
8. Select the carrier charge terms from the Charge Terms drop-down list
(optional).
9. The Penalty and Penalty (%) fields are used for Dual Rating. See Dual
Rating in Chapter 2 of this guide.
NOTE: Using the Don’t
Use field gives you the
flexibility of changing
the rate shop group
quickly in the future. If
you decide to change
the makeup of your
rate shop group, you
can simply check the
boxes under Don’t Use
instead of having to
insert or delete lines.
2-20
10. Select the checkbox under Direct Only to screen-out any interline shipments
for this carrier (optional).
11. Select the checkbox under Don’t Use to have SendSuite skip this carrier
during the rating process.
12. Repeat steps 6 through 11 for all the carriers you want in your rate shop
group.
13. Click the Save button.
SVTS9117 Rev. J
SendSuite® Shipping
Administrator Guide
Supporting Data • 2
Rate Shop
Groups
Dual Rating
When you perform the Rate event on the SendSuite Shipping workstation,
SendSuite Shipping selects the carrier with the lowest routing cost. Without using
a rate shop group, the routing cost is the same as the net freight.
You can using the rate shop group to modify the routing cost, affecting how
SendSuite Shipping rates a shipment.
For example, if Joe’s Trucking and Fred’s trucking charge similar rates, but you
prefer to use Joe’s, then you can use dual rating so SendSuite Shipping selects
that carrier more often than it selects Fred’s. Using the rate shop group feature,
you can make Joe’s rates look 10% less expensive than Fred’s. The routing cost
will not display on the screen for the user.
To set up dual rating:
1. Follow the instructions in Chapter 2 to set up the rate shop group.
2. If you want the routing cost to be based on a flat amount, type that amount
in the Penalty field. For example, if you want Joe’s to look $10 cheaper than
Fred’s, type -10 in the Penalty field.
3. If you want the routing cost to be based on a percentage, type that
percentage in the Penalty (%) field. For example, if you want Joe’s to look
10% cheaper than Fred’s, type -10 in the Penalty (%) field.
SVTS9117 Rev. J
SendSuite® Shipping
Administrator Guide
2-21
2 • Supporting Data
Routing
Instructions
Setting Up Routing
Instructions
Routing instructions specify how shipments will be routed and rated for a
particular shipper, agent, consignee, bill-to, or ship-for parties. You can use
routing instructions to select carriers and rates.
You can specify the priority for determining which routing ID to assign to a
shipment based on charge terms by setting up route priorities.
You can also add a field to your shipment processing screen, allowing your
shipping operator to type or select a routing instruction during shipping.
To set up routing instructions:
1. Open the Supporting Data module from the Control Center.
2. Double-click the Shipment Planning Setup folder.
3. Double-click Routing Instructions.
4. Type a unique ID or name for the routing instructions in the Route ID field.
5. Type a description for the routing instruction in the Description field
(optional).
6. Use the Instructions field to display a pop-up message when using the Call
For Instructions Action in Chapter 2 of this guide. Type the message you
want to appear in this field.
NOTE: The label lines
need to be in order from
the first one you want
to check to the last one.
SendSuite Shipping will
stop when it reaches
the first true condition in
the routing instruction.
2-22
NOTE: Although optional, a detailed description is very
helpful for future reference or for others who want to
understand the purpose of the routing instructions. Explaining
the logic used to create the routing instruction would be a
helpful description.
7. Click the cursor in the Label column of the instruction line.
SVTS9117 Rev. J
SendSuite® Shipping
Administrator Guide
Supporting Data • 2
8. Type the label.
Routing
Instructions
9. Populate the following fields:
Setting Up Routing
Instructions
NOTE: You can use a
descriptive term (such
as Oversized) or just a
letter or number (a, b, c
or 1, 2, etc.).
•
Criterion—Click the drop-down list and select the field SendSuite
Shipping should look for when applying the routing instruction.
NOTE: If you select Default as the criterion, do not tab past
the Units field. If you do tab past the Units field, SendSuite
Shipping will force you to select a specific carrier and will not
allow you to default to all carriers.
If you accidentally tab into the next fields, you will get a
series of error messages. Click OK to exit these messages.
Then, delete the line you created and start again.
•
Units — Select the unit of measurement to use, if applicable.
•
Low Val — Enter the lowest value for which you want this instruction to
be used to rate shipments.
•
High Val — Enter the highest value for which you want this instruction to
be used to rate shipments, if applicable.
10. Click the cursor in the Action field.
11. Click the drop-down arrow in the Action field and select one of the following
actions:
•
G — The Go to Label refers to another line in your routing instructions.
•
C — The Assign Carrier assigns a specific carrier or service.
•
R — The Rate Shop Group assigns a rate shop group.
•
I — The Call for Instructions displays a pop-up message containing the
text entered in the Instructions field.
12. If you selected G, C, or R in the Action field, select one of the following items
in the Goto Label/Carrier/Rate Shop Group field:
•
G — Type the name of the label you want the instructions to go to.
•
C — Select a specific carrier from the drop-down list.
•
R — Select a specific rate shop group from the drop-down list.
13. If you selected C in the Action field, you have the option to specify terms in
the Service and Charge Terms fields (both fields are optional).
•
Select a specific carrier service to apply to the shipment.
•
Select charge terms to apply to the shipment.
14. Follow Step 7 through Step 13 for all additional conditions you want to apply
to this set of instructions.
15. Click the Save button to save the routing instructions.
16. Click Close to exit the routing instruction window.
SVTS9117 Rev. J
SendSuite® Shipping
Administrator Guide
2-23
2 • Supporting Data
Routing
Instructions
Applying Routing
Instructions to a
Consignee, Agent,
or Shipper
To apply routing instructions to a consignee, agent, or shipper:
1. Open the Supporting Data module from the Control Center.
2. Double-click Data.
3. Double-click Address.
4. From the Address ID drop-down list, select to whom you want to assign the
routing instructions.
5. Click the Detail 1 tab.
6. From the Route ID drop-down list, select the ID for the routing instructions
you want to assign.
7. Click Save.
2-24
SVTS9117 Rev. J
SendSuite® Shipping
Administrator Guide
Supporting Data • 2
Routing Priority must be configured for Route IDs to function properly. The priority
indicates which routing instruction will be applied if a conflict occurs (for example,
if there is a Route ID for both the Consignee and the Shipper).
Routing
Instructions
Setting Routing
Instruction Priority
To set routing instruction priority:
1. Open the Supporting Data module from the Control Center.
2. Select Route Priority from the Setup menu.
3. For each of the Charge Terms, indicate the order in which SendSuite
Shipping should apply routing instructions. For example, prepaid packages
may use the shipper as first priority and consignee second. However, collect
shipments may use the consignee instructions first and shipper second.
4. Click Save.
5. Click Close.
Adding a Route
ID Field to
the Shipment
Processing Screen
SVTS9117 Rev. J
You can add a lookup button on the shipping screen so the user can select a
route manually. See Configure the Appearance of the Shipping Screen in Chapter
3 of this guide.
SendSuite® Shipping
Administrator Guide
2-25
2 • Supporting Data
Batch Rating
While most packages or shipment are processed one at a time, there may be a
need to process a group of packages all at once. SendSuite Shipping supports
this need with its Batch Rating Feature.
Batch Rating can be done the following ways:
•
It can be done on the Shipping Workstation.
•
Interactive batch rating can be done through the use of a script.
•
It can be done as part of a scheduled task on the Administrative Workstation.
See Task Scheduler in Chapter 5 of this guide.
\
This document provides an explanation of what happens during the batch rating
process.
Groups
To rate shipments in a batch, they must first be grouped. When you create a
group, a new record is written to tblGroup. The Group ID is also saved with the
shipments on tblShipmentHeader, tblLoad, and tblStop.
Plan Shipments
When you execute the batch rating feature, it rates each shipment individually.
Please note the following conditions:
•
It does not pick up any routing instructions.
•
It will rate and save multipiece parcel shipments as a single shipment
(instead of using the MultiPack feature).
•
If there is a pre-specified carrier or service, it will use that information (for
example, if the shipment was saved with a NAM service, then it will be rated
using a NAM service).
Once the shipments have been rated, it will attempt to consolidate shipments
going to the same destination. It will attempt this consolidation when there is no
pre-specified carrier or when the shipments have a common carrier. Consider the
following examples:
2-26
•
Three shipments with no pre-specified carriers were grouped and rated. One
shipment was routed using Courier A, the second was routed using Courier
B, and the third was routed using Freight Carrier C. The system determined
that it is more cost effective to combine all the shipments into one shipment
using Freight Carrier C, so the first two shipments are re-rated and combined
with the third shipment.
•
Three shipments were grouped, each having Freight Carrier D already
specified. The system routed and rated them individually, then it re-routed
and re-rated them as a single shipment, combining their weight and pieces to
achieve a volume discount.
SVTS9117 Rev. J
SendSuite® Shipping
Administrator Guide
Supporting Data • 2
Batch Rating
Plan Shipments
Batch Labeling
SVTS9117 Rev. J
•
Three shipments were grouped. One shipment had Courier A as a prespecified carrier, the second and third shipment had no-specified carrier. The
system routed the first shipment using the pre-specified carrier. The second
shipment is routed using Courier B and the third shipment is routed using
Courier C. The system then determined that the second and third shipments
could be shipped more cost effectively using Freight Carrier D, so it re-routes
and re-rates them. The first shipment is not consolidated because it had a
pre-specified carrier.
Once the shipments have been routed and rated, you can print the labels in a
batch. This process is done on the shipping screen by running a VBScript as a
processing event. See Writing a Script in Chapter 8 of this guide for information
on VBScripts, and see Processing Events in Chapter 3 of this guide for a
description of how to create the shipping event.
SendSuite® Shipping
Administrator Guide
2-27
2 • Supporting Data
Accounting
Features
SendSuite Shipping includes accounting features that allow you to create
accounts for tracking and reporting purposes. Account Sets defines the
relationship between Accounts, Sub-Accounts, and Sub-Sub-Accounts. With this
relationship, the you can have a hierarchical relationship between these fields, as
defined by the Account Set.
Configuring
Accounts and
Account Sets
Creating Accounts
You must create Accounts (and optional Sub-Accounts and Sub-Sub-Accounts)
before creating Account Sets. Use the Instructions below to create Accounts,
Sub-Accounts and Sub-Sub-Accounts.
To create accounts:
1. Open the SendSuite Shipping thin-client and click Setup > Data and select
either:
•
Account
•
Sub-Account
•
Sub-Sub-Account
2. Type an appropriate account and description, then click Save
.
3. Repeat steps 1 and 2 for every account you wish to create.
Creating Account Sets
NOTE: Account Sets
must be associated with
a valid Account ID. SubAccounts and Sub-SubAccounts are optional.
1. Open the SendSuite Shipping thin-client and click Setup > Data > Account
Sets.
2. Type a new Account Set ID and Description.
3. Use the lookup icons
to search for an Account ID.
4. (optional) Use the lookup icons
Account IDs.
5. Click Save
2-28
to search for Sub-Account and Sub-Sub-
.
SVTS9117 Rev. J
SendSuite® Shipping
Administrator Guide
Supporting Data • 2
If you configure Account Sets for accounting use, the accounts can be validated
per shipper ID. This is configured on the Address record (in the thin-client).
Accounting
Features
Account Validation
To configure account validation:
1. Open the SendSuite thin-client and click Setup > Data > Address.
2. Click the Shipper tab.
3. Select an Account Validation Type from the drop-down menu. (This field
defaults to V.) Valid values include:
V — The Account, Sub-Account, and Sub-Sub-Account selected must already
exist as a valid relationship. A blank in the account set ID field is valid.
X — The Account, Sub-Account, and Sub-Sub-Account selected must already
exist as a valid relationship. A blank in the Account Set ID field is NOT
valid.
N — No validation is performed.
Using the
Accounting Fields
Open a Shipping screen with the AccountSetID field enabled and type your
Account Set into the field. The Account and associated Sub-Accounts will be
automatically displayed. (These cannot be changed on the Shipping Screen).
See Chapter 4 for more information on viewing Accounting Reports.
SVTS9117 Rev. J
SendSuite® Shipping
Administrator Guide
2-29
2 • Supporting Data
Additional
Supporting
Data
The following information covers the less frequently-used features found in the
Supporting Data tables. This information is presented in the order it appears in
the SendSuite Shipping Supporting Data module.
NOTE: If you specify
that the user must
select a valid account
set, then the user must
use a Shipping Screen
with the Account
Set field available.
See Chapter 3 for
more information on
configuring Shipping
Screens.
System
Configuration
Auto Numbers
In Auto Numbers one can set the Sequence Number to increment Bill Numbers,
Invoice Numbers, Order Numbers, Status Numbers, and VICSBOL Numbers.
The sequence numbers can be set to use a Beginning, Ending, and Current,
along with a warning and when to Reset those numbers.
2-30
SVTS9117 Rev. J
SendSuite® Shipping
Administrator Guide
Supporting Data • 2
Additional
Supporting
Data
Privacy Statement and Legal Notice
When values are entered into the URLs for the Privacy Statement or Legal
Notice fields, the system will display links in the top right of the thin-client screen
to allow the user to navigate to these pages for reference.
Proxy Server
Proxy Server configuration supports the use of different proxy and tunnelling
methods for carrier communication such as USPS FTP.
SVTS9117 Rev. J
SendSuite® Shipping
Administrator Guide
2-31
2 • Supporting Data
Additional
Supporting
Data
Email Setup
If you setup password resets for SendSuite Shipping, use the Email Setup screen
to configure your email server settings. Configuration settings will vary depending
on each email server's settings.
To test your email settings, enter your server settings and type an email address
in the To Email Address field. Click Test Email, and an email should arrive at
the address you just entered.
Workstation
Configuration
Peripheral Setup
Obsolete. Use the SendSuite Shipping Digital Dashboard to configure peripherals
in SendSuite Shipping.
2-32
SVTS9117 Rev. J
SendSuite® Shipping
Administrator Guide
Supporting Data • 2
Additional
Supporting
Data
E-Track Setup
In E-Track Setup, settings can be configured for the various carriers regarding if
and when SendSuite goes out and tries updating tracking information.
Data
Account
Use the Account Number table to set up account numbers that you can use
to maintain orders and/or shipping charges. One may also obtain detailed or
summary information by printing account reports. This field corresponds to the
Sub-Sub-Account in the thin-client.
Currency Exchange
Use the Currency Exchange table to maintain foreign currency exchange rates.
Currency rates are not entered for you. You will need to enter the rates and keep
them up-to-date if you want them to be useful for your international documents.
SVTS9117 Rev. J
SendSuite® Shipping
Administrator Guide
2-33
2 • Supporting Data
Additional
Supporting
Data
Department
Data
Use the Department table to maintain a list of your organization’s departments
for accounting purposes. This field corresponds to the Sub-Account in the thinclient.
Distance
The Distance table contains distance information for each set of origin and
destination that your system has used to rate an LTL or truckload shipment.
For example, after you rate a shipment going from Minneapolis to Chicago, the
distance between those cities will display in the data file.
This is used for Distance Rated carriers, which requires installation of PCMiler
software
2-34
SVTS9117 Rev. J
SendSuite® Shipping
Administrator Guide
Supporting Data • 2
Additional
Supporting
Data
Division
Data
Use the Division table to optionally maintain a list of your organization’s divisions
for accounting purposes. This field corresponds to the Account in the thin-client.
Dock Hours
Use the Dock Hours table to maintain pickup and delivery hours of operation for
each of your customers’ or vendors’ shipping docks. Dock hours can be included
in route instruction reports.
SVTS9117 Rev. J
SendSuite® Shipping
Administrator Guide
2-35
2 • Supporting Data
Additional
Supporting
Data
Export Licence
Data
An export license is needed to ship certain commodities to certain countries. If
your product requires a license for export, enter the export license number and
expiration date. For many SendSuite overseas shippers, no license is required
(NLR) for ordinary goods to friendly countries.
NOTE: Standard
NMFC Freight Classes
are loaded during
installation and should
not require modification.
Freight Class
Use the Freight Class table to maintain a list of freight classes for your products.
A freight class determines the cost to ship a product by LTL or truckload carrier.
Each freight class is based on a combination of factors such as the weight, risk in
handling, bulk, value, competition and cost of handling.
You must have a freight class in this data file for every product that you will ship
by LTL shipment. Look up each freight class in the NMFC (National Motor Freight
Classification) Guide.
While the freight class value can be used for rating, you should utilize the
commodity code if you want freight descriptions to print on the bill of lading.
For more information, see the NMFC web page:
http://www.nmfta.org/
2-36
SVTS9117 Rev. J
SendSuite® Shipping
Administrator Guide
Supporting Data • 2
Additional
Supporting
Data
Geograph
Data
The Geograph table contains the geographic coordinates for all zip codes in the
United States. Use this information to calculate distance-based rates. You can
modify a set of pre-populated coordinates.
To have SendSuite calculate distances to Canada or Mexico, manually enter the
postal code and coordinates on this window. Then, go to the Distance window
and have SendSuite load the distance from the PC Miler data file.
Geograph Batch Update - Use this table to load updates from a Geograph
Update file into your SendSuite system. Updates will periodically be provided to
you.
SVTS9117 Rev. J
SendSuite® Shipping
Administrator Guide
2-37
2 • Supporting Data
Additional
Supporting
Data
HTS
Data
A harmonized code is like an international commodity code. The shipper should
be familiar with their HTS codes.
All products being exported to another country must be assigned their
appropriate Harmonized Tariff Schedule (HTS) number as defined by the
International Standards Organization (ISO). The first six digits of the HTS number
serves as a common identification for the product in all countries.
The US Census Bureau maintains statistics about the import and export of
commodities between the US and other countries.
Schedule B HTS numbers can be located on the Census Bureau's web site:
http://www.census.gov/foreign-trade/schedules/b/
2-38
SVTS9117 Rev. J
SendSuite® Shipping
Administrator Guide
Supporting Data • 2
Additional
Supporting
Data
Letter of Credit
Data
Use the Letter of Credit table to store detailed information about each consignee
letter of credit. A letter of credit verifies that funds will be available for goods
and/or shipping costs. Each letter must be saved under a unique alpha-numeric
reference number.
Mode Code
The Mode Code table stores transportation mode codes used in rating packages.
A transportation mode lets you specify a group of carrier services. For example,
the code “Air” indicates to select a rate for shipment by Air.
Generally, it is not necessary to modify anything in the Mode Code table.
SVTS9117 Rev. J
SendSuite® Shipping
Administrator Guide
2-39
2 • Supporting Data
Additional
Supporting
Data
Ports
Data
The ports of exit and entry can be entered here. This includes the Foreign Port
(Schedule K) information as well as the U.S. Port (Schedule D) information.
Units
Use the Units table to look up the units of measurement used in SendSuite
Shipping. This information is for viewing only, and cannot be changed.
Unit Conversion
Use the Unit Conversion table to look up how units of measurement are
converted to other units. This information is for viewing only, and cannot be
changed.
2-40
SVTS9117 Rev. J
SendSuite® Shipping
Administrator Guide
Supporting Data • 2
Manifest Setup
Additional
Supporting
Data
Carrier & Labels
NOTE: The Manifest
Setup is configured
during carrier
installation.
Use this feature to make required settings for carrier manifests. You can make
different settings for each shipper.
Airborne Commission
Obsolete. Airborne services have been replaced by DHL.
SVTS9117 Rev. J
SendSuite® Shipping
Administrator Guide
2-41
2 • Supporting Data
Additional
Supporting
Data
Configure StreetSmart Data
StreetSmart Address Verification data is installed using the Address Verification
install CD. See SVTS9128 for more information. Use this screen to notify the
SendSuite Shipping administrator before the Address Verification data expires.
Carrier & Labels
ONTR (OnTrac Communication)
Use this screen to set your User ID and password for OnTrac communication.
See SVTS9129 for more information.
EANC (Load EANC Rates)
Use this screen to manually download rates from Eastern Connection. See
SVTS9129 for more information.
NOTE: UPS
Communication is
configured during
carrier installation.
UPS
UPS Communication
Use the UPS Communication to setup the desired connection method to UPS.
This can be either direct Internet access or dial-up.
UPS Commission
Use UPS Commission to put the system in production, giving the system the
ability to ship UPS and transmit revenue files.
UPS DDU Basic Load
This is used under special circumstances where the customer negotiates basic
contract rates with UPS. Engineering is involved in creating files that are loaded
by a Service Representative.
UPS DDU PO Box Load
This is used under special circumstances where the customer negotiates basic
contract rates with UPS. Engineering is involved in creating files that are loaded
by a Service Representative.
UPS Lane Load
This is used under special circumstances where the customer negotiates basic
contract rates with UPS. Engineering is involved in creating files that are loaded
by a Service Representative.
2-42
SVTS9117 Rev. J
SendSuite® Shipping
Administrator Guide
Supporting Data • 2
UPS Support Files
UPS Support Files creates activity logs that are useful in troubleshooting
connectivity and transmission issues with UPS communications.
Additional
Supporting
Data
Carrier & Labels
USPS
Electronic Communication Setup
Use this screen to configure your FTP information for communicating with the
USPS.
NOTE: Delivery
Confirmation is
configured during
carrier installation.
Delivery Confirmation Setup
Use Delivery Confirmation Setup to specify the user name and password
along with the upload and download paths given by USPS to transmit Delivery
Confirmation Data.
Service Rate Category Setup
Use this screen to select Commercial Plus rates for USPS services, which
are significantly lower than retail rates. Before using Commercial Plus rates, a
shipper must meet certain USPS thresholds or have an existing agreement with
the USPS.
Install RDI Data
Use this to update the RDI address data given by the post office via CD through
a monthly subscription.
Rates
Tariff Setup
Please see Chapter 6: Tariffs for more information on tariff setup.
Carrier Setup
See Carrier Setup in Chapter 6 of this guide for more information.
NOTE: Binary Carrier
Data is configured
during carrier
installation.
Binary Carrier Data
The Binary Carrier Data Utilities dialog box contains the following tabs: Tariff,
Market Points, Interline, Service and US-Canada Zone.
SVTS9117 Rev. J
SendSuite® Shipping
Administrator Guide
2-43
2 • Supporting Data
Additional
Supporting
Data
The following fields are located on each tab:
•
Carrier ID - From the drop-down list, select the LTL Carrier whose rates and
zip to zone are stored in a proprietary Binary format.
•
Tariff - The identifier under which a set of rates are stored in SendSuite. The
Tariff ID may differ from the tariff name in the Tariff field, which is defined by
the carrier.
•
Effective Date - The date that the rates for this carrier and tariff become
effective.
•
Expiration Date - The date after which the discount lane will no longer be
used.
Rates
The Binary Z Tariff header information is located on the Tariff tab or US-Canada
Zone tab.
The Interline and Service tabs have an additional button: Update Points.
This allows you to modify the values previously configured in the system. This
should only be done in special circumstances. Logistics Services periodically
receives updates from the carriers and provides updates to the customers. Any
modifications should be sent (using e-mail) to Logistics Services.
Package Type
NOTE: Commonlyused package types
are loaded during
installation and should
not need modification.
Use this window to setup your package type codes. A package type is an
identifier for a type of package used in rating. For example, if you are rating using
letter rates, you may have a package type of LTR. Then, the user can select
letter rates with this code.
Labels
See Chapter 7: Labels for more information on labels.
Label Setup
Use the Label Setup window to define the content and purpose of labels in
SendSuite. Use one of the many label templates as the basis for labels. There
are four configured text fields on the labels that can be modified.
2-44
SVTS9117 Rev. J
SendSuite® Shipping
Administrator Guide
Supporting Data • 2
There are four types of labels:
Additional
Supporting
Data
Rates
•
Carrier Labels - Labels required by the carrier to designate the service.
•
Compliance Labels - Labels required by trading partners using EDI
standards. These are provided by a third-party supplier.
•
Billing Labels - Labels used for consignee billing.
•
Shipper (address) Labels - Labels used to indicate the origin and destination
addresses. If desired, you can use a different shipper label for each shipper
ID.
See Label Configuration in Chapter 7 for more information.
Label Selection
All of the predefined labels are selected from the Label Selection dialog box.
There are four different label types that are available. Each label type (or group)
has pre-defined label IDs that correspond to a carrier, consignee, trading partner,
etc.
See Selecting a Label in Chapter 7 for more information.
Shipment
Planning Setup
Rate Shop Group
See Rate Shop Groups in Chapter 2 for more information.
Routing Instructions
See Routing Instructions in Chapter 2 for more information.
Route Priority
This indicates indicate the order in which eTMS should apply routing instructions.
For example, prepaid packages may use the shipper as the first priority
and consignee second. However, collect shipments may use the consignee
instructions first and shipper second.
•
1st Priority - select the routing instructions you want to use first.
•
2nd Priority - select the routing instructions you want to use if the 1st priority
choice does not have any.
•
3rd to 5th Priority - select the routing instructions you want to use if the
previous choices do not have any.
See Setting Routing Instruction Priority in Chapter 2 for more information.
SVTS9117 Rev. J
SendSuite® Shipping
Administrator Guide
2-45
2 • Supporting Data
Additional
Supporting
Data
Selection Criteria
Use Selection Criteria to create criteria IDs for load planning and data searches.
For example, one could create a criteria ID that would search for all shipments
for a consignee, for a certain carrier, within a certain date range.
Shipment
Planning Setup
Default Settings
Use Default Settings to set Shipment Planning defaults which include,
Consolidation, Batch Rating, Truck, and Shipment Defaults. Also FedEx server
settings are set here.
2-46
SVTS9117 Rev. J
SendSuite® Shipping
Administrator Guide
3
Shipping
E-Track ................................................................................. 3-2
Data ................................................................................ 3-2
Tracking Shipments ........................................................ 3-2
International Documents....................................................... 3-4
Overview ......................................................................... 3-4
Using these Instructions ........................................... 3-5
Single values ............................................................ 3-5
Multiple Values ......................................................... 3-6
Calculated Values ..................................................... 3-6
Multiple Lines ............................................................ 3-6
Commercial Invoice ........................................................ 3-7
Certificate of Origin ........................................................3-11
NAFTA Certificate of Origin .......................................... 3-14
SED .............................................................................. 3-17
Shipping Screens ............................................................... 3-21
Creating a Custom Screen ........................................... 3-21
Configuring the Appearance of the Shipping Screen.... 3-22
Delete Fields ........................................................... 3-23
Add Fields ............................................................... 3-23
Move Fields ............................................................ 3-23
Changing the Field Labels ...................................... 3-24
Creating Hot Keys................................................... 3-24
Setting Properties on the Screen Tab ..................... 3-25
Field Properties ............................................................ 3-25
Setting Properties on the Defaults Tab ......................... 3-28
Processing Events ........................................................ 3-29
Sub Event Descriptions .......................................... 3-31
Exporting and Importing Screens ................................. 3-40
Exporting Shipping Screens ................................... 3-40
Importing Shipping Screens.................................... 3-41
Allowing User Access ................................................... 3-42
Single Use Recipients ........................................................ 3-43
Field Edit Control .......................................................... 3-45
SVTS9117 Rev. J
SendSuite® Shipping
Administrator Guide
3-1
3 • Shipping
E-Track
You can use SendSuite Shipping to track shipments through the Internet. This
can be done on a shipment-by-shipment basis or in a batch mode.
Follow the instructions below to configure e-Track. Once configured, you can
automate the e-Track functionality by configuring a task in the Task Scheduler.
See Task Scheduler on page 5-16 for detailed instructions pertaining to
automating the e-Track process.
Data
When you track the delivery status of shipments using e-Track, SendSuite
Shipping updates several fields. Specifically, it updates tblLoad.ActualDelDate.
This field is compared to tblLoad.ScheduledDelDate when the Carrier
Performance Analysis reports are run.
Tracking
Shipments
To track a batch of shipments using e-Track:
1. From the SendSuite Shipping Control Center, open the Shipping Module.
2. Expand Workstation Configuration and double-click E-Track Setup. The
End of Day Package Tracking Setup window appears.
3. Select the checkboxes in the Selected column for the carriers you want to
track.
4. Type the Start and End dates for each of the carriers. If you specify actual
dates, the format must be MM/DD/YYYY.
NOTE: You can specify a range of actual dates (for example,
03/01/2005 through 03/14/2006) or you can specify a
range of dates that is relative to today’s date (for example,
TODAY-15 through TODAY-1). The advantage of using the
range of dates that is relative to today’s date is that you don’t
have to update the dates each time you run a batch e-Track.
The word TODAY must be in all caps.
3-2
SVTS9117 Rev. J
SendSuite® Shipping
Administrator Guide
Shipping • 3
5. Click inside the Time Delay for Each Page field that corresponds with one
of the selected carriers. A drop-down arrow appears allowing you to select a
delay of 1 to 15 seconds. This setting is used to create a delay between each
tracking request sent to the specified carrier.
E-Track
Tracking
Shipments
NOTE: Within the
carrier group, if one
of the shipment
inquiries fails, then the
whole group fails. For
example, if you selected
10 as the maximum
inquiry number for
FEDX, if one inquiry
failed, the other 9
would fail as well. This
is the result of carrier
limitations.
SVTS9117 Rev. J
6. If you are going to track FEDX (Federal Express), EWCF (Emery), or RPS
shipments (Federal Express Ground Shipments), you must also specify
the maximum number of inquiries that SendSuite Shipping will send to the
carriers’ websites. You must specify this number because the carriers allow
multiple inquiries to the web sites at one time.
7. Click the Save button.
8. To launch the batch e-Track process, click the Start EOD button.
SendSuite® Shipping
Administrator Guide
3-3
3 • Shipping
International
Documents
SendSuite Shipping will print export documentation from the shipping
workstation. No configuration is required on the Administrative Workstation, but
this document describes what data is used to produce the documents.
Overview
SendSuite Shipping can print four international documents:
•
Commercial Invoice
•
Shipper’s Export Declaration (SED)
•
Certificate of Origin
•
NAFTA Certificate
The documents require product details. You can load much of this information in
tblProduct. Those products can then be selected during shipping. See Product
Data in Chapter 2.
These documents may require more information than will fit on a standard
shipping screen. You may want to consider creating a separate screen for the
entry of international shipping information. See Shipping Screens in Chapter 3.
When a shipment is processed, SendSuite Shipping uses fields from tblIntlLine
to complete some of the documentation. You can map data to this table using the
SendSuite Shipping Data Mapper, but you cannot map to this table using ODBC
or XML. For more information on mapping data, see Mapping to tblIntlLine in
Chapter 8.
When the documents are printed from the shipping screen, the default number
of copies is 1. To set a different default number, change the properties for each
country on tblCountry. See Country Data in Chapter 2.
3-4
SVTS9117 Rev. J
SendSuite® Shipping
Administrator Guide
Shipping • 3
International
Documents
Overview
Using these Instructions
The pages that follow show a sample of each document. Each sample document
is meant to show where data appears; they are not intended as an example of
the type of data you should enter in a given field.
After each sample document is a table. Each table lists the report fields and
where SendSuite Shipping gets the data for each field. You will see shorthand
references to some tables:
•
SH = tblShipmentHeader
•
L = tblLoad
•
IL = tblIntlLine
Single values
Some document fields draw from several database fields, checking each one
until it finds a value. For example, you might see the following:
Document Field
3. Transportation
Reference No
SendSuite Shipping
Source
Notes
SH.BookingNr
Selects one
L.MasterTrackingNr
L.ProNumber
SH.PreSpecProNumber
In this example, SendSuite Shipping will look at the fields in descending order
and it uses the first value it finds. For example, consider a shipment with the
following values:
SendSuite Shipping
Source
SH.BookingNr
L.MasterTrackingNr
L.ProNumber
SH.PreSpecProNumber
Value
NULL
NULL
12345
45678
Document Field
12345
The document will show the third value because it was the first field with a value.
The last database field is ignored.
SVTS9117 Rev. J
SendSuite® Shipping
Administrator Guide
3-5
3 • Shipping
International
Documents
Overview
Multiple Values
Some document fields draw from several database fields, using the values from
each field. For example, you might see the following:
Document Field
Order NR & Items NR
Reference NR
SendSuite
Shipping Source
Notes
IL.OrderNr
IL.OrderHostItemNr
IL.PONr
Combined field
In this example, the values from all the fields will appear on the document.
Calculated Values
Some document fields draw from several database fields, adding or multiplying
the values together. For example, you might see the following:
Document Field
Pricing Total
SendSuite Shipping
Source
Notes
(IL.PricingUnit *
IL.ProductQuantity)
In this example, the values from the two database fields are multiplied, and their
product appears on the document. For example, if the Pricing Unit is $5.00 each,
and there is a Product Quantity of 2, then there would be a value of $10.00 on
the document.
Some document fields summarize database information. For example, you might
see the following:
Document Field
Total Quantity
SendSuite Shipping
Source
Notes
Sum(IL.ProductQuantity)
This is the sum of
all the lines.
In this example, there are multiple lines, so the system adds the values together.
There are other fields where the system counts the number of lines.
Multiple Lines
The documents draw information from line items, so several lines of information
will appear on the page. When you see for each, it means that the system is
drawing information for each individual line on the table.
3-6
SVTS9117 Rev. J
SendSuite® Shipping
Administrator Guide
Shipping • 3
International
Documents
Commercial
Invoice
SVTS9117 Rev. J
SendSuite® Shipping
Administrator Guide
3-7
3 • Shipping
International
Documents
Commercial
Invoice
Document
Field
Invoice Number
Invoice Date
Trade Terms
Payment Terms
Charge Terms
Ship To name,
address, etc.
SH.BillNr
L.ScheduledShipDate
SH.ScheduledShipDate
SH.TradeTerms
SH.PaymentTerms
L.ChargeTerms
SH.ChargeTerms
vUltimateCons
vAgent
Sold To name,
address, etc.
Vendor name,
address, etc.
vSoldTo
Ship From name,
address etc.
Remit To name
address, etc.
Reference
Number
Carrier Name
Service
vShipper
Port of Export
Total Pieces
Total Net Weight
Total Gross
Weight
Total Volume
Total Quantity
3-8
SendSuite Shipping
Source
vExportAlternateShipper
Notes
Selects one
Selects one
Selects one.
If no selection is made
in SH. UltimateConsID,
then the system
populates vUltimateCons
with information from
vConsignee
If no selection is made in
SH. AltShipperID, then
the system populates
vExportAlternateShipper
with information from
vShipper
vRemitTo
SH.RefNr
vCarrier.Name
L.Service
SH.PreSpecService
SH.PortOfExportName
SH.TotalShipPieces
Sum(IL.NetWeight *
IL.ProductQuantity)
SH.TotalActualWeight
SH.TotalVolume
Sum(IL.ProductQuantity)
SVTS9117 Rev. J
Selects one
For shipments to Canada
only
This is the sum of all the
lines.
This is the sum of all the
lines.
SendSuite® Shipping
Administrator Guide
Shipping • 3
International
Documents
Commercial
Invoice
SVTS9117 Rev. J
Document
Field
SendSuite Shipping
Source
Pro Number
L.MasterTrackingNr
L.ProNr
SH.PreSpecProNumber
Notes
If this is a multipiece
shipment, then the
system looks at
MasterTrackingNr.
Otherwise, it selects one
of the others.
Country of
SH.CountryOfTranshipment For shipments to Canada
TransShipment
only
Department
SH.DeptRuling
For shipments to Canada
Ruling
only
Remarks
SH.ExportRemarks
Quantity
Sum(IL.ProductQuantity)
If this is a multipiece
shipment, then the system
will sum the total number
of product items across all
packages
Unit Meas
IL.PricingUnit
Product Number / IL.ProductNr
Prints both
Description
IL.ProductDescription
HTS NR
IL.HTSNr
The HTS number is a 10
digit number. SendSuite
Shipping prints only the
first six digits as required
on the Commercial
Invoice.
CTR MFG
IL.CountryMFG
Order NR & Items IL.OrderNr
Prints all
NR Reference NR IL.OrderHostItemNr
IL.PONr
Pricing Unit
IL.PricingUnit
Pricing Total
((IL.PricingUnit * Sum(IL.
If this is a multipiece
ProductQuantity))
shipment, then the system
will sum the total number
of product items across all
packages
SendSuite® Shipping
Administrator Guide
3-9
3 • Shipping
International
Documents
Commercial
Invoice
Document
Field
Packing
Freight
Other
Insurance
Discount/Rebate
SendSuite Shipping
Source
Notes
SH.MiscChargeAmtOne
SH.MiscChargeAmtTwo
SH.MiscChargeAmtThree
SH.MiscChargeAmtFour
SH.MiscChargeAmtFive
SH.MiscChargeAmtSix
SH.MiscChargeAmtSeven
SH.MiscChargeAmtEight
3-10
SVTS9117 Rev. J
The labels on the
report come from
the corresponding
SH.MiscChargeDesc field.
To change these labels,
the miscellaneous charge
description fields must be
on the shipping screen
so the user can change
them.
There are three more
miscellaneous charge
amount fields you can
place on the shipping
screen. To have the
labels show up on the
document, the user must
enter those names on
the shipping screen in a
MiscChargeDesc field.
SendSuite® Shipping
Administrator Guide
Shipping • 3
International
Documents
Certificate of
Origin
SVTS9117 Rev. J
SendSuite® Shipping
Administrator Guide
3-11
3 • Shipping
International
Documents
Certificate of
Origin
Document Field
2. Exporter
3. Consigned To
vShipper
vUltimateCons
VAgent
4. Notify Party /
Intermediate
Consignee
5. Document
Number
5A. B/L or AWB
Number
vIntermediate
6. Exporter
Reference
7. Forwarding Agent
8. Point of Origin or
FTZ Number
SH.BillNr
SH.RefNr
vAgent
vShipper.ShipperState
SH.FTZNr
9. Domestic
Routing/Export
INstructions
10. Loading Pier/
Terminal
11. Type of Move
SHRemarks.BOLRemarks
11a. Containerized
12. Pre-Carriage by
13. Place of Receipt
by Pre-Carrier
3-12
SendSuite Shipping
Source
Notes
Selects one.
If no selection
is made in SH.
UltimateConsID, then
the system populates
vUltimateCons with
information from
vConsignee
SH.BookingNr
L.MasterTrackingNr
L.ProNr
SH.PreSpecProNumber
If this is a multipiece
shipment, then the
system looks at
MasterTrackingNr.
Otherwise, it selects
one of the others.
Prints both
Selects one
SH.LoadingPier
L.Service
SH.PreSpecService
Yes if
SH.TotalContainerCount>1
Otherwise, checks No
vCarrier.Name
vShipper.ShipperCity
SVTS9117 Rev. J
Selects one
SendSuite® Shipping
Administrator Guide
Shipping • 3
International
Documents
Certificate of
Origin
Document Field
14. Exporting Carrier
15. Port of Loading/
Export
16. Foreign Port of
Unloading
17. Place of Delivery
by On-Carrier
18. Marks and
Numbers
SVTS9117 Rev. J
SendSuite Shipping
Source
If L.Service or
SH.PreSpecService
= OCN, then uses
SH.VesselVoyageNr
Otherwise, uses vCarrier.
Name
SH.PortOfExportName
SH.PortOfUnloadingName
vUltimateCons.ConsCity
tblCountry.CountryName
L.ProNumber
IL.PackageType
IL.PackageID
19. Number of
Packages
Sum(IL)
20. Description of
Commodities
21. Gross Weight
IL.HTSDescription
SendSuite® Shipping
Notes
Sum(IL.GrossWeight)
Administrator Guide
Prints both.
Prints all in the
following format:
ProNumber
(PackageType,
PackageID)
The lines are rolled up
by
IL.HTSNr and
IL.CountryMfg.
The system counts the
number of packages
and places the total
number in this field.
Only one weight will
show per package. For
example, if you have
two products in one
box, one of the lines
will show a zero (0)
weight.
3-13
3 • Shipping
International
Documents
NAFTA Certificate
of Origin
3-14
SVTS9117 Rev. J
SendSuite® Shipping
Administrator Guide
Shipping • 3
International
Documents
NAFTA Certificate
of Origin
Document Field
SendSuite Shipping
Source
1. Exporter
vExportAlternateShipper
2. Blanket Period
SH.NAFTAEffectiveDate
SH.NAFTAExpirationDate
3. Producer
SH.IntlMfgType
vManufacturer
4. Importer
vSoldTo
vUltimateCons
vAgent
5. Description of
Goods
SH.BillNr
IL.ProductNr
IL.ProductDescription
IL.HTSNr
6. HR Tariff
Classification
Number
7. Preference
Criteria
8. Producer
9. Net Cost
10. Country of
Notes
If no selection is made in
SH. AltShipperID, then
the system populates
vExportAlternateShipper
with information from
vShipper
Prints both.
These dates are
necessary only when
you are printing one
certificate that will cover
all shipments during the
blanket period.
If no selection is made
in SH. ManufacturerID,
then the system prints
“Same” on the document
Selects one.
If no selection is made
in SH. UltimateConsID,
then the system
populates vUltimateCons
with information from
vConsignee
Prints all
The HTS number is a 10
digit number. SendSuite
Shipping prints only the
first six digits as required
on the Certificate of
Origin.
IL.NAFTAPrefCrit
IL.NAFTALevel
IL.NAFTANetCost
IL.NAFTANetBeginDate
IL.NAFTANetEndDate
IL.CountryMfg
Prints all
Origin
SVTS9117 Rev. J
SendSuite® Shipping
Administrator Guide
3-15
3 • Shipping
International
Documents
NAFTA Certificate
of Origin
Document Field
11a. Authorized
Signature
11b. Company
Name
11c. Name
11d. Title
11e. Date
11f. Telephone
Number
3-16
SendSuite Shipping
Source
Notes
none, manually written
vShipper.ShipperName
vShipper.ShipperAttention
vShipper.
ShipperAttentionTitle
L.ScheduledShipDate
SH.ScheduledShipDate
SH.ActualShipDate
vShipper.ShipperPhoneNr
vShipper.ShipperFAXNr
SVTS9117 Rev. J
Selects one
Prints both
SendSuite® Shipping
Administrator Guide
Shipping • 3
International
Documents
SED
SVTS9117 Rev. J
SendSuite® Shipping
Administrator Guide
3-17
3 • Shipping
International
Documents
SED
Document Field
1a. Principle Party
1b. USPPI EIN (IRS) or
ID Number
1c. Parties to Transaction
2. Date of Exportation
3. Transportation
Reference No
4a. Ultimate Consignee
4b. Intermediate
Consignee
5. Forwarding Agent
6. Point (state) of Origin
or FTZ No
7. Country of Ultimate
Destination
3-18
SendSuite Shipping
Source
Notes
vShipper
vShipper.ShipperIRSNR
SH.ShipperConsRelated
SH.ScheduledShipDate
SH.ActualShipDate
SH.BookingNr
L.MasterTrackingNr
L.ProNumber
SH.PreSpecProNumber
vUltimateCons
Selects one
Selects one
If no selection
is made in SH.
UltimateConsID,
then the system
populates
vUltimateCons with
information from
vConsignee
vIntermediate
vAgent
vShipper.ShipperState
SH.FtzNr
vUltimateCons.
ConsCountryName
8. Loading Pier
9. Mode of Transport
SH.LoadingPier
L.Service
SH.PreSpecService
10. Exporting Carrier
SH.VesselVoyageNr
vCarrier.Name
SVTS9117 Rev. J
Selects one
If no selection
is made in SH.
UltimateConsID,
then the system
populates
vUltimateCons with
information from
vConsignee
Selects one, then
converts the value
to Air, OCN, etc.
If the mode of
transport has an
OCN value, then
the system uses
VesselVoyageNr.
Otherwise, it uses
vCarrier.Name
SendSuite® Shipping
Administrator Guide
Shipping • 3
International
Documents
SED
Document Field
11 Port of Export
12. Port of Unloading
13. Containerized
14. Carrier Identification
Code
15. Shipment Reference
No
16. Entry Number
NOTE: For some
carriers, such as DHL,
hazardous materials
may also be referred to
as "dangerous goods".
17. Hazardous Materials
18. In Bond Code
SendSuite Shipping
Source
Notes
SH.PortOfExportName
SH.PortOfUnloadingName
Yes if tblShipmentLine.
ContainerCount > 0
Otherwise, No
vCarrier.CarrierSCAC
SH.BillNr
IL.EntryNr
Checked if tblCommodity.
Hazardous = 1
Otherwise, not checked
IL.InBondCode
Yes if SH.AgentID <>
SH.ConsigneeID
Otherwise, No
21. D/F or M
IL.CountryMfgType
22. Schedule B Number
IL.HTSNr
IL.HTSDescription
IL.EntryNr
IL.InBondCode
IL.SEDLicenseIL.
SEDLicenseExpires
23. Quantity - Schedule B IL.HTSQuantity1
Units
IL.HTSQuantityUnits1
IL.HTSQuantity2
IL.HTSQuantityUnits2
24. Shipping Weight
(IL.NetWeight *
IL.ProductQuantity)
If there is more than
one product, then
this code will print
with the products in
field 22.
If there is more than
one product, then
this code will print
with the products in
field 22.
19. Routed Export
Transaction
25. VIN/Product Number/
Vehicle Title Number
SVTS9117 Rev. J
SendSuite® Shipping
Administrator Guide
Prints all for each
Prints all for each
The system
automatically
converts pounds to
kilos.
IL.VIN_PIN
IL.VehicleTitleNr
3-19
3 • Shipping
International
Documents
SED
3-20
Document Field
SendSuite Shipping
Source
26. Values
IL.SEDValue OR
(IL.UnitPrice *
IL.ProductQuantity)
27. License No.
IL.SEDLicense
28. ECCN
29. Duly authorized officer
or employee
30. Signature
31. Authentication
Date
Telephone No.
IL.ECCN
none, completed manually
Notes
If no value is
entered by the user
in SEDValue, then
the system creates
a value based on
the unit price and
quantity
If there is more than
one product, then
this code will print
with the products in
field 22.
none, completed manually
none, completed manually
SH.ScheduledShipDate
vShipper.ShipperPhoneNr
SVTS9117 Rev. J
SendSuite® Shipping
Administrator Guide
Shipping • 3
While the SendSuite Shipping user interface opens in a web browser window, it
is set up on the Administrative Workstation.
Shipping
Screens
SendSuite Shipping has several pre-loaded system templates. These templates
can be used as shipping screens, or you can use them to create custom shipping
screens.
Once you create a custom shipping screen, you can modify it at any time on the
Administrative Workstation. The users will see the changes the next time they
refresh the screen or click on the screen name.
After a screen has been configured, it can be exported as a file and saved to
a disk. Screens that have been exported can easily be imported into the same
system or on another system.
Creating a Custom
Screen
To create a custom screen:
1. From the Control Center, open the Shipping module.
2. From the Setup menu, select Setup Shipment Processing.
NOTE: If you selected
one of the system
templates, you must
give the screen a new
name. You cannot save
over a system template.
3. Open the screen that you would like to change.
•
If you want to use one of the system templates, select the checkbox next
to Display System Templates.
4. Select Save As from the File menu.
5. Type the name of the new template in the Form Name field.
6. Click OK.
SVTS9117 Rev. J
SendSuite® Shipping
Administrator Guide
3-21
3 • Shipping
Shipping
Screens
On the Settings tab, you have the following options:
•
Read Only Form – If you check this box, the user will not be able to save any
information. The user can perform any other action, such as rating.
Configuring the
Appearance of the
Shipping Screen
•
Back Ground Color – If you click on this button, you can change the
background color of the shipping screen frame. The background color on the
other frames will not be affected. If you want to return to the original system
color, click the Default Color button.
•
Screen Identifier – SendSuite Shipping automatically assigns a screen ID
to every screen. You cannot change this ID, but you can use it with other
features. See Processing Events in Chapter 3 and Setting up Users in
Chapter 5.
•
Processing Tab Display – Use these checkboxes to select what tabs display
with the Shipping Screen. The user cannot access information for tabs not
selected.
3-22
SVTS9117 Rev. J
SendSuite® Shipping
Administrator Guide
Shipping • 3
Click the Screen tab, then follow the steps listed below to delete, add, or move
fields on the shipment processing screen.
Shipping
Screens
Configuring the
Appearance of the
Shipping Screen
Delete Fields
1. Click the cursor in the field you want to delete.
2. Right-click outside the field to display the menu.
3. Select Delete Field.
Add Fields
1. Right-click anywhere in the grey area on the Screen tab.
2. Select Add Field.
3. Double-click on the folder icon to open a table that holds the data you want to
add.
4. Click and drag the table icon of the data you want to add to an empty line on
the template.
Move Fields
1. Select Move Fields from the Options menu to activate the move fields
function. Notice the Move Fields Active note in red at the bottom of the setup
screen.
2. Click and drag a field to an empty line on the template.
3. Select Move Fields from the Options menu to turn off the move fields
function.
SVTS9117 Rev. J
SendSuite® Shipping
Administrator Guide
3-23
3 • Shipping
Shipping
Screens
Configuring the
Appearance of the
Shipping Screen
Changing the Field Labels
You can change the name of a field. You may want to do this so the user can
easily relate to the data. For example, SendSuite Shipping uses the Bill Number
to keep track of the shipment. If the user is scanning an Invoice Number that
becomes the Bill Number, then you can change the name of that field on the
screen to read “Invoice Number”.
Although you can change the field label, you are not actually changing the field
name on the database table. In the example above, the screen will display
“Invoice Number” but that information will be saved in the tblShipmentHeader.
BillNr field.
Also, if you use the Search feature on the shipping screen, the drop-down will still
show Bill No.
NOTE: Internet Explorer
uses the following
letters as hot keys on
their menu: F, E, V, A,
T, H. If you assign one
of these letters as a hot
key for the SendSuite
Shipping screen,
your hot key takes
precedence over the
Internet Explorer menu.
3-24
Creating Hot Keys
You can create hot keys for quick navigation to select fields:
1. Left-click on the label of the field you want to change.
2. Type an ampersand (&) in front of the letter you want to be a hot key.
For example, if you want to use the P in Pieces, change the label to &Pieces.
SVTS9117 Rev. J
SendSuite® Shipping
Administrator Guide
Shipping • 3
You can change the behavior of the fields on the screen. These behaviors
include:
• Holding data from one shipment to the next
Shipping
Screens
Field Properties
•
Making a field read-only
•
Setting a default value
•
Changing the data source
•
Requiring the user to input data before they can save a shipment
These properties can be set on the Screen tab, or on the Defaults tab.
Setting Properties on the Screen Tab
1. Click the Screen tab.
2. Click the cursor in the field you want to edit.
3. Right-click outside the field to display the menu.
4. Select Field Properties.
5. Make changes to any of the field properties listed in the Properties window
(see below).
6. Click Close.
SVTS9117 Rev. J
SendSuite® Shipping
Administrator Guide
3-25
3 • Shipping
Shipping
Screens
Property
Internal Name
Field Properties
Internal Table
User Label
Default Value
Font Size
Display Width
Text Color
Back Color
Tab Stop
3-26
Function
Values
Read only. Shows you the name
of the field on the table in the
database.
Read only. Shows you the name
of the table in the database.
This is what will appear on the
shipping screen.
Although this is a
256 character field,
the label should be
brief. The screen
will resize itself to
accommodate the
text.
Read Only. See Setting
Properties on the Defaults Tab on
page 3-28.
Selects the size of the text
displayed on the shipping screen.
Use this field to specify the field's Click Suggested
width on the shipping screen.
to let SendSuite
Shipping determine
an appropriate
width.
Defines the color of the text on
Click Default to
the shipping screen.
select SendSuite
Shipping' defaults
of black text on a
white background.
Defines the background color
of the text field displayed on the
shipping screen.
Obsolete. Although you can see
the tab stop values, they have
no affect on the behavior of the
shipping screen.
SVTS9117 Rev. J
SendSuite® Shipping
Administrator Guide
Shipping • 3
Shipping
Screens
Property
Read Only
This prevents the user from
adding or deleting information in
the field.
Hold Single
When the New With Hold event
is performed, this data will
remain on the new shipment.
Hold Multipack
When the New Shipment event
is performed during a multipack
session, this data will appear
on the new shipment in the
multipack.
Read only. See Setting
Properties on the Defaults Tab
on the next page.
Read only. See Setting
Properties on the Defaults Tab
on the next page.
Field Properties
Source
Source Table
SVTS9117 Rev. J
Function
SendSuite® Shipping
Administrator Guide
Values
Check this box
to make the field
read-only. Although
you can remove
the checkmark
on some fields, it
will still be a readonly field (e.g.,
TotalFreight).
Read-only fields
on the screen
will have a yellow
background.
Check this box to
keep the value from
one shipment to the
next.
Check this box to
keep the value from
one shipment to the
next.
3-27
3 • Shipping
Shipping
Screens
To set properties on the Defaults tab:
1. Click the Defaults tab.
Setting Properties
on the Defaults
Tab
2. Change the field properties on the screen.
Property
Values
Default Value
When the New
with Default or Set
Shipment Defaults
event is performed, this
value will be placed in
the field.
User Label
This is what will appear
on the shipping screen.
This is the same
user label that can
be configured using
the properties on the
screen.
This tells you where the
system is getting the
data for the field.
If the Source is set to
Table, this tells your
table the system is
getting the data for the
field.
Source
Source Table
3-28
Function
SVTS9117 Rev. J
Values depend on the field.
Some fields are just text
fields, some fields have
specific values that you must
choose from a drop-down.
In date fields, you can use
a relative date by typing
TODAY, then you can add or
subtract days. For example,
to default tomorrow’s date in
a field, type “TODAY+1”.
Although this is a 256
character field, the label
should be brief. The
screen will resize itself to
accommodate the text.
SendSuite® Shipping
Administrator Guide
Shipping • 3
Shipping
Screens
Property
Hold Single
Setting Properties
on the Defaults
Tab
Hold Multipack
Read Only
Required
Processing Events
Function
When the New
With Hold event is
performed, this data
will remain on the new
shipment.
When the New
Shipment event is
performed during a
multipack session, this
data will appear on the
new shipment in the
multipack.
This prevents the user
from adding or deleting
information in the field.
Read-only fields on
the screen will have a
yellow background.
Values
Check this box to keep the
value from one shipment to
the next.
Check this box to keep the
value from one shipment to
the next.
Check this box to make the
field read-only.
NOTE: Although you can
remove the checkmark on
some fields, it will still be a
read-only field (for example,
TotalFreight).
If this box is checked,
Check this box to make the
the user must input data field a required field.
in this field in order to
save the shipment.
NOTE: Although you can
The field labels or
remove the checkmark on
required fields will
some fields, they may still be
appear in red text.
needed for rating.
To create a Master Event that will be triggered while working in a shipment
processing template:
1. Select Setup Shipment Processing from the Setup menu.
2. Select the template that will contain the event.
3. Click the Events tab.
4. Double-click on the Processing Events folder icon that will contain the subevent.
5. Scroll through the list of Available Sub-Events to determine which sub
event(s) you want associated with the event.
6. Click and drag the sub-event(s) folder icon(s) to the folder icon of the event
that you selected in Step 4.
SVTS9117 Rev. J
SendSuite® Shipping
Administrator Guide
3-29
3 • Shipping
Shipping
Screens
Processing Events
7. Repeat Step 6 until you have assigned all necessary sub-events to the event.
NOTE: Place the sub-events in the order they must occur.
SendSuite Shipping processes each sub-event in the order
they are listed in the event folder.
8. Type a name for the new shortcut key in the User Description field.
NOTE: You can allow
an event to continue
when a sub-event fails
by enabling Continue
on Error. To enable
Continue on Error,
select the sub-event
and press the Space
Bar.
NOTE: You must select
a key that is not already
assigned subevents.
The key you assign will
also appear when the
user hovers over the
event on the processing
screen.
NOTE: You can type a custom menu caption for every
Master Event available (even non-custom events). The
caption appears when the user hovers the mouse over the
button on the Shipping Screen.
9. (Optional): You can create a shortcut key for user defined processing events.
When you do this, the user can press a key on the keyboard to execute the
event, instead of using the mouse to click on the event.
a. Click the drop-down arrow in the Key field to select a key that will trigger
the sub-events you assigned to the user-configured event.
b. If you want to add Shift, Alt, or Control to be pressed with the shortcut
key, click the check box before Shift, Alt, or Ctl.
10. Click the save icon on the horizontal toolbar.
11. Click Close.
3-30
SVTS9117 Rev. J
SendSuite® Shipping
Administrator Guide
Shipping • 3
Sub Event Descriptions
Shipping
Screens
Sub-Event
Processing Events
Add Change
Consignee
Add/Change BillTO
Description
Saves the information in the vConsignee fields to
tblAddress.
The Move Shipment Screen Fields to
Consignee Fields parameter moves data from
tblShipmentHeader to vConsignee.
Saves the information in the vBillTo fields to
tblAddress.
Saves the information.
Add/Change Carrier
AcctNr
Add/Change ShipFor Saves the information in the vShipFor fields to
tblAddress.
Address Verify
Validates the address on vConsignee. Check
Consignee
the box next to Save Consignee Info to update
tblAddress.
Bill of Lading
Billing Label
Billing Label
Multipack
Breakup Shipment
Carrier Terms &
Conditions
Change Shipper
Check Package Max
Weight
Clear Weight on
Shipment
DeleteMPShipments
SVTS9117 Rev. J
SendSuite® Shipping
If tblAddress.Cleansed = 1, then the address is
not verified again.
Prints the Bill of Lading. The ActualShipDate and
the BOLPrinted flag are updated.
This sub-event can only be used if the carrier
service is LTL.
Prints a billing label.
This prints the billing label for an entire multipack.
This creates a number of new shipments based
on the number in the Pieces field. The multipack
process does this automatically, use this subevent to do it manually.
Presents the DHL Carrier terms and conditions
information sheet for international shipping.
Changes the shipper address information during
shipment processing.
This checks the max weight entered in the
package attribute screen against the actual
weight of the box. An error message is provided
for overweight boxes, but this does not stop the
shipment from being processed.
Deletes tblShipmentLine.Weight.
Deletes all the shipments in a multipack.
Administrator Guide
3-31
3 • Shipping
Shipping
Screens
Sub-Event
Delete Shipment
Processing Events
eMultiPack Auto
eMultiPack Auto
Close
eMultipack Close
eMultiPack Loop
Pieces
eMultipack Open
Generate Auto Bill
Number
Generate Tracking
Number
Get Weight Default
Scale
3-32
Description
Deletes the current shipment. If the shipment
is part of a consolidation or if it has been
manifested, it cannot be deleted.
Starts the automatic multipack process. The user
must specify the expected number of pieces.
By default, the system will continue processing
pieces as part of this multipack even after the last
number is reached. To change this behavior, use
the eMultiPack Auto Close sub-event.
This sub-event automatically stops the multipack
session after the specified number of packages
have been processed. Place this event in the
eRate and Save master-event following the New
Shipment sub-event.
Closes the multipack session. If the user has
the consolidation option on, then the system
attempts to consolidate the individual pieces into
a hundredweight shipment. If the consolidation is
successful, then the shipments are updated with
the prorated cost. The first shipment is then read
back in and displayed on the screen.
This is the main sub-event in the eAutoMultiPack
master event. This sub-event tells the system
to loop back to the first sub-event in the master
processing event. When it detects that all pieces
in a multipack have been processed, it allows the
master event to proceed to the next sub-event.
In the properties, check the box to Loop at Server
if there is nothing else happening on the client.
For example, if the master event is designed
to process a shipment then print a label, then it
cannot loop at the server; it must return to the
client to print the label, then go back to the server
for the other sub-events.
Starts a multipack session and creates the
number of shipments indicated by the user.
Generates a new bill number based on the auto
number setup in the Supporting Data Module
Creates a new tracking or PRO number using the
setup from the Supporting Data Module.
Brings in the weight registered by the default
scale attached to the system. If there already is
a weight assigned to the shipment, the scale will
not override that value.
SVTS9117 Rev. J
SendSuite® Shipping
Administrator Guide
Shipping • 3
Shipping
Screens
Sub-Event
Hazardous Detail
Processing Events
NOTE: For some
carriers, such as DHL,
hazardous materials
may also be referred to
as "dangerous goods".
Intellishop
International Detail
Edit
Load Processing
Screen
Meter Batch Close
Meter Batch Open
Meter Batch Status
Meter Information
Meter Simulate Trip
Meter Trip Postage
SVTS9117 Rev. J
SendSuite® Shipping
Description
Opens a new browser window for EasyShip
Platinum Web™.
Runs the Intellishop feature. You can turn off
the calendar that shows the shipping dates by
changing the Sub Event Properties.
Opens the window where international package
detail information can be entered.
Select the ID from the drop-down under the
sub-event properties. When SendSuite Shipping
encounters this sub-event, it will open the screen
selected.
pTable data will persist, so the user loses no
information.
This ends a meter batch that is currently open. If
no meter batch is open, then this sub-event has
no effect.
This starts a batch process on a postage meter.
The user must select the carrier called POST.
This sub-event opens a display window showing
the current status of a batch process running on
a postage meter.
Presents a screen with your meter's information.
This event causes the system to mark a POST
(only) shipment as if it were ran through a
postage meter for manifesting purposes. This
is used when using a disconnected meter with
the desire of sending confirmation services
electronically through the SendSuite Shipping
system for the pieces metered.
This feature speeds up and standardizes the
process of setting the shipment state so the endof-day process can include the shipments in the
transmission file.
Posts back to the client postage to set and
trip the postage meter. The digital dashboard
components must be installed for this to work.
Administrator Guide
3-33
3 • Shipping
Shipping
Screens
Processing Events
3-34
Sub-Event
Description
Meter Undo Simulate This event removes the flags set on the shipment
Trip
when using the Meter Simulate Trip task. When
Meter Simulate Trip is executed, the shipment is
frozen with no option of executing events such
as Unrate against the shipment. Use this event in
the case that a shipment that has had the Meter
Simulate Trip event executed against it requires
changes that cannot occur on a frozen shipment.
New Shipment
Creates a new shipment with blank fields.
New Shipment With Creates a new shipment using the default values
Default
you set on the Defaults tab.
New Shipment With Creates a new shipment holding the values you
Hold
set up on the Defaults tab.
ODBC
Runs an ODBC script. You must select the script
in the Sub Event Properties box.
Power of Attorney
Presents a UPS-specific form for when you
Form
want to give UPS the power of attorney for the
shipment. This is on a per shipment basis.
Present ERR
Presents the electronic return receipt signature
Signature
file for a POST tracking number.
Print Airbill
Prints a carrier’s airbill on the printer you selected
in the Peripheral setup. The ActualShipDate and
the AirbillPrinted flag are updated.
Print Carrier Label
Prints the carrier’s label on the printer specified in
the Peripheral setup.
Print Carrier Label
Prints the carrier’s label on a network label
LAN
printer.
Print Carrier Label
Prints to the server's local label printer to speed
Local
up printing time. This sub-event is only suitable
for stand-alone SendSuite Shipping systems.
Print CODTAG
Prints a carrier COD tag, if applicable.
Print eCertified
Prints a laser printed, certified bar code along
Cover
with the ship-to and ship-from addresses.
Print eCertified Label Prints an eCertified label for USPS or POST
shipments. See SVTS9146 for more information.
SVTS9117 Rev. J
SendSuite® Shipping
Administrator Guide
Shipping • 3
Shipping
Screens
Sub-Event
Processing Events
Print International
Docs
Description
If any of the following fields has a value of
1, then the system prints the document:
tblShipmentHeader.ExportComInvoice,
tblShipmentHeader.ExportCertificateOfOrigin,
tblShipmentHeader.ExportNAFTA,
tblShipmentHeader.ExportSED
On the Sub Event Properties, check the box
to print the documents directly to the printer. If
the box is unchecked, then the user will see a
preview of the document and will have to click
the Print button.
Print Shipper Label
Prints a label you setup in the Supporting Data
module.
Print USPS 2976 or Prints a 2976 or 2976-A customs declarations
2976-A
form for USPS international shipments.
Prompt Special
Generates a pop-up window that appears before
Services
or after rating, displaying the special services
for the selected carrier. The shipper has the
opportunity to select special services and validate
costs before proceeding.
Prompt USPS Article Prompts the user to enter or scan the tracking
Nrs
number for the selected service(s) of COD,
Registered Mail, Insurance, and Certified Mail for
both internal carrier IDs of USPS and POST.
Rate Quote
This sub-event will rate a shipment across all
carriers, skipping any business logic.
Rate Shipment
Uses the current information on the shipping
screen to rate the shipment.
Rating Decision
Prints the Rating Decision Report.
Report
Rating Error Report
Prints the Rating Error Report.
Rating Summary
Prints the Rating Summary Report.
Report
Read Bol Remark
Reads the BOL remarks from the Remarks table
Append
using the Remark ID. This appends together all
of the remarks to the BOL Remarks field based
on the BOL Remarks code.
Read Linked Account Populates the account, sub account, sub sub
Set
account field based on the account set ID for the
shipment.
Read Linked
Populates the fields on vAltShipper with values
AltShipper
from tblAddress based on the AltShipperID.
SVTS9117 Rev. J
SendSuite® Shipping
Administrator Guide
3-35
3 • Shipping
Shipping
Screens
Sub-Event
Description
Read Linked BillTo
Processing Events
Populates the fields on vBillTo with values from
tblAddress based on the BillToID.
Read Linked Carrier Populates the fields on vCarrier with values from
tblAddress based on the CarrierID.
Read Linked
Populates the fields on vConsignee with values
Consignee
from tblAddress based on the ConsigneeID.
Read Linked ShipFor Populates the fields on vShipFor with values from
tblAddress based on the ShipForID.
Read Linked Shipper Populates the fields on vShipper with values from
tblAddress based on the ShipperID.
Read Package
Populates package dimensions fields based on
Attributes
what the user selects in the Package Attribute ID
field.
Read Shipment
Re-populates data in the pTable with values
saved in the database. For example, if you
search for a saved shipment, change information
on the screen, then change your mind and want
to go back to the original data, then this read
information from the database and replace what
you see on the screen.
Return Service
Generates a return label during shipment
Shipment
processing. The shipper's address is used as the
'ship to' address and the consignee's address is
used as the 'return' address.
Save Shipment
Script Conditional
Logic
Set Consignee
Defaults
Set Focus to Search
Set Shipment
Defaults
3-36
Note that you must select the appropriate Return
Shipment option on the Special Services tab to
assess the proper charges for this feature
Saves the data on the shipping screen to the
database (saves the pTable values to the
database)
Runs a conditional logic script written in VBScript
that you set up in the Integration Module. You
select the script in the Sub Event Property box.
This sends the perm/temp flag to the tblAddress.
This event is designed to be used after the
ODBC In sub-event and prior to the Add/Change
Consignee sub-event
This places the cursor on the Search box on the
shipping screen.
Sets the defaults for a shipment. It can be used
to override the values read in the database on a
read shipment.
SVTS9117 Rev. J
SendSuite® Shipping
Administrator Guide
Shipping • 3
Shipping
Screens
Sub-Event
Shipment Form
Processing Events
Shipment Form New
Account
Split Accounting
Costs
SWOG Order
SWOG Order Scan
SWOG Shipment
SWOG Shipment
Consolidate
SWOG Shipment
Load
Tab Accessorials
Tab Address
Tab Carrier
Tab Freight Cost
Tab Information
Tab Line Items
Tab Processing
Tab Remarks
SVTS9117 Rev. J
SendSuite® Shipping
Description
This prints the Shipment Request Form.
On the Sub Event Properties, check the box
to print the documents directly to the printer. If
the box is unchecked, then the user will see a
preview of the document and will have to click
the Print button.
This prints the Shipment Request Form with the
accounting fields: AccountSetID, AccountID,
SubAccountID, SubSubAccountID
This event displays a window for the currently
selected shipment allowing the user to split
charges across multiple accounts. This process
can only be used on meter batch, meter
discrepancy or previously split shipments.
Opens the default SWOG Edit screen.
Presents a SWOG screen used to scan related
orders for a shipment. Each scan is transmitted
back to the server. The screen is designed for
high-speed scanning of additional orders that are
part of the shipment.
Opens the Shipment SWOG Details screen.
Consolidates Express (package-based service),
LTL, or Truckload shipments.
Loads the SWOG table with shipment bill
numbers.
Jumps to the Accessorials tab on the Shipping
screen.
Jumps to the Address tab on the Shipping
screen.
Jumps to the Carrier tab on the Shipping screen.
Jumps to the Freight Cost tab on the Shipping
screen.
Jumps to the Information tab on the Shipping
screen.
Jumps to the Line Items tab on the Shipping
screen.
Jumps to the Processing tab on the Shipping
screen.
Jumps to the Remarks tab on the Shipping
screen.
Administrator Guide
3-37
3 • Shipping
Shipping
Screens
Sub-Event
UnBOL\UnAirbill
Processing Events
Undo Simulate Trip
Undo Rates
Validate Manifest
Fields
Verify Account ID
Verify Sub Account
ID
Verify Sub Sub
Account ID
Void Post Manifest
Void Online Postage
Void Shipment
Web Track
XML File Link In
XML FIle Link Out
3-38
Description
This removes the actual ship date and re-saves
the shipment. This will clear the BOLPrinted
or AirbillPrinted fields. It also will clear the
ActualShipDate field.
The clears the fields that were set from the Meter
Simulate trip sub event.
This removes routes and rates that were set by
the Rate Shipment event, deletes the associated
record from tlbLoad, and re-saves the shipment.
If a tracking or PRO number was assigned to
the shipment when it was rated, that number is
removed. The next time the shipment is rated, a
new tracking or PRO number will be generated.
If the shipment has been manifested, the user
will not be allowed to perform this sub-event.
This checks to make sure all the fields needed
for manifesting are complete. If a field required is
not complete, then the system prompts the user.
Reads from tblDivision and verifies the AccountID
exists in the table.
Reads from tblDepartment and verifies the
SubAccountID exists in the table.
Reads from tblAccount and verifies the
SubSubAccountID exists in the table.
This feature allows you to void a UPS® shipment
after the manifest has been transmitted. The subevent will take the use to myups.com where you
can logon and void the package. The sub-event
makes no changes to the data in SendSuite
Shipping.
This feature is not supported at this time.
This marks the shipment as Voided. A shipment
cannot be unvoided.
This uses an internet connection to track the
shipment on the carrier’s web site. No data from
the carrier’s web-site is saved in the SendSuite
Shipping database.
Brings data in using an XML File Link map set up
in the Integration module.
Sends data out using an XML File Link map set
up in the Integration module.
SVTS9117 Rev. J
SendSuite® Shipping
Administrator Guide
Shipping • 3
Shipping
Screens
Sub-Event
XML In Round Trip
Processing Events
XML Out Round Trip
XML Out This
Shipment
XML Rate Quote
SVTS9117 Rev. J
SendSuite® Shipping
Description
XML In Round Trip imports data posted to
SendSuite Shipping through the B2B XML Round
Trip interface. This uses an XML map setup
through the Integration module. Select the map
name from the drop-down list.
XML Out Round Trip returns data from SendSuite
Shipping to another application through the B2B
XML Round Trip interface. This uses an XML
map setup through the Integration module. Select
the map name from the drop-down list.
This write the shipment information out to an
XML file based on the map you set up in the
Integration Module.
Generates an XML rate quote. See SVTS9131
for more details.
Administrator Guide
3-39
3 • Shipping
Shipping
Screens
Exporting and
Importing Screens
Screens can be exported to a file that is saved to disk. Exporting files can be
useful for many reasons, including:
Creating an backup copy of the screen. When you modify a custom
screen and save it using the same name, there is no record of the original
screen. By exporting the original screen, you have a copy that you can
revert back to, if necessary.
Assisting Pitney Bowes support staff with troubleshooting. If you
encounter a problem with the system, there may be an issue with a
custom screen. A Pitney Bowes representative may be able to diagnose
the problem by importing a custom screen on another system. If the
problem is corrected by modifying the screen, then the new screen can be
easily imported.
Exporting Shipping Screens
1. You must close any screens you have open in this Shipping module on the
Administrative Workstation.
2. From the File menu, select Export Screen.
NOTE: SendSuite
Shipping saves the file
with an adtg extension.
After you save the file,
you can move it to a
new location, copy it to
a floppy disk, etc.
3. Click the Browse button
, then browse to where you want to save the
export file. Name the file at this time.
4. Check the boxes next to the screens you want to export.
NOTE: If you choose more than one screen, the system will
save all the screens in the same adtg file. When you are
importing screens, you have the option of which ones in the
adtg file you want to import.
5. Click the Export Selected Screens button.
6. Click Close.
3-40
SVTS9117 Rev. J
SendSuite® Shipping
Administrator Guide
Shipping • 3
Shipping
Screens
Importing Shipping Screens
Exporting and
Importing Screens
2. From the File menu, select Import Screen.
1. You must close any screens you have open in this Shipping module on the
Administrative Workstation.
NOTE: If the adtg
contains multiple
screens, you can
choose only the ones
you want to import by
placing a checkmark
next to them.
SVTS9117 Rev. J
3. Click the Browse button
, then browse for the file you want to
import. Name the file at this time.
4. Click Open.
5. Check the boxes next to the screens you want to export.
6. Click the Import Selected Screens button.
SendSuite® Shipping
Administrator Guide
3-41
3 • Shipping
Shipping
Screens
7. If you are importing a screen that has the same name as a screen already
in the system, you will be asked what you want to do with the screen in the
system.
Exporting and
Importing Screens
Don’t import it — If you do not want to replace the screen that is already
in this system, choose this option. This will not import the screen that is in
the adtg file.
Overwrite it — If you want to replace the screen that is currently in the
system, then choose this option. The screen on the adtg file will replace
the one currently in the system.
Call it — If you want to import the screen, but give it a new name,
then choose this option. Type the new name for the screen in the field
provided. The screen currently in the system will remain in the system.
8. Check to make sure your screens imported successfully. A message
confirming this should appear at the bottom of the screen.
9. Click Close.
Allowing User
Access
3-42
By default, a user will have access to all screens in the system. You can restrict
the screens that a user can see, therefore controlling what a user can do. To
identify which screens a user will see when he/she logs on, see Configuring
Groups and Users in Chapter 5 of this guide.
SVTS9117 Rev. J
SendSuite® Shipping
Administrator Guide
Shipping • 3
Single Use
Recipients
You can create shipping screens that allow you to send shipments to one-time
recipients. The recipient information is created on-the-fly and stored in the
following, unique manner:
•
When searching your address book, these addresses do not appear.
•
When you delete the shipment, these addresses are automatically deleted.
To create a shipping screen that supports single use recipients:
1. Create a new shipping screen of whatever tabs and appearance desired.
2. Click the Screen tab.
3. Adjust the screen so that the user can enter recipient information (such as
Name, Address, City, etc.).
SVTS9117 Rev. J
SendSuite® Shipping
Administrator Guide
3-43
3 • Shipping
Single Use
Recipients
4. Click the Defaults tab.
5. Click Source under the ConsigneeID row.
6. Select Generate from the drop-down menu.
NOTE: By selecting
Generate, SendSuite
Shipping will
automatically generate
a unique Consignee
ID. To the user on
the shipping screen,
the Consignee ID will
appear as a series of
asterisks (*******).
7. Configure the events as necessary on the Events tab.
8. Save and close the shipping screen.
3-44
SVTS9117 Rev. J
SendSuite® Shipping
Administrator Guide
Shipping • 3
You can adjust how users will look-up certain information while using a Shipping
Screen.
Single Use
Recipients
Field Edit Control
To adjust the user look-up options:
1. Open the Shipping Module from the Control Center.
2. Click Setup > Setup Field Edit Control.
3. Adjust the lookup options for the following fields:
•
CarrierID: This is the field the used to select a carrier for the shipment.
•
ChargeTerms: This is the field used to select the charge terms for the
shipment (such as Collect on Delivery).
•
Cons State: This field selects the recipient's state.
•
Package Attribute ID: This field is used to select a package attribute
type. This sets the length, height, and maximum weight for the current
shipment.
4. Toggle the following look-up options to best suit your needs:
SVTS9117 Rev. J
•
(D) Combo Drop Down: Allows you to select information from a dropdown menu.
•
(Q) Quick Lookup: Allows you to select information from a list in a pop up
window.
SendSuite® Shipping
Administrator Guide
3-45
3 • Shipping
This Page Intentionally Blank
3-46
SVTS9117 Rev. J
SendSuite® Shipping
Administrator Guide
4
Reports
Running SendSuite Shipping Reports .................................. 4-2
Running a Report in SendSuite Shipping Format........... 4-2
Creating and Saving Report Filters ................................ 4-2
Creating Custom Reports ..................................................... 4-4
Selecting a Report to Modify .......................................... 4-4
Modifying the Report Data .............................................. 4-4
Modifying Data Groups ................................................... 4-6
Modifying Total Columns ................................................ 4-7
Saving a Custom Report ................................................ 4-7
Importing External Reports ................................................... 4-8
Availability of Data .......................................................... 4-8
Current List of Tables and Views Supported............. 4-8
Data Available ........................................................... 4-9
Exporting a Report from Crystal Reports...................... 4-10
Importing the Report into SendSuite Shipping ............. 4-10
Using the Report........................................................... 4-10
Creating Custom Reports for the Shipping Workstation ......4-11
General Report Process ................................................4-11
Creating a New Thin Client Report ............................... 4-12
Converting a Crystal Reports Document ................ 4-12
Creating a New Report from Scratch ...................... 4-14
Defining Data .......................................................... 4-15
Headers and Footers .............................................. 4-17
Grouping ................................................................. 4-18
Summary Fields ...................................................... 4-19
Scripting on the Report ........................................... 4-20
Toolbar Buttons ....................................................... 4-21
Modifying Sample Scripts ....................................... 4-23
Importing the Script................................................. 4-23
Writing VB Script .......................................................... 4-23
Running the Report ...................................................... 4-24
Accounting Reports ............................................................ 4-25
Account Summary Report ............................................ 4-25
Transactions by Account Report ................................... 4-26
SVTS9117 Rev. J
SendSuite® Shipping
Administrator Guide
4-1
4 • Reports
Running
SendSuite
Shipping
Reports
SendSuite® Shipping contains templates for a number of reports. You can run a
report in the SendSuite format or you can modify the format to suit your needs.
Running a Report
in SendSuite
Shipping Format
2. Use one of the following methods to open the folder containing the report:
To run a report in SendSuite Shipping format:
1. Open the Reports module.
a. Double-click the folder name.
b. Click the + to the left of the folder.
3. Double-click the name of the report you want.
4. If you want to print the report containing all possible data, then click Print.
5.
If you want to print only selected data, then:
a. Type information in the Selection Fields to filter the data (See Creating
and Saving Report Filters below).
b. Click Print.
Creating and
Saving Report
Filters
To create and save report filters:
1. Click the drop-down arrow under Selection Field.
2. Click the data you want to limit.
3. Type the Beginning Value and Ending Value that SendSuite Shipping
should limit the report to.
NOTE: The keyword
TODAY can be used in
values for filters, and
can supply a range
of dates relative to
the current date. For
example, a Beginning
Date of TODAY - 7 and
Ending Date of TODAY
would return data for
the previous week.
4. Repeat the steps above for any additional data you want to filter out of the
report.
5. Click the Save Filter button.
4-2
SVTS9117 Rev. J
SendSuite® Shipping
Administrator Guide
Reports • 4
6. Type the name of the filter.
Running
SendSuite
Shipping
Reports
7. Click the OK button.
8. (optional) Use the Preview button to generate the report using the entered
criteria.
Creating and
Saving Report
Filters
9. (optional) Use the Test Filter button to display the raw report data below the
selection fields.
NOTE: This filter can
be selected the next
time the report is run
by clicking the dropdown arrow next to the
Selection ID field.
SVTS9117 Rev. J
SendSuite® Shipping
Administrator Guide
4-3
4 • Reports
Creating
Custom
Reports
You can modify the column layout, data selection, and total columns for any of
SendSuite’s standard reports.
Selecting a Report
to Modify
To select a report to modify:
1. Open the Reports module from the Control Center.
2. Click Custom > Crystal Report on the menu bar.
3. Click the drop-down arrow in the Report Name field and select the report you
want to modify.
NOTE: You can
only modify the data
normally appearing on
a report. For example,
since the Shipment
Activity report does not
have order information
on it, you cannot get the
customer’s purchase
order number on that
report.
4. Type a description of the report in the Description field (optional).
Modifying the
Report Data
To modify the report data:
1. Click the Data tab in the Custom Report Interface window.
NOTE: The Fields
column lists how the
data will appear on
the report. The odd
numbers represent
the column labels,
and the even numbers
represent the data
fields. To change the
order of information
on the report you must
change the contents
of the Label and Data
Field columns.
4-4
SVTS9117 Rev. J
SendSuite® Shipping
Administrator Guide
Reports • 4
Creating
Custom
Reports
Modifying the
Report Data
2. If you want to change the order of the data on the report:
a. Highlight the text in the Label column and press Delete.
b. Type a new label in the empty field.
c. Select the data you want to appear on the report from the drop-down in
the Data Field column.
d. Repeat Step a through Step c for every column you want to change.
3. If you want to delete data from the report:
a. Highlight the text in the Data Field column.
b. Press the Delete key on your keyboard.
c. Highlight the text in the Label column.
d. Press the Delete key on your keyboard.
4. If you want a column to combine data (for example, calculate the difference
between the Gross Charges and Total Shipper Costs):
a. Select the Complex data fields box.
b. Click anywhere in the Data Field column. The Complex Data Field
window appears.
c. Click the drop-down in the left-side of the Complex Data Field window and
select the first field you want to use in your calculation.
d. Click the drop-down in the center of the window and select “+” or “-”.
e. Click the drop-down in the right side of the window and select the second
field you want to use in your calculation.
f.
SVTS9117 Rev. J
Click OK.
SendSuite® Shipping
Administrator Guide
4-5
4 • Reports
Creating
Custom
Reports
Modifying Data
Groups
To modify data groups:
NOTE: Many SendSuite Shipping reports group data within
the report so you can easily summarize data. For example,
if the first grouping is by consignee, SendSuite Shipping will
total all the data for that customer. If the second grouping is
by shipped date, SendSuite will break down each customer’s
data by date. If a third grouping is selected for carrier,
SendSuite Shipping will total the carrier activity for a specific
date by customer.
Grouping is optional. If you wish, you can delete the
SendSuite groups by highlighting the text field and data field
and pressing the Delete key on your keyboard.
1. Click the Totals tab in the Custom Report Interface window.
2. Type the text you want for the groups in the fields next to First, Second and/
or Third.
3. Click the drop-down arrow in the field(s) next to the group(s) you defined in
step 2.
4. Select the field containing the data corresponding to the group you specified
in step 2 from the drop-down in the field on the left.
4-6
SVTS9117 Rev. J
SendSuite® Shipping
Administrator Guide
Reports • 4
To modify total columns:
Creating
Custom
Reports
1. Click the Totals tab in the Custom Report Interface window.
Modifying Total
Columns
Saving a Custom
Report
2. If you want a total for the entire report, click the box in the Report Totaling
column next to the data field you want SendSuite to calculate.
3. If you want a total for a group within a report, click the box in the Group
Totaling column next to the data field you want SendSuite to calculate.
To save a custom report:
1. Click the Save Report button.
2. Type a unique name for the report.
NOTE: You cannot
replace a standard
SendSuite report with a
custom report. You must
give your report a new
and unique name.
SVTS9117 Rev. J
3. Click OK.
NOTE: Custom reports are saved in the Custom folder on the left side of the
main reports window. You can apply filters and run them the way you would
run a standard SendSuite report. See Running SendSuite Reports on page
4-2 for instructions on how to apply filters.
SendSuite® Shipping
Administrator Guide
4-7
4 • Reports
Importing
External
Reports
The standard reports for SendSuite were developed using Seagate Crystal
Reports™. You may use Crystal Reports to create your own reports with data from
the SendSuite database. Those reports can be run from Crystal in any manner
you choose. You can get data from any SendSuite table.
If you want to import a Crystal report into SendSuite so it can be run in the
SendSuite Reports module or from the SendSuite Task Scheduler, then you must
follow the guidelines in this section.
NOTE: The reports you create in this manner can only be
run from an Administrative Workstation. If you want to run a
report from the Shipping Workstation, please see Creating
Custom Reports for the Shipping Workstation on page 4-11.
Availability of Data
When running a report, the SendSuite component looks for data from a limited
set of tables and views. If you design a report that uses a table or view that is not
supported, the report will not print in SendSuite.
Current List of Tables and Views Supported
To view the latest list of tables and views supported, follow these steps:
1. Open the Microsoft SQL Server Query Analyzer.
2. Run the following query:
USE ConquestDB SELECT DataSourceName FROM pb_
tblReportFilterFieldList
4-8
SVTS9117 Rev. J
SendSuite® Shipping
Administrator Guide
Reports • 4
Data Available
Importing
External
Reports
Each table or view contains different information. Some of the common tables
and views are explained below.
vReportShipmentLoads — This view contains the information about a
Availability of Data
carrier’s load. It contains the Shipment Header, Load and associated address
information.
vReportShipmentLines — The view contains the physical properties of the
shipping goods and includes the multiple shipments linked to the Bill Number.
It contains the Shipment Header, Shipment Line, Load, Cost, SWOG and
address information.
NOTE: Some views
pull data from tables
that are not currently in
use. For example, if you
were to use vExportSLI
you would get no data
on your report because
your system is not
populating data in these
fields.
tblStatusHeader — This table contains information for the status of
shipments that are checked by e-Track.
vShipper — The view combines information form tblAddress and
tblCountry.
vReportShipments — This view contains the Shipment Header and
associated address information.
vConsignee — The view combines information form tblAddress and
tblCountry.
vShipFor — The view combines information form tblAddress and
tblCountry. The Ship-For address is a location such as a retail store where
the goods will be forwarded by the customer.
vBillTo — The view combines information form tblAddress and tblCountry.
tblProduct — This table contains information about products stored in the
database. This table may or may not contain data, depending on whether
you have chosen to store data in this table. For example, when exporting
products, you must provide product detail which is stored in tblIntlLine.
Storing that information in tblProduct is optional.
vCarrierDeliveryDetailRpt — This view contains information for the Carrier
Performance Analysis Detail Report.
vCarrierDeliverySummRpt — This view contains information for the Carrier
Performance Analysis Summary Report.
SVTS9117 Rev. J
SendSuite® Shipping
Administrator Guide
4-9
4 • Reports
Importing
External
Reports
You must also save the report format so that SendSuite formats the document
correctly.
Exporting a Report
from Crystal
Reports
1. In Crystal Reports, from the File menu, verify that Save Data with Report is
NOT selected.
To export a report from crystal reports:
2. From the File menu, select Print.
3. From the Print menu, select Export.
4. From the Format drop-down list, select Report Definition.
5. From the Destination drop-down list, select Disk File.
6. Click OK.
7. Save the export file (.txt) in the same directory as you saved the .rpt file.
8. Exit Crystal Reports.
Importing the
Report into
SendSuite
Shipping
NOTE: When the report
is imported a copy is
placed in the Conquest
Rpt directory.
To import the report into SendSuite Shipping:
1. From the Control Center, open the Reports Module.
2. From the Custom menu, select Crystal Report.
3. From the File menu, select Import Report.
4. Locate the report you created and then click Open.
5. Enter a new name for the report to be imported and then click OK. The
following message is displayed:
User-Defined Report added successfully!
6. Click OK to clear the message box.
7. Click Close to return to the Reports window.
Using the Report
To use the report:
1. In the Reports module, double-click the User-Defined folder.
2. Double-click the name of the report you created.
You can use this report in the same manner that you use other reports in
SendSuite Shipping. For example, you can apply a filter to the information and
you can imbed the report in the Task Scheduler. You also can designate the
default printer where the report should print.
4-10
SVTS9117 Rev. J
SendSuite® Shipping
Administrator Guide
Reports • 4
Creating
Custom
Reports for
the Shipping
Workstation
General Report
Process
You can print custom documents or reports on the SendSuite Shipping
Workstation. Reports can include summaries or single shipment reports. They
also can include domestic or international documents, such as a bill of lading or a
packing list.
SendSuite Shipping reports or documents that are produced on the Shipping
Workstation (Thin Client) are run using Data Dynamics ActiveReports™. Your
SendSuite Shipping system has a run-time version of ActiveReports built into it.
This interface allows you to create custom documents that can be printed from
the SendSuite Shipping screens.
To set up a custom report for the SendSuite Shipping Workstation:
1. Create or convert the new report. See below. Make sure that you complete
the following:
Create or modify the data connection using an ActiveX Data Object
(ADO).
Write the error handling script.
2. Write a VBScript to run the report. See Writing VBScript elsewhere in this
chapter.
3. Embed the VBScript in a shipping screen as a sub-event. See Processing
Events in Chapter 3 of this guide.
SVTS9117 Rev. J
SendSuite® Shipping
Administrator Guide
4-11
4 • Reports
Creating
Custom
Reports for
the Shipping
Workstation
Creating a New
Thin Client Report
There are two ways you can create a Thin Client report:
Convert an existing Seagate Crystal Reports™ document into
ActiveReports. If you are familiar with Crystal, you can create new
reports using that application and convert them into ActiveReports. See
Converting a Crystal Reports Document elsewhere in this chapter.
Develop the report from the ground up using the run-time version of
ActiveReports in SendSuite. See Creating a New Report from Scratch
elsewhere in this chapter.
Converting a Crystal Reports Document
To convert Crystal Reports to ActiveReports:
1. From the Control Center, select the Reports module.
2. From the Custom menu, select Import Crystal Report to ActiveReport.
3. Click Next.
4. Click the ellipsis
is saved.
and then locate the directory where your Crystal report
5. Click Next.
6. In the list of reports, find your report and click in the selection box next to it.
7. Click Next.
8. On the Options screen in the Wizard, select the path where the new
ActiveReport will be located. The standard path for these is:
C:\Program Files\pbTranscape\Conquest\rpx\
4-12
SVTS9117 Rev. J
SendSuite® Shipping
Administrator Guide
Reports • 4
Creating
Custom
Reports for
the Shipping
Workstation
9. Make sure that the Place Multiple Sections To Frames checkbox is
unselected.
Creating a New
Thin Client Report
10. Click Next.
11. When the conversion process has finished, click Finish.
12. You may need to correct the name of the report if it has both rpt and rpx file
extensions.
13. You may need to change the data controls. The SendSuite interface supports
only ADO data controls.
14. Create the error handling script in ActiveReports. See Scripting on the Report
elsewhere in this chapter.
15. Build the script that will call the report on the Thin Client. See Writing VB
Script elsewhere in this chapter.
SVTS9117 Rev. J
SendSuite® Shipping
Administrator Guide
4-13
4 • Reports
Creating
Custom
Reports for
the Shipping
Workstation
Creating a New Report from Scratch
To create a new report from scratch using the ActiveReports interface in
SendSuite Shipping:
1. Before you begin designing the report, you need to define the data you will
pull onto the report. See Defining Data elsewhere in this chapter.
2. From the Control Center, select the Reports module.
Creating a New
Thin Client Report
3. From the Custom menu, select ActiveReports.
4. Configure the report header and add groups if necessary.
5. Build your report using the vertical toolbar on the left side of the design
window. For a definition of the buttons, see Toolbar Buttons elsewhere in this
chapter.
6. Save the report. You must save the report in the following directory:
NOTE: If you are
familiar with Crystal
Reports, you can use
that application to
create new reports and
then convert them into
ActiveReports using the
process above.
4-14
C:\Program Files\pbTranscape\Conquest\rpx\
7. Write the VBScript to run the report. See Writing VBScript elsewhere in this
chapter.
SVTS9117 Rev. J
SendSuite® Shipping
Administrator Guide
Reports • 4
Creating
Custom
Reports for
the Shipping
Workstation
Defining Data
Creating a New
Thin Client Report
For reports on SendSuite Shipping data, ADO is all that is needed.
Although ActiveReports is designed to use several different data types,
SendSuite will only work with ActiveX and XML. When designing the report, you
must use one or the other of these data objects:
To create the database connection:
1. Click the ADO button on the tool bar.
2. In the detail area of the design window, click and drag to create the ADO
connection (you do not need to be precise when creating the ADO connection
since the box resizes itself to the same size as the icon).
NOTE: A pre-configured
DSN is installed on the
server: pbSQLData,
UserID ConquestUser,
(password transcape)
retrieves all the data
that's needed.
3. Use the Property Toolbox on the right side of the window
- OR Right-click the ADO object and select Properties to open the Properties
Dialog Box.
4. Define the database connection using one of the following methods:
Complete the following fields in the Property Toolbox or Properties dialog
box:
DataSourceName—You will see a list of the available DSNs on your
system. Use pbSQLData to connect to the SendSuite database.
Default Database—If you used the pbSQLData DSN, the you do not
need to specify the database, since the default database is built into
the DSN. The SendSuite database is ConquestDB.
SVTS9117 Rev. J
SendSuite® Shipping
Administrator Guide
4-15
4 • Reports
Creating
Custom
Reports for
the Shipping
Workstation
Creating a New
Thin Client Report
NOTE: Unlike reports
that are run from the
Admin Workstation, you
may use any table or
view for the Thin Client
report data. You may
join tables together, or
you can create your
own views for data.
UserID—ConquestUser is the user ID that connects to the SendSuite
SQL data.
Password—The password for ConquestUser is transcape.
Complete the Connection String—The Connection String contains all
the data the object will need in order to connect to the database. This
includes the database name, SQL user, password. The Properties Dialog
Box has a tool to help you build a Connection String.
The string may look something like this:
Provider=SQLOLEDB.1;Persist Security Info=False;User ID=conquestuser;
Password=transcape;Initial Catalog=ConquestDB
5. Identify the data you will pull onto the report. You may either use an SQL
statement or you may call a stored procedure. Write the statement in the
Source field in either the Property Toolbox or Properties Dialog Box.
The statement you write here will only be used when viewing the report in the
designer. The actual query will be made by the VBScript that runs the report.
Ideally, the two should be the same.
The SQL statement may look something like this:
select * from vReportShipmentLoads
A stored procedure call may look something like this:
csp_EQRptExportSLI ‘020719TS0204’, ‘’
6. Continue designing the report using the other tools (see Toolbar Buttons
elsewhere in this chapter).
4-16
SVTS9117 Rev. J
SendSuite® Shipping
Administrator Guide
Reports • 4
Creating
Custom
Reports for
the Shipping
Workstation
Creating a New
Thin Client Report
Headers and Footers
Every report has a page header by default. Any fields you place in this area will
appear at the top of the every page of the report.
If you want a different header on the first page of the report, then you must insert
a report header.
To insert a report header or footer:
1. Right-click in the body of the report design window.
2. From the pop-up menu, select Insert, then select Report Header/Footer.
SVTS9117 Rev. J
SendSuite® Shipping
Administrator Guide
4-17
4 • Reports
Creating
Custom
Reports for
the Shipping
Workstation
Creating a New
Thin Client Report
Grouping
If you have data that has some common element, then you can group that
information together and have the report provide you with a subtotal.
For example, you can create a group for different shippers, so that one report can
show you totals for each shipper and then give you one grand total at the end.
To insert a group:
1. Right-click in the body of the report design window.
2. From the pop-up menu select Insert, then select Group Header/Footer.
Vertical lines used in the
Detail section. They line
up with the shaped used
in the Group Header and
Footer sections.
4-18
Borders created
using the Shape tool.
This border was applied
to the Text Box using
the Format menu.
SVTS9117 Rev. J
SendSuite® Shipping
Administrator Guide
Reports • 4
Creating
Custom
Reports for
the Shipping
Workstation
Creating a New
Thin Client Report
Summary Fields
In the footers, you can summarize your data by applying the following functions.
Sum
Average
Count
Minimum
Maximum
Variance
To apply a summary, create a text box in a footer and then modify the
settings in the Property Toolbox:
1. In the SummaryFunc field, select the type of summary you want to print.
2. If the summary is for a group, select the group name in the SummaryGroup
field. Otherwise, leave this field blank.
3. If you want a total on each page, select an option from the SummaryRunning
drop-down. You must make a selection from this drop-down.
If you want the running total to reflect just the current group, select
1-ddSRGroup.
If you want the running total to reflect the values from all groups, select
2-ddSRAll.
4. From the SummaryType drop-down, select the type of summary you want to
print. You must make a selection from this drop-down.
Use a Grand Total in the report footer.
Use a Sub Total for a group footer.
Use a Page Count in the page footer.
SVTS9117 Rev. J
SendSuite® Shipping
Administrator Guide
4-19
4 • Reports
Creating
Custom
Reports for
the Shipping
Workstation
Creating a New
Thin Client Report
Scripting on the Report
You can run VBScript within the report. These scripts can be used for a variety
of purposes, including assigning a value to a field. This includes printing a date
and time on the report. If ActiveReports encounters an error, the component
may lock on the server. Therefore, you must build the following script into your
ActiveReport.
1. Select the scripting tool.
2. From the Object drop-down, select ActiveReports Document.
3. Delete the existing text.
4. From the Events drop-down, select OnError.
5. In the sub-routine body, type the following:
CancelDisplay = True
6. Close the scripting window.
For other scripts, follow these general instructions:
1. To assign a script, select the scripting tool.
2. From the Object drop-down, select what section of the report the script
applies to. For example, if you are assigning a value to a field in the report
header, select ReportHeader.
3. In the sub routine, type your script. The system defaults to OnFormat, which
means that the script will run when the report is formatted. If you want the
script to run when the report is printed, select OnBeforePrint from the Events
drop-down.
NOTE: The script runs
on the server, meaning
that the time it prints on
the report is the time on
the server.
For example, if you want to print the run date in the report header, then set up
the script like this:
This example assumes that you have two data fields on your report called
txtDate and txtTime.
4-20
SVTS9117 Rev. J
SendSuite® Shipping
Administrator Guide
Reports • 4
Creating
Custom
Reports for
the Shipping
Workstation
Toolbar Buttons
To use a tool, click the desired button on the toolbar. Then, in the report design
window, click and drag to create the space where you want that feature.
You can move items later by using the cursor tool and dragging or re-sizing
items. However, if you want to move an item from one section to another (for
example moving a date from a group header to a page header), you must cut
and paste the item (you cannot drag from one section to another).
Creating a New
Thin Client Report
Cursor—Use this tool when you want to select an existing
item on the report.
Label—This tool creates a text field on the report. Use this for
report titles and field labels.
Once you have placed the field on the report, you can modify
the format using the Property Toolbox. For example, you can
modify the font by selecting the ellipsis.
Text Box—Use this tool to create the fields on the report
for your data. Before you use this tool, you need to define
the date on your report. See Defining Data elsewhere in this
chapter.
You can create the text box on the design window and then
select the DataField in the Property Toolbox.
You also can create a list of fields on the screen and then drag
and drop the fields. To view the list of available data fields,
click the View menu and then select Explorer. If you do not
see your fields, click the refresh button.
Image—Use this to place a graphic on the report. This can
include logos. It also can include a signature that you have
saved as a graphic. You can use various bitmap image types,
such as .bmp, .gif and .jpg.
Line and Shape—Use these tools to draw lines or boxes on
the screen. The can be used to create borders around text or
to separate sections or fields.
You can create a border around a text field by using the
Format menu. Select the field you want to border, then select
the Format menu, then select Format Border.
Rich Edit Control—This tool creates a box on the report
design window. You can place labels and text fields in this
area, grouping them together. Text that you type directly into
the Rich Control area will appear on the design window but
not on the actual report. This allows you to put notes on the
report without having them print.
SVTS9117 Rev. J
SendSuite® Shipping
Administrator Guide
4-21
4 • Reports
Creating
Custom
Reports for
the Shipping
Workstation
Creating a New
Thin Client Report
Frame—This creates a frame or frames on the report. Like
the Rich Control Edit tool, objects you place in these frames
will be grouped together. Once you create a frame, you can
split the frame horizontally or vertically into multiple panes.
If you want
To split a pane, click one of the split tools.
to delete a pane, click the delete icon in that pane.
Sub Report—Do not use this tool with SendSuite Shipping.
Page Break—Use this tool to create a page break. When
you run a report, it will create a new page when there is more
data than will fit on a page. This tool creates a page break in a
specific spot on the report.
OLE Object—Object Linking and Embedding (OLE) allows
you to link to an item created in another application and
embed it in your report. For example, if you exported data to
Microsoft® Excel and created a chart, you can link to that chart
whenever you run the report. If the chart is updated, then the
updated version of it will appear in the report.
ActiveX Control—Use this tool to insert an ActiveX control.
These controls allow Internet Explorer to interact with
other applications. In general, these are not necessary for
SendSuite reports.
Barcode Control—If you want to print text in barcode format,
you must use this tool.
ADO Data Control—In most cases, you will use an ActiveX
Data Object to connect to the SendSuite database to get
information.
DAO Data Control—These controls are not used with
SendSuite since the information must be presented on the
Thin Client.
RDO Data Control—These controls are not used with
SendSuite since the information must be presented on the
Thin Client.
XML Data Control—An alternative to using an ADO
connection is to get data from an XML string.
4-22
SVTS9117 Rev. J
SendSuite® Shipping
Administrator Guide
Reports • 4
Creating
Custom
Reports for
the Shipping
Workstation
You must call two components on the server in order to run the report. You can
write your own report, or you can modify one provided to you on the server.
The first component gathers the specific data you are looking for. The second
component finds the report format and then displays the report on the browser.
The second component call also creates a file with an rdf extension in the
eQuest Temp directory on the server.
pbCQEDataServicehelper.clsDBHelper.RunSQLReturnRS(your SQL
Writing VB Script
statement, Null)
pbCQEUserRpt.clsUserRpt.ProcessRPX(your report name, the record set
created by the ServiceHelper, the user’s session ID)
Modifying Sample Scripts
Three sample scripts have been included with SendSuite Shipping. After creating
a report, you can modify one of these scripts to run your specific report.
The report name is part of the script, so if you created multiple reports, you will
need multiple scripts—one script per report.
Each script was written for a different report call:
ADO — shipmentactivity.itg was created for ActiveX Data Objects using a
SQL statement.
XML — shipmentactivityXML.itg was created for XML data.
Stored Procedures — SLI.itg was created for ActiveX Data Objects
calling a stored procedure.
These scripts are included in SendSuite Shipping, but you will not find them in
the Integration module. You must first import the script and then modify it.
Importing the Script
NOTE: The File menu
changes when other
integration maps are
open. You must close all
maps before importing
a map.
To import a script:
1. From the Control Center, open the Integration module.
2. From the File menu, select Import.
3. Select the map you want to import. They are all in the same directory:
C:\Documents and Settings\All Users\Pitney Bowes\SendSuite Shipping\dat\
Integration\
4. Click the Import button.
5. The file is automatically saved, however the script name may be different
from the physical file name:
shipmentactivity.itg = UserReportTables.vbs
SLI.itg = SLI.vbs
shipmentactivityxml.itg = ShipmentActivityXML.vbs
SVTS9117 Rev. J
SendSuite® Shipping
Administrator Guide
4-23
4 • Reports
Creating
Custom
Reports for
the Shipping
Workstation
6. Modify the following variables:
DataSourceName—In quotations, type the SQL statement you will use
to select the data for the report. This should be the same as the SQL
statement you wrote in the report design.
strReports—In quotations, type the name of your report. Do not include
the file path nor the file extension. The SendSuite Shipping component
will look in C:\Program Files\pbTranscape\Conquest\rpx\ for the report.
Writing VB Script
7. Save the script. Embed the script in a shipping sub-event.
Running the
Report
To run the report, you need to call the VBScript you just created. To call a
VBScript from the SendSuite Shipping Workstation, it must be set up as a
processing sub-event. You can embed the script in an existing Master Event or
you can create a new User Defined event.
For instructions on setting up the report sub-event, see Processing Events in
Chapter 3 of this guide.
4-24
SVTS9117 Rev. J
SendSuite® Shipping
Administrator Guide
Reports • 4
Accounting
Reports
Unlike most reports in SendSuite, the accounting reports are run from the
thin client. These reports detail the shipments and costs associated with each
Account in the system.
Account Summary
Report
The Account Summary report displays each Account, Sub-Account, and SubSub-Account's activity for the time period specified. The information presented
includes:
Pieces — The total number of packages shipped for the specified time
period.
Average Cost — The average cost per package for the specified time
period.
Total Cost
SVTS9117 Rev. J
SendSuite® Shipping
Administrator Guide
4-25
4 • Reports
Accounting
Reports
The Transaction by Account report lists the carriers and services used by each
Account Set ID and the shipping charges incurred for a specified time period.
Transactions by
Account Report
4-26
SVTS9117 Rev. J
SendSuite® Shipping
Administrator Guide
5
Tools
Configuring Groups and Users ............................................. 5-2
Setting Up Groups .......................................................... 5-2
Setting Up Users ............................................................ 5-4
Setting the User's Defaults ....................................... 5-5
Editing the User Properties and Permissions ................. 5-5
User Data Visibility.................................................... 5-6
Account Visibility ....................................................... 5-7
Adding a User to a Group ......................................... 5-8
Assigning Individual User Rights .............................. 5-9
Security Permissions .................................................... 5-14
Administrative Workstation Permissions................. 5-14
The Text File ........................................................... 5-15
Importing Into SendSuite ........................................ 5-15
Importing Users ............................................................ 5-15
Simple Database Queries................................................... 5-17
Tools Module Simple Query.......................................... 5-17
Advanced Database Queries.............................................. 5-19
Tools Module Advanced Query ..................................... 5-19
Task Scheduler ................................................................... 5-20
Available Tasks ............................................................. 5-20
Create a Task Group .................................................... 5-23
Add a Task to the Group ............................................... 5-24
Schedule When Task Groups Will Run......................... 5-25
Start the Task Scheduler .............................................. 5-26
Modifying a Scheduler .................................................. 5-26
Terminating the Task Scheduler ................................... 5-27
Setting Up Purge Shipment .......................................... 5-27
Small Package Manifest Setup..................................... 5-28
Creating the Windows Task .................................... 5-29
Running Tasks From Windows Task Scheduler ........... 5-29
Testing the Task ...................................................... 5-33
Purging Database Records ................................................ 5-34
Purge Feature............................................................... 5-34
Empty Customer Data .................................................. 5-36
Customize ............................................................... 5-36
Empty Tables .......................................................... 5-36
User Authentication ............................................................ 5-37
SVTS9117 Rev. J
SendSuite® Shipping
Administrator Guide
5-1
5 • Tools
Configuring
Groups and
Users
Configuring groups and users will establish levels of security in SendSuite®
Shipping. To prompt the user to login, you must enable security. To do so, verify
that Security Enabled (ON) is selected under the Security menu in the Tools
module.
Setting Up Groups
To set up a group:
1. Select the Tools module from the Control Center.
2. Select Users/Groups from the Security menu.
3. Open the Users & Groups folder.
NOTE: Pitney Bowes
strongly encourages
keeping security
enabled. If you
disable security, every
user operates as an
administrator and can
make changes that
might damage the
system.
4. Double-click Create a New Group.
5. Type the Group ID.
6. Type the Group name.
7. Type a Name and Comments (optional).
8. Click Add.
9. Right-click the group you just created.
10. Select Properties.
5-2
SVTS9117 Rev. J
SendSuite® Shipping
Administrator Guide
Tools • 5
11. Click the Permissions tab.
Configuring
Groups and
Users
Setting Up Groups
TIP: To quickly give the
group read and write
access to all features,
click the Check All
Read/Write button.
See Security
Permissions elsewhere
in this chapter for
descriptions of each
security permission.
12. Assign permissions for the group by clicking in the boxes to the left of the
desired features.
13. Click OK.
SVTS9117 Rev. J
SendSuite® Shipping
Administrator Guide
5-3
5 • Tools
Configuring
Groups and
Users
1. Select the Tools module from the Control Center.
2. Select Users/Groups from the Security menu.
3. Open the Users & Groups folder.
4. Double-click Create a New User.
Setting Up Users
5. Type the user’s Login ID and Password. The Real Name is optional.
6. Comments are also optional. Most comments you input are plain text that can
only be seen by the administrator.
7. Click Add.
5-4
SVTS9117 Rev. J
SendSuite® Shipping
Administrator Guide
Tools • 5
Configuring
Groups and
Users
To display the User Properties dialog box:
Editing the User
Properties and
Permissions
Setting the User's Defaults
1. Right-click on the user or group you just created.
2. Select Properties.
On the General tab, you can edit the user's name, password, as well as what
screens and defaults are assigned to the user.
EXAMPLE: In the
example to the right, the
User has the following
Account visibility
options:
The User can view all
Account Set IDs.
The User can view
all Account IDs. The
default on the shipping
screen is GMS.
The User can only
view the Sub Account
IDs that are in the
GMS Finance Account
Visibility Group.
The User can only
view the Sub-Sub
Account IDs that are
in the PBDS Cargo
and PBDS Shipping
Account Visibility
Groups.
1. (optional) Under Default Accounting IDs, select the user's default account
settings to appear on shipping screens. See page 5-7 for more information on
configuring Accounting Visibility.
The boxes underneath the Default Accounting IDs display which accounting
visibility groups the user can access.
2. (optional) Select a default Shipper for the user under the Default
ShipmentOwnerID drop-down menu.
NOTE: By leaving any
of the Default dropdowns blank, the user
will have to select a
screen or value for that
field.
IMPORTANT: To use the SendSuite Basic edition shipping templates, you
must assign a Default ShipmentOwnerID for individual users (or groups).
The Basic templates assume the user ships from the same location. The
user does not have access to theShipper field.
3. (optional) Select a default recipient for the user under the Default
AddressOwnerID drop-down menu.
4. (optional) Select a default shipping screen for the user under the Default
Shipping Startup Screen drop-down menu. This screen will appear
automatically when the user logs in to SendSuite.
SVTS9117 Rev. J
SendSuite® Shipping
Administrator Guide
5-5
5 • Tools
Configuring
Groups and
Users
User Data Visibility
1. Click DV to change which screens and field values are visible to the User or
Group on the shipping screen.
Editing the User
Properties and
Permissions
NOTE: By leaving any
of the Selected fields
blank, the user can
access all data for that
selection.
For example, if you
leave Selected
Processing Screens
blank, the user will
be able to access
every shipping screen
available in SendSuite.
•
The Available Shipment Owner IDs field lists the available shippers stored
in the system. The Selected Shipment Owner IDs field lists what shippers
the user can ship with.
•
The Available Address Owner IDs field lists the available addresses
stored in the system. The Selected Address Owner IDs field lists what
addresses the user can ship to.
•
The Available Processing Screens field lists the available shipping
screens stored in the system. The Selected Processing Screens field lists
what shipping screens the user can access.
2. Move fields from an Available to Selected field using the
•
Use the
button to select all available fields.
•
Use the
and
button.
to remove (and remove all) selections.
3. Click OK when you are done.
5-6
SVTS9117 Rev. J
SendSuite® Shipping
Administrator Guide
Tools • 5
Account Visibility
Configuring
Groups and
Users
1. Click Acct Vis to change which accounts and account sets are visible to the
User or Group on the shipping screen.
Editing the User
Properties and
Permissions
NOTE: Enabling
Account Visibility
allows you to limit
what accounts and
account sets users can
access on the shipping
screens.
Account Visibility groups
are configured in the
thin-client. Refer to the
thin-client's online help
for more information
on setting up Account
Visibility groups.
NOTE: By leaving any
of the Selected fields
blank, the user can
access all data for that
selection.
For example, if you
leave Selected
Account Set AV Group
IDs blank, the user
will be able to access
every account set group
available in SendSuite.
SVTS9117 Rev. J
•
The Available Account Set AV Group IDs field lists the available account
set groups stored in the system. The Selected Account Set AV Group IDs
field lists what account set groups the user can access.
•
The Available Account AV Group IDs field lists the available account
groups stored in the system. The Selected Account AV Group IDs field
lists what account groups the user can access.
•
The Available Sub Account AV Group IDs field lists the available sub
account sets stored in the system. The Selected Sub Account AV Group
IDs field lists what sub account groups the user can access.
•
The Available Sub-Sub Account AV Group IDs field lists the available
sub-sub account groups stored in the system. The Selected Sub-Sub
Account AV Group IDs field lists what sub-sub account groups the user
can access.
2. Move fields from an Available to Selected field using the
•
Use the
button to select all available fields.
•
Use the
and
button.
to remove (and remove all) selections.
3. Click OK when you are done.
SendSuite® Shipping
Administrator Guide
5-7
5 • Tools
Configuring
Groups and
Users
Adding a User to a Group
Editing the User
Properties and
Permissions
1. Click the Membership tab.
Groups eliminate the need to configure user rights individually.
To assign a User to a Group:
2. Click the Add button.
3. Select the group.
4. Click Add.
5-8
SVTS9117 Rev. J
SendSuite® Shipping
Administrator Guide
Tools • 5
Assigning Individual User Rights
Configuring
Groups and
Users
Use the following permissions to assign rights to the user, regardless of what
group the user is a member of.
1. Click the Permissions tab.
Editing the User
Properties and
Permissions
2. Select the checkboxes to the left of the features to assign the individual’s
permissions.
TIP: To quickly give
the user read and write
access to all features,
click the Check All
Read/Write button.
See the security
permissions table on
the next several pages
for descriptions of each
security permission.
(This is strongly
discouraged, since most
users should not have
all the available rights.)
3. Click OK.
NOTE: You can assign a user to a group and then give the user
additional individual rights. However, a user cannot have fewer rights
than the group. If a user must have fewer rights than the group, you
must remove the user from the group. If you remove a user from a
group, that user will have no rights until you assign individual rights
or add the user to another group.
SVTS9117 Rev. J
SendSuite® Shipping
Administrator Guide
5-9
5 • Tools
User Properties Dialog Box: Permissions Tab
Feature
Description
Applies To
ProductAdministration
Allows you to have administrator permissions. You can
access all modules and functions within SendSuite.
Allows you to start up and stop the SQL Server and the
Server Agent from the SendSuite interface. Setting this
permission in SendSuite does not affect permissions in
SQL Server.
Allows you to look up any information in your SendSuite
data files. For example, you can view all shipments
that went to a particular customer on a given date. This
feature is located in the Tools Module.
The Query feature is always read-only, so it does not
matter whether you check Read/Write or Read-Only.
Allows you to permanently delete data records from
your SendSuite database tables. This feature is located
in the Tools Module.
The following options allow you to empty customer
data:
Customize — select the tables from the SendSuite
database that you want to empty
Admin
ServerDatabaseMaintenance
QueryDatabase
PurgeData
EmptyCustomerData
Admin
Admin
Admin
Admin
Empty — select the tables to empty all customer
SupportDataAddress
SupportDataAutoNumbers
SupportDataCarrier Setup
SupportDataCommodity
SupportDataDistance
5-10
data in the customized table list
Allows you to specify all addresses needed on your
packing and shipping documents, including those
of your consignees and your own organization and
carriers. This feature is located in the Supporting Data
Module.
Allows you to set up how SendSuite will generate
automatic bill numbers, invoice numbers, and order
numbers. This feature is located in the Supporting Data
Module.
Allows you to modify carrier profiles that were loaded
during data loading. This feature is located in the
Supporting Data Module.
Stores the commodity codes and freight classes. The
Commodity Table provides a general description of the
type of goods. This feature is located in the Supporting
Data Module.
Stores distance information for use with distance-based
LTL and truckload shipping rates. This feature is located
in the Supporting Data Module.
SVTS9117 Rev. J
SendSuite® Shipping
Admin
Admin
Admin
Admin
Admin
Administrator Guide
Tools • 5
User Properties Dialog Box: Permissions Tab
Feature
Description
Applies To
SupportDataGeograph
The Geograph table contains the geographic
coordinates for all zip codes in the United States. The
Distance window uses this information to calculate the
distance-based rates. If you plan to use the distancebased rates to Canada and Mexico, you will need to
manually enter the geographic coordinates here first.
This feature is located in the Supporting Data Module.
Use the Label Selection window to assign how labels
will be used. You can assign carrier, compliance,
billing, and shipper labels. This feature is located in the
Supporting Data Module.
Use the Label Setup window to define the content and
purpose of labels in SendSuite. Use one of SendSuite’s
many label templates as the basis for labels. This
feature is located in the Supporting Data Module.
Use this feature to make required settings for carrier
manifests. You can make different settings for each
shipper. The Manifest Setup window consists of two
tabs:
Configuration tab—This tab contains a separate
configuration tab for parcel carriers.
Admin
SupportDataLabel
Selection
SupportDataLabelSetup
SupportDataManifest
Configuration
SupportDataManifest
Configuration (cont.)
SupportDataProduct
SupportDataProNumbers
SupportDataTariffSetup
CustomizeReport
ShipmentProcess
Operation
SVTS9117 Rev. J
SendSuite® Shipping
Manifest Numbers tab—This tab allows you to set
up sequence numbers for manifests.
This feature is located in the Supporting Data Module.
Allows you to set up and maintain your product
database. This feature is located in the Supporting Data
Module.
Use this feature to set up the PRO number format and
number range for each shipper/carrier combination.
This feature is located in the Supporting Data Module.
Tariff Setup is where the rates and zones of the system
actually reside. Logistics Services configures these
tables and the data loading process populates the data
into the SendSuite system. However, you may need
to use these tables to enter programmable rates. This
feature is located in the Supporting Data Module.
Use the Custom Report Interface window to create your
own SendSuite Reports. This feature is located in the
Reports Module.
Use Shipment Processing to rate shipments and
generate carrier-approved shipping documents
and labels. This feature is located on the Shipping
Workstation.
Administrator Guide
Admin
Admin
Admin
Admin
Admin
Admin
Admin
Admin
Shipping
5-11
5 • Tools
User Properties Dialog Box: Permissions Tab
Feature
Description
SetupShipmentProcessing
Use the Shipment Processing Setup to define
Admin
processes, screen layouts, field defaults, and
processing events for the Shipment Processing window.
This feature is located in the Shipping Module.
Allows you to access the End of Day menu category.
Admin
EndOfDay
Applies To
PlanningOperation
Allows access to the Shipment Planning menu category
on the Shipping Workstation.
SetupIntegration
Allows you to set up integration in various places within
SendSuite. This feature is located in the Integration
Module.
RunIntegration
Allows you to run integration, such as Data Mapper,
ODBC, and Conditional Logic. This feature is located in
the Integration Module.
DeleteShipment
Use the Shipments tab from the Purge Data window to
delete shipments. This feature is located in the Tools
Module.
SetupTaskScheduler
Allows the automated execution of defined tasks on a
one-time, periodic, or continuous schedule. This feature
is located in the Tools Module.
LaunchTaskScheduler
Launches the task scheduler option and begins
processing tasks that you schedule. This feature is
located in the Tools Module.
SetupSystem
Allows you to perform system setup functions.
eTMSSupportingData
Allows you to enable/disable the Supporting Data icon
on the thin client. Read Only is not supported for this
function.
eTMSShipmentProcessing
Allows you to enable/disable the Shipment Processing
icon on the thin client. Read Only is not supported for
this function.
eTMSIntegration
Allows you to enable/disable the Integration icon on the
thin client. Read Only is not supported for this function.
eTMSeQuery
Allows you to enable/disable the eQuery icon on the
thin client. Read Only is not supported for this function.
eTMSDataAccount
Allows access to the sub-sub account data entry screen
through the browser.
eTMSDataAddress
Allows access to the address screen through the
browser.
eTMSDataShipperHandlingFees Allows access to the shipper handling fees through the
browser.
eTMSDataCarrierAccounts
Allows access to the carrier account setup page
through the browser.
5-12
SVTS9117 Rev. J
SendSuite® Shipping
Shipping
Admin
Admin
Admin
Admin
Admin
Both
Shipping
Shipping
Shipping
Shipping
Shipping
Shipping
Shipping
Shipping
Administrator Guide
Tools • 5
User Properties Dialog Box: Permissions Tab
Feature
Description
Applies To
eTMSDataCommodity
Allows access to the commodity table through the
browser.
Allows access to the sub-account setup through the
browser.
Allows access to the account setup through the
browser.
Allows access to the remarks setup through the
browser.
Allows access to the Bill of Lading preferences through
the browser.
Allows access to Setup > Downloads through the
browser.
Allows access to the Carrier and Labels tab.
Enables access to extended templates in the shipping
screen setup and through the browser.
Allows user to run a batch of Bills of Lading through the
interface.
Allows users access to the meter settings.
Allows access to Setup > Pitney Bowes Links through
the browser.
Allows access to Setup > Password Maintenance
through the browser.
Allows access to the Reports menu through the
browser.
Allows access to Shipping > Delivery Information
through the browser. See SVTS9146 for more
information on the Delivery Information screen.
Allows access to Shipping > Return Receipt Catalog
through the browser. See SVTS9146 for more
information on the Return Receipt Catalog screen.
Allows access to Setup > Data > Package Attributes
through the browser.
Allows access to Setup > Data > Accounting Visibility
Groups through the browser.
Allows access to Setup > Data > Meter Setup through
the browser.
Allows access to Setup > Data > Account Sets
through the browser.
Shipping
eTMSDataDepartment
eTMSDataDivision
eTMSDataRemarks
eTMSDataBOLPreferences
eTMSDataDownloads
eTMSDataCarrierAndLabels
Extended Shipping Templates
Batch BOL
Meter Settings
eTMSPBLinks
eTMSPWDMaintenance
eTMSReports
eTMSDeliveryInfo
eTMSCatalog
eTMSPkgAttributes
eTMSAccountVisibility
eTMSMeterSetup
eTMSAccountSets
SVTS9117 Rev. J
SendSuite® Shipping
Administrator Guide
Shipping
Shipping
Shipping
Shipping
Shipping
Shipping
Shipping
Shipping
Shipping
Shipping
Shipping
Shipping
Shipping
Shipping
Shipping
Shipping
Shipping
Shipping
5-13
5 • Tools
Configuring
Groups and
Users
Administrative Workstation Permissions
Security
Permissions
Obsolete Permissions
5-14
The following permissions apply to the Administrative Workstation and/or the
Shipping Workstation.
The following permissions are obsolete:
Feature
Description
SupportDataEDI
EDIParameterSetup
EDIPartnerSetup
EDITranslator
EDITranslatorOverride
Setup Planning
SetupPickPack
SetupExport
OrderOperation
PackingOperation
StagePackageOperation
DeleteOrder
SetupPlanning
Obsolete
Obsolete
Obsolete
Obsolete
Obsolete
Obsolete
Obsolete
Obsolete
Obsolete
Obsolete
Obsolete
Obsolete
Obsolete
SVTS9117 Rev. J
SendSuite® Shipping
Administrator Guide
Tools • 5
You can import users into SendSuite into a group through a text file.
Configuring
Groups and
Users
The Text File
The text file must be named UserInfo.txt and be in the following location:
Importing Users
C:\Program Files\PB Transcape\Conquest\Data Exchange
The text file must be comma-delimited, and use ins and del actions to insert and
delete records on a single line. The action is followed by the Shipper ID, User
Name, and the password for the user.
The text below is an example of a UserInfo.txt file:
Action
NOTE: If no password
is imported for the user,
SendSuite will assign
the user a default
password of password.
User ID
ins,Shipper1
ins,Shipper2,Joe Shipper
ins,Shipper3,Bob Stanley,xyz
ins,Shipper4,Ray Knight
ins,Shipper5,Calvin Schiraldi
del,Shipper4
User Name
Password
In this example, the Shipper4 entry is deleted, and not imported into SendSuite.
Shipper1 has no User Name (this can be added later).
Importing Into SendSuite
1. Open the Tools module.
2. Click Security > Users/Groups.
3. Right-click an existing group.
•
Alternatively, create a new Group. See Setting Up Groups, page 5-2.
4. Click Import Users.
5. Click Yes at the prompt.
SVTS9117 Rev. J
SendSuite® Shipping
Administrator Guide
5-15
5 • Tools
Configuring
Groups and
Users
Importing Users
6. A prompt displays indicating a successful import. Click OK.
7. The Shipper IDs from your UserInfo.txt file now display under the selected
Group.
•
You can now edit each individual user:
•
Right-click on a Shipper ID and click Properties.
8. Users with no assigned password will log in with password. SendSuite
Shipping then prompts the user to type a new password.
5-16
SVTS9117 Rev. J
SendSuite® Shipping
Administrator Guide
Tools • 5
Simple
Database
Queries
You can make simple SendSuite database queries from the Tools module.
To make a simple query of a SendSuite database from the Tools module:
1. Select Query Database from the Database menu.
Tools Module
Simple Query
2. Click the drop-down arrow in the Select table field.
3. Use one of the following methods to select the database fields listed in
Check fields to show that you wish SendSuite to display:
•
Click the box to the left of the corresponding database fields you wish to
display.
•
Click the Check All button.
4. If you are defining a new query criterion, then:
a. Click the drop-down arrow in the Field field.
b. Select a field you wish to look up.
c. Click the drop-down arrow in the Operator field.
d. Select the appropriate operator.
e. Type the value you wish to find in the Value field.
f.
Click the drop-down arrow in the Sort by field.
g. Select the field you wish to have SendSuite use to sort the records it
finds.
h. If you want SendSuite to display the records in descending order, then
select the checkbox to the left of Descending.
SVTS9117 Rev. J
SendSuite® Shipping
Administrator Guide
5-17
5 • Tools
Simple
Database
Queries
i.
If you want SendSuite to save the query criterion you just defined, then
click the Save as button.
j.
Click the View button.
Tools Module
Simple Query
5. If you want to use a query criterion already saved in SendSuite, then:
a. Click the box to the left of Select an Existing Criterion.
b. Click the drop-down arrow in the Select an Existing Criterion field.
c. Select the saved query criterion you wish to use.
d. Click the View button.
5-18
SVTS9117 Rev. J
SendSuite® Shipping
Administrator Guide
Tools • 5
You can make advanced SendSuite Shipping database queries from the Tools
module. Advanced database queries allow you to add a logic operator(s) to add
additional query criteria.
Advanced
Database
Queries
Tools Module
Advanced Query
To make an advanced query of a SendSuite database from the Tools
module:
1. Select Query Database from the Database menu.
2. Click the drop-down arrow in the Select table field.
3. Use one of the following methods to select the database fields listed in
Check fields to show that you wish SendSuite Shipping to display:
•
Click the box to the left of the corresponding database fields you wish to
display.
•
Click the Check All button.
4. Click the drop-down arrow in the Field field.
5. Select a field you wish to look up.
6. Click the drop-down arrow in the Operator field.
7. Select the appropriate operator.
8. Type the value you wish to find in the Value field.
9. Repeat step 4 through step 8 until you have added all of the necessary query
criteria.
10. Click the drop-down arrow in the Sort by field.
11. Select the field you wish to have SendSuite Shipping use to sort the records it
finds.
12. If you want SendSuite Shipping to display the records in descending order,
select the checkbox to the left of Descending.
13. If you want SendSuite Shipping to save the query criterion you just defined,
click the Save as button.
14. Click the View button.
SVTS9117 Rev. J
SendSuite® Shipping
Administrator Guide
5-19
5 • Tools
Task Scheduler
The Task Scheduler is a SendSuite Shipping feature that will perform a recurring
function based on a schedule you set up.
There are three steps to setting up the Task Scheduler:
1. Create a task group.
NOTE: Although
multiple task schedules
can be setup, only
one task schedule
can run at any given
time throughout the
enterprise.
2. Add tasks to the group.
Available Tasks
SendSuite Shipping can run the following operations from the Task Scheduler:
3. Set up the schedule.
In order to run the Task Scheduler, a Windows user must be logged on the
computer, and a SendSuite Shipping user must be logged on to SendSuite
Shipping. The Task Scheduler must be launched from the Tools module in
SendSuite Shipping. If the Administrative Workstation is shut down and restarted,
you must manually restart the Task Scheduler. See Start the Task Scheduler in
the next section in this chapter.
Feature
What it Does
Requirements
Airborne Auto Update
(NOTE: Airborne is no
longer supported and
has been replaced by
DHL.)
Uses FTP to data obtain
updates from the carrier.
You must have an
agreement with the
carrier. The connection
requires a username and
password for the carrier’s
site.
Screen configured with
batch e-mail notification
script assigned.
Batch Email Notification Runs a script specified
in the task setup to send
e-mail notification in a
batch.
Carrier Service
This task makes services
Description Branding
available only if they are
enabled for Shipper's
account.
Data Mapper
Runs a Data Mapper
integration script. See
Data Mapper in Chapter
8.
Download Bulk POD
Downloads and
Files
processes Bulk POD data
from USPS/PB Secure
Archive.
e-Track
Tracks shipments in a
batch. See E-Track in
Chapter 3.
5-20
SVTS9117 Rev. J
You must have a Data
Mapper integration map
set up.
The workstation running
the task must have
Internet (http) access.
SendSuite® Shipping
Administrator Guide
Tools • 5
Task Scheduler
Feature
What it Does
Empty Customer Data
Executes the Empty
Customer Data feature,
purging data from the
database. See Empty
Customer Data elsewhere
in this chapter.
This sends all manifests
that have been queued
in tblPBQueue. This
task can run even when
tblPBQueue is empty.
That means that you can
run it several times every
day.
Retrieves carrier package
status information.
Prints a SendSuite report.
See Reports in Chapter 4.
Available Tasks
End of Day Carrier
Communication
Get Package Status
Print Report
Print Small Package
Manifest
Process Downloaded
Carrier Data
Process Package
Status
Purge Group/Loads/
Shipments
Purge Shipment
SVTS9117 Rev. J
SendSuite® Shipping
Administrator Guide
Allows reprint of manifest
for manifesting carriers.
This processes carrier
rate and route files for
carriers such as DHL and
Eastern Connection.
Processes carrier
package status
information.
This feature deletes all
the shipments that have
the same GroupID.
Deletes shipments. You
can specify criteria. For
example, you can delete
all shipments that are
more than 60 days old.
Requirements
Depending on the carrier,
the workstation running
the task may need to
communicate through port
443.
You must have a filter
defined for the report.
See Creating and Saving
Report Filters in Chapter
4.
The shipments must have
a GroupID. See Batch
Rating in Chapter 2.
You must set up criteria
telling SendSuite which
shipments to delete. See
Purge Shipments Setup
elsewhere in this Chapter.
5-21
5 • Tools
Task Scheduler
Feature
What it Does
Purge Status
Deletes the status of
packages that have been
tracked. This task is
best used with e-Track.
For example, you track
packages, print reports,
then delete the shipment
status so those packages
do not print on the report
again.
Purges cached time in
transit data stored in
SendSuite Shipping.
This will undo the routing This shipments must have
and rating on a group of
a common group ID as
shipments.
assigned by the Shipment
Planning feature. See
Batch Rating in Chapter
2.
This feature runs an
You must have the
external executable file
executable file set up.
on the schedule you set
up. For example, you
can run a batch file that
moves a text file from one
directory to another.
Removes data and carrier
files (manifests, labels,
etc.) stored by carrier
component. These items
are still available from
SendSuite Shipping.
Rates shipments in a
The shipments must be
batch.
saved in the database
using a common group
ID. See Batch Rating in
Chapter 2.
This task runs the small
The carrier manifest
package manifest for the properties must be
date and carrier selected. configured.
See Small Package
Manifest Setup elsewhere
in this Chapter.
Available Tasks
Purge Time In Transit
Remove Routes and
Rates
Run a Batch or
Executable File
Remove Temporary
Data and Files
Shipment Planning
Small Package
Manifest
5-22
SVTS9117 Rev. J
Requirements
SendSuite® Shipping
Administrator Guide
Tools • 5
Task Scheduler
Feature
What it Does
Update Manifest
Transmission Status
This task updates the
manifest transmission
status for DHL.
Download and update the UPS communication must
SendSuite system from
be enabled.
UPS site.
Available Tasks
UPS Auto Update
Create a Task
Group
Requirements
To create a task group:
1. Open the Tools module from the Control Center.
2. Select Task Groups from the TaskScheduler menu.
3. Click Available Groups/Tasks.
4. Double-click Add a New Group.
5. Type a unique name for the task group in the Group Name field.
6. Optionally, type a description for the task group in the Description field.
7. Click Add.
8. If necessary, enter other task groups.
9. Click Cancel/Close to close the window.
SVTS9117 Rev. J
SendSuite® Shipping
Administrator Guide
5-23
5 • Tools
Task Scheduler
To add a task to the group:
1. In the Available Task Group window, click the task group you created.
2. Double-click Add a Task to Group.
Add a Task to the
Group
3. Click the drop-down arrow in the Select Task field to display the task dropdown list.
4. Select the task you want to add to this group.
5. Type the task’s sequence number in the Task Order Number field. The
sequence number specifies the order you want this task to occur in the task
group.
6. Type a description of the task in the Description field.
7. Click Edit to complete the parameters for the specific task.
8. Click OK.
9. Click Add to add the task to the list.
10. If necessary, repeat step 2 through step 9 to add more tasks to the task list.
11. Close the Available Task Groups window.
5-24
SVTS9117 Rev. J
SendSuite® Shipping
Administrator Guide
Tools • 5
Task Scheduler
To schedule when task groups will run:
1. Select Setup Schedulers from the TaskScheduler menu.
Schedule When
Task Groups Will
Run
2. Click the drop-down arrow in the Scheduler Name field and select the
appropriate task scheduler.
3. Click the drop-down arrow in the Group Name field and select the appropriate
group name. You can run more than one task group in a task schedule.
4. Complete each of the following for each task group:
NOTE: Make sure that
the schedule does
not conflict with any
other process. For
example, do not set
the Task Scheduler to
run when the database
maintenance plan is
running.
•
Start Time — You can type in 12 hour or 24 hour format. For example, if
you want a group to start at 10:30 every night, you can type “10:30 PM” or
you can type “22:30”.
•
Re-Start Every (Mins.) — If the group needs to run more than once
during the day, type the number of minutes between the times it launches.
For example, if a group runs at 8:00 PM and you want to run it again at
10:00 PM, the type “120” in this field.
•
Effective Duration (Hours) — If you entered something in the Re-Start
field, then you must indicate how many times the system should run that
group. For example, if a group runs at 8:00 PM and you want to run it
again at 10:00 PM and then stop, the type “2” in this field.
•
Days (Mon.–Sun.) — Check the days you want the group to run.
•
Catch Up — When you launch the Task Scheduler, it will wait until it
reaches the Start Time to run the task group. For example, if you set up a
group to run at 2:00 AM and launch the scheduler at 10:00 AM, it will wait
until the next day to run that group.
If you select this checkbox, the Task Scheduler will not wait to run a
group. In the example above, it will run that group immediately.
5. Click Save.
SVTS9117 Rev. J
SendSuite® Shipping
Administrator Guide
5-25
5 • Tools
Task Scheduler
Start the Task
Scheduler
NOTE: If the Task
Scheduler stops
abnormally (e.g.,
someone unplugs the
machine running it), you
must follow these steps
to restart the scheduler.
The Task Scheduler
does not automatically
start when you restart
the machine.
Tasks you schedule will not begin processing until you launch the task scheduler
option.
To start the Task Scheduler:
1. Select Launch a Scheduler from the TaskScheduler menu.
2. Click the drop-down arrow in the Launch a Scheduler field and select the task
to be launched.
3. Click Launch.
4. Leave Task Scheduler open and minimize the Tools module. The tasks will
continue to run until you stop the scheduler.
5. If you want to stop the scheduler, click Terminate.
6. To restart the Task Scheduler, follow the steps above.
Modifying a
Scheduler
You can create new task groups, add tasks to existing groups, and change
the schedule on which the scheduler runs by following the instructions on the
previous pages.
Note that once you create a task, you cannot modify it. If you want to modify the
properties of a task or change the order in which tasks run, you must delete them
and re-add them to the task group.
If you modify anything, it is important to stop the scheduler and restart it for the
changes to take place.
5-26
SVTS9117 Rev. J
SendSuite® Shipping
Administrator Guide
Tools • 5
Task Scheduler
To terminate the Task Scheduler:
1. Open the Tools module from the Control Center.
2. Identify the scheduler that is running.
Terminating the
Task Scheduler
3. Click the Terminate button.
Setting Up Purge
Shipment
If you are using the Purge Shipment task, you must tell the system which
shipments to delete.
4. Click Yes to confirm that you want to stop the scheduler.
To set up shipment purge:
1. Follow the steps earlier in this chapter to create and add the task to the
group.
2. Select the Purge Shipment feature.
3. Click the Edit button.
4. Use any of the fields to select the shipments.
5. If you want to purge shipments by date, you can use a relative date.
a. Make sure the Relative Date checkbox is selected.
b. Select an Operator. For example, if you want to delete all shipments that
are over 60 days old, select <= or < operator.
c. Type the number of days in the Value field. For example, if you want to
delete all shipments that are over 60 days old, type 60 in this field.
6. Click OK.
SVTS9117 Rev. J
SendSuite® Shipping
Administrator Guide
5-27
5 • Tools
Task Scheduler
This task runs the end of day manifest for the date and carrier you select. This
task can be used as a forced close, automatically manifesting all shipments for a
particular day.
Small Package
Manifest Setup
While the task prepares the manifest and places the electronic document in the
queue for transmission, it does not print any of the documents. The manifest
documents can be printed from the End of Day - Small Package Reprint feature
on the Shipping Workstation.
If you want to transmit the manifest the same day that it was prepared, then
you will want to include the End of Day Carrier Communication task in the
same group with the Small Package Manifest task. Make sure that the Carrier
Communication task is ordered to follow the Manifest task.
To set up small package manifesting:
1. Follow the steps earlier in this chapter to create and add the task to the
group.
2. Select the Small Package Manifest feature.
3. Click the Edit button.
NOTE: Due to how
some of the carriers are
configured, you may
need to set up multiple
tasks to make sure you
have manifested for all
services.
4. From the Carrier ID drop-down, select the carrier/service/shipper
combination.
NOTE: Always
Send causes an
email notification to
be sent with every
communication attempt.
If the system makes
repeated attempts
multiple emails will be
generated. Select only
during troubleshooting.
5. Make sure the Relative Date checkbox is selected.
6. In the Scheduled Ship Date fields and Actual Ship Date field, type a zero (0).
This will manifest for the current day.
•
If you want to run this process after midnight (therefore it is the next day),
then type a negative-one (-1) in this field.
7. Click the SendSuite button to populate the SendSuite URL field.
•
If you are using multiple application servers, then manually type the Web
address for the main application server in this field.
8. (optional) Type an email address to send a notice once communication is
completed.
9. Click OK.
5-28
SVTS9117 Rev. J
SendSuite® Shipping
Administrator Guide
Tools • 5
Task Scheduler
Running Tasks
From Windows
Task Scheduler
You can run scheduled tasks in SendSuite from the Windows Task Scheduler.
Use the instructions below to configure the Windows Task Scheduler.
Creating the Windows Task
To create the Windows task:
1. Create a Task Group. (See elsewhere in this chapter.)
2. Click Start > Settings > Control Panel.
3. Double-click Scheduled Tasks.
4. Double-click Add Scheduled Tasks.
5. Click Next.
6. Click Browse to find the SendSuite Shipping task scheduler.
7. Navigate to: C:\Program Files\Pitney Bowes\SendSuite Shipping.
•
SVTS9117 Rev. J
Legacy users should navigate to: C:\Program Files\PBTranscape\
Conquest.
SendSuite® Shipping
Administrator Guide
5-29
5 • Tools
Task Scheduler
8. Select pbTMSTaskScheduler.exe.
9. Click Open.
Running Tasks
From Windows
Task Scheduler
10. Add the name of the group to the name of the scheduled task. For example:
pbTMSTaskScheduler Nightly.
11. Select how often the task should run: Daily, Weekly, Monthly, etc., then click
Next.
12. Set the Start time and Start date for the task, and indicate whether it should
run Every Day, on Weekdays, or on another schedule.
13. Click Next.
5-30
SVTS9117 Rev. J
SendSuite® Shipping
Administrator Guide
Tools • 5
Task Scheduler
14. Enter a user name and password, confirm the password, then click Next.
Running Tasks
From Windows
Task Scheduler
15. Select Open advanced properties for this task when I click Finish.
16. Click Finish.
SVTS9117 Rev. J
SendSuite® Shipping
Administrator Guide
5-31
5 • Tools
Task Scheduler
Running Tasks
From Windows
Task Scheduler
17. Type the name of the task group in the Run box after the final quotation
mark. For example:
“C:\Program Files\Pitney Bowes\SendSuite Shipping\pbTMSTaskScheduler.
exe” Nightly
NOTE: If the name of the task group contains spaces, the name
must also be enclosed in double quotes. For example:
“C:\Program Files\Pitney Bowes\SendSuite Shipping\
pbTMSTaskScheduler.exe” “End Of Day”
18. If you need the task to run more than once per day, click the Schedule tab.
a. Click Advanced.
b. Select Repeat Task.
c. Set the frequency of repetition. For example, every 10 minutes.
5-32
SVTS9117 Rev. J
SendSuite® Shipping
Administrator Guide
Tools • 5
Task Scheduler
d. Set the duration of repetition, or indicate a stop time by selecting the Until
option button.
e. Click OK.
Running Tasks
From Windows
Task Scheduler
19. Click OK.
20. Type and confirm the password, and click OK.
Testing the Task
To test the task:
1. Right-click on the task you just created, and select Run.
2. Check the Status column to verify that it displays as Running.
3. After the task completes, click the Last Run Time and Status columns. If the
Status column displays Could not start the task failed. Open the properties of
the task, and the properties of the task group to determine what might have
caused the task to fail. See the Notes below for additional tips.
NOTES: The Windows Task Scheduler can run tasks concurrently,
and without a user being logged into the system. The user you
supply for the task MUST be a member of the Administrators group
and no other, or some tasks in the group may not run.
SVTS9117 Rev. J
SendSuite® Shipping
Administrator Guide
5-33
5 • Tools
Purging
Database
Records
Purge Feature
You can permanently delete records from your database files by instructing
SendSuite to purge its records.
NOTE: Once records have been purged, they cannot be restored
without restoring the entire database.
You can schedule a purge by using the Task Scheduler.
Use the purge feature to select the data that you want to delete from the
database. You will input criteria that will display specific records to delete.
To use the purge feature:
1.
From the Control Center, open the Tools module.
2. Select Purge Data from the Database menu.
3. Click one of the following tabs:
•
Orders — to delete orders
•
Shipments — to delete shipments
•
Support Data — to delete records from the Supporting Data Module
•
Individual Tables — to select from all the databases in the system
4. If you selected Support Data or Individual Tables tab:
a. Click the drop-down arrow in the Select table field.
b. Select the appropriate table.
c. Click the drop-down arrow in the Field field.
5. Select a field you wish to use to look up records that will be purged.
6. Click the drop-down arrow in the Operator field.
7. Select the appropriate operator.
5-34
SVTS9117 Rev. J
SendSuite® Shipping
Administrator Guide
Tools • 5
8. Select the appropriate value by typing the value you wish to find in the Value
field.
Purging
Database
Records
9. Add additional criteria to locate records, if necessary. To add additional
criteria:
Purge Feature
a. Click the drop-down arrow in the Logic Operator field.
b. Select the appropriate logic operator.
c. Repeat Step 5 through Step 9.
10. Click the drop-down arrow in the Sort by field.
11. Select the field you wish to have SendSuite use to sort the records it finds.
12. Click the Preview button.
NOTE: To select
multiple records, you
must press and hold the
C key while you click on
the gray areas to the left
of the records you want
to delete. If you want
to select a group of
sequential records, click
the gray area to the left
of the first record, press
and hold the S key, and
then click the gray area
to the left of the last
record.
SVTS9117 Rev. J
13. If you want to purge all the records displayed, click the Delete All button.
14. If you want to purge only selected records:
a. Click in the gray area to the left of the displayed record to highlight the
record you want to delete.
b. Click the Delete Selected button.
SendSuite® Shipping
Administrator Guide
5-35
5 • Tools
Purging
Database
Records
Empty Customer
Data
This feature allows you to specify the tables you want to purge. Unlike the purge
feature, this feature will delete all the data on a table.
When using this feature, you first define the tables that will be emptied, then you
execute the data purge.
Customize
To define the tables you want to empty:
NOTE: This type
of purge is not
recommended
because all data will
be deleted. Some
tables contain very
important information
that you must keep. For
example, tblAddress
contains records for
carriers and your
shipper ID. Using
this feature, you
would delete carrier
information that is
necessary to rate
shipments.
1.
From the Control Center, open the Tools module.
2. From the Database menu, select Empty Customer Data > Customize.
3. Check the tables you want to empty when you execute this feature.
4. Click OK.
Empty Tables
After you have defined what tables to empty, follow these instructions to
execute this feature:
1. From the Control Center, open the Tools module.
2. From the Database menu, select Empty Customer Data.
3. Select Empty.
NOTE: All data in the
tables you selected will
be deleted. The system
does not discriminate
based on date, type of
data, etc.
5-36
4. PB SendSuite asks you if you are sure you want to do this. Click Yes to
empty the data.
SVTS9117 Rev. J
SendSuite® Shipping
Administrator Guide
Tools • 5
User
Authentication
The User Authentication screens allows you to setup the authentication method
when logging into the SendSuite Shipping thin-client.
There are five authentication methods in SendSuite Shipping:
No Authentication — Anyone who launches the thin-client will run under the
built in ADMIN user and will not be prompted for user ID and password.
Interactive Authentication — SendSuite presents a login page to prompt
for the user ID and password. The user ID and password are verified against
SendSuite database.
SVTS9117 Rev. J
SendSuite® Shipping
Administrator Guide
5-37
5 • Tools
User
Authentication
Windows Authentication — The application will verify the Windows user ID
passed in exists in the SendSuite Database. Since the user is authenticated
through Windows, no password is validated by SendSuite Shipping.
You must enable Windows security before enabling Windows Authentication
in SendSuite Shipping.
To enable Windows security:
1. Click
> Settings > Control Panel.
2. Double-click Administrative Tools.
3. Double-click Internet Information Services.
4. Open (local computer) > Web Sites > Default Web Site.
5. Right-click eQuest and select Properties.
6. Click the Directory Security tab.
7. Click Edit….
8. Select Integrated Windows authentication.
9. Click OK and close Internet Information Services.
5-38
SVTS9117 Rev. J
SendSuite® Shipping
Administrator Guide
Tools • 5
User
Authentication
NOTE: Call technical
support for assistance
with configuring Single
Sign on 3rd Party or
Key Exchange.
Single Sign on 3rd Party — A third party authentication provider sits
between or the client browser and the thin-client.
The third party single sign on provider authenticates the user and then
passes the authenticated user to the application. SendSuite Shipping
verifies user credentials from the third party provider against the SendSuite
Database.
Key Exchange — This authentication option is used when Pitney Bowes
provides hosting services or when SendSuite Shipping is behind the
customer’s firewall. User ids/profiles must be established on SendSuite
Shipping for each user.
SendSuite Shipping generates a client key for each software instance, and
encrypts and stores the key. Each customer is provided with their key to
store and use securely.
1-800-692-0003
SVTS9117 Rev. J
SendSuite® Shipping
Administrator Guide
5-39
5 • Tools
This Page Intentionally Blank
5-40
SVTS9117 Rev. J
SendSuite® Shipping
Administrator Guide
6
Tariffs
Creating a Custom Parcel Tariff from Scratch ...................... 6-2
SCAC Code .................................................................... 6-2
Address Record .............................................................. 6-3
Tariff Setup ..................................................................... 6-4
Tariff Header Tab ...................................................... 6-4
Zone/RBN Tab .......................................................... 6-5
Rates Tab ................................................................. 6-9
Creating a Custom LTL Tariff from Scratch .........................6-11
SCAC Code ...................................................................6-11
Address Record ............................................................ 6-12
Tariff Setup ................................................................... 6-13
Tariff Header Tab .................................................... 6-13
Zone/RBN Tab ........................................................ 6-14
Rates Tab ............................................................... 6-17
Carrier Setup ...................................................................... 6-19
Tariff Accessorials............................................................... 6-23
Tariff Discounts ................................................................... 6-26
Carrier Service Days .......................................................... 6-28
Tariff FAK ............................................................................ 6-30
Tariff Absolute Minimums ................................................... 6-32
Tariff Accessorial Incompatibility......................................... 6-34
Temporary Tariff Increase ................................................... 6-35
Borrowing a Tariff ............................................................... 6-37
Clone a Carrier Setup ................................................... 6-37
Create the Carrier Address Record .............................. 6-39
Set Up Carrier PRO Numbers or Tracking Numbers .... 6-40
Select or Create a Label ............................................... 6-40
Add Carrier to Rate Shop Group and/or Routing Instr.. 6-40
Manual Rating .................................................................... 6-41
Creating the Manual Carrier ......................................... 6-41
Creating the VB Script .................................................. 6-47
Modifying the Sub-event ......................................... 6-49
Associating the VB Script with a Shipping Screen ....... 6-49
Adding Fields to the Shipping Screen..................... 6-50
Processing a Shipment Using Manual Rates ............... 6-51
Zero-Rate Carrier ............................................................... 6-52
Creating the SCAC ....................................................... 6-52
Creating the Tariff ......................................................... 6-52
Setting Up the Tariff ................................................ 6-52
Setting the Zone Details ......................................... 6-53
Setting the Class Rates .......................................... 6-54
Configuring the Carrier ........................................... 6-55
Creating an Address Record ........................................ 6-56
SVTS9117 Rev. J
SendSuite® Shipping
Administrator Guide
6-1
6 • Tariffs
Creating a
Custom Parcel
Tariff from
Scratch
To create a custom parcel tariff from scratch, you must complete the
following tasks:
1. Enter the carrier’s SCAC code.
2. Create an address record for the carrier.
3. Create the carrier’s tariff for each level of service the carrier provides.
4. Set up the carrier profile.
5. Define any additional parameters, such as discounts, etc.
6. Apply the carrier’s new tariff(s) to the shipper(s) who will use the tariff.
Once you have analyzed the carrier’s rate structure and entered the required
data, you must also test the tariff to be certain that it rates shipments correctly.
SCAC Code
To enter the SCAC code:
1. Open the Supporting Data module from the Control Center.
2. Open the Carrier & Labels folder.
3. Open the SCAC Codes table.
4. Click the blank button to make a new record.
5. Type a three to four letter code for the carrier in all caps in the SCAC Code
field.
6. Type the carrier’s name in the Carrier Name field.
7. (Optional) Type the carrier's URL in the URL field. (MAC Certification
information is not required for custom tariffs.)
8. Click Save, then click Close.
9. Close the Carrier & Labels folder.
6-2
SVTS9117 Rev. J
SendSuite® Shipping
Administrator Guide
Tariffs • 6
Creating a
Custom Parcel
Tariff from
Scratch
To create an address record for the carrier:
1. Open the Supporting Data module from the Control Center.
2. Open the Data folder.
3. Open the Address table.
4. Click the blank button to make a new record.
Address Record
5. Type the new carrier’s SCAC code in the Address ID field.
6. Type the new carrier’s name in the Name field.
7. Select the Carrier checkbox.
8. Type the new carrier’s SCAC Code in the SCAC Code field on the Carrier
tab.
9. Does the new carrier have an IATA code? If it does, then type the two to three
letter IATA code in the IATA field. If not, leave that field blank.
10. Does the carrier carry international shipments? If so, select Yes in the
International field. If not, select No in that field.
11. Does the carrier have payment terms? If so, type the number of the carrier’s
payment terms (for example, 10 days or 30 days) in the Pay Term field. If not,
leave the field blank.
12. Select Express Carrier if this carrier considers itself 'express'.
13. Click Save, then click Close.
14. Close the Data folder.
SVTS9117 Rev. J
SendSuite® Shipping
Administrator Guide
6-3
6 • Tariffs
Creating a
Custom Parcel
Tariff from
Scratch
To set up a carrier's tariff:
1. Open the Supporting Data module from the Control Center.
2. Open the Carrier & Labels folder.
3. Open the Rates folder.
4. Double-click Tariff Setup to display the Tariff Setup window.
Tariff Setup
5. Complete the instructions in the sections that follow to enter the correct data
on the following tabs:
•
Tariff Header tab
•
Zone/RBN tab
•
Rates tab
Tariff Header Tab
NOTE: From this point
on, we will refer to the
line marked with a * as
the “New Record” line.
Under the Tariff Header tab of the Tariff Setup window:
1. Scroll to the bottom of the list of tariffs in the Tariff Header tab. Click anywhere
in the last empty line, which is marked with a * in the far left gray column.
2. Click the Details button.
NOTE: Pitney Bowes
recommends that you
use the carrier’s SCAC
code followed by a
number for the tariff
revision. For example, if
Joe’s Delivery’s SCAC
is JOES, then type
JOES01 as the Tariff
Revision ID.
3. Type the carrier’s SCAC code in the SCAC field and press Tab.
NOTE: If the carrier
provides multiple
services, you must set
up a separate tariff for
each service.
4. Create a unique Tariff Revision ID and type it in the Tariff Revision field and
press Tab. When you press Tab, SendSuite® Shipping automatically fills in
the Tariff ID.
5. Select or type the appropriate level of service for this tariff in the Service field
and press Tab.
6. (Optional) Type a description of the service in the Service Desc field.
6-4
SVTS9117 Rev. J
SendSuite® Shipping
Administrator Guide
Tariffs • 6
Creating a
Custom Parcel
Tariff from
Scratch
7. Type the date the tariff took effect in the Eff. Date field.
8. (Optional) Click the binoculars button and select the package type that this
tariff supports.
9. Select Package Rates Table. Package rates are used to create parcel tariffs
that rate based upon a weight applied to each package.
10. Select Lane to Zone.
Tariff Setup
11. Select or type a Lane to Zone ID:
NOTE: You must type
the date as MM/DD/YY.
NOTE: Pitney Bowes
recommends that if you
are creating a new Lane
to Zone ID that you
base the name on the
SCAC and the service.
For example, Joe’s
Delivery’s Lane to Zone
ID for ground service
might be JOESGRD.
•
If the carrier bases its rates on the same lane to zone that another carrier
uses, then you can select the other carrier’s Lane to Zone ID from the
drop-down list.
•
If the carrier bases its rates on a lane to zone that is not already loaded
into SendSuite, then you must create a new Lane to Zone ID and type it
in the Lane to Zone ID field.
12. Click Save, then click Close.
Zone/RBN Tab
You establish all the zones that a carrier delivers to when you complete the Zone/
RBN tab. If a carrier delivers to a number of zones, then you will create multiple
lines on the Zone/RBN tab. Repeat the steps listed below for each Zone/RBN
that the carrier supports.
NOTE: A Zone/RBN (Rate Base Number) is an identifier for range of
areas. For example a carrier may charge $5 for every zip code from
Minneapolis (55420) to Chicago (60609). The carrier may also specify
that every zip code from Minneapolis to Chicago has a Zone/RBN of
12345. By assigning a Zone/RBN, the charge does not have to be
entered for every zip code between Minneapolis and Chicago.
In the Tariff Setup window:
1. Click the Zone/RBN tab.
2. Click in the New Record line.
3. Click the Details button.
4. Type or select the two-letter ISO country code in the Country field (for
example, US).
5. Enter the data necessary for rating, depending on the way the carrier
determines its rates. You must select one of the following methods and
complete the instructions in that section to correctly enter the Lane to Zone
data:
SVTS9117 Rev. J
•
State
•
City and State
•
ZIP Code
SendSuite® Shipping
Administrator Guide
6-5
6 • Tariffs
Creating a
Custom Parcel
Tariff from
Scratch
State
If the carrier’s origin point and destination points are always within a certain state,
you can use the state option. This means you create a tariff that will only apply to
consignees within the state you indicate in the State field.
Tariff Setup
NOTE: The Zone/
RBN can be an alpha,
numerical, or alpha/
numerical value. If
you make the Zone/
RBN an alpha or alpha/
numerical value, then
the value can be any
length. Numbers less
than 8 digits long will
be padded with leading
zeros.
6-6
a. Type or select the two-letter state code in the State field.
b. Create a Zone/RBN code and type it in the Zone/RBN field.
c. Click Save, then click Close.
SVTS9117 Rev. J
SendSuite® Shipping
Administrator Guide
Tariffs • 6
Creating a
Custom Parcel
Tariff from
Scratch
City and State
If the carrier’s origin and destination points are always within a certain city and
state, then you can use the city and state option. This means that you create a
tariff that will only apply to consignees within the city and state that you indicate.
Tariff Setup
NOTE: You must
always spell the city the
same way SendSuite
spells the name of the
city in the Geograph
table. SendSuite will not
recognize any variations
of the spellings of city
names.
a. Type or select the two-letter state code in the State field.
b. Type or select the name of the city in the City field.
c. Create a Zone/RBN code and type it in the Zone/RBN field.
NOTE: Pitney Bowes
recommends that you
click the drop-down
arrow in the field and
select the city name
from the list to assure
that you have the
spelling that SendSuite
recognizes.
SVTS9117 Rev. J
NOTE: The Zone/RBN can be an alpha, numerical, or alpha/
numerical value. If you make the Zone/RBN an alpha or alpha/
numerical value, then the value can be any length. However, if you
make the value strictly numerical, it must be eight digits long.
d. Click Save, then click Close.
SendSuite® Shipping
Administrator Guide
6-7
6 • Tariffs
Creating a
Custom Parcel
Tariff from
Scratch
Tariff Setup
NOTE: The Zone/
RBN can be an alpha,
numerical, or alpha/
numerical value. If
you make the Zone/
RBN an alpha or alpha/
numerical value, then
the value can be any
length. However, if you
make the value strictly
numerical, it must be 8
digits long.
6-8
ZIP Code
If the carrier’s origin and destination points are within a range of ZIP codes, then
you can use the ZIP code option. This option is the one that is the most used
because you can specify a range of cities, based on their ZIP codes.
NOTE: Be aware that sometimes a ZIP code found within a range of
ZIP codes may be in a different zone than the rest of the ZIP codes. For
example, in the ZIP code range of 55400–55500, the ZIP code 55420
might be in Zone 2, while the other ZIP codes might be in Zone 1. If
this situation occurs, you must be sure to single out the ZIP code that
falls outside of the zone range and assign it to its own line item. In this
situation, there would actually be 3 separate line items for the 2 ranges
of ZIP codes and for the individual ZIP code out of the zone. The first
range would be defined as 55400–55419. Then the ZIP code 55420
would be on its own line item. Finally, the third line item would be the
range of 55421–55500.
a. Type the low origin ZIP code in the Low Origin field.
b. Type the high origin ZIP code in the High Origin field (the high and low
origins can be the same).
c. Type the low destination ZIP code in the Low Destination field.
d. Type the high destination ZIP code in the High Destination field (the high
and low destinations can be the same).
e. Create a Zone/RBN code and type it in the Zone/RBN field.
f.
Click Save, then click Close.
SVTS9117 Rev. J
SendSuite® Shipping
Administrator Guide
Tariffs • 6
Creating a
Custom Parcel
Tariff from
Scratch
Rates Tab
Tariff Setup
In the Tariff Setup window:
You must create rates that support every Zone/RBN that you created while in the
Zone/RBN tab. You can make individual rates for each Zone/RBN, or you can
create a rate that applies to a range of Zones/RBNs with numeric values. You just
must be certain that every Zone/RBN has a rate that supports it.
1. Click the Rates tab.
2. Click in the New Record line.
3. Click the Details button.
4. Type the same zone number that you created in the Zone/RBN tab in the
Zone field.
5. Type the maximum weight that this tariff supports in the Max. Tariff Wgt field.
6. Select the appropriate weight unit in the Wgt. Break Unit field and press Tab.
7. Enter the rates using one of the methods listed below:
•
Flat charges
•
Weight rates
Flat Charges
Flat charges allow you to assign a separate rate per pound.
NOTE: Flat charges
only go up to 200 lbs.
Use a Weight Rate (see
next page) for carriers
that ship parcels
weighing more than 200
lb. Weight Rates should
also be used if the rate
is based upon weight
breaks.
NOTE: You must enter
a rate for every line
item that is within the
carrier’s weight limit.
To create flat charges:
1. Click the Flat Charges tab.
2. Type the appropriate dollar amount in the Charge column for the
corresponding weight on each line item.
3. Click Save, then click Close.
4. Complete all of the instructions in Carrier Setup elsewhere in this chapter.
SVTS9117 Rev. J
SendSuite® Shipping
Administrator Guide
6-9
6 • Tariffs
Creating a
Custom Parcel
Tariff from
Scratch
Weight Rates
Weight rates allow you to assign rates for a range of weights.
To create weight rates:
1. Click the Weight Rates tab.
Tariff Setup
2. Type the low weight for the first weight range on the first line item.
3. If the carrier charges a minimum charge, then type that charge in the Min.
Charge field. Type the full dollar amount, but do not type the “$” before the
amount.
4. Type the charge for that weight range in the Base Charge field. Type the full
dollar amount, but do not type the “$” before the amount.
5. Populate the Rate field with the appropriate value. If you want the rate to be
the exact dollar amount that you typed in the Base Charge field, then type a
“0” in the Rate field. If you want a dollar amount added to the Base Charge,
then type that value in the Rate field.
6. Select Incremental Rates if the carrier uses incremental rates (see below).
7. Repeat these steps for each weight range. Each weight range goes on a
separate line item.
8. Click Save, then click Close.
9. Complete all the instructions in Carrier Setup elsewhere in this chapter.
NOTE: Enabling Incremental Rate instructs SendSuite Shipping to
apply the base charge to a shipment and apply the rate only to the
difference between the minimum weight and the actual weight of the
shipment.
For example, if shipping 1100 lb. using the above screen setup, with
Incremental Rate enabled, SendSuite Shipping would apply a base
charge of $120 and rate 99 lb. at $0.11 (for a total of $130.89).
Without Incremental Rate enabled, SendSuite would apply the base
charge and rate the entire 1100 lb. (totalling $241.00).
6-10
SVTS9117 Rev. J
SendSuite® Shipping
Administrator Guide
Tariffs • 6
Creating a
Custom LTL
Tariff from
Scratch
To create a custom LTL tariff from scratch, you must complete the following
tasks:
1. Enter the carrier’s SCAC code.
2. Create an address record for the carrier.
3. Create the carrier’s tariff for each level of service the carrier provides.
4. Set up the carrier profile.
5. Define any additional parameters, such as FAK, discounts, etc.
6. Apply the carrier’s new tariff(s) to the shipper(s) who will use the tariff.
Once you have analyzed the carrier’s rate structure and entered the required
data, you must also test the tariff to be certain that it rates shipments correctly.
Complete all of the instructions listed below in the order they appear. You may
be instructed to skip a section, depending on the way the LTL carrier rates
shipments.
SCAC Code
To enter the SCAC code:
1. Open the Supporting Data module from the Control Center.
2. Open the Carrier & Labels folder.
3. Open the SCAC Codes table.
4. Click the blank button to make a new record.
5. Type a three to four letter code for the carrier in all caps in the SCAC Code
field.
6. Type the carrier’s name in the Carrier Name field.
7. Click Save, then click Close.
8. Close the Carrier & Labels folder.
SVTS9117 Rev. J
SendSuite® Shipping
Administrator Guide
6-11
6 • Tariffs
Creating a
Custom LTL
Tariff from
Scratch
To create an address record for the carrier:
1. Open the Supporting Data module from the Control Center.
2. Open the Data folder.
3. Open the Address table.
4. Click the blank button to make a new record.
Address Record
5. Type the new carrier’s SCAC code in the Address ID field.
6. Type the new carrier’s name in the Name field.
7. Check the box in front of Carrier.
8. Type the new carrier’s SCAC code in the SCAC Code field on the Carrier
tab.
9. Does the new carrier have a IATA code? If it does, then type the two-three
letter IATA code in the IATA field. If not, leave that field blank.
10. Does the carrier carry international shipments? If so, then select Yes in the
International field. If not, select No in that field.
11. Does the carrier have payment terms? If so, type the number of the carrier’s
payment terms (for example, 10 days or 30 days) in the Pay Term field. If not,
leave the field blank.
12. Click Save, then click Close.
13. Close the Data folder.
6-12
SVTS9117 Rev. J
SendSuite® Shipping
Administrator Guide
Tariffs • 6
Creating a
Custom LTL
Tariff from
Scratch
To set up a carrier's tariff:
1. Open the Supporting Data module from the Control Center.
2. Open the Carrier & Labels folder.
3. Open the Rates folder.
4. Double-click Tariff Setup to display the Tariff Setup window.
Tariff Setup
5. Complete the instructions listed below to enter the correct data on the
following tabs:
NOTE: From this point
on, we will refer to the
line marked with a * as
the “New Record” line.
•
Tariff header tab
•
Zone/RBN tab
•
Rates tab
Tariff Header Tab
Under the Tariff Header tab of the Tariff Setup window:
1. Scroll to the bottom of the list of tariffs. Click anywhere in the last empty line,
which is marked with a * in the far left gray column.
2. Click the Details button.
NOTE: Pitney Bowes
recommends that you
use the carrier’s SCAC
code followed by a
number for the tariff
revision. For example, if
Joe’s Delivery’s SCAC
is JOES, then type
JOES1 as the Tariff
Revision ID.
3. Type the carrier’s SCAC code in the SCAC field and press Tab.
4. Create a unique Tariff Revision ID and type it in the Tariff Revision field and
press Tab. When you press Tab, SendSuite Shipping automatically fills in the
Tariff ID.
5. Select or type LTL in the Service field and press Tab.
6. (Optional) Type a description of the service in the Service Desc field.
SVTS9117 Rev. J
SendSuite® Shipping
Administrator Guide
6-13
6 • Tariffs
Creating a
Custom LTL
Tariff from
Scratch
7. Type the date the tariff took effect in the Eff. Date field.
8. Click in the circle to the left of Class Rates table.
9. Click in the circle to the left of Lane to Zone.
10. Select or type a Lane to Zone ID:
•
If the carrier bases its rates on the same lane to zone that another carrier
uses, then you can select the other carrier’s Lane to Zone ID from the
drop-down list.
•
If the carrier bases its rates on a lane to zone that is not already loaded
into SendSuite, then you must create a new Lane to Zone ID and type it
in the Lane to Zone ID field.
Tariff Setup
NOTE: You must type
the date as MM/DD/YY.
11. Click Save, then click Close.
Zone/RBN Tab
NOTE: Pitney Bowes
recommends that if you
are creating a new Lane
to Zone ID that you
base the name on the
SCAC and the service.
For example, Joe’s
Delivery’s Lane to Zone
ID might be JOESLTL.
You establish all of the zones that a carrier delivers to when you complete the
Zone/RBN tab. If a carrier delivers to a number of zones, then you will create
multiple lines on the Zone/RBN tab. Repeat the steps listed below for each Zone/
RBN that the carrier supports.
In the Tariff Setup window:
1. Click the Zone/RBN tab.
2. Click in the New Record line.
3. Click the Details button.
4. Type or select the two-letter ISO country code in the Country field (for
example, US).
5. Enter the data necessary for rating, depending on the way the carrier
determines its rates. You must select one of the following methods and
complete the instructions in that section to correctly enter the Lane to Zone
data:
6-14
•
State
•
City and State
•
ZIP Code
SVTS9117 Rev. J
SendSuite® Shipping
Administrator Guide
Tariffs • 6
Creating a
Custom LTL
Tariff from
Scratch
State
If the carrier’s origin point and destination points are always within a certain state,
then you can use the state option. This means you create a tariff that will only
apply to consignees within the state you indicate in the State field.
Tariff Setup
NOTE: The Zone/
RBN can be an alpha,
numerical, or alpha/
numerical value. If
you make the Zone/
RBN an alpha or alpha/
numerical value, then
the value can be any
length. However, if you
make the value strictly
numerical, it must be 8
digits long.
a. Type or select the two-letter state code in the State field.
b. Create a Zone/RBN code and type it in the Zone/RBN field.
c. Click Save, then click Close.
City and State
NOTE: You must
always spell the city the
same way SendSuite
spells the name of the
city in the Geograph
table. SendSuite will not
recognize any variations
of the spellings of city
names.
NOTE: Pitney Bowes
recommends that you
click the drop-down
arrow in the field and
select the city name
from the list to assure
that you have the
spelling that SendSuite
recognizes.
If the carrier’s origin and destination points are always within a certain city and
state, then you can use the city and state option. This means that you create a
tariff that will only apply to consignees within the city and state that you indicate.
a. Type or select the two-letter state code in the State field.
b. Type or select the name of the city in the City field.
c. Create a Zone/RBN code and type it in the Zone/RBN field.
NOTE: The Zone/RBN can be an alpha, numerical, or alpha/
numerical value. If you make the Zone/RBN an alpha or alpha/
numerical value, then the value can be any length. However, if you
make the value strictly numerical, it must be 8 digits long.
d. Click Save, then click Close.
SVTS9117 Rev. J
SendSuite® Shipping
Administrator Guide
6-15
6 • Tariffs
Creating a
Custom LTL
Tariff from
Scratch
Tariff Setup
ZIP Code
If the carrier’s origin and destination points are within a range of ZIP codes, then
you can use the ZIP code option. This option is the one that is the most used
because you can specify a range of cities, based on their ZIP codes.
NOTE: Be aware that sometimes a ZIP code found within a range of
ZIP codes may be in a different zone than the rest of the ZIP codes. For
example, in the ZIP code range of 55400–55500, the ZIP code 55420
might be in Zone 2, while the other ZIP codes might be in Zone 1. If
this situation occurs, you must be sure to single out the ZIP code that
falls outside of the zone range and assign it to its own line item. In this
situation, there would actually be 3 separate line items for the 2 ranges
of ZIP codes and for the individual ZIP code out of the zone. The first
range would be defined as 55400–55419. Then the ZIP code 55420
would be on its own line item. Finally, the third line item would be the
range of 55421–55500.
a. Type the low origin ZIP code in the Low Origin field.
b. Type the high origin ZIP code in the High Origin field (the high and low
origins can be the same).
c. Type the low destination ZIP code in the Low Destination field.
d. Type the high destination ZIP code in the High Destination field (the high
and low destinations can be the same).
e. Create a Zone/RBN code and type it in the Zone/RBN field.
f.
6-16
Click Save, then click Close.
SVTS9117 Rev. J
SendSuite® Shipping
Administrator Guide
Tariffs • 6
Creating a
Custom LTL
Tariff from
Scratch
Rates Tab
Tariff Setup
You must also create a rate that supports every freight class. If the carrier does
not specify different rates for different freight classes, then you can create an
FAK rate. If you decide to create an FAK rate, then you must also complete the
instructions to create an FAK record (see Tariff FAK elsewhere in this chapter).
You must create rates that support every Zone/RBN that you created while in the
Zone/RBN tab. You can make individual rates for each Zone/RBN, or you can
create a rate that applies to a range of Zones/RBNs. You just must be certain that
every Zone/RBN has a rate that supports it.
In the Tariff Setup window:
1. Click the Rates tab.
2. Click the New Record line.
3. Click the Details button.
NOTE: If your carrier
has different rates for
different freight classes,
then you must create a
rate for each of those
freight classes. If the
rate is for FAK, then be
sure to complete the
FAK instructions found
in Chapter 7.
4. Type or select the freight class that this rate supports in the Freight Class
field.
5. Type or select the Low RBN number in the Low RBN field. The RBN number
is linked with the number you assigned on the Zone/RBN tab.
6. Type or select the High RBN number in the High RBN field. This RBN number
is also associated with the number you assigned on the Zone/RBN tab.
The low and high RBN numbers can be the same or they can be a range of
numbers.
7. (Optional) Type the maximum weight that the tariff will support in the Max
Tariff Wgt. field.
8. Type or select the weight units in the Wgt. Break Unit field and press Tab.
The Rate Wgt Unit field is automatically populated when you press Tab.
SVTS9117 Rev. J
SendSuite® Shipping
Administrator Guide
6-17
6 • Tariffs
Creating a
Custom LTL
Tariff from
Scratch
Tariff Setup
9. Enter the correct data according to how the carrier rates shipments. LTL
rating allows you to enter rates according to weight ranges only. You cannot
assign a rate per pound unless you enter weight ranges of one pound. Follow
these instructions to enter the rates:
a. Type a low weight and a high weight for the first weight range on the first
line item.
b. If the carrier charges a minimum charge, then type that charge in the Min.
Charge field. Type the full dollar amount, but do not type the “$” before
the amount.
c. Type the charge for that weight range in the Base Charge field. Type the
full dollar amount, but do not type the “$” before the amount.
d. Populate the Rate field with the appropriate value. If you want the rate to
be the exact dollar amount that you typed in the Base Charge field, then
type a “0” in the Rate field. If you want a dollar amount added to the Base
Charge, type that value in the Rate field.
e. Repeat these steps for each weight range. Each weight range goes on a
separate line item.
f.
Click Save, and then click Close.
10. Complete all of the instructions in Carrier Setup in the next section of this
chapter.
6-18
SVTS9117 Rev. J
SendSuite® Shipping
Administrator Guide
Tariffs • 6
Carrier Setup
After loading or creating a tariff, you must define how those rates will be used
in your shipping operations. The Carrier Setup form allows you to specify such
parameters as discounts, supported accessorials, and service days.
To set up a carrier:
1. Open the Supporting Data module from the Control Center.
2. Open the Carrier & Labels folder.
3. Open the Rates folder.
4. Open Carrier Setup.
5. Click in the New Record line (the first blank line at the end of the list that is
marked with a *).
6. Click the Details button.
NOTE: If you have
multiple shipper IDs that
will use this carrier, then
you must set up each
shipper individually.
7. Click the binoculars button to the right of the Shipper field and select the
shipper from list.
8. Type or select the carrier in the Carrier field and then press Tab.
NOTE: If you type a Y
in the Matching Service
Required on Shipment
field, the shipping
operator must specify
this service and carrier
in order to access this
tariff. If the shipping
operator rate shops
all tariffs, SendSuite
Shipping will not look at
this one.
SVTS9117 Rev. J
9. Select the service from the drop-down in the Service field.
10. If you want to use this carrier when rate shopping, type an “N” in the Matching
Service Required on Shipment field.
11. Type the effective date of this carrier in the Effective Date field.
12. (Optional) Type the expiration date for this carrier in the Expiration Date field.
13. Type or select the carrier’s SCAC in the Reporting SCAC field.
SendSuite® Shipping
Administrator Guide
6-19
6 • Tariffs
Carrier Setup
14. (Optional) Select the type of package used by this carrier and this tariff.
Click the binoculars button next to the Package Type(s) field and select the
package.
NOTE: In order for the SendSuite to select a tariff with
specific package type, the shipping operator must specify that
package type in the shipping module. If the shipping operator
does not specify the package type shown on the carrier
setup, SendSuite will skip this tariff.
To have SendSuite use this tariff regardless of the package
type, leave this field blank.
15. Type the number of ZIP code digits SendSuite must match before it can rate
a package in the Zip Digits Required field.
16. Indicate whether this tariff allows consolidation of several shipments into one
load in the Allow Consolidation field. SendSuite will default to Y.
NOTE: You must set
up a separate carrier
record for every carrier
tariff you wish to use.
NOTE: If you do not
make a selection,
SendSuite will default to
Rate Per Piece.
17. Select the tariff to be used in this profile from the drop-down in the Tariff ID
field and then press Tab. Other fields are automatically populated when you
press Tab.
18. (Optional) Select the method by which your discounts will be applied from the
drop-down in the Discount Application field.
•
Actual Weight — The discount is applied using the actual weight of the
shipment.
•
Rated Weight — The discount is applied using the billed weight of the
shipment. This would use the deficit weight or DIM weight instead of the
actual weight.
•
Billable (A/R) — The discount is applied behind the scenes for
accounting purposes.
19. Select how SendSuite will rate multiple piece shipments from the drop-down
in the Rate Per Piece or Ship field.
•
Rate Per Piece — The rate will be calculated for every piece in the
shipment. For example, for a shipment of three five pound packages
SendSuite will rate each package individually to come up with the total
freight for the shipment.
•
Rate Per Shipment — The rate will be calculated based on the weight
of the shipment as a whole. For example, a shipment of three five pound
packages will be rated as one 15 pound package. Using this method will
usually result in lower freight costs than the Rate Per Piece method.
20. Select the type of tariff being used from the drop-down in the Rate Type field.
(If you make no selection, SendSuite Shipping will default to Standard.)
6-20
SVTS9117 Rev. J
SendSuite® Shipping
Administrator Guide
Tariffs • 6
Carrier Setup
NOTE: Typing an ID
will activate a tab on
the main carrier profile
screen. For example,
if you type an ID for
Discount Lanes but
you do not type an ID
for FAK Lanes, only
the Discount tab will be
activated.
NOTE: For some
carriers, such as DHL,
hazardous materials
may also be referred to
as "dangerous goods".
21. In the Supplemental Data area, type unique IDs for any of the other data in
the carrier profile.
•
Accessorial Lanes — Use this to set up the ancillary costs carriers
charge for services such as deliver confirmation, hazardous materials,
fuel surcharges, insurance, weekend delivery, oversize packages, etc.
SendSuite will default these as NS (Not Supported) unless you set them
up. See Tariff Accessorials elsewhere in this chapter for instructions to set
up accessorial costs.
•
Discount Lanes — Use this to set up the discounts you have negotiated
with your carriers. See Tariff Discounts elsewhere in this chapter for
instructions to set up carrier discounts.
•
Service Days Lanes — Use this to tell SendSuite how soon a package
will get to its destination using this tariff. For example, if this is a second
day tariff, then SendSuite needs to know that it cannot be used for
overnight delivery. SendSuite will default delivery days to 0 unless you
set them up. See Carrier Service Days elsewhere in this chapter for
instructions to set up carrier service days.
•
FAK Lanes — Use this to set up freight of all kinds arrangements you
have negotiated with your carriers. See Tariff FAK elsewhere in this
chapter for instructions to set up an FAK lane.
•
Absolute Min Lanes — Use this to set up the minimum charge or weight
your carrier requires. For example, an LTL carrier’s tariff may go as low
as 50 pounds, but the carrier has told you they will not come to your
warehouse unless you have 1,000 pounds to ship. See Tariff Absolute
Minimums elsewhere in this chapter for instructions to set up absolute
minimum charges.
•
Accessorial Incompatibility — Use this to tell SendSuite what
accessorials cannot go together. For example, your carrier may
support both inside delivery and hazardous materials, but they will not
support inside delivery of hazardous materials. See Tariff Accessorial
Incompatibility elsewhere in this chapter for instructions to set up
accessorial incompatibility.
•
Tariff Increase — Use this to set up temporary tariff increases until
the actual new tariffs can be loaded. See Temporary Tariff Increase
elsewhere in this chapter for instructions to enter a tariff increase.
•
Service File Name — This field is used to identify a data file used with
the tariff. This data file can contain supported postal codes, country
codes, port codes, etc.
NOTE: You must type
or select an ID in this
field if the tariff is an
FAK tariff.
SVTS9117 Rev. J
SendSuite® Shipping
Administrator Guide
6-21
6 • Tariffs
Carrier Setup
22. To disable deficit weighting, click the Def Rate/CWT button:
NOTE: For some
carriers, such as DHL,
hazardous materials
may also be referred to
as "dangerous goods".
NOTE: If you do not
enter this data in the
Deficit Weight/Hundred
Weight window,
SendSuite Shipping will
always select the lowest
rate, regardless of the
weight of the shipment.
If you do not want
SendSuite Shipping
to automatically deficit
down, be sure to enter
zeroes in the Number
Deficit Up and Number
Deficit Down fields.
6-22
a. Type a “0” (zero) in the Number Deficit Up field.
b. Type a “0” (zero) in the Number Deficit Down field.
c. Click Save, then click Close.
23. Click Save, then click Close.
SVTS9117 Rev. J
SendSuite® Shipping
Administrator Guide
Tariffs • 6
Tariff
Accessorials
To set up accessorials that your carriers support:
1. Open the Supporting Data module from the Control Center.
2. Double-click the Carrier & Labels folder.
NOTE: If you want
to use an existing
accessorial file, click the
drop-down arrow and
select the accessorial
file ID. Likewise, once
you set up the following
accessorials, you can
use them for other
carriers just by selecting
this accessorial lane ID.
3. Double-click the Rates folder.
4. Double-click Carrier Setup.
5. Click in the line that has the carrier tariff you want to modify.
6. Click the Details button.
7. Click in the Accessorial Lanes ID field and type a unique ID for the
accessorial file.
8. Click Save.
9. Click Close.
10. Click the Accessorial Lanes tab.
11. Click the Details button.
12. Type any information about the lane in which these accessorials apply. For
example, if the accessorials you are about to define apply only to deliveries
in California, select that state. If your accessorials apply to all delivery
destinations, leave all the white fields blank.
13. Type the effective date of the accessorials.
14. Type or select the file with the accessorial information in the Accessorial
Support ID field.
SVTS9117 Rev. J
•
If these are new accessorial parameters, type a new and unique name in
this field and continue following this procedure.
•
If you are using and existing accessorial parameter, skip to Step 23.
SendSuite® Shipping
Administrator Guide
6-23
6 • Tariffs
Tariff
Accessorials
15. Click the Accessorial Support button.
NOTE: NS means
Not Supported. For
example, if Residential
Delivery is marked as
NS, a shipment to a
consignee address
flagged as Residential
would not use this
carrier.
16. Type an ID for the accessorial supported by the carrier
17. Click the Parameters button.
NOTE: Some
algorithms are specific
to certain accessorial
charges, such as Fuel
Surcharges, COD, etc.
6-24
18. Click the drop-down arrow in the Algorithm field and select the method used
to calculate the accessorial charge.
NOTE: Leave the File Name field blank. This field is not used
for custom/manual carriers. Use this field when you want to
duplicate the algorithm used for a small package carrier (such
as UPS). In that case, you would type the file name of the
binary file that the carrier uses in this field.
SVTS9117 Rev. J
SendSuite® Shipping
Administrator Guide
Tariffs • 6
Tariff
Accessorials
19. Click Save, then click Close on the Accessorial Setup window.
20. Repeat step 16 through step 19 for every accessorial charge supported by
the carrier.
21. Click Save, then click Close on the Accessorial Support window.
22. Repeat Step 14 through Step 21 for each unique accessorial lane.
23. Click Close on the Accessorial Lanes window.
24. Repeat step 5 through step 23 for every tariff that supports accessorial
charges.
SVTS9117 Rev. J
SendSuite® Shipping
Administrator Guide
6-25
6 • Tariffs
Tariff Discounts
To set up carrier discounts:
1. Open the Supporting Data module from the Control Center.
2. Double-click the Carrier & Labels folder.
3. Double-click the Rates folder.
4. Double-click Carrier Setup.
NOTE: If you want
to use an existing
discount file, click the
drop-down arrow and
select the discount file
ID. Likewise, once you
set up the following
discounts, you can use
them for other carriers
just by selecting this
Discount lane ID.
5. Click in the line that has the tariff you want to discount.
6. Click the Details button.
7. Click in the Discount Lanes ID field and type a unique ID for the discount
file.
8. Click Save.
9. Click Close.
10. Click the Discount tab.
11. Click the Details button.
12. Type any information about the lane in which this discount applies. For
example, if the discount you are about to define applies only to deliveries in
California, select that state. If your discounts apply to all delivery destinations,
leave all the white fields blank.
13. Type the effective date of the discount.
14. Type or select the file with the discount information in the Disc. Parameters ID
field.
6-26
•
If these are new discount parameters, then type a new and unique name
in this field and continue following this procedure.
•
If you are using an existing discount parameter, then skip to step 18.
SVTS9117 Rev. J
SendSuite® Shipping
Administrator Guide
Tariffs • 6
Tariff Discounts
15. Click the Discount Parameters button.
16. Type information regarding the discount. When typing discount percentages,
type the number without the “%” sign. For example, if your discount is 63.2%,
type “63.2” in the Discount (%) field.
a. If the carrier gives you a minimum percentage discount, type that number
in the Minimum Discount (%) field.
b. If the carrier gives you the same percentage for all weights and gives you
an incremental discount as weight goes up, type the base discount in the
Base Discount (%) field.
c. If the discounts vary by weight, type the weights and discounts in the
Weight Based Discounts. Type the percentage discount in the Discount
(%) column and type maximum weight for the discount in the Wgt. Break
column.
17. Click Save, then click Close on the Discount Parameters window.
18. Click Save, then click Close on the Discount Lanes window.
SVTS9117 Rev. J
SendSuite® Shipping
Administrator Guide
6-27
6 • Tariffs
Carrier Service
Days
Unless told otherwise, SendSuite Shipping will assume that your custom
designed LTL carriers can deliver any shipment anywhere in the U.S. within an
hour. Use these instructions to define the number of days it takes a carrier to get
from your warehouse to a destination.
NOTE: If you want to
use an existing service
file, click the drop-down
arrow and select the
service file ID. Likewise,
once you set up the
following service day
lanes, you can use
them for other carriers
just by selecting this
service days lanes ID.
To define the number of days:
1. Open the Supporting Data module from the Control Center.
2. Double-click the Carrier & Labels folder.
3. Double-click the Rates folder.
4. Double-click Carrier Setup.
5. Click in the line that has the carrier tariff you want to modify.
6. Click the Details button.
7. Click in the Service Days Lanes ID field and type a unique ID for the
accessorial file.
8. Click Save.
9. Click Close.
10. Click the Service tab.
11. Click the Details button.
12. Type any information about this lane. For example, if the carrier can deliver
anywhere in California in 2 days, then select that state. If the carrier has
defined a range of ZIP codes that can be reached in 3 days, then just fill in
the Low and High Dest fields.
13. Type the effective date of the accessorials (required).
14. If the carrier has defined specific rest days, then fill in the Rest Day fields.
NOTE: SendSuite Shipping automatically assumes that
Saturday and Sunday are rest days and the trucks are not
moving. To change that, select the days, then select the Rest
Day Transit checkbox.
6-28
SVTS9117 Rev. J
SendSuite® Shipping
Administrator Guide
Tariffs • 6
Carrier Service
Days
15. Type the number of service days for this lane in the Delivery Days field.
16. Specify a delivery time (optional).
17. Click Save, then click Close on the Service Days Lanes window.
18. Click in the next line down and repeat step 11 through step 17 for each
additional lane you want to define.
SVTS9117 Rev. J
SendSuite® Shipping
Administrator Guide
6-29
6 • Tariffs
Tariff FAK
A freight of all kinds (FAK) agreement changes the way SendSuite Shipping
rates shipments. A standard FAK causes all commodities to be rated the same,
regardless of the actual freight class. A detailed FAK is used to map one or more
freight classes to an alternative freight class.
If you have FAK agreements with your carriers, use these instructions to
set them up:
1. Open the Supporting Data module from the Control Center.
2. Double-click the Carrier & Labels folder.
3. Double-click the Rates folder.
4. Double-click Carrier Setup.
5. Click in the line that has the tariff you want to modify.
NOTE: If you want to
use an existing FAK
file, click the drop-down
arrow and select that
file ID. Likewise, once
you set up the following
FAK, you can use them
for other carriers just
by selecting this FAK
Lanes ID.
6. Click the Details button.
7. Click in the FAK Lanes ID field and type a unique ID for the discount file.
8. Click Save.
9. Click Close.
10. Click the FAK tab.
11. Click the Details button.
12. Type any information about the lane in which this agreement applies. For
example, if your agreement is good only for to deliveries to California, then
select that state. If your agreement applies to all delivery destinations, leave
all the white fields blank.
13. Type the effective date of the FAK parameter in the Effective Date field.
14. Type or select the file with the discount information in the FAK Params ID
field.
6-30
•
If this is a new discount parameter, then type a new and unique name in
this field and continue following this procedure.
•
If you are using and existing FAK parameter, skip to step 19.
SVTS9117 Rev. J
SendSuite® Shipping
Administrator Guide
Tariffs • 6
Tariff FAK
15. Click the FAK Parameters button.
16. Select Use Detailed FAK to specify a FAK Class for different freight classes.
a. In the Freight Class column, select each freight class included in the
agreement.
b. In the FAK Class column, select the class at which the freight will be
rated.
17. To select a global FAK select a freight class from the FAK drop-down list.
18. Click Save, then click Close on the FAK Parameter window.
19. Click Save, then click Close on the Discount Lanes window.
20. Click in the next line down and repeat step 11 through step 19 for each
additional FAK lane.
SVTS9117 Rev. J
SendSuite® Shipping
Administrator Guide
6-31
6 • Tariffs
Tariff Absolute
Minimums
To define the minimum rate that an LTL carrier will accept:
1. Open the Supporting Data module from the Control Center.
2. Double-click the Carrier & Labels folder.
3. Double-click the Rates folder.
NOTE: If you want to
use an existing file,
click the drop-down
arrow and select the
file ID. Likewise, once
you set up the following
minimums, you can use
them for other carriers
just by selecting this
Absolute Min Lanes ID.
4. Double-click Carrier Setup.
5. Click in the line that has the tariff you want to discount.
6. Click the Details button.
7. Click in the Absolute Min Lanes ID field and type a unique ID for the
discount file.
8. Click Save.
9. Click Close.
10. Click the Absolute Minimums tab.
11. Click the Details button.
12. Type any information about the lane in which these minimums apply. For
example, if the minimums apply only to deliveries in California, then select
that state. If your minimums apply to all delivery destinations, leave all the
white fields blank.
6-32
SVTS9117 Rev. J
SendSuite® Shipping
Administrator Guide
Tariffs • 6
Tariff Absolute
Minimums
13. Type the effective date of the minimums in the Effective Date field.
14. Click the drop-down arrow in the Weight Unit field and select the unit of
measure you will use for the weight breaks.
15. Type information regarding the minimums.
a. Type the lowest weight at which the minimum charge will be assessed in
the Weight column.
b. Type the minimum charge for any shipment greater than that weight in the
Minimum Charge column.
c. Repeat these steps for all minimums defined by the carrier.
NOTE: Direct vs. Interline selections — Direct indicates the
carrier will ship the package the entire distance. This is the
default for SendSuite Shipping.
Interline indicates that the carrier will not carry the shipment
the entire way (but may offer to take it part of the way). In this
case, some restrictions or features (such as tariff absolute
minimums) may not apply.
16. Click Save, then click Close on the Absolute Minimum Lanes window.
SVTS9117 Rev. J
SendSuite® Shipping
Administrator Guide
6-33
6 • Tariffs
Tariff
Accessorial
Incompatibility
Some accessorials cannot be combined. For example, a carrier may support
Saturday delivery and COD, but they do not collect COD on Saturday.
To tell SendSuite Shipping which accessorials cannot be combined:
1. Open the Supporting Data module from the Control Center.
2. Double-click the Carrier & Labels folder.
NOTE: If you want
to use an existing
incompatibility file, click
the drop-down arrow
and select that file ID.
Likewise, once you
set up the following
incompatibilities, you
can use them for other
carriers just by selecting
this Accessorial
Incompatibility ID.
3. Double-click the Rates folder.
4. Double-click Carrier Setup.
5. Click in the line that has the carrier tariff you want to modify.
6. Click the Details button.
7. Click in the Accessorial Incompatibility ID field and type a unique ID for the
accessorial file.
8. Click Save.
9. Click Close.
10. Click the Accessorial Incomp tab.
11. Click the Details button.
12. Select the accessorials that cannot be combined.
13. Type the effective date of the incompatibility.
14. Click Save, then click Close on the Accessorial Incompatibility Details
window.
15. Click in the next line down and repeat step 11 through step 14 for every other
combination of accessorial incompatibility.
6-34
SVTS9117 Rev. J
SendSuite® Shipping
Administrator Guide
Tariffs • 6
Temporary
Tariff Increase
On occasion, carriers may increase their rates before Pitney Bowes can send
you an update.
To temporarily define the tariff increase:
1. Open the Supporting Data module from the Control Center.
2. Double-click the Carrier & Labels folder.
3. Double-click the Rates folder.
4. Double-click Carrier Setup.
5. Click in the line that has the carrier tariff that you will temporarily increase.
6. Click the Details button.
7. Click in the Tariff increase ID field and type a unique ID for the tariff increase
file.
8. Click Save.
9. Click Close.
10. Click the Tariff Increase tab.
11. Click the Details button.
12. Type the effective date for the change in the Adjustment Date field.
13. Type the percent of the increase as a whole number in the Percent Rate field.
For example, if the rate has increased by 5%, type 5 in the Percent Rate field.
SVTS9117 Rev. J
SendSuite® Shipping
Administrator Guide
6-35
6 • Tariffs
Temporary
Tariff Increase
14. Click the drop-down arrow in the Rate Type field and indicate how this rate
increase will be handled with others you have input.
•
Base Percent — This percentage will be calculated on the original tariff
and will ignore any other tariff increase you entered.
•
Cumulative — This percentage will be added to other tariff increases you
have entered. For example, if you entered a tariff increase in May for 2%,
and you are entering a cumulative tariff increase in July for 5%, the freight
will be figured at 7.1% of the original tariff.
•
Noncumulative — This percentage will not be added to other tariff
increases you have entered. For example, if you entered a tariff increase
in May for 2%, and you are entering a cumulative tariff increase in July for
5%, the freight will be figured at 7% of the original tariff.
15. Click Save, then click Close on the Tariff Increase Details window.
16. Repeat step 5 through step 15 for every tariff that has changed.
6-36
SVTS9117 Rev. J
SendSuite® Shipping
Administrator Guide
Tariffs • 6
Borrowing a
Tariff
These instructions can be used to create a custom tariff using an existing tariff.
To borrow another carrier’s tariff, follow the steps below. It is not necessary to
create a tariff header, zones, or rates since those have already been defined for
the master tariff.
Clone a Carrier
Setup
When you clone a carrier setup and borrow the tariff that the carrier uses, you
are borrowing all of that carrier’s setup, including delivery points, accessorial
charges, discounts, etc. Remember to change these items to reflect the new
carrier’s accurate information.
To clone a carrier setup:
1. Open the Supporting Data module from the Control Center.
2. Double-click the Carrier & Labels folder.
3. Double-click the Rates folder.
4. Double-click Carrier Setup.
5. Scroll to the carrier you want to clone and click in the grey area to the left to
highlight the entire line.
6. Click the Clone button.
7. Select or type the new carrier ID in the Carrier ID field.
8. Click Continue.
9. Click the Details button.
SVTS9117 Rev. J
SendSuite® Shipping
Administrator Guide
6-37
6 • Tariffs
Borrowing a
Tariff
Clone a Carrier
Setup
10. Select the method by which your discounts will be applied from the dropdown in the Discount Application field (optional).
•
Actual Weight — The discount is applied using the actual weight of the
shipment.
•
Rated Weight — The discount is applied using the billed weight of the
shipment. This would use the deficit weight or DIM weight instead of the
actual weight.
•
Billable (A/R) — The discount is applied behind the scenes for
accounting purposes.
11. Select how the discount will be applied on a per shipment basis from the
drop-down in the Rate Per Piece or Ship field (optional).
•
Rate Per Piece — The discount will be calculated and applied for every
piece in the shipment.
•
Rate Per Shipment — The discount will be calculated and applied to the
shipment as a whole.
12. Select B (Borrowed Rates) for the type of tariff being used from the dropdown in the Rate Type field.
13. In the Supplemental Data area, type unique IDs for any of the other data in
the carrier profile.
NOTE: Typing an ID will activate a tab on the main carrier profile
screen. For example, if you type an ID for Discount Lanes but you
do not type an ID for FAK Lanes, only the Discount tab will be
activated.
NOTE: For some
carriers, such as DHL,
hazardous materials
may also be referred to
as "dangerous goods".
6-38
•
Accessorial Lanes — Use this to set up the ancillary costs that carriers
charge for services such as deliver confirmation, hazardous materials,
fuel surcharges, insurance, weekend delivery, oversize packages, etc.
SendSuite will default these as Not Supported unless you set them up.
•
Discount Lanes — Use this to set up the discounts you have negotiated
with your carriers.
•
Service Days Lanes — Use this to tell SendSuite how soon a package will
get to its destination using this tariff. For example, if this is a second day
tariff, then SendSuite needs to know that it cannot be used for overnight
delivery. SendSuite will default delivery days to 0 unless you set them up.
•
FAK Lanes — Use this to set up freight of all kinds arrangements you
have negotiated with your carriers.
•
Absolute Min Lanes — Use this to set up the minimum charge or weight
your carrier requires. For example, an LTL carrier’s tariff may go as low
as 50 pounds, but the carrier has told you they will not come to your
warehouse unless you have 1,000 pounds to ship.
SVTS9117 Rev. J
SendSuite® Shipping
Administrator Guide
Tariffs • 6
Borrowing a
Tariff
Clone a Carrier
Setup
NOTE: For some
carriers, such as DHL,
hazardous materials
may also be referred to
as "dangerous goods".
Create the Carrier
Address Record
•
Accessorial Incompatibility — Use this to tell SendSuite what accessorials
cannot go together. For example, your carrier may support both inside
delivery and hazardous materials, but they will not support inside delivery
of hazardous materials.
•
Tariff Increase — Use this to set up temporary tariff increases until the
actual new tariffs can be loaded.
•
Service File Name — This field is used to identify a data file used with the
tariff. This data file can contain supported postal codes, country codes,
port codes, etc.
14. Click Save.
15. Click Close.
To create the carrier address record:
1. Open the Supporting Data module from the Control Center.
2. Open the Data folder
3. Open the Address table.
4. Click the Blank Current Form button on the horizontal toolbar.
5. Type the carrier’s SCAC code in the Address ID field.
6. Type the carrier’s name in the Name field.
7. Check the Carrier box in the Address Types area of the window.
8. Type or select the carrier’s SCAC code in the SCAC field.
SVTS9117 Rev. J
SendSuite® Shipping
Administrator Guide
6-39
6 • Tariffs
Borrowing a
Tariff
Create the Carrier
Address Record
9. (Optional) Specify the following about the carrier:
•
IATA
•
If it handles international shipments
•
If it is an express carrier
•
Pay terms
10. Click Save, then click Close.
Set Up the Carrier
PRO Numbers or
Tracking Numbers
You must set up PRO numbers or tracking numbers for this carrier. See “Setting
up PRO Numbers and Tracking Numbers” on page 49 for instructions to do this.
Select or Create a
Label
If you want to print a label for this carrier, you must select a label to be associated
with the carrier. See the instructions in Chapter 7: Labels, beginning on page 7-1,
for instructions to select or create a label for the carrier.
Add the Carrier to
a Rate Shop Group
and/or Routing
Instruction
If the new carrier is to be used in a rate shop group or as part of a routing
instruction, then you must add it to those groups. See Creating Rate Shop
Groups on page 2-19 and Creating Routing Instructions on page 2-21 for
instructions to do this.
6-40
SVTS9117 Rev. J
SendSuite® Shipping
Administrator Guide
Tariffs • 6
Manual Rating
You can manually rate a shipment using a “dummy” carrier. A conditional logic
script prompts the user for the carrier, total freight and pro number to be assigned
to the shipment.
EXAMPLE: One instance where you might consider manual rating is for a
company that rarely uses LTL services. Such a company would probably find it
more cost effective to use a manual carrier than purchase an actual LTL tariff.
There are two major components required for manual rating. The first, creating a
manual tariff (below), involves modifying a number of settings in the Supporting
Data module.
The second component, using VB Scripts, involves creating a new script and
associating it with a shipping screen. See Creating the VB Script elsewhere in
this chapter.
This section provides you with information on:
• Creating the manual carrier
• Creating the VB Scripts needed for manual rating.
• Associating the scripts with a browser shipping screen.
• Processing a shipment from the browser using manual rates.
Creating the
Manual Carrier
SendSuite always rates a shipment. Therefore, in order to manually rate a
shipment, you must first start with an existing tariff. Following this process, you
will set up an LTL tariff so you can print a bill of lading.
To create the manual carrier:
1. Open the Supporting Data module from the Control Center.
2. Open the Carrier & Labels folder.
3. Open the SCAC Codes table.
4. Click the blank button to make a new record.
5. Type MAN in the SCAC Code field.
6. Type Manual Carrier in the Carrier Name field.
7. Click Save, and then click Close.
8. Close the Carrier & Labels folder.
SVTS9117 Rev. J
SendSuite® Shipping
Administrator Guide
6-41
6 • Tariffs
Manual Rating
9. Open the Data folder.
10. Open the Address table.
11. Click the blank button to make a new record.
Creating the
Manual Carrier
12. Type MAN in the Address ID field.
13. Type Manual Carrier in the Name field.
14. Select Carrier under Address Types.
15. Type MAN in the SCAC Code field on the Carrier tab.
16. Click Save, and then click Close.
17. Close the Data folder.
18. Open the Rates folder.
19. Open the Tariff Setup table.
6-42
SVTS9117 Rev. J
SendSuite® Shipping
Administrator Guide
Tariffs • 6
Manual Rating
20. Scroll to the bottom of the list of tariffs. Click anywhere in the last empty line,
which is marked with a * in the far left gray column.
Creating the
Manual Carrier
21. Click the Details button.
22. Type MAN in the SCAC field and then press Tab.
23. In the Tariff Revision field type MAN1 and then press Tab.
24. In the Package Type(s) field, select MAN.
25. Type LTL in the Service field then and press Tab.
26. Click in the circle to the left of Class Rates table.
27. Click in the circle to the left of Lane to Zone.
28. In the Lane to Zone ID field, type MAN1.
29. Click Save, and then click Close.
30. Click the Zone/RBN tab.
SVTS9117 Rev. J
SendSuite® Shipping
Administrator Guide
6-43
6 • Tariffs
Manual Rating
31. Click the Details button.
Creating the
Manual Carrier
32. Type US in the Country field.
33. Type MAN1 in the Zone/RBN field.
34. Click Save, then click Close.
35. Click the Rates tab.
36. Click the Details button.
37. Type 100 in the Freight Class field.
NOTE: Your freight classes may vary when you input the
shipment. Instead of creating a rate for every class, you are
telling the system to use one rate for all classes. The class
you use here has no effect on what prints on the bill of lading.
The BOL will always contain the commodities and classes
you entered on the shipping screen. We will set the freight of
all kinds (FAK) parameter later.
38. Type MAN1 in the Low RBN field.
39. Type MAN1 in the High RBN field.
40. Type Lbs in the Wgt. Break Unit field and then press Tab.
41. Type 0 (zero) for a low weight and 99999 for a high weight.
42. Type 90000 in the Min. Charge field.
6-44
SVTS9117 Rev. J
SendSuite® Shipping
Administrator Guide
Tariffs • 6
Manual Rating
43. Type 1 the Rate field.
44. Click Save, and then click Close.
45. Close the Tariff Setup.
Creating the
Manual Carrier
46. Open Carrier Setup.
47. Click in the last line in the table.
48. Click the Details button.
NOTE: If you have
multiple shipper IDs that
will use this carrier, then
you must set up each
shipper individually.
49. Click on the binoculars button to the right of the Shipper field and select the
shipper from list.
50. Type MAN in the Carrier field and then press Tab.
51. Type LTL in the Service field.
SVTS9117 Rev. J
SendSuite® Shipping
Administrator Guide
6-45
6 • Tariffs
Manual Rating
52. Select Y in the Matching service required on shipment field.
NOTE: This will make sure that an operator does not see the
dummy carrier when rate shopping for parcel shipments.
Creating the
Manual Carrier
53. Type an effective date of this carrier in the Effective Date field.
54. Type MAN in the Reporting SCAC field.
55. Type MAN in the Package Type(s) field.
56. Type Y in the Allow Consolidation field.
57. From the drop-down in the Tariff ID field, select the tariff you setup before
and then press Tab. The tariff ID will be MAN1 followed by a date.
58. In the FAK Lanes field type MAN1.
59. Click Save.
60. On the Carrier Setup window, click the FAK tab.
61. Click the Details button.
62. In the Country field, type US.
63. Input a date in the Effective Date field.
64. In the FAK Params ID field, type MAN1.
65. Click the FAK Parameter button.
NOTE: The freight of all
kinds (FAK) will make
sure that the shipment
rates regardless of the
commodities that are
entered at the time of
shipping. Make sure
that the class you use
here is the same as the
class you used to set
up the rate in the Tariff
Setup.
66. In the FAK Class field, type 100.
6-46
SVTS9117 Rev. J
SendSuite® Shipping
Administrator Guide
Tariffs • 6
Manual Rating
67. Click Save, and then click Close.
68. Click Save, and then click Close.
69. Close the Carrier Setup form.
Creating the
Manual Carrier
70. Close the Supporting Data module.
Creating the VB
Script
The following script sets carrier and service values on the shipping screen.
There are several variables in the script that are specific to your operation.
Before writing the script, identify the following:
• Screen ID — To get the ID, open the Shipping module and then select
Setup Shipment Processing. Open the screen, and the ID number will
appear on the Settings tab.
•
Manual Rate Field — You must choose one of eight configurable number
fields where you will type the rate you want to use. The example below
will use ConfigNumSix.
Use the following instructions to create the manual rating script.
1. From the Control Center, open the Integration module.
2. Click the New button.
3. Select Script and then click OK.
4. In the Description field, type Manual rating.
5. From the This map will be used for drop-down list, select Shipment
Processing.
SVTS9117 Rev. J
SendSuite® Shipping
Administrator Guide
6-47
6 • Tariffs
Manual Rating
6. Create the following script:
Rem This script runs manual rating. Do not delete.
Creating the VB
Script
Rem This stores the pre-specified carrier and service for
Rem later use.
Dim PSpecCarrier
Dim PSpecService
PSpecCarrier = SHIPMENTHEADER(1).PreSpecCarrierID
PSpecService = SHIPMENTHEADER(1).PreSpecService
Rem
Rem
Rem
Rem
Rem
Rem
NOTE: This is where
you need to screen ID
and the master event
ID. In this example,
the screen is 1006 and
the rate event ID is
1106. The rate event ID
should stay the same,
but you will need to
change your screen ID.
NOTE: This is where
you get the rate that the
operator typed on the
shipping screen. You
can use a different field
for the rate.
This sets the carrier and service to the manual carrier
so SendSuite can rate the shipment.
We assume there is a commodity in tblCommodity with
the ID "100." Ensure there is a commodity in the line
item for the shipment or the bill of lading will not
print.
SHIPMENTHEADER(1).PreSpecCarrierID = “MAN”
SHIPMENTHEADER(1).PreSpecService = “LTL”
SHIPMENTHEADER(1).SHIPMENTLINE(1).CommodityCode = "100"
Rem Rate the shipment
Dim oBL
Set oBL = CreateObject("PBCQEShipping_bl.clsPBCQEShipping_bl")
obl.PerformEvent 1006, 1106, Shipments, eQuestParam
Rem Sets fields on load, cost & shipment header tables
LOAD(1).CarrierID = PSpecCarrier
LOAD(1).TotalFreight = SHIPMENTHEADER(1).ConfigNumSix
LOAD(1).Service = PSpecService
LOAD(1).AltCarrierCost = LOAD(1).TotalFreight
LOAD(1).GrossCharges = LOAD(1).TotalFreight
LOAD(1).TotalBillableCost = LOAD(1).TotalFreight
LOAD(1).AltCarrierID =PSpecCarrier
SHIPMENTHEADER(1).PreSpecCarrierID = PSpecCarrier
SHIPMENTHEADER(1).PreSpecService = PSpecService
SHIPMENTHEADER(1).DirectCost = LOAD(1).TotalFreight
SHIPMENTHEADER(1).ProratedCarrierCost = LOAD(1).TotalFreight
LOAD(1).COST(1).Amount = LOAD(1).TotalFreight
LOAD(1).COST(1).Rate = LOAD(1).TotalFreight
LOAD(1).COST(1).CostType = “LINEHL”
7. Save the file as MAN_RATE.
6-48
SVTS9117 Rev. J
SendSuite® Shipping
Administrator Guide
Tariffs • 6
Manual Rating
Associating the
VB Script with a
Shipping Screen
This allows you to add a configurable event to the shipping screen that calls the
script.
There are two steps to this procedure:
•
Set the VBScript you created as a sub-event
•
Add the fields to the screen.
Modifying the Sub-event
To modify the sub-event:
1. Open the Shipping module.
2. Create a new Shipping screen.
3. Click the Events tab.
4. Select any of the unused user configurable folders.
5. Complete the User Function Properties.
a. Type the user description you want on the menu in the Menu Caption
field. For example, Manual Rating.
NOTE: Other optional
subevents include:
Generate Tracking
Number and Print
Carrier Label.
b. (optional) Assign a hot key combination to automatically call the event in
the shipping screen.
6. Drag the Script Conditional Logic sub-event from the Available Subevents list into the selected folder.
a. Drag the Save Shipment sub-event into the selected folder.
b. (optional) Drag the Bill of Lading sub-event into the selected folder.
7. With the Script Conditional Logic sub-event highlighted, click the downarrow next to the Map Name field and select MAN_RATE.
8. Save your changes.
SVTS9117 Rev. J
SendSuite® Shipping
Administrator Guide
6-49
6 • Tariffs
Manual Rating
Adding Fields to the Shipping Screen
Before you can process a shipment using manual rates, you need to add the
following fields to the shipment processing screen:
Associating the
VB Script with a
Shipping Screen
•
tblShipmentHeader.ConfigNumSix — Manual Freight
•
tblShipmentHeader.PreSpec ProNumber (or ProNumber) — Manual Pro
Number
To add fields to the Shipping screen:
1. Click the Screen tab.
2. From the Process menu, select Add Field.
3. Double-click the tblShipmentHeader folder.
4. Click and drag ConfigNumSix to a location on your screen.
5. Repeat steps 3 and 4 for PreSpec ProNumber (or ProNumber, depending
on if you are viewing by User-Defined or System-Defined name).
6. Change the field labels.
•
ConfignumSix = Manual Rated Freight Cost
•
PreSpec ProNumber = Manual Rated Pro Number
7. Save your changes.
6-50
SVTS9117 Rev. J
SendSuite® Shipping
Administrator Guide
Tariffs • 6
Manual Rating
This allows you to enter any carrier and have the rates associated with the tariff
set up for manual rates.
Processing a
Shipment Using
Manual Rates
To process a shipment using manual rates:
1. In the SendSuite thin-client, open the custom shipping screen you created in
the previous section in this chapter.
2. Select or create a shipment.
3. Type the carrier in the Carrier field.
4. Select LTL from the Service drop-down menu.
5. Type an appropriate Shipper in the Shipper field.
6. Enter the freight cost in the Manual Rated Freight Cost field.
7. Enter the pro number in the Manual Rated Pro Number field.
8. Click Manual Rating to execute the scripts and other sub-events associated
with this processing event.
SVTS9117 Rev. J
•
The Carrier ID is set to MAN.
•
The shipment is rated.
•
The tblLoad is updated with the freight cost and pro number.
•
A Bill of Lading will display on screen (if added as a sub-event).
•
The shipment is saved and you are ready to rate another shipment.
SendSuite® Shipping
Administrator Guide
6-51
6 • Tariffs
Zero-Rate
Carrier
A zero-rate carrier provides a useful way of logging shipments in cases where
there are no shipping charges (for example, if you are using your own truck to
make a delivery). Follow the below instructions to create your own LTL zero-rated
carrier.
Creating the SCAC
To create the SCAC:
1. Open the SendSuite Supporting Data module.
2. Open Carrier & Labels > SCAC Codes.
3. Click the New button.
4. Type ZERO in the SCAC field.
5. Save and close the SCAC setup.
Creating the Tariff
Setting Up the Tariff
To set up the tariff:
1. Open the SendSuite Supporting Data module.
2. Open Carrier & Labels > Rates > Tariff Setup.
3. Click the New Record line and click Details.
4. Select ZERO from the SCAC drop-down menu.
6-52
SVTS9117 Rev. J
SendSuite® Shipping
Administrator Guide
Tariffs • 6
Zero-Rate
Carrier
5. Tab to the Tariff Revision field and type ZERO.
Creating the Tariff
7. Type Zero Rate in the Description field.
6. Tab to the Service field. (The Tariff ID field should auto-populate.)
Select LTL as a service.
8. Set the Eff. Date to the beginning of the calendar year (01/01/06).
9. Select Class Rates table under Rate Data Source.
10. Select ZIP to Zone under Zone/RBN Data Source.
a. Type ZERO in the Zip to Zone ID field.
b. Type 1 for the Zone index.
11. Save and close the Tariff Details screen.
Setting the Zone Details
To set the zone details:
1. On the Tariff Setup screen, select the ZERO tariff and click the Zone/RBN
tab.
2. Click Details.
3. Select ZERO from the ZIP to Zone ID drop-down menu.
4. Type 00000 in the Low Origin and Low Dest. fields.
5. Type 99999 in the High Origin and High Dest. fields.
6. Type 00000001 in the Zone/RBN field (this must be 8 characters).
7. Save and close the ZIP to Zone Details screen.
SVTS9117 Rev. J
SendSuite® Shipping
Administrator Guide
6-53
6 • Tariffs
Zero-Rate
Carrier
Setting the Class Rates
To set the class rates:
1. On the Tariff Setup screen, click the Rates tab.
Creating the Tariff
2. Click Details.
3. Select a Freight Class to use with the tariff.
4. Type 00000000 in the Low RBN field
5. Type 00000001 in the High RBN field (this must be 8 characters).
6. Select LBS as a Wgt. Break Unit.
7. Under Rate Per Weight Range:
a. Type a low and high weight in their respective fields.
b. Type 0 in the Rate field.
8
Save and close the Class Rates Details screen.
9
Repeat the above steps (1-8) for every freight class you want to use.
10 Close the Tariff Setup window.
6-54
SVTS9117 Rev. J
SendSuite® Shipping
Administrator Guide
Tariffs • 6
Configuring the Carrier
Zero-Rate
Carrier
To configure the carrier:
1. Open Carrier & Labels > Rates > Carrier Setup.
Creating the Tariff
2. Go to the New Record line and type in your shipper code.
3. Type ZERO in the Carrier ID field.
4. Set the effective date to the first day of the year (i.e. 01/01/06).
5. Type ZERO in the SCAC field.
6. Select LTL from the Service drop-down menu.
7. Select the Zero Tariff ID from the Tariff ID drop-down menu.
8. Click Close.
SVTS9117 Rev. J
SendSuite® Shipping
Administrator Guide
6-55
6 • Tariffs
Zero-Rate
Carrier
To create an address record:
1. Open Data > Address.
2. Create a new address record.
Creating an
Address Record
3. Type ZERO in the Address ID field.
4. Type Zero Rate Carrier in the Name field.
5. Under Address Types, select Carrier. (Leave the other options unselected.)
6. Select ZERO from the SCAC drop-down menu.
7. Save and close the address record.
You can now select the Zero Rate carrier on the shipping screen for LTL
shipments. By selecting the Zero Rate carrier, you will record the shipments for
logging purposes without applying a charge to them.
6-56
SVTS9117 Rev. J
SendSuite® Shipping
Administrator Guide
7
Labels
Label Configuration .............................................................. 7-2
Label Setup .................................................................... 7-2
Selecting a Label .................................................................. 7-5
Label Printing Options .......................................................... 7-6
Graphic Labels ..................................................................... 7-7
Setting the Windows Font Size ....................................... 7-7
Graphic Label File Information ....................................... 7-8
SVTS9117 Rev. J
SendSuite® Shipping
Administrator Guide
7-1
7 • Labels
Label
Configuration
Label configuration is done in the Supporting Data module. The label definitions
that come with the software cannot be changed or deleted. Custom labels can be
created by copying the pre-defined label formats and then making changes to the
copy.
The SendSuite Client/Server Edition comes pre-defined and loaded with label
formats and definitions for three general types (or groupings) of labels:
•
Carrier — labels required by the carrier to designate the service. Labels
are provided for all of the carriers that are supported that require a tracking/
address label.
•
Billing — labels used for consignee billing.
•
Shipper — labels used to indicate the origin and destination addresses.
The shipper label is the only group that does not come with pre-defined labels.
This label group is for custom shipper labels or printing duplicates of the other
three types.
The setup and selection of labels is already defined for carriers when the rates
are loaded. The billing and shipper label setup and selection are defined on a
case-by-case basis. Carrier labels can be modified as needed.
Label Setup
Label Setup is for defining the category or type of label a format is used for.
It is also where the format file is linked to a label definition and where the data
elements are defined for a label. An existing label can be used to create a custom
label. The label templates supplied cannot be changed.
To set up a label:
1. Open the Supporting Data module from the Control Center.
2. Double-click the Carrier & Labels folder.
3. Double-click the Labels folder.
4. Double-click Label Setup.
7-2
SVTS9117 Rev. J
SendSuite® Shipping
Administrator Guide
Labels • 7
Label
Configuration
5. The General tab displays the label's name, description, and function. Type a
name and a brief description for the label.
6. Select the label's function under Category.
NOTE: You can make only one selection. If you want to
use the same label for other functions, you must create a
separate label format.
Label Setup
7. Specify the type of package the label will print for under Print Label For.
8. Click the Format File tab.
9. Review the available printers and their associated files. Then click the Data
tab.
SVTS9117 Rev. J
SendSuite® Shipping
Administrator Guide
7-3
7 • Labels
Label
Configuration
Label Setup
10. Modify as necessary the following fields of the label:
•
Field Number — Identifies each field.
•
Part Number — Part number of the label.
•
Primary Data — Primary SendSuite value to be displayed.
•
Operator — Defines how the primary data interacts with the alternate data (if
any).
•
Alternate Data — Alternate SendSuite value to be displayed.
•
Data Field Index — Defines where on the label the fields print. Generally,
this should not be changed.
•
Text — Text appearing before any SendSuite data.
•
Start — Defines where on the label the fields print. Generally, this should not
be changed.
•
Length — Defines the maximum length of the field.
•
Field Type
11. Click View Format at any time to preview the label.
12. Close the Label Format Viewer when you are done previewing the label.
13. Save and Close the Label Setup window when you are done.
7-4
SVTS9117 Rev. J
SendSuite® Shipping
Administrator Guide
Labels • 7
Once you have labels defined and formatted, you must then tell SendSuite when
to use them. Follow the instructions below to select labels for use.
Selecting a
Label
To select a label:
1. Open the Supporting Data module from the Control Center.
2. Double-click the Carrier & Labels folder.
3. Double-click the Labels folder.
4. Double-click Label Selection.
5. Click the tab for the type of label you are selecting.
6. Click the Blank Current Form button.
NOTE: If your carrier
supports multiple
services, you must
select a label for each
service.
7. Click the drop-down arrow in the ID field and select the carrier, shipper, or
trading partner.
8. If you are selecting a carrier label, then click the drop-down arrow in the
Service field to select the service for the label (e.g., next day, ground).
9. Click the drop-down arrow in the Label Name field and select the label
format.
10. If you want to use this label only in certain circumstances, then click the dropdown arrow in the Secondary Selection Field and select the data field you
want SendSuite to look at. For example, you can set up a label that will only
be used for collect shipments.
•
Click the drop-down arrow in the Secondary Selection Value field and
select the specific criteria to apply.
11. Click the drop-down arrow in the Printer Selection field and select the printer
for this label (optional). If you do not select a printer, SendSuite will print the
label on your default label printer.
12. Click Save. Note the Label ID field automatically populates.
SVTS9117 Rev. J
SendSuite® Shipping
Administrator Guide
7-5
7 • Labels
Label Printing
Options
You can tell SendSuite how many copies of a label to print and whether to print
the consignee’s country on the label. These options are set for every workstation
using the SendSuite Digital Dashboard.
To select label printing options:
1. Open the SendSuite Digital Dashboard.
2. Click the Peripheral Setup button.
3. Click the Labels tab.
4. Click Label Options.
5. In the Number of Copies box, type the number of labels to be printed for
each type of packing resource.
6. In the Consignee Country Name box, you can tell SendSuite whether to
print the consignee’s country on the label.
•
If you want the country to print only if the shipper and consignee are in
different countries, then select Skip On Shipper Country Match.
•
If you want the country printed on all labels, then select Always Print.
7. In the Multi-piece Numbering box, specify how you want SendSuite to print
labels for multiple piece shipments.
•
If you want SendSuite to ask the user how many labels to print, then select
Always Prompt.
•
If you want SendSuite to print labels for all shippable pieces (including boxes
on a pallet), then select Print All Pieces Starting At 1.
8. Click Save.
9. Click Close.
7-6
SVTS9117 Rev. J
SendSuite® Shipping
Administrator Guide
Labels • 7
Graphic Labels
SendSuite supports the printing of graphic labels via a laser printer. Graphic label
support is available for:
•
UPS (excluding UPS Basic)
•
FedEx (excluding IEXF-Fedex International Express Freight and IECF-Fedex
International Economy Freight)
•
DHL
•
Golden State Overnight
•
OnTrac
•
Eastern Connection
•
USPS (IOP only)
EXAMPLE: Customers with multiple remote locations with lower
volumes of shipping often do not want to purchase a thermal label
printer for each location. Most customers, however, typically have
access to a laser printer. Graphical label printing will allow customers
to print UPS, FedEx and DHL carrier labels to a laser printer.
Graphic labels are required for desktop shipping.
Refer to SVTS9124 for additional information on graphic labels.
Setting the
Windows Font
Size
The SendSuite application server must have the Windows fonts set to large.
To set the Windows font size:
1. Right click the on the desktop, and select Properties from the shortcut menu.
2. Go to the Settings tab and then click the Advanced button.
3. On the General tab, select Large Fonts from the drop-down menu.
SVTS9117 Rev. J
SendSuite® Shipping
Administrator Guide
7-7
7 • Labels
Graphic Labels
Graphic Label File
Information
7-8
DHL and UPS graphical labels are written to the Inetpub\wwwroot\eQuest\
GraphicLabels directory as a .gif file. FedEx graphical labels are written to this
directory as a .png file. The file name contains the tracking number. For example:
1Z55310X0311140520.gif.
SVTS9117 Rev. J
SendSuite® Shipping
Administrator Guide
8
Integration
Data Mapper ......................................................................... 8-3
Preparation ..................................................................... 8-3
General Instructions ....................................................... 8-3
Data Map Settings .......................................................... 8-4
General Tab .............................................................. 8-4
In Tab ........................................................................ 8-6
Host File Properties .................................................. 8-7
SendSuite Table Properties In ................................ 8-10
Out Tab ....................................................................8-11
Filtering Records..................................................... 8-13
Mapping the Fields ....................................................... 8-14
Adding Host Fields.................................................. 8-14
Mapping Fields ....................................................... 8-15
Host Field Properties — In ........................................... 8-16
Host Field Properties — Out......................................... 8-16
SendSuite Shipping Field Properties ............................ 8-17
Mapping to tblIntlLine ................................................... 8-18
Considerations for Data on the Host File ................ 8-18
Shipment Header Map ............................................ 8-19
International Detail Line Map .................................. 8-19
Running Data Mapper .................................................. 8-20
Creating a DSN .................................................................. 8-22
Verifying that the ODBC Driver for Database Is
Installed ........................................................................ 8-23
Creating the Data Source ............................................. 8-24
ODBC Integration in SendSuite Shipping ........................... 8-26
Preparing for Integration ............................................... 8-26
Creating a New ODBC Map ......................................... 8-27
ODBC Toolbar .............................................................. 8-30
Adding the Host Tables................................................. 8-30
Mapping the Fields ....................................................... 8-31
Host Field Properties .................................................... 8-32
SendSuite Shipping Field Properties ............................ 8-34
Selection Criteria .......................................................... 8-35
Using Sendsuite Shipping Supplied Scripting Tools 8-36
Manually Writing an SQL WHERE Clause Using
Free Text ................................................................. 8-37
Updating a WHERE Clause .................................... 8-37
SVTS9117 Rev. J
SendSuite® Shipping
Administrator Guide
8-1
8
Integration
XML In Integration .............................................................. 8-38
Preparation ................................................................... 8-38
General Instructions ..................................................... 8-39
XML Map Settings ........................................................ 8-40
General Tab ............................................................ 8-40
Server XML File Properties..................................... 8-40
In Tab ...................................................................... 8-41
Mapping the Fields ....................................................... 8-43
Adding Host Fields.................................................. 8-43
Mapping Fields ....................................................... 8-45
Host Field Properties — XML In ................................... 8-46
SendSuite Shipping Field Properties ............................ 8-47
General Instructions ..................................................... 8-48
XML Map Settings ........................................................ 8-49
General Tab ............................................................ 8-49
Out Tab ................................................................... 8-50
Mapping the Fields ....................................................... 8-51
Adding Host Fields.................................................. 8-51
XML Out Integration ........................................................... 8-53
Mapping the Fields ....................................................... 8-53
Mapping Fields ....................................................... 8-53
SendSuite Shipping Field Properties ............................ 8-54
XML Integration: File Link ................................................. 8-55
File Link Setup .............................................................. 8-55
Modifying the Shipping Screen for XML File Link ......... 8-56
Conditional Logic Scripting ................................................. 8-57
SendSuite Shipping Toolset.......................................... 8-58
Conditional Logic Operations ...................................... 8-59
VBScript Conditional Logic Properties.......................... 8-60
Writing a Script ............................................................. 8-61
Parsing a Script ............................................................ 8-61
Attaching the Script to a Shipping Screen .............. 8-61
Attaching a Script to an Integration Map................. 8-61
Importing Data From Ascent ............................................... 8-62
Importing Address Data ................................................ 8-62
Extracting the Data From Ascent ............................ 8-62
Importing the Ascent Data into SendSuite Shipping 8-63
Verifying the Results ............................................... 8-64
8-2 SVTS9117 Rev. J
SendSuite® Shipping
Administrator
SVTS9117
Guide Rev. J
SendSuite® Shipping
Administrator Guide 8-2
Integration • 8
Data Mapper
SendSuite can send and receive data from flat ASCII text files using the Data
Mapper feature. These transactions usually process information in batch. For
example, a host system writes out all the morning’s orders to a file at 10:00.
SendSuite picks up those orders through the Data Mapper. Once the shipments
have been processed, SendSuite writes shipping information to another text file
that is picked up by the host system.
Preparation
It is important to review the host file structure and data before creating the Data
Map in the SendSuite.
NOTE: A consistent file
format is critical for Data
Mapper In integration
maps. Changes in the
file format can cause
the import to fail.
To do this:
1. Get a copy of a host file and determine where it will be located
2. Identify the data in the file; i.e. the column headers
3. Identify the data type being brought in; e.g., dates, numbers, characters, etc.
4. Identify the file layout; e.g., comma delimited, tab delimited, etc.
5. Identify the line attributes; e.g., combined header and line records, or
separate header and line records, etc.
General
Instructions
When preparing a data mapper in SendSuite, you will follow this general set of
instructions. There is considerable detail when completing these steps, so refer
to the pages that follow for more detail.
1. From the Control Center, open the Integration module.
2. From the File menu, select New, or click the New button.
3. Select Data Mapper from the list of file types, the click OK.
4. Set the direction the data will flow.
5. Locate the ASCII file that contains the data coming in or going out.
6. Select the view that will be used (this determines the SendSuite tables that
can be mapped to or from).
7. Define the host file properties (delimiters, separate or combined lines, etc.)
8. Map the fields.
9. Save the Data Mapper.
10. Run the data mapper from the Integration module, or schedule it to run using
the SendSuite Task Scheduler.
SVTS9117 Rev. J
SendSuite® Shipping
Administrator Guide
8-3
8 • Integration
Data Mapper
Data Map Settings
The Data Mapper Settings window appears immediately when you create a
new map. To modify the settings for an existing map, select Map > Change Map
Properties.
General Tab
Direction — Sets the way the data will flow
•
In — Data coming into the SendSuite database
•
Out — Data going out of SendSuite
Transaction Behavior — This sets when the records will be loaded into the
SendSuite database.
• Commit after each transaction — If selected, each record will be written
immediately to the database after it is read.
•
Commit after the whole operation is completed — If selected, SendSuite will
wait until all the records have been read before updating the database.
Host File Properties
•
8-4
Name — Type the source file for In or the export file for Out (you may also
browse for the file—see below).
•
Browse — Click this button to search for the file you want to use.
•
Edit — Click this button to open the file you selected. The file will be
opened with Notepad.
•
File Format — Select the format that the data is in. If the host file uses a
delimiter other than any in the list, select Custom Defined.
•
Delimiter — This field is enabled only for Custom Defined formats. Type the
character that is used to mark each new field in the host file.
SVTS9117 Rev. J
SendSuite® Shipping
Administrator Guide
Integration • 8
Data Mapper
•
Data Map Settings
Release — Type the character that is used to distinguish a character from
a delimiter. This field is most commonly used when the host file is comma
delimited, but some records in the host file contain commas. The release
character precedes the character that is part of the data set. For example,
consider the following address record: 10800 Lyndale Ave South, Suite 300,
Bloomington, MN, 55420. If you want to read the suite number as part of the
address, you need to tell SendSuite to ignore the comma or it will think that
information is supposed to go in the next field.
In this case, the text file should read:
10800 Lyndale Ave South/,Suite
300,Bloomington,MN,55420
where the release character is “/”. This preserves the suite number as part of
the address record. Without the release, the Data Map would interpret that
data as belonging to the next field, making the suite number the city, the city
would then be in the state field, the state in the ZIP, and so on.
•
Save host file after processing? — You can use this feature to track of the
data being received or sent out of the system.
After SendSuite processes an ASCII document, it renames the document
by adding a numeric value to the file extension. For example, if the original
file name was Hostdata.txt, SendSuite renames the file Hostdata.txt00.
SendSuite will create a maximum of 11 (00-10) files, then it starts over (00).
SVTS9117 Rev. J
•
Batch Files — Type (or browse) to select an .exe, .com or .bat file to process
before or after the mapping.
•
Conditional Logic Script — From the drop-down, you can select a Conditional
Logic script to run at the time the map is running. The Conditional Logic script
will run for each record as it is processed.
•
Host Date and Time Format — From the drop-down, you can select a date
and time translation.
SendSuite® Shipping
Administrator Guide
8-5
8 • Integration
Data Mapper
In Tab
Data Map Settings
NOTE: When
SendSuite imports data
into a view, the table the
view is based on is also
updated.
Views — From the drop-down, select the type of data you will bring into
SendSuite. The selection you make determines the database tables and fields
you can map to. Once you make a selection and close the setting window, you
cannot change your selection.
•
•
NOTE: If you need to
map to tblIntlLine for
international shipments,
see Mapping to
tblIntlLine elsewhere in
this chapter.
8-6
Shipment In — This will allow you to map data to the following tables or
views:
tblCommodity
tblFreightClass
tblShipmentLine
User Fields
tblPayorAcct
tblShipmentHeader
vAltShipper (tblAddress)
vBillTo (tblAddress)
vCarrier (tblAddress)
vConsignee
(tblAddress)
vShipFor (tblAddress
vShipper (tblAddress)
Supporting Data — This will allow you to map data to the following tables or
views:
tblAccount
tblCommodity
tblCountry
tblDepartment
tblDivision
tblExportLicense
tblFreightClass
tblHTS
tblPackResourceType
tblPayorAcct
tblProduct
User Fields
vAgent (tblAddress)
vAltShipper
(tblAddress)
vBillTo (tblAddress)
vCarrier (tblAddress)
SVTS9117 Rev. J
vConsignee (tblAddress)
vDC (tblAddress)
vintermediate (tblAddress)
vRemitTo (tblAddress)
vShipFor (tblAddress)
vShipper (tblAddress)
vSoldTo (tblAddress)
SendSuite® Shipping
Administrator Guide
Integration • 8
Data Mapper
Host File Properties
•
Data Map Settings
File Type — Specify how the records are organized on the host file. The
fields to the right will change based on your selection.
•
Separate Header, Detail and Trailer Lines — In this host file, each
header record is followed by one or more detail lines. Each line begins
with a character that identifies what type of record it is. The last detail
record is followed by a trailing record indicating that the first header
record has been completed. The next record will be a new header.
•
Header, Detail, and Trailer Line ID — In these fields, type the character
that identifies the line (see the sample below):
H,BILL1234,CONS1234,ADDRESS1
L,1,PIECE,PRODUCT1
T,EOF
•
Separate Header and Detail Lines — In this host file, each header
record is followed by one or more detail lines. Each line begins with a
character that identifies what type of record it is.
H,BILL1234,CONS1234,ADDRESS1
L,1,PIECE,PRODUCT1
SVTS9117 Rev. J
SendSuite® Shipping
Administrator Guide
8-7
8 • Integration
•
Data Mapper
Data Map Settings
Separate Header and Detail, related by a key — In this host file, each
header record is followed by one or more detail lines. The header and
detail lines are related by a key, such as an order number.
•
Header and Line Key Column — In these fields, type the column
number that contains the key that links the lines together. For
example, in the example below, the Header Key is 1 and the Line Key
is 4:
Order123,ConsID456,Address1
4,Pieces,Product1,Order123
•
Combined Header and Detail, related by a key — In this host file, each
record contains both header and detail information. This type of data is
used when product or commodity information does not change for each
piece shipped (see the example below):
Order123,Cons789,Address1,4,Pieces
•
Trailing/Leading character to be removed from fields (e.g. double
quotes) — If the lines have some character at the beginning or the end, then
you indicate what that is in this field. For example, some host systems place
double quotes (“) at the beginning and end of each line. SendSuite will strip
those off if you type the double quotes in this field.
Default Group ID — Only enabled when Shipment In is selected, you can type
or select a Group ID to which all shipments will be assigned.
No line item response mode — If SendSuite is expecting a line item for each
header, your selection here will determine what the system should do if there is
no line item.
• Add only Header Record — This will add only the header record, leaving a
line blank.
8-8
•
Disregard Header Record — This will skip that record and go on to the next.
•
Add Detail Line to database table — This will add the header record and
create a dummy line record as well.
SVTS9117 Rev. J
SendSuite® Shipping
Administrator Guide
Integration • 8
Data Mapper
Data Map Settings
Rollup Line Item by Commodity Code or by Product — By default, SendSuite
Shipping will add each tblOrderLine or tblShipmentLine as a separate record.
If you check this box, SendSuite will consolidate multiple lines where the
commodity or product code is the same.
For example, SendSuite Shipping will create one line with 7 pieces from a host
file with the following lines:
Pieces
Commodity
5
2
123456
123456
Skip record if record would be added to the conflict table — SendSuite
Shipping will not overwrite or update existing records in the database. Instead,
duplicate records are added to tblShipmentHeaderConflict.
If you select this box, SendSuite Shipping will skip the duplicate record and it will
not add it to the database.
You can also control this behavior by setting the SendSuite Table properties (see
SendSuite Table Properties In in the next section of this chapter).
Locked Record Behavior — Records are locked when they are in use by
another application or user. If SendSuite encounters a locked record, your
selection here determines what the system will do:
SVTS9117 Rev. J
•
Skip Record — The record is skipped and not added to the database
•
Prompt User — SendSuite will prompt the user to take action.
•
Wait — The system will retry after waiting the number of seconds you specify.
If the record is still locked, the system will wait again until the record is
unlocked.
SendSuite® Shipping
Administrator Guide
8-9
8 • Integration
Data Mapper
Data Map Settings
SendSuite Table Properties In
When importing data into SendSuite, you can tell the system what to do if it finds
an existing record in the database. You can set different properties for different
tables. For example, you can set the properties for tblShipmentHeader to Update,
and set the properties for tblShipmentLine to Replace.
To set the table properties:
1. Left-click on the SendSuite table, then right-click on the table and select
Table Properties.
2. Choose the radio-dial button next to the Duplicate Record behavior you
want.
•
Skip Record — The information in the record being imported is not loaded
into the SendSuite database.
•
Update Record — Any new information on the record being imported is
saved in the SendSuite database. Fields that have not changed are left
alone.
•
Replace Record — The record being imported overwrites the existing record
in the database. If you set this behavior on tblShipmentHeader, it will rewrite
all the tblShipmentLine records as well.
•
Prompt User — If the mapper encounters an existing record, the user will
be given a choice whether to replace the existing record, update the existing
record, delete the existing record (see below), or skip the incoming record.
•
Delete Record — This deletes the existing record and does not import the
new record.
3. Click OK.
8-10
SVTS9117 Rev. J
SendSuite® Shipping
Administrator Guide
Integration • 8
Data Mapper
Data Map Settings
Out Tab
Views — From the drop-down, select the type of data you will send out of
SendSuite. The selection you make determines the database tables and fields
you can map from. Once you make a selection and close the setting window, you
cannot change your selection.
•
Shipment Consolidated Costs — This will allow you to map data out from
the following tables or views:
tblLoad
tblShipmentHeader
tblStop
vConsolidatedCosts
•
Shipment Costs — This will allow you to map data out from the following
tables or views:
tblCost
tblLoad
tblShipmentHeader
tblStop
•
Shipment Out — This will allow you to map data out from the following tables
or views:
tblCost
tblLoad
tblShipmentHeader
tblShipmentLine
tblStop
vBillTo
vConsignee
Update UPLOADED flag — By checking this box, SendSuite Shipping will add
the current date to tblShipmentHeader.Uploaded.
If Host File exists — If the file name you are writing to already exists, your must
tell SendSuite what to do with the new data.
SVTS9117 Rev. J
•
Append — This will add the new data to the existing data in the file.
•
Overwrite — This will rewrite the file with only the new data. The previous
data in the file will be lost.
•
Abort Upload — This will stop the transfer of data out of SendSuite.
•
Prompt — This will notify the user that the file already exists and ask the user
which action to perform. The user can choose to Overwrite the file, Append
the file, or abort the mapper by clicking the Cancel button.
SendSuite® Shipping
Administrator Guide
8-11
8 • Integration
Data Mapper
Host File Properties — Using these fields, you must tell SendSuite Shipping
how to write the data out.
Data Map Settings
•
Combine header and detail lines — If you select this box, SendSuite
Shipping will write out the header and line information on one line.
If you leave this box unchecked, then SendSuite will write out separate
header and detail lines. If you do this, then you must indicate how the header
and detail lines are related.
•
Line Identification — What you type in these fields will appear at the
beginning of every line. If you leave a field blank, SendSuite will not put a
character at the front of the line. For example, if you want the bill number in
the first column, then leave this field blank. You might get something like this:
BILL789,FEDX,NAM,111545541,23.04
BILL963,YFSY,LTL,9854545,378.53
If you did not check the Combine box, then you can use these fields to
distinguish header and detail lines. For example, if you type H in the Load/
Stop/Shipment Header field and D in the Shipment Detail Line ID field, then
your file might look something like this:
H,BILL123,FEDX,GRD,1165245412
D,1,5.235,0,1
H,BILL345,YFST,LTL,9825652
D,52,1053,2,1
•
8-12
Trailing/Leading character to be added to fields (e.g. double quotes)
— If you need to add leading or trailing characters to the line written out by
SendSuite Shipping, type that character in this field.
SVTS9117 Rev. J
SendSuite® Shipping
Administrator Guide
Integration • 8
Data Mapper
Data Map Settings
Filtering Records
When you are sending data out of SendSuite Shipping to an ASCII file, you
can select which records are sent out. Using a filter queries only a portion of
the database while unfiltered searches query the entire database. Filters can
significantly improve performance on large databases.
To filter records:
1. From the Map menu, select View Filter.
2. Setup your criteria using the check-boxes and Conquest Fields (see below).
3. Click OK.
•
Date (TODAY +/- n days) — If you want to select record using a relative
date, then check this box. Then, in the Conquest Field, you must select a
date field. The input mask on the Minimum and Maximum value fields will
change from data entry to TODAY. This will select only records with today’s
date.
To select a range of dates, type an operator then a number. For example, if
you want the system to select all the shipments with an ActualShipDate in the
last week, then set the minimum value to TODAY-7.
•
SVTS9117 Rev. J
Get records that have not yet been uploaded (Uploaded Flag is NULL)
— By checking this box, SendSuite will only write out records where
tblShipmentHeader.Uploaded in NULL. This can be used very effectively
with the Update Uploaded flag (see Out Tab elsewhere in this chapter).
SendSuite® Shipping
Administrator Guide
8-13
8 • Integration
Data Mapper
Mapping the
Fields
Adding Host Fields
New Map
When creating a map for the first time, the first thing you must do is define the
fields on the ASCII file. See the example on page 8-15 for a line of sample data
along with each element's corresponding field.
To add host fields:
1. From the Host Fields menu, select Add a Host Field.
2. Type the name you want to use for the host field in the Name field.
NOTE: You must
identify all the fields on
the data file, regardless
of whether you will map
them.
3. Modify the properties for the field. (See Host Field Properties — In, in the
next section of this chapter.)
4. Click Add
5. Repeat these steps until all the fields have been added
Existing Map
If you are adding host fields to an existing map, click on the existing field that the
new field will follow, then select Host Fields > Add a Host field.
8-14
SVTS9117 Rev. J
SendSuite® Shipping
Administrator Guide
Integration • 8
Data Mapper
EXAMPLE: Below is a line of sample data to be imported via the data mapper.
1 Bill Number
3 Attention
5 Address 2
7 City
9 ZIP
11 Nothing
Mapping the
Fields
1101,4614,JOSE DIAZ,THE BIG HAT,323 W MAIN ST,Suite 734,DALLAS,TX,75208,US,FC,0,
2 Consignee ID
4 Address 1
6 Address 3
8 State
10 Country
12 Nothing
Mapping Fields
To map the fields, begin by expanding your host records. Then expand the
SendSuite table to which you will map the data.
To map a field, click and drag the host field onto the SendSuite (Conquest) field.
If you mapped the field successfully, the host field icon and the SendSuite field
icon change color. Also, in the SendSuite pane, the host field name appears next
to the SendSuite field name.
SVTS9117 Rev. J
SendSuite® Shipping
Administrator Guide
8-15
8 • Integration
Data Mapper
Host Field
Properties — In
To define the host field properties, left-click on the host field, then right-click on
the field. Select Edit from the popup menu.
Name — This field contains the host field
name.
Type — This field identifies the data type in this
field; e.g., character, number, date or time.
Cost Type — This field is not used.
Field position — The following fields are only
enabled when the data on the host file is in a
fixed length format. You use these fields to tell
SendSuite where the data is in on the file. Refer
to the following example:
1234567890123456789012345678901234567890123456789012345678901234567890123
BILL456
CONSID123
AUTOMOTIVE REPAIR SPECIALISTS
123 MAIN ST
BILL789
CONS753
JOES AUTOBODY
4 N 8TH
•
Position — Type the number of the column where the data starts. F or
example, the consignee names above start at column 23.
•
Width — Indicate how many characters might be in that field. For example,
the consignee ID field above contains up to 10 characters
•
Precision — Defines how many decimal places a field uses.
Strip spaces from field after reading it? — This is checked by default and it
will remove any blank space from a field. This can be useful if the host system
always outputs the maximum number of character for a field, padding the data
with spaces.
Host Field
Properties — Out
To define the host field properties, left-click on the host tag, then right-click on the
tag. Select Edit from the popup menu.
All the properties are the same as what is shown in Host Field Properties — In (in
the previous section of this chapter) with the following difference:
Pad field before writing it out? — Using these radio-dial buttons, you can add
characters to the left or the right of the data you are sending back to the host. For
example, if SendSuite is sending back “Dave” but the host system expects 10
characters, you can pad right so SendSuite actually sends back “Dave000000”.
Type the character to use for padding in the Padding Character field.
8-16
SVTS9117 Rev. J
SendSuite® Shipping
Administrator Guide
Integration • 8
Data Mapper
SendSuite
Shipping Field
Properties
To define the SendSuite Shipping field properties, left-click on the SendSuite
field, then right-click on the field name. Select Field Properties from the popup
menu.
Table Name — This identifies the SendSuite table that this is on.
Field Name — This identified the field name on the SendSuite table.
Default Label — This is the name of the field as it shows in the mapping tree.
Default Value — If the value being transferred is NULL, SendSuite Shipping
will use the default value. The data input must match the Field Type. To use the
current date, type TODAY (this must be in caps).
Translation Type — If the host and SendSuite Shipping use different values,
then you can set up a translation. Once the translation has been defined, then
you can select that translation from the drop-down here.
Field Type — This identifies the type of data expected by SendSuite Shipping.
Field Length — This identifies the maximum number of characters that the
SendSuite Shipping database will accept for this field.
Field is Required? — If checked, SendSuite Shipping will require a value for this
field. If no value is sent to SendSuite Shipping, the system will return an error.
Roll Up Item? — This field applies when multiple line items are being sent to
SendSuite Shipping. If checked, SendSuite Shipping will summarize all the line
items into a single line.
SVTS9117 Rev. J
SendSuite® Shipping
Administrator Guide
8-17
8 • Integration
Data Mapper
Mapping to
tblIntlLine
If you need to map date to tblIntlLine, you must set up a separate Data Mapper
for that data. You must execute that Data Mapper separately from the Data
Mapper bringing in the header information. The following section explains how to
set up and run this separate Data Mapper.
Considerations for Data on the Host File
First, for the purposes of international documentation, you must first determine
the contents of each box being shipped. This data can then be imported via the
data mapper and printed on any required documents.
The data mapper will create lines on tblIntlLine based on the PackageID
field. SendSuite automatically generates this number. If you map to this field,
SendSuite will rewrite the field value. For example, if you have box numbers 235,
236, and 237 on your host file and map these to tblIntlLine.PackageID, after the
data mapper runs you will see 1, 2, and 3 in the PackageID field.
SendSuite determines whether to create a new PackageID whenever it
encounters a change in BillItemNr. In the example below, the host file contains
three lines, but only two box IDs. However, the box IDs are not grouped together,
so SendSuite creates three PackageIDs because it sees three changes:
Host Product Number
Host Box ID
SendSuite Package ID
P123
P124
P125
458
459
458
1
2
3
This means that the host file must arrange the data by PackageID. The correct
arrangement for this example would be:
8-18
Host Product Number
Host Box ID
SendSuite Package ID
P123
P125
P124
458
458
459
1
1
2
SVTS9117 Rev. J
SendSuite® Shipping
Administrator Guide
Integration • 8
Data Mapper
Shipment Header Map
Mapping to
tblIntlLine
The first map is set up to bring data into tblShipmentHeader and tblShipmentLine.
The two tables are related by the BillNr field, in a one to many relationship. You
can create multiple records on tblShipmentHeader.
When running the second mapper to bring information into tblIntlLine, SendSuite
will recreate all the tblShipmentLine necessary. To make sure that you do not
end up with duplicate records on tblShipmentLine, you must set the SendSuite
table properties to “Replace”. See SendSuite Table Properties In, elsewhere in
this chapter.
You must set a value for tblShipmentLine.HostItemNr. You can map up to four
number in this field, or you can set a default value.
International Detail Line Map
The setup of the tblIntlLine Data Mapper follows the same general process
described in General Instructions on page 8-3.
When choosing the view, select Shipment Line Detail In.
Add the host fields, following the instructions for Adding Host Fields, elsewhere in
this chapter.
SVTS9117 Rev. J
SendSuite® Shipping
Administrator Guide
8-19
8 • Integration
Data Mapper
Running Data
Mapper
Data Mapper can be run manually from the Integration module. It also can
be run automatically in Task Scheduler. (To run the data mapper from Task
Scheduler, see Task Scheduler in Chapter 5.)
1. From the Operations menu, select Run Data Mapper
- OR Click the Run Data Mapper button.
2. On the Data Mapper Parameters window, select the mapper you want to run
from the Map Name drop-down.
3. For Data Mapper In only, you can select a planning group to assign the
shipments to.
8-20
•
You can type an existing group in the Default Group ID field
•
You can select NOW from the Default Group ID drop-down. This will
create a new group using the current date and time. For example, if you
select NOW on July 14, 2005 at 3:52 PM, the SendSuite will create a
group called 200507141532.
•
You can select TODAY from the Default Group ID drop-down. This will
create a new group using the current date and time. For example, if you
select TODAY on July 14, 2005 at 3:52 PM, the SendSuite will create a
group called 20050714.
•
If you do not make a selection, you will be prompted for a group again
later. If you did make a selection, you will not be prompted twice.
SVTS9117 Rev. J
SendSuite® Shipping
Administrator Guide
Integration • 8
Data Mapper
Running Data
Mapper
4. Make a selection about how SendSuite should log the data
•
Log errors — This is the default and it will only write errors to the
SendSuite activity log.
•
Log errors and events — This will write errors and events to the
SendSuite activity log.
•
Print out log — If you check this box, the system will print the log once
the data mapper has finished running.
5. Run in attended mode (Will display messages and Dialog Boxes) — This
box is checked by default and it will display any error messages as the data
mapper runs. It also will display a summary when the data mapper is done.
If you remove the check, then the data mapper runs unattended, and it does
not display a summary when complete. When running in this mode, it is a
good idea to check the Print out log box.
Leave this unchecked to run maps from the Task Scheduler.
6. Click OK.
SVTS9117 Rev. J
SendSuite® Shipping
Administrator Guide
8-21
8 • Integration
Creating a DSN
A data source is a flat file, relational or other database on a remote computer.
The data source consists of the data that the user wants to access and its
associated operating system, DBMS (database management system) and
network platform (if any) used to access the DBMS.
Database vendors provide drivers which implement the specific interfaces with
their database system. Users then use the ODBC Data Source Administrator
(from the Control Panel) to provide logical names for data sources. Applications
can then do their work without knowing any of the particulars of the database
system being used. This allows all applications to work with databases on a wide
variety of platforms.
The ODBC Administrator is installed when Windows® is installed. The ODBC
Administrator manages the ODBC drivers present on a system. When the ODBC
Administrator receives SQL statements from the application, it directs them to the
appropriate ODBC driver.
The ODBC driver then processes the SQL statements and gives them the
appropriate DBMS to execute. For example, if the intended ODBC data source is
a Microsoft Access database, the ODBC Administrator sends the SQL statements
to the Microsoft Access ODBC driver. The Access driver then processes the SQL
statements and interfaces with the Access database.
To use a data source, you must configure the data source in the ODBC
Administrator. You must also install the appropriate ODBC driver. This lesson
provides procedures to configure the data source in the ODBC Administrator.
Before setting up the ODBC Data Exchange, the following steps must be
completed:
8-22
•
Verify that the host application is installed.
•
Verify that the ODBC Driver for the target database is installed.
•
Create a Data Source Name.
SVTS9117 Rev. J
SendSuite® Shipping
Administrator Guide
Integration • 8
Creating a DSN
To verify that the ODBC driver is installed:
1. From the Windows®
menu, select Settings.
2. From the Settings menu, select Control Panel.
Verifying that
the ODBC Driver
for Database Is
Installed
3. From the Control Panel, double-click the Administrative Tools icon.
4. Double click the Data Sources (ODBC) icon.
5. Click the Drivers tab to display a list of drivers (and the specific version).
NOTE: The ODBC Data
Source Administrator
dialog box shows the
different data sources
and their ODBC drivers.
These data sources can
be used to connect to
DBMS.
NOTE: If the correct
driver is not loaded,
use the driver’s setup
program to install
the driver. It is the
responsibility of the MIS
Administrator at the
Customer Site to ensure
that the correct driver is
installed.
SVTS9117 Rev. J
6. Click OK to exit.
7. From the File menu, select Close to close Control Panel.
SendSuite® Shipping
Administrator Guide
8-23
8 • Integration
Creating a DSN
A DSN is created using Microsoft tools. You can access these tools through the
Control Panel, or you can access the tools through the integration module in
SendSuite.
Creating the Data
Source
To create the DSN from within SendSuite Shipping:
1. From the Control Center, open the Integration Module.
2. From the File menu, select New.
3. Select ODBC Data Exchange and click OK.
NOTE: A Machine Data
Source is specific to the
machine and cannot
be shared. User Data
Sources are specific to
a user on the machine.
System Data Sources
can be used by all users
on the machine, or by a
system-wide service.
4. Enter a descriptive name for the ODBC Data Exchange Map.
5. Click Find under ODBC Data Source Name.
6. From the Select Data Source dialog box, click the Machine Data Source
tab.
8-24
SVTS9117 Rev. J
SendSuite® Shipping
Administrator Guide
Integration • 8
Creating a DSN
7. Click New.
Creating the Data
Source
8. From the Create New Data Source dialog box, select System Data Source
and click Next.
NOTE: The DSN setup
from this point will vary
by the driver chosen.
9. Select the ODBC driver to use. Be certain to select the right driver for the
database you are using. The driver you use should match the database type.
10. Once you have named the DSN and selected the database, you will return to
the SendSuite ODBC Data Exchange Properties window.
SVTS9117 Rev. J
SendSuite® Shipping
Administrator Guide
8-25
8 • Integration
ODBC
Integration
in SendSuite
Shipping
Preparing for
Integration
Open Database Connectivity (ODBC) is possible with SendSuite. This method
of integration requires a valid and updated driver for the host database. (See
Verifying that the ODBC Driver for Database is Installed, elsewhere in this
chapter.)
The fundamental principle of ODBC is that each database talks directly to the
other database using the ODBC driver. A database can add or update records on
the other database. One advantage of using ODBC is the real-time exchange of
data between databases. For example, when Data Mapping is used, records are
downloaded and uploaded in batch, meaning that they sit idle for some period of
time. On the other hand, when an ODBC call is made, the data is taken from one
database and written to the other immediately.
You should review the host database before beginning the integration. When you
look at the host database, write down the names of the tables that you will be
using. Open the tables and write down the names of the fields that contain the
data you will bring into SendSuite as well as the names of the fields you will write
information to on the host.
NOTE: While you are using the SendSuite integration tools, you have
a live connection to the host database. This may lock other users out of
the database.
8-26
SVTS9117 Rev. J
SendSuite® Shipping
Administrator Guide
Integration • 8
ODBC
Integration
in SendSuite
Shipping
To set up a new ODBC map, open the Integration module from the Control
Center.
When you select File > New, and select ODBC Data Exchange, the ODBC Data
Exchange Properties window will open.
Creating a New
ODBC Map
Description — (required) Type a description of the data exchange in this field.
Data Direction — Select the direction and behavior of the data exchange.
SVTS9117 Rev. J
•
In (SQL Select) — This will bring information into SendSuite.
•
Out (SQL Insert or Update) — This will send information back to the host
database. You can either add new records to the host database or you can
change existing records.
•
Out (SQL Insert) — This will send information back to the host database, but
it will only insert new records; it will not update existing records in the host db.
•
Out (SQL Update) — This will send information back to the host database,
but it will only update existing records; it will not insert new records into the
host db.
SendSuite® Shipping
Administrator Guide
8-27
8 • Integration
ODBC
Integration
in SendSuite
Shipping
Creating a New
ODBC Map
ODBC Data Source Name — You can type the DSN in this field or you can click
the Find button and browse for the DSN. If the DSN has not already been set
up, you can click the Find button and use the Windows wizards to create a new
DSN. For further instruction on how to create a new DSN, See Creating a DSN
elsewhere in this chapter.
•
User — If the host DB requires a user login, then type that in this field.
•
Password — If the user ID requires a password, type that in this field.
•
Use Cursor Library — Use this checkbox to specify whether to use the
cursor library for the data source. Deselecting this checkbox may resolve
some ODBC problems. See Microsoft's website for more information on
cursor libraries.
Database Properties — Use the fields in this box to define additional information
about the data in the host DB.
Escape Clause (ODBC Driver Database Properties) — Some data
in the host file may look like a wildcard character to the SQL statement.
Different ODBC drivers use different symbols as wildcards. Click Driver
Values to query the driver for the wildcard symbols.
EXAMPLE: If a date value must be imported literally and not translated,
the an escape character may precede and follow the value; for
example, #05/21/05!. Use the Prefix and Suffix fields to specify these
escape characters.
String used to specify Table Alias — If you are referring to table aliases
instead of the actual table names, type the characters that are used to
indicate that the table is an alias. For example, if you are connecting to a
table called “CustomerTableHeader” but you want to refer to it as “CH”,
then you may need to type “Alias” in this field in order to connect to the
correct table.
Connection String — Type any additional connection information in this
field. For example, if you want to set a 3-second timeout on a MS SQL
database, you can type “TIMEOUT=3000” in this field.
Select Statement Strings — The ODBC map will create a SQL Select statement
to gather the information it needs. You cannot alter the SQL statements
SendSuite creates, but you can add a statement after the Select and From
statements using these fields. For example, if you want to use a SELECT
DISTINCT statement, type DISTINCT in this field.
Host Date and Time Format — From the drop-down, you can select a date and
time translation.
8-28
SVTS9117 Rev. J
SendSuite® Shipping
Administrator Guide
Integration • 8
ODBC
Integration
in SendSuite
Shipping
Creating a New
ODBC Map
SVTS9117 Rev. J
This map will be used for — From the drop-down, select Shipment
Processing (the only view available). Once you make a selection and close the
setting window, you cannot change your selection.
•
Shipment Processing — This will allow you to map data to the following
tables or views:
ProcessMemory
tblCost
tblLoad
tblShipmentHeader
SendSuite® Shipping
tblShipmentLine
tblStop
tblSwog
vAltShipper
Administrator Guide
vBillTo
vCarrier
vConsignee
vShipFor
vShipper
8-29
8 • Integration
ODBC
Integration
in SendSuite
Shipping
ODBC Toolbar
There is an additional toolbar that can be used with the ODBC mapping feature
in SendSuite. To add the toolbar to the screen, select View > ODBC Data
Exchange Toolbar. You can move the toolbar anywhere on the screen, including
docking it next to the standard integration toolbar.
ODBC Data Exchange Properties — This opens the Data Exchange
Properties window.
Add Host Tables — This opens the host database and displays its tables.
Edit Selection Criteria — See below.
NOTE: Optimization
is not recommended.
Running optimization
removes fields from the
view used by integration
maps. If any of the fields
you remove are needed
by other maps, they will
not be available.
Adding the Host
Tables
NOTE: If SendSuite
does not read the host
tables, then the ODBC
driver does not support
this feature. The table
names will have be
added manually in this
case.
Show SQL Statement — See below.
Execute SQL Statement — See below.
Delete Mapped ODBC Field — See below. This button is enabled only
when you click on a SendSuite field that has a host value mapped to it.
Optimization — This button is enabled only when you click on a SendSuite
table or view.
Once the data exchange properties have been defined, you must add the host
tables to the screen to map the fields. Use the button on the ODBC toolbar or
select Operations > Add Host Tables.
To add a host table, click on the table you want, then click the Add button. You
may add multiple tables.
If you selected a table by mistake, click on the table in the right pane of the
window and click the Remove button.
8-30
SVTS9117 Rev. J
SendSuite® Shipping
Administrator Guide
Integration • 8
ODBC
Integration
in SendSuite
Shipping
Mapping the
Fields
NOTE: For all database
types, if a host table
name or host field
name is two words
(with spaces), the name
must be enclosed by
delimiters. Common
delimiters include
quotation marks (" ")
and brackets ([ ]).
To map the fields, begin by expanding your host tables. Then expand the
SendSuite table to which you will map the data.
Drag the host field and drop it onto the SendSuite field to map the data.
SVTS9117 Rev. J
SendSuite® Shipping
Administrator Guide
8-31
8 • Integration
ODBC
Integration
in SendSuite
Shipping
If you need to make modifications to the host field properties, right-click the host
field and select Edit.
Host Field
Properties
Field Name — This field identifies the name of the host field. Do not change this
name unless you are connecting to an Access database where the field names
contain spaces.
Field Type — In most cases, SendSuite automatically reads the type of data
expected from the host database. Sometimes, however, you must manually set
this field. All fields require a data type.
Field Width — This field defines how many characters or bytes are allowed in
the field.
Field Precision — This field is enabled only when you are working with number
or currency data types.
This field will be treated as free text — If selected, text in the Field Name
will be used in the select statement. The syntax should be valid for the host
database.
Getting data IN — Use these fields to define how data is brought into SendSuite.
These fields will only be enabled when the Data Exchange Properties are set to
In (SQL Select).
8-32
•
Strip leading and training characters — If the data in the host table
contains a special character before or after the data, then type that character
in this field. For example, data in a field may begin and end with a space ( ).
•
Existing value for field — If the SendSuite table already contains a value for
this field, then you can tell the system what to do with that information.
•
Keep existing value — The new value will be ignored.
•
Append to existing value — The new information will be added to the
field. For example, if the field contains 123 and a new value of 456 is
being appended, then the field will contain 123456.
•
Replace existing value — The old value will be destroyed.
SVTS9117 Rev. J
SendSuite® Shipping
Administrator Guide
Integration • 8
ODBC
Integration
in SendSuite
Shipping
Sending Data Out? — Use these fields to define how data is to the host
database. These fields will only be enabled when the Data Exchange Properties
are set to Out.
•
Host Field
Properties
•
SVTS9117 Rev. J
Padding — If you need to add extra characters to a field. For example, if the
host database is expecting a 10 character string but you are only sending 7
characters, you can pad the string. SendSuite will add the necessary padding
to make up the difference.
•
Pad left — Adds characters to the left of your string; e.g., 0000123.
•
Pad right — Adds characters to the right of your string; e.g., 123000.
•
Padding character — Indicate which character you will use for padding.
Send value after sending field — Use this field for legacy systems that
require a value to be sent after the data element.
SendSuite® Shipping
Administrator Guide
8-33
8 • Integration
ODBC
Integration
in SendSuite
Shipping
To define the SendSuite Shipping field properties, left-click on the SendSuite
Shipping field, then right-click on the field name. Select Field Properties from
the popup menu.
SendSuite
Shipping Field
Properties
Table Name — This identifies the SendSuite table that this is on.
Field Name — This identified the field name on the SendSuite table.
Default Label — This is the name of the field as it shows in the mapping tree.
Default Value — If the value being transferred is NULL, the SendSuite will use
the default value. The data input must match the Field Type. To use the current
date, type TODAY (this must be in caps).
Translation Type — If the host and SendSuite use different values, then you can
set up a translation. Once the translation has been defined, then you can select
that translation from the drop-down here.
Field Type — This identifies the type of data expected by SendSuite.
Field Length — This identifies the maximum number of characters that the
SendSuite database will accept for this field.
Field is Required? — If checked, SendSuite will require a value for this field. If a
null value is sent to SendSuite, the system will return an error.
Roll Up Item? — This field applies when multiple line items are being sent to
SendSuite. If checked, SendSuite will summarize all the line items into a single
line.
8-34
SVTS9117 Rev. J
SendSuite® Shipping
Administrator Guide
Integration • 8
ODBC
Integration
in SendSuite
Shipping
To write the SQL WHERE clause, use the SendSuite Selection Criteria tool:
1. On the SendSuite Integration window, highlight a Host table
2. On the SendSuite Integration window, highlight a SendSuite (Conquest) table
3. Open the Selection Criteria window:
•
Selection Criteria
From the Operations menu, select Edit Selection Criteria.
- OR -
•
Click on the Edit Selection Criteria button on the ODBC Toolbar.
4. Write a WHERE clause using Free Text.
•
You can use the SendSuite supplied tools to write a script (see “Using
SendSuite supplied scripting tools” in the next section in this chapter),
or you can write your own script (see Manually Writing a SQL Statement
elsewhere in this chapter).
5. Click the Add button.
6. If you are going to write a multiple line statement, then follow these steps:
a. Click And or Or. This tells the system whether a record must meet all the
criteria (And), or just one of the criteria (Or). For example, if you want to
select a record where the warehouse number is 5, and the order number
is 123, then use And.
b. Click the Add button to add the new line.
c. Repeat Step 5 and Step 6 until you have completed the WHERE clause.
7. Click the Close button. Any changes are automatically saved when you close
the window.
SVTS9117 Rev. J
SendSuite® Shipping
Administrator Guide
8-35
8 • Integration
ODBC
Integration
in SendSuite
Shipping
Selection Criteria
Using Sendsuite Shipping Supplied Scripting Tools
To use the SendSuite supplied scripting tools, use the fields on the screen:
1. In the First Parameter box, click on the first host field you want use for your
selection.
2. Select the operator you want to use to compare the host data with what
follows. For example, if you want to select a record where the order number
is 1234, then select the = operator.
3. In the Second Parameter box, tell the system what value you are looking for.
In the Type box, tell the system where you will be getting the data:
8-36
•
Prompt User — This feature will prompt the user, but it cannot place a
prompt on browser client. This option can be helpful when testing a script
in the Integration module, but it cannot be used in production.
•
Constant — When you choose this type, you must type a value in the
Low Expression Value box. When you do this, the system will always
select the same record. This option can be helpful when testing a script in
the Integration module.
•
Conquest Field — Use this feature to compare the host field to a
SendSuite. For example, if the user types an order number in the
tblShipmentHeader.ConfigCharSeven field on the shipping screen, the
you would select this type. This is a standard method of selecting records
to import into SendSuite.
•
ODBC Field — Use this feature to compare one host field to another.
The main use of this type is when you are selecting records from multiple
tables and you need to create a relationship between the tables. For
example, if you want to select OrderHeader.OrderNumber, and you
need line items from OrderLine.OrderNumber, then you will use this
type. Your selection criteria might look like the following:
•
Free Text — Using this type, you are creating a manual script (see
Manually Writing a SQL Statement elsewhere in this chapter).
SVTS9117 Rev. J
SendSuite® Shipping
Administrator Guide
Integration • 8
ODBC
Integration
in SendSuite
Shipping
Manually Writing an SQL WHERE Clause Using Free Text
There may be many reasons to use free text instead of the SendSuite tools.
For example, if you want to select only the first few characters of a field you can
place a left string command in this text box.
To manually write an SQL WHERE Clause using free text:
Selection Criteria
1. Click the Add Free Text button.
2. You can type the statement manually, or you can use the buttons to select the
fields. If you type the statement manually, make sure you use the SendSuite
naming conventions (see the example above).
3. Click OK when you have finished the statement.
Updating a WHERE Clause
Use the WHERE free text field when a field you want to use in the selection
criteria is not in the select statement.
To update a WHERE statement:
1. Open the ODBC script.
2. From the Operations menu, select Edit Selection Criteria.
3. Click in the statement you need to modify.
4. Modify the statement.
•
If you used the SendSuite tools to create the statement, then change the
selections on the top of the window, then click the Update/Edit button.
•
If you created the statement manually, then click the Update/Edit button.
Change your criteria in the window, then click OK.
5. Click the Close button.
SVTS9117 Rev. J
SendSuite® Shipping
Administrator Guide
8-37
8 • Integration
XML In
Integration
XML refers to eXtensible Markup Language. SendSuite can be setup to integrate
with a host application using XML files.
There are many differences between XML and Data Mapping, but one of the key
differences is that XML integration is executed from the shipping client, whereas
the Data Mapper is executed from the Administrative Workstation.
SendSuite can import data structured in an XML format. It can also export data in
an XML format, whether that is into an existing XML document, or SendSuite can
create an XML file with all the data and tags.
There are many ways SendSuite can integrate using XML. Here are a few
examples:
Preparation
•
Batch Integration — The host application rewrites an XML file, SendSuite
imports those records in a single upload, processes the records, then exports
the data back to the XML file. The host application reads the new information
into its database, then rewrites the XML document with new shipments.
•
Semi-batch Integration — As above, SendSuite imports the data in a single
batch. When each shipment is processed, the data is sent back to the XML
file, so the records are updated in “real time”, one record at a time.
•
Separate Batch Integration — As above, SendSuite imports data in batch,
but each client integrates with a different XML file.
•
Single file integration — The operator provides SendSuite with a shipment
number. SendSuite looks for an XML file with that number in the title.
SendSuite imports data from that file, processes it, and sends the data back
to the same file.
It is important to review the XML file structure and data before creating the XML
map in the SendSuite. You must know which tags will contain the data coming
into or going out of SendSuite.
Some XML files may contain multiple records. Only one record is necessary
when setting up the mapping in SendSuite, so try to obtain a copy of the XML file
with only one record (or you can edit the file to include only one record).
It is important to verify that the XML file is structured properly before mapping it.
One way to test an XML file structure is to get a copy of an XML file and drag it
into a Web browser. If the data shows in the browser window, then the basic XML
structure is good and the file can be used. If the page cannot be displayed, then
the XML structure is bad and you must obtain a new XML file. Other software
may be used to parse the XML file for validity, but this method will verify its basic
structure.
8-38
SVTS9117 Rev. J
SendSuite® Shipping
Administrator Guide
Integration • 8
XML In
Integration
When preparing XML Integration in SendSuite, you will follow this general set of
instructions. There is considerable detail when completing these steps, so refer
to the pages that follow for more detail.
General
Instructions
1. From the Control Center, open the Integration module.
2. From the File menu, select New, or click the New button.
3. Select XML Data Exchange from the list of file types, the click OK.
4. For the direction, select In.
5. Locate the XML file that contains the data coming into SendSuite.
6. If applicable, identify any batch files that will run with the map.
7. If applicable, select a conditional logic VBScript that will run with the map.
8. Select the view that will be used (this determines the SendSuite tables that
can be mapped to or from).
9. Define the line item, multiple record, and locked record behaviors.
10. Set the properties of the XML parent tags.
11. Set the properties of the XML fields, identifying the key fields.
12. Map the fields.
13. Save the XML Map.
14. Execute the map from the Shipping Workstation.
SVTS9117 Rev. J
SendSuite® Shipping
Administrator Guide
8-39
8 • Integration
XML In
Integration
The XML Map Settings window appears immediately when you create a new
map. To modify the settings for an existing map, select Map > Change XML Map
Properties.
XML Map Settings
General Tab
Direction — Sets the way the data will flow
•
In — Data coming into the SendSuite database
•
Out — Data going out of SendSuite to an XML file
Server XML File Properties
•
8-40
Name (URL) — (required) Type the source file (you may also browse for the
file—see below).
•
Browse — Click this button to search for the file you want to use.
•
Edit — Click this button to open the file you selected using Notepad.
•
Save XML after processing? — This feature saves the XML file and does
not delete it.
•
Batch Files — Type (or browse) to select an exe, com or bat file to process
before or after the mapping. For example, to run a process on the host that
creates the XML data.
•
Conditional Logic Script — From the drop-down, you can select a VBScript
to run at the time the map is running. The script conditional logic will run for
each record as it is processed.
•
Host Date and Time Format — From the drop-down, you can select a date
and time translation.
SVTS9117 Rev. J
SendSuite® Shipping
Administrator Guide
Integration • 8
In Tab
XML In
Integration
XML Map Settings
Views — From the drop-down, select the type of data you will bring into
SendSuite. The selection you make determines the database tables and fields
you can map to. Once you make a selection and close the setting window, you
cannot change your selection.
•
XML ShipmentIn — This will allow you to map data to the following tables or
views:
tblShipmentHeader
tblShipmentLine
•
vBillTo (tblAddress)
vConsignee (tblAddress)
vShipper (tblAddress)
XML ShipmentIn is the only view available for XML In maps.
Default Group ID — Only enabled when XML ShipmentIn is selected, you can
type or select a Group ID to which all shipments will be assigned.
SVTS9117 Rev. J
SendSuite® Shipping
Administrator Guide
8-41
8 • Integration
XML In
Integration
XML Map Settings
No line item response mode — If SendSuite is expecting a line item for each
header, your selection here will determine what the system should do if there is
no line item.
•
Add only Header Record — This will add only the header record, leaving a
line blank.
•
Disregard Header Record — This will skip that record and go on to the next.
•
Add Detail Line to database table — This will add the header record and
create a dummy line record as well.
Rollup Line Item by Commodity Code or by Product — By default, SendSuite
will add each tblShipmentLine as a separate record. If you select this box,
SendSuite will consolidate multiple lines where the commodity or product code is
the same.
For example, SendSuite will create one line with 7 pieces from a host file with the
following lines:
Pieces
Commodity
5
2
123456
123456
Skip record if record would be added to the conflict table — SendSuite
will not overwrite or update existing records in the database. Instead, duplicate
records are added to tblShipmentHeaderConflict.
If you select this box, SendSuite will skip the duplicate record and it will not add it
to the database.
Locked Record Behavior — Records are locked when they are in use by
another application or user. If SendSuite encounters a locked record, your
selection here determines what the system will do:
8-42
•
Skip Record — The record is skipped and not added to the database
•
Wait — The system will retry after waiting the number of seconds you
specify. If the record is still locked, the system will wait again until the
record is unlocked.
SVTS9117 Rev. J
SendSuite® Shipping
Administrator Guide
Integration • 8
XML In
Integration
Mapping the
Fields
Adding Host Fields
New Map
When creating a map for the first time, the first thing you must do is define the
fields on the XML file.
•
You can do this manually by selecting XML Fields > Add a XML field.
•
If your XML file already exists, select XML Fields > Create XML Tree View.
This will import the tags from the XML file and display them in the left pane of
your window.
Note that if your XML file contains multiple records, SendSuite will import
each parent tag and display it in the tree. You need only one parent tag
record, so delete any extras by clicking on the tag and pressing the D key.
Since the parent tag will be used for each data record in your XML file, you
must change its properties.
To change the parent tag's properties:
1. Left-click on the tag.
2. Right-click on the tag.
SVTS9117 Rev. J
SendSuite® Shipping
Administrator Guide
8-43
8 • Integration
XML In
Integration
3. Select Edit.
Mapping the
Fields
4. Click the drop-down arrow next to Map this field to Conquest table
and select the table primary table you are mapping to or from; e.g.,
ShipmentHeader, Load, etc. (See Host Field Properties — XML In elsewhere
in this chapter.)
Existing Map
If you are adding host fields to an existing map, select XML Fields > Add a XML
field. If you select Create XML Tree View, you will destroy your old tree and you
must remap all the fields again.
8-44
SVTS9117 Rev. J
SendSuite® Shipping
Administrator Guide
Integration • 8
Mapping Fields
XML In
Integration
To map the fields, begin by expanding your host records. Then expand the
SendSuite table to which you will map the data.
Mapping the
Fields
To map a field, click and drag the host field onto the SendSuite (Conquest) field.
If you mapped the field successfully, the host field icon and the SendSuite field
icon change color. Also, in the SendSuite pane, the host field name appears next
to the SendSuite field name.
NOTE: Do not let up
on the mouse button
until you have reached
a SendSuite field.
Releasing the button
too quickly will result
in the host field being
deleted.
SVTS9117 Rev. J
SendSuite® Shipping
Administrator Guide
8-45
8 • Integration
XML In
Integration
To define the host field properties, left-click on the host tag, then right-click on the
tag. Select Edit from the popup menu.
Host Field
Properties — XML
In
Tag — This field contains the XML tag name.
Type — This field identifies the data type in this field; for example, character,
number, date or time.
XML Node Type — This identifies what will be found in the XML tag. The default
value is ELEMENT and that should be used for all fields being mapped into
SendSuite. For example, you can identify the source tag as an Entity Reference;
however, since data from these tags would not be directly imported, it is not
necessary to map them or define their properties.
Qualifier Properties — If the source file uses repeating segments, this identifies
the field as a qualifier and defines its value.
Map this field to Conquest table — This applies to the parent node only. In
order to successfully map data into or out of SendSuite, you must choose a
SendSuite table from this drop-down list. If the tag you have selected is a child,
then this field is disabled.
Identifies the XML Document? — Use this to flag the root node.
Prefix and suffix strings — Identify any characters that precede or follow the
actual data you are transferred; for example, remove quotation marks.
Strip spaces from field after reading it? — This is checked by default and it
will remove any blank leading and trailing spaces from a field. This can be useful
if the host system always outputs the maximum number of character for a field,
padding the data with spaces.
8-46
SVTS9117 Rev. J
SendSuite® Shipping
Administrator Guide
Integration • 8
To define the SendSuite Shipping field properties, left-click on the SendSuite
field, then right-click on the field name. Select Field Properties from the popup
menu.
XML In
Integration
SendSuite
Shipping Field
Properties
Table Name — This identifies the SendSuite table that this is on.
Field Name — This identified the field name on the SendSuite table.
Default Label — This is the name of the field as it shows in the mapping tree.
Default Value — If the value being transferred is NULL, the SendSuite will use
the default value. The data input must match the Field Type. To use the current
date, type TODAY (this must be in caps).
Translation Type — If the host and SendSuite use different values, then you can
set up a translation. Once the translation has been defined, then you can select
that translation from the drop-down here.
Field Type — This identifies the type of data expected by SendSuite.
Field Length — This identifies the maximum number of characters that the
SendSuite database will accept for this field.
Field is Required? — If checked, SendSuite will require a value for this field. If
no value is sent to SendSuite, the system will return an error.
Roll Up Item? — This field applies when multiple line items are being sent to
SendSuite. If checked, SendSuite will summarize all the line items into a single
line.
Running XML
Refer to the XML In instructions in SVTS9131 XML Configuration Guide.
SVTS9117 Rev. J
SendSuite® Shipping
Administrator Guide
8-47
8 • Integration
XML Out
Integration
When preparing XML Out Integration in SendSuite, you will follow this general
set of instructions. There is considerable detail when completing these steps, so
refer to the pages that follow for more detail.
General
Instructions
The following steps are required, unless noted otherwise:
1. From the Control Center, open the Integration module.
2. From the File menu, select New, or click the New button.
3. Select XML Data Exchange from the list of file types, then click OK.
4. Set up the map properties (see XML Map Settings elsewhere in this chapter
for more information).
a. For the direction, select Out.
b. Identify the XML file that the data will be going to.
c. If applicable, identify any Batch Files that will run with the map.
d. If applicable, identify a conditional logic VB Script that will run with the
map.
e. Select the view that will be used (this determines the SendSuite tables
that can be mapped to or from).
f.
Identify the Selection Criteria that will be used to select the data going
out.
5. Map the fields (see Mapping the Fields elsewhere in this chapter for more
information).
NOTE: Make sure that
you choose the same
SendSuite table for the
host field properties
on the parent node
matches the table used
selected for the view.
6. Modify the Host Field Properties (see Host Field Properties—XML Out
elsewhere in this chapter for more information).
a. For each parent node, select the SendSuite table that will be used to
retrieve data.
b. Identify the primary key in each parent node.
7. Save the XML Map.
8. If applicable, set up the shipping screen to execute this integration using the
XML Out This Shipment subevent. See Processing Events in Chapter 3.
8-48
SVTS9117 Rev. J
SendSuite® Shipping
Administrator Guide
Integration • 8
The XML Map Settings window appears immediately when you create a new
map. To modify the settings for an existing map, select Map > Change XML Map
Properties.
XML Out
Integration
XML Map Settings
General Tab
Direction — Sets the way the data will flow
NOTE: When using
XML File Link, select
an XML document that
will serve as a template
for all other XML
documents.
•
In — Data coming into the SendSuite database
•
Out — Data going out of SendSuite to an XML file
Server XML File Properties
•
•
Name (URL) — (required) Type the name of the file SendSuite will be
sending data to (you may also browse for the file—see below).
•
Browse — Click this button to search for the file you want to use.
•
Edit — Click this button to open the file you selected using Notepad.
Save XML after processing? — This feature is used to track the history of
data imported by keeping a record of all the files imported.
After SendSuite processes the file, it will copy the data into a new file, and
append the file extension with a numeric value. For example, if the original
file name was Hostdata.xml, SendSuite will create a new file called Hostdata.
xml00. SendSuite will create a maximum of 11 (00-10) files, then it starts over
(00).
Each time the host file is processed, SendSuite will create a new file with
the next number in sequence. For example, if the original file was processed
five times, you will see the following files: Hostdata.xml, Hostdata.xml00,
Hostdata.xml01, Hostdata.xml02, Hostdata.xml03, and Hostdata.xml04.
•
SVTS9117 Rev. J
Batch Files — Type (or browse) to select an .exe, com or bat file to process
before or after the mapping.
SendSuite® Shipping
Administrator Guide
8-49
8 • Integration
XML Out
Integration
•
Conditional Logic Script — From the drop-down, you can select a VBScript
to run at the time the map is running. The script conditional logic will run for
each record as it is processed.
XML Map Settings
•
Host Date and Time Format — From the drop-down, you can select a date
and time translation.
Out Tab
Views — From the drop-down, select the type of data you will export from
SendSuite. The selection you make determines the database tables and fields
you can map to. Once you make a selection and close the setting window, you
cannot change your selection.
• XML ShipmentOut and XML LoadOut — This will allow you to map data to
the following tables or views:
tblCost
tblLoad
tblMultipackTotals
tblShipmentHeader
tblShipmentLine
tblStop
vBillTo (tblAddress)
vConsignee (tblAddress)
vShipper (tblAddress)
Selection Criteria For Root Table — Type or select the fields you will use to
select data from the SendSuite database. To select fields, click the drop-down
under tbl~ Fields, select the field, then click Get Root Table Field.
Get records that have not yet been uploaded (Uploaded Flag is NULL)
— Select this box when you want to write out only records that have not been
uploaded before. SendSuite will look at
tblShipmentHeader.Uploaded for a date or a NULL.
8-50
SVTS9117 Rev. J
SendSuite® Shipping
Administrator Guide
Integration • 8
If Host File exists — If the file name you are writing to already exists, your must
tell SendSuite what to do with the new data.
XML Out
Integration
•
Overwrite — This will rewrite the file with only the new data. The previous
data in the file will be lost.
•
Abort Upload — This will stop the transfer of data out of SendSuite.
•
Merge — This will add the new data to the existing data in the file.
XML Map Settings
Update UPLOADED flag — By selecting this box, SendSuite will add the current
date to tblShipmentHeader.Uploaded.
Mapping the
Fields
Adding Host Fields
New Map
When creating a map for the first time, the first thing you must do is define the
fields on the XML file.
SVTS9117 Rev. J
•
You can do this manually by selecting XML Fields > Add a XML field.
•
If your XML file already exists, select XML Fields > Create XML Tree View.
This will import the tags from the XML file and display them in the left pane of
your window.
SendSuite® Shipping
Administrator Guide
8-51
8 • Integration
XML Out
Integration
Mapping the
Fields
Note that if your XML file contains multiple records, SendSuite will import
each parent tag and display it in the tree. You need only one parent tag
record, so delete any extras by clicking on the tag and pressing the Delete
key.
Since the parent tag will be used for each data record in your XML file, you
must change its properties.
To change the parent tag's properties:
1. Left-click on the tag.
2. Right-click on the tag.
3. Select Edit.
4. Click the drop-down arrow next to Map this field to Conquest table and
select the table primary table you are mapping to or from; for example,
ShipmentHeader, Load, etc. (See Host Field Properties—XML Out elsewhere
in this chapter.)
Existing Map
If you are adding host fields to an existing map, select XML Fields > Add a XML
field. If you select Create XML Tree View, you will destroy your old tree and you
must remap all the fields again.
8-52
SVTS9117 Rev. J
SendSuite® Shipping
Administrator Guide
Integration • 8
XML Out
Integration
Mapping Fields
Mapping the
Fields
To map a field, click and drag the host field onto the SendSuite (Conquest) field.
If you mapped the field successfully, the host field icon and the SendSuite field
icon change color. Also, in the SendSuite pane, the host field name appears next
to the SendSuite field name.
To map the fields, begin by expanding your host records. Then expand the
SendSuite table to which you will map the data.
NOTE: Do not let up
on the mouse button
until you have reached
a SendSuite field.
Releasing the button
too quickly will result
in the host field being
deleted from the list.
Right-click and select
Add XML Field to add
the field back in.
To define the host field properties, left-click on the host tag, then right-click on the
tag. Select Edit from the popup menu. Many of the definitions are them same as
the Host Field Properties—XML In elsewhere in this chapter. The differences are
noted below:
Qualifier Properties — This will always be disabled for data going out of
SendSuite.
Identifies the key for the parent node? — You must identify the primary key
for each parent node. This maintains system integrity when sending data out of
SendSuite. If you do not make a selection, then SendSuite will not send data out
correctly.
Pad field before writing it out? — Using these radio-dial buttons, you can add
characters to the left or the right of the data you are sending back to the host. For
example, if SendSuite is sending back “Dave” but the host system expects 10
characters, you can pad right so SendSuite actually sends back “Dave
”.
SVTS9117 Rev. J
SendSuite® Shipping
Administrator Guide
8-53
8 • Integration
XML Out
Integration
To define the SendSuite Shipping field properties, left-click on the SendSuite
Shipping field, then right-click on the field name. Select Field Properties from
the popup menu.
SendSuite
Shipping Field
Properties
Table Name — This identifies the SendSuite table that this is on.
Field Name — This identified the field name on the SendSuite table.
Default Label — This is the name of the field as it shows in the mapping tree.
Default Value — If the value being transferred is NULL, the SendSuite will use
the default value. The data input must match the Field Type. To use the current
date, type TODAY (this must be in caps).
Translation Type — If the host and SendSuite use different values, then you can
set up a translation. Once the translation has been defined, then you can select
that translation from the drop-down here.
Field Type — This identifies the type of data expected by SendSuite.
Field Length — This identifies the maximum number of characters that the
SendSuite database will accept for this field.
Field is Required? — If checked, SendSuite will require a value for this field. If
no value is sent to SendSuite, the system will return an error.
Roll Up Item? — This field applies when multiple line items are being sent to
SendSuite. If checked, SendSuite will summarize all the line items into a single
line.
Running XML
•
8-54
If you are running the XML Out on a shipment by shipment basis, refer to
Processing Events in Chapter 3 for information on how to create a shipping
subevent to perform the XML Out process.
SVTS9117 Rev. J
SendSuite® Shipping
Administrator Guide
Integration • 8
XML
Integration:
File Link
XML File Link integration allows you to use the shipping screen to perform the
XML In and XML Out data transfers. Instead of always looking at the same XML
file, XML file link uses a key field from the shipping screen to identify the XML
file to read. For example, if the user wants to process order 4567, the user types
that number on the shipping screen, performs the XML File Link In event, and
SendSuite looks for a file called 4567.XML.
From an operator's viewpoint, XML File Link behaves very much like ODBC
integration. The operator scans a bar code, and a single shipment comes in.
In order to use this method of integration, the host system must write a unique
XML file for every shipment that will be processed.
To set up the XML File Link In integration map, follow the same general
instructions for setting up a batch map. See General Instructions elsewhere in
this chapter.
File Link Setup
After setting up the map properties, you must configure the map for XML File Link
following these instructions:
1. Click on the Map menu and select File Link Setup.
NOTE: These files must
be in XML format (using
XML tags), but they do
not have to have the
.xml file extension; they
can be simple text files
with a .txt extension.
2. In the Directory Name field, type or browse for the directory where the XML
documents will be stored. The directory must be accessible from the server
(on either a local or mapped drive).
3. In the File Extension field, type the extension used on the files in this
directory.
4. In the File Name From box, locate and click on the SendSuite field that
will be used to select the XML file. For example, if the user types the bill
number into the ConfigCharEight field on the shipping screen, then open
tblShipmentHeader and select ConfigCharEight.
5. Click OK to save this setup.
6. Set up the shipping screen. See Modifying the Shipping Screen for XML File
Link elsewhere in this chapter.
To set up the XML File Link In integration map, follow the same general
instructions for setting up a batch map. See General Instructions elsewhere in
this chapter. You must make sure that the Host File Properties are set correctly,
and that they are in line with View used for the map.
After setting up the map properties, you must configure the map for XML File Link
following the instructions for File Link In Setup above.
Set up the shipping screen (see next page).
SVTS9117 Rev. J
SendSuite® Shipping
Administrator Guide
8-55
8 • Integration
XML
Integration:
File Link
Modifying the
Shipping Screen
for XML File Link
Once the integration files have been set up, you must set up the Shipping screen.
To set up the Shipping screen:
1. Make sure that the field you selected in Step 4 above is on the screen. If it is
not, see Configure the Appearance of the Shipping Screen in Chapter 3 for
instructions for adding a field to the screen.
2. Add the XML File Link In and XML File Link Out sub-events to processing
event. See Processing Events in Chapter 3 for instruction on how to add and
modify shipping sub-events.
Running XML
Once the shipping screen has been set up, the XML integration is executed using
the sub-events on the screen.
8-56
SVTS9117 Rev. J
SendSuite® Shipping
Administrator Guide
Integration • 8
Conditional
Logic Scripting
SendSuite is designed to perform specific tasks. When circumstances dictate,
you can write conditional logic scripts to perform actions that are not part of the
system design.
NOTE: Scripts are
can be edited, run,
and parsed on the
SendSuite server.
However, on an admin
station that is not the
server, the field tree will
not be displayed and
the Parse Script feature
will not function.
There are two versions of Conditional Logic:
SVTS9117 Rev. J
•
SendSuite toolset
•
Microsoft Visual Basic® Scripting (VBScript) interface in SendSuite
The type of script you use depends on where in the application you want to use:
•
Shipment Processing uses VBScript
•
Data Mapper integration uses the SendSuite toolset.
•
XML integration uses VBScript
SendSuite® Shipping
Administrator Guide
8-57
8 • Integration
Conditional
Logic Scripting
SendSuite
Shipping Toolset
1. From the Control Center, select the Integration module.
2. Click the New button.
3. Select Conditional Logic.
4. Briefly explain what the script is for in the Description field.
NOTE: Using the This
map will be used
for field for Shipment
Processing is obsolete.
5. In the This map will be used for field, choose the function that you will use
the script for. When you make a selection, you will be able to use the script
only for that function. For example, if you Data Mapper Shipment In, you will
not be able to use the script with Shipment Processing screen.
6. Begin writing the script by selecting an item from the Operations menu (see
below).
7. Click the Save button and give the script a name. This is the name you will
see when you select the script from a drop-down.
8-58
SVTS9117 Rev. J
SendSuite® Shipping
Administrator Guide
Integration • 8
Conditional
Logic Scripting
Conditional Logic
Operations
Operation
Set Value
Execute Command
Comparison Test
Message Box
Skip Record
Conditional I/O
Display Field Value
Jump
Stop Script
Link Table
Abort Execution
SVTS9117 Rev. J
SendSuite® Shipping
What it does
Assigns a value to a
field
Runs an external .exe,
.com. or .bat
Creates an IF
statement.
Creates a message
box during run time
Omits the current
record
Obsolete
Shows the value of a
field during run time
Will go to another line
in the script
Ends the script at this
line
If the result of the
comparison is TRUE,
then the script proceeds
to the next line. If it is
FALSE, then it skips one
line. If you need to run
a series of commands
for a TRUE statement,
then your next line will be
JUMP pointing to a subscript
Can be used after a
comparison test to skip
invalid records
Can be used in the
middle of script to stop
the script before it hits a
sub-script
Stops the data mapper
Administrator Guide
8-59
8 • Integration
Conditional
Logic Scripting
To write a new script, open the Integration module from the SendSuite Control
Center on the administrative workstation.
Click the New button, and select Script.
VBScript
Conditional Logic
Properties
Description — Type a description of the script you are writing.
This map will be used for — Click the drop-down and select the use for this
script. Your selection determines what SendSuite tables you can view. It also
will determine where the script can be used. For example, if you choose XML
ShipmentIn, you will not be able to use this script in the Shipment Processing
module.
Once you start typing your script, you will disable this field. Once you save the
script, you will not be able to change this field.
Language — The default is Visual Basic Script. The field is not enabled, so you
cannot change this.
8-60
SVTS9117 Rev. J
SendSuite® Shipping
Administrator Guide
Integration • 8
Conditional
Logic Scripting
You write your script in the large text box. You can write your script freehand, you
can copy a script from another application (such as Notepad).
It is important that you use the SendSuite field names as they have been defined
for scripting. If you are unfamiliar with the SendSuite field names, you can insert
them by selecting them from the tables in the right pane of your window.
Writing a Script
In the left pane, place your cursor where you want the SendSuite field to appear
in your script. Double-click the field name in the right pane.
Parsing a Script
You can use SendSuite tools to validate your script.
NOTE: This utility will only validate the syntax of your VBScript. It will
not validate whether SendSuite will use the script correctly or that the
user will be able to execute the script on their client workstation. The
script should be thoroughly tested with the SendSuite function that is
using it.
Select Operations > Parse Script to validate the script.
Attaching the Script to a Shipping Screen
A script that has been written for shipment processing must be added to the
shipping screen. See Processing Events in Chapter 3.
Attaching a Script to an Integration Map
A script that has been written for an integration map must be added to the map
properties. See Data Mapper elsewhere in this chapter.
SVTS9117 Rev. J
SendSuite® Shipping
Administrator Guide
8-61
8 • Integration
Importing Data
From Ascent
SendSuite Shipping can import existing address data from an Ascent™ system
using the Data Mapper. Pitney Bowes includes Data Maps for importing Ascent
data on your SendSuite Shipping DVD. Use the instructions below to import
Ascent data into SendSuite Shipping.
Importing Address
Data
Extracting the Data From Ascent
To extract the data from Ascent:
1. On your Ascent computer, insert your SendSuite Shipping DVD into your
DVD/CD-ROM drive.
2. Open Ascent Setup.
3. Click File > Import Script….
4. Select DB Export Script.
5. Name the script CONEXP in the Destination Script Code field.
6. Click
and navigate to your DVD/CD-ROM drive. Select ASCENT CONS
EXPORT.EXX. Click OK.
7. Click File > Export DB Data….
8. Select CONEXP from the Export Code drop-down menu.
9. Ensure the Export File name is C:\consignee.txt.
10. Click OK.
11. Click OK at the confirmation prompt.
8-62
SVTS9117 Rev. J
SendSuite® Shipping
Administrator Guide
Integration • 8
Importing Data
From Ascent
12. In Windows Explorer, navigate to C:\ and open consignee.txt in Notepad.
•
Verify the data was exported properly. The file should look similar to the
graphic below.
Importing Address
Data
Importing the Ascent Data into SendSuite Shipping
1. Transfer the consignee.txt file generated on your Ascent computer to your
SendSuite server. Place the file in C:\.
2. Insert your SendSuite Shipping DVD into your DVD/CD-ROM drive.
3. Open the SendSuite Control Center and open the Integration module.
4. Click File > Import.
5. Navigate to your DVD/CD-ROM drive and select ascent cons import.itg.
Click Import.
6. Click Operations > Run Data Mapper.
7. Ensure the Map Name is Ascent Cons Import and click OK.
SVTS9117 Rev. J
SendSuite® Shipping
Administrator Guide
8-63
8 • Integration
Importing Data
From Ascent
8. After a successful import, the Data Mapper Results will display. Click OK.
Importing Address
Data
Verifying the Results
Open the Address Table in the Supporting Data module. All of the Ascent records
you imported should now be in SendSuite Shipping's Address Table.
8-64
SVTS9117 Rev. J
SendSuite® Shipping
Administrator Guide
A
Appendix A:
Supported Peripherals
Supported Peripherals in SendSuite Shipping ..................... A-2
Manuals for Peripherals........................................................ A-3
SVTS9117 Rev. J
SendSuite® Shipping
Administrator Guide
A-1
A • Supported Peripherals
Supported
Peripherals
in SendSuite
Shipping
SendSuite® Shipping supports the following peripherals:
Forms Printers
•
J624 Laser Printer
•
J630/J632 Standard Report Printer
•
J670/J676 Forms Printer
•
J680 High Speed Forms Printer
•
J683 Laser Printer
•
J685 Laser Printer with Duplex Unit
Label Printers
•
J693 Datamax Printer
•
J695 Datamax Printer
•
1E05 Zebra 200 DPI Printer
•
1E08 Zebra 200 DPI Printer
Scales
•
ExpressCube Scale
•
A217/A218/A219 Tabletop Scale
•
JN50/JN55 Rollertop Scale
•
JN6X (JN60, JN64) 150 lbs. Rollertop Scale
•
J06X (J060, J064) 200 lbs. Rollertop Scale
•
J070/J075 100 lbs. Tabletop Scale
•
JN75 100 lbs. Tabletop Scale
•
Toledo 2038/2138 1000 lbs. Scale
•
Mettler Toledo (2158) Lynx Floor Scale
Scanners
•
J765 — Non-Contact Programmable Laser Scanner
•
F196022 — Contact Wedge Scanner
Postage Meters
•
A900 Electronic Postage Meter
•
B900 Post-Right Postage Meter
•
6500/6501
•
E100/101 Paragon Meters
NOTE: The above meters are supported via legacy PBIO, and are
not available for purchase.
•
A-2
DM300 - DM1000 Postage Meters
SVTS9117 Rev. J
SendSuite® Shipping
Administrator Guide
Supported Peripherals • A
Manuals for
Peripherals
The tables below list all relevant manuals for setting up and operating SendSuitecompatable peripherals (if available).
Forms Printers
J624 Laser Printer
J630/J632 Standard
Report Printer
J670/J676 Forms Printer
J680 High Speed Forms
Printer
J683 Laser Printer
J685 Laser Printer with
Duplex Unit
SV60262 — Model J630 Printer Product Reference
Manual
SV60262-PL — Model J630 Printer Parts
Reference Guide
SV60257 — Model J630 Printer Operating Guide
SV60538 — Model J632 Printer Operating Guide
SV60077 — Model J670 Printer Product Reference
Manual
SV60077-PL — Model J670 Printer Product Parts
List
SV60079 — Model J670 Printer
Operating Guide
SV60442 — Model J676 Printer User’s Manual
SV60111 — Model J680 Printer
Product Reference Manual
SV60111-PL — Model J680 Printer Product Parts
List
SV60110 — Model J680 Printer Operating Guide
SV60465 — J683 User’s Guide
Label Printers
J693 Datamax Label
Printer
J695 Datamax Label
Printer
1E05 Zebra 200 DPI
Printer
1E08 Zebra 200 DPI
Printer
SVTS9117 Rev. J
SendSuite® Shipping
Administrator Guide
SV60824 — J693 Operator’s Manual
SV61120 — Printer Instructions
A-3
A • Supported Peripherals
Manuals for
Peripherals
Scales
ExpressCube Scale
A217/A218/A219
Tabletop Scale
JN50/JN55 Rollertop
Scale
JN6X (JN60, JN64) 150
lbs. Rollertop Scale
J06X (J060, J064) 200
lbs. Rollertop Scale
J070/J075 100 lbs.
Tabletop Scale
JN75 100 lbs. Tabletop
(J075/JN75)
Toledo 2038/2138 1000
lbs. Scale
Mettler Toledo (2158)
Lynx Floor Scale
SVTS9148 — Setup Instructions, pending approval
SV11697 — Install Instructions
SV11695 — Install Instructions
SV60510 — JN50/JN55 Scales Setup/User Guide
& Parts Manual
SV60621 — JN6X Scale Service Manual
SV60155 — Model J064 Scale Product Reference
Manual
SV60155-PL — Model J064 Product Parts List
SV60045 — J070/J075 Scale Product Reference
Manual
SV60045-PL — J070/J075 Scale Product Parts
Reference Guide
SV60552 — JN75 Scale Service Manual
Scanners
J765 Non-Contact
SV60651 — Install Guide
Programmable Laser
Scanner
F196022 Contact Wedge
Scanner
Postage Meters
A-4
SVTS9117 Rev. J
SendSuite® Shipping
Administrator Guide
Supported Peripherals • A
Manuals for
Peripherals
SVTS9117 Rev. J
A900 Electronic Postage
Meter
B900 Post-Right Postage
Meter
6500/6501
E100/E101 Paragon
Meters
SV50001 — Model A900 Postage Meter Operating
Guide
SV50385 — Model B900 Postage Meter User
Guide
DM300
DM300L/DM400L;
DM300i/DM400i.
DM350, DM400
DM400L
DM400i
DM500, DM550
DM800, DM800i
DM900
DM1000
SV60691 — Operator Guide
SV61304 — Operator Guide
SendSuite® Shipping
Administrator Guide
SV208SS — Settings Instructions
SV208ST — Settings Instructions
SV61005 — Installation Instructions
SV61301 — Installation Instructions
SV61015 — Quick Reference Guide
SV60890 — Operator Guide
SV61162 — Operator Guide
SV60861 — Operator Guide
SV60951 — Operator Guide
A-5
A • Supported Peripherals
This Page Intentionally Blank
A-6
SVTS9117 Rev. J
SendSuite® Shipping
Administrator Guide
B
Appendix B:
Version Compatibility
Operating System and Upgrade Compatibility ..................... B-2
SendSuite Desktop Compatibility ......................................... B-3
SVTS9117 Rev. J
SendSuite® Shipping
Administrator Guide
B-1
B • Version Compatibility
Operating
System and
Upgrade
Compatibility
Specific Requirements for Each SendSuite® Shipping Version
SendSuite® Shipping Version
Prior to 6.20
6.20
6.21
6.25
6.50
Call
Customer
Support
12/2008
03/2010
06/2010
12/2010
Compatible to Call
Upgrade from Customer
Support
5.4
6.00
6.01
6.01 (original
release and USPS
update version),
6.20
6.20
6.21
6.20
Application
Operating
System
Win XP SP3
Win 2003 SP2
Win XP SP3
Win 2003 SP2
Win XP SP3
Win 2003 SP2
Estimated
Release Date
Call
Customer
Support
6.21
6.25
32-bit mode:
Win XP SP3
Win 2003 SP2/R2
Win 2008 SP2
Win 7 a
64-bit mode:
Win 2008 SP2
Win 2008 R2
Windows 7 a
Database
Call
Customer
Support
SQL 2000
SQL 2000
SQL 2000
32-bit mode:
SQL 2005
SQL 2005
SQL 2005
SQL 2000 b
SQL 2005
Express
SQL 2005
Express
SQL 2005 Express SQL 2005 SP3
SQL 2008 (32 Bit
Only)
SQL 2008 (32 Bit
Only)
SQL 2008 SP1
SQL 2008 R2 RTM
64-bit mode:
SQL 2008 SP1
SQL 2008 R2 RTM
Upgrading to
SendSuite®
Shipping
Version 6.50
a
b
c
B-2
Call
Customer
Support
Supported c
Supported c
Supported c
Only for Admin Workstation and Thin Client Workstation.
SendSuite® Shipping 6.50 will be the last version to support SQL Server 2000.
Customers upgrading from Sendsuite 6.20/6.21 must also execute Carrier Feature Setup (from the SendSuite Shippping 6.5
menu) to complete the upgrade to SendSuite 6.50 (This is not required for customers upgrading from SendSuite 6.25).
SVTS9117 Rev. J
SendSuite® Shipping
Administrator Guide
Version Compatibility • B
SendSuite
Desktop
Compatibility
SendSuite
Desktop
5.04
6.00
6.01
6.20
6.20
SP4
6.20
SP5
6.21
SP1
6.25
6.50
4.20
No 2
No 6
No 6
No
No
No
No
No
No
6
6
5.00
5.10
5.25
No
1, 2
Yes
Yes
No
No
Yes
5, 6
Yes
5, 6
6
No
No
No
No
No
No
Yes
5, 6
No
No
No
No
No
No
Yes
5, 6
No
No
No
No
No
No
Yes
6
5.26
Yes
Yes
No
No
No
No
No
No
5.27
Yes 6
Yes
Yes
No
No
No
No
No
No
5.50
Yes
6
Yes
Yes
No
No
No
No
No
No
Yes
6
Yes
Yes
Yes
No
No
No
No
No
Yes
6
Yes
Yes
Yes
No
No
No
No
No
Yes
6
Yes
Yes
Yes
Yes
No
No
No
No
6.02
Yes
6
Yes
Yes
Yes
Yes
Yes
Yes
Yes
Yes
6.03
No
No
No
No
Yes
Yes
Yes
Yes
Yes
6.10
No
No
No
No
No
Yes
Yes
Yes
Yes
6.20
No
No
No
No
No
Yes
Yes
Yes
Yes
6.50
No
No
No
No
No
Yes
Yes
Yes
Yes 7
5.60
6.00
6.01
SVTS9117 Rev. J
SendSuite Shipping
1
SendSuite Accounting – if sub accounts are used
2
SendSuite Address Verification engine compatibility
5
Carrier/Service UCU uploads are incompatible due a change in the SSS DB architecture.
Therefore, if the previous version of the UCU is used (v5.20) with v5.26 and SSS, compatibility
will be maintained.
6
Large Flat Rate Box will not work
7
The New Technology Release.
SendSuite® Shipping
Administrator Guide
B-3
B • Version Compatibility
This Page Intentionally Blank
B-4
SVTS9117 Rev. J
SendSuite® Shipping
Administrator Guide
I
SVTS9117 Rev. J
Index
SendSuite® Shipping
Administrator Guide
I-1
I • Index
A
Accessorials
tariff 6-23, 6-24, 6-25
File Name field 6-24
Accounting 2-28, 2-29
account validation 2-29
account visibility 5-7
reports 4-25, 4-26
Ascent
importing data from 8-62, 8-63, 8-64
B
Batch Rating 2-26, 2-27
batch labeling 2-27
groups 2-26
plan shipments 2-26, 2-27
BOL
remark codes 2-12
Borrowing a Tariff 6-37, 6-38, 6-39, 6-40
C
Carrier log......See Zero-Rate Carrier
Carrier Setup 6-19, 6-20, 6-21, 6-22
Certificate of Origin 3-11, 3-12, 3-13
Commercial Invoice 3-7, 3-8, 3-9, 3-10
Commodity Data 2-8
adding a commodity code 2-8
Company Logo 1-4
Conditional Logic 8-57, 8-58, 8-59, 8-60, 8-61
operations 8-59
toolset 8-58
VB script 8-60
attaching to an integration map 8-61
attaching to a shipping screen 8-61
parsing 8-61
Consignee Data 2-4, 2-5
Continue on Error......See Shipping Screens
Country Data 2-6, 2-7
modifying 2-7
Custom Reports
creating 4-4, 4-5, 4-6, 4-7
for the shipping workstation 4-11, 4-12, 4-13, 4-14,
4-15, 4-16, 4-17, 4-18, 4-19, 4-20, 4-21, 4-22,
4-23, 4-24
running the report 4-24
thin client report 4-12, 4-13, 4-14, 4-15, 4-16, 4-17,
4-18, 4-19, 4-20, 4-21, 4-22
defining data 4-15
grouping 4-18
headers and footers 4-17
scripting 4-20
summary fields 4-19
I-2
writing VBScript 4-23, 4-24
D
Database
purging 5-34, 5-35, 5-36
Database Maintenance 1-5, 1-6, 1-7, 1-8, 1-9, 1-10,
1-11, 1-12, 1-13, 1-14, 1-15, 1-16, 1-17, 1-18,
1-19, 1-20, 1-21, 1-22
backing up 1-8, 1-9, 1-10, 1-11, 1-12, 1-13, 1-14, 1-15,
1-16, 1-17, 1-18, 1-19, 1-20
database maintenance plan, creating 1-8, 1-9, 1-10,
1-11, 1-12, 1-13, 1-14, 1-15, 1-16, 1-17, 1-18,
1-19, 1-20
editing 1-20
SendSuite database maintenance plan 1-13
system maintenance plan 1-9
viewing history 1-20
Database Queries
advanced query 5-19
simple query 5-17, 5-18
Data Mapper 8-3, 8-4, 8-5, 8-6, 8-7, 8-8, 8-9, 8-10, 8-11,
8-12, 8-13, 8-14, 8-15, 8-16, 8-17, 8-18, 8-19,
8-20, 8-21
host file properties 8-4
in settings 8-6
mapping fields 8-14, 8-15
mapping to tblIntlLine 8-18, 8-19
out settings 8-11
running 8-20, 8-21
settings 8-4, 8-5, 8-6, 8-7, 8-8, 8-9, 8-10, 8-11, 8-12,
8-13
Data Visibility 5-6
Discounts
tariff 6-26, 6-27
DSN
creating 8-22, 8-23, 8-24, 8-25
verifying ODBC driver is installed 8-23
Dual Rating 2-21
E
e-Track
data 3-2
tracking shipments 3-2, 3-3
Exporting
reports from crystal reports 4-10
screens 3-40, 3-41, 3-42
F
Field Edit Control 3-45
SVTS9117 Rev. J
SendSuite® Shipping
Administrator Guide
Index • I
G
N
Graphic Labels
file information 7-8
windows font size 7-7
Groups
configuring 5-2, 5-3, 5-4, 5-5, 5-6, 5-7, 5-8, 5-9, 5-14,
5-15, 5-16
importing users to 5-15, 5-16
NAFTA Certificate of Origin 3-14, 3-15, 3-16
I
Importing
Ascent data 8-62, 8-63, 8-64
external reports 4-8, 4-9, 4-10
screens 3-40, 3-41, 3-42
Importing Users 5-15, 5-16
Integration
Data Mapper 8-3, 8-4, 8-5, 8-6, 8-7, 8-8, 8-9, 8-10,
8-11, 8-12, 8-13, 8-14, 8-15, 8-16, 8-17, 8-18,
8-19, 8-20, 8-21
ODBC 8-26, 8-27, 8-28, 8-29, 8-30, 8-31, 8-32, 8-33,
8-34, 8-35, 8-36, 8-37
XML 8-38, 8-39, 8-40, 8-41, 8-42, 8-43, 8-44, 8-45,
8-46, 8-47
Interactive Authentication......See User Authentication
International Documents 3-4, 3-5, 3-6, 3-7, 3-8, 3-9,
3-10, 3-11, 3-12, 3-13, 3-14, 3-15, 3-16, 3-17,
3-18, 3-19, 3-20
certificate of origin 3-11, 3-12, 3-13
commercial invoice 3-7, 3-8, 3-9, 3-10
NAFTA certificate of origin 3-14, 3-15, 3-16
SED 3-17, 3-18, 3-19, 3-20
O
ODBC 8-26, 8-27, 8-28, 8-29, 8-30, 8-31, 8-32, 8-33,
8-34, 8-35, 8-36, 8-37
creating a new ODBC map 8-27, 8-28, 8-29
host field properties 8-32, 8-33
mapping fields 8-31
shipper alerts 2-14
SQL WHERE statement 8-35
toolbar 8-30
Operating system
version compatibility B-2
P
Parcel Tariff
address record 6-3
creating custom tariff from scratch 6-2, 6-3, 6-4, 6-5,
6-6, 6-7, 6-8, 6-9, 6-10
incremental rates 6-10
SCAC code 6-2
tariff setup 6-4, 6-5, 6-6, 6-7, 6-8, 6-9, 6-10
Peripherals, Supported......See Appendix A
Product Data 2-9, 2-10, 2-11
adding 2-9, 2-10, 2-11
international products 2-11
product fields 2-10
PRO Numbers 2-18, 2-19
Purging Database Records 5-34, 5-35, 5-36
empty customer data 5-36
K
Q
Key Exchange......See User Authentication
Queries......See Database Queries
L
R
Logo......See Company Logo
LTL Tariff
address record 6-12
creating custom tariff from scratch 6-11, 6-12, 6-13,
6-14, 6-15, 6-16, 6-17, 6-18
SCAC code 6-11
tariff setup 6-13, 6-14, 6-15, 6-16, 6-17, 6-18
Rate Shop Groups
creating 2-20, 2-21
dual rating 2-21
Remark Codes 2-12
adding 2-12
Reports
custom reports......See Custom Reports
for the shipping workstation 4-11, 4-12, 4-13, 4-14,
4-15, 4-16, 4-17, 4-18, 4-19, 4-20, 4-21, 4-22,
4-23, 4-24
thin client report 4-12, 4-13, 4-14, 4-15, 4-16, 4-17,
4-18, 4-19, 4-20, 4-21, 4-22
exporting a report from crystal reports 4-10
importing external reports 4-8, 4-9, 4-10
running in SendSuite format 4-2
M
Manual Rating 6-41, 6-42, 6-43, 6-44, 6-45, 6-46, 6-47,
6-48, 6-49, 6-50, 6-51
creating 6-44
creating the VB script
associating the VB script 6-49, 6-50
processing shipments with 6-51
SVTS9117 Rev. J
SendSuite® Shipping
Administrator Guide
I-3
I • Index
Restoring the SendSuite Database 1-23, 1-24, 1-25
Routing Instructions
adding a route ID field 2-25
applying 2-24
creating 2-22, 2-23, 2-24, 2-25
setting priority 2-25
S
SCAC......See Standard Carrier Alpha Codes
SED 3-17, 3-18, 3-19, 3-20
SendSuite Desktop
version compatibility B-3
Shipper Alert 2-14, 2-15
creating 2-14
deleting 2-15
Shipper Handling Fees 2-16, 2-17
Shipping Screens 3-21, 3-22, 3-23, 3-24, 3-25, 3-26,
3-27, 3-28, 3-29, 3-30, 3-31, 3-32, 3-33, 3-34,
3-35, 3-36, 3-37, 3-38, 3-39, 3-40, 3-41, 3-42
creating a custom screen 3-21
exporting and importing screens 3-40, 3-41, 3-42
field edit control 3-45
processing events 3-29, 3-30, 3-31, 3-32, 3-33, 3-34,
3-35, 3-36, 3-37, 3-38, 3-39
sub events 3-31
continue on error, toggling 3-30
properties on the defaults tab 3-28, 3-29
Single Sign on 3rd Party......See User Authentication
Single Use Recipients 3-43, 3-44, 3-45
Small Package Manifest
in Task Scheduler 5-28
SQL Server
SQL Server Agent 1-6, 1-7
Standard Carrier Alpha Codes 2-13
Sub-Events......See Shipping Screens
T
Tariffs
absolute minimums 6-32, 6-33
accessorial incompatibility 6-34
accessorials 6-23, 6-24, 6-25
borrowing 6-37, 6-38, 6-39, 6-40
clone a carrier setup 6-37, 6-38, 6-39
create carrier address record 6-39, 6-40
carrier service days 6-28, 6-29
discounts 6-26, 6-27
FAK 6-30, 6-31
label format 6-40
PRO numbers 6-40
rate shop groups 6-40
routing instruction 6-40
temporary increase 6-35, 6-36
tracking numbers 6-40
I-4
Task Scheduler 5-20, 5-21, 5-22, 5-23, 5-24, 5-25, 5-26,
5-27, 5-28, 5-29, 5-30, 5-31, 5-32, 5-33
available tasks 5-20, 5-21, 5-22, 5-23
creating a task group 5-23
adding tasks 5-24
modifying 5-26
running from Windows 5-29, 5-30, 5-31, 5-32, 5-33
small package manifest 5-28
starting 5-26
terminating 5-27
Thin Client Report......See Reports
Tracking Numbers 2-18, 2-19
Transaction Log 1-21
U
Upgrading
version compatibility B-2
User Authentication 5-37, 5-38, 5-39
Users
adding to a group 5-8
assigning individual user rights to 5-9
data visibility 5-6
defaults 5-5
importing 5-15, 5-16
properties and permissions 5-5, 5-6, 5-7, 5-8, 5-9
setting up 5-4
V
VB Script
attaching to an integration map 8-61
attaching to a shipping screen 8-61
importing script 4-23
parsing 8-61
writing 4-23, 4-24
Version compatibility
operating system B-2
upgrading B-2
with SendSuite Desktop B-3
W
Windows Authentication......See User Authentication
X
XML Integration 8-38, 8-39, 8-40, 8-41, 8-42, 8-43, 8-44,
8-45, 8-46, 8-47
File Link 8-55, 8-56
integration in 8-38, 8-39, 8-40, 8-41, 8-42, 8-43, 8-44,
8-45, 8-46, 8-47
host field properties 8-46
mapping fields 8-43, 8-44, 8-45
map settings 8-40, 8-41, 8-42
SVTS9117 Rev. J
SendSuite® Shipping
Administrator Guide
Index • I
integration out 8-48, 8-49, 8-50, 8-51, 8-52, 8-53, 8-54
mapping the fields 8-51, 8-52, 8-53
map settings 8-49, 8-50, 8-51
Z
Zero-Rate Carrier 6-52, 6-53, 6-54, 6-55, 6-56
SVTS9117 Rev. J
SendSuite® Shipping
Administrator Guide
I-5
1 Elmcroft Road
Stamford, Connecticut 06926-0700
www.pb.com
PB Form SVTS9117 Rev. J 12/2010
© 2010 Pitney Bowes Inc.
All Rights Reserved
Printed in the USA
*svTS9117revJ*