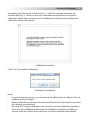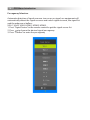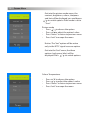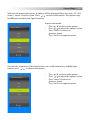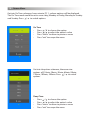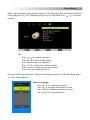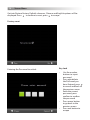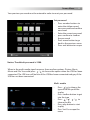
1
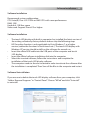
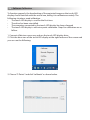
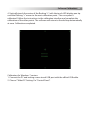
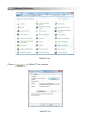
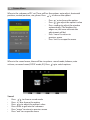
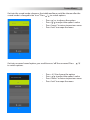
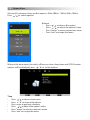
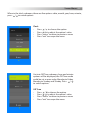
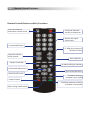
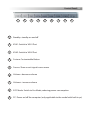
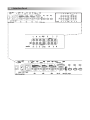
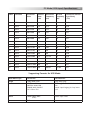
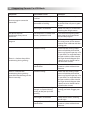
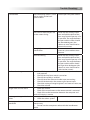
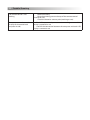
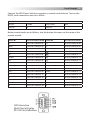
Touch
User Manual
Gen
Please retain this manual properly for future reference
World
ee
Contents
Installation requirements
1
Notes
2-3
Introduction and Features
3-4
Basic Operations
4
Software Installation and Calibration
5-9
OSD Menu Introduction/ Passageway Selection
10
Screen Menu 11 - 25
Remote Control Functions
26
Control Panel
27
Interface Panel
28
PC Mode (VGA Input) specifications / USB Mode
29
Trouble-shooting 30 - 32
Serial Control
33
Installation Requirements 01
The Load-bearing of the mounting rack:
Please choose the rack or sliding saddle specified by the manufacturer. Make
sure that the home-made rack’s bearing capacity and also the bearing capacity of
the support platform, is 4 times more than the actual weight capacity. Keep the LED
Interactive Multi-touch Display stable at all times.
The load-bearing of the mounting surface:
The bearing capacity of the mounting surface needs to be 4 times more than the
actual weight capacity. Make sure that the material of the mounting surface is
stable enough and consists of a strong material.
Heat Dissipation
Cooling Requirements
Nominal Power
Above 100W
The distance from the mounting surface (cm)
Left/ right side
Top
Bottom
Back
10
20
20
10
Tips: Keep the air flowing and make sure that the vent hole area of the top, left/right side
and bottom are no less than 50% of the sealing area, if the LED interactive multi-touch
display will be installed into a wall or box.
02
Notes
Key Notes:
•
•
•
•
•
•
•
•
•
•
•
•
•
•
•
All electronic components should be installed or placed out of children's reach
Do not use other power cords except for what is provided with the screen
Do not attempt to repair anything, without consulting a qualified technician
Make sure the line voltage corresponds to the power of the receiving host
before use. Unplug the receiving host when unused for long periods of time
Must use the three-phase power socket and make sure there is a ground
contact
Do not install or place the device near any heat sources, such as a furnace, heat
transfer tube, power amplifier, etc. Do not expose this device to direct sunlight,
dust and moisture. Do not install the device in any place which may have
mechanical vibrations or could lead to a vulnerable strike. For better
performance, it should be placed far away from high voltage transmission grid,
large metal objects and so-on
Disconnect the power immediately and unplug when there is abnormal sound
or smell in the device. Do not use the device and call the qualified service
personnel for maintenance
There should not be any liquid or other metals in the device. If any, power off
and disconnect the power and call the qualified service personnel
Do not use any chemical reagent for the device’s body cleaning as it may result
in deterioration or damage to the paint. For any dust or dirt, use a warm cloth
and clean it after power disconnected. The IR Touch LED Display should be
gently wiped down with a clean soft cloth, when dirty
Do not turn on and off the device frequently as it will shorten the service life of
the device. Turn on the device three minutes later after a normal power off
Do not set the brightness and contrast ratio to maximum in long term so as to
lengthen the service life of the device
Do not place the device on an unstable stand bracket or desk, or else the
device might tip over and get damaged
Take extra care when moving the device to avoid any damage to the screen
Should follow the operation manual of the manufacturer and install this device
and should only use the accessories for installation recommended by the
manufacturer
The wall mounting of the device is only applicable on a cemented wall, solid
masonry wall and a wood siding wall that could bear more than three times
the weight of the device and should also be good for ventilation. For other
walls such as a Steel structure wall or one with a hollow structure or a glass or
marble wall. The walls ability to bear the device should be analysed to make
sure that there will be reduced risks.
Introduction & Basic Features
03
Introduction
The LED interactive multi-touch display is a multi- function teaching device with
functions of interactive teaching *digital demo *multi-media presentation *touch
control operation and handwriting input. From design and production, it is feature rich and
produced with a focus on the education industry . This device has
the advantages of convenience for observing and operating, all-digital intelligent
control, writing *modifying and deleting freely on the screen with fingers or
light-proof objects. This interactive screen is the perfect device for modernized
interactive education & presenting.
Features:
•
•
•
•
•
•
•
•
•
•
•
•
•
•
•
•
Design specifically for both educational and business interactive presentations
High brightness and contract ratio display and clearly visible in bright light or
indoor and outdoor environment
One key power saving mode (the backlight brightness was lowered and power
saved) when there is a need for low brightness during operation
With advanced IR scanning sensor technology and HID drive free, plug
and play
The graphic processing is based on vector graphics with high compression
and no distortion etc
Multiple pen types, line widths and colours
Strong edit function and supports real-time editing
Multiple backgrounds and supports custom backgrounds, free insert of
figures and images
Intelligent recognition of geometric figures. With features of variety figures
recognition, high discrimination and multi- pen recognition etc
Ink-brush simulation with vigorous and forceful calligraphy
Written documents can be saved as formats in PDF, GIF, PNG, TIFF and BMP etc.
Simulate mouse operation
Dual-point touch and multi- finger roaming
User management with functions of user adding and deleting, user switch over
and user customization etc. This enables the software configuration close to
user’s operation habits
Support other apps
Handwriting English, numbers and special characters recognition
04 Basic Operating
Basic Operations
Power On
•
Power the Touch LED Display with 100~240V 50/60Hz AC
•
Turn on the ship form switch on the bottom of the Touch LED Display (beside
the power interface) to power on (the indicator light is red)
•
Press “Power” on the Touch LED Display or “Standby” on the remote control
to switch on the Touch LED Display (the indicator light is green now). Press
“Computer” to turn on the computer (only applicable to the model with built in
PC.
Power Off
•
•
•
If you want to turn off the touch LED display temporary, press “Power” on
the touch LED display. Press “Computer” on the panel to turn off the
computer when it is in the ON status (only applicable to the model with
built in PC)
If you want to turn off the touch LED display completely, turn off the ship
form switch on the bottom of the touch LED display (beside the power
interface) or unplug the power cord
For the model with built in PC, turn off the PC and disconnect the power
Software Installation
05
Software Installation
Recommend system configuration:
CPU: Inter(R) Core i3 2.27GHz or AMD CPU with same performance
RAM: 1GB
Hard disk: 1GB free space
Video card: Support DirectX 9 or higher
Software Installation
•
•
•
•
•
•
The touch LED display with built-in computer has installed the latest version of
the writing software by factory default and can skip the following steps
HID free drive function is only applicable to Vista, Windows 7 or a higher
version (realize the functions of multi-touch etc.). The touch LED display with
Windows XP version should install/run the software for normal use
Insert the official USB cable into the USB ports of the computer and touch
LED display
Insert the official software installation disk into the computer.
Select the inserted software, follow the instructions and complete the
installation of the touch LED display software
The computer needs to then be restarted in order to activate the software after
the installation is completed. Then Save all the files in the computer and restart
Software Uninstallation
If you are sure to delete the touch LED display software from your computer, click
“Add or Remove Programs” in “Control Panel”. Choose “WPad” and click “Uninstall”
to uninstall.
06 Software Calibration
To function properly, the handwriting of the projected image on the touch LED
display should coincide with the actual one, aiding it to calibrate accurately. The
following situations need calibration.
•
The touch LED display is used for the first time.
•
The drive has been reinstalled.
•
The computer connected to the touch LED display has been changed
•
The touch LED display is with nine-point calibration. Steps for calibration are as
follow:
1. Connect all devices necessary and run the touch LED display drive.
2. Click the drive icon of the touch LED display at the right bottom of the screen and
you can see the following:
3. Choose “9 Points” and click “calibrate” as shown below.
Software Calibration 07
4. Vertically touch the centre of the flashing “+” with the touch LED display pen tip
until the flashing “+” moves to the next calibration point . Thus one point is
calibrated. Follow the instructions in the calibration interface and complete the
calibration of the other points. The software will return to the desktop automatically
at once. Calibration completed.
Calibration for Windows 7 version:
1. Connect the PC and writing screen touch USB port with the official USB cable.
2. Choose “Tablet PC Settings” in “Control Panel”.
08
Software Calibration
Table PC Set
Choose
in Tablet PC Set window.
Table PC Set
Software Calibration
09
Vertically touch the centre of the flashing “+” with the writing screen pen tip
until the flashing “+” moves to the next calibration point and thus one point is
calibrated. Follow the instructions in the calibration interface and complete the
calibration of the other points.
Calibration Interface
Click “Yes” to complete calibration.
Calibration Completed
Notes:
•
For good writing accuracy, you should use the official pen to calibrate. Do not
calibrate with your finger
•
Wrong calibration may lead to the abnormal function of the touch screen and
this requires re calibration
•
Pressing “ESC” during calibration can cancel the current calibration operation
•
There are minor differences between the calibration interfaces of different
version software. Follow the instructions in actual interface and calibrate
10
OSD Menu Introduction
Passageway Selection:
Automatic detection of signal resource: turn on or no signal, our equipment will
automatically detect the signal resource and switch signal resource, the signal list
and the order are as bellow:
VGA 1, VGA2, VGA3, HDMI1, HDMI2, HDMI3.
1. Press “Signal Source” in the remote control to get the signal source list
2. Press
to choose the desired signal passageway
3. Press “Confirm” to enter the passageway
Screen Menu
Press “menu” to display the menu. Press
Picture menu
Sound menu
Time menu
11
to choose a submenu.
Option menu
In the picture menu, we could choose picture mode, colour temperature, aspect
ratio, noise reduction, PC set. Press
to choose the corresponding option.
Picture
•
•
•
•
•
•
Press / to choose picture menu, the options will be different based on the
kind of the signal resource
Press / to choose
Press “confirm” to adjust the option’s value
Press “confirm” to get into submenu
Press “menu” to return to previous menu
Press “exit” to escape the menu
12
Screen Menu
Get into the picture mode menu, the
contrast, brightness, colour, sharpness
and tint will be displayed, you could press
/ to switch options if the mode is set to
“User”.
Picture mode
•
Press / to choose the option
•
Press / to adjust the option’s value
•
Press “menu” to return to previous menu
•
Press “exit” to escape the menu
Notice: The “tint” option will be active
only in the NTSC signal resource option.
Get into the “tint” menu; the three
options (red, green, blue) will be
displayed. Press / to switch options.
Colour Temperature:
•
•
•
•
Press / to choose the option
Press / to adjust the option’s value
Press “menu” to return to previous menu
Press “exit” to escape the menu
Screen Menu
13
When in the aspect ratio menu. 6 options will be displayed They are: auto, 4:3, 16:9,
zoom 1, zoom 2 and Just Scan. Press / to choose the option. The options may
be different based on the signal resource.
Aspect ratio mode
•
Press / to choose the option
•
Press / to adjust the option’s value
•
Press “menu” to return to
previous menu
•
Press “exit” to escape the menu
Get into the submenu of Noise Reduction, you could choose low, middle, high
option, press / to choose the option.
•
•
•
•
Press / to choose the option
Press / to adjust the option’s value
Press “menu” to return to
previous menu
Press “exit” to escape the menu
14
Screen Menu
When in the submenu of PC set. There will be five options: auto adjust, horizontal
position, vertical position, size, phase. Press / to choose the option.
•
•
•
•
•
Press / to choose the option
Press / to adjust the option’s value
Press confirm to adjust the window
automatically (The brighter the
edges are, the more accurate the
adjustment will be)
Press “menu” to return to
previous menu
Press “exit” to escape the menu
When in the sound menu, there will be six options: sound mode, balance, auto
volume, surround sound, SPDIF mode, EQ. Press / to switch options.
Sound
•
Press / to choose sound mode
•
Press / to choose the option
•
Press / to adjust the option’s value
•
Press enter to get into the submenu
•
Press “menu” to return to previous menu
•
Press “exit” to escape the menu
Screen Menu 15
Get into the sound mode submenu, the treble and base could be chosen after the
sound mode is changed to be “user”. Press / to switch options.
•
•
•
•
Press / to choose the option
Press / to adjust the option’s value
Press “menu” to return to previous menu
Press “exit” to escape the menu
Get into surround sound option; you could turn on/ off the surround. Press
to switch options.
•
•
•
•
/
Press / to choose the option
Press / to adjust the option’s value
Press “menu” to return to previous menu
Press “exit” to escape the menu
16 Screen Menu
Get into EQ submenu, there are five options: 20Hz, 500Hz, 1.5KHz, 5KHz, 10KHz.
Press / to switch options.
Balance
•
Press / to choose the option
•
Press / to adjust the option’s value
•
Press “menu” to return to previous menu
•
Press “exit” to escape the menu
When in the time menu, the clock, off time, on time, sleep timer and OSD Duration
options will be displayed, press / to switch options.
Time
•
Press / to choose time menu
•
Press / to choose the option
•
Press enter to get into submenu
•
Press / to adjust the option’s value
•
Press “menu” to return to previous menu
•
Press “exit” to escape the menu
Screen Menu 17
When in the clock submenu, there are five options: date, month, year, hour, minute,
press / to switch options.
Clock
•
Press / to choose the option
•
Press / to adjust the option’s value
•
Press “menu” to return to previous menu
•
Press “exit” to escape the menu
Get into Off Time submenu, hour and minute
options will be displayed, the Off Time mode
could be set as once a day, Monday to Friday,
Monday to Sunday and Sunday. Press
/
to switch options.
Off Time
•
Press / to choose the option
•
Press / to adjust the option’s value
•
Press “menu” to return to previous menu
•
Press “exit” to escape the menu
18
Screen Menu
Get into On Time submenu, hour, minute, PC 1, volume options will be displayed.
The On Time mode could be set as once a day, Monday to Friday, Monday to Sunday
and Sunday. Press / to switch options.
On Time
•
Press / to choose the option
•
Press / to adjust the option’s value
•
Press “menu” to return to previous menu
•
Press “exit” to escape the menu
Get into sleep time submenu, there are nine
options: off, 10min, 20min, 30min, 60min, 90min,
120min, 180min, 240min. Press / to switch
options.
Sleep Time
•
Press / to choose the option
•
Press / to adjust the option’s value
•
Press “menu” to return to previous menu
•
Press “exit” to escape the menu
Screen Menu
19
Within the set menu, there are five options: OSD language, Restore Factory Default,
3D type Bypass, 3D_LR L, Blen ding, Key Lock, Set Password. Press / to switch
options.
Set
•
•
•
•
•
•
Press / to choose set menu
Press / to choose the option
Press enter to get into submenu
Press / to adjust the option’s value
Press “menu” to return to previous menu
Press “exit” to escape the menu
Get into OSD language menu, Chinese and English options will be displayed, press
/ to switch options.
Menu Language
•
Press /
to choose the option
•
Press / to adjust the option’s value
•
Press “menu” to return to previous menu
•
Press “exit” to escape the menu
20
Screen Menu
Get into Restore Factory Default submenu, Chinese and English options will be
displayed. Press
to confirm to reset, press to escape.
Factory reset
Entering the Password to unlock
Key Lock
•
•
•
•
•
Use the number
buttons to input
password
Press to delete
the Password you
have Entered, press
to cancel and back to
the previous menu
Enter the correct
password, press
confirm to confirm
the password
Press menu button
to go back to the
previous menu
Press exit button to
escape
Screen Menu
21
Your previous password must be entered in order to reset your password.
Set password
•
•
•
•
•
Press number buttons to
enter the old password,
new password and confirm
new word
Enter the correct password
press confirm to confirm
the password
Press menu button to go
back to the previous menu
Press exit button to escape
Notice: The default password is 2580.
When in the multi-media signal resource, there are four options: Picture, Music,
Movie and File. You could press / to choose the option when the USB has been
connected. The USB icon will be blue if the USB has been connected and gray if the
USB has not been connected.
Multi- media
•
•
•
•
•
Press / to choose the
type of the file you’d like
to play
Press confirm button to get
into the type
Press
/ /
/
to
choose the file
Press play button to start
to play
Press “exit” to escape the
menu
22 Screen Menu
Get into the picture option. Press / / / to choose the picture, press confirm to
choose play or cancel, press play button to start to play.
Picture
•
•
•
Press display button to show the menu. Press to exit menu
Press / to choose different functions: play/stop, previous
track, next track, cease, circulation mode, turn on/off the
background music, playlist, information, picture rotating
clockwise, picture rotating counterclockwise, zoom in, zoom
out, move
Press exit to quit playing.
Screen Menu 23
Get into music option, press / / / to choose the music. Press confirm button
to choose play or cancel, press play button to play.
Music
•
•
•
Press display to show the action menu. Press to quit
Press / to choose different functions and press confirm to
implement. The functions are: play/stop, rewind, fast forward,
previous track, next track, cease, circulation mode, mute,
playlist, skip
Press exit to quit playing
24 Screen Menu
Get into movie option, press / / / to choose movie, press confirm to choose
play or cancel, press play button to play.
Movie
•
•
•
Press display to show the action menu. Press to quit.
Press / to choose different functions and press confirm to
implement. The functions are: play/stop, rewind, fast forward,
previous track, next track, cease, circulation mode, A-B circle,
playlist, information, slow play, stepping play, skip, zoom in,
zoom out, zoom in/out mode, move, sound track.
Press exit to quit playing.
Screen Menu 25
Get into file option, press
/ / / to choose file, press confirm button to choose
play or cancel, press play button to play.
File
•
•
•
Press display to show the action menu. Press to quit.
Press / to choose different functions and press confirm to
implement. The functions are: play/stop, rewind, fast forward,
previous track, next track, cease, circulation mode, mute,
playlist, skip.
Press exit to quit playing.
26
Remote Control Functions
Remote Control Buttons and Key Functions:
Press this button to
eliminate or restore sound
Switchover between
standby and power on
Show or exit signal
source menu
Customizable Button
FF, REW, play and pause
of audio or video
Adjust the volume
of the speaker
Next media file
Previous media file
up/down/left/right selection
Confirm the selected one
Exit current operation
Enter/Exit OSD menu
Freeze Function
Adjust image automatically
Freeze
Switchover among 3
computer input signals
Switchover between standard
and power saving mode
Control Panel 27
1
2
3
4
5
6
7
8
9
1
Standby: standby on and off
2
VGA1: Switch to VGA1 Port
3
VGA2: Switch to VGA2 Port
4
Custom: Customizable Button
5
Source: Show or exit signal source menu
6
Volume-: decrease volume
7
Volume+: increase volume
8
ECO Mode: Switch to Eco Mode, reducing power consumption
9
PC: Power on/off the computer (only applicable to the model with built in pc)
28
Interface Panel
PC Mode (VGA Input) Specifications 29
Index
Standard
Resolution
Ratio
Refresh
Rate
(Hz)
Horizontal
Frequency
(Hz)
Vertical
Frequency
(Hz)
Horizontal/ Vertical
Sync Plarity
(TTL)
1
VESA
640 x 480
60
31.5
60
N/N
2
VESA
640 X 480
72
37.9
72
N/N
3
VESA
640 X 480
75
37.5
75
N/N
4
VESA
800 X 600
56
35.1
56
P/P
5
VESA
800 X 600
60
37.9
60
P/P
6
VESA
800 X 600
72
48.1
72
P/P
7
VESA
800 X 600
75
46.9
75
P/P
8
VESA
1024 X 768
60
48.4
60
N/N
9
VESA
1024 X 768
70
56.5
70
N/N
10
VESA
1024 X 768
75
60
75
N/N
11
VESA
1280 X 960
60
60
60
N/N
12
VESA
1280 X 960
75
75.159
75
N/N
13
VESA
1280 X 1024
60
64
60
P/P
14
VESA
1280 X 1024
75
80
75
P/P
15
VESA
1600 X 1200
60
75
60
P/P
16
VESA
1920 X 1080
60
66.547
59.988
P/P
Supporting Formats for USB Mode
Multi-Media Type
File Format
File Extension
Image
*Jpeg *BMP *PNG
*jpg *bmp *png
Movie
*MPEG1 *MPEG2
*MPEG4 *H264 *RM
*RMVB *MOV *MJPEG
*VC1 *Divx *FLV
*avi *mpg *dat *vob *div *mov *mkv
*rm
*rmvb *mp4 *mjpeg *ts *trp *wmv
*asf
Music
*WMA *MP3 *M4A
(AAC)
*wma *mp3 *m4a
Text
TXT
.txt
30 Supporting Formats For USB Mode
Symptoms
Presumable Causes
Solutions
The drive is not correctly
installed
Install the drive correctly
The usb port (cable) is not
connected or working
Change a new usb cable to test
or check if the usb port is good
or not
The IR lights are blocked
Make sure there is no obstacles
blocking the IR light covers
The device requires
recalibration every time it
powers on
The computer is installed with
recovery protection card
Turn off the computer protection program and recalibrate
the service program
Incorrect calibration of service
program
Incorrect calibration
Full screen the image with
the auto button in the remote
control. Then calibrate with the
writing pen
Incorrect writing
write with the writing screen
pen and hold the place of the
pen away from the pen tip as far
as possible. The angle between
the pen and the screen should
be larger than 60 degrees (the
sleeves or wrist should not be
closed to the screen).
Strong light source or IR source
interferences
Remote the interferences or
move to a place without interferences
Incorrect writing
Write with the writing screen
pen and hold the place of the
pen away from the pen tip as far
as possible. The angle between
the pen and the screen should
be larger than 60 degrees 9the
sleeves or wrist should not be
closed to the screen)
The covered place is not big
enough as required during
writing or the pen tip is too
tapering.
Change the pen tip or use a
writing pen with a bigger pen
tip
The IR lights are blocked
Check for obstacles, covering
the IR Light
Strong light source or IR source
interferences
Remove the interferences or
move to a place without interferences
Service program cannot be
connected
There is a shake or leap of the
handwriting during writing
There is a break of the
handwriting during writing
(part of the handwriting can be
shown normally)
Trouble-Shooting 31
Cannot Write
No Sound or image
The handwriting colour is smae
with or similar to the background colour
Use the pen with pther colours
The hands or other objects are
on the screen during
Write with the writing screen
pen and hold the place of the
pen away from the pen tip as far
as possible. The angle between
the pen and the screen should
be above 60 degrees (the
sleeves or wrist should not be
close to the screen)
Strong light source or IR source
interferences
Remove the interferences or
move to a place without interferences
Incorrect Writing
Write with the writing screen
pen and hold the place of the
pen away from the pen tip as far
as possible. The angle between
the pen and the creen should
be larger than 60 degrees (the
sleeves or wrist should not be
sclose to the scrreen)
1.
2.
3.
4.
5.
6.
7.
Check if the power cable is connected to the power socket
and powered
Check if the ship form switch is turned on
Check if the standby is enabled
Check if the of the video and audio input are working
Check if the device has the correct signal source input
Check the setting of image brightness and contrast ration, etc
Check the volume
Image works but no sound
1. Check the volume
2. Check if the mute button on the remote control is activated
3. Check if the audio connection between the computer and
touch LED display is correct
No image or image is black and
white
1.
2.
No image or the sound is
interfered
1. Find out the interference devices around the LED display and
move it away
2. Do not use the same power socket with the interferences
device
Adjust the colour setting
Check the colour system
32 Trouble-Shooting
The remote control is not
working
1. Check the battery
2. Clean the emitting port on the top of the remote control
(covered or not)
3.
Check the batteries contact point (working or not)
Computer can not be turned
on (only for the model with
computer inside)
1. Check if the power adapter connection working or not and the
device is powered or not
2. Check if the connection between the computer and touch LED
display is correct or not
Serial Control 33
Connect the RS232 port with the computer or central control device. Turn on the
RS232 serial connection and set as follow:
Port: COM1 (set according to the port of the computer or central control device)
Bit rate:
19200
Parity Check:
NON
Data bit:
8
Stop bit:
1
Button control codes are as follows, also the button functions are the same as the
remote control:
Power On
99 A2 B3 C4 02 ff 01 00
Power Off
99 A2 B3 C4 02 ff 01 01
V-:
99 A2 B3 C4 02 ff 01 0C
V+:
99 A2 B3 C4 02 ff 01 0D
Mute:
99 A2 B3 C4 02 ff 01 02
P-:
99 A2 B3 C4 02 ff 01 0E
TV:
99 A2 B3 C4 02 ff 01 03
P=:
99 A2 B3 C4 02 ff 01 0F
PC:
99 A2 V3 C4 02 ff 01 04
:
99 A2 B3 C4 02 ff 01 10
AV:
99 A2 B3 C4 02 ff 01 06
:
99 A2 B3 C4 02 ff 01 11
HDMI1:
99 A2 B3 C4 02 ff 01 07
:
99 A2 B3 C4 02 ff 01 12
OK:
99 A2 B3 C4 02 ff 01 08
:
99 A2 B3 C4 02 ff 01 13
Multi-media:
99 A2 B3 C4 02 ff 01 09
Menu:
99 A2 B3 C4 02 ff 01 14
Still:
99 A2 B3 C4 02 ff 01 0A
Auto:
99 A2 B3 C4 02 ff 01 15
Input:
99 A2 B3 C4 02 ff 01 0B
S_Video:
99 A2 B3 C4 02 ff 01 16
Exit:
99 A2 B3 C4 02 ff 01 05
YPbPr:
99 A2 B3 C4 02 ff 01 17
1:
99 A2 B3 C4 02 ff 01 18
2:
99 A2 B3 C4 02 ff 01 19
3:
99 A2 B3 C4 02 ff 01 1A
4:
99 A2 B3 C4 02 ff 01 1B
5:
99 A2 B3 C4 02 ff 01 1C
6:
99 A2 B3 C4 02 ff 01 1D
7:
99 A2 B3 C4 02 ff 01 1E
8:
99 A2 B3 C4 02 ff 01 1F
9:
99 A2 B3 C4 02 ff 01 20
0:
99 A2 B3 C4 02 ff 01 21
LED Interactive
Multi-Touch Display
RS-232 Port Definition:
Gen
World
ee
Leaders In Learning Technology
Genee World
PO Box 3256
Wolverhampton
WV3 0LA
Sales Tel: 0870 386 1900
Fax: 0870 405 0188
Email: [email protected]
Web: www.geneeworld.com