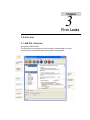
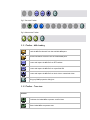
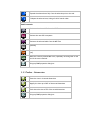
1
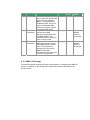
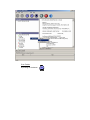
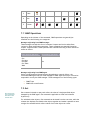
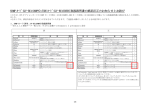
Blackowl – MIB Browser
User Guide
Asclep Communications
Copyright © 2006, Asclep Communications
All rights reserved.
USER MANUAL
Software Version 1.0 (Windows)
Software Version 1.0 (Linux)
(Document Version: 1.00)
Document published on Thursday, 18 September 2003
Disclaimer
Blackowl- MIB Browser User Guide, Version 1.0
18/Sep/03
Notice
© 2003 Asclep Communications. All rights reserved.
No part of this publication shall be reproduced or transmitted in any form or by any
means, electronic or mechanical, for any purpose, without prior written permission
from Asclep Communications. The information in this publication and the product it
describes are subject to change without notice. The software program described in this
publication is provided to its users pursuant to a license agreement or nondisclosure
agreement. Such software program may only be used, copied or reproduced pursuant
to the terms of such agreement. This publication does not contain or represent any
commitment of any kind on the part of Asclep Communications.
Important: You should carefully read the license terms and conditions noted in the
Asclep Communications website before you download / use the product. If you do not
agree with the terms and conditions, you should promptly cease using the product and
remove from deployed machines.
Disclaimer
Asclep Communications makes no representation or warranties other than the standard
warranty with regard to the contents of this manual or the suitability of this software
product for any particular purpose. Therefore, Asclep Communications assumes no
liability for damages incurred directly or indirectly from errors, omissions or
discrepancies between the software and this manual.
Asclep Communications has made every effort to ensure that the information contained
in this document is accurate. However, we accept no responsibility for any errors or
omissions, and we reserve the right to modify design, characteristics and products at
any time without obligation.
For the most recent version of this spec sheet, please go to the Asclep Communications
Web site at http://www.asclep.com. In case of discrepancy, the Web version takes
precedence over any printed literature. All names, trademarks, products and services
mentioned are registered or unregistered trademarks of their respective owners.
Trademarks
Asclep, the Asclep LOGO, Blackowl, Blackowl – MIB Browser and Blackowl-RT Manager
are registered trademarks of Asclep Communications in the United States and other
countries.
Java, JavaScript, and Sun are registered trademarks of Sun Microsystems, Inc.
Microsoft and Windows are registered trademarks of Microsoft Corporation.
All other trademarks or registered trademarks are properties of their respective
owners.
Table of Contents
preface
BACKGROUND ...............................................................................................................................6
BACKGROUND ...............................................................................................................................7
Introduction...............................................................................................................................7
About the Company...................................................................................................................7
Contact Information..................................................................................................................8
ABOUT THE PRODUCT ....................................................................................................................9
Product Description..................................................................................................................9
About this manual ...................................................................................................................10
Requirements...........................................................................................................................11
SETTING UP ................................................................................................................................13
1.0 OVERVIEW .............................................................................................................................13
1.1 INSTALLATION INSTRUCTIONS................................................................................................13
1.1.1 Launching the Installer ..................................................................................................13
1.1.2 Selecting the Installation Folder ....................................................................................14
1.1.3 Selecting the Application Shortcut .................................................................................15
1.1.4 Confirming the Selected Options....................................................................................16
STARTING UP .............................................................................................................................18
2.0 OVERVIEW .............................................................................................................................18
2.1 STARTING UP .........................................................................................................................18
2.1.1 From Blackowl-RT Manager .........................................................................................18
2.1.2 Standalone version .........................................................................................................18
2.2 OS SPECIFIC STEPS ................................................................................................................18
2.2.1 Windows OS ...................................................................................................................18
2.2.2 Linux OS.........................................................................................................................18
2.3 TYPES OF LICENSE .................................................................................................................19
2.4 THIRD PARTY SOFTWARES......................................................................................................19
FIRST LOOKS..............................................................................................................................20
3.0 OVERVIEW .............................................................................................................................20
3.1 MIB GUI -OVERVIEW ............................................................................................................20
3.2 TOOLBAR ...............................................................................................................................21
3.2.1 Toolbar - MIBs Loading.................................................................................................22
3.2.2 Toolbar – Tree view .......................................................................................................22
3.2.3 Toolbar - Schema view...................................................................................................23
3.3 ICONS & GLYPHS ...................................................................................................................24
3.3.1 Tree view ........................................................................................................................24
3.3.2 Schema view...................................................................................................................24
3.4 MENU BAR .............................................................................................................................24
3.4.1 File Menu .......................................................................................................................24
3.4.2 Edit Menu.......................................................................................................................25
3.4.3 View Menu......................................................................................................................26
3.4.4 Command menu..............................................................................................................27
3.4.5 Help menu ......................................................................................................................27
FIRST STEPS................................................................................................................................30
4.0 OVERVIEW .............................................................................................................................30
4.1 CONFIGURING NET ACCESS ...................................................................................................30
4.2 CONFIGURING PROTOCOLS & PROPERTIES .............................................................................31
4.2.1 Invoking the Configuration Dialog ................................................................................31
4.2.2 Basic settings..................................................................................................................32
4.2.3 SNMP v1 Settings...........................................................................................................33
4.2.4 SNMP v2c Settings .........................................................................................................34
4.2.5 SNMP V3 Settings ..........................................................................................................36
4.3 CONFIGURING SNMP V3 PROFILES .......................................................................................38
4.3.1 Add Profile .....................................................................................................................38
4.3.2 Delete Profile .................................................................................................................38
4.3.3 Edit Profile.....................................................................................................................38
LOADING MIBS ..........................................................................................................................39
5.0 OVERVIEW .............................................................................................................................39
5.0.1 MIB sources ...................................................................................................................39
5.1 LOCAL NETWORK ..................................................................................................................40
5.2 IETF WEBSITE .......................................................................................................................42
5.3 VENDOR SITES........................................................................................................................44
FIRST VIEWS ..............................................................................................................................47
6.0 OVERVIEW .............................................................................................................................47
FIRST ACTIONS..........................................................................................................................48
7.0 OVERVIEW .............................................................................................................................48
7.1 SNMP OPERATIONS ...............................................................................................................49
7.2 GET ........................................................................................................................................49
7.3 GET NEXT ..............................................................................................................................51
7.4 GET BULK ..............................................................................................................................51
7.5 GET TABLE ............................................................................................................................51
7.6 WALK ....................................................................................................................................52
7.7 SET.........................................................................................................................................53
Preface
Background
Introduction
MIB is a database of managed objects accessed by network management protocols. An
SNMP MIB is a set of parameters which an SNMP management station can query or set in
the SNMP agent of network devices such as routers, hubs, modems, switches and
printers.
Standard minimal MIBs have been defined, and many hardware (and certain software,
e.g. DBMS) providers have developed private MIBs in ASN.1 format allowing them to be
compiled for use in a Network Management System. In theory, any SNMP manager can
talk to any SNMP agent with a properly defined MIB.
With the introduction and standardization of SNMP as the de facto management
protocol, vendors of network firmware provide the Management Information Base (MIB)
for their network devices.
Discovery and analysis of configuration data accessible from MIBs is challenging in view
of the rich and in-depth statistics for developing and managing SNMP agents based
solutions in corporate networks.
Blackowl-MIB is a visual MIB browser capable of multiple-querying network components
to discover data on their structure, status and errors. Discovered data is visually
profiled in a uniquely designed schema view, in addition to traditional tree views.
About the Company
Asclep congratulates you on having chosen a new generation MIB browser.
Blackowl-MIB is a visual MIB browser capable of multiple-querying network components
to discover data on their structure, status and errors. Discovered data is visually
profiled in a uniquely designed schema view, in addition to traditional tree views.
Asclep Communications is a privately owned software development company.
Established in 2002 and promoted by NRIs, Asclep specializes in next generation
network management solutions for enterprises and OEM network element vendors. A
précis on Asclep, its core competencies and product-mix can be found at
www.asclep.com.
Asclep's vision is to become the market leading vendor offering next generation
communication and networking management solutions which span a spectrum of
infrastructure resources and enterprise assets at competitive price points.
Asclep offers highly productive and cost-effective products and services to OEM vendors
and developers of network management solutions, which will result in getting their
products to market at reduced cost and minimized time.
Asclep offers suitably customized and competent services that result in enhancement
of competitive advantage of our customers. Asclep leverages on its technical expertise
and domain knowledge to custom-configure and meet the exact needs of our customers
so that we could assist them in developing high quality solutions within stipulated
timeframe and specified resources.
Contact Information
To learn more about Asclep Communications and our network management solutions,
contact us via e-mail at [email protected], on the Web at www.asclep.com, or at the
following location:
Asclep Communications
3/480, 2nd street
Sri venkateshwara nagar
Kottivakkam
Chennai - 600 041
Ph: 91-44-24 510 788 (INDIA)
About the product
Product Description
Benefits
•
Visual Identification / Depiction
Find out what MIBs and OIDs are supported on a particular device -at a glancefrom the distinct schema view.
•
Monitor & Mange Remote SNMP devices
Any SNMP-instrumented utility or device can be quickly configured and
controlled from a central graphic console. Find out what MIBs and OIDs are
supported on a particular device.
•
Test / Debug SNMP agents
Get down to the packet level transmission of SNMP devices to capture data for
developing, testing and debugging. Track changes in values of various MIB
counters in a simple table for troubleshooting.
An integrated Trace Console displays SNMP messages passed between MIB
Browser and managed devices. Output from Trace window can be configured to
show messages in raw hexadecimal format and decoded, human-readable
format. Trace console output is useful for debugging when developing an SNMP
agent and for stress-testing and troubleshooting problems.
•
Simplified Operations
SNMP agents in the network can be automatically discovered and profiled.
SNMP-compliant MIB documents can be automatically parsed to create an
integrated MIB database.
Features
•
Easy-to-use Graphical Interface
All actions are wizard driven. Context-sensitive help is available for all
interactive elements. Extensive support for drag-n-drop is implemented
throughout the GUI to make all monitoring and managing of SNMP-aware
devices in an intuitive, efficient manner.
Instead of the unwieldy side-by-side comparison of MIBs to assess
dependencies, Blackowl-MIB has an integrated Schema view to perform visual
comparison at a glance.
•
Dynamic Loading & Updating
MIBs can be loaded as needed and unloaded dynamically. The browser instantly
reconfigures the database and refreshes the visuals. System MIBs can be viewed
and updated to effect any desired changes in the user description fields such as
Location and System name.
•
SNMP agents in the network can be automatically discovered and profiled.
•
•
Compliance with Industry Standards
Protocols supported:
SNMPv1, SNMPv2C, and SNMPv3
Operations supported:
SNMP Set, SNMP Get, SNMP GetNext, SNMP
GetBulk and Capture SNMP Traps and SNMP
Inform packets
Export of MIB definitions:
HTML, XML
Syntax Supported:
SMIv1 and SMIv2
Complete Customization Configurability
Results of a SNMP query or details from MIBs can be selectively displayed to
reduce the visual clutter and focus on only needed information. A userconfigurable combination of properties can be chosen from OIDs, OID Status,
OID settings, Index, Status, Access, Type, Value, Description, Raw Value and
Raw description.
•
Visual Monitor
Internal activity status and resource utilization are visually represented by
built-in graphical report generation wizards.
About this manual
This manual describes the concepts underlying Blackowl-MIB's user interface and details
how developers can take advantage of Blackowl-MIB's rich user interface component
library. Developers looking to configure and control SNMP=enabled network devices
using the visual MIB browser should read this document.
This manual contains guidelines for performing the basic operations that can be carried
out by Blackowl-MIB. It is assumed that user is familiar with well known GUI windowing
environment and skilled at recognizable common operations such as choosing menus,
accessing context sensitive menu items, drag-n-drop actions and mouse movements.
Blackowl-MIB is designed with nifty user interaction features, and flexibility to offer
multiple ways to perform same action.
Invoking an action can be done by any of the following options:
• From the menubar or sub-menubar items
• From context sensitive menus
• From accelerator keys
• From toolbar
In this manual, the access to most of the operations is described through the use of
menu commands. However, you can also use any of the above-mentioned shortcuts,
when they are available.
Requirements
Hardware Requirements
CPU Pentium 500 MHz or higher is recommended
Memory 256 MB RAM (512 MB or higher recommended)
Disk Space 50 MB
Color Monitor
CD-ROM Drive - For accessing manuals and demo projects
Network Connection - Network card or modem For accessing and downloading vendor-specific or proprietary MIB files or
from the IETF site.
Operating System Requirements
Solaris 2.6, 7, 8
HP-UX 11.0
Windows NT, 2000, XP
AIX 4.3.3
Linux
Mac OS X
Software Requirement
JDK 1.5
Part
Getting
This section covers
•
Setting up Blackowl-MIB
Chapter
1
Setting Up
1.0 Overview
This chapter presents the initial steps needed to install Blackowl-MIB and explains the
procedures involved in configuring the various options for a successful installation and
running the application.
1.1 Installation instructions
1.1.1 Launching the Installer
EXE File: If you have the installation file in exe format, double-click that file. This will
launch the installer.
The installer takes the user through a step-by-step approach. The installer provides
options for the user to choose the destination folder where the application should be
installed and the desktop shortcut icons to launch the application once installed.
If user clicked the
‘Install’ button, user
can no longer modify
any values nor can
navigate.
User can navigate between the screens of the installer by clicking ‘Next’ and ‘Previous’
buttons at the bottom. This provides the user to modify his preferences at any time.
User can also at anytime cancel the installation by clicking the ‘Cancel’ button. This
will abort the installation.
When the installer starts, user will be presented with a welcome screen as shown
below:
On clicking ‘Next’ button, user is presented with the option of choosing the destination
folder where the application should be installed.
1.1.2 Selecting the Installation Folder
User can select the destination folder in two ways as described below:
•
User can directly enter the name of folder in the text field.
•
By clicking ‘Choose…’ button, a file explorer dialog box opens. User can select
the preferred folder from the dialog box.
If user wants to retain the default folder option, clicking the ‘Restore Default Folder’
button will restore the default value in the text box.
On clicking ‘Next’ button, user is presented with the option of choosing the shortcuts
for launching the application.
1.1.3 Selecting the Application Shortcut
User can choose one among the various options listed below for the shortcut for the
application launcher:
•
•
•
•
•
Start Menu
New Program Group
Existing Program Group
Desktop Icon
Quick Launch Icon
User can select only one option as the installer does not support selection of multiple
options. Alternatively user can also decide to not to create any icons for the
application launcher.
User can also decide to create icons only for the current user or for all users by
selecting the checkbox ‘Create Icons for all users’.
1.1.4 Confirming the Selected Options
Having chosen the required information for installation, user is now presented with a
screen capturing the options chosen in the previous screens. If user wants to modify
any values, user can go back by clicking the ‘Previous’ button.
When user is satisfied with the options chosen, user can start the installation process
by clicking ‘Install’ button.
Chapter
2
Starting Up
2.0 Overview
2.1 Starting Up
2.1.1 From Blackowl-RT Manager
In its simplest form, starting up Blackowl-MIB is easier, when it is invoked from inside
the integrated Blackowl SNMP suite. With a host of related functional modules,
Blackowl-MIB can be found and invoked from the available tools list.
If Blackowl-MIB is purchased separately from other modules, no extensive configuration
is needed to integrate with and configure from the Blackowl-RT Manager. Blackowl-MIB
is hot-pluggable and self-configurable.
2.1.2 Standalone version
Standalone version of Blackowl-MIB is invoked by clicking the shortcut option chosen
during installation. The procedure is similar in both windows and Linux Operating
systems.
2.2 OS Specific Steps
2.2.1 Windows OS
Launch Blackowl-MIB by clicking on the icon on your desktop or selecting from the Start
menu depending on the options you have provided during installation. In windows,
there will not be any console by default when the program starts up.
2.2.2 Linux OS
Launch Blackowl-MIB by clicking on the icon on your desktop or selecting from the Start
menu depending on the options you have provided during installation.
2.3 Types of License
This program is freeware and released under the GNU General Public License.
2.4 Third party softwares
This product includes software developed by JFreeChart.org. Copyright © 2005-2006
http://www.jfree.org/
This product includes software developed by Apache Software Foundation. Copyright ©
2002-2006 http://www.apache.org/
This product includes software developed by JGraph. Copyright © 2000-2006
http://www.jgraph.com/
This product includes software developed by JUnit. Copyright © 2001-2006
http://www.junit.org
This product includes itext-1.2 software developed by Bruno Lowagie. Copyright ©
1999-2006 http://www.lowagie.com
This product includes software developed by Westhawk. Copyright © 2005
http://snmp.westhawk.co.uk
This product includes software developed by Sun Microsystems, Inc. Copyright © 19942006
Chapter
3
First Looks
3.0 Overview
3.1 MIB GUI -Overview
Navigating in Blackowl-MIB
The following picture displays the initial window of Blackowl-MIB on startup.
Key features of the Blackowl-MIB program window are annotated.
Features
Description
Menu Bar
Contains main Blackowl-MIB menu names. Choose a menu
name to display a drop-down list of commands
Toolbar
Major oft-repeated actions are accessible from the toolbar
buttons. You can speed up your work by using command
buttons located on the toolbar.
Tab Views
You can move from one Blackowl-MIB view to another by
clicking a tab.
Status Bar
Displays the current date and time as well as information
about the selected command,
It also shows context-sensitive help messages.
Available MIBs Pane
Lists MIB files available in the local folder. These are xml
files.
Loaded MIBs Pane
Lists MIB files loaded into the Blackowl-MIB from the MIBDIR
folder.
RFC Tab
Displays in a scrollable text window RFC specific contents of
MIB file selected in the available MIBs pane.
Text Tab
Displays in a scrollable text window all textual contents of
MIB file selected in the available MIBs pane.
MIB Tab
Brings up the available & Loaded MIBs pane. For loading and
viewing contents of MIB files.
Tree Tab
Brings up the tree view , which traverses the contents of an
MIB file based on the OID hierarchy and displays results in a
tree view. User can carryout all SNMP commands from here.
Schema Tab
Shows the Schema view, which is an alternative to the tree
view. Unique to the Schema view are visual representation
of dependency relationships among objects, which are not
readily seen from the traditional tree views.
3.2 Toolbar
Blackowl-MIB's toolbar is designed to be clean and uncluttered to provide quick and
easy access to most common and frequently performed operations. When a user
changes views by clicking on any of the 3 bottom tabs (MIB,Tree, Schema), depending
on the context, only pertinent buttons specific to the particular context are shown to
the user in a logically grouped fashion.
There are 3 toolbars in Blackowl-MIB as shown below:
Fig 1 MIBs Loading Toolbar
Fig 2 Tree view Toolbar
Fig 3 Schema view Toolbar
3.2.1 Toolbar - MIBs Loading
Load the MIB file selected from the available MIBs pane.
Unload the MIB file selected from the Loaded MIBs pane.
Locate and import the MIB file from IETF website
Locate and import the MIB file from a specified URL
Locate and import the MIB file from local drive or networked drives
Brings up SNMP properties dialog box
3.2.2 Toolbar – Tree view
General
Combines the loaded MIBs to present a unified view
Shows loaded MIBs as separate trees
Expands the selected tree fully from the selection point to the end.
Collapses the selected tree, hiding all child/ branch nodes
SNMP Commands
Retrieves the selected OID from the MIB Tree item
Retrieve the next OID in sequence
Retrieves the selected table from the MIB Tree
[Getbulk]
[set]
Walks the currently selected MIB Tree, repeatedly retrieving OIDs till the
end of the tree is reached.
Brings up SNMP properties dialog box
3.2.3 Toolbar - Schema view
Shows the view in its actual dimensions
Magnify the view up to 300% of the actual dimensions
Scale down the view to 25% of the actual dimensions
Brings up SNMP properties dialog box
3.3 Icons & Glyphs
3.3.1 Tree view
scalar
column
table
node
Row/entry
3.3.2 Schema view
Access key or linker connecting two classes.
The connected classes are related to each other by
way of Association.
The two classes are related to each other by way
of Aggregation. The class to which the diamond
points to acts as the “Whole” and the other class
to which the arrow head points to acts as a
“Component”.
The two classes are related to each other by way
of Inheritance. The class to which the arrow points
to serves as the base class and
characteristics/values of this class are extended
and used by the other class from which the arrow
line starts.
3.4 Menu Bar
The menu bar is available at all times in Blackowl-MIB, under title bar. The menu bar
provides an always-available access mode to all commands, irrespective of the
context/ view the user is in. All commands can be invoked by a few clicks to execute
operations as needed. Related commands are grouped and available as sub-menu
items.
3.4.1 File Menu
File related operations and closing Blackowl-MIB can be performed using menu items
available under File menu.
Import Submenu Options
From local sources...
Imports the selected file from either the current system or from one of the networked
drives, accessible via the local network, and saves it , by default, in the MIBDIR folder.
From IETF...
Imports MIB file using the specified RCF number from www.ietf.org and saves it in text
format by default, in the MIBDIR folder.
From URL...
Imports MIB file from the indicated URL and specified name. This command is useful,
when a proprietary or vendor supplied MIB needs to be downloaded from known sites or
fileservers. The MIB file, when fetched from the specific source is saved in text format
by default, in the MIBDIR folder. Both http and ftp protocols are supported.
Save as xml
Saves a copy of the selected MIB file in XML format in user-specified location.
Load MIB
Loads the selected MIB for managing SNMP commands and analyzing the results
Unload MIB
Unloads the MIB and cleans the views as needed. The unloaded file will still be
available and can be loaded later, if needed.
Exit
Closes Blackowl-MIB and exits.
3.4.2 Edit Menu
Specifying default settings and modifying protocol specific properties can be performed
using menu items available under Edit menu.
Properties
Basic Settings
SNMP V1 Properties
SNMP V2c Properties
SNMP V3 Properties
Preferences
SNMP Preferences
Default protocol
Default Host
Net Connection
Specify Proxy Details
3.4.3 View Menu
Operations related to different display options based on action contexts (loading MIBs,
traversing hierarchies/Issuing SNMP commands and studying relations among MIBs) can
be performed using menu items available under View menu.
Main view
[Contents as RFC] - Shows RFC specific contents of selected MIB file
[Contents as text] - Shows all textual contents of selected MIB file
Tree view
[As a single tree] - Shows in a unified view of all loaded MIBs
[Individual trees] - Shows loaded MIBs as separate trees
[Expand Nodes] - Expands the selected tree from the selection point to its end.
[Collapse Nodes] - Collapses the selected tree, hiding its child/ branch nodes
Schema View
[Zoom in] - Shows the magnified view of schema of MIB in increments of 1.5 X
[Zoom out] - Scales down the view of schema of MIB in decrements of 0.67 X
[Normal size] - Shows the view in its actual dimensions
[Show Status bar] - Toggles the display of Status bar
[Show Tool Bar] - Toggles the display of Tool bar
[Show Taskpane] - Toggles the display of task pane
3.4.4 Command menu
Basic SNMP dataset operations such as retrieving and modifying SNMP values can be
performed using menu items available under Command menu.
Get
Retrieves the selected OID from the MIB Tree item
Get Next
Retrieves the next OID in sequence
Get Bulk
Retrieves a sizeable set of data from typically large tables.
Get Table
Retrieves the selected table from the MIB Tree.
Set
Modifies the data for one or more MIB variables
Walk
Walks the currently selected MIB Tree, repeatedly retrieving OIDs till
the end of the tree is reached.
3.4.5 Help menu
Contents
By pressing the key F1, one can see the built-in help manual from the help viewer as
shown below:
By selecting the relevant hyperlink from the help manual, one can get detailed
explanation for any item.
What's This Help
Provides context specific help and information on the widget clicked on.
About Blackowl-MIB
If a user needs more information, help or clarifications, this message box presents him
the contact points such as [email protected] or Asclep Communication’s website. Based
on the need, the default mail client or browser can be invoked from this message box
itself, without quitting or switching the application.
Further, this message box provides specific information regarding the version of the
Blackowl-MIB being used, License key, Expiry date, in case of Trial license.
There is a Tech Details button conveniently placed at the bottom of this message box
so users can have a one click access to Blackowl-MIB specific page on Asclep
Communication’s website, where more details and links to further resources are
available.
Chapter
4
First Steps
4.0 Overview
4.1 Configuring Net Access
Blackowl-MIB automatically detects and uses the configuration settings, if the
workstation is setup to connect directly to the internet. It is also possible to preconfigure Blackowl-MIB to use a specific access profile, by specifying appropriate
values in Edit | Preferences -Net Connection.
In cases where the system connects to the net through a proxy or multiple connection
profiles configured for net access, Blackowl-MIB presents the dialog box shown below:
By configuring the IP address of the desired proxy server and the specific port number,
Blackowl-MIB is net-enabled. These settings can later be changed from invoking the
configuration options from Edit | Preference menu.
4.2 Configuring protocols & Properties
Blackowl-MIB supports all three commercially prevalent versions of SNMP protocol.
•
•
•
SNMPv1
SNMP V2C
SNMP V3
Any of these protocols can be used in Blackowl-MIB to access and manage a SNMPinstrumented network device, which are abstracted and available from a SNMP agent.
Depending on the specific protocol supported by the SNMP agent, Blackowl-MIB needs
to be configured accordingly.
Configuration of SNMP properties comprises two parts:
• Basic settings
• Protocol specific settings
4.2.1 Invoking the Configuration Dialog
User can select the relevant option from the Edit menu as shown here:
Alternatively user can click on the toolbar button
to invoke the dialog box.
4.2.2 Basic settings
There are three prerequisite parameters that are common to all three versions of the
SNMP protocol.
•
•
•
Trap port
Timeout
Retries
S.No
Parameter
Description
Unit
1
Trap port
Integer
2
Timeout
This parameter specifies the
port at which the SNMP
manager listens for unsolicited
messages sent by any SNMP
agents. Such unsolicited
messages can be in the form of
either SNMP traps or SNMP
inform notifiers.
This parameter controls the
time duration during which
Blackowl-MIB awaits the
response from a SNMP agent.
This parameter is specified in
seconds. Once the specified
timeout value is elapsed,
Default
Value
162
Seconds
5
Other
Options
3
Retries
Blackowl-MIB either repeats
the query or cancels the action
as indicated by the value of
Retries parameter.
This parameter specifies the
number of times Blackowl-MIB
should repeat querying the
SNMP agent in case of
timeouts. This parameter is
specific in non-negative integer
values.
Integer
0
4.2.3 SNMP v1 Settings
This section describes settings that need to be specified for configuring the SNMP v1
protocol, in addition to the configuration of basic parameters as described in the
preceding section.
There are 3 settings specific to SNMP v1:
•
•
•
SNMP port
Get Community
Set Community
S.No
Parameter
Description
Unit
Other
Options
Integer
Default
Value
161
1
SNMP Port
2
Get
Community
3
Set
Community
This parameter specifies the
port to which the remote SNMP
agent listens for messages /
queries / commands sent by
the Blackowl-MIB. This port is
used by the Blackowl-MIB to
transmit and receive requests
to managed SNMP agents.
This parameter is specified for
data retrieving SNMP
operations such as SNMP GET
and SNMP GETNEXT. Get
community values are input in
terms of string format.
This parameter is specified for
SNMP operations for creating
and modifying SNMP variable
values. This parameter is
relevant only in the case of
SNMP SET operation.
SetCommunity values are input
in terms of string format.
String
public
Any userdefined
values of
string type.
String
private
Any userdefined
values of
string type.
4.2.4 SNMP v2c Settings
This section describes settings that need to be specified for configuring the SNMP v2C
protocol, in addition to the configuration of basic parameters as described in the
earlier sections.
SNMP V2C protocol, like SNMP v1, uses the concept of 'community' strings to establish a
trusted data exchange mechanism between SNMP agent and SNMP manager. Thus,
specifying SNMP port and community related settings - Get community and set
Community- are equally applicable to SNMP v2C. These settings can be modified in an
identical manner discussed in the preceding section on SNMP v1.
In addition, SNMP v2c allows retrieval of SNMP table in large chunks through SNMP Get
BULK operation. This command is enabled by specifying two settings as follows:
• Non-repeaters
• Max repetitions
S.No
Parameter
Description
Unit
1
Nonrepeaters
Integer
2
Maxrepetitions
This parameter indicates to the
SNMP GET BULK request the
number of objects to retrieve
from the start, with a simple
getnext operation. This
parameter is specified in nonnegative integer values.
This parameter specifies the
no. of SNMP Get NEXT
operations the Blackowl-MIB
should attempt for retrieving
the remaining objects from the
lexicographical order. This
parameter is specified in nonnegative integer values.
Default
Value
0
Integer
50
Other
Options
4.2.5 SNMP V3 Settings
This section describes settings that need to be specified for configuring the SNMP v3
protocol, in addition to the configuration of basic parameters as described in the
earlier sections.
For all practical purposes from the standpoint of SNMP commands, SNMP v3 is no
different from its two predecessors. The singular exception is that SNMP v3 supports
strong authentication features and private communication mechanism between
managed objects.
Thus basic settings and SNMP v2c related settings are applicable to SNMP v3. These
settings can be specified in an identical manner discussed in the preceding section on
SNMP v2c.
The new features, authentication and private communication are implemented in SNMP
v3 based on User Based Security Model (USM) through specified and approved useraccess profiles. A profile typically consists of the following parameters:
•
•
•
User Name
Profile Type
Authentication Data
•
•
•
Privacy Data
Target Host
SNMP Port
S.No
Parameter
Description
Unit
1
User Name
String
2
Profile
Type
This parameter is specified in
strings and accepts any user
defined strings composed of
alpha-numeric characters.
Choosing a dropdown value for
this parameter determines the
security level for a given
profile. The security level is
composed of two elements and
can have a value equal to any
one of the following
combinations of authentication
and privacy types:
Default
Value
Null
No
Authent
ication
- No
Privacy
No Authentication - No Privacy
Authentication - No privacy
Authentication - Privacy
Margin notes for
MD5
3
Authentica
tion
Protocol
Margin notes for
SHA
While the first option has no
security, the last choice offers
stronger security combination.
This parameter is available
when profile type is chosen to
be either Authentication - No
privacy or Authentication Privacy. This parameter can
have any one of the following
values:
MD5
MD5
SHA
Margin notes for
DES
4
Authentica
tion
Password
5
Privacy
Protocol
This parameter is enabled
when profile type is chosen to
be either Authentication - No
privacy or Authentication Privacy, and consequently
Authentication Protocol field is
enabled. This parameter is
specified in strings and accepts
any user defined strings
composed of alpha-numeric
characters. This parameter
cannot be null.
This field is enabled only when
Authentication - Privacy is
selected to be the Profile type,
and is null for other two
String
DES
Other
Options
6
Privacy
Password
options. When it is enabled it
becomes a non-null value (DES)
and can not be modified.
This parameter is enabled only
when Authentication - Privacy
is selected to be the Profile
type. This parameter is
specified in strings and accepts
any user defined strings
composed of alpha-numeric
characters. This parameter
cannot be null.
String
4.3 Configuring SNMP V3 Profiles
4.3.1 Add Profile
While configuring settings for SNMP v3, a user profile may be selected from the
available profiles. If no profiles are available, a new user profile can be created by
clicking on the Add Profile button.
Selecting a user profile and pressing the Apply button configures the SNMP v3 with the
selected user profile settings and the created profile is appended to the USM table.
4.3.2 Delete Profile
Selecting a user profile and pressing Delete button removes the selected user profile
from the available profiles list and the USM table.
4.3.3 Edit Profile
A profile's settings are displayed on clicking on the profile name in the available
profiles enumerated on the left side tree. Any modifications can be done by editing the
desired values and clicking the Apply button. Changes made will be stored in USM table
for the profile.
Chapter
5
Loading MIBs
5.0 Overview
It is necessary for a network administrator to know the exact status structure and
statistical information implemented by the vendor of the devise which is exposed to
NMS applications through a SNMP agent. Such management information, available in
MIBs, is an essential prerequisite as it enables the decision and issuance of appropriate
commands in proper protocols supported by the device.
5.0.1 MIB sources
Internet Engineering Task Force (IETF) hosts standard MIBs for a variety of network
devices covering various areas such as Frame relay, ATM, RDBMS, RADIUS
Authentication servers, DNS severs and mail monitoring. MIBs can be freely downloaded
from IETF website and these files are in text format and contain RFC information, in
addition to MIB definitions.
As MIBs from IETF are standard in that they provide management information for
standard features, vendors of network devices with additional, new or non-standard
features provide specific management information in proprietary MIBs. These vendor or
device specific MIBs are supplied along with network devices and, often, available for
download from customer support sites.
Network architects developing NMS applications also create and test custom-built MIBs,
which are typically available in local workstations or network.
It may be summarized that MIBs can be loaded from 3 different sources as follows:
• Local network
• IETF website
• Vendor sites
5.1 Local Network
Importing a MIB into Blackowl-MIB from a local drive or networked drive can be done by
either of the following methods:
From the menu bar
Click on File -> Import MIB -> From Local Sources as shown here:
This opens a file explorer as shown below:
In the above dialog box, where the name and path details of the MIB can be given.
Alternately, by clicking on the browse button, drives and folders can be navigated to
the desired MIB file. Once the MIB file is identified, double-clicking on it closes the
dialog box, compiles and places a copy of it in the MIBDIR folder and adds a visual entry
in the Available MIBs panel.
From Available MIBs pane
The importing operation as described above can also be carried out by right-clicking on
the Available MIBs panel and selecting Import MIB -> From Local Sources from the
context sensitive menu as shown below:
From Toolbar
By clicking on the button
5.2 IETF Website
Importing a MIB into Blackowl-MIB from IETF website can be done, subject to the
following conditions:
•
•
A standard MIB in adequate for the purposes of managing of or developing a
NMS for a device.
The specific RFC number is available.
Click on the menu File -> Import MIB -> From IETF as shown below:
This opens the following dialog box.
Simply specifying the RFC number corresponding to the desired MIB will fetch the MIB
from the IETF site and after parsing and stripping, a copy of it is placed in the MIBDIR
folder and adds a visual entry in the Available MIBs panel.
From Available MIBs pane
The importing operation as described above can also be carried out by right-clicking on
the Available MIBs panel and selecting Import MIB -> ietf.org from the context sensitive
menu as shown below:
From Toolbar
By clicking on the button
5.3 Vendor sites
A proprietary MIB can be imported if its full path in the source website is known.
Click on File -> Import MIB -> From Vendor sites as follows:
This opens the following dialog box.
It is necessary to indicate the transfer protocol in specifying the URL. Blackowl-MIB
supports specification of http as well as ftp protocols in the above dialog box.
From Available MIBs pane
The importing operation as described above can also be carried out by right-clicking on
the Available MIBs panel and selecting Import MIB -> ietf.org from the context sensitive
menu as shown below:
From Toolbar
By clicking on the button
Chapter
6
First Views
6.0 Overview
Chapter
7
First Actions
7.0 Overview
Remote IP devices are managed on the basis of manager-agent paradigm powered by
SNMP protocols. Prior to issuance of any SNMP commands, the following prerequisites
are to be identified and observed:
Blackowl-MIB
intelligently enables
or disables the
available commands
on the tool bar as
well as the menu
bar, based on the
object type selected
in the tree view
•
Version of SNMP protocol supported by the remote network device
This is essential since availability of commands varies across versions. For
instance, Get Bulk command is supported under SNMP v2 and v3 protocols only.
•
Type of actions supported by the device architecture
If a particular property exposed for management is defined to be of a scalar
data type, then SNMP commands such as Get Table become irrelevant.
•
Access type as defined in object characteristics
If a specific object has read-only access, then data retrieval operations only
can be performed on that object. If data retrieval as well as data modification
operations are to be performed, the object should have either read-write or
write-only access types defined in the MIB.
The following table summarizes the type of objects appearing in the object hierarchy
as seen in the tree view and the range of possible SNMP commands:
S.No
Object
Type
1
Node
2
Scalar
Icon
Get
GetNext
GetBulk
GeTable
Set
Walk
;
;
;
;
;
;
3
Table
4
Row
5
Column
;
;
;
;
;
;
;
;
7.1 SNMP Operations
Depending on the initiator of the commands, SNMP operations can generally be
classified into the following two categories:
Messages originating from SNMP manager
These messages can take the form of command /request and involve either Data
retrieval or Data modification operations. These commands are essentially based on
request -response model. These operations are classified according to their read/write
nature as follows:
Data retrieval operations
Data altering operations
Get
Get Next
Get Bulk
Get Table
Walk
Set
Messages originating from SNMP agent
Under critical situations like performance degradation or network failure, the
concerned SNMP agent itself will send messages to SNMP agent that may or mat not be
responded in turn by the SNMP manager. These messages are of the following types:
•
•
SNMP Traps
SNMP inform notifications
7.2 Get
Get command can
only be performed
from the tree and
schema views
Get command is issued to query and collect the value of a single specified object
managed by the SNMP agent. Get command is applicable to scalar and columnar
objects only.
For individual scalar objects, Get command can be issued from the tree view, while the
schema view displays the related scalar objects together and makes it possible to issue
a single Get command which collects values of all scalar objects at a time.
Get operations are
permitted only for
objects whose
access or maxaccess values do not
values preventing
data retrieval such
as write-only or notaccessible
Tree View
In order to retrieve the value of managed information from a SNMP agent, perform the
following steps:
1. Click to select the specific scalar object from which the value of managed
information is to be retrieved.
2. Click on the get button
in the toolbar
Or
Click on File -> Commands -> Get from the file menu
Get command is
applicable to scalar
and columnar
objects only.
Or
Select Get from the popup menu
3. The following dialog box is shown
The OID value of the selected object is pre-filled in the dialog box. The address of the
remote agent can be specified in the Host text box. The default value is pre-selected
in the combo box in tune with the default settings, if any, specified by the user under
Edit -Preferences settings. However the SNMP protocol version may be changed in the
dropdown box corresponding to the protocol. The final entry is non-editable and is
presented for informational purposes. This values for a specific object is pre-selected
based on the MIB definition file
Entering appropriate values in the dialog box and clicking OK, the SNMP Get request
queries for and retrieves the value of managed network entity from an SNMP agent.
The result is shown in the Results Pane in the following format:
OID = Value
7.3 Get Next
Get next command is similar to the Get command. Get command is applicable to scalar
and columnar objects only. Like Get command, Get Next operations are permitted only
for objects whose access or max-access values do not values preventing data retrieval
such as write-only or not-accessible. The get next command is used in the following
scenarios:
•
•
•
For traversing the object hierarchies in the MIB
For data retrieval operations on tabular object
For retrieval of values from objects whose OIDs may not be known
The procedure for performing Get Next command is outlined below:
1. Click to select the object in the tree view
2. Click on Get Next button
in the toolbar
Or
Click on File -> Commands -> Get Next from the file menu
Or
Select Get Next from the popup menu
Results of the Get Next request will be displayed in the Result pane. Results are shown
in the following format:
Name of the current object
(OID of the current Object)
Ψ
OID of succeeding object in
lexicographical order
7.4 Get Bulk
Data retrieval operations as defined in SNMP v1 are not efficient in the sense that it
would require multiple interactions and packet traffic between the manager and agent,
particularly for tabular objects. Get Bulk command available in the later versions of
SNMP protocol optimizes the data exchange and traffic. It is possible to query for and
retrieve large portions of data from objects of Table type in minimized network
interactions.
7.5 Get Table
Get Table can be
performed from both
tree and schema
views
Get Table command is unique in the following respects:
•
It is the only SNMP command that can be performed on row objects in
Blackowl-MIB tree view
•
Get Table operations
are permitted only for
objects whose
access or maxaccess values do not
values preventing
data retrieval such
as write-only or notaccessible
It is also the only command for which results are shown in the Task pane under
Command Result Tab. Results for all other SNMP commands are shown in the
Result pane adjoining the tree view pane.
The Get table command essentially retrieves the contents of a table in tabular form. A
get table command can use either Get Next or Get Bulk requests for data retrieval
from a table. Choice of a data retrieval mode depends on the SNMP protocol employed.
Get Next mode is available under all SNMP protocols, whereas Get Bulk mode is
available only under SNMP v2c and v3 protocols.
Tree View
In order to retrieve the table values from a SNMP agent, perform the following steps:
Ensure that MIBs are loaded. SNMP properties are set with appropriate values. In the
absence of custom settings, SNMP operations will be attempted to run based on the
default settings. For default settings, please refer Appendix 1.
1. Click to select the specific row object
2. Click on the Get Table button
in the toolbar.
With the exception of the Walk button, this is the only button enabled on selecting a
row type object.
Or
Click on File -> Commands -> Get Table from the file menu
Or
Select Get Table from the popup menu
Results of the Get Table request will be displayed in the Task pane under Command
Result tab. Results are mapped in the following format:
For each columnar object under the selected row object, there is a corresponding
column displayed in the Table view. Each column will be named after the
corresponding MIB definition.
For each instance / variable value of a columnar object, a row will be iteratively
added.
The following image shows a typical output of a Get Table request:
<!-- Screenshot here -->
Results of a Get Table request can be saved as a text file for reference. The ‘Save as’
command is available as the popup menu as well as in the menu bar.
7.6 Walk
Walk is the only
command that can
be performed on all
types of objects in a
tree view (scalar,
node, table, row and
column).
Walk command is used to traverse the object hierarchy in the tree view for a selected
node. The purpose is to progressively identify and plot the OIDs starting from the
selected node till the end of tree is reached.
Walk command internally uses multiple SNMP Get Next requests on each successive
node to query and discover the OID of the object following the current one.
The procedure for performing Walk command is outlined below:
Walk command can
be performed from
the tree view only
1. Click to select the object from which the traversal of the object hierarchy is
desired.
2. Click on the Walk button
in the toolbar
Or
Click on File -> Commands -> Walk from the file menu
Or
Select walk from the popup menu
Results of the walk request will be displayed in the Result pane. Results are mapped in
the following format:
Name of the nth object
(OID of the Object n)
Ψ
OID of object n+1
As Walk command issues Get Next commands repeatedly, each successive line in the
Result pane displays the OID of the object succeeding the current one.
The following image shows a typical output of a Walk request:
<!-- Screenshot here -->
Results of a WALK request can be saved as a text file for reference. The save as
command is available as the popup menu as well as in the menu bar.
7.7 Set
Set Command is typically issued for the following cases:
Set operations can
be carried out only
from the tree view.
•
Modifying the value of a scalar
•
Adding a new row to a table
•
Modifying the value of a columnar object
object
object
in a table
Set operations are permitted only for objects whose access or max-access values have
any of the following parameters: read-write, read-create or write-only
It is possible to modify values of more than one managed object in a single operation.
By using the SNMP Set operation, you can configure and control network devices by
modifying the object instance values in their SNMP agents.