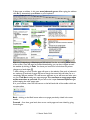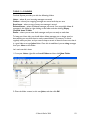
1
A beginner’s guide to computers,
word processing,
the Internet
and email
For Microsoft XP
& Office 2003
© Martin Darke 2008
1
Introduction
Nowadays our world is dominated by computers. Anyone aged under 30 is
fortunate enough to have been brought up in the computer age, whereas
many amongst the baby-boomer generation are still fearful of these highly
technical devices and all their associated jargon.
Yet, believe it or not, computers are not really much of a mystery. It’s just
that we have been led to believe that they are.
This manual aims to remove the mystery. It has been written by someone
who, in 2000, left all the computing to his secretary. Nowadays, he teaches
computing to groups and individuals, mainly mature-aged people, and his
eldest client is a sprightly 92!
So it is never too late to learn.
Computers can change your life. So much can be achieved, from tracing
your family history, to booking your next holiday, checking the weather and
paying all your bills.
The aim of this manual is to give you the confidence to walk into a room and,
if you see a computer, you’ll want to switch it on and start clicking.
If you already have a computer, but it’s sitting in a room at home largely
redundant, then things are going to change.
If you don’t already own a computer, you’ll be thinking of going out and
buying one.
So turn over the page and let’s get started.
© Martin Darke 2008
2
Modules
This manual comprises five main sections followed by an Appendix:
1. Understanding a computer – in which you will get to learn the
basic structure of a computer, how it works, and how to set it up to
suit your needs
Page 4
2. Word processing using Microsoft Word – in which you will
learn how to write and format documents, and how to save them
Page 33
3. The Internet – in which you will learn how to visit websites and find
information on any subject
Page 53
4. Email – in which you will set up a free Hotmail account and be able
to communicate via email from any computer in the world connected
to the Internet
Page 65
5. Outlook Express – which covers how to use an alternative email
program called Outlook Express
Page 91
6. Appendix - which introduces the main things you need to know
about Internet security, basic computer maintenance and how to
download programs
Page 130
© Martin Darke 2008
3
Section One
Understanding a computer
OBJECTIVES
On completing this section, you will be able to:
Understand computer terminology
Know what to look for when buying a computer
Find help when you need it
Turn on and navigate around a computer
Set up folders
Set up shortcuts
Print a document
Turn off a computer
TOPICS
1. Computer Terminology
2. Information Storage
3. A Typical Specification For A New PC
4. Software
5. Getting Started
6. Using a Mouse
7. The Start Button
8. Help & Support
9. Control Buttons
10. Shortcuts
11. Files & Folders
12. Properties
13. Search
14. The Recycle Bin
15. Printing
16. Shut Down
© Martin Darke 2008
4
Table of Contents – Section One
TOPIC 1 – COMPUTER TERMINOLOGY
6
TOPIC 2 - INFORMATION STORAGE
8
TOPIC 3 - A TYPICAL SPECIFICATION FOR A NEW PC
9
TOPIC 4 - SOFTWARE
11
TOPIC 5 – GETTING STARTED
12
TOPIC 6 – USING A MOUSE
13
TOPIC 7 – THE START BUTTON
17
TOPIC 8 – HELP & SUPPORT
18
TOPIC 9 – CONTROL BUTTONS
20
TOPIC 10 – SHORTCUTS
21
TOPIC 11 – FILES AND FOLDERS
22
TOPIC 12 – PROPERTIES
28
TOPIC 13 – SEARCH
28
TOPIC 14 – THE RECYCLE BIN
30
TOPIC 15 – PRINTING
30
TOPIC 16 – SHUT DOWN
32
© Martin Darke 2008
5
TOPIC 1 – COMPUTER TERMINOLOGY
In the past few years, computers have come down in
price considerably and are now very affordable. Most
people prefer to buy a PC for the home, though if space
is at a premium and portability is important then you
might prefer to buy a notebook (often called a laptop)
computer. Both a PC and a notebook perform the same
functions and have more or less the same features. It’s
just that the notebook is more compact and is easily transportable for people on the
move.
So what do you get when you purchase a PC? Let’s look at the main components.
1. CPU – the most important is what is known as the CPU
or central processing unit. It’s usually in the form of a tower,
often called the ‘box’, though in some office environments you’ll
sometimes see the box lying horizontally on the desk with the
monitor placed on top. Inside the box lies all the computing
power, with its micro-circuitry and tiny chips which can store
vast amounts of information. If you’re the type of person who
likes pulling cars apart, then you’ll probably be interested in what’s
inside the box. However, we won’t be taking the lid off the box
in this manual.
2. MONITOR
The cheaper computer packages on offer usually feature an old-style bulky CRT
(cathode ray tube) monitor, but most of us are switching to flat-screen LCD (liquid
crystal display) monitors which have excellent picture quality and take up much less
space.
3. KEYBOARD
There are many different types of keyboard available, but most are similar to the one
pictured below divided into different sections as follows:
a) the numeric keypad is used to enter numbers. Data entry operators can reach
amazing speeds of 10,000 characters per hour by using this section
b) the main keypad is what we’ll be using throughout this course. Here you can see
keys for letters, numbers and punctuation as well as various symbols such as the $
sign and the ampersand (&). To type a $ sign, or a capital letter, you have to hold
down the Shift key when you are typing
c) the cursor or editing keypad features a number of keys for moving the cursor
around the screen
d) the function keys along the top row are used for common tasks, though the only
one that’s important for now is F1 which takes you to Help
e) make a note of the position of the booster keys, Ctrl, Shift, and Alt, as well as the
Enter and Delete keys, as these are ones that you will use often
© Martin Darke 2008
6
4. MOUSE
Even if you have never used a computer, you will probably have heard of the mouse
which allows you to move a pointer across the screen. We’ll look at the mouse in more
detail later.
5. SPEAKERS
Speakers are a separate component, but are sometimes built into flat-screen monitors
and are always built into notebook computers. Advanced and more expensive speaker
systems are always available for audiophiles.
6. PRINTERS
Standalone printers can be purchased but most people now buy a three-in-one unit
which includes a printer, copier and scanner. The machines themselves are very cheap
and the manufacturers make most of their profit from the ink cartridges. Always
purchase those with multiple colour cartridges as this will save you considerable
expense. Colour comprises at least three colours, and if you have a single colour
cartridge and one of the colours runs out, then you have to replace the whole cartridge.
Some of these devices have as many as seven separate colour cartridges, but three is the
norm. It is also possible to buy a four-in-one device which includes a fax.
7. MODEM
For a dial-up Internet connection, the modem is already inside the box. However, if you
have an ADSL broadband connection, your Internet Service Provider (ISP) will send you
an external modem for connecting. We’ll look at Internet connections in more detail
later in this course.
© Martin Darke 2008
7
MORE TERMINOLOGY
1. NETWORKS
In the workplace it is quite common for PCs to be linked together to form a network
so that they can share stored information and printers. A network can also handle
communication between PCs, and they require special cables to link the computers.
There are two main types of network, namely:
LAN – local area network, for instance computers in the same office, and
WAN – wide area network, for instance a bank’s computers connected throughout a
state, a country and globally
2. SERVERS
A server is usually a high-capacity computer on which all the information is stored so
that users on a network can share it.
TOPIC 2 - INFORMATION STORAGE
A simple description of a computer would be an electronic filing cabinet, in which huge
amounts of information can be stored.
Stored information is measured in units called bytes. One byte holds a single character
such as a letter or number.
Common terms used to measure storage capacity are:
• kilobytes (Kb) = one thousand bytes
• megabytes (Mb) = one million bytes
• gigabytes (Gb) = one billion bytes
A computer stores the information you have saved on one of its drives. Alphabetic
labels are given to the drives as follows:
A drive – reserved for the floppy disk, the original means of portable storage for
transferring information from one computer to another. Floppies are largely obsolete
and it is difficult to purchase a PC with a built-in floppy drive.
C drive – the main memory store of your computer, usually around 160Gb for a
standard PC package nowadays, and often referred to as the hard drive.
D drive – reserved for CDs and DVDs. Most PCs come with a combined CD/DVD
drive which enables you to play (and copy) CDs and DVDs. CDs have 700MB of storage
capacity, and DVDs some 4.5GB. CDs took over from floppies because we needed to
store music albums, and DVDs were then invented because we needed to store movies.
Essentially, floppies, CDs and DVDs are simply portable storage devices.
© Martin Darke 2008
8
E drive and upwards – reserved for other storage devices such as ‘thumb’ drives, a
portable storage device, no bigger than a key ring, which can hold up to several
gigabytes of information.
TOPIC 3 - A TYPICAL SPECIFICATION FOR A NEW PC
Computer manufacturers and retailers still resort to far too much jargon in their
advertisements, and the unwitting beginner can often be caught out by salesman through
lack of knowledge. So it important to do some research prior to spending your money.
A typical specification might read:
Windows Vista
160Gb hard drive
1Gb RAM
Core-duo processor
CD/DVD-RW
Graphics card
17” flat screen monitor
Keyboard, mouse and speakers
56k modem
These are the main elements of a PC package, and the price can range between $5001,500. So it is important to understand what this terminology means.
Let’s start with Windows Vista.
Every computer has to have an operating system, which controls how you and a
computer communicate. It enables you to create and save documents, copy music,
browse the Internet, send emails and perform many other tasks
When PCs first came on to the market, there were two main competitors, Windows
(owned by Microsoft) and Apple. Many computer buffs will tell you that Apple was and
still is the best, but Microsoft won the marketing battle, now has some 95% of the
market, and Apple is more renowned for its iPods. This also explains why Bill Gates is
the richest man in the world.
Microsoft’s first operating system was called 3.1. Since then we have had many others,
including Windows 95, 97, 98, NT, Me XP, and now Vista, of which there are several
versions. Each one was an improvement on the previous one, and the next scheduled
release of a new Microsoft operating system is 2008-9, when we will be able to
purchase what is provisionally entitled Windows 7.
In effect, Microsoft makes so much money because it forces us to upgrade every few
years. It has withdrawn technical support for Windows 98 and previous versions, and
support for XP Professional is scheduled to be withdrawn in 2011. Yet many businesses
© Martin Darke 2008
9
and individuals continue to use Windows XP (the version covered by this manual)
because it performs everything they need it to do. Another problem is that various
related service providers insist that you have to have the latest operating system in
order to use their service. It’s a bit like running an old car but finding it difficult to obtain
spare parts and comply with regulations to keep it on the road. Eventually you’ll have to
leave it in the garage or put it on show in a museum.
You may well hear of other operating systems such as Linux. Believe it or not, this is
absolutely free, and businesses are starting to use it, but it would take a quantum leap
for everyday users to make the switch from Windows to Linux, not only because we’re
so used to Windows but also because Microsoft also sells software which can only be
used with its operating system.
We have already mentioned the hard drive. This is your main storage area. One
hundred and sixty billion bytes of information may sound like a lot, and it is, but in
reality it’s less than 40 DVDs, and hence 40 movies. However, 160Gb is more than
enough for the average user, and in future it can easily be increased by taking the box to
your local computer shop and having more memory installed quite cheaply.
More important is the amount of RAM, or random access memory. RAM is a
temporary storage area which enables you to perform lots of tasks at the same time.
You can be playing a music CD, browsing the Internet, and writing a letter at the same
time. Whilst 1Gb is a standard offering, and essential for Vista to operate efficiently, it is
worth upgrading to 2Gb of RAM if you want optimum performance from your
computer. Some of the latest electronic games demand a large slice of RAM so that you
can see the graphics on the screen.
On the subject of graphics, a PC has what is known as a graphics card inside the box
which enables you to enjoy high-quality images. Basic computer packages come with
standard graphics cards, so ensure you discuss this item with the retailer if you’re
interested in playing the latest video games.
Still on the subject of graphics, flat-screen monitors are common now and can be
purchased over 20” in size.
As for the processor, the latest chip on the market is what is known as ‘core-duo’. The
two main chip manufacturers are Intel and AMD. Outlets vary in which one they
recommend, and for a beginner it really does not matter that much. However, the
speed of the chips varies, and the faster the speed the higher the price. So discuss with
the retailer the best-value chip to suit your requirements.
Another important item is the CD/DVD drive. These now play both types of disk.
Specifications are normally written as CD-R, CD-RW, DVD-R, DVD-RW, CDRW/DVD and CD/DVD-RW.
© Martin Darke 2008
10
The difference between R and RW is critical. The first means that you can play a disk,
whilst RW means that you can record a disk (‘burn’ is the term that is used). Hence
CD-RW/DVD means that you can copy CDs but only play DVDs, whilst CD/DVD-RW
means that you can copy and play both CDs and DVDs.
It might sound confusing so always ask the salesman what the device is capable of doing.
If you intend to do a lot of copying, then consider purchasing an extra CD/DVD drive.
There’s always a spare slot inside the box. So one drive would be a burner, and one
would be a reader. You put a music CD or movie DVD in the reader, and you put a
blank CD or DVD in the burner. Follow the instructions on the screen and you can
copy CDs and DVDs in a very short time, rather like the olden days when we used to
have two slots for our cassette tapes.
The 56k modem is a standard device used for connecting to the Internet through a dialup connection and is relatively slow compared to the broadband connection which most
of us prefer.
Standard keyboards and the mouse will be connected by wire, but you can always
upgrade to wireless devices, the only drawback being that both of them demand
batteries.
TOPIC 4 – SOFTWARE
Every PC or notebook comes with a suite of very basic software. This is insufficient if
you intend to write letters, produce spreadsheets, and design your own greetings cards
etc. Therefore you will probably need to purchase software to enable you to perform
these functions. There are competitors to Microsoft in this area but it still retains a
stranglehold on the everyday software used by individuals and businesses.
Moreover, its pricing policy means that you often have to purchase a bundle of software
rather than individual items. Generally, Microsoft sells its bundle as Microsoft Office, but
there are several variations. The current Office suite is labelled 2007, which is very
different to the last version called 2003. The main items might include:
Word – for producing high-quality documents
Excel – for producing spreadsheets
PowerPoint – for putting together presentations which include animations and
graphics
Publisher – for producing greetings cards, invitations, flyers and much more
Access – for maintaining databases
© Martin Darke 2008
11
Outlook – a more sophisticated email program than Outlook Express
Be aware that is it now possible to download free of charge a suite of software called
OpenOffice which can be used in much the same way as Microsoft Office and, more
important, is compatible.
Other companies such as Adobe publish software which is excellent for photography, so
make sure you discuss your software needs with the salesman when you are purchasing
your PC. Another piece of software you will need is Adobe Reader which enables you
to read documents in a particular format. This can be downloaded free from the
Internet.
TOPIC 5 – GETTING STARTED
When you turn on the computer, it ‘boots up’ and loads the operating system to enable
you to use it. If you’re on a network, you may be asked to type a username and
password, but eventually you will come to a screen similar to the one below, which is
called the Desktop.
The desktop has a number of small pictures (icons) usually down the left-hand side of
the screen. You can have as many icons as you wish. They are actually shortcuts to
programs (or folders or files) that you use regularly. We’ll be setting up shortcuts later.
© Martin Darke 2008
12
The Task Bar is usually at the bottom of the screen. It includes the Start button and
shows the programs that are open, as well as the time.
Before we start learning how to use the computer, we need to understand how the
mouse works and practise using it.
TOPIC 6 – USING A MOUSE
Moving the mouse on a flat surface controls the position of the mouse pointer on the
screen. The mouse pointer can take many shapes, the most common being an arrow.
The shape of the pointer is an indication of the type of operation that can be carried out
at that time.
Notebooks have a built-in touch panel to enable you to move the pointer, which can be
very sensitive and takes time to master. However, you can still connect a standard
mouse to a notebook if you prefer.
Holding the mouse
Cup the mouse comfortably in your right hand so that your index finger rests on the left
mouse button. There is no need to grip the mouse tightly. The right mouse
button is also useful and you’ll learn the benefits, but generally you will be using the left
mouse button at least 90% of the time. Some people never get to learn the usefulness of
the right mouse button.
If you are left-handed, it is actually possible to change your mouse to a left-handed
mouse by changing its settings through the Control Panel.
Mouse operations
Windows uses icons (small pictures) on the screen to represent computing objects that
can be used or manipulated, menus (from which options can be selected that carry out
particular tasks) and dialog boxes (that request further information from you). The
mouse is used to select and manipulate objects, choose options from menus and
respond to dialog boxes.
© Martin Darke 2008
13
The different mouse operations are:
Point
Move the mouse so that the mouse pointer rests on the required
object (for example, an icon, name of a menu, button in a dialog box,
character in a document, shape in a picture). If the pointer is an
arrow, the tip of the arrowhead must be on the object.
Click
Press and release a mouse button. If the button is not specified, always
use the left button. Clicking selects an object.
Doubleclick
Click a mouse button twice in quick succession. Do not move the
mouse between clicks. Beginners often move the mouse as a reflex
action and this can cause the wrong action to occur. Double-clicking
usually selects an object and completes an operation. For example,
double-clicking on an application icon runs the application.
Drag
Point at an object, press a mouse button, hold it down, move the
mouse to a new position, then release the mouse button. Dragging is
used to select a section of text or other objects and to move objects
to a new position (if used to move an object this is sometimes
referred to as drag-and-drop).
Scroll
A mouse also has a scroll wheel by which you can easily scroll up and
down the screen or page. This is easier than using the vertical scroll
bar.
Now let’s practise using the mouse. The best way to learn is to play the game of
Solitaire.
Activity 1
1. Click on the Start button.
2. Move the pointer over All Programs. You will see a screen similar to the one
below.
© Martin Darke 2008
14
3. Next move the pointer carefully into the middle of the list of programs, and then
move up to Games until the latter has a blue background (this means it is selected or
highlighted). Your screen will be similar to the one below.
© Martin Darke 2008
15
4. Note how a list of games has appeared.
5. Move the pointer slowly across to this new list and then carefully down to Solitaire
until it is highlighted as below.
6. Double-click on Solitaire and the game will open.
7. To play the game, you have to click on cards and then drag and drop them using the
procedure mentioned above in the instructions for using the mouse. Your instructor
will demonstrate. Practise using the mouse. You will soon start to get the hang of it and
don’t be afraid to move it quickly.
8. To close the game, click on the Close button at the top right-hand side of the
window. It looks like
.
© Martin Darke 2008
16
TOPIC 7 – THE START BUTTON
The Start button is the main entrance to all the programs and functions on a computer.
From the Start button you can run programs, find files or folders, get help, change
computer settings and shut down the computer.
When you click on the Start button, a screen like this will appear:
Let’s look at this item by item.
1. Username – in this case the user of this computer is Me. On your home computer
you can set this to your own name.
2. Shortcuts – immediately underneath are two shortcuts to Internet and E-mail.
These are exactly the same as shortcuts on the desktop.
3. More shortcuts – underneath are six more shortcuts, starting with Windows Media
Player. These are the last six programs that you have used.
4. All Programs – we have already seen that, by moving the pointer over All
Programs, this gives us access to all the programs on our computer.
© Martin Darke 2008
17
5. Folders – on the right-hand side we have shortcuts to five of the main folders,
starting with My Documents. We will look at folders in more detail later.
6. Control Panel – this takes us to all the computer settings that you can change. For
instance, you can slow down the double-click speed of the mouse, put a picture on your
desktop or change the date and time.
7. Printers & Faxes – provides details on which printers and faxes are installed and
helps you add new ones.
8. Help & Support – this is very important. It represents the user manual for using
your computer and we will look at this in more detail shortly.
9. Search – you can search for anything on your computer. Even if you only remember
one word in a document, and you can’t remember where you stored that document,
the computer can find it in seconds.
10. Log Off – if there is more than one user on the computer, each can log off. One of
the advantages of Windows XP is that you can have multiple users. Each has their own
desktop and shortcuts, totally independent of the others. You can even set a password
to protect your own area.
11. Turn Off Computer – you click here to start the shutdown process.
TOPIC 8 – HELP & SUPPORT
When you click on Help & Support, you will see a screen similar to the following:
© Martin Darke 2008
18
By clicking on any topic on the left-hand side, you can access instructions for that topic.
For instance, if you want to learn how to copy a music CD, do this:
1. Click on Music, video, games and photos
2. Click on Music and sounds
3. Click on Playing and copying music
4. On the right-hand side click on Copying and playing CDs to get to the following
screen:
Hence you can teach yourself anything about your computer by reading and following
the instructions. Within Help & Support there are many audio and video tutorials, so
make sure your speakers are turned on. Use the Back button at the top left-hand side
of the screen to navigate back to previous menus.
On the main menu, click on Fixing a problem and explore the many troubleshooters.
You can save yourself a lot of money, by not having to call computer consultants, by
following the step-by-step solutions to potential problems. Computers are not rocket
science after all!
Finally, if you want to find a topic but don’t know where it is, all you have to do is type
the subject (e.g. create shortcut), in the Search window, click on the arrow, and the
computer will very quickly find the instructions. Try it now.
© Martin Darke 2008
19
TOPIC 9 – CONTROL BUTTONS
When you open a program such as Solitaire, you will see three control buttons in the
top right-hand corner of the window which look like this:
The Minimise button has a dash on it. Clicking on this button reduces your current
document or application program to a button on the task bar. You will not lose unsaved
alterations to the document or exit the program until you close them.
The Close button has a cross on it. It closes the document or program you are
currently working in.
The Maximise button has a square on it and is in the middle of the other two buttons.
Clicking on this will expand your window to cover as much of the screen as is possible.
The button will now have changed to a button with two squares on it - the Restore
button. Clicking on this button will restore the window size to what it was before you
clicked the maximise button.
Activity 2
1. Open Solitaire as in Activity 1.
2. Practise using the control buttons and watch what happens on the screen.
3. If you minimise the window, Solitaire will still be on the Task Bar. Click on
Solitaire on the Task Bar to reopen the window.
© Martin Darke 2008
20
TOPIC 10 – SHORTCUTS
As we have seen when we opened Solitaire, it was a seemingly lengthy process. For
programs which we use regularly, it is much better to put a shortcut on the desktop for
easy access. Let’s see how this is done.
Activity 3
We will put a shortcut to the Hearts game on our desktop.
1. Click Start
2. Move the pointer over All Programs
3. Move the pointer up to Games
4. Move across and down to highlight Hearts
5. Now comes the tricky part. Right-click on Hearts.
6. Move down to Send To
7. Next move across and down to Desktop(create shortcut). You will see the
screen below:
You will also notice that there is another option in the previous menu which says
Create Shortcut. This is actually another method and achieves the same result. You
can try it later.
8. Next click in the blue area of the desktop. All the menus disappear and you will see a
shortcut to Hearts on your desktop.
© Martin Darke 2008
21
TOPIC 11 – FILES and FOLDERS
This is arguably the most important topic in this section. If you can understand the basic
folder structure of your computer, then you are half-way to mastering the device.
As we have mentioned, a computer is an electronic filing cabinet. When you create a
document such as a letter, you save it on the computer as a file. If you save a photo, it is
stored as a file. If you save a music track, it is stored as a file. Everything on the
computer is a file. The XP operating system is made up of thousands of files.
Microsoft provides you with a basic folder structure which includes folders such as My
Documents, My Pictures and My Music. If you write a letter and save it, XP
prompts you to save the letter in My Documents because it knows you are writing a
document. If you try to save a photo, you will be prompted to save it in My Pictures.
My Music is where XP wants you to store music tracks.
But is up to you to store files where you want to store them. In your home, you
don’t put socks in the drawer where you put your underpants. It’s the same with
computers. You store like with like.
So it is up to you to set up your own folders and store things where you want to save
them.
For instance, within My Documents you could set up a folder called Résumés. If
you’re running a business, you could set up a folder called Invoices. If you write a lot of
letters, then set up a folder called Letters. If you don’t, then every document is liable
to end up in My Documents and it all becomes very messy. It becomes difficult to find
files. It’s a bit like having a desk and simply throwing every document on top of the desk
rather than storing them in hanging folders in drawers.
If you plan to save a lot of music tracks, then it makes sense to set up folders such as
Opera, Jazz, Pop, and Country. Each folder would be a sub-folder of My Music.
Within the Pop folder, you could set up sub-folders called 60s, 70s and 80s.
So let’s now take a look at the folder structure within XP and learn how to create our
own folders.
© Martin Darke 2008
22
Activity 4
1. On the desktop, click on the shortcut to My Computer. If there is no shortcut,
click on Start, My Computer.
2. Next, double-click the C drive, our main memory store. You will see the screen
below:
3. The message These files are hidden is put there deliberately. Microsoft does not
want you to interfere with the contents of two key folders, Windows and Program
Files, which contain all the files which enable your computer to run properly. However,
we can see the first layer of the folder structure of the C drive by clicking on Show the
contents of this drive.
4. You will now see a screen similar to the one below. The folder in which we are
interested is the one called Documents & Settings. When we open this folder by
double-clicking, we then get down to the layer which separates the different users on
the computer.
© Martin Darke 2008
23
5. Next, we see the following screen, in which we observe the main folder for user Me.
© Martin Darke 2008
24
6. Double-clicking on Me opens the folder so we see:
7. Double-clicking on My Documents brings up the following:
© Martin Darke 2008
25
8. In the screen above we see the first mention of My Pictures (Me’s Pictures) and My
Music (Me’s Music).
Note also the path to the My Documents (Me’s Documents) as written in the
Address line at the top of the screen. The full path is actually:
C:\Documents and Settings\Me\My Documents
So a computer is simply a tree-like structure of folders starting at the top
with the C drive and going down as far as you like. You can have as many
layers as you wish, limited only by the memory capacity of the drive.
9. To navigate back up the tree, you click on the Back button in the top left-hand
corner.
10. To set up a new folder in My Documents, click on the Back button and then click
Make a new folder. See below:
11. The screen below appears. Notice how the menu has changed on the left-hand side,
starting with Rename this folder.
© Martin Darke 2008
26
12. Now type the name of your new folder. This will overwrite the words New
Folder. Type My Folder and see the result. Once you have typed the name, press
Enter on the keyboard. This confirms the name. If you mis-type the name, select the
folder by clicking on it once, then click on Rename this folder. You can then type a
new name. Don’t forget to press Enter.
13. Once a folder is selected, you can click on any of the buttons on the left to Move,
Copy, Share, Delete and even E-mail this folder’s files. XP makes it very easy for
us. Remember to look at the screen and decide what you want to do.
It is impossible to over-estimate the importance of understanding the folder structure of
your computer, and learning how to create a new folder. All you have to do is navigate
to the folder where you want your new folder, click on the right button, and then name
your folder.
You will see the benefits of this when we come to create and save our first files. Rather
than the computer dictate where these files are saved, you will tell the computer where
to save them. YOU ARE IN CONTROL, NOT THE COMPUTER!
© Martin Darke 2008
27
TOPIC 12 – PROPERTIES
The properties of a folder or file tell you its size, when it was created, the type and
where it is saved. Knowing the size of a folder is important if you are copying it to a
thumb drive, CD or DVD. There must be sufficient capacity on the storage device.
Activity 5
1. Open My Documents
2. Right-click on the My Pictures folder as below:
3. Click on Properties.
TOPIC 13 – SEARCH
As long as you know you have saved a file or folder, then you will always be able to find
it. To do this we use the Search button under the Start menu.
Activity 6
1. Click Start
2. Click Search to obtain the window below:
© Martin Darke 2008
28
3. Next, click on All files and folders to obtain the window below:
4. Here you have lots of options for your search criteria, and by clicking on the downarrow in the Look in window, you can narrow your search further. Once you have
made your selection, click the Search button and the computer will find what you are
looking for.
© Martin Darke 2008
29
TOPIC 14 – THE RECYCLE BIN
When you delete a file or folder from the C drive it is sent to the Recycle Bin. There
is usually an icon for the Recycle Bin on the desktop. Any deleted item is not
permanently deleted until you empty the Recycle Bin.
It is not recommended to empty the Recycle Bin. Imagine deleting a file and then three
months later realising that you needed it after all. There’s always a chance that it’s still in
the Recycle Bin and, if it is, it can be restored quite easily to its original folder.
XP allocates a certain percentage of the total memory to the Recycle Bin. It’s feasible
that the Recycle Bin could reach capacity. In that event, should you delete another file,
the Recycle Bin actually decides what it wants to keep. Therefore, should your Recycle
Bin be full, open it up and delete all those files and folders that you definitely do not
want to keep.
Activity 7
Let’s look at how you can restore deleted items.
1. Right-click on the Hearts shortcut that we placed on the desktop.
2. Click Delete on the drop-down menu that appears.
3. You will be asked to confirm that you want to delete the Hearts icon. Click Yes.
4. Click on the Recycle Bin icon on the desktop.
5. Select the Hearts icon with a single click.
6. On the left-hand side of the screen, click Restore this item.
7. Check your desktop and you will see that the Hearts icon is back in its place.
TOPIC 15 – PRINTING
If you open a document file and click the Print icon, a message is sent to the printer to
print the document. Files waiting to be printed line up in a queue. Be aware that if your
document does not print, do not click the Print icon again. If you do, the same
document will line up in the queue. Check that your printer is not malfunctioning as you
could end up wasting a lot of paper and ink.
You can observe the queued documents by doing the following:
Activity 8
1. Click the Start button
2. Click Printers and Faxes
3. Right-click on the printer icon for the printer attached to the computer.
4. Click Open to see the window below
5. By single-clicking on the queued document, and then clicking on either the Printer
or Document menu, you can cancel the printing of the document if you wish.
© Martin Darke 2008
30
6. It is a good idea to put a shortcut to your printer on the desktop.
Another way to print a document is to open the folder in which the document is
stored, select the file you wish to print, and then click Print this file on the left-hand
side of the window. The screen below is an example:
© Martin Darke 2008
31
TOPIC 16 – SHUT DOWN
To shut down the computer when you have finished, do the following:
Activity 9
1. Click Start
2. Click Turn Off Computer or Shut Down
3. Choose Turn Off from the three options
The box will switch itself off automatically but you should also remember to turn off the
power to the monitor, the speakers and any other device, such as the modem, attached
to the computer.
© Martin Darke 2008
32
Section Two
Word processing using Microsoft Word
OBJECTIVES
On completing this section, you will be able to:
Create your own documents
Apply formatting to your documents
Save your documents
Locate saved documents
Print your documents
TOPICS
1. About Microsoft Word
2. Using Help
3. Begin Using Word
4. Saving Documents
5. Opening Saved Documents
6. More Everyday Tips
7. Inserting Pictures
8. Templates
9. Other Common Features
10. Printing
© Martin Darke 2008
33
Table of Contents – Section Two
TOPIC 1 – ABOUT MICROSOFT WORD......................................................35
TOPIC 2 – USING HELP ..................................................................................37
TOPIC 3 – BEGIN USING WORD ..................................................................39
TOPIC 4 – SAVING DOCUMENTS.................................................................40
TOPIC 5 – OPENING SAVED DOCUMENTS................................................44
TOPIC 6 – MORE EVERYDAY TIPS................................................................45
TOPIC 7 – INSERTING PICTURES.................................................................46
TOPIC 8 – TEMPLATES...................................................................................48
TOPIC 9 – OTHER COMMON FEATURES....................................................50
TOPIC 10 – PRINTING ....................................................................................51
© Martin Darke 2008
34
TOPIC 1 – ABOUT MICROSOFT WORD
Microsoft Word is a word processing program used to create documents such as
letters, faxes, reports and even résumés. The version used here is 2003, though
Microsoft brought out a new version in 2007. If you have a licensed copy of Word on
your computer, which is usually installed as part of the Office suite of software, then
you are entitled to download updates to the software and also access many other
resources free of charge from the Microsoft website.
Word is very powerful and has many features. Even highly qualified secretaries might
only use 50% of its capabilities. For most of us on our home computers, we might only
use 10-20% of its capacity.
In this module we will be taking a look at some basic features so that, by the end of the
lesson, you will be able to create and print high-class documents such as letters.
When you start the Word program, normally by double-clicking on a shortcut, we see
the following screen or one that is similar. The top line is called the Title Bar, and
underneath are the Menu Bar and two Toolbars (Standard and Formatting), on
which are numerous icons.
Other features include the Work Area, Task Bar, Scroll Bars and Task Pane.
© Martin Darke 2008
35
Now we’ll describe the window above in more detail.
Title Bar
Drop-down
menus
The blue border at the top of the screen. When you first open
Word, the new document will be named Document 1. When you
save the document, Document 1 will change to whatever you
decide to name your document.
The next bar down contains the menus, File, Edit, View etc. These
are called drop-down menus because when you click the mouse
over one of the words, a menu appears giving you a range of
options.
Toolbars
Below the drop-down menus are two rows with a number of icons
on each. By clicking on these icons you can perform word
processing selections on your documents and text. Every icon also
appears on one of the drop-down menus, i.e. there are two ways of
performing the same action. There are many other toolbars available
which can be displayed, but the more toolbars there are then the
less working space you have.
Rulers
Below the toolbars and also down the left-hand side of the screen
are the horizontal and vertical rulers respectively. These help you to
set margins and tab stops in your document and help you to see
exactly where you are inserting text.
Cursor or
The cursor, usually a flashing line, is where text will be placed once
Insertion Point you start typing. It is easy to move the cursor by using the mouse,
the spacebar on your keyboard, or the cursor arrows on your
keyboard.
Scroll Bars
On the right-hand side of the document and also at the bottom are
scroll bars. On the vertical scroll bar, either click on the rectangle
and drag it down, or click on the arrows at the top and bottom of
the scroll bar in order to scroll up and down the page. Similarly for
the horizontal scroll bar.
Status Bar
This displays information about your document according to the
location of your cursor, telling you the page and section numbers,
and the lines and columns where your cursor is placed. It also shows
the action you are performing such as saving or printing.
Task Bar
Incorporates the Start button and shows tasks that are open as well
as the time.
Small icons at the bottom left just above the status bar which allow
you to see your documents in different ways.
View Buttons
Control
Buttons
We are already familiar with these.
© Martin Darke 2008
36
Activity 1
1. Open Word by double-clicking on the Word icon on your desktop.
2. Move your mouse over the Word screen.
3. Click on the drop-down menus such as File and Edit. Notice how some items in the
drop-down menus are greyed out. For these buttons to become active, something has
to be selected first, and we will look at this later.
4. Practise using the scroll bars, both horizontal and vertical. Drag the rectangle and
click on the up and down arrows.
5. Notice how, when moving the mouse over a button on a toolbar, a rectangle appears
telling you the function of that button. Make a special note of the location of the Save
button.
TOPIC 2 – USING HELP
In every piece of software that you purchase, help is always available. It is usually a menu
on the right-hand side of the menu bar. Further help can be accessed online, and the
Help function can also be started by pressing F1 on the keyboard. Help actually
represents your manual for using the software. You can teach yourself how to use
Word by clicking on the various topics. Let’s look at Help in Word.
Activity 2
1. Click Help on the Menu Bar.
2. Click on Microsoft Word Help.
3. The screen below will appear with the Help Task Pane on the right-hand side.
4. Type what you are looking for in the Search for window, e.g templates.
© Martin Darke 2008
37
5. A list of items will appear and it is up to you to click on the item which is most
relevant to your search. The screen below shows the result from clicking on Create a
document template:
6. By clicking on Table of contents in the previous window on page 37, you will see
the following screen. Note the complete list of topics.
© Martin Darke 2008
38
TOPIC 3 – BEGIN USING WORD
Let’s begin using Word and see how we change the text using some of the buttons on
the toolbars.
Activity 3
1. Open Word. Don’t worry if it says Document 2 or Document 3 on the Title
Bar. You may have already used Document 1.
2. Type your name into the document.
3. Now scroll across your name to highlight (select it). To do this the simplest way is to:
a) position the cursor just to the left of the first letter of your name
b) hold down the left mouse button
c) scroll across your name
d) a blue background will appear behind your name
e) you can now change the style of your name
4. Click on the bold button
on the toolbar.
5. Click in the white space of your working area away from the text.
6. Notice how your text has changed to bold.
7. Now try the italics button
but first remember to select your text.
8. Now try the underline button
.
9. You can use these three buttons in any combination. All you have to do is select your
text and then click the relevant buttons.
10. Next try the font colour button which looks like
. When you click on the
small down arrow, a palette of colours appears. Click on the colour you require for
your text.
11. Just to the left of the font colour button is the highlight button. Try this one as
well.
12 Within Word there are many font styles available and you can also change the size of
the font. The default font is normally Times New Roman or Arial. By clicking on the
down arrow next to the font, the following menu appears:
© Martin Darke 2008
39
13. Click on a font style you prefer to change the font. Changing the size is just as easy.
Just click the down-arrow next to the number and another drop-down menu will
appear. Choose the size you require by clicking on a number.
14. There is a wonderful button available called Undo which allows you to undo your
last action. It looks like
. If you make a mistake, you can click on the undo button
and your last action will be undone. In fact, Word remembers all your actions so if you
now click the undo button over and over again, all your actions in this activity will be
undone. The undo button pairs with the Redo button next to it, so that if you undo too
far, you can simply click on redo to restore the action. It looks like
.
15. Finally, in this activity, try using the Centre button,
, to centre your text. Next
to the centre buttons are the Align Left, Align Right and Justify buttons with which
you can position your text.
REMINDER – you must select your text before you can alter it.
TOPIC 4 – SAVING DOCUMENTS
You have already begun to understand the folder structure of the computer and how to
set up folders. This topic teaches you to save documents you have created. Remember
that you are in control and it is up to you to tell the computer exactly where you want
to save something. Do not allow the computer to tell you!
When you save a document, you have to undertake two very important steps. These
are:
1. Give your document a name.
2. Tell the computer where to store it.
The process is quite simple but many people do not make the effort to understand the
steps involved, so consequently their computers resemble a very untidy desk.
So far, we have been practising on a document called Document 1, Document 2 or
whatever, the default name that Word gives to any new document you open.
Note that, until you save a document, you are in danger of losing all your work. This is
because it is stored temporarily in the RAM, the memory we looked at in Section One.
If a power cut occurs, or if the computer malfunctions for any reason, you will lose all
your work. So it is vital that, once you start work on a new document, you save it at the
first opportunity.
© Martin Darke 2008
40
Let’s look at the process with our existing document on which we have been practising.
We will save this document in the folder called My Folder which we set up in Section
One.
Activity 4
1. Click File, Save As. The Save As window appears:
2. In the File name window, give your document a name by typing Test. This will
over-write Doc1 which is already highlighted.
3. Next, double-click on My Folder. This will move My Folder up to the Save in
window. Your screen should now look like the one below:
© Martin Darke 2008
41
4. Now click the Save button. Thus we have performed the two critical processes in
saving a document.
5. To check that the document has been saved, close the document and close Word by
clicking on the close button in the top right-hand corner of the screen.
6. Back at your desktop, click Start, My Documents.
7. Double-click on My Folder to open the folder, and you will see your document
called Test.
8. To open this document, all you need to do is double-click on the icon, and then you
can carry on working on the document.
9. The screen below shows the contents of My Folder:
© Martin Darke 2008
42
10. When you open the Save As window, it sometimes happens that you click on the
wrong folder to be placed in the Save in window. If this occurs, you can easily navigate
back to the right folder by using the three arrows next to the Save in window. These
are shown below:
© Martin Darke 2008
43
11. The down arrow produces the drop-down box through which you can navigate to
any folder on your computer. The left-pointing arrow takes you back to the last folder
visited, and the icon with an up arrow over a folder takes you up one level.
VERY IMPORTANT – the first time you save a new document, always click File,
Save As. From then on, if you open the document again and make changes, all you have
to do is click the Save button,
, on the toolbar to save your changes.
Many people make the mistake of clicking File, Save As again and end up saving
another document. XP does not allow you to save two documents with the same name
in the same folder, so you could end up with similar documents with different names.
TOPIC 5 – OPENING SAVED DOCUMENTS
As we saw above, we navigated to the folder called My Folder, located our Test
document, and then double-clicked the icon to open the document. There are always at
least two different ways to perform the same action so let’s look at another way to
open documents you have already saved.
Activity 5
1. Open Word.
2. Click on the Open icon on the standard toolbar,
3. The screen below appears:
© Martin Darke 2008
44
4. Double-click My Folder to tell the computer to Look in this folder. The screen
below appears:
5. Click on Test to select the file and then click Open in the bottom right-hand corner
to open the document.
6. If you accidentally insert the wrong folder in the Look in window, then you can again
use the navigation buttons to locate the right folder.
TOPIC 6 – MORE EVERYDAY TIPS
1. If you want to delete text, simply scroll across the text to highlight it, and then press
the Delete key.
2. Another method of deleting text, let’s say if you have mis-typed a letter or word, is to
press the Backspace key.
3. To move your insertion point down to the next line, press the Enter key.
4. Cut, Copy and Paste are buttons you will use regularly. They look like
. Select the text first. Cutting removes the text from your document,
whilst copying makes a copy. The cut or copied text goes to the Clipboard where you
can store up to 24 items. Clicking Paste pastes the text wherever you have placed the
insertion point.
Activity 6
1. Open your Test document and practise inserting and deleting text, as well as moving
the insertion point further down the page.
© Martin Darke 2008
45
TOPIC 7 – INSERTING PICTURES
If you have a new résumé and you want to put your photo on this document, then as
long as a picture is stored on your computer, you can achieve your aim.
Let’s look at this process.
Activity 7
1. Ensure your Test document is open.
2. Position your insertion point anywhere you like. This is where our picture will be
inserted.
3. Click on the Insert menu at the top of the page.
4. Click on Picture, and then From File. Remember that every picture stored on our
computer is a file.
5. The following screen will appear. Normally Word will automatically default to the My
Pictures folder where it expects all your pictures to be saved. However, you can
navigate to any folder on your computer as we have already seen.
© Martin Darke 2008
46
6. Double-click the Sample Pictures folder to open it, and in the next screen click on
a picture and then click Insert.
© Martin Darke 2008
47
7. The picture you have selected will be inserted into your document.
8. To resize the picture, click anywhere inside the picture. Small squares, called grab
handles, will appear at each corner and half way up each side. Position the pointer over
a grab handle and notice it changes shape to a double-headed arrow. By holding your
mouse down and dragging, you can change the size of your picture as desired.
9. Notice also that the Picture toolbar appears on your screen. You can alter your
picture using the toolbar, for instance by making it brighter, but this is too advanced for
a beginner’s course.
TOPIC 8 – TEMPLATES
One of the best features of Word is the range of templates provided to enable you to
write very professional-looking documents. A template is a series of fixed settings that
include margins, font type and font size. Even a blank document is a template. Within
Word there are templates for letters, reports, résumés, memos, theses and much more.
All you have to do is open the required template and start typing. The formatting is
already done for you. It can save a great deal of time. What’s more, you can still change
anything if the layout is not precisely to your liking.
Let’s have a look at the templates available.
© Martin Darke 2008
48
Activity 8
1. Open Word.
2. Click File, New and then On my computer under the Templates heading:
3. At the next window click Letters & Faxes and then Elegant Letter.
© Martin Darke 2008
49
4. The template for Microsoft’s version of an elegant letter will appear. Follow the
instructions on the page, i.e. where it says Click here and type recipient’s address,
that’s exactly what you do. Notice how the date is automatically inserted.
5. Once you have finished typing your letter, click File, Save As to save it in an
appropriate folder. The original template will always remain in the templates folder and
can be used over and over again. You can even set up your own template, for instance a
letter heading, which will save you having to type your name, address and contact details
each time you write a letter.
TOPIC 9 – OTHER COMMON FEATURES
Word has many features. Here’s a few you can try, perhaps by first reading about the
subject in Help if you don’t immediately have the confidence to experiment.
1. Once you have written a document, click on Tools, Spelling and Grammar to
check your spelling. Note the button on the toolbar,
, performs the same function.
As you type your document you will occasionally see red and green jagged underlines
appearing. This is a function of Word which is suggesting that the spelling or grammar
respectively might need to be changed. The underlines are never printed.
© Martin Darke 2008
50
2. You can compile numbered lists in documents, using the Bullets and Numbering
tool found under the Format menu. The corresponding buttons on the toolbar look
like
.
3. To put a header and footer in your document, including page numbers, go to View,
Header and Footer. Note the footer on this page and throughout the manual.
4. If you type a document and find that you have only one sentence on the second page,
you can decrease the margins of your document and thus create space on the first page
for more text. To do this, go to File, Page Setup.
5. Tables can be inserted into documents by going to the Table menu, and then clicking
on Insert, Table.
TOPIC 10 – PRINTING
Another impressive feature of Word is that you can see how a document looks before
you print it. How often do people print a document and then decide that something
needs to be changed? Both paper and ink are wasted.
To see your document before it is printed, we use the Print Preview button, which
looks like
. You can also click on File, Print Preview. To close Print Preview,
click on the Close button,
.
When you are ready to print your document, there are various options. If you require
only one copy of the document, the quickest way is to click on the Print button on the
toolbar, which looks like
immediately print.
. If your printer is switched on, the document will
However, if you want to print more than one copy, or certain pages, or even just a
paragraph of text, then the best option is to click File, Print. The window below
appears:
© Martin Darke 2008
51
From here you can choose to print All the pages, the Current page (that’s the one
showing on the screen), or particular Pages. The instructions give an example. For
instance, if you want to print pages 1, 3, and 5-12 in a 15-page document, then you type
these figures, with the commas and hyphen, in the appropriate window.
Note the Selection button is greyed out or inactive. If you select just one word, or a
paragraph say, then this button will become active and you choose to print the selected
text only.
Note too that you can also change the number of copies by clicking on the small up
arrow next to the Number of copies window.
You are now in a position to start writing your own documents, either on a blank sheet,
or from one of the many templates. Don’t forget to use some of the formatting features
such as bold, italic, underline and colour. Once you are happy with your document, you
can then print it.
GOOD LUCK!
© Martin Darke 2008
52
Section Three
The Internet
OBJECTIVES
On completing this section, you will be able to:
Browse the World Wide Web
Access all kinds of information
Search for information on any subject
Save favourite Web pages for easy access
Change your home page
TOPICS
1.
2.
3.
4.
5.
6.
What is the Internet?
Browsers
Begin using the Internet
Favourites
Search Engines
The Home Page
© Martin Darke 2008
53
Table of Contents – Section Three
TOPIC 1 – WHAT IS THE INTERNET?..........................................................55
TOPIC 2 – BROWSERS....................................................................................55
TOPIC 3 – BEGIN USING THE INTERNET ...................................................56
TOPIC 4 – FAVOURITES.................................................................................59
TOPIC 5 – SEARCH ENGINES........................................................................61
TOPIC 6 – THE HOME PAGE .........................................................................63
© Martin Darke 2008
54
TOPIC 1 – WHAT IS THE INTERNET?
Described simply, the Internet is millions of networked computers on which information
is stored, all of them connected by telephone lines. All the information stored on these
computers is known as the World Wide Web. To access all this information (and to
send emails which we’ll look at later) you need a computer connected to the Internet
and a piece of software on your computer called a browser.
There are over 600 Internet Service Providers in Australia, the largest being Telstra,
followed by Optus. It is a very competitive business and being the biggest doesn’t
necessarily imply the best, so it is important to shop around and do some research
before committing to an ISP.
There are four main types of connection, namely:
Dial-Up – slow and when you connect to the Internet via your modem in your
computer, you incur the cost of a local call. More important is the fact that, whilst you
are on the Internet, you will not be able to make and receive telephone calls.
ADSL Broadband – more and more people nowadays are upgrading to this type of
service. Your ISP sends you an external modem, which again connects to your computer
and telephone line, but small filters are attached to each telephone connection in the
house which enable you to make and receive calls at the same time as you are using the
Internet. When your modem is switched on you are permanently connected to the
Internet, and there are no local call charges. ADSL is also much faster than dial-up.
Wireless Broadband – exactly as it sounds. Can be set up in the home for several
computers using a router or by simply inserting a device, similar to a thumb drive, in a
USB port.
Cable Broadband – a premium service which uses a cable network such as Foxtel.
Very fast but also much more expensive.
TOPIC 2 – BROWSERS
If you purchase a computer with Windows XP, Microsoft provides a free browser called
Internet Explorer. One of the reasons why there have been so many problems with
things such as viruses, worms and trojans, is because Microsoft didn’t really address
security issues within its browser. Consequently many people have switched to
alternative browsers such as Mozilla Firefox. Recently though, Microsoft has paid more
attention to security and Internet Explorer is much more secure, with improvements
being carried out continuously.
Through your browser, you can do many things, for instance:
read newspapers from all over the world
do your banking and pay bills
© Martin Darke 2008
55
shop
trace your family history
find a job
check the weather
find properties to rent or purchase
and much more. In fact, the possibilities are endless. The Internet has changed our lives.
Remarkably, to use the Internet effectively, you only need to know four things, which
are:
how to type an address
how to save Favorites (note the American spelling)
how to use a search engine such as Google
how to change your home page
Let’s look at these one by one. Before commencing, note that we are using Version 6 of
Internet Explorer. In November, 2006, Microsoft released the more secure Version 7.
The basic features of Version 7 are much the same as Version 6, except that the buttons
are in different places. Those of you who are already using Version 7, please refer to the
section in the Appendix at the back of this manual.
TOPIC 3 – BEGIN USING THE INTERNET
Every page on the on the World Wide Web has a unique address, usually beginning with
www (there are some www2 addresses). A typical example would be
www.jobsearch.gov.au, the website for the Federal Government’s site for helping
jobseekers. Note that the letters are all lower case and that there are no spaces.
Web addresses are preceded by http://. This stands for hyper-text transfer protocol, but
you don’t really need to know that. A few years ago, you still had to type http:// but
browsers have improved so that you no longer have to do this. Even if you type
microsoft.com, omitting www, you will find that your browser is intelligent enough to
take you to the right website.
So now it’s time to start using the Internet.
Activity 1
1. Open Internet Explorer by double-clicking the icon on your desktop.
2. The browser will open your home page, which in our case is Google.
© Martin Darke 2008
56
3. Note the address of the Google page which is http://www.google.com.au/.
4. To change the address and visit another website, first you have to click inside the
Address line as below. The address will be highlighted.
© Martin Darke 2008
57
5. Next type an address. In this case, www.jobsearch.gov.au. After typing the address
click Go or alternatively press Enter on your keyboard.
6. As the Jobsearch page downloads you will notice a blue bar unravelling at the bottom
of the screen. Once the page has finished downloading, you can then navigate around
the website by clicking on links. You know you have found a link when the pointer
changes to a hand shape, .
7. After clicking on a link, another page will open on the website. Sites such as Jobsearch
are made up of hundreds of pages. Be aware though that some links will take you to a
completely different website. This will become apparent as you will have two tasks open
on your Task Bar showing two separate pages. You can have as many pages open
at the same time as you wish. All you have to do is open Internet Explorer again,
whilst keeping the other pages open.
8. In your browser, there are five buttons on the left-hand side of the toolbar which we
use quite often.
Back – clicking on the Back button takes us to pages previously visited in the same
session.
Forward – if we have gone back, then we can revisit pages we have visited by going
forward again.
© Martin Darke 2008
58
Stop – if you decide that you don’t want to fully download a particular page, then you
can stop the download.
Refresh – occasionally pages do not download properly and an error message appears
on the screen (such as This page cannot be displayed) asking you to try again by
clicking the Refresh button. Be aware that sometimes the server on which the page is
actually stored might be out of action, in which case you need to try again later.
Home – clicking on the Home button always takes you straight back to your home
page.
9. Practise using these buttons, starting by clicking a link on the Jobsearch page.
TOPIC 4 – FAVOURITES
There are pages that you will visit on a regular basis. It would be very annoying if you
had to type the address each time you wanted to visit the same website. To get round
this problem, Internet Explorer allows us to save pages as favourites.
On the menu bar you will see a Favorites menu, and on the toolbar is a Favorites
button. Both perform exactly the same function, the difference being that the button
opens Favorites by taking up a part of the screen. For this reason, most people prefer to
use the menu.
Activity 2
1. Open Internet Explorer.
2. If you have not already done so, type www.jobsearch.gov.au in the address line
and download this page.
3. Click Favorites on the menu bar and then Add to Favorites. The screen below
will appear.
© Martin Darke 2008
59
4. Note that the text in the Name box of the Add Favorite window is already
highlighted. You can change this name to anything you like. Type Jobsearch and then
click OK.
5. If you click on Favorites again you will see Jobsearch on the list. All you have to do
is click on each favourite to visit the page.
© Martin Darke 2008
60
TIP - You might find that Favorites puts new items at the bottom of the list. If you want
your Favorites in alphabetical order, right-click inside the Favorites list and then click
Sort by name.
TIP – Eventually you will have many favourites. You can sort them into folders by
clicking on Favorites, Organize Favorites. For further information on this subject,
use Help.
TOPIC 5 – SEARCH ENGINES
If you do not know the web address for the information you are looking for, then you
use a search engine. There are a number of search engines available, but by far the most
popular is Google. It has even become a verb in our language. If you search for
something, you google it!
Activity 3
1. Open your browser and type www.google.com in the address line, then press
Enter. The screen below will appear.
2. With Google, you can search the whole Web, or for pictures, newsgroups and news
articles by clicking on Images, Groups and News respectively. Also, you can narrow
your search by clicking pages from Australia.
© Martin Darke 2008
61
3. To try a search, type soccer in the search window and then click Google Search. A
screen similar to the one below will appear:
4. In this case Google found 426 million pages relating to soccer in just over one-tenth
of a second! How incredible is that? Moreover, Google is a very intelligent search engine
and lists the pages in priority order. The first item on the list is FIFA, the world
governing body for soccer. To visit each page, move your pointer over the blue link
until it changes to a hand, then click. When you find pages you like you can save them as
favourites. Google makes its money from the sponsored links on the right-hand side
of the page.
5. Google lists its findings in blocks of ten. To see the next ten links, scroll to the
bottom of the page and click on the figure 2.
6. To refine your search, we use logical operators, such as the + sign. For instance, a
search for Asian food reveals 121 million hits, whereas Asian food + recipes +
curry results in around 1.17 million.
© Martin Darke 2008
62
7. What is the purpose of the I’m Feeling Lucky button? If you click this button
Google tries to guess exactly which website you want to visit and takes you straight
there rather than offer you a list of hits. Try typing Bunnings in the search window and
then click I’m Feeling Lucky.
8. If you’re feeling inquisitive, do a search for your own name. You might get a surprise.
9. If you’re interested in tracing relatives, type your surname + genealogy into the
search window. There is usually a website for every surname.
TOPIC 6 – THE HOME PAGE
When you set up the Internet on your home computer, you often find that your ISP
installs its website as your home page. Changing your home page to one that you would
prefer to see, for instance a daily newspaper, is easy.
Activity 4
1. Open your browser and type www.theaustralian.news.com.au in the address line
and press Enter.
2. After the webpage has downloaded, click Tools on the menu bar and then Internet
Options.
© Martin Darke 2008
63
3. At the next screen click Use Current and then OK. In other words you will be
using the current page on the screen.
4. The page for The Australian will now be your home page. Test this by clicking on the
Home button on the toolbar.
The world now really is your oyster! Good luck.
ONE FINAL TIP – Many people are concerned about using their credit card for
paying for services on the Internet, such as buying airline tickets for instance. If sites
such as Qantas and Virgin were not secure, then they would soon be out of business.
Generally speaking, to check whether a site is secure, always look for the address
beginning with https instead of http, and always look for a locked padlock icon
in the bottom-right corner of your screen. This is not an absolute
guarantee that the sight is secure as some fraudsters have succeeded in setting up scam
sites with similar features. As always, caveat emptor.
© Martin Darke 2008
64
Section Four
Email
OBJECTIVES
On completing this section, you will be able to:
Establish a free email account
Send and receive emails
Attach files such as photos to emails
Save attachments sent to you
Organise your emails
Set up an address book
Add a signature to your emails
Format your emails
TOPICS
1. All about Email
2. Setting up Hotmail
3. Reading messages
4. Creating a new message
5. Replying to and forwarding messages
6. Sending attachments
7. Receiving attachments
8. Folders
9. Managing folders
10. Junk Mail
11. Contacts
12. Some useful features
© Martin Darke 2008
65
Table of Contents – Section Four
TOPIC 1 – ALL ABOUT EMAIL ......................................................................67
TOPIC 2 – SETTING UP LIVE.........................................................................69
TOPIC 3 – READING MESSAGES...................................................................74
TOPIC 4 – CREATING A NEW MESSAGE ....................................................75
TOPIC 5 – REPLYING TO AND FORWARDING MESSAGES .....................77
TOPIC 6 – SENDING ATTACHMENTS .........................................................77
TOPIC 7 – RECEIVING ATTACHMENTS......................................................80
TOPIC 8 – FOLDERS........................................................................................82
TOPIC 9 – MANAGING FOLDERS .................................................................84
TOPIC 10 – JUNK MAIL ...................................................................................84
TOPIC 11 – CONTACTS .................................................................................82
TOPIC 12 – SOME USEFUL FEATURES ........................................................88
© Martin Darke 2008
66
TOPIC 1 – ALL ABOUT EMAIL
Not everyone who uses email knows that there are two types of email, one that is free
and one that is not. Yet the one that is free is only free if you use someone else’s
computer and there is no charge involved. Even to use free email, you have to be
connected to the Internet, and being connected usually incurs a monthly charge if you
are connected at home via an ISP.
Free services include Windows Live (owned by Microsoft and previously called
Hotmail), Yahoo, and even Google now offers a service called Gmail. They make their
money from advertising and have millions of customers.
When you pay a monthly fee to an ISP, you automatically receive an email address, such
as [email protected] (Telstra), [email protected], and
[email protected].
Typical free email addresses include [email protected] and
[email protected].
Note that there are no spaces in email addresses and they are almost always lower case.
In most cases you are usually allowed to choose your own username, as long as
someone else has not already chosen that address.
The big difference between using a free service and one designated by an ISP is the way
in which you access emails. Different software is involved. For a free service, you
connect to the Internet, open your browser, log on using your username and
password, and then you can read and send emails. All the work performed takes place
online and on a remote server. Firms such as Google provide space on their computers
which is yours. There is absolutely no need for you to have your own computer.
When you connect through an ISP at your home, you open special email software such
as Outlook Express or Outlook (both owned by Microsoft), or Incredimail
(independent from Microsoft), and you download all your mail to your computer. Once
the emails are downloaded, you can technically disconnect from the Internet, and read
your messages and compose your replies in your own time. In other words, you do not
have to be online permanently.
An analogy in terms of snail mail would be that, if you had to write a letter (for a feepaying service through an ISP), you write your letter, put it in an envelope, put a stamp
on the envelope, and then place it on your desk at home. The letter will not be posted
until you decide to send it, i.e. take it to the postbox down the road.
The equivalent for a free service is that, in order to write your letter, you actually have
to go to the post office, write your letter, put it in an envelope, and then post it
immediately. In other words, you have to be ‘online’.
© Martin Darke 2008
67
The questions will always be asked, ‘What do I do when I go on holiday? Should I open a
free email account so that all my friends can stay in touch?’.
The answer is No!
There is no need to have a free account. If you have an email address through an ISP,
when you go on holiday, you can still access your emails. To do so, you go to an
Internet café say, connect to the Internet, open a browser, and go to the home page
for your ISP, for instance www.bigpond.com if you are with Telstra. On that page you
can log on with your username and password, view and read your email, and reply to
them (in exactly the same way as a free service). The reason why you can do this is that
all emails addressed to you go to the ISP’s server first, and there they remain until you
download them to your home computer using software such as Outlook Express.
One of the advantages of a free service is that Gmail, for instance, does the initial virus
scanning. If you use Outlook Express, you need anti-virus software on your computer
and that involves another fee. Live (Hotmail) also filters spam (junk mail).
A disadvantage is that, if friends send you attachments such as photos, it might be
difficult to download and save them, though you could always use a thumb drive for this
purpose. Internet cafés might not always allow you to download and copy photos to
CDs or DVDs.
Even if you do have an email address through an ISP, it is worthwhile having a free
account as well, the main reason being that, if you have to put an email address on a
Web page accessible to the public, it is better to put your free address. This is because
spammers trawl through Web pages collecting email addresses and then send junk mail
to any addresses they find. Junk mail is a huge problem, and if you start receiving it to
your free account, all you have to do is close that account and open another one. It is
much more inconvenient closing your ISP email, as this is the one most often used by
your friends and for services such as banking.
In this chapter we are going to look at setting up a Live (Hotmail) account and learn
how to use it. Remember that this can be used from any computer in the world that is
connected to the Internet.
© Martin Darke 2008
68
TOPIC 2 – SETTING UP LIVE (HOTMAIL)
Activity 1
1. Open Internet Explorer, type www.hotmail.com in the address line and press
Enter on your keyboard. The screen below will appear.
2. Note that, once you have registered with Hotmail and set up your account, you must
always open this page and sign in by putting your full email address
(e.g. [email protected]) and password in the appropriate boxes before clicking
Sign In.
3. For now we must click Sign Up.
© Martin Darke 2008
69
4. In the window above, you can use the drop-down arrow to choose either a Hotmail
or Live address. In this case we’ve chosen the former.
5. In the next box type your required username. Try your name first, e.g billsmith.
6. Once you have inserted a name, click on the Check availability button.
7. If you are successful, i.e. nobody else has claimed that name, you will receive a
confirmation message in green. If you are unsuccessful, the message will be in red, and
you will have to try an alternative. For alternatives you could try similar names such as
bill.smith or billsmith26.
8. Next, you have to choose a password, and then re-type your password. Whilst most
people like to choose a password they can remember, be aware that hackers have
password-cracking software that can crack a password in less than a second if the
password is a word from the dictionary. If you don’t want someone to take over your
Hotmail account, set a password with an unusual combination of letters and numbers so
it is at least medium strength.
9. If you have an alternative email address this can be used if you forget your password.
Alternatively you can click on Or choose a security question for password reset
and then complete the details.
© Martin Darke 2008
70
10. At the bottom of the screen is an odd-looking box containing jumbled letters and
numbers. This is a security procedure introduced because spammers were able to set
up automated accounts for illegal purposes. It is claimed that these letters and numbers
can only be read by humans, so there is less likelihood of the account being used for
spamming. Type the characters as required.
11. Next, click I accept .
12. Quite often things start to go wrong here and it is almost certain that you will have
to perform the procedure all over again starting from scratch. Use the same email
address as before. If it is unavailable, then try signing in with it.
13. If you do succeed, the following screen will appear. You are now in the Inbox for
your new Hotmail account and a message is waiting for you.
© Martin Darke 2008
71
14. Take some time to familiarise yourself with this window. Note the links to various
folders. Where there are arrows, there is always a menu with more links. Always
remember to sign out when you have finished your session.
15. Clicking on the Today link takes you to this screen where you can see how much
of the 5Gb storage space you have used. We were able to register the username
[email protected].
© Martin Darke 2008
72
16. Bear in mind also that, if you do not use your account for more than 30 days, it is
possible it will be deleted. However, you should be able to re-activate it.
17. The two other links under Today are as follows:
Calendar – which is a daily organiser and allows you to keep track of your
appointments.
Contact list – which allows you to store email addresses and other information on
your regular contacts.
TOPIC 3 – READING MESSAGES
Activity 2
1. Click on the Inbox link to see your messages.
2. Every new customer receives a welcome message from Hotmail. Click on Windows
Live Hotmail to open your message.
3. Use your scroll bar to view the full message, and then click Inbox to return to your
inbox.
© Martin Darke 2008
73
TOPIC 4 – CREATING A NEW MESSAGE
Activity 3
1. You can click on the New button when you are in the Today section but, since most
people operate from their Inbox, click on the New link.
2. A blank message opens. Type the address of the recipient in the To: line.
3. If you are sending a copy to someone else, click on the Show Cc & Bcc (carbon
copy and blind carbon copy) button to expose the boxes. You can use the Tab key to
move down to the next box.
4. Bcc means blind carbon copy. The person to whom the original message is sent will
not know others have received a copy if their addresses are placed in this box.
5. Next type a Subject. This gives the recipient an idea of what your message is about.
6. Click inside the main text area, type your message, and then click Send. All sent
messages are saved in the Sent folder.
7. When you send a message to someone new, the next screen will appear, confirming
the message has been sent and prompting you to add their details to your Contacts.
© Martin Darke 2008
74
8. You can either go back to your inbox by clicking Return to Inbox or tick the box,
insert the First name and Last name and then click Add to contacts.
9. If you click Add to contacts, at the next screen click on Contact list, then you will
see that the addressee has been added to your contacts.
10. We will look at Contacts in more detail later.
TOPIC 5 – REPLYING TO AND FORWARDING MESSAGES
Activity 4
1. Open a message received from someone.
2. At the top of the message you have several options as follows:
3. If you click Reply, a new message will open with the address of the original sender in
the To box. The original subject will be preceded by Re, and the original message will
be in the main text area. The latter is included so that you can refer to it when
© Martin Darke 2008
75
composing your reply. Usually there is not much point sending back the original
message, so delete this part before sending your reply.
4. Once you have composed your reply, click Send.
5. Reply All is used when the original message was sent to more than one person and
you want to respond to everybody.
6. Click on Forward to forward the original message to another recipient. All you have
to do is insert their address and type a message (if you wish). Many people forward
jokes to others by email.
TOPIC 6 – SENDING ATTACHMENTS
An attachment is a file on your computer such as a document or photo. Remember
that, when we use Hotmail, we are actually composing our emails on a remote server,
so any attachment has to be uploaded along the telephone line to be attached to our
email before it can be sent. Let’s see how this process works.
Activity 5
1. Open a new message by clicking New, Mail Message.
2. When you have addressed and typed your message, click on the down arrow next to
Attach and then File.
3. A window called Choose file will appear. It is up to you to navigate to the file you
want to attach to your email, select the file by clicking on it once and then click Open
in the bottom right-hand corner. Your file will then be uploaded to the Hotmail server
and attached to your email. In the instance below, a file called Memoirs Part 1 has
been uploaded and it size is 25Kb. Note that Hotmail allows you to attach files with a
total size of 10Mb.
© Martin Darke 2008
76
4. To attach more files to the same email, simply go through the above process again
until you have uploaded all the files you require. Once the email is complete, click Send.
TOPIC 7 – RECEIVING ATTACHMENTS
You will know when an attachment has been sent to you by the paper clip-shaped icon
next to the email in your inbox.
Activity 6
1. Open an email in which there is an attachment and then click on the attachment. An
example is shown below.
2. The screen below appears
© Martin Darke 2008
77
3. Note that Hotmail screens all attachments for viruses and you will see a warning
screen if a virus is found.
4. If you choose Open, assuming you have the required software in which the file was
produced, then the file will open. You can then save it by clicking File, Save As.
5. If you choose Save, the Save As window opens anyway, and you can rename the file
and tell the computer in which folder to store it. Don’t forget to click Save. In the case
below we are saving a file called Programworkbook.
TOPIC 8 – FOLDERS
It is sensible to keep your inbox tidy. If you no longer want to keep a message, tick the
box next to it and click Delete.
© Martin Darke 2008
78
Deleted messages are placed in the Deleted folder and are deleted permanently by
Hotmail within 24 hours.
If you want to keep messages from certain people, it is a good idea to set up a new
folder and transfer messages from the inbox to that folder. Here’s how to do it.
Activity 7
1. Ensure you can see your inbox and click Manage Folders.
2. in the next window, click on New.
© Martin Darke 2008
79
3. Give you new folder a name (in this case Jokes) and then click Save.
4. Return to your inbox and you will see your new folder (Jokes) in the list on the lefthand side.
5. To transfer messages to your new folder, tick the box next to a message and then
click Move to.
6. Click on the required folder in the drop-down list and your message will be
transferred. To check, simply click on the folder on the left-hand side of the inbox and
you will see the contents.
© Martin Darke 2008
80
TOPIC 9 – MANAGING FOLDERS
You might want to delete folders when they are no loner needed. Here’s the process.
Activity 8
1. From your inbox, click on Manage Folders.
2. The next screen shows a summary of your folders. Simply tick the box next to any
folder, and then click Delete. You will be asked to confirm the deletion process. Note
that you cannot delete any of the five main folders provided by Hotmail.
TOPIC 10 – JUNK MAIL
Hotmail has the capability to filter spam. Generally the filter works quite well. All
messages placed in the Junk folder are automatically deleted after five days.
However, be aware that genuine messages from friends, particularly if their addresses
are not stored in your Contact list, sometimes slip through the net and are placed in
the Junk folder. So, in the first few months of using Hotmail, it is worthwhile checking
your Junk folder every now and again. You can easily transfer messages back to your
inbox using the Move to or Not junk button.
© Martin Darke 2008
81
TOPIC 11 – CONTACTS
We have already seen how, when we send a message to someone new, we are
prompted to add their name to our Contact list. How do we add a new name to
Contacts without sending a message? Let’s see how.
Activity 9
1. Click on the Contact list button.
2. Click New.
3. In the next window, add a First Name, Last Name, Nickname and Personal email address, as well as any other relevant details.
4. Once you have finished, click Save.
© Martin Darke 2008
82
5. Eventually you will have a whole list of contacts. When you are in your Contacts list
(People), by ticking the box next to a contact, and then clicking Edit, you can change
the details of any individual. Don’t forget to click Save.
If you are the secretary of an association, or the captain of a sports team, you can notify
each member of the association or team with just one email. This is simplified even
further by putting the email addresses of all the members into a single group. All you
have to do is send an email to the group and every member gets the message.
How do we set up a group?
Activity 10
1. From People, click on Manage categories.
© Martin Darke 2008
83
2. At the next window, click on New.
3. Give your group a name, which in this case is Squash Team. Click in the Members
box and type the first letter of a name. A drop-down box will appear from which you
can select a name. Repeat this action until you have selected all the names for the group.
When you have finished click Save.
4. In the instance below, when you type the letter ‘s’ in the To: line of a new email, you
have the choice of sending a message to the Squash Team. This saves a lot of time!
© Martin Darke 2008
84
TOPIC 12 – SOME USEFUL FEATURES
Spell check – when you have typed a new message, you can run a spell check by
clicking on Spell check. The functions are very similar to those in Microsoft Word.
Rich-Text Editor – ensure your Rich-Text Editor is turned ON by selecting it from
the drop-down menu.. This offers you all the formatting tools, similar to those in Word,
and you can also insert emoticons (smileys, kisses etc) from the toolbar.
Signatures – you can also store a signature which will automatically appear at the
bottom of every message you create. If you don’t need that signature for a particular
message, for example a job application, then you simply scroll across it, delete it, and
type a more appropriate signature. To access the signature tool, from the inbox click
Options, More options.
© Martin Darke 2008
85
Next click Personal e-mail signature.
Enter your text not forgetting to use the formatting toolbar, and then click Save.
You are now able to communicate by email from any computer connected
to the Internet from anywhere in the world. Good luck!
© Martin Darke 2008
86
Section Five
Outlook Express
OBJECTIVES
On completing this section, you will be able to:
Set up Outlook Express for first use
Send and receive emails
Attach files such as photos to emails
Save attachments sent to you
Organise your emails in folders
Set up an address book
Add a signature to your emails
Format your emails
TOPICS
1. Setup
2. Setup Part 2
3. Setup Part 3 - Security
4. Reading Messages
5. Creating and Sending Emails
6. Sending Attachments
7. Receiving Attachments
8. Address Book - Individuals
9. Address Book - Groups
10. Creating and Sending Emails – Part 2
11. Replying To & Forwarding Emails
12. Folders
13. Some Tips
© Martin Darke 2008
87
Table of Contents – Section Five
TOPIC 1 – SETUP.............................................................................................90
TOPIC 2 – SETUP PART 2...............................................................................96
TOPIC 3 – SETUP PART 3 - SECURITY.......................................................101
TOPIC 4 – READING MESSAGES.................................................................102
TOPIC 5 – CREATING AND SENDING EMAILS ........................................103
TOPIC 6 – SENDING ATTACHMENTS .......................................................109
TOPIC 7 – RECEIVING ATTACHMENTS....................................................110
TOPIC 8 – ADDRESS BOOK - INDIVIDUALS .............................................108
TOPIC 9 – ADDRESS BOOK - GROUPS ......................................................110
TOPIC 10 – CREATING AND SENDING EMAILS – PART 2 .....................117
TOPIC 11 – REPLYING TO & FORWARDING EMAILS .............................119
TOPIC 12 – FOLDERS....................................................................................121
TOPIC 13 – SOME TIPS .................................................................................123
© Martin Darke 2008
88
OUTLOOK EXPRESS
Outlook Express is one of the two original email software programs developed by
Microsoft. If you purchase a computer with the XP operating system, then you will be
given a free copy of Outlook Express, along with Internet Explorer to browse the
World Wide Web. Millions of people use Outlook Express at home for sending and
receiving emails – it’s user friendly and has a straightforward interface which helps you
to do what you want to do.
This is not to say that Outlook Express is the best software for managing your email. If
you want more advanced features, then you can always switch to Outlook, the other
program offered by Microsoft and which is used by many businesses. Outlook is one of
the components of the Microsoft Office suite.
With the introduction of Vista Microsoft ‘upgraded’ its version of Outlook Express to
Windows Mail. The two are very similar and if you have used Outlook Express you will
have no problems with Windows Mail.
Many individuals have switched from Outlook Express to programs such as Incredimail,
which you can download free from the Internet. Incredimail has some interesting
features which enable you to ‘decorate’ your emails so that they are more attractive to
the eye. Aside from Incredimail, there are yet more programs available, such as Eudora,
but in the end it’s entirely up to you, the user, to decide which is the most suitable for
your needs.
In this module, we’re going to take an in-depth look at Outlook Express to enable you
to get the best out of this program.
© Martin Darke 2008
89
TOPIC 1 – SETUP
When you enter into an agreement with an Internet Service Provider (ISP), you are
automatically given an email address such as [email protected] or
[email protected]. In most cases you choose the user name, e.g. billsmith, and
the rest of the address is determined by your ISP. Email addresses are almost always
lower case and there must be no spaces.
Having received your email address, Outlook Express (OE) has to be configured so that
you can send and receive emails. More often than not, the settings are installed via the
CD which is provided by the ISP, though in the case whereby you set up an Internet
account by telephone (e.g. Dodo), the call centre operator can easily step you through
installing the settings manually, as it only takes a few minutes.
It is worthwhile taking a look at this procedure as it can sometimes happen that settings
are accidentally deleted and you might have to install them again.
Activity 1
1. Open OE via the shortcut on your desktop or by clicking Start, All Programs,
Outlook Express.
2. Above is the opening screen for OE. Click on Set up a Mail account.
3. The following screen appears:
© Martin Darke 2008
90
4. Choose your Display name. For instance, if your name is Bill Smith, then type Bill
Smith in the box. When you send an email, the recipient will know whom it’s from by
the Display name in their Inbox. Then click Next.
5. Type your full email address, e.g [email protected], then click Next.
© Martin Darke 2008
91
6. Inserted in the boxes above are the addresses for your mail servers. These are the
ones for Telstra Bigpond. Remember that, when you are connected to the Internet, OE
‘talks’ to the ISP server to find out if there are any emails. If any have been sent to you,
they will be downloaded to your computer via the incoming mail server. Your outgoing
messages are delivered by the outgoing mail server. For beginners, there is absolutely no
need to understand the meanings of POP3 and SMTP. Suffice to say that POP3 should
normally appear in the box at the top. If it doesn’t, use the down arrow to access the
options.
7. Click Next.
© Martin Darke 2008
92
8. Enter your Account name (i.e your username) and your password. Ensure the box
is ticked to remember your password, then click Next.
9. Click Finish to complete the setup.
© Martin Darke 2008
93
Before we start learning how to use OE, let’s look at how these settings are stored.
10. Click Tools, Accounts.
11. Select the Mail tab, then click Properties.
© Martin Darke 2008
94
12. Under the General tab, you can see the Display name you chose. If ever you wish
to change your display name, the General tab is the place to go. Simply scroll across
the name, make the change, and remember to click OK. If you wish to change the name
for the servers then, for instance, mail.bigpond.com can easily be changed to
Bigpond.
13. By clicking on the Servers tab, you can see the addresses of the servers.
This is where you would change your username and password if ever the case arose.
Always remember to click OK if you make any changes.
Knowing where these settings are stored makes life a lot easier when you are talking to
call-centre staff and makes their lives easier too!
If OE is working normally, then DON’T interfere with these settings.
© Martin Darke 2008
95
TOPIC 2 – SETUP PART 2
Having completed the initial setup, it is now a good idea to change the layout of the
opening screen when we open OE. There are two ways of doing this but we’ll use the
longer one because it introduces us to another interesting area where we can make
many changes which influence the way OE operates.
The first change we’ll make is to ensure that OE always opens at our Inbox when we
start the program. After all, we always want to see what’s in our Inbox.
© Martin Darke 2008
96
Activity 2
1. In the window above, click Tools, Options.
2. Tick the box When starting, go directly to my ‘Inbox folder, then click OK.
© Martin Darke 2008
97
3. Click Tools, Options again, but this time click the Send tab. Untick the box
Automatically put people I reply to in my Address Book, then click OK. This
ensures you have control over who goes into your Address Book.
4. Close OE then re-open it. It will now open at your Inbox.
© Martin Darke 2008
98
5. It is wise to make further changes at this stage to reach the optimum setup (in the
opinion of the author!).
6. The Preview pane gives us a preview of the selected message in our Inbox.
Unfortunately, if the preview pane is showing, you do not have total control over
opening your messages. Once you close one, the next automatically opens. The problem
lies in opening a spam (junk mail) message. If you do, a message is automatically sent
back to the spammer that you exist, so you will get more spam. So it makes sense not
to use the preview pane, and hence you have total control over whether a message is
opened or not. If ever you suspect a message is spam, then simply delete it by selecting
it first (one click!) then pressing Shift + Delete on your keyboard. You will be asked to
confirm that you wish to permanently delete the message. Click Yes. The message will
bypass the Deleted Items folder and be permanently erased.
© Martin Darke 2008
99
7. To remove the Preview pane, click View, Layout.
8. Tick and untick the boxes as per the screen below, paying particular attention to
Show preview pane. Click OK.
9. It sometimes happens that OE changes its layout of its own accord. In such cases,
always click View, Layout, and restore the options according to your preference.
Don’t forget to click OK.
© Martin Darke 2008
100
TOPIC 3 – SETUP PART 3 - SECURITY
One critical aspect of using Outlook Express for emails is security. Viruses are usually
contracted by opening attachments attached to incoming emails. The user can often be
tricked into opening an attachment by the subject line of the email and the fact that the
email is received from a trusted friend. Normally, as long as your anti-virus software is
up-to-date and turned on, then it should automatically detect suspect emails so you
need not have to worry.
Should you ever have any suspicions about an email with an attachment, then do not
open either the email or the attachment. It is wise to delete the message
immediately and the best way to do this, repeating what we have already said, is to click
once on the email to select it, then press Shift + Delete on your keyboard. You will be
asked if you want to permanently delete the message. Click Yes. This method bypasses
the Deleted Items folder and the message is deleted, never to be retrieved.
You may find that you cannot open any attachments at all. This is entirely due
to Microsoft’s default security settings. To overcome this problem, here’s what to do:
1. Click Tools, Options, then the Security tab.
2. Untick the box ‘Do not allow……’ and then click OK. You will now be able to
open all attachments, but always be wary if you suspect any emails. If the box remains
ticked you will always be asked whether you want to open the attachment.
© Martin Darke 2008
101
TOPIC 4 – READING MESSAGES
Opening and reading messages is very easy. Let’s first take a look at our screen when
we have opened OE, connected to the Internet, and downloaded our new messages.
1. Note the summary of the contents in the bottom-left corner. There are two
messages in our Inbox above, one of which is unread. The latter is confirmed by the
figure in brackets alongside Inbox and also by the closed envelope icon alongside the
message from Michael. Once the message from Michael is read, the figure will disappear
and the envelope will appear open. Note that, when you use OE for the first time, there
is always a welcome message from Microsoft.
2. To open a message, double-click the message. By double-clicking the second message
in our Inbox above, we observe the screen below:
© Martin Darke 2008
102
3. You can expand the message by clicking the Maximise button and don’t forget to
use the vertical scroll bar if there is a large amount of text. Once you have read the
message, assuming you do not wish to reply, then close it by clicking the Close button.
TOPIC 5 – CREATING AND SENDING EMAILS
1. From your Inbox click Create.
2. The New Message window appears as below. Again it is a good idea to maximise
this window so that you can see all the buttons on the toolbar.
© Martin Darke 2008
103
2. Enter the email address of the recipient in the To box where you will find the
insertion point already flashing.
3. If you are copying the message to someone else, then put their address in the Cc
box. You can use the Tab key on the keyboard to move from one box to another.
4. Type a short Subject. Notice how New Message changes to the subject you have
typed, thus becoming the name of the message.
5. Type your message in the main text area and then click Send.
If you are online when sending messages, you will observe a figure one appear briefly
alongside the Outbox folder. Your message passes through the Outbox quickly before
it is sent. If you are offline when composing messages then your messages will be stored
in your Outbox until you are ready to send them. A figure will appear in brackets
denoting how many messages are waiting. This is more applicable to people using dial-up
or prepaid accounts who do not wish to waste valuable time with their ISP, thus
incurring additional costs. When messages are ready for sending, then they would
normally click the Send/Receive button as below.
© Martin Darke 2008
104
TOPIC 6 – SENDING ATTACHMENTS
Sending an attachment is very straightforward.
1. Start by opening a new email, addressing it, typing a subject and your message. Next
click the Attach button.
2. Next you will see the Insert Attachment window, usually opened to Look in the
My Documents folder. Here we have already navigated to a folder called Invoices by
using the navigation arrows. We plan to send a document called List of invoices as
an attachment.
3. To do this, select List of invoices by clicking on it once, then click Attach.
The document will automatically be attached to your email as below.
© Martin Darke 2008
105
Note that if you accidentally attach the wrong document, then right-click the attachment
and then click Remove from the menu that appears.
Note also that you can attach multiple documents, photos etc to an email but always be
conscious of the size limits (in MB) set by your ISP and that of the recipient. The size
can usually be ascertained from the figure in brackets as above.
Once you are happy your message is correct, then click Send.
TOPIC 7 – RECEIVING ATTACHMENTS
As has already been mentioned, viruses are spread through attachments, so it is
important that your anti-virus software is up-to-date and active, scanning all incoming
messages. Nevertheless, you should always be cautious before opening or saving
attachments, which are always indicated by the paper-clip icon alongside the incoming
message.
© Martin Darke 2008
106
1. After opening the message double-click the attachment.
2. The window below will appear. Once you click Open you can view the attachment.
3. After opening the attachment, if you wish to save it to a folder, then simply click File,
Save As and go through the normal procedure of telling the computer where to save
the file. You can also choose to rename the file if you wish.
© Martin Darke 2008
107
TOPIC 8 – ADDRESS BOOK - INDIVIDUALS
Outlook Express allows you to store lots of information on all your regular contacts.
This makes life very easy, particularly when sending emails, as you no longer have to
type the individual addresses. Let’s look at adding individual names to our list of
contacts, and later we’ll look at setting up groups, which is very useful for sending one
email to many people all at once (as a secretary of an association, for instance).
1. Open the Address Book by double-clicking on Addresses.
2. Click on the down arrow next to New, then New Contact.
3. Using the tab key to move from box to box, type in the first name, last name and
email address of a contact, then click the Add button.
© Martin Darke 2008
108
4. After clicking Add, the address moves down to the large box and the other buttons
on the right become active. If you have mis-typed the address, or if the contact later
informs you that he/she has changed their address, use the Edit button to make
amendments. After any changes, always click Set as Default and then OK.
© Martin Darke 2008
109
5. You can use the other tabs in this window to store further information on each
contact, including birthdays of children! Try clicking on them and, if you do add more
details, don’t forget to click OK.
TOPIC 9 – ADDRESS BOOK - GROUPS
1. Open Outlook Express and then open your Address Book.
2. Click on the down-arrow next to New and then click New Group.
© Martin Darke 2008
110
3. Type a name for your group, e.g. Association, and then click Select Members.
4. In the window below, there are four individuals in the Address Book. To add any one
to the Association group, click on a name and then click Select. This moves the name
over to the right-hand side (Members).
© Martin Darke 2008
111
5. Move across all the addresses of the individuals you want to be in the Association
group. An example is given below. Once you have done that, click OK.
6. You will now see the window below. Note the name of the group, and the number
of members.
If you wish to delete an individual, simply click on a name and then click Remove. If you
want to add new members, click on Select Members and then this takes you back to
the previous window from which you can shift new members to the group. ALWAYS
© Martin Darke 2008
112
REMEMBER TO CLICK OK IN THE WINDOW ABOVE TO SAVE ANY
CHANGES.
Your group will now be stored in your Address Book. If you want to make
any changes, simply open your Address Book and then double-click on the
group to open it up.
Next, how do you use the group to send emails? Start typing the name of the group
when you open a new email and it will automatically appear in the To line.
The problem with this method is that, when you send a message, the recipient sees the
email addresses of all the other recipients.
To get round this, what you should do is send the message to yourself and then put
the group in the bcc box (blind carbon copy). But how do you access the bcc box?
7. When you open a new email, you simply click on the little Address Book icon next to
To as shown below.
© Martin Darke 2008
113
8. This gives the following result, showing the Select Recipients window.
9. Now all you have to do is click on the Association group and then click the Bcc
button.
10. Next click OK.
© Martin Darke 2008
114
11. This gives the following result. Now insert your own email address in the To line,
type a subject, type your message and then click Send.
12. To simplify sending a message to yourself, it is a good idea to store your address
under the name of Distribution. Using the bcc function, you will be distributing a
message to multiple recipients.
See the windows below for clarification. The first stores your address (e.g. Bill Smith)
in the Address Book and the second sends the message.
© Martin Darke 2008
115
13. Once you have added a few more names, your Address Book will appear similar to
the one below. Note how the Association group appears on the left-hand side.
© Martin Darke 2008
116
TOPIC 10 – CREATING AND SENDING EMAILS – PART 2
Once you have added contacts to your Address Book, sending emails becomes so much
easier.
For instance, if you open a new email message by clicking Create, once you start typing
an address, OE tries to guess to whom you are sending the message, according to the
display names in your Address Book. Here’s an example. By typing the letter b (case
does not matter), Brenda’s name appears as she is the only person in our Address
Book under B. If we want our message to go to Brenda, then we add a subject and write
our message.
As another example, say for instance we had Martin, Melanie and Michael in our
Address Book, we would have to type Mi for Michael to appear, as OE scans the
Address Book alphabetically.
© Martin Darke 2008
117
Going back to the opening window for OE, with our Contacts in the bottom left-hand
corner, we have another easy way to enable new messages to be created.
By double-clicking on any name, a new message will automatically be opened with the
recipient’s address already in place. Clicking on Raymond Brown brings the following
result:
© Martin Darke 2008
118
TOPIC 11 – REPLYING TO & FORWARDING EMAILS
1. Again, OE makes things very easy for us. There are two ways to reply to and
forward emails. The first method is to open your Inbox, select a message and click on
either Reply or Forward.
2. The second method, which we will look at in more detail, is to open the message first
and then click on the same buttons which are always present.
3. Clicking on Reply produces the following:
© Martin Darke 2008
119
4. The important points to note here are:
a) the name of the original sender is automatically inserted as the recipient
b) the subject line uses the original topic with the letters Re inserted (meaning Reply).
You can change the subject to anything you wish by scrolling across and typing a new
topic.
c) the original message is included in your reply. The purpose of this is to enable you
to refer to the message when you are composing your reply in the space above. Once
you have written your reply, unless it is absolutely necessary to include the original
message, scroll across it and delete it.
Click Send when you have written your response.
Forwarding (to someone else) is very similar, the only differences being that you
have to type the name of a recipient, and Fw appears instead of Re.
Finally, what does the Reply All button achieve? If you are one of many recipients of an
email, then clicking Reply All means that your response goes to everybody else and not
just the original sender. It’s useful if you are participating in a group discussion, for
instance.
© Martin Darke 2008
120
TOPIC 12 – FOLDERS
Outlook Express provides you with the following folders:
Inbox – where all your incoming messages are stored
Outbox – where your outgoing messages are stored until they are sent
Sent Items – where a copy of every sent message is stored
Deleted Items – where all deleted messages are stored. You can quickly delete all
messages in this folder by right-clicking on the folder and then clicking Empty
‘Deleted Items’ Folder
Drafts – where you can save draft messages until you are ready to send them
To keep your Inbox tidy, you should either delete messages you no longer need, or
alternatively you can store them in newly created folders. For instance, if a friend
regularly sends you jokes, and you want to keep a record of them for future use, then it
is a good idea to set up a Jokes folder. Once this is established, you can drag messages
from your Inbox to this folder.
Let’s see how this is done.
1. From your Inbox, right-click on Local Folders and then click New Folder.
2. Gives the folder a name, in this case Jokes, and then click OK.
© Martin Darke 2008
121
3. The result is seen below, with a new Jokes folder.
4. To move messages between folders, click on the message, drag it over the name of
the desired folder, and then drop it into the folder by releasing the mouse button. You
can view the contents of each folder by clicking on the name of the folder.
© Martin Darke 2008
122
TOPIC 13 – SOME TIPS
1. Deleting messages
To delete messages, select the message in your Inbox and then click the Delete
button.
2. Formatting
If you wish to format your messages using tools similar to those in Word, ensure you
have ticked the Rich Text button in a new message so that the formatting toolbar
appears.
3. Spell Check
Check the spelling in your messages by clicking the Spelling button. This is very similar
to the spellchecker in Word.
© Martin Darke 2008
123
4. Adding a signature
Click Tools, Options, and then the Signatures tab to add the same signature to all
your messages. Use Help for further clarification if you have any difficulty.
5. Making your messages more attractive
You can change the design layout of your new messages by using Apply Stationery.
© Martin Darke 2008
124
6. Prioritising messages
To ensure the recipient understands that your message is of high priority, tick High
Priority. The recipient will see a red exclamation mark against the message in his/her
Inbox. The default for all messages is Normal Priority.
7. Read receipt
To receive notification that messages have actually been read, click Request Read
Receipt.
8. Multiple recipients
Messages can be sent to multiple recipients. Addressees are separated by semi-colons.
9. Help
Don’t forget Help, as information on every topic can be found under this heading.
© Martin Darke 2008
125
Appendix
Once you have purchased a computer and learnt the basics there are a few
important things you need to know to enjoy trouble-free computing.
For instance, Internet security is absolutely critical nowadays yet it is
remarkable that some users still do not have anti-virus software. To protect
your computer further, it is also necessary to have a firewall and antispyware software.
It is useful to know how to download programs from the Internet, as there is
so much good stuff out there which is free, and it helps to be aware of
Microsoft’s very useful utility (System Restore) which allows you to take your
computer back to a previous state if a download goes wrong.
Some basic computer maintenance will help to keep your computer running
smoothly, and finally there’s an introduction to the new version of Internet
Explorer.
So although by no means exhaustive and comprehensive, this appendix will
add to your knowledge base and help you to build even more confidence.
© Martin Darke 2008
126
Internet Security
A very important topic, security comprises three main elements, namely anti-virus
software, a firewall, and anti-spyware software. Let’s look at each one in more detail.
ANTI-VIRUS
Viruses are usually contracted by opening attachments that come with emails. If in doubt
about any email, DELETE IT. A virus is an executable program which installs itself on
your computer and can potentially do lots of damage, depending on how malicious the
virus writer intended it to be. In the worst case, you would lose all the information on
your computer and could spend several hundred dollars getting the virus removed.
By installing anti-virus software and keeping it updated, you reduce your risks
considerably. There are several main manufacturers of such software, including Norton,
McAfee, Computer Associates and Trend, and all are as good as each other. When
purchasing some computers, anti-virus software may be pre-installed. If not, you can
purchase a product off the shelf. Even though it may be pre-installed, you will have to
register with the software manufacturer in order to receive updates. Updating is usually
done automatically when your computer is connected to the Internet.
These companies make their money not only by selling the software but also by charging
you an annual subscription which entitles you to download the latest updates. Since new
viruses appear every day, it is essential to keep updated. Your first year’s annual
subscription is included in the cost of the initial package, but thereafter subscriptions
cost around $50 per year, depending upon the product.
You can avoid paying any costs by downloading a free anti-virus product such as AVG
or avast!. Both are very good products.
AVG, for instance, is rated just as good as any of the commercial products at detecting
viruses. It is also very user-friendly and millions of people take advantage. Completing a
Google search for AVG will take you to a website from which you can download the
product. AVG is owned by a German company called Grisoft which makes its money by
selling other products, offering AVG free as an incentive.
FIREWALLS
A firewall is a piece of software that protects your computer from hackers. It runs
quietly in the background whilst you are on the Internet, continually repelling attempts
to break into your computer. Any computer connected to the Internet is vulnerable to
attack, so it is essential to have a firewall permanently on. Windows XP has its own
firewall which can be found by clicking Control Panel, Security Center.
© Martin Darke 2008
127
The major anti-virus software manufacturers combine their products with a firewall but
it is not a good idea to have two firewalls running as they can conflict with each other.
Therefore, if you are using a commercial firewall, ensure that the Windows XP firewall
is turned off by accessing the Security Center.
ANTI-SPYWARE
Spyware has been defined as malicious software that takes partial control of your
computer without your permission, whilst adware monitors and profiles your Web
usage. These programs are installed on your computer without your knowledge when
you visit certain websites, and no software has yet been invented which prevents these
programs from being downloaded.
Symptoms of spyware include your home page being changed, pop-up ads appearing,
more toolbars installed, and your computer getting slower and slower.
Fortunately free software is available to combat this problem. Two recommended ones
are Ad-Aware and Spybot, whilst Microsoft has recently introduced an addition to its
security through Windows Defender. It is recommended that all of these programs be
installed. The two free ones can be downloaded via the Internet, and should be run at
least once a month, whilst Defender can be downloaded from the Microsoft website.
The latest free version of AVG anti-virus also includes anti-spyware software.
© Martin Darke 2008
128
System Restore
Before adding any new hardware or software to your computer it is a good idea to set
up a system restore point. In the event that anything goes wrong with an installation,
you can then restore your computer to an earlier state, that is the restore point, and
start a clean installation all over again.
System Restore can be found by clicking the Start button, then All Programs,
Accessories, System Tools, System Restore.
Click on Create a restore point and then click Next. It is a simple procedure to then
give your restore point a name. Periodically your computer will automatically set up its
own restore points, and you can view all the restore points available in the calendar by
selecting Restore my computer to an earlier time and then clicking Next.
If ever you use System Restore to take your computer back to a previous state, another
button called Undo my last restoration will be inserted as an additional option.
Further information can be found in Help & Support.
© Martin Darke 2008
129
Downloading Programs
Let’s look at downloading a program such as AVG from the Internet.
1. First, set a Restore Point just in case anything goes wrong.
2. Locate the website for downloading the program and click on the relevant button to
commence the download.
3. Click on Save.
© Martin Darke 2008
130
4. Save the file to your Desktop. There is no need to change the name. The file will
commence downloading.
5. Once the download is complete, close all open windows. You will see a new icon on
your desktop. Double-click on the icon and the program will commence installation on
your computer. Follow the prompts, accepting any defaults.
6. After the program has been installed, another icon will probably be placed on the
desktop giving you access to the main window of the program.
7. Remember to delete the original installation file icon from your desktop.
8. The program should now be ready for use.
9. If installation is interrupted at any stage, you can always use System Restore and go
through the whole procedure again.
© Martin Darke 2008
131
Windows Update
If you have a genuine copy of Windows XP, then you are entitled to download any
updates to the system. In fact, Microsoft is continually issuing updates as there are so
many things wrong with XP, particularly as far as security is concerned. You will find a
link to Windows Update in Control Panel, Security Center under the heading of
Automatic Updates.
When you are on the Internet, your computer will automatically check to see if any new
updates are available and will download them. When the download is complete, a popup window appears in the bottom right-hand corner of the screen advising that updates
have been downloaded. Follow the prompts to install the updates. You are able to
continue working whilst installation is completed.
The default setting for Automatic Updates is to install them at 3.00am every day. It is
recommended to change the setting as in the window above. Don’t forget to click OK.
© Martin Darke 2008
132
Simple Computer Maintenance
Defragmentation
It is a quirk of Windows operating systems that any new files are broken into pieces
(fragments) when they are saved to the memory. If you never defragment your
computer it gets slower and slower. ‘Defragging’, as the term goes, brings all the pieces
of each file together and stores them in one place.
You will find Disk Defragmenter in System Tools, the same place as System
Restore.
Click on the C drive to select it, then click the Defragment button. A coloured display
will appear as the defragmenter converts the fragmented (red) files into contiguous
(blue) files.
It is recommended to defrag once a month. It normally takes a matter of minutes and
no other programs should be run at the same time.
© Martin Darke 2008
133
Disk Cleanup
Whenever you visit a website, the page is stored as a temporary file in the memory. The
Disk Cleanup utility, which is also found in System Tools, allows you to delete these
temporary files and free up memory space. It is very easy to run. Accept any defaults
and it normally takes a few minutes at most.
Scheduled Tasks
To make life even easier, Microsoft allows you to schedule tasks such as Disk
Defragmenter and Disk Cleanup. The Scheduled Tasks utility can be found in
System Tools.
© Martin Darke 2008
134
Internet Explorer Version 7
In November, 2006 Microsoft upgraded Internet Explorer by adding more security
features. It also decided to change the interface, reflecting various improvements. Much
remains the same, except that the usual buttons are in different places. Let’s have a look
at some of the differences. Below is the new opening screen:
Note the new positions of the Back and Forward buttons, Refresh and Stop.
Favorites can be accessed from the Menu Bar or by clicking on
favourites can be added by clicking on
The Home button looks like
, and more
.
and the Print icon has changed to
© Martin Darke 2008
.
135
The Tools menu on the right-hand side offers a range of options. A new feature is the
introduction of the Phishing Filter which informs you whether the website you are
visiting is a bogus site. Ensure that both this and the Pop-up Blocker are turned on.
By clicking on New Tab you can open up another web page, which allows for easy
navigation between pages. You can open as many tabs as you wish. If you have more
than one tab open, you can close each individual page by clicking on the Close
button that appears on each tab. If you decide to close Internet Explorer completely you
will be asked if you wish to close all tabs.
Once you have more than one tab open, a Quick Tabs icon appears which enables you
to see all your open tabs in one window as below.
Finally, printing is also much improved. Print Preview allows you to shrink pages to fit,
adjust margins by click-and-drag, remove headers and footers, and switch between
landscape and portrait printing.
Overall, Version 7 is a vast improvement so don’t be afraid to download it if you haven’t
already done so.
© Martin Darke 2008
136
A Few Final Tips
Backup
Whilst XP is a very stable operating system which is unlikely to crash, if you store
important information on your computer, then you should back this up to a portable
storage device (CD or DVD) which should then be stored at a different venue to your
computer. Files can easily be copied to CDs or DVDs using burning software.
Error Messages
Occasionally error messages will appear on your screen and sometimes you will not
have a clue what they are about. Extract the text of the message and put it into Google.
This will lead you to lots of links about the error and you will be in a position to take
remedial action. Rest assured that any error will not be unique to you and will already
have affected thousands of other computer users.
Spam
Junk mail, or spam, is an enormous problem. You will get spam if you put your email
address on a publicly accessible website (better to use a Hotmail address rather than
your ISP address). If you suspect any email in your inbox to be spam, NEVER open it. If
you do, a message will go back to the spammer confirming your existence and you will
get more spam. Spam-filtering software is available, some of it free, but for a beginner it
is very difficult to use properly. If spam is a problem to you, the best way to get rid of it
is to change your email address.
File Sharing
File-sharing software allows you to download, for instance, free music from other
computers. Naturally children think this is wonderful. Unfortunately, if you use such
software, you are literally overriding your security software and leaving yourself very
vulnerable. It’s a bit like leaving the front door of your house open when you go to
work. Anyone can come in and help themselves. The risk is yours, but don’t say you
haven’t been warned!
Good luck!
© Martin Darke 2008
137
ABOUT THE AUTHOR
Martin Darke (56) arrived in Melbourne in 1996 with a global consulting firm after a
successful career in Hong Kong. Not long afterwards he was made redundant.
Seeking a change in career, he studied for a Diploma in eBusiness Support in 2000, but
despite being awarded a certificate of excellence, he still found himself working in a
factory, being deemed too ‘old and experienced’.
It was only after meeting Grace Johnston in 2003 that Martin was able to decide what to
do with the rest of his life. Grace (www.busyboomers.com.au) specialises in helping
people to re-invent themselves. She helped Martin to recognise his range of skills and
point him in the direction of building his own business.
Martin moved to Perth in July, 2004 to start all over again. He hasn’t looked back.
Martin now specialises in computer training for mature-aged people, the generation that
missed out. He teaches individuals one-on-one, as well as groups, particularly
unemployed people.
He also writes résumés, having spent many years in recruitment, teaches various
courses at TAFE, and imparts Grace’s ideas through workshops for the unemployed.
More recently, Martin has completed a course in relaxation massage.
For further information, visit Martin’s website at www.a-new-career-direction.com.
© Martin Darke 2008
138