1
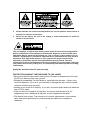
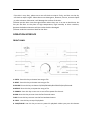
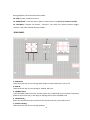
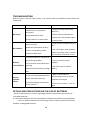
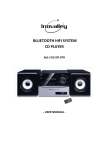
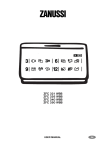
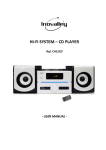
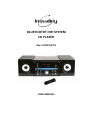
BLUETOOTHT HIFI SYSTEM CD PLAYER Ref: CH10CD‐BTH ‐ USER MANUAL ‐ IMPORTANT SAFETY INSTRUCTION ‐ Thank you very much for your purchase of our Bluetooth HiFi System. ‐ To optimize the performance of this system, please take the time to read through this manual and become familiar with the operation procedures. ‐ Be sure to keep this manual for future reference. ‐ On the machine should not receive the water drop or the water splashes, on the machine could not lay object filled with liquid, like vase. ‐ The power cord must remain easily accessible. Power sources: this unit should only be used with indicated on the marking label. Never handle the power plug with wet hands. Do not place a heavy object on or step on the unit. Avoid to place under sunlight. Never open the cover. Avoid small metals and liguids dropping into the unit Protect power cable. Avoid high pressure and do not step on it . Do not pull it or bend it excessively. Unplug the power cord from the wall outlet when you do not use it for a long time. 2 Please read this user manual carefully before you use this product. Please reserve it properly for reference in the future. Please do not expose the unit in the raining or moist environment to avoid fire hazard or electric shock. This set employs an optical laser beam system in the CD mechanism designed with built-in safeguards. Do not attempt to disassemble. Exposure to this invisible laser light beam may be harmful at the human eye. This is a Class 1 laser product. Use of controls, adjustments or procedures other than those specified here in may result in hazardous laser light beam exposure. This compact disc player should not be adjusted or repaired by anyone except qualified service personnel. The laser mechanism in the set corresponds to the stylus (needle) of a record player. Although this product uses a laser pick-up lens, it is completely safe when operated according to directions. Apply the advices below for your security. PROTECTION AGAINST THE EXPOSURE TO THE LASER Being given that the laser beam used by this CD player is dangerous for the eyes, do not try to dismount the case yourself. Extinguish immediately if a solid object or liquid falls into the case. • Never not to touch the objective. If you do it, you are likely to damage the lens, and the reader could not function more correctly. Nothing to put in the slit of security. If you do it, the laser diode remains lit when the door of CD is open. If the unit will not be used for a long time, you ensure that the device is not supplied any more. Withdraw all the piles of the compartment with piles. This device uses a laser. The execution of controls, adjustments, or procedures other than those specified here could generate an exposure to dangerous radiations. 3 ELECTRIC SUPPLY 1. Please unplug the product in case of prolonged non‐use. 2. If the supply cable is damaged, it must be replaced by the manufacturer or qualified after‐sales personnel to avoid any danger. 3. This product must be connected to an electrical supply 100‐240V ~ 50/60Hz. 4. The plus must be accessible after installation. 5. Hold the plug well when you plug the power cord in or out. 6. Please do not put the AC power cord near any heat source equipment. 7. Please do not place any heavy objects on the AC power cord. 8. Please do not overhaul the AC power cord. 9. This product contains a low power laser device. In order to keep safety, please do not open the unit to expose the inside parts. If there is some problem need to be repaired, please let the professional people check and repair it. PLACEMENT AND MAINTAIN FOR THE UNIT 1. Please do not put the unit in a sealed place or cover something onto the unit, to avoid the unit damaged by its inside temperature’s abrupt rising. 2. Please do not expose the unit under the sunshine directly or place it near the heat source equipment. 3. Please do not place any container with water or fire liquid. If there is any liquid in, please plug out the power cord and contact with the professional repairer. 4. Please do not open the unit to contact the inside components. Otherwise it may cause electric shock or unit damage. If need any repairs or adjustment, please provide this unit to the professional person. 5. Please put the unit on the horizontal surface. Please do not put any heavy object on the unit. 6. When the unit pauses, please set it to the standby state. If you do not want to use the unit for a long time, please take off the power cord from the AC power socket, and take out the Li‐battery from the unit. 4 7. Do not put your fingers or other objects into the unit. 8. Under the following circumstances, there will be condensed dew on the Lens: 1) When the heat source equipment was just activated. 2) In a very damp room or a room with vapor. 3) When the unit is just moved from a colder place to a hotter place. 9. Pull the plug out of the socket before cleaning the unit. Use a piece of wet cloth for cleaning. Please do not use detergents or sprays, which will cause the liquid enter into the inside unit and cause unit damage, fire hazard or electric shock. This kind of liquid will also damage the surface of the unit. 10. Please do no repair the unit by yourself. 11. If there is Dirt or Friction on the Lens, It will impair sound, or even make it no sound when disc playing. 5 TABLES OF CONTENT IMPORTANT SAFETY INSTRUCTION PLACEMENT AND MAINTAIN FOR THE UNIT TABLES OF CONTENTS MAIN CHARACTERISTICS PACKING CONTENT OPERATION AND MAINTENANCE OF CD DISCS OPERATION INTERFACE REMOTE CONTROL BASIC OPERATION TECHNICAL SPECIFICATIONS USEFUL TIPS TROUBLESHOOTING 6 MAIN CHARACTERISTICS Full compatible with CD, WMA, MP3, CD‐R/RW discs etc. With USB2.0 and SD card Slot. The unit can read information from USB or SD card quickly. With Digital FM function. With Bluetooth function It can play MP3 file both from CD disc and USB driver. With Full Function Remote Control. PACKING CONTENT Please refer to the following accessories. If you found there is any shortage for the contents, please contact the dealer immediately. Remote Control 1pc User Manual 1pc Audio Cable 1pc OPERATION AND MAINTENANCE OF CD DISCS ◇ Please take out the disc by holding the brim of the discs as below, please try to not touch the shinning side of the disc (Data Storage Side) ◇Please don’t attach any labels on the side of the disc. Do not scratch the surface of the disc. ◇When the disc is being played, the rotate speed will be very high. Please do not use any damaged, scratched, cracked or bent discs to avoid causing unit damaged. ◇Fingerprints or Dirt on a disc will impair the reflective light of the disc and will affect the signal’s quality directly. The poorer the signal’s quality is, the poorer the playing effect is. Please use the soft cloth to wipe the disc from the disc center towards the outside direction. 7 If the disc is very dirty, please use a wet soft cloth to wipe it firstly, and then use the dry soft cloth to wipe it again. Please do not use detergents, benzene, thinner, antistatic liquid or other solvents. Otherwise it will damage the surface of the disc. ◇Please put the discs into the original boxes where they are so as not to bend them. Do not put the discs at the place of high temperature, high humidity or direct sunshine, because the bad environment will also make the discs damaged. ◇Please read the instruction label for the discs. OPERATION INTERFACE FRONT PANEL 1. PREV: Press this key to choose last song or file. 2. NEXT: Press this key to choose next song or file. 3.SOURCE: Press this key to choose CD/USB/SD CARD/BLUETOOTH/AUX/FM mode. 4.REPEAT: Press this key to repeat the song or file. 5. POWER: Press this key to turn on or turn off the power for the unit. 6.FWD: Press this key to enter into the fast forward status 7.REV: Press this key to enter into the fast backward status. 8. STOP: Use this key to stop CD playback 9. PLAY/PAUSE: Use this key to start or pause CD playback. When you press this button 8 during playback, the unit enters Pause mode. 10. USB: Connect a USB Driver here. 11. OPEN/CLOSE: Press this key to open or close the disc tray (only use under CD mode). 12. VOLUME+/‐: Rotate this button, “Volume+” will make the volume become bigger, “Volume‐“will make volume become smaller. REAR PANEL 1. AUDIO Out These terminals are for connecting audio output of external devices, such as TV. 2. AUX IN These terminals are for connecting PC, Mobile, MP3 etc.. 3. SD/MMC Card: Insert SD/MMC card to this slot, and then press the “FUNCTION” key to choose Card status, and then press PLAY key, it will begin to playing the file from SD/MMC card. 4. FM Antenna: When you choose FM status and search for the FM channels, you need to use it. 5. Speaker Output: These terminals are for connecting speakers. 9 REMOTE CONTROL ◇Method for installing the batteries of the remote control 1. Turn to the back side of the remote control and remove the small cover; 2. Install 2 x AAA batteries (not included)properly; 3. Fit on the small cover. Note: 1. Please do not use the rechargeable battery 2. Does not mix use the battery with different brand and type for the remote control. Please do not use the new and old batteries together. 3. When the remote control’s function is not so strong or the control range becomes smaller, please change the 2pcs x AAA batteries together. 4. If the unit will not be used for a long time, please take out the batteries from the remote control so as not lead to battery liquid leak, corrosion and unit damaged. 5. Do not put the remote control on the high temperature high humidity place. 6. Please do not disassemble the remote control. 7. Please do not let the remote control or the infrared reception head of the panel glared by the strong light. Otherwise it will interfere the remote control’s signals. The effect will be excellent when the remote control is operated within 5m distance and within the angle of 30°. 10 REMOTE CONTROL DIAGRAM 1.STANDBY 2.NUMBER KEYS 3.MUTE 4.CH+ 5.VOL‐ 6.PLAY/PAUSE 7.PROG 8.CH‐ 9. SOURCE 10.REPEAT 11.PREV 12.NEXT 13.OPEN/CLOSE 14.BASS/TREBLE 15.CH+ 16.ST/MO 17.SLEEP 18.STOP 19.FWD 20.REV NOTA : batteries 2 x AAA 1.5V NOT INCLUDED. FUNCTION INSTRUCTION FOR REMOTE CONTROL 1.STANDBY: Press this key to choose the unit POWER ON or STANDBY status. 2.NUMBER KEYS: It includes 0‐10 number keys and 10+/10‐ keys. You can press them to select the file which you want directly. 3.MUTE: Press it will make sound off; press it again will make sound on. 4.CH+ Press this key, it will choose the next FM station 11 (only use in radio mode and choose the FM channel which you have saved) Press this key to decrease the volume. 6.PLAY/PAUSE Press this key to make the music play or pause(automatic searching under radio mode). 7.PROG Only after FM automatically searching and saved many FM channels, it will realize the PROGRAM function. There is no function under other modes. 8.CH‐ Press this key, it will choose the last FM station.(only use in radio mode and choose the FM channel which you have saved) 9.SOURCE Press this key repeatedly; you can switch among CD, USB, SD CARD,AUX IN,FM RADIO and BLUETOOTH playing. 10.REPEAT Press this key twice; it will enter into the "ALL REPEAT" mode. But because the software defaulted this mode ON, when you press this key twice, there will be no any change. But if you made the software setup this mode as OFF previously. When you press the REPEAT key twice, it will realize the "ALL REPEAT" function. 11. PREV Press this key to select the last file or frequency. 12. NEXT Press this key to select the next file or frequency. 13.OPEN/ CLOSE Open or Close the disc tray. 14.BASS/TREBLE: regulate the bass and treble Press this key one time ,then pres VOL+ or VOL‐ Button on remote control to make the bass bigger or lower; Press this key twice ,then press VOL+ or VOL‐ Button on remote control to make the treble bigger or lower. 15.VOL+ Press this key to increase the volume. 16.ST/MO Press this button to choose FM Stereo or Mono sound. 17.SLEEP When pressing this key, there are several options: 15mins, 30mins, 60mins and 90mins. That means the unit will be power off automatically after playing the music for 15mins, 30mins, 60mins or 90mins which you choose. This function is suitable for listening the music before sleep. 18.STOP 12 Press it to stop the file playing. 19.FWD Press this key to enter into the fast forward status, press it repeatedly, it will show: 2X: The program will be played at 2 times speed of forward. 4X: The program will be played at 4 times speed of forward. 8X: The program will be played at 8 times speed of forward. 20.REV Press this key to enter into the fast backward status, press it repeatedly, it will show: 2X: The program will be played at 2 times speed of backward. 4X: The program will be played at 4 times speed of backward. 8X: The program will be played at 8 times speed of backward. BASIC OPERATION I.FUNCTION CHOOSE Press the " SOURCE" key on the remote control, you can choose to play CD, USB,SD CARD, AUX IN,FM RADIO and BLUETOOTH as you like. II. CD PLAYING Press the ON/OFF power button the unit, the unit shall take the priority to enter into CD mode . III. USB PLAYING Insert USB flash driver, and then press the “SOURCE" key to choose USB status, and then press PLAY key, it will begin to playing the file from USB flash driver. IV. SD/MMC PLAYING Insert SD/MMC card, and then press the “SOURCE" key to choose Card status, and then press PLAY key, it will begin to playing the file from SD/MMC card. V. FM RADIO Using the FM antenna, if it is the first time for you to use this unit, please choose FM status by pressing “SOURCE" key firstly, and then please press ll key (on the remote control) , it will search the FM channels and save the stations automatically. Press “CH+” or “CH‐”, you can choose the last or next FM station. You can also revise the stored FM channel’s position by using PROG key. Press “ST/MO” key, you can choose or cancel the stereo FM radio receiving. 13 VI. BLUETOOTH Press “SOURCE" key to choose BLUETOOTH status from the front panel or remote control, it will enter into the Bluetooth status automatically. And then please open the Bluetooth function on your mobile phone or others Bluetooth device, it will begin to search for the Bluetooth device. This unit’s Bluetooth name is “CH10CD‐BTH”, finally your phone will match with this unit successfully. VII. AUX IN Press “SOURCE" key to choose AUX IN status from the front panel or remote control, it will enter into the AUX IN status automatically. TECHNICAL SPECIFICATIONS Compatible disc type Ports HIFI SYSTEM BLUETOOTH WITH CD PLAYER AND FM RADIO CD, WMA, MP3, CD‐R/RW discs etc. USB2.0 PORT AND SD/MMC SLOT CARD Audio output level FM band 1.0‐2.2V 87.5‐108Hz Audio signal to noise ratio ≥70dB(A weighted) 100‐240V /50‐60HZ 80 Watts Product type Power voltage Maximum power consumption Loudspeakers 2 x 25 Watts The instructions are only for reference, the company will reserve the right to modify specifications in this document without any prior notification. USEFUL TIPS ● In order to extend the local machine life, the switch me between machines turn on and off must be more than 30 seconds. ● Turn off the power a er using. ● The use of power should correspond with the mark voltage values, otherwise it will not play. ● For some of the discs, using some of the features of this machine, it cannot be achieved. ● If appear contingent dead halt, please restart the machine. 14 TROUBLESHOOTING Before contact with the repair person, you should check the problem reason follow the instructions. Phenomenon No sound Reasons Countermeasures 1.Audio line is not properly connected 2.Please clean and handle disc 2.Disc deformed or dirty 3.The machine n a mute status No read disc 1.Please correctly connect the audio line 1.Disc was bad produced ,deformation or dirty 2.Disc is not properly placed 3.Please press mute button again to cancel mute 1.Clean the disc and deal with the disc 2.Put in disc again, label upwards 3.Open the power switch, remove disc, and then hold about 1 hour 3.Optical header dew 1. Remote control is not point at the receiving window Remote control failure 1.Use the remote control 2. The remote control distance is properly too long. 2.The same time to replace 3.Remote control battery voltage battery less Instant function failure 1. Disk itself suppressed badness 2. Mis‐operation other key 3. External leakage electrostatic of the machine 1.Wait 5‐10 seconds will automatically return to normal 2.Operate once again 3.Turn off 1‐2 minutes,turn on again DETAILS AND PRECAUTIONS ON THE USE OF BATTERIES ‐ Discard a used battery in nature or garbage pollutes and prevents the recovery of recyclable materials. It is therefore important to limit consumption of batteries and follow these guidelines: ・ focus on alkaline batteries (that last longer than the saline batteries) and when possible, rechargeable batteries 15 ・ deposit batteries and accumulators in specific containers arranged among traders. For example, metals will be valued and polluted the environment because they contain heavy metals hazardous to health and the environment primarily (cadmium and nickel) ‐ The piles must installation by respecting the polarity indicated on the apparatus and the pile. An incorrect positioning can is to damage the apparatus, is to cause escapes on the level of the pile, is to the extreme to cause a fire or the explosion of the pile. ‐ To ensure proper operation, the batteries must be in good condition. In case of abnormality in the functioning of the device, put fresh batteries ‐ Never attempt to recharge non‐rechargeable batteries. They could run, warm up, causing a fire or explosion. ‐ Replace all batteries at the same time. Never mix zinc batteries with alkaline batteries or rechargeable batteries ‐ The batteries must be removed from the device ‐ Also, remove the batteries from your device if you do not use it for a long time, if the batteries may leak and cause damage. ‐ Never try to short‐circuit the battery terminals ‐ Never dispose of batteries in fire, they might explode ‐ Charging of batteries is to be performed by an adult. ‐ Remove batteries from the device before reloading. ‐ We recommend an adult to supervise children when they change the batteries so that these instructions are complied with or to make himself the replacement of batteries. ‐ If a battery is swallowed, immediately consult a doctor or poison control center nearest you. Do not forget to carry the product with you. 16 17