1
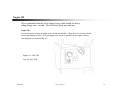
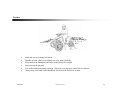
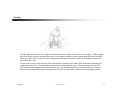
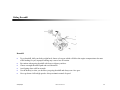
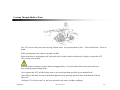
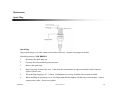
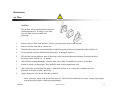
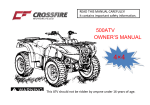
All Terrain Vehicle (ATV) Welcome to the growing family. This vehicle is delivered to you with the confidence and the reliability that have made us standout in these fields. This vehicle is designed and manufactured for OFF-ROAD use only, please check your local riding laws and regulations before operating this machine. Read this manual together with your children. It is important that you take the time to get acquainted with how your ATV works. The user manual provides detailed safety instructions, operation and maintenance procedures. An ATV is not a toy and can be hazardous to operate without proper instructions, we highly recommend that you take a training course from a certified instructor. Please follow the age recommendation: ATV Size / Minimum Age 50cc: 6~12 years old 90cc: 12 years old and up Please pay close attention to the following labels: ALWAYS USE APPROVED HELMET AND PROTECTIVE GEAR 2004/10/16 NEVER USE ON PUBLIC ROADS B017-DN-00-A6A NEVER CARRY PASSENGERS NEVER USE WITH DRUGS OR ALCOHOL 1 Specifications- 50cc / 90cc Engine Type: 2 Stroke Horizontal Suspension Rear: N/A Max. Power: 3.0ps / 6000 rpm Brake Front & Back Rear: Drum (Option) & Mechanical Disk Cylinder No# 1 Front & Rear Tire: 145 / 70-6 Bore Stroke: 40 x 39.2 Transmission: Automatic (C.V.T.) Displacement: 49.3cc Fuel: Unleaded Gasoline Max. Torque: 3.8N-m / 5500 rpm Overall Dimension: 48.8” x 28.5” x 30.1” (1240mm x725mm x 765mm) Carburetor: M6A Wheelbase: 33.9” (860mm) Starting: Electric Seat Height: 23.6” (600mm) Lubricate: Separated Ground Clearance: 4.3”(110mm) Lubricate Capability: 1 Liter Dry Weight: 165 lbs(75kg) Suspension Front: Double Wishbone Max. Load: 165 lbs (75kg) 2004/10/16 B017-DN-00-A6A 2 Understand your ATV and specifications 2004/10/16 B017-DN-00-A6A 3 ATV Parts locations and specifications 2004/10/16 B017-DN-00-A6A 4 Are You Ready? Important Information Before you ride your ATV, we urge you to read and do the followings: Always follow the age recommendation for the ATV. Do not allow your child to ride without adult supervision. This vehicle is not designed for carrying a passenger. Carrying passengers can cause loss of control resulting in severe injury or death. This vehicle is properly balanced to carry only the operator. Never operate without wearing an approved motorcycle helmet that fits properly. We urge you to wear eye goggles, face shield, gloves, boots, long-sleeved shirt or jacket and long pants. Never use with drugs or alcohol before or while operating this vehicle. Never operate an ATV on any public street, road, and highway. Try to avoid on any paved surfaces, including sidewalks, driveways, and parking lots. Never operate at speeds faster than your skill, or attempt any stunts. This can result in severe injury. Never modify an ATV through improper installation or use of accessories. Always use the size and type of tires specified in this manual. Always maintain proper tire pressure as described in this manual. Please inspect your ATV each time before use, and make sure it is in safe operating condition. Always follow the maintenance procedures. Read the warranties thoroughly so you understand the coverage that protect your new ATV and are aware of your rights and responsibilities. Always turn off the engine when refueling. Do not refuel when the engine is hot or running. Do not spill gasoline on the engine or the exhaust pipe, muffler. Never refuel while smoking, and do not use the cellular phone while riding you ATV. An ATV handles differently from other vehicles, including motorcycles and cars. A collision or rollover can occur quickly, even during routine maneuvers such as turning and driving on hills and over obstacles, if you fail to take proper precautions. 2004/10/16 B017-DN-00-A6A 5 Are You Ready? Important Information If you have any questions, or if you ever need special service or repairs, remember that your source dealer knows your ATV the best and is dedicated to your complete satisfaction. Never remove any labels from your ATV. If a label becomes difficult to read or comes off, a replacement label is available from your dealer. Never run the engine in close areas. The exhaust gas contains poisonous carbon monoxide. Do not touch any part of the engine, muffler or exhaust system while the ATV is still hot. Never attempt to operate over large obstacles, such as large rocks or fallen trees. Always check for obstacles before operating in a new area. Never operate an ATV in fast flowing water. Remember that wet brakes may reduce stopping ability. Test your brakes after leaving water. If necessary, apply them several times to let friction dry out the linings. When transporting the machine in another vehicle, be sure it is kept upright and that the fuel cock is in the “OFF” position. Otherwise, fuel may leak out of the carburetor or fuel tank. Always be careful when skidding or sliding. Learn to safely control skidding or sliding by practicing at low speeds and on level smooth terrain. On extremely slippery surfaces such as ice, go slowly and be very cautious in order to reduce the chance of skidding or sliding out of control. ATV handles differently from other vehicles, including motorcycles and cars. A collision or rollover can happen quickly and even routine maneuvers, turning, driving on hills or down hills and over obstacles, if you fail to take proper precautions, it can result in serious injury or death. Be cautious when riding and check your ATV each time before taking off, always have emergency first aid kit, tools with your ride. 2004/10/16 B017-DN-00-A6A 6 Are You Ready? Protective Apparel Never operate without wearing an approved motorcycle helmet that fits properly. You should also wear eye goggles, face shield, chest protector, gloves, boots, long-sleeved shirt or jacket and long pants. Your helmet is the most important piece of protective gear, can help prevent a serious head injury. Your helmet should fit snugly and fasten securely. Select a helmet that meets or exceeds state’s safety standards. Full face helmets help protect your face as well as your head. Open face helmet are lighter and may be cooler, but should be used with eye and mouth protection. Good padded gloves can help keep your hands from getting sore, cold or bruised. Over-the-ankle boots with low heels can prevent your feet from slipping off the footrest and protect your feet, ankles and lower legs. 2004/10/16 B017-DN-00-A6A 7 Is Your ATV Ready? Always inspect your ATV before you ride, please follow the checklist, it decreases the possibility of an accident or equipment damage. 1. Fuel: Check the level, fill fuel if needed. 2. Engine Oil: Check oil level, fill oil if needed. 3. Wheels and Tires: Check tire pressure, wear or damage. 4. Switches: Check to make sure they are working properly. 5. Fittings and fasteners: Check all fittings and fasteners. 6. Brakes: Check operation, of cable or fluid level on rear brakes. 7. Parking Brakes: Check for smooth condition and operation. 8. Drive Chain: Check the tension of the chain and make sure there are no damaged or rusted links, and check on sprocket condition. 9. Always warm up the engine for at least 5 minutes before take off, never accelerate hard with a cold engine, it does damage to your engine life. * Apply chain lubricant to lubricate the drive chain. 2004/10/16 B017-DN-00-A6A 8 Break-In your ATV Make sure all fluids have been filled (coolant, trans oil. etc.). Before starting a freshly rebuilt or new engine it is strongly recommended that you make sure that the carburetor has been thoroughly cleaned and fuel tank has been flushed clean. Fresh fuel/oil mixture has been used, air box has been cleaned and a new or freshly serviced air filter has been installed. Once the above steps have been completed, start your engine and follow the break-in procedure. Break-In your ATV During the first two weeks of riding, operate your new vehicle tenderly. Don’t run it very fast and don’t approach the maximum rpm. Following these guidelines will greatly enhance the long-term power and life of the engine. To get maximum engine life, always warm up the engine for at least 5 minutes before take off, never accelerate hard with a cold engine, it does damage to your engine life. 2004/10/16 B017-DN-00-A6A 9 Engine On / Stop Switches Engine Stop Switch The engine stop switch is on the left handle-bar. When the switch is in the “ “position, the engine will be OFF. When the switch is in the” “ position, the engine will be ON. This switch also can be used as a safety or emergency switch. 1. On 2. Off 2004/10/16 B017-DN-00-A6A 10 Starting Procedure Starting Procedure Remote control for engine kill MINI 50cc ONLY • Parking the vehicle on a level surface and lock the parking brake. • • Insert the ignition key into its switch and turn it to the “ON” position. • Turn the fuel valve to. • Move the engine stop switch to “ON “. If you use the remote control “ “ to kill engine while engine is on and operating, you have to press “ “on remote control first and then restart the ATV by turning on the key to “ON” position. Without pressing “ “ on remote control first, it’s not possible to restart ATV by only turning on the key. • Push the throttle level lightly. • • Push the start button on the left handle bar. Engine kill switch for parents to kill engine within 50m. (remote control) • Try not to kill engine while ATV is running unless under necessary condition. Note: • 2004/10/16 If you don’t use the remote control to kill engine, you can start the mini ATV as per normal Starting Procedure B017-DN-00-A6A 11 Throttle Lever Throttle Lever The throttle lever is beside the right handle bar grip and is activated by the right hand thumb. To accelerate the vehicle, simple press the lever forward and open the throttle, to decelerate, release the lever and the spring tension will close the throttle automatically. Before starting the engine, check the throttle to be sure it can operate smoothly. Make sure it returns back to idle position as soon as the lever is released. 2004/10/16 B017-DN-00-A6A 12 Front Brake & Rear Brake Rear Brake The rear brake is the lever located on the left handlebar. When braking, squeeze this lever. This brake also has a locking feature that allows it to act as a parking brake. To use the parking brake, pull the left-brake lever back and lock it. Make sure the vehicle is completely stopped before using the parking brake. To release the parking brake, firmly squeeze the left brake lever until the lock release. Check your brakes at the start of every ride. Do not ride the ATV if you find any problem with the brakes. Please contact your local dealer to fix the problem. 2004/10/16 B017-DN-00-A6A 13 Engine Oil We recommended that the oil be changed every other month, for heavy riding change once a month. Check for leaks from wear and tear. Engine Oil Two-Stoke engine oil must be added to the oil tank periodically. Check the oil level in the oil tank before operating this vehicle. If the oil supply to the engine is insufficient, the engine will stop operating until you replenish the oil. Engine oil : SAE 20W Gear oil : SAE 90W 2004/10/16 B017-DN-00-A6A 14 Fuel Valve & Fuel Tank Fuel Tank Fuel Valve Fuel tank capacity is 4 liters (1.32 gallons) including 0.8 liter (0.21 gallon) in the reserve supply. The three-way fuel valve is on the left side of the vehicle, just below the seat. With the fuel valve set on the “OFF” position, gasoline cannot flow into the engine carburetor. Use only unleaded automotive gasoline with an octane level from 87, 89 or 91. With the fuel valve set on the “ON” positing, fuel will flow from the tank and go into engine. After refueling, be sure to tighten the tank cap firmly. With the fuel valve set on the “RES” position, fuel will flow from the reserve fuel supply to the engine. At this setting, the fuel tank should be refilled as soon as possible. Do not overfill the fuel tank, be careful not to spill fuel, it can cause severe injury or fire. Turn off cellular phones and do not smoke when refueling. If overfill wipe off any spilled fuel immediately. Make sure the fuel tank cap is closed securely. 2004/10/16 B017-DN-00-A6A 15 Safety Switch & Speed Limiter Safety Switch The safety switch is located on handle bar. To operate the vehicle, the switch cap must be connected to the safety switch. The switch cap is attached to a rope, this rope should be controlled by the parents or the instructor. They must pull out the safety switch cap to stop the engine. 2004/10/16 B017-DN-00-A6A 16 Tires Pressure If the tire pressure is too high or too low, steering will be affected and tire wear will be increased. Operating tire pressure: You should check the pressure before running the vehicle when the tires are cold. •Recommended for 50cc: Max. pressure: 10psi Min. Pressure: 3psi NOTE: Do not fill more than 10psi of pressure. Seal damage may occur. • Never set tire pressure below minimum, it could cause the tire to dislocate from the rim. Loading: • Maximum vehicle load for the 50cc: 179 lbs, includes weight of operator, cargo and accessories. 2004/10/16 B017-DN-00-A6A 17 Under the seat Remove the seat Under the ATV seat there is a safety knob. Pull forward to remove the seat cover. You will be able to find the battery and tool kit. 2004/10/16 B017-DN-00-A6A 18 Vehicle Identification Number (VIN) & Engine Number VIN Numbers The frame, VIN and engine serial numbers are required when you register your ATV. They may also be required when ordering replacement parts. Please record the frame and engine serial number for future reference. Frame No._______________________________ 2004/10/16 Engine No.__________________________________ B017-DN-00-A6A 19 Posture 2004/10/16 Head and eyes up, looking well ahead. Shoulder relaxed, elbows bent slightly out away from your body. Keep hand on the handlebars and wrists should always be straight. Knees toward the gas tank. Feet on the footboards during operation. Otherwise your feet may contact the rear wheels. Always keep your hands on the handlebars and foot on the footrest at all time. B017-DN-00-A6A 20 Turning The rider must learn to move his weight and control the throttle to allow the rear tires to turn properly. When turning, the wheels on the outside of the turn must travel a wider radius and thus a greater distance than the wheels on inside of the turn. Since the rear wheel axle does not permit a differing rate of wheel rotation, it is enough to merely steer this vehicle into a turn. To turn properly, steer in the direction of the turn and lean your body to the inside of the turn while supporting your weight on the outer foot. Use the throttle to maintain power throughout the turn. Incorrect turning may cause the front wheels to slide straight ahead. If this should occur, close the throttle and stop. Avoid braking or accelerating until you have regained directional and speed control in order to avoid skids or while traveling on slippery terrain. 2004/10/16 B017-DN-00-A6A 21 Riding Uphill Uphill Practice riding at first on gentle slopes. Try more difficult hills only after developing and being comfortable with your basic skills. Avoid excessive steep hills or slopes, this could cause loss of control or the ATV to overturn. Keep both feet on the footrest at all times. When climbing a hill, shift your body weight forward at all times, proceed at a steady rate of speed and throttle opening. Never ride past the limit of your visibility. Slow down or stop. Proceed slowly only when you have a clear view. If you are unable to continue uphill, dismount the vehicle on the uphill side, turn the vehicle around and then descend the hill. If you cannot complete the hill due to steepness, do not engage the rear brake to stop from rolling backwards. This can easily tip the ATV backwards. Engage front brake and dismount the ATV. Only remount after turning the ATV around. 2004/10/16 B017-DN-00-A6A 22 Riding Downhill Downhill To go downhill, shift your body weight back, choose a low gear which will allow the engine compression to do most of the braking for you, improper braking may cause a loss of traction. Be cautious when going downhill with loose or slippery surfaces. Choose a straight down hill path and avoid obstacles. Avoid going down a hill at an angle. Use the brake(s) to slow you down as you going downhill and always use a low gear. Never go down a hill at high speeds. Always maintain control of speed. 2004/10/16 B017-DN-00-A6A 23 Crossing A Slope When you go across a slope rather than directly up or down, it’s called traversing. Traversing a sloping surface on your ATV requires you to properly position your weight to maintain proper balance. Be sure that you have learned the basic riding skills on flat ground before attempting to cross a sloping surface. • Lean your body uphill direction as you travel across a slope and keep both feet firmly on the footrests. • When riding on the loose surfaces, you may need to turn your front wheel(s) gently uphill to keep straight line across the hill. • Make sure not to attempt any sharp turns either up or downhill. • If your ATV does begin to tip over, turn the front wheel(s) downhill direction if there are no obstacles in your path or dismount the ATV immediately! • Avoid hills with excessively slippery or loose surfaces, it could cause loss of control or cause the ATV to over turn. 2004/10/16 B017-DN-00-A6A 24 Crossing Through Shallow Water The ATV can be used to cross slow moving, shallow water of up to maximum of (50cc : 18cm and 90/100cc : 20cm) in depth. Before entering the water, choose your path carefully. Enter where there is no sharp drop off, and avoid rocks or other obstacles which may be slippery or upset the ATV. Drive slowly and carefully. Remember that wet brakes may have reduced stopping ability. Test your brakes after leaving water until you have regained proper braking ability. Never operate this ATV in fast flowing water or in water deeper than specified in your manual book. After riding in the water, be sure to drain the trapped water by removing the check hose at the bottom of the air filter case. Wash the ATV in fresh water if it has been operated in salt water or muddy conditions. 2004/10/16 B017-DN-00-A6A 25 Maintenance Spark Plug Spark Plug Inspect spark plugs every other month for maximum efficiency. Replace when plugs are needed. Standard spark plug: NGK BR8HSA 1. Disconnect the spark plug cap. 2. Clean up dirt from around the spark plug base. 3. Remove the spark plug. 4. Inspect the plug electrodes for wear. If the electrodes and insulator tip appear unusually fouled or burned, replace with new one. 5. The spark plug plug gap is 0.7 – 0.8mm. If adjustment is necessary, bend the side electrode carefully. 6. When Installing the spark plug, screw it in finger tight and then tighten with the plug wrench another ½ turn to compress the washer. Do not over tighten. 2004/10/16 B017-DN-00-A6A 26 Maintenance Air Filter Air Filter The air filter will accumulate dust and must be cleaned periodically. If riding in very dusty area, the filter must be cleaned more frequently. 1. Remove dirty air filter from machine. Never try to wash a dirty filter on the machine. 2. Remove the filter from the air cleaner case. 3. Wash the filter element in a non-flammable or high flash-point solvent to help break down the old filter oil. 4. Do not twist the air filter element when squeezing it, if damaged, replace it. 5. Fill a bucket with one gallon or more of hot soapy water with strong detergent submerge filter into bucket of hot water, and let soak for 10 – 15 minutes. 6. After filter has soaked thoroughly, clean the filter out by hand, be mindful not to tear or rip the filter. 7. It must be rinsed very thoroughly, filter should be back to their original new color. 8. After rinsed, dry in a none dust free places. Make sure the filter is in a completely ventilated area for a minimum of 24 hours or more, until is dry. 9. Apply all-purpose oil to the air filter and reinstall it. Never operate the engine with the air filter removed. This will allow unfiltered air to enter, causing rapid engine wear and possible engine, carburetor jetting damage. 2004/10/16 B017-DN-00-A6A 27 Maintenance Carburetor & Drive Chain Drive Chain Carburetor adjustment Keep this part free of dirt and particles. If they enter the engine it may Cassese sewer damage of engine. The carburetor is a vital part of the engine and requires very sophisticated adjustment. Most adjusting should be left to a authorized dealer who has the professional knowledge and experience to do so. The drive chain will wear with use and requires periodic adjustment. Remove the chain guard to check the chain tension. The amount of slack should be 10 – 20mm, the chain slack can be adjusted by loosening the lock nuts and removing the chain tensioned plate. Don’t forget to tighten the lock nuts well. Lubricating the chain is sometimes needed. The SAE 80 or 90 gear oil is recommended. Check for: Rusted Links / damaged rollers / Twisted or binding Links. Parts found defective must be replaced. 2004/10/16 B017-DN-00-A6A 28 Maintenance Disc Brakes Disc Brakes Disc Brakes Check the brake cable for rust or signs of wear that could cause sticking or failure. Lubricate the brake cable with a available cable lubricant to prevent premature wear or corrosion. Make sure the brake arm, spring, rod and fasteners are in good condition. 2004/10/16 B017-DN-00-A6A 29 Maintenance Throttle Cable & Battery Throttle Cable Inspect the throttle cable’s condition and operation. Replace the cable if it has become worn or kinked. Keep cable smooth with lubricant to prevent premature wear or corrosion. Adjustments can be made with the adjuster beside the throttle lever. Loosen the lock nut and turn the adjuster, maintain free play of 5 – 10mm. 2004/10/16 Battery When reinstalling the battery, be sure to connect the cable to the positive ( + ) lead and the black cable to negative ( - ) lead. Replace the battery immediately when it looses power and does not hold a charge. On normal service, the battery should be replaced every three years. B017-DN-00-A6A 30 Maintenance Tire Thread Tire Thread: • Replace tire when groove becomes less than 3 mm (0.12 in), or has side wall cracks or cuts. • Worn tires can blow and cause loss of control. • Tire depth limit: 3mm • Never apply grease, oil or gasoline to the tire bead; it will diminish the tire. 2004/10/16 B017-DN-00-A6A 31 Wiring Diagram 2004/10/16 B017-DN-00-A6A 32 Maintenance Schedule: The maintenance intervals in table below are based on average riding conditions. Riding in unusually dusty areas requires more frequent servicing. Parts: Initial Service (First week) Regular Service (Every 30 operating days) (Every) 6 Month Every Year I+D I+D I I I Spark Plug I+D I+D I+D Carburetor / Idle Speed Adjustment I+D I+D I+D I I I+D I+D I+D I+D I+D I+D I+D Nut, Bolt, Fastener I I Wheel I I I I I I I Fuel Line Throttle Operation I I Air Filter Crankcase Breather System Drive Chain I I Brake Shoe Wear Brake System Steering System Battery 3 months C.V.T Air Filter C Note: ( I ): Inspect, check for any leakage or damage, clean, adjust, lubricate or replaced if necessary ( C ): Clean / ( L ): Lubricate ( D ): By a Dealer / ( R ):Replace 2004/10/16 B017-DN-00-A6A 33 Maintenance Schedule: Note: Before lubricating each part, clean off any rusty spots and wipe off any grease, oil, dirt or stain. Regular Service (Every 30 operating days) 6 Month Every Year Valves I+D I+D I+D Exhaust System I+D I+D I+D C C R R C or R C or R C C C Clutch I+D I+D I+D Wheel bearings I or R I or R I or R Upper & Lower Arm Pivot & Steering Shaft I +D I +D Rear Pivot I+D I+D I +D I+D I I I+D I+D I+D I+D I+D I+D Parts: Initial Service (First week) Spark Arrester Engine Oil R Engine Oil Filter Element Engine Oil Strainer Fittings & Fasteners I +D Front & Rear Suspension Chassis bolts and nuts Lights & Switches I+D Note: ( I ): Inspect, check for any leakage or damage, clean, adjust, lubricate or replaced if necessary ( C ): Clean / ( L ): Lubricate ( D ): By a Dealer / ( R ):Replace 2004/10/16 B017-DN-00-A6A 34