Transcript
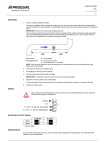
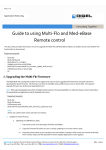
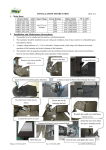
3. Notices
1. General Introduction
1) Please use the standard power supply only, and do not use
other power supplies.
2) Before you plug in the product, please read the instruction of
port wiring.
3) Before you plug the product to power supply, please
re-confirm that all wirings match the instruction. You may turn
on the product and if it works as usual, then the power
indicator and run indicator are on.
4) Please be notified that before you plug/unplug the product,
power switch must be at OFF position.
The product appearances are as follows. Please see
Figure 1- 1 and Figure 1- 2 .
Hall Switch VTNS1060A
User’s Manual
4. Installation Instruction
Version 1.0.0.
1.2.51.18.0900
There are 4 installation holes on switch which are for wall
mount installation. Please see Figure 4- 1 and Figure 4- 2 .
The 4 holes are located as each at one corner of switch.
Figure 1- 1
Caution
All installation and operation here should conform to
your local electrical safety codes.
Figure 1- 2
We assume no liability or responsibility for all the fires or
For product detailed information, please see Chart 1-1.
electrical shock caused by improper handling or
installation.
We are not liable for any problems caused by
Figure 4- 1
unauthorized modifications or attempted repair.
The device should be installed in a cool, dry place
away from direct sunlight, inflammable, explosive
substances and etc.
Indicator keeps
on or flashes
Indicator off:
Chart 1-1
2. Technical Specifications
For product technical specifications, please see Chart 2-1.
Figure 4- 2
0.2W (under free load)
45W (under full load)
Chart 2-1