1
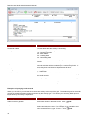
Data Access Studio Administrator's
Manual
Table Of Contents
ReportsNow Administrator's Guide ......................................................................................................................... 1
Create a DASADMIN user ............................................................................................................................. 1
Recommended System Requirements .......................................................................................................... 2
Minimum System Requirements .................................................................................................................... 2
Installation ...................................................................................................................................................... 3
Web Server .................................................................................................................................................... 4
Web Server Administration ............................................................................................................................ 5
Assign Users to a License Type..................................................................................................................... 6
Set Global Application Settings ...................................................................................................................... 7
Generate Search ............................................................................................................................................ 8
View Audit Trail Information ........................................................................................................................... 9
Working with the Audit Trail ........................................................................................................................... 9
Control All User Reports .............................................................................................................................. 12
Transfer Everyone's Work ............................................................................................................................ 13
Create and Manage Folders ........................................................................................................................ 14
User Security .................................................................................................................................................... 15
Application Permissions ............................................................................................................................... 17
Table Permissions ........................................................................................................................................ 19
Environment Permissions ............................................................................................................................ 21
Address Book Permissions .......................................................................................................................... 22
Object Selection Control .............................................................................................................................. 23
Enforce Index Use ........................................................................................................................................ 24
Email ................................................................................................................................................................. 25
Automator (Scheduling) .................................................................................................................................... 27
Installation .................................................................................................................................................... 27
Licensing ...................................................................................................................................................... 27
User Security ................................................................................................................................................ 27
Task Maintenance ........................................................................................................................................ 27
Index ..................................................................................................................................................................... 31
ii
ReportsNow Administrator's Guide
The Data Access Studio Administrator typically has high technical knowledge of the JDE system: network
architecture, database, deployment, etc. The Administrator controls how all other users access and use Data
Access Studio.
This guide discusses how to administer:
•
•
•
•
•
•
•
•
Setting up an administrator user
Installation
Web server
User licenses
Security
Audit trail
Transferring a user's work
Upgrades
Create a DASADMIN user
To access the Data Access Studio as an Administrator:
1. If you have not done so, add a user named DASADMIN to JD Edwards (EnterpriseOne/World). Make
sure DASADMIN has basic user rights to log in to JDE and query tables. Do not share the DASADMIN
password with anyone.
2. Launch Data Access Studio and sign in as DASADMIN.
If you licensed Data Access Studio by number of users, then the DASADMIN user will not consume an extra
license. NOTE: The DASADMIN user also has access to all layouts and reports. You can use the DASADMIN
account to manage layouts and reports of E1 users such as contractors who are no longer with your company.
1
Data Access Studio Administrator's Manual
Recommended System Requirements
Because Data Access Studio bolts onto JDE, Data Access Studio runs on any database or system that JDE
runs on. The following is the list of recommended technical requirements for the various deployment options:
Web Client
•
•
•
•
•
•
Windows XP, Windows 7 or greater
2GB RAM, 3 GHz+ processor or equivalent
40 GB HDD
.NET Framework v1.1 +
DAS Security MSI
Internet Explorer recommended
EnterpriseOne Full Client
•
•
•
•
•
Windows XP, Windows 7 or greater
2GB RAM, 3 GHz+ processor or equivalent
40 GB HDD
.NET Framework v1.1 +
EnterpriseOne Full Package Install
Web Server
•
•
•
•
•
•
•
•
•
•
Windows Server 2003, 2008, or greater
1 processor (3.0 GHz ) per 20 clients
2 GB RAM per 30 clients
80 GB HDD
TCP network
For EnterpriseOne: EnterpriseOne client install
For JDE World: Client Access Version 10 or higher
Data Access Studio client install
.NET Framework v1.1
IIS 6.0+
Web Server + Automator
•
•
Microsoft Excel (2010, 2007 recommended). Highest version of Excel for your organization
1 GB extra RAM
Minimum System Requirements
Because Data Access Studio bolts onto JDE, Data Access Studio runs on any database or system that JDE
runs on. The following is the list of minimum technical requirements for the various deployment options:
Web Client
•
•
•
•
2
Windows XP, Windows 7 or greater
2GB RAM, 3 GHz+ processor or equivalent
40 GB HDD
.NET Framework v1.1 +
ReportsNow Administrator's Guide
•
•
DAS Security MSI
Internet Explorer recommended
EnterpriseOne Full Client
•
•
•
•
•
Windows XP, Windows 7 or greater
2GB RAM, 3 GHz+ processor or equivalent
80 GB HDD
.NET Framework v1.1 +
EnterpriseOne Full Package Install
Web Server
•
•
•
•
•
•
•
•
•
•
Windows Server 2000 or greater
1 processor (3.0 GHz ) per 40 clients
1 GB RAM per 40 clients
20 GB HDD
TCP network
For EnterpriseOne: EnterpriseOne client install
For World: Client Access Version 10 or higher
Data Access Studio client install
.NET Framework v1.1
IIS 5.0+ (only necessary if you run DAS in a WAN configuration)
Web Server + Automator
•
•
Microsoft Excel (2010, 2007 recommended). Highest version of Excel for your organization
1 GB extra RAM
Installation
The ReportsNow web site contains all current installation instructions.
3
Data Access Studio Administrator's Manual
Web Server
Data Access Studio provides a Web deployment option. With the Web deployment, a client machine only
needs a browser and a connection to the Data Access Studio Web Server.
This mode of operation has the following benefits to an organization:
•
•
•
•
•
•
•
Light clients. Client machines do not require an EnterpriseOne Full Client Install nor World ODBC
drivers.
Edit and run reports. User interface is far superior to HTML only.
Easy to administer. Data Access Studio Web Server is the only place where you need to update
software.
High performance. Data transfer is far superior to HTML.
Load balanced. Web mode distributes processor and memory load to client PCs.
Secure. WAN mode supports all standard encryption modes including AES.
Scalable. Add as many Data Access Studio Web Servers as you need. Or increase server processor
power or RAM to support more users (see System Requirements).
Architecture
1. A Web (Thin) client connects to the DAS Server through a browser.
2. Once connected, the DAS Server service creates a DASWorker to host the client's requests.
3. The DAS Worker accesses JDE through EnterpriseOne (OneWorld) security or through Data Access
Studio World security.
4. The DAS Server and database pass through data to the Web client. The majority of the processing
power and memory is on the Web client.
The result is a scalable solution that compromises none of the rich user interface capabilities of DAS.
To install the Web Server, please refer to the ReportsNow web site.
EnterpriseOne Notes
For JDE EnterpriseOne, you will need to install one or more E1 packages on the DAS Web Server. Each pack
your install (for example, PD, PY, etc.) will make that environment available to the user.
4
ReportsNow Administrator's Guide
Web Server Administration
Once you have the Web server installed and running, refer to the following tasks to maintain its operation.
Update DAS Web Server with new version of Data Access Studio
As ReportsNow enhances Data Access Studio, you will need to update the Data Access Studio software itself.
To update the DAS Server with new Data Access Studio software:
1. Schedule update off-hours.
2. Notify users of update.
3. At the time of the update:
1. From Windows click Start | Control Panel | Administrative Tools | Services.
2. Stop the Data Access Studio Service and DAS Automator Service. Once stopped, users
will not be able to log into DAS (which is what you want for this stage).
3. Run Task Manager. Stop any running DASWorker.exe process.
4. Download newest DASUpdate.exe from ReportsNow web site to a JDE client machine.
5. Run DASUpdate.exe to completion. This will update the install files in the Target Folder.
6. On the DAS Web Server, map a drive to the Target Folder.
7. Run Setup.exe from the Target Folder.
8. Once Setup.exe completes, it will automatically launch the Web Setup and start the Data
Access Studio Service.
EnterpriseOne Only - Update DAS Web Server with new E1 Client Package
If you make custom table modifications you will need to update the E1 client package on the DAS Web server.
To update the E1 client package:
1. Schedule update off-hours.
2. Notify users of update.
3. At the time of the update:
1. From Windows click Start | Control Panel | Administrative Tools | Services.
2. Stop the Data Access Studio Service. Once stopped, users will not be able to log into DAS
(which is what you want for this stage).
3. Run Task Manager. Stop any running DASWorker.exe process.
4. Install the E1 Client package(s).
5. Start the Data Access Studio Service. Start the DAS Automator Service.
5
Data Access Studio Administrator's Manual
Assign Users to a License Type
Data Access Studio supports two types of users:
User Type
Notes
Designer
Designs and publishes reports. Has access to all of the Data
Access Studio functionality (less any secured functionality). In
order to run Data Access Studio you must have at least one full
user. If you purchased Full users only, no additional setup is
required here.
Subscriber
May only run published reports. If you purchased Subscriber
licenses, you must designate which users are the
Subscriber users (see below).
Designate a User or Group as a Subscriber
1. Sign in as DASADMIN
2. Select Admin | Security
3. Select one or more users on the left-hand side (use CTRL to multi-select)
4. Click Make subscriber only
6
ReportsNow Administrator's Guide
Set Global Application Settings
There are certain options that you can set for all Data Access Studio users. To set these options:
1. Sign in as DASADMIN
2. Click Admin | Preferences for all users...
To
Do This
Match the DAS Grid filter to the casesensitivity of your database
Check/Uncheck Case-sensitive queries. If your JDE database
is case-sensitive (typical), then leave this check box checked. If
your JDE database is case-insensitive, uncheck this box.
Record all user queries in the Audit Trail
Check Enable EnterpriseOne Auditing (note: this option
works for World also). To instruct DAS to automatically delete
old audit trail records, click Auto Purge records older than
and enter the number of days. The Audit Trail adds very little
overhead and can be turned on in production environments. To
disable the Audit Trail, uncheck this box.
Set a global default date pattern
Enter a Microsoft .NET date format string. If a DAS user has a
JDE date format, then the JDE Date format will override this
global setting. Also, if the DAS user designs a report with a
custom date format, this will override this global setting.
If this setting is blank, then DAS will first check the JDE date
format for the user. If this is blank, DAS will use the date format
for the client workstation as the default.
WARNING: If you set this value to a valid date format you may
possibly break pre-existing queries that query for date in a
different format.
Example date formats:
yyyy-MM-dd = 2007-01-01
d/M/yy = 1/1/07
Google DateTimeFormatInfo for more date formatting options.
Drilldown query limit
Limits how big the query for a drill down can be. Lower this
number if users experience a delay when using the Drill Down
features from one grid to another.
7
Data Access Studio Administrator's Manual
Generate Search
If your developments create custom JDE tables, you may want to re-generate the search so that users can
search for the new tables. Search generation takes approximately 5 minutes:
1. Sign in as DASADMIN
2. Click Admin | Generate Search
When the search generation is done, you should see the generating search text disappear. You will then see
the search window where you can type search terms.
8
ReportsNow Administrator's Guide
View Audit Trail Information
Data Access Studio (DAS) provides an Audit Trail that records all queries in the DAS software. The
DASADMIN can then review and purge the audit trail as necessary.
Additional benefit to EnterpriseOne
Although many databases support auditing, database audit tools typically do not work well with
EnterpriseOne. This is because EnterpriseOne maps many EnterpriseOne users to one database proxy
user. Once mapped to the proxy user, the database audit utilities will not be able to determine which
EnterpriseOne user was responsible for which query.
The audit trail can be useful for the following:
•
•
•
•
•
Identify who submitted a query that needs to be terminated. Simply query for the table names and sort
by most recently used to see which EnterpriseOne users could have submitted the query in question.
Identify inefficient queries. The Audit Log can show if a user is accessing the database inefficiently.
For instance, if the user is filtering on non-indexed columns or if the user is doing excessive table
lookups as opposed to creating a business view to do the same thing.
Identify unauthorized access. The Audit Log can show if a user is accessing a table that they should
not be authorized to access.
Monitor DAS Performance. The Audit log shows run times for the main select, load, and calculation
operations. This will help you identify poor running queries.
Monitor how DAS is utilized in your organization.
To enable the audit trial see Set Global Application Settings and refer to Enable EnterpriseOne Auditing.
Once Auditing is enabled, DAS will record database access for all DAS users. All records are stored in the
FDASPROP table. Access recording will continue indefinitely until you disable auditing.
Working with the Audit Trail
To work with the Audit Trail:
1. Sign in as DASADMIN
2. Select Admin | Audit Trail
You will see the following Audit Trail form below:
9
Data Access Studio Administrator's Manual
Audit Trail Field
Information it provides
Accessed Tables
List the tables that the activity is accessing.
Activity
Defines the type of activity:
10 - Counting records
20 - Main Select
30 - Loading data
40 - Calculating data
User
The JDE user that submitted the query from Data Access
Studio.
Elapsed time
The time in seconds that the activity took to complete. All subsecond activities will be rounded up to 1s when they finish. If
an activity does not finish its elapsed time will be 0.
User Type
0 - Designer
1 - Subscriber
Audit Record Size
The size of the audit record. Useful to determine when to purge
the audit records.
Audit ID
The system-generated audit ID for each distinct DAS activity.
Access Date
The date when the audit activity occurred.
Access Time
The time when the audit activity occurred.
Examples of querying audit records
When you click find, you will see the most recent activity at the top of the grid. The default layout for the audit
groups the related activities together and sorts by the activity type. This shows you what any DAS report or
layout does by its activity components.
To Query for
Audit records in general
A specific table
Information it provides
Enter filter values in the filter boxes. Click
In the Accessed Tables column, type the table name with *
before and after the name. For example, if you wanted to see
who accessed F0101, type: *F0101*. Click
10
Find.
Find.
ReportsNow Administrator's Guide
A user
Long-running queries
Type the JDE user name in the User filter box. Click
Find.
Enter 10 in the Activity Type and enter something like >60000
in the Elapsed time filter. Click
Find. This will show
queries that took longer than one minute to execute.
Purging audit records
Only the DASADMIN user has the authority to purge Audit Trail records.
To
Purge select records
Information it provides
1. Highlight the audit record.
2. Press
Delete.
Purge all records
Click Clear All.
Automatically purge old records
Enable Auto-Purge as described in Set Global Application
Settings.
Viewing Audit Details
By default, the audit record shows an outline of the query. This shows what tables were accessed, what layout
was run, what filters and sorts were used. This detailed information can be useful in identifying precisely what a
user did on any given query.
You may also choose to display this information in XML format. This format may be useful if you want to export
the audit document to a third party tool for further analysis and reporting.
Reporting on audit information
As with any DAS grid, you can customize the grid as you need and save the grid as a layout for future use. See
Maintaining Layouts for more information.
Performance Considerations
Turning on the audit trail does increase the amount of database and network traffic in your system. Data
Access Studio makes every effort to minimize this overhead as much as possible. The users should not
experience noticeable delays when the Audit Trail is on.
You may want to purge the Audit Trail records if you begin to notice significant delays.
11
Data Access Studio Administrator's Manual
Control All User Reports
As DASADMIN, you can to see and manage all reports in Data Access Studio. This privilege lets you copy and
delete reports for any user. This can be useful if a user leaves the company or if a user changes his/her JDE
user name.
The following steps assume that you signed in as DASADMIN:
To
Copy a Private Report from one user to
another
Information it provides
1. Click File | Open | My Custom Reports...
2. Type the name of the user to copy from in the Owner
filter.
Find.
3. Click
4. Multi-select the layouts for that user by clicking the
rows in the grid and holding down the CTRL key or
SHIFT key.
5. Click Copy from user to user.
6. In the resulting message box, enter the destination user
and click OK.
7. Click OK on the confirmation message box.
Delete a Private Report for a user
1. Click File | Open | My Custom Reports...
2. Type the name of the user to delete from in the Owner
filter.
Find.
3. Click
4. Multi-select the layouts for that user by clicking the
rows in the grid and holding down the CTRL key or
SHIFT key.
5. Click Delete.
6. Click OK on the confirmation message box.
12
ReportsNow Administrator's Guide
Transfer Everyone's Work
If you need to upgrade your external hardware or software:
1. On you old system, export all user work to a flat file:
1. Sign in as DASADMIN.
2. Click Admin | DAS Instance...
3. Click the Export button.
4. On the Export DAS Instance file dialog, click Save.
2. On your new system, import the flat file you created in step 1.
1. Sign in as DASADMIN.
2. Click Admin | DAS Instance...
3. Click the Import tab and click the Import button.
4. On the Import DAS Instance file dialog, select the .dasi file and click Open. If you want to
overwrite the target with the contents of the .dasi, check the "Overwrite target" checkbox (this is
usually NOT recommended).
EnterpriseOne note
The transfer will work regardless of the source and target E1 releases. For example, you can export
objects from non-unicode Xe to Unicode E8.12.
13
Data Access Studio Administrator's Manual
Create and Manage Folders
As of Version 5.2, you may create folders to organize user reports and layouts. The list of folders is a central
one which the DASADMIN controls. No one else can add, delete, or modify folders other than DASADMIN. To
manage folders:
1. Sign in as DASADMIN
2. Select Admin | Folders
To
Do This
Add a new folder
Click Add Folder. Alternately, type in a new folder name in the
blank cell at the bottom of the grid.
Delete a folder
Select the folder(s) and click Delete. All reports under this
folder will be moved to Unassigned.
Rename a folder
Click a folder and type in its new name.
Translate a folder name
Change the drop-down from English to another language.
DAS will show the English and the to-be-translated names
side-by-side. Enter the translation for folders. Once you are
done, then DAS users will see the folders in their JDE language
preference. If you do not provide a translation, DAS defaults
the folder name to English.
14
ReportsNow Administrator's Guide
User Security
Data Access Studio extends the JD Edwards security model by providing application-level security.
For maximum flexibility and minimum redundancy, Data Access studio gives you three options for specifying a
set of users (in order of highest granularity to lowest):
1. JD Edwards user name
2. JD Edwards group or role
3. All Data Access Studio users (DASUSERS)
If your security definitions overlap for a given user, the definition with the highest granularity wins. For instance,
if you defined security to DASUSERS and to a specific User Name, the permissions of the specific User Name
win out because it is more granular than "All users". Some security settings will automatically inherit the
security from a more general group of users that you defined. In this case, you will see an Inherited indicator.
For Inherited you will typically have the option to enable or disable it.
To setup application level security:
1. Sign in as DASADMIN
2. Select Admin | Work With Security
To
Do This
Add security for a user or group
Click the empty box under the User ID column. Select a user
or role. Click the security category tabs to the right to set
security settings (see below).
Delete security for a user or group
Click on row on the left-hand side. Click Delete.
Modify security for a user or group
Click on the row for the user or group. Edit the settings in the
category tabs to the right.
Save your settings
Click Save.
Exit without changing settings
Click Close (without clicking Save first).
Restore security settings from backup
When you click Save, DAS writes a backup of the current
record. If that succeeds, then DAS commits the new changes
to the security definition. If you need to restore security settings
from the last backup, click Restore from backup.
15
Data Access Studio Administrator's Manual
16
ReportsNow Administrator's Guide
Application Permissions
Click the Permissions tab to grant and revoke action permissions for the selected user or group:
To Grant or Revoke Ability to
Check (grant) or Uncheck (revoke)
Allow user to drill from one report into
another
Can Drilldown Single.
Allow user to burst multiple driver rows
at one time
Can Do Multiple Row Burst.
Allow user to email and file copy burst
results
Can Distribute Burst Result.
Export Data Access Studio layouts to a
flat file
Can export DAS objects.
Import Data Access Studio layouts from
a flat file
Can import DAS objects.
Create and modify private reports
Can create and modify private reports.
Open private reports
Can open private reports.
Enable layout to issue a sort command
to the database
Can enable sort at database.
Do a find with count
Can do find with count.
Delete lists
Mapping | Can Delete.
Publish lists
Mapping | Can Publish.
Open non-JDE tables
Can use OLE DB.
Open JDE tables and views
Can open OneWorld tables and views.
Override default datasource when
opening a JDE table
Can open in any data source.
Run reports published to user
Can use published reports.
Publish reports to other users
Can publish reports.
Delete published reports
Published Reports | Can delete.
Copy a published report to private layout
Can copy to layout.
Overwrite the published report of
another user
Can overwrite reports published by others.
Move a published report to a folder
Can move to folder.
Use Financial Quick Reports
Quick Reports | Financials.
Snapshot grid data
Can use Snapshot.
17
Data Access Studio Administrator's Manual
Embed Excel into layouts at design-time
Can Embed Excel.
Schedule reports
Can Schedule.
18
ReportsNow Administrator's Guide
Table Permissions
Click the Filter Tables and Views tab to restrict which tables a user or group can access. To reduce
redundancy, Data Access Studio organizes table filter by the following hierarchy:
DASUSERS
Group or Role
User
Use DASUSERS represents all users of the software. Use this level to apply global security filters. For
example, if you lock DASUSERS out of all tables, then everyone is locked out of all tables by default.
Use Group (World) or Role (E1) to apply security filters for a group of users. Any security on this level can
override DASUSER security.
Use User to apply security filters for a specific user. Any security on this level can override DASUSER and
Group security.
Example
To illustrate how security is built up with the inheritance model, we will examine the following setup:
•
•
•
Lock out all users from all tables
Let Accounting Group have access to Product codes 00 through 05
Let Paul have access to Product codes 05 through 09
1.
2.
3.
4.
Sign in as DASADMIN.
Click Admin | Security.
Under User ID, add a row for DASUSERS.
On the Filter Tables and Views tab, enter OBNM in the Alias column. Click the
button in the Filter Criteria Column. Select Blank:
Filter Helper
This basically says that the only object that all users can open by default is blank (which doesn't exist).
Therefore, nobody can open any object.
5. Under User ID, add a row for the Accounting Group. (You may or may not have this group on your
system.)
6. On the Filter Tables and Views tab, uncheck the box under Inherited: Yes. Click outside the
checkbox to apply. The result is that the Accounting Group will now override the default.
Filter Helper button in the
7. On the same tab, enter SY (Product Code) in the Alias column. Click the
Filter Criteria Column. Select Range. In the resulting dialog box, enter From 00 Through and
excluding 05. Click OK.
19
Data Access Studio Administrator's Manual
Notice that the line we unchecked is the only line that has a checkbox in it under the Enable column.
Also notice that the form shows that this line comes from DASUSERS. When the line is unchecked, it is
not enabled. So in this case, the OBNM <BLANK> line does not apply to the Accounting group.
The only filter that will be applied is Product Code between 00 and 05 (excluding the 05).
8. Under User ID, add a row for the Paul.
9. On the Filter Tables and Views tab, uncheck the box under Inherited: Yes. Click outside the
checkbox to apply. The result is that the Paul will now override the default.
Filter Helper button in the
10. On the same tab, enter SY (Product Code) in the Alias column. Click the
Filter Criteria Column. Select Range. In the resulting dialog box, enter From 00 Through 09. Click
OK.
11. If you want to Cancel all changes, click Close before you click Save.
12. Click Save to save the security settings.
13. To delete a security setting for any user or group, highlight the row for the user or group on the leftDelete.
hand side and click
20
ReportsNow Administrator's Guide
Environment Permissions
You can restrict which environments a user may access by either:
•
•
Specifying a list of environments that the user can only access
Or specifying a list of prohibited environments
This security appears on the Environment Security tab for a given user.
Example 1 - Restrict all users to environment PD812
1.
2.
3.
4.
5.
6.
Sign in as DASADMIN.
Click Admin | Security.
Add a user row for DASUSERS (or select the DASUSERS row if it is already present).
Click on the Environment Security tab.
In the Include/Exclude column, select Include.
In the Environment column, enter PD812.
Example 2 - Allow all users to sign into any environment except for PD812 and PY812:
1.
2.
3.
4.
5.
6.
7.
8.
Sign in as DASADMIN.
Click Admin | Work With Security.
Add a user row for DASUSERS (or select the DASUSERS row if it is already present).
Click on the Environment Security tab.
In the Include/Exclude column, select Exclude.
In the Environment column, enter PD812.
Tab to the next row. In the Include/Exclude column, select Exclude.
In the Environment column, enter PY812.
21
Data Access Studio Administrator's Manual
Address Book Permissions
Address Book Security lets you mask select fields for certain address book users. The most common
application for this type of security is to mask sensitive information such as Tax Id, Address, and Phone for
Employees. Address Book Security is a great option when you are not using JDE Row or Column Security to
take care of this. Address Book Security, however, is a more flexible way to secure sensitive information. First,
the security masks out certain fields (vs. blocking the entire column or row). Second, the security works over
multiple tables. Third, the Address Book Security implements default inheritance to save you time--any new
security record you add will automatically inherit the field masking from its group or DASUSERS (whichever it
finds first respectively).
Example
For all users, secure the Tax ID and Salary fields for employees:
1.
2.
3.
4.
5.
Sign in as DASADMIN.
Click Admin | Security.
Add a user row for DASUSERS (or select the DASUSERS row if it is already present).
Click on the Address Book Security tab.
In the Address criteria field = field group, select AT1 (search Type) with the visual assist. In the filter
field, type E.
6. In the Data Items to mask group, type TAX (then Tab out). Then type SAL (and Tab out).
With this setup, when any Data Access Studio user signs in and queries any table with an address number
(e.g., Employee Master, Employee History, Accounts Payable, ...), then if the address number is an employee
(i.e. Search Type E), Data Access Studio will blank out the TAX and SAL fields.
Using this approach, you can add additional Data Items to the Data Items to mask. E.g., addresses, phone
number, email, etc.
If you add a new user security record, by default, it will inherit the Address Book Security of its parent.
22
ReportsNow Administrator's Guide
Object Selection Control
This security option lets you make the Table Object selection more limited and friendlier for your users. By
default, users will have access to all tables that you allow from JDE Security and Data Access Studio Table
Security. Using this security, you can custom tailor the look and feel of the table list presentation:
1. Sign in as DASADMIN.
2. Click Admin | Open | EnterpriseOne Data (or World Data).
3. Design a custom layout on this form. You can filter columns, hide columns, add associated
descriptions, rollup fields names (see Data Access Studio Users Manual).
4. Once you've designed the layout you want for a particular user group, click Admin | Save.
5. Provide a descriptive name for your customized view.
6. Click Admin | Work With Security.
7. Add a user/group (or select an existing user/group).
8. Click on the Object View tab.
9. In the Layout column, click the visual assist. Select the layout you created in step 5.
In this setup, DEBBIE will see the HR View when she goes to select tables and views. If the HR View is a
simplified view over just the HR tables, DEBBIE will find the tables she needs much more conveniently.
23
Data Access Studio Administrator's Manual
Enforce Index Use
This security lets you set index usage levels by table. This helps you control the possibility of a bad query
being submitted to a large table. You will typically enforce index use at least on the Account Ledger Table
(F0911).
1.
2.
3.
4.
5.
6.
24
Sign in as DASADMIN.
Click Admin | Security.
Add a user row for DASUSERS (or select the DASUSERS row if it is already present).
Click on the Index Use tab.
In the Table Name field enter the name of a JDE table (e.g., F0911).
In Required Index Use field, enter a number that represents a percentage. (E.g., 20 means require
any query against the table to use at least 20% of some index on that table.)
ReportsNow Administrator's Guide
Email
Version 5.2 of Data Access Studio supports email of report outputs to recipients. The DAS Email capability
supports SMTP (Mail), IMAP, and Outlook Exchange.
In order to use email in DAS, you must set up DAS to reference your email system. Once set up, end-users
simply enter normal email addresses in DAS to specify email recipients. To set up your email provider(s):
1. Sign in as DASADMIN
2. Click Admin | Email Providers...
To
Information it provides
Add a new email provider
Click New Provider. See Define Email Provider.
Edit an existing email provider
Highlight the provider name. Click Edit. Alternately, doubleclick the email provider name. See Define Email Provider.
Copy an email provider
Highlight the provider name. Click Copy.
Delete an email provider
Highlight the provider name. Click Delete.
Make an email provider the default email
provider
Highlight the provider name. Click Make Default.
To Save all email provider changes
Click Save.
Cancel any changes and exit
Click Close. (without selecting Save first).
25
Data Access Studio Administrator's Manual
When you add or edit an email provider, you specify key email information so that DAS can utilize the provider:
Field
Purpose
Name
Name of the email provider. DAS end-users will see the email
provider as this name.
Provider Type
Select either Mail (SMTP), Imap, or Exchange. (POP3 is for
incoming and should not be specified here.)
Outgoing mail address
For SMTP, this is the domain name for the SMTP server. For
IMAP, it is the URL. For Exchange, it is the Exchange server
name.
User Name
The user name to log into the mail account.
Password
The password to log into the mail account.
Port
For SMTP and IMAP, the port for the email server.
From email
The email address you want to use to show emails that are sent
from DAS. E.g., [email protected].
Enable SSL
Check the SSL checkbox, SSL Mode, and SSL Port to enable
SSL.
When you are finished defining your email provider, click OK to save the changes.
26
ReportsNow Administrator's Guide
Automator (Scheduling)
Version 5.2 allows authorized users to schedule and email reports. This feature is made possible by the DAS
Web server process called the DAS Automator. This section discusses how to setup the Automator so that
your users can schedule reports.
Installation
The DAS Scheduler (DAS Automator Service) runs on your DAS Web Server. Therefore, you must first have a
DAS Web server up and running.
The DAS Automator service gets installed when you install the DAS Web Server. The service appears in your
Windows Services as: DAS Automator Service.
IMPORTANT: You must create a DASADMIN user to control the DAS Scheduler. Once you create the
DASADMIN user for the first time, you need to stop the DAS Automator Service and then start it again.
Additional Technical requirements:
1. Because the DAS Automator can run reports unattended, ReportsNow recommends that you add an
extra 1 GB RAM for scheduler jobs.
2. Install the latest version of Microsoft Excel on the DAS Web Server. When the Automator runs, it
will present report outputs in Excel. The DAS Web server must have Excel (and the highest Excel
version in your organization) installed.
Licensing
IMPORTANT: Before you can use the Automator, you must have a license to run it. Contact ReportsNow
([email protected]), for information to purchase an Automator license.
Once you purchase and receive your Automator license. Apply your license as follows:
1. Run DAS
2. Click Help | Import license
3. Import the Automator .dasl license file
Once you import the Automator license, you may continue to configure and enable the Automator to run on your
system.
User Security
IMPORTANT: You must enable your users with the Can schedule permission before they can schedule
jobs.
Task Maintenance
As DASADMIN, you can run Schedule | Edit Schedule to view, edit, or stop all user tasks. See the Scheduler
topic in the User Manual for more information.
27
Data Access Studio Administrator's Manual
Once you have setup the DAS Web server and imported your Automator license, you can control the Automator
as follows:
1. Sign in as DASADMIN
2. Click Admin | Automator
The Automator has four
main states:
Need license - Automator
did not find a valid license
and therefore cannot
execute requests.
Need DASADMIN login DASADMIN did not log in
prior to Automator service
running. In this case, stop
and restart the DAS
Automator Service on the
DAS Web Server (see
Windows Services).
Automator stopped Automator is set to run,
but is currently stopped.
Automator running Automator is running and
processing scheduled
requests.
Field
Purpose
Status
What state the Automator is currently in: license, login, stopped,
or running.
Start time
When the Automator was started (server time).
Tasks updated time
When any user last updated a task definition.
Up time
How long the Automator has been running.
Executing task
Which task, if any, is currently executing.
Next task
Which task, if any, it will execute next. If there is no task
executing and there is a Next Task, you may click the Run
Next Now to run that task now.
Reports launched
Number of tasks executed.
Errors
Number of task execution errors.
Notifications
Number of notifications sent to the Automator administrator
(typically the DASADMIN).
28
ReportsNow Administrator's Guide
In the Automator Settings form, you may also configure run settings. Click the Run Settings tab to configure:
To
Purpose
Limit the amount of time any report is
given to run
Change the Limits value to the maximum report time execution
in minutes.
Send email notification on execution
error
Check the Errors checkbox. Specify a valid Email and Email
provider for the notification. IMPORTANT: Set up a valid email
provider first.
Send email notification on task
completion
Check the Each report completion checkbox. Specify a valid
Email and Email provider for the notification.
Save your settings
Click Save.
29
Index
A
Access............................................................... 1, 20
Data Access Studio ............................................ 1
Product ............................................................. 20
Access Date .......................................................... 10
Access Time.......................................................... 10
Accessed Tables ................................................... 10
Accounting ............................................................ 20
Accounting Group ................................................. 20
Accounts Payable ................................................. 24
Activity Type .......................................................... 10
Add ........................................................................ 25
user/group......................................................... 25
Address ................................................................. 24
Address Book Security.......................................... 24
Administrative Tools................................................ 6
Administrator ........................................................... 1
AES ......................................................................... 4
Alias ...................................................................... 20
All 16
All Data Access Studio.......................................... 16
Application-level security ...................................... 16
providing ........................................................... 16
Assign ................................................................... 25
Pre-defined Table Selection View .................... 25
Assign Users ........................................................... 7
License Type ...................................................... 7
Audit ...................................................................... 10
Audit Details .......................................................... 10
Viewing ............................................................. 10
Audit ID ................................................................. 10
Audit Log ............................................................... 10
Audit Record Size ................................................. 10
Audit Trail .......................................................... 8, 10
disable ................................................................ 8
provides ............................................................ 10
Audit Trail Field ..................................................... 10
Auto Purge .............................................................. 8
B
Benefit ................................................................... 10
EnterpriseOne................................................... 10
C
Can Delete ............................................................ 18
Can Publish ........................................................... 18
Cancel ................................................................... 20
Case-insensitive ...................................................... 8
Case-sensitivity ....................................................... 8
Check Enable EnterpriseOne Auditing ................... 8
Check/Uncheck Case-sensitive .............................. 8
Column Security .................................................... 24
Control All User Layouts ....................................... 13
Control Panel .......................................................... 6
Copy ...................................................................... 13
Layout ............................................................... 13
D
DAS Instance ........................................................ 14
DAS Security MSI ................................................... 2
DAS Server ......................................................... 4, 6
DAS Web ................................................................ 6
DAS Web Server................................................. 4, 6
DAS Worker ............................................................ 4
DASADMIN .....................................1, 10, 13, 14, 25
Dasi file ................................................................. 14
DASUpdate.exe ...................................................... 6
DASUSER............................................................. 20
DASUSERS ........................................ 16, 20, 22, 24
DASWorker ............................................................. 4
DASWorker.exe ...................................................... 6
Data Access Studio... 1, 2, 4, 6, 7, 8, 10, 13, 16, 20,
24
Data Access Studio Service ................................... 6
Start .................................................................... 6
Stop .................................................................... 6
Data Access Studio Web Server ............................ 4
Data Access Studio World ...................................... 4
Datasource............................................................ 18
Delete ........................................................ 13, 16, 20
Layout ............................................................... 13
Designate ................................................................ 7
User .................................................................... 7
Disable .................................................................... 8
Audit Trail ........................................................... 8
Drive ........................................................................ 6
Target Folder ...................................................... 6
E
E1 ........................................................ 1, 4, 6, 14, 20
reports................................................................. 1
E1 Client ................................................................. 6
Install .................................................................. 6
E1 Client Package .................................................. 6
Employee Master .................................................. 24
Employees ............................................................ 24
Enable ................................................................... 20
Enable Auto-Purge................................................ 10
Enable EnterpriseOne Auditing ............................ 10
EnterpriseOne Data .............................................. 25
EnterpriseOne Full Client ........................................ 2
EnterpriseOne Full Client Install ............................. 4
EnterpriseOne Full Package Install ........................ 2
EnterpriseOne Notes .............................................. 4
EnterpriseOne/World .............................................. 1
Environment .......................................................... 22
Environment Security ............................................ 22
Export button......................................................... 14
Export DAS Instance file dialog ............................ 14
Export Data Access Studio ................................... 18
F
FDASPROP .......................................................... 10
Filter Criteria Column ............................................ 20
Filter Helper button ............................................... 20
Filter Tables .......................................................... 20
Financials .............................................................. 18
Find ................................................................. 10, 13
Full .......................................................................... 7
G
Google DateTimeFormatInfo .................................. 8
Grant ..................................................................... 18
Group ................................................................ 7, 20
31
Data Access Studio Administrator's Manual
H
High technical knowledge ....................................... 1
JDE system......................................................... 1
HR View ................................................................ 25
HTML ...................................................................... 4
I
ID 10
IIS 5.0 ...................................................................... 2
Import .................................................................... 14
Import button ......................................................... 14
Import DAS Instance file dialog............................. 14
Import Data Access Studio ................................... 18
Include/Exclude ..................................................... 22
Inherited .......................................................... 16, 20
Install ...................................................................4, 6
E1 Client ............................................................. 6
Web Server ......................................................... 4
Internet Explorer ..................................................... 2
J
JD Edwards ....................................................... 1, 16
JD Edwards security model .................................. 16
JDE ............................................ 1, 2, 4, 6, 8, 10, 18
check .................................................................. 8
opening ............................................................. 18
Type .................................................................. 10
JDE Date ................................................................. 8
JDE EnterpriseOne ................................................. 4
JDE Row ............................................................... 24
JDE Security ......................................................... 25
JDE system ............................................................. 1
JDE Upgrade......................................................... 14
Transfer Everyone's Work During .................... 14
L
Launch .................................................................... 6
Web Setup .......................................................... 6
Launch Data Access Studio .................................... 1
Layouts............................................................ 13, 25
Copy ................................................................. 13
Delete ............................................................... 13
License Type ........................................................... 7
Assign Users....................................................... 7
List
Specifying ......................................................... 22
M
Main Select ........................................................... 10
Make ..................................................................... 25
Table Object ..................................................... 25
Mask Address Book Information ........................... 24
Match ...................................................................... 8
DAS Grid............................................................. 8
Microsoft.................................................................. 8
Minimum System Requirements ............................. 2
Monitor DAS Performance .................................... 10
N
NET ......................................................................... 8
NET Framework v1.1 .............................................. 2
Non-unicode Xe .................................................... 14
Unicode E8.12 .................................................. 14
O
Object View ........................................................... 25
OK ...................................................................13, 20
OLE DB ................................................................. 18
OneWorld .......................................................... 4, 18
Open ...................................................13, 14, 18, 25
32
JDE ................................................................... 18
Open JDE ............................................................. 18
Open non-JDE ...................................................... 18
Overwrite ............................................................... 14
Owner ................................................................... 13
P
Performance Considerations ................................ 10
Permissions ...................................................... 7, 18
Pre-defined Table Selection View......................... 25
Assign ............................................................... 25
Preferences............................................................. 8
Press Delete ......................................................... 10
Product .................................................................. 20
access............................................................... 20
Product Code ........................................................ 20
Provides .......................................................... 10, 16
application-level security .................................. 16
Audit Trail ......................................................... 10
Published Reports................................................. 18
Q
Query .................................................................... 10
Quick Reports ....................................................... 18
R
RAM ........................................................................ 4
Refer ..................................................................... 10
Enable EnterpriseOne Auditing ........................ 10
Reports ............................................................. 1, 13
E1 ....................................................................... 1
ReportsNow ............................................................ 6
Require ................................................................... 4
EnterpriseOne Full Client Install ......................... 4
Revoke Ability ....................................................... 18
Revoke Application Permissions .......................... 18
Role ....................................................................... 20
Rollup .................................................................... 25
Run DASUpdate.exe............................................... 6
Run Setup.exe ........................................................ 6
Run Task Manager ................................................. 6
Running ................................................................... 6
DASWorker.exe .................................................. 6
S
Save .......................................................... 14, 20, 25
Scalable .................................................................. 4
Search Type.......................................................... 24
Second .................................................................. 24
Secure ................................................................... 24
Tax ID ............................................................... 24
See .................................................................. 16, 25
HR View ............................................................ 25
Inherited ............................................................ 16
See Data Access Studio Users Manual ................ 25
See Maintaining Layouts ...................................... 10
Select .............................................................. 22, 24
DASUSERS ................................................ 22, 24
Select Blank .......................................................... 20
Select File ................................................... 7, 10, 16
Select Range ........................................................ 20
Services .................................................................. 6
Set Global Application Settings .............................. 8
Setup.exe ................................................................ 6
Share ...................................................................... 1
DASADMIN ......................................................... 1
Snapshot ............................................................... 18
Specify Which Environments ................................ 22
User Can Access .............................................. 22
Specify Which Tables ........................................... 20
User Can Access .............................................. 20
Specifying.............................................................. 22
list ..................................................................... 22
Start......................................................................... 6
Data Access Studio Service ............................... 6
Stop ......................................................................... 6
Data Access Studio Service ............................... 6
Subscriber ............................................................... 7
System-generated ................................................. 10
T
Table Object .......................................................... 25
make ................................................................. 25
Target Folder........................................................... 6
drive .................................................................... 6
TCP ......................................................................... 2
Transfer Everyone's Work During ......................... 14
JDE Upgrade .................................................... 14
Type ..........................................................10, 13, 24
JDE ................................................................... 10
U
Uncheck ..................................................7, 8, 18, 20
Under User ID ....................................................... 20
Unicode E8.12 ...................................................... 14
non-unicode Xe................................................. 14
Update DAS Web Server ........................................ 6
Use .......................................................................... 1
DASADMIN ......................................................... 1
Use DASUSERS ................................................... 20
Use Financial Quick Reports ................................ 18
Use Group ............................................................. 20
Use User ............................................................... 20
User.............................................................7, 10, 25
Designate............................................................ 7
User Can Access ............................................20, 22
Index
Specify Which Environments ............................ 22
Specify Which Tables ....................................... 20
User ID .............................................................. 7, 16
User Name ............................................................ 16
User Type ......................................................... 7, 10
User/group ............................................................ 25
Add ................................................................... 25
V
View Audit Trail Information .................................. 10
Viewing ........................................................... 10, 20
Audit Details ..................................................... 10
W
WAN .................................................................... 2, 4
Want ...................................................................... 20
Cancel............................................................... 20
WARNING............................................................... 8
Web ..................................................................... 4, 6
Web Client .............................................................. 2
Web Server ......................................................... 2, 4
install................................................................... 4
Web Server Administration ..................................... 6
Web Setup .............................................................. 6
launch ................................................................. 6
Windows ................................................................. 6
Windows Server 2000 ............................................. 2
Work .................................................................. 8, 14
World .................................................................. 8
Work With Security ...................7, 16, 20, 22, 24, 25
World ................................................................... 2, 8
works .................................................................. 8
World Data ............................................................ 25
World ODBC ........................................................... 4
X
XML ....................................................................... 10
33