1
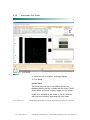
Illumina® Systems & Software
AutoLoader
User Guide
FOR RESEARCH ONLY
ILLUMINA PROPRIETARY
Doc. # 11219711
Notice
This publication and its contents are proprietary to Illumina, Inc., and are
intended solely for the contractual use of its customers for no other
purpose than to operate the system described herein. This publication and
its contents shall not be used or distributed for any other purpose and/or
otherwise communicated, disclosed, or reproduced in any way whatsoever
without the prior written consent of Illumina, Inc.
For the proper operation of this system and/or all parts thereof, the
instructions in this guide must be strictly and explicitly followed by
experienced personnel. All of the contents of this guide must be fully read
and understood prior to operating the system or any of the parts thereof.
FAILURE TO COMPLETELY READ AND FULLY UNDERSTAND AND FOLLOW
ALL OF THE CONTENTS OF THIS GUIDE PRIOR TO OPERATING THIS
SYSTEM, OR PARTS THEREOF, MAY RESULT IN DAMAGE TO THE
EQUIPMENT OR PARTS THEREOF, AND INJURY TO ANY PERSONS
OPERATING THE SAME.
Illumina, Inc. does not assume any liability arising out of the application or
use of any products, component parts, or software described herein.
Illumina, Inc. further does not convey any license under its patent,
trademark, copyright, or common-law rights nor the similar rights of
others. Illumina, Inc. further reserves the right to make any changes in any
products, or parts thereof, described herein without notice.
DASL, GoldenGate, Illumina, Infinium, and Sentrix are trademarks of
Illumina, Inc. Other brand and product names mentioned herein may be
trademarks or registered trademarks of their respective owners.
© 2006 Illumina, Inc. All rights reserved.
1.800.809.ILMN (1.800.809.4566) or +1.858.202.4566 (outside North America) www.illumina.com
Doc. # 11219711 Rev. A
Revision History
Revision Letter
Release Date
A
04/07/06
1.800.809.ILMN (1.800.809.4566) or +1.858.202.4566 (outside North America) www.illumina.com
Doc. # 11219711 Rev. A
Contents
Chapter 1
Overview
AutoLoader Introduction . . . . . . . . . . . . . . . . . . . . . . . . . . . . . 1-2
Audience and Purpose of this Guide . . . . . . . . . . . . . . . . . . . . . 1-2
Related Documentation. . . . . . . . . . . . . . . . . . . . . . . . . . . . . . 1-2
AutoLoader Hardware . . . . . . . . . . . . . . . . . . . . . . . . . . . . . . . 1-3
Safety Considerations . . . . . . . . . . . . . . . . . . . . . . . . . . . . 1-3
Single and Dual Readers . . . . . . . . . . . . . . . . . . . . . . . . . . 1-4
Component Diagrams . . . . . . . . . . . . . . . . . . . . . . . . . . . . 1-4
AutoLoader Software . . . . . . . . . . . . . . . . . . . . . . . . . . . . . . . 1-7
Overview . . . . . . . . . . . . . . . . . . . . . . . . . . . . . . . . . . . . 1-7
Main Screen . . . . . . . . . . . . . . . . . . . . . . . . . . . . . . . . . . 1-7
Log Files. . . . . . . . . . . . . . . . . . . . . . . . . . . . . . . . . . . . . 1-8
Chapter 2
AutoLoader Operation
Configuring AutoLoader . . . . . . . . . . . . . . . . . . . . . . . . . . . . . 2-2
Setting Default File Locations . . . . . . . . . . . . . . . . . . . . . . 2-2
Setting Email Alerts . . . . . . . . . . . . . . . . . . . . . . . . . . . . . 2-4
Single-Reader Scanning . . . . . . . . . . . . . . . . . . . . . . . . . . . . . . 2-7
Before You Begin . . . . . . . . . . . . . . . . . . . . . . . . . . . . . . . 2-7
Starting the Scan . . . . . . . . . . . . . . . . . . . . . . . . . . . . . . . 2-7
Scanning Process . . . . . . . . . . . . . . . . . . . . . . . . . . . . . . 2-15
Adding and Removing Carriers . . . . . . . . . . . . . . . . . . . . . 2-16
Interrupting the Scanning Process . . . . . . . . . . . . . . . . . . . 2-16
Ending the Session . . . . . . . . . . . . . . . . . . . . . . . . . . . . . 2-17
Dual-Reader Scanning . . . . . . . . . . . . . . . . . . . . . . . . . . . . . . 2-17
Before You Begin . . . . . . . . . . . . . . . . . . . . . . . . . . . . . . 2-17
Starting the Scan . . . . . . . . . . . . . . . . . . . . . . . . . . . . . . 2-17
Scanning Process . . . . . . . . . . . . . . . . . . . . . . . . . . . . . . 2-26
Adding and Removing Carriers . . . . . . . . . . . . . . . . . . . . . 2-27
1.800.809.ILMN (1.800.809.4566) or +1.858.202.4566 (outside North America) www.illumina.com
Doc. # 11219711 Rev. A
vi
AutoLoader User Guide
Interrupting the Scanning Process . . . . . . . . . . . . . . . . . . .
Ending the Session . . . . . . . . . . . . . . . . . . . . . . . . . . . . .
Switching from AutoLoad Mode to Manual Mode . . . . . . . . .
Switching from Manual Mode to AutoLoader Mode . . . . . . . .
Chapter 3
2-28
2-28
2-28
2-29
Troubleshooting
Introduction . . . . . . . . . . . . . . . . . . . . . . . . . . . . . . . . . . . . . 3-2
Operational Constraints . . . . . . . . . . . . . . . . . . . . . . . . . . . . . 3-2
Advisories, Warnings, Cautions, and Notes . . . . . . . . . . . . . . . . . 3-3
Advisories. . . . . . . . . . . . . . . . . . . . . . . . . . . . . . . . . . . . 3-3
Cautions. . . . . . . . . . . . . . . . . . . . . . . . . . . . . . . . . . . . . 3-3
Notes . . . . . . . . . . . . . . . . . . . . . . . . . . . . . . . . . . . . . . . 3-3
Errors . . . . . . . . . . . . . . . . . . . . . . . . . . . . . . . . . . . . . . . . . 3-4
Index
Doc. # 11219711 Rev. A
Doc. # 11219711 Rev. A
1.800.809.ILMN (1.800.809.4566) or +1.858.202.4566 (outside North America) www.illumina.com
1.800.809.ILMN (1.800.809.4566) or +1.858.202.4566 (outside North America) www.illumina.com
vii
List of Figures
Figure 1-1
On/Off Switch . . . . . . . . . . . . . . . . . . . . . . . . . . . . . . . . . . 1-3
Figure 1-2
Single-Reader Configuration . . . . . . . . . . . . . . . . . . . . . . . . . 1-4
Figure 1-3
Dual-Reader Configuration . . . . . . . . . . . . . . . . . . . . . . . . . . 1-5
Figure 1-4
AutoLoader Main Screen . . . . . . . . . . . . . . . . . . . . . . . . . . . . 1-7
Figure 2-1
Accessing Configuration Options . . . . . . . . . . . . . . . . . . . . . . 2-2
Figure 2-2
Decode Map and Image File Configuration . . . . . . . . . . . . . . . . 2-3
Figure 2-3
Data File Locations . . . . . . . . . . . . . . . . . . . . . . . . . . . . . . . 2-4
Figure 2-4
BeadScan and Email Configuration . . . . . . . . . . . . . . . . . . . . . 2-5
Figure 2-5
Options Dialog . . . . . . . . . . . . . . . . . . . . . . . . . . . . . . . . . . 2-6
Figure 2-6
Configuring Scan Settings . . . . . . . . . . . . . . . . . . . . . . . . . . . 2-7
Figure 2-7
BeadChip Carrier . . . . . . . . . . . . . . . . . . . . . . . . . . . . . . . . . 2-8
Figure 2-8
AutoLoader Stacks . . . . . . . . . . . . . . . . . . . . . . . . . . . . . . . . 2-9
Figure 2-9
Starting the AutoLoader Application . . . . . . . . . . . . . . . . . . . 2-10
Figure 2-10
AutoLoader Initializing . . . . . . . . . . . . . . . . . . . . . . . . . . . . 2-10
Figure 2-11
Select Your Lab System . . . . . . . . . . . . . . . . . . . . . . . . . . . 2-11
Figure 2-12
Scan Status . . . . . . . . . . . . . . . . . . . . . . . . . . . . . . . . . . . 2-12
Figure 2-13
About AutoLoader Screen . . . . . . . . . . . . . . . . . . . . . . . . . . 2-13
Figure 2-14
BeadChip Carrier . . . . . . . . . . . . . . . . . . . . . . . . . . . . . . . . 2-18
Figure 2-15
AutoLoader Stacks . . . . . . . . . . . . . . . . . . . . . . . . . . . . . . . 2-19
Figure 2-16
Starting the AutoLoader Application . . . . . . . . . . . . . . . . . . . 2-20
Figure 2-17
AutoLoader Initializing . . . . . . . . . . . . . . . . . . . . . . . . . . . . 2-21
Figure 2-18
Select Your Lab System . . . . . . . . . . . . . . . . . . . . . . . . . . . 2-22
Figure 2-19
Scan Status . . . . . . . . . . . . . . . . . . . . . . . . . . . . . . . . . . . 2-23
Figure 2-20
About AutoLoader Screen . . . . . . . . . . . . . . . . . . . . . . . . . . 2-24
Figure 2-21
Remote Reader Not Selected . . . . . . . . . . . . . . . . . . . . . . . . 2-28
Figure 2-22
Remote Reader Selected . . . . . . . . . . . . . . . . . . . . . . . . . . . 2-29
Figure 3-1
Remote BeadScan is Active . . . . . . . . . . . . . . . . . . . . . . . . . . 3-4
Figure 3-2
Remote BeadScan Went Down Unexpectedly . . . . . . . . . . . . . . . 3-4
1.800.809.ILMN (1.800.809.4566) or +1.858.202.4566 (outside North America) www.illumina.com
Doc. # 11219711 Rev. A
vii
List of Tables
Table 1-1 AutoLoader Parts List . . . . . . . . . . . . . . . . . . . . . 1-5
1.800.809.ILMN (1.800.809.4566) or +1.858.202.4566 (outside North America) www.illumina.com
Doc. # 11219711 Rev. A
Chapter 1
Overview
Topics
` AutoLoader Introduction 1-2
` Audience and Purpose of this Guide 1-2
` Related Documentation 1-2
` AutoLoader Hardware 1-3
` AutoLoader Software 1-7
1.800.809.ILMN (1.800.809.4566) or +1.858.202.4566 (outside North America) www.illumina.com
Doc. # 11219711 Rev. A
1-2
AutoLoader User Guide
AutoLoader Introduction
The AutoLoader is a device that loads and unloads carriers
which contain slides of the BeadChips. The AutoLoader
places the carriers in the BeadArray Reader tray, so that the
BeadArray Reader can scan the BeadChips. This completes
the final step in digitizing data for disease study and
research. The AutoLoader:
` Supports up to 20 carriers, each holding up to
two BeadChips
` Can be used in a Single-Reader or DualReader configuration
` In a Single-Reader configuration, can scan up to 32 chips
per day
` In a Dual-Reader configuration, can scan up to 64 chips
per day
` Is fully integrated with BeadScan software and
Illumina LIMS
` Has an email alert system, to be used for both critical
alerts, and summary information
` Is designed for unattended operation
Audience and Purpose of this Guide
This document explains how to use the AutoLoader, including
the associated hardware and software. The audience for this
manual is Lab Technicians and Lab Managers responsible for
day-to-day operations and monitoring of the AutoLoader.
Related Documentation
` Document # 11207963 - Infinium User Manual
` Document # 11206805 - BeadScan 3.0
Software Addendum
` Document # 11172465 - BeadArray Reader
for BeadStation
Doc. # 11219711 Rev. A
Doc. # 11219711 Rev. A
1.800.809.ILMN (1.800.809.4566) or +1.858.202.4566 (outside North America) www.illumina.com
1.800.809.ILMN (1.800.809.4566) or +1.858.202.4566 (outside North America) www.illumina.com
Overview
1-3
AutoLoader Hardware
Safety Considerations
While the AutoLoader has been designed for safe operation,
any system with moving parts can potentially cause damage.
Do not touch the AutoLoader robot arm while it is moving, or
put your face, body, or any lab equipment in its path.
If the AutoLoader robot arm encounters anything unexpected
in its path, it stops automatically.
Emergency Stop
To cut off power to the AutoLoader, trip the emergency on/
off switch, located at the base.
Figure 1-1
On/Off Switch
When you turn off the power, the robot arm will begin to
slowly descend. Ensure that the arm is not directly above any
other raised component, such as the barcode scanner or one
of the stacks.
1.800.809.ILMN (1.800.809.4566) or +1.858.202.4566 (outside North America) www.illumina.com
Doc. # 11219711 Rev. A
Overview
3
1-4
AutoLoader User Guide
WARNING:
Warning: If the robot arm drops on top of another
component, it is possible that the robot arm or the
component may be damaged, or that the
component may need to be realigned by an
Illumina Customer Support representative.
Single and Dual
Readers
AutoLoader can run using either one or two BeadArray
readers. Dual-reader systems can handle greater throughput.
Dual-reader systems use a master/slave configuration. The
master reader is called the local BeadArray Reader, and the
slave reader is called the remote BeadArray Reader.
Component Diagrams
The following diagram shows the hardware for a singlereader configuration.
Figure 1-2
Single-Reader Configuration
The following diagram shows the hardware for a dualreader configuration.
Doc. # 11219711 Rev. A
Doc. # 11219711 Rev. A
1.800.809.ILMN (1.800.809.4566) or +1.858.202.4566 (outside North America) www.illumina.com
1.800.809.ILMN (1.800.809.4566) or +1.858.202.4566 (outside North America) www.illumina.com
Overview
Figure 1-3
1-5
Dual-Reader Configuration
Parts List
Table 1-1
AutoLoader Parts List
Part
Purpose
Barcode Reader
Scans the barcodes of the carrier and
the two BeadChips it contains. The
main screen uses the barcodes to
identify the carriers and BeadChips.
If the carrier barcode cannot be read
for any reason, AutoLoader uses the
BeadChip barcodes to identify
the scans.
Base Plate
Holds all of the AutoLoader
components in precise positions, so
that the robot can move the BeadChip
carriers successfully. Never move the
base plate.
BeadArray Reader
Contains all of the scanning hardware
and firmware.
In a dual-reader system, there is a local
and a remote BeadArray reader.
Carriers are evenly distributed between
the local and the remote
BeadArray Readers.
1.800.809.ILMN (1.800.809.4566) or +1.858.202.4566 (outside North America) www.illumina.com
Doc. # 11219711 Rev. A
Overview
5
1-6
AutoLoader User Guide
Table 1-1
AutoLoader Parts List
Part
Doc. # 11219711 Rev. A
Doc. # 11219711 Rev. A
Purpose
BeadArray Reader Tray
Holds the BeadChip carrier in position
for scanning. Auto-scans require a
special adaptor plate.
BeadChip Carrier
Holds two BeadChips. Each carrier acts
as a lid for the carrier beneath it.
Gripper
Attaches to the sides of the BeadChip
carrier to lift and move it.
Hotel/Stacks
Keeps the stacked carriers in place so
that the Robot Arm can lift and replace
them successfully.
Input Stack
Holds carriers with BeadChips that are
ready to be scanned.
Lid
Protects the BeadChips in the top
carrier in a stack from exposure to
excessive light, heat, and humidity.
Lid Stack
Holds lids while they are not on an
input or output stack.
Output Stack
Holds carriers containing the
scanned BeadChips.
PC
Provides an interface to the BeadScan
and AutoLoader software on the
BeadArray reader. The PC is physically
attached to the Reader.
In a dual-reader system, there is a
separate PC for each BeadArray reader.
Robot Arm
Moves the BeadChip carriers
between locations.
Robot Housing
Provides a stable base for the
Robot Arm.
1.800.809.ILMN (1.800.809.4566) or +1.858.202.4566 (outside North America) www.illumina.com
1.800.809.ILMN (1.800.809.4566) or +1.858.202.4566 (outside North America) www.illumina.com
Overview
1-7
AutoLoader Software
Overview
Main Screen
The AutoLoader software fully integrates with the Illumina
BeadScan software.
Viewing the Scan
Drag the mouse over the scan to zoom in or out.
Figure 1-4
AutoLoader Main Screen
1.800.809.ILMN (1.800.809.4566) or +1.858.202.4566 (outside North America) www.illumina.com
Doc. # 11219711 Rev. A
Overview
7
1-8
AutoLoader User Guide
Log Files
During each run, AutoLoader creates a log file listing each
step in the scanning process.
Default location:
Program Files\Illumina\AutoLoader\AutoLoader.log
When the first log file reaches 5 MB in size, AutoLoader
renames it to the AutoLoader.1.log. AutoLoader then creates
a new AutoLoader.log file and begins logging information in
it. When this log file reaches 5 MB, AutoLoader renames
AutoLoader.1.log to AutoLoader.2.log, renames
AutoLoader.log to AutoLoader.1.log, and so on until
AutoLoader.9.log. When there is an AutoLoader.9.log file,
and a new log file is created, AutoLoader.9.log is deleted,
and AutoLoader.8.log is renamed to AutoLoader.9.log.
AutoLoader.log is always the current log, and
AutoLoader.9.log is always the oldest.
Doc. # 11219711 Rev. A
Doc. # 11219711 Rev. A
1.800.809.ILMN (1.800.809.4566) or +1.858.202.4566 (outside North America) www.illumina.com
1.800.809.ILMN (1.800.809.4566) or +1.858.202.4566 (outside North America) www.illumina.com
Overview
1-9
NOTES
1.800.809.ILMN (1.800.809.4566) or +1.858.202.4566 (outside North America) www.illumina.com
Doc. # 11219711 Rev. A
Overview
9
1-10
AutoLoader User Guide
NOTES
Doc. # 11219711 Rev. A
Doc. # 11219711 Rev. A
1.800.809.ILMN (1.800.809.4566) or +1.858.202.4566 (outside North America) www.illumina.com
1.800.809.ILMN (1.800.809.4566) or +1.858.202.4566 (outside North America) www.illumina.com
Chapter 2
AutoLoader Operation
Topics
` Configuring AutoLoader 2-2
` Single-Reader Scanning 2-7
` Dual-Reader Scanning 2-17
1.800.809.ILMN (1.800.809.4566) or +1.858.202.4566 (outside North America) www.illumina.com
Doc. # 11219711 Rev. A
2-2
AutoLoader User Guide
Configuring AutoLoader
Before you start using the AutoLoader, there are some
configuration steps that need to be taken.
Setting Default File
Locations
It is important to set the file paths to the decode maps and
your image data. Decode maps record the location and the
bead-type of each bead on the BeadChip. Image files are the
resulting images from a scan.
1. Click the Illumina logo.
2. In the BeadScan Scanning Mode window, click
Automated Scan.
Figure 2-1
Accessing Configuration Options
3. From the context menu, select AutoLoader | Options.
Doc. # 11219711 Rev. A
Doc. # 11219711 Rev. A
1.800.809.ILMN (1.800.809.4566) or +1.858.202.4566 (outside North America) www.illumina.com
1.800.809.ILMN (1.800.809.4566) or +1.858.202.4566 (outside North America) www.illumina.com
AutoLoader Operation 2-3
Figure 2-2
Decode Map and Image File Configuration
4. Enter the locations where your decode maps and image
files will be stored.
1.800.809.ILMN (1.800.809.4566) or +1.858.202.4566 (outside North America) www.illumina.com
Doc. # 11219711 Rev. A
AutoLoader Operation
3
2-4
Figure 2-3
AutoLoader User Guide
Data File Locations
NOTE:
The location must be set separately for both readers when
operating in dual-reader AutoLoader mode.
Setting Email Alerts
AutoLoader can send you emails about:
` Catastrophic events
• When scanning has stopped for any reason
• When the BeadScan application has gone off-line
• When the AutoLoader robot cannot move
` Scan summaries
• Number of BeadChips scanned
• Number of successful scans
• Number of failed scans
To set up your email options:
1. From the context menu, select BeadScan | Options.
Doc. # 11219711 Rev. A
Doc. # 11219711 Rev. A
1.800.809.ILMN (1.800.809.4566) or +1.858.202.4566 (outside North America) www.illumina.com
1.800.809.ILMN (1.800.809.4566) or +1.858.202.4566 (outside North America) www.illumina.com
AutoLoader Operation 2-5
Figure 2-4
BeadScan and Email Configuration
2. In the Options dialog box, enter your email
server address.
1.800.809.ILMN (1.800.809.4566) or +1.858.202.4566 (outside North America) www.illumina.com
Doc. # 11219711 Rev. A
AutoLoader Operation
5
2-6
Figure 2-5
AutoLoader User Guide
Options Dialog
NOTE:
Do not make changes to anything other than email and Bead
Scan in this options dialog.
Configuring Scan Settings
To configure scan settings:
1. Exit autoscan mode.
2. Select Manual Scan to change any settings.
Doc. # 11219711 Rev. A
Doc. # 11219711 Rev. A
1.800.809.ILMN (1.800.809.4566) or +1.858.202.4566 (outside North America) www.illumina.com
1.800.809.ILMN (1.800.809.4566) or +1.858.202.4566 (outside North America) www.illumina.com
AutoLoader Operation 2-7
Figure 2-6
Configuring Scan Settings
3. Go back to autoscan mode to continue.
NOTE:
You must exit autoscan mode to set scan settings.
Single-Reader Scanning
Before You Begin
Before you begin configuring automated scanning:
` Ensure that the BeadArray Reader(s) is turned on and
ready. The Power light and the Ready light should both
be solid amber.
` Log in to the PC that is attached to the
BeadArray Reader.
` Ensure that neither BeadArray reader is not running the
BeadScan software.
` Ensure that no carriers are in the BeadArray tray before
using the AutoLoader.
` Ensure that the isolation table has the proper air
pressure, to prevent vibration.
` Set the decode file locations. See “Setting Default File
Locations” on page 2.
Starting the Scan
For more information about the Illumina BeadArray Reader,
see the BeadArray Reader User Guide (document
# 11172465).
1.800.809.ILMN (1.800.809.4566) or +1.858.202.4566 (outside North America) www.illumina.com
Doc. # 11219711 Rev. A
AutoLoader Operation
7
2-8
AutoLoader User Guide
1. At your lab bench, away from robotic moving parts, place
the BeadChips to be scanned into BeadChip carriers. The
barcode should be on the left side of the carrier when
you hold the carrier, so that you can read the
Illumina plaque.
Figure 2-7
BeadChip Carrier
2. Remove the input hotel from stack #1 (located beside the
local BeadArray Reader) and set it aside.
3. Stack up to 20 BeadChip carriers into the input stack.
The barcode on each carrier should face the front. If you
try to place the carrier on the stack in the wrong
orientation, it will not fall securely into place on top of
the carrier below it.
Doc. # 11219711 Rev. A
Doc. # 11219711 Rev. A
1.800.809.ILMN (1.800.809.4566) or +1.858.202.4566 (outside North America) www.illumina.com
1.800.809.ILMN (1.800.809.4566) or +1.858.202.4566 (outside North America) www.illumina.com
AutoLoader Operation 2-9
Figure 2-8
AutoLoader Stacks
4. Place a lid into the top of the BeadChip carrier.
5. Replace the input hotel.
6. Place a lid into the empty output stack.
7. On the local PC, double-click the Illumina BeadScan
desktop icon to open the BeadScan software application.
BeadScan checks to see if AutoLoader is available. If it is,
BeadScan launches the AutoLoader application.
8. At the dialog box, click Automated Scan to start the
AutoLoader application.
1.800.809.ILMN (1.800.809.4566) or +1.858.202.4566 (outside North America) www.illumina.com
Doc. # 11219711 Rev. A
AutoLoader Operation
9
2-10
AutoLoader User Guide
Figure 2-9
Starting the AutoLoader Application
The following screen displays, as the AutoLoader initializes.
Figure 2-10
AutoLoader Initializing
Doc. # 11219711 Rev. A
Doc. # 11219711 Rev. A
1.800.809.ILMN (1.800.809.4566) or +1.858.202.4566 (outside North America) www.illumina.com
1.800.809.ILMN (1.800.809.4566) or +1.858.202.4566 (outside North America) www.illumina.com
AutoLoader Operation 2-11
9. In the AutoLoader window at the top of the Welcome
screen, select the type of scan setting you are using.
Figure 2-11
Select Your Lab System
10. Click Next.
The scan status displays.
1.800.809.ILMN (1.800.809.4566) or +1.858.202.4566 (outside North America) www.illumina.com
Doc. # 11219711 Rev. A
AutoLoader Operation
11
2-12
Figure 2-12
AutoLoader User Guide
Scan Status
11. When the scan is complete, a message displays.
12. Click Done.
System Status
The System Status section of the window displays the
BeadArray Readers that are available and their status. The ID
shown relates to the user currently logged in to the system.
Double-click the image of the reader to view the software
and firmware information associated with that reader.
Doc. # 11219711 Rev. A
Doc. # 11219711 Rev. A
1.800.809.ILMN (1.800.809.4566) or +1.858.202.4566 (outside North America) www.illumina.com
1.800.809.ILMN (1.800.809.4566) or +1.858.202.4566 (outside North America) www.illumina.com
AutoLoader Operation 2-13
Figure 2-13
About AutoLoader Screen
Two checkboxes on the right side of the AutoLoader window
show the local and remote reader user IDs, and indicate
whether the readers are online. You cannot change the
status of the local BeadArray reader.
13. Enter your user name (and password, if required).
14. Click Next.
NOTE:
You do not need to log in to the BeadScan application in the
lower part of the screen.
1.800.809.ILMN (1.800.809.4566) or +1.858.202.4566 (outside North America) www.illumina.com
Doc. # 11219711 Rev. A
AutoLoader Operation
13
2-14
AutoLoader User Guide
The AutoLoader robot initializes. This involves the
following actions:
` Verifying the login information for both
BeadArray Readers
` Moving between all the components
` Making sure that the barcode scanner and robot housing
are operational
` Determining the number of BeadChip carriers in
each stack
After a few moments, the Setup screen appears. AutoLoader
displays the number of BeadChip carriers that it detected in
the stacks.
15. At the Setup screen, select the appropriate scan setting.
NOTE:
If you have more than one type of BeadChip, select the
Default option. This instructs AutoLoader to read the Sentrix
Description File for each BeadChip to determine its type.
16. Click Next. The automated scanning process begins.
When all the BeadChips have been scanned, click Done. A
popup screen appears and displays scan information. The
upper-right window on the main screen lists all the carriers
and indicates any errors or warnings that occurred. The
upper-left window shows a log of all events during the
scanning process.
The log records a variety of errors, such as not being able to
find the decode map, registration errors, etc. The table
records all of the BeadChips scanned during the AutoLoader
session, records any errors that were encountered for each
chip, and also notes which carrier the BeadChip was on so
that the user can easily locate the BeadChip with the error.
Doc. # 11219711 Rev. A
Doc. # 11219711 Rev. A
1.800.809.ILMN (1.800.809.4566) or +1.858.202.4566 (outside North America) www.illumina.com
1.800.809.ILMN (1.800.809.4566) or +1.858.202.4566 (outside North America) www.illumina.com
AutoLoader Operation 2-15
If a BeadChip was not scanned, it will not appear in the list.
Immediately place the BeadChips on top. It is important to
scan the BeadChip as soon as possible to minimize any
possible degradation.
NOTE:
Should AutoLoader not release a BeadChip carrier, support the
carrier with your hand and click Open Gripper.
Scanning Process
AutoLoader and the BeadArray Reader will cycle through the
following actions until all BeadChips have been scanned.
AutoLoader:
1. Removes BeadChip carrier lid from the input stack and
places lid in the lid stack.
2. Lifts the top BeadChip carrier from the input stack and
scans the carrier and slide barcodes.
3. Places the top BeadChip carrier into the BeadArray
Reader tray.
4. Retrieves the lid from the lid stack and places it onto the
top BeadChip carrier in the input stack.
BeadArray Reader:
5. Performs BeadChip scan, and then ejects the tray.
If there is no decode file loaded in BeadScan, the
BeadArray Reader will not be able to complete the
scan.
AutoLoader:
6. Removes the BeadChip carrier lid from the output stack
and places it in the lid stack.
7. Lifts the BeadChip carrier from the BeadArray Reader
tray.
8. Places the BeadChip carrier into the output stack.
1.800.809.ILMN (1.800.809.4566) or +1.858.202.4566 (outside North America) www.illumina.com
Doc. # 11219711 Rev. A
AutoLoader Operation
15
2-16
AutoLoader User Guide
9. Retrieves the lid from the lid stack and places it onto the
top BeadChip carrier in the output stack.
NOTE:
Before leaving the AutoLoader unattended during automatic
operation, verify that the AutoLoader has placed the first
BeadChip carrier into the BeadArray Reader tray and that the
carrier was successfully accepted for imaging. If it was, then
the BeadChip format appears on the main screen.
Adding and Removing
Carriers
Adding and removing carriers is a great benefit to the
AutoLoader. You can add and remove BeadChip carriers from
the input stack while auto-scanning is in process. To do this
safely and without interrupting the ongoing scanning
process, follow these rules:
` Do not add or remove a carrier when the robot arm is
in motion.
` Add or remove a carrier only when the lid is on the input
stack (not on the lid stack). It is important to keep the
lid on the carrier to protect the BeadChips from
the environment.
CAUTION:
Do not add so many carriers that the lowest carriers
in the stack do not get scanned for a long time. If
this happens, the quality of the signal on the slide
may degrade.
Interrupting the
Scanning Process
Doc. # 11219711 Rev. A
Doc. # 11219711 Rev. A
Click Stop to stop both readers.
Click Pause to stop scanning at the end of the current stripe.
The button changes to Resume. When you are ready to
continue, click Resume. The scanning picks up where it
left off.
1.800.809.ILMN (1.800.809.4566) or +1.858.202.4566 (outside North America) www.illumina.com
1.800.809.ILMN (1.800.809.4566) or +1.858.202.4566 (outside North America) www.illumina.com
AutoLoader Operation 2-17
Ending the Session
To end the scan session, wait until all of the BeadChips have
been scanned. Click Stop to stop all scans.
Dual-Reader Scanning
Before You Begin
Before you begin configuring automated scanning:
` Make sure that the BeadArray Reader(s) is turned on and
ready. The Power light and the Ready light should both
be solid green.
` Log in to both PCs that are attached to the BeadArray.
` Make sure that neither BeadArray Reader is running the
BeadScan software.
` To enable the AutoLoader to control both BeadArray
Readers, make sure that the BeadScan application is not
running on the remote PC. If the remote PC is running
BeadScan, the system will generate an error indicating
that BeadScan is being run in manual mode.
` Click the Run button on the AutoLoader service running
on the remote PC.
` Ensure that the isolation table has the proper air
pressure to prevent vibration.
` Check to ensure that no carriers are in the BeadArray
Reader tray before using the AutoLoader.
` Load decode files into BeadScan. See Setting Default File
Locations 2-2.
Starting the Scan
For more information about the Illumina BeadArray Reader,
see the BeadArray Reader User Guide (document
# 11172465).
1. At your lab bench, away from robotic moving parts, place
BeadChips to be scanned into BeadChip carriers. The
barcode should be on the left side of the carrier when
you hold the carrier, so that you can read the
Illumina plaque.
1.800.809.ILMN (1.800.809.4566) or +1.858.202.4566 (outside North America) www.illumina.com
Doc. # 11219711 Rev. A
AutoLoader Operation
17
2-18
AutoLoader User Guide
Figure 2-14
BeadChip Carrier
2. Remove the input hotel from stack #1 (located beside the
local BeadArray Reader) and set it aside.
3. Stack up to 20 BeadChip carriers into the input stack.
The barcode on each carrier should face the front. If you
try to place the carrier on the stack in the wrong
orientation, it will not fall securely into place on top of
the carrier below it.
Doc. # 11219711 Rev. A
Doc. # 11219711 Rev. A
1.800.809.ILMN (1.800.809.4566) or +1.858.202.4566 (outside North America) www.illumina.com
1.800.809.ILMN (1.800.809.4566) or +1.858.202.4566 (outside North America) www.illumina.com
AutoLoader Operation 2-19
Figure 2-15
AutoLoader Stacks
4. Place a lid into the top of the BeadChip carrier.
5. Replace the input hotel.
6. Place a lid into the empty output stack.
1.800.809.ILMN (1.800.809.4566) or +1.858.202.4566 (outside North America) www.illumina.com
Doc. # 11219711 Rev. A
AutoLoader Operation
19
2-20
AutoLoader User Guide
7. On the local PC, double-click the Illumina BeadScan
desktop icon to open the BeadScan software application.
BeadScan checks to see if AutoLoader is on the system. If
it is, BeadScan launches the AutoLoader application.
AutoLoader initiates BeadScan on the remote machine,
and then begins acting as the user for both
BeadScan applications.
8. At the dialog box, click Automated Scan to start the
AutoLoader application.
Figure 2-16
Starting the AutoLoader Application
The following screen displays, as the AutoLoader initializes.
Doc. # 11219711 Rev. A
Doc. # 11219711 Rev. A
1.800.809.ILMN (1.800.809.4566) or +1.858.202.4566 (outside North America) www.illumina.com
1.800.809.ILMN (1.800.809.4566) or +1.858.202.4566 (outside North America) www.illumina.com
AutoLoader Operation 2-21
Figure 2-17
AutoLoader Initializing
9. In the AutoLoader window at the top of the Welcome
screen, select the type of scan setting you are using.
1.800.809.ILMN (1.800.809.4566) or +1.858.202.4566 (outside North America) www.illumina.com
Doc. # 11219711 Rev. A
AutoLoader Operation
21
2-22
Figure 2-18
AutoLoader User Guide
Select Your Lab System
10. Click Next.
The scan status displays.
Doc. # 11219711 Rev. A
Doc. # 11219711 Rev. A
1.800.809.ILMN (1.800.809.4566) or +1.858.202.4566 (outside North America) www.illumina.com
1.800.809.ILMN (1.800.809.4566) or +1.858.202.4566 (outside North America) www.illumina.com
AutoLoader Operation 2-23
Figure 2-19
Scan Status
11. When the scan is complete, a message displays.
12. Click Done.
System Status
The System Status section of the window displays the
BeadArray Readers that are available and their status. The ID
shown relates to the user currently logged in to the system.
Double-click the image of the reader to view the software
and firmware information associated with that reader.
1.800.809.ILMN (1.800.809.4566) or +1.858.202.4566 (outside North America) www.illumina.com
Doc. # 11219711 Rev. A
AutoLoader Operation
23
2-24
Figure 2-20
AutoLoader User Guide
About AutoLoader Screen
Two checkboxes on the right side of the AutoLoader window
show the local and remote reader user IDs, and indicate
whether the readers are online. You cannot change the
status of the local BeadArray reader.
Clear the remote reader check box to disconnect the
reader if:
` There is a problem with the remote machine and you
need to turn it off.
` You plan to manually scan a BeadChip on the
remote machine.
If the check box does not automatically become selected
when you start BeadScan, check to ensure that:
Doc. # 11219711 Rev. A
Doc. # 11219711 Rev. A
1.800.809.ILMN (1.800.809.4566) or +1.858.202.4566 (outside North America) www.illumina.com
1.800.809.ILMN (1.800.809.4566) or +1.858.202.4566 (outside North America) www.illumina.com
AutoLoader Operation 2-25
` The remote reader is on and ready (Power and Ready
lights are solid [color]).
` You are logged in to the remote reader.
` BeadScan is not already running on the remote machine.
If it is, then the local machine remains in singlereader mode.
13. Enter your user name (and password, if required), then
click Next.
NOTE:
You do not need to log in to the BeadScan application in the
lower part of the screen.
The AutoLoader robot initializes. This involves the
following actions:
` Verifying the login information for both
BeadArray Readers
` Moving between all the components
` Making sure that the barcode scanner and robot housing
are operational
` Determining the number of BeadChip carriers in
each stack
After a few moments, the Setup screen appears. AutoLoader
displays the number of BeadChip carriers that it detected in
the stacks.
14. At the Setup screen, select the appropriate scan setting.
NOTE:
If you have more than one type of BeadChip, select the
Default option. This instructs AutoLoader to read the Sentrix
Description File for each BeadChip to determine its type.
15. Click Next. The automated scanning process begins.
1.800.809.ILMN (1.800.809.4566) or +1.858.202.4566 (outside North America) www.illumina.com
Doc. # 11219711 Rev. A
AutoLoader Operation
25
2-26
AutoLoader User Guide
When all the BeadChips have been scanned, click Done. A
popup screen appears and indicates whether the scan was
successful. The upper-right window on the main screen lists
all the carriers and indicates any errors or warnings that
occurred. The upper-left window shows a log of all events
during the scanning process.
The error log records a variety of errors, such as not being
able to find the decode map, registration errors, etc. The
Error Summary table records all of the BeadChips scanned
during the AutoLoader session, records any errors that were
encountered for each chip, and also notes which carrier the
BeadChip was on so that the user can easily locate the
BeadChip with the error.
If a BeadChip was not scanned, it will not appear in the list.
Immediately set up any unscanned BeadChips for manual
scanning or place it on top of the next BeadChip carrier. It is
important to scan the BeadChip as soon as possible to
minimize any possible degradation.
NOTE:
Should AutoLoader not release a BeadChip carrier, support the
carrier with your hand and click Open Gripper.
Scanning Process
AutoLoader and the BeadArray Reader cycle through the
following actions until all BeadChips have been scanned.
AutoLoader:
1. Removes BeadChip carrier lid from the input stack and
places lid in the lid stack.
2. Lifts the top BeadChip carrier from the input stack and
scans the carrier and slide barcodes.
3. Places the top BeadChip carrier into the BeadArray
Reader tray.
Doc. # 11219711 Rev. A
Doc. # 11219711 Rev. A
1.800.809.ILMN (1.800.809.4566) or +1.858.202.4566 (outside North America) www.illumina.com
1.800.809.ILMN (1.800.809.4566) or +1.858.202.4566 (outside North America) www.illumina.com
AutoLoader Operation 2-27
4. Retrieves the lid from the lid stack and places it onto the
top BeadChip carrier in the input stack.
BeadArray Reader:
5. Performs BeadChip scan, and then ejects the tray. If
there is no decode file loaded in BeadScan, the
BeadArray Reader will not be able to complete the scan.
AutoLoader:
6. Removes the BeadChip carrier lid from the output stack
and places it in the lid stack.
7. Lifts the BeadChip carrier from the BeadArray
Reader tray.
8. Places the BeadChip Carrier into the output stack.
9. Retrieves the lid from the lid stack and places it onto the
top BeadChip carrier in the output stack.
NOTE:
Before leaving the AutoLoader unattended during automatic
operation, verify that the AutoLoader has placed the first
BeadChip carrier into the BeadArray Reader tray and that the
carrier was successfully accepted for imaging. If it was, then
the BeadChip format appears on the main screen.
Adding and Removing
Carriers
The ability to add and remove carriers is one of the main
benefits to the AutoLoader. You can add and remove
BeadChip carriers from the input stack while auto-scanning is
in process. To do this safely and without interrupting the
ongoing scanning process, follow these rules:
` Do not add or remove a carrier when the robot arm is
in motion.
` Add or remove a carrier only when the lid is on the input
stack (not on the lid stack). It is important to keep the
lid on the carrier to protect the BeadChips from
the environment.
1.800.809.ILMN (1.800.809.4566) or +1.858.202.4566 (outside North America) www.illumina.com
Doc. # 11219711 Rev. A
AutoLoader Operation
27
2-28
AutoLoader User Guide
CAUTION:
Do not add so many carriers that the lowest carriers
in the stack do not get scanned for a long time. If
this happens, the quality of the signal on the slide
may degrade.
Interrupting the
Scanning Process
Click Stop to stop both readers.
Click Pause to stop scanning at the end of the current stripe.
The button changes to Resume. When you are ready to
continue, click Resume. The scanning picks up where it
left off.
Ending the Session
To end the scan session, wait until all of the BeadChips have
been scanned. Click Stop to stop all scans.
Switching from
AutoLoad Mode to
Manual Mode
To switch the BeadArray Reader to Manual mode, do
the following:
Figure 2-21
1. Deselect the BeadArray Reader check box.
Remote Reader Not Selected
2. Wait until all BeadChips are finished scanning.
3. Remove all carriers and use the appropriate adapter tray
for manual scan.
Doc. # 11219711 Rev. A
Doc. # 11219711 Rev. A
1.800.809.ILMN (1.800.809.4566) or +1.858.202.4566 (outside North America) www.illumina.com
1.800.809.ILMN (1.800.809.4566) or +1.858.202.4566 (outside North America) www.illumina.com
AutoLoader Operation 2-29
Switching from Manual
Mode to AutoLoader
Mode
To switch the BeadArray Reader from Manual mode to
AutoLoad mode, do the following:
1. Complete all manual scans.
2. Remove all of the carriers from the manual tray, and put
them in the AutoLoader tray.
3. Close the BeadScan software on the remote
BeadArray Reader.
4. Select the Remote Reader check box in the AutoLoader
software on the local PC.
Figure 2-22
Remote Reader Selected
5. When the scan is complete on the local PC, the
AutoLoader utilizes both readers on the next round.
1.800.809.ILMN (1.800.809.4566) or +1.858.202.4566 (outside North America) www.illumina.com
Doc. # 11219711 Rev. A
AutoLoader Operation
29
2-30
AutoLoader User Guide
NOTES
Doc. # 11219711 Rev. A
Doc. # 11219711 Rev. A
1.800.809.ILMN (1.800.809.4566) or +1.858.202.4566 (outside North America) www.illumina.com
1.800.809.ILMN (1.800.809.4566) or +1.858.202.4566 (outside North America) www.illumina.com
Chapter 3
Troubleshooting
Topics
` Introduction 3-2
` Advisories, Warnings, Cautions, and Notes 3-3
` Errors
1.800.809.ILMN (1.800.809.4566) or +1.858.202.4566 (outside North America) www.illumina.com
Doc. # 11219711 Rev. A
3-2
AutoLoader User Guide
Introduction
Several troubleshooting topics have been identified, to help
you through any issues you may have with the AutoLoader.
Operational Constraints
1. The Autoloader will stop operation when the total
number of carriers in the output stack and in the scanner
is 20.
2. The total number of carriers allowed in the input-stack,
output-stack and inside the BeadArray reader is 20.
However, carriers in the output stack can be removed
once they are done.
3. Adding and removing carriers (and the lids) should only
be done when both lids are in the input and output stack,
and when the AutoLoader robotic arm is not in motion.
4. Scan setting configuration and data path can only be
modified in manual mode. When operating in AutoLoader
mode, you need to exit and start BeadScan in manual
mode to make this change.
5. Obstructing the Autoloader robot will result in an error
dialog box.
6. To enable autoloader to control Dual-Readers, ensure
that the BeadScan software on the remote PC is not
running; otherwise, the system will generate an error
indicating the remote BeadScan is being used in manual
mode.
7. Ensure that no carriers are in the tray prior to using the
AutoLoader. This is important for both Single- and DualReader Autoloader configurations.
Doc. # 11219711 Rev. A
Doc. # 11219711 Rev. A
1.800.809.ILMN (1.800.809.4566) or +1.858.202.4566 (outside North America) www.illumina.com
1.800.809.ILMN (1.800.809.4566) or +1.858.202.4566 (outside North America) www.illumina.com
Troubleshooting
3-3
Advisories, Warnings, Cautions, and Notes
Advisories
To prevent possible failures due to potential dye degradation
in unimaged BeadChips, do not leave BeadChips in the
AutoLoader for more then 16 consecutive hours.
Ensure that decode files are loaded into BeadScan before
starting AutoLoader. If decode files are not present, no
scanning will occur.
Cautions
To protect BeadChips from light, temperature, and humidity,
always use lids.
Do not add so many carriers that the lowest carriers in the
stack do not get scanned for a long time. If this happens, the
quality of the signal on the slide may degrade.
The robot, barcode reader, and BeadArray Reader have been
precisely aligned to enable automated scanning. Do not
move or bump them. Positional changes will require an
Illumina service call to realign the integrated system.
Do not touch the AutoLoader hardware or operate the
BeadArray Reader when AutoLoader is moving or scanning a
BeadChip carrier.
Notes
The Illumina BeadScan application in the lower 75% of your
screen will be greyed out (inactive) while the AutoLoader
application window is open.
AutoLoader supports Illumina BeadChips only.
1.800.809.ILMN (1.800.809.4566) or +1.858.202.4566 (outside North America) www.illumina.com
Doc. # 11219711 Rev. A
Troubleshooting
3
3-4
AutoLoader User Guide
Errors
The errors that you are most likely to see relate to the
BeadScans ability to communicate with the
BeadArray Reader.
Figure 3-1
Remote BeadScan is Active
To resolve this error, turn off BeadScan on the
specified workstation.
Figure 3-2
Remote BeadScan Went Down Unexpectedly
To resolve this error, restart BeadScan and the
BeadArray Reader.
Doc. # 11219711 Rev. A
Doc. # 11219711 Rev. A
1.800.809.ILMN (1.800.809.4566) or +1.858.202.4566 (outside North America) www.illumina.com
1.800.809.ILMN (1.800.809.4566) or +1.858.202.4566 (outside North America) www.illumina.com
Troubleshooting
3-5
NOTES
1.800.809.ILMN (1.800.809.4566) or +1.858.202.4566 (outside North America) www.illumina.com
Doc. # 11219711 Rev. A
Troubleshooting
5
3-6
AutoLoader User Guide
NOTES
Doc. # 11219711 Rev. A
Doc. # 11219711 Rev. A
1.800.809.ILMN (1.800.809.4566) or +1.858.202.4566 (outside North America) www.illumina.com
1.800.809.ILMN (1.800.809.4566) or +1.858.202.4566 (outside North America) www.illumina.com
Index
A
H
adding and removing 2-16
Adding carriers 2-16
Advisories 3-3
Audience 1-2
AutoLoader configuration 2-2
AutoLoader Hardware 1-2
AutoLoader software 1-7
Hardware 1-2
C
Carriers 2-16
Cautions 3-3
Component diagrams 1-4
Configuring AutoLoader 2-2
Configuring scan settings 2-6
I
Interrupting a scan 2-16
Introduction 1-2
L
Log files 1-8
N
Notes 3-3
P
Parts 1-5
D
Default file locations 2-2
Dual-Reader 1-2
Dual-reader diagram 1-5
R
E
S
email alerts 2-4
Emergency stop 1-2
end 2-17
Ending the session 2-17
Errors 3-4
errors 3-4
Safety 1-2
Scan settings 2-6
Scan starting 2-7
Scaninterruption 2-16
Scanning 2-7
Scanning process 2-15
Session 2-17
Setting email alerts 2-4
Single-Reader 1-2
single-reader 2-7
Single-reader diagram 1-4
F
File locations 2-2
Related documentation 1-2
Removing carriers 2-16
1.800.809.ILMN (1.800.809.4566) or +1.858.202.4566 (outside North America) www.illumina.com
Doc. # 11219711 Rev. A
Index-2
AutoLoader User Guide
Single-Reader scanning 2-7
software 1-7
Starting scan 2-7
Status 2-12
system 2-12
Doc. # 11219711 Rev. A
Doc. # 11219711 Rev. A
System status 2-12
T
Troubleshooting 3-4
1.800.809.ILMN (1.800.809.4566) or +1.858.202.4566 (outside North America) www.illumina.com
1.800.809.ILMN (1.800.809.4566) or +1.858.202.4566 (outside North America) www.illumina.com