1
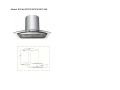
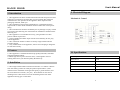
KITCHEN APPLIANCE SERIES
RANGE HOOD
INSTRUCTION MANUAL
Read this manual carefully before using the appliance, and
store it in a safe place for future reference.
For authorized service & original parts.
RANGE HOOD
Model: H75.6P/H75.7P/H75.9P/H75.10P
User’s Manual
RANGE HOOD
11. Cleaning & Maintenance
Content
* Before cleaning, Please confirm that the power is switched off
11.1 Cleaning the surface of hood every week. Use mild soap or
Introduction ………………………………………1
detergent to clean the hood.
11.2 Avoid the use of scouring powers of dishwasher compounds.
11.3 Grease filter may be washed using mild soap or detergent when
Features
use it three months. (heavy grease build-up may not be cleaned easily
Installation
and the filter may require replacement)
Lamp Change
11.4 Do not use harsh alkalis or abrasives.
………………………………………1
……………………………………1
…………………………………2
11.5 Charcoal filters cannot be cleaned and must be replaced when use
Notice of Installation
it six months.
Safety Warning
How to Use
…………………………3
…………………………………3
……………………………………4
Trouble Shooting
……………………………5
Electrical Diagram
……………………………6
Specifications
………………………………6
Cleaning & Maintenance
7
………………………7
User’s Manual
RANGE HOOD
9. Electrical Diagram
1. Introduction
1.1 This appliance has been manufactured with materials and processes that
respect the environment. We hope that you will continue this important
consideration in the operation of this appliance & the disposal of the
packaging materials, thank you.
1.2 The installation work must be undertaken by a qualified technician
experienced in cooker hood installation. Please connect the correct power
rating.
1.3 The manufacturer disclaims all liability for any damage or injury caused
as a result of not following the instructions for installation contained in the
following text.
1.4 The appliance is not intended for use by young children or infirm
persons without supervision.
1.5 Young children should be supervised to ensure that they do not play
with the appliance.
1.6 The maximum number of hobs covered by range hood should not
exceed 5 burners.
1.7 Any modifications to the appliance, electric wire and plug is dangerous
& voids the warranty.
2. Feature
2.1 This appliance is manufactured from top quality materials, and offers
superb streamlined effects.
2.2 With high suction power and low noise, it is designed to remove
cooking fumes from your kitchen quietly & effectively.
3. Installation
3.1 The range hood should be mounted at a distance of 650mm- 700mm
from the cooking surface for safety & optimum performance (If the
instructions for installation of the gas hob specify a greater distance, this
has to be taken into account.) (see pic1 ). That exhaust air must not be
discharged into a flue which is used for exhausting fumes from other
appliances burning gas or other fuels.
1
Mechanical Control
10. Specifications
Rated Input
220V~240V,50Hz
Rated Power
122W
Lighting Power
2W X 1
Motor Power
120W
Drive Mode
Single Motor
Air tube diameter
150mm
6
User’s Manual
RANGE HOOD
8. Trouble Shooting
If any problem occurs, please remove the plug from the socket and contact
the manufacturer or its service agent or a similarly qualified person in order
to avoid a hazard.
Problem
Light on, but
motor does not
work
Light does not
work, motor
does not work
Cause
Solution
The outlet valve is blocked
Detach flue and duct then
turn on the hood to check if
the valve opens
The capacitor has failed
Call for technical service
The control switch has failed
Call for technical service
No power supply
Plug another appliance into
the socket to confirm there
is power supply
Fuse has blown
Open up the plug and
replace the 13A fuse
The propeller is damaged or
unbalanced
Call for technical service
The hood is not installed correctly
Review the installation
instructions & check the
installation again for loose
screws, brackets or
connections
The distance between the hood and the
cooker is too long
Check that the distance is
between 650mm to 700mm
The filters are saturated
Clean the filters from
grease residue and replace
after drying.
Vibration
Insufficient
suction effect
5
3.2 To install onto the wall, drill 2 holes of φ8mm on
a sturdy wall and in line with the hood.
3.3 Insert expended screws into the holes.
3.4 Fix drilling template on the wall. (See pic2).
3.5 Install the duct (not offered) to the hood air outlet
And put the other end out of the wall (See pic3).
3.6 Mount the U-shaped bracket (alternative part),
make sure it’s firmed (see pic4).
Pic 2
Pic 4
Pic 3
4. Lamp change
1.Turn off the power supply by unplugging
from the wall socket.
2.Unfasten the screws on the glass canopy and remove
the glass.
3.Detach the low-voltage electric connector.
4.Then unfasten the screws on the lamp (see pic 4B).
5.Replace the lamp (LED Lamp Max.2W) and then
reinstall in the reverse manner.
2
PIC 4B
User’s Manual
RANGE HOOD
5. Notice of Installation
5.1 Before installation, please make sure that there is adequate
ventilation of the room when the range hood is used at the same time
as appliances burning gas or other fuels and clean up the surrounding
area, to avoid suction of the such as bits of broken wood.
5.2 It can not share the same air ventilation tube with other appliance
such as gas tube, warmer tube, and hot wind tube.
5.3 The bending of soot ventilation tube should be ≥120°C, parallel
or above the start point and should be connected to the outdoor.
5.4 After installation, test carefully on the horizontal degree,
see pic7.
5.5 Be sure that the plug is accessible after installation.
* The range hood is for home use only and is not suitable for outdoor,
barbecue, and other commercial applications.
* The range hood and its filter should be cleaned regularly for best
performance. Excessive grease will impede airflow and may cause the motor
to overheat.
* Before cleaning, please confirm that the power is switched off.
* Building regulations concerning the discharge of exhaust air have to be
fulfilled.
* Don’t cook with an open flame under the range hood.
* For any technical issues ensure that a suitably qualified person effects any
repairs or inspection.
7. How to Use
PIC 7
6. Safety Warning
* Push the Low button, and the motor runs at low speed.
* Push the Mid button, and the motor runs at mid speed.
* Push the High button, and the motor runs at high speed.
* Push the Light button, and the lamp illuminates. Push it again and
the lamp will turn off.
* Push the Stop button, and the motor will stop.
* There must permanent & adequate ventilation of the room when operating
the range hood with appliances burning gas or other fuels.
* Do not check the status of the filters when the range hood is operating,
wait at least 30 minutes after switching off to avoid scalding.
* Do not touch the (Halogen) light within 30 minutes after appliance use.
* Avoid operating a gas cooker when there is no pan on the stove, it is a fire
hazard and may cause damage to the hood filters.
* Disconnect the electrical plug prior to any maintenance.
* This appliance is not intended for use by young children and persons
unless they have been adequately supervised by a responsible person to
ensure that they can use the appliance safely.
3
4