1
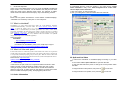
MSO Plus
User Manual V1.12a
Revision History
User Manual
Rev
Date
Note
Author
1.00
Sep 11, 2006
1. Initial draft
Nelson
1.08
Sep 15, 2006
1. Add Clock Display description
2. Add more description in export
client config.
Nelson
1.09
Oct 30, 2006
1. Add example in Work Space
Nelson
1.09a
Nov 10, 2006
1. Modify software specification
Nelson
1.10
Nov 21, 2006
1. Change from Work Space to
Event
2. Add sorting function in
management window
3. Change the time slot color to blue
4. Auto-play media in media
database
5. Change default end time to
23:59:59
6. Correct the spelling of Save icon
in Japanese
7. firmware/MSO Plus compatibility
chart
8. Change client default IP mode to
DHCP
9. Show the actual file name instead
of modified file name in media
database
Nelson
1.10a
Jan 04, 2007
1. Modify Management window UI
Nelson
1.11
Jan 23, 2007
1. Change from Media Signage to
Network Player
Nelson
1.11a
Mar 06, 2007
1. Add RS232 crossover cable
description
Nelson
MSO Plus
¾
¾
¾
¾
Multiple Zones Display
Auto Media Update
Daily Schedule
Client Billing Log
USER MANUAL Revision 1.12a
1.11b
May 7, 2007
1.11c
May 29, 2007
1.12
June 6, 2007
1. Add warranty description
2. Add resume feature in Media
Sync.
3. Add auto-delete description in
Media Transfer
1. Add Layout 10 & 11
2. Add Appendix B Video Editing
Tutorial
1. Add RS232 baud rate 9600 and
19200 option
Page II
Nelson
Nelson
Nelson
MSO Plus
1.12a
User Manual V1.12a
June 26, 2007
2. Add non-ASCII Event and Group
name support
1. Add RSS feed function
2. Add File System Repair function
3. Add IR enable/disable function
4. Add Group Type for
MSS300/MSS500/MSS600
MSO Plus
Index
Chapter 1
Nelson
1.1
1.2
1.3
1.4
1.5
1.6
1.7
1.8
1.9
1.10
Page III
User Manual V1.12a
MSO Plus Utility ........................................................ 6
Starting the MSO Plus ......................................................... 9
Event ................................................................................. 10
1.2.1 Create an Event ................................................................. 12
1.2.2 Load an Event.................................................................... 13
1.2.3 Edit an Event ..................................................................... 14
1.2.4 Delete an Event ................................................................. 15
Client/Group Management ................................................ 15
1.3.1 Management Window ........................................................ 15
1.3.2 New Group Creation .......................................................... 16
1.3.3 Group Edition..................................................................... 20
1.3.4 Group Deletion................................................................... 21
1.3.5 Change a Client’s Name .................................................... 22
1.3.6 Assign a Client to a Group ................................................. 23
1.3.7 Client Auto Update Media Time Setup............................... 23
1.3.8 Client Auto Time Sync. Time ............................................. 24
1.3.9 Client Network Configuration ............................................. 25
1.3.10 Client Time Sync................................................................ 26
1.3.11 Client Log Reports ............................................................. 28
1.3.12 Group Log Reports ............................................................ 30
1.3.13 Connection Test................................................................. 31
1.3.14 Unattached Clients ............................................................ 33
1.3.15 Media Sync. ....................................................................... 34
Media Collection ................................................................ 35
Schedule Setting ............................................................... 37
Play List Edition*................................................................ 40
Clock Display..................................................................... 41
Media File Property ........................................................... 42
1.8.1 Video.................................................................................. 42
1.8.2 Picture* .............................................................................. 43
1.8.3 Text.................................................................................... 44
Media Files Preview .......................................................... 45
1.9.1 Video.................................................................................. 45
1.9.2 Picture................................................................................ 46
1.9.3 Message ............................................................................ 47
Program Configuration ...................................................... 47
1.10.1 Boot-up Logo Setup ........................................................... 47
1.10.2 RS232 Configuration (Optional)* ....................................... 48
Page IV
MSO Plus
1.13
1.14
MSO Plus
User Manual V1.12a
1.10.3 Password............................................................................58
1.10.4 Firmware update.................................................................58
1.10.5 Firmware Update via Ethernet ............................................59
1.10.6 Export Client Config to Local Drive.....................................60
1.10.7 Real-Time RSS Feed (Really Simple Syndication).............61
Save Program ....................................................................63
Transfer..............................................................................63
1.12.1 Single IP .............................................................................63
1.12.2 Local Drive(for Network Player BOX / Integrated Display
above 7”) .......................................................................................65
Instant Message .................................................................65
Exit .....................................................................................66
CHAPTER
1.11
1.12
User Manual V1.12a
Appendix A How to Get Codec Information.................................67
Appendix B Video Editing Tutorial ...............................................70
Chapter 1
9
9
9
9
9
Page V
MSO Plus Utility
Client/Group Management
Media Collection
Schedule Setting
Play List Edition
Program Configuration
Page 6
1
MSO Plus
User Manual V1.12a
MSO Plus
User Manual V1.12a
The factory setting for every Network Player Plus is listed below.
The IP address of your server PC has to be
192.168.0.188 in order to establish
Factory LAN Setting
IP mode
DHCP
IP port
8001,8002,8003*1
Server IP (the IP that NP Plus connects
to automatically)
192.168.0.188
connection in the first time. Then you are
free to set the server IP address.
The default IP mode is DHCP and it will automatically switch to Fixed mode if
no IP is assigned to Network Player unit.
IP mode
Fixed
LAN IP
192.168.0.128
LAN Subnet Mask
255.255.255.0
LAN Gateway
192.168.0.1
Factory Wireless LAN Setting
WLAN IP
192.168.252.249
WLAN Subnet Mask
255.255.0.0
Network Player Plus connects to the server actively; therefore, you will need
to either change the IP that NP Plus connects to or configure the IP address
of your PC to establish communication channel. We provide a utility to
configure client settings in you PC and use USB flash drive to apply those
configurations in Network Player unit. Please refer to 4.10.6 Export Client
Config to Local Drive for more detail.
If you choose to change the IP address of your PC, please make sure your
desktop or laptop’s IP address comply the following rules.
Path to call Internet Protocol(TCP/IP) Property:
z Click Start→Control Panel→ Double-click on Network
Connections.
z Right-click on Local Area Connection → select Properties.
z On General tab , double click Internet Protocol (TCP/IP)
z Setup client IP
z Click OK to confirm the setting
After the configuration of server IP, you can use a crossover cable or a hub
to connect client and server.
Playlist Creation Flow
Start MSO Plus
Create
an Event
Open
Management
Window
Create a group
Set
Play Schedule
Add media
into database
Configure
client settings
Assign client
to a group
Drag media
into playlist
Save
&
Transfer
7
1
If your PC is behind a firewall, please make sure port 8001, 8002, 8003 are
open. Please refer to the Troubleshooting section in this manual for detail
on setting firewall exceptions.
Page 7
Page 8
MSO Plus
1.1
User Manual V1.12a
MSO Plus
1.2
Starting the MSO Plus
User Manual V1.12a
Event
The client management in MSO Plus is based on hierarchical concept. The
highest level in this hierarchy is Event, followed by Group and Client. Every
Client belongs to a Group and every Group belongs to an Event. Each time
you have to load an Event and work on it.
1. Click MSO Plus icon on your desktop.
2. If this is the first time you start the MSO Plus, a pop-up window will guide
you to set up your own password.*2
3. Enter your password and choose language*3 from drop-down menu.
4. Click the “Enter” button to start MSO Plus.
Instead of doing all the settings from scratch, you can also copy client
configurations from an existent Event when you create a new Event. This
feature would be really useful when you need to create a bunch of existent
clients but in different Event. For instance, if you have 20 clients in Group A
(in Event 1) which has playback schedule for weekdays and you would like to
create a Group B (in Event 2) having the same 20 clients for weekend
schedule. You can simply make Event 2 to inherit settings from Event 1
without adding 20 clients in Group B over again.
.
The length of password has to be at least 6 alphanumeric
characters. We strongly suggest you select a password consisting of
uppercase and lowercase letters, numbers, and special characters.
3
Currently there are four languages available: English, Japanese,
Simplified Chinese, and Traditional Chinese.
2
Page 9
Page 10
MSO Plus
User Manual V1.12a
MSO Plus
User Manual V1.12a
Example 1: hierarchical structure in a shopping center
Hierarchical View of Clients
Layout of building:
‧ 1st Floor: Entry, Food & Toys
‧ 2nd Floor: Women’s Fashion, Men's Fashion
Customer would like:
‧ Place a 32” NP in the Entry to welcome customers and
inform them about news and events
‧ Play daily and seasonal promotions in the food court
‧ Play cartoon, new games and toys Ad in Toys department
‧ Play individual fashion shows in Men’s and Women’s
department, with information about brand and style
Event
Daily
Loading schedule every day
Group
Schedule&
Entry
Schedule&
Playlist
1
DVI
Schedule&
Playlist
2
Playlist 3 1280x1024
Client
Welcome
1
Food
DVI
1024x768
Toys
DVI
1024x768
Food_frozen Food_fresh Toys_baby Toys_kids
2
3
4
5
Women
DVI
1024x768
Men
DVI
1024x768
Women_Sport Women_Elegant Men_Sport Men_Elegant
6
8
7
9
Layout of Shopping Center
1st Floor
Example 2: How to utilize Event setting up different daily playlist?
In order to have different playlist everyday from Sunday to Saturday, you will
need to create 7 Events and each applies its loading type. Note that loading
an Event in MSO Plus does not apply playlist to clients automatically, clients
still need to download media playlist from server.
2nd Floor
entry
1
9
7
Men’s Fashion
2
5
Food
Women’s Fashion
Toys
8
3
6
4
stairs
stairs
In order to apply the hierarchical structure of a shopping center, you will need
to create an Event which loads schedule everyday. You will also need to
create Groups under the Event: Entry, Food, Toys, Women, and Men. Each
group has its own clients.
1.2.1
Create an Event
1. Click the “Event Loader” button in MSO Plus.
2. Click the “New” button, then a dialog will pop up on the screen.
3. Enter Event Name*4 and Event Loading Type*5.
4. Click the “Copy the group setting from following event” check box and
select the Event if you would like to copy its group/client setting.
Event name can be ASCII and non-ASCII character.
The priority of loading type is: specific day > every
weekday/weekend > everyday.
4
5
Page 11
Page 12
MSO Plus
User Manual V1.12a
MSO Plus
User Manual V1.12a
5. Click the “Copy Play List Simultaneously” check box if you would like to
copy the event’s play list.
6. The system will load the new Event automatically once you click the OK
button.
1.2.3
1.2.2
Load an Event
If you have existent Events, you can choose one to load its client setting and
database.
1. Click the “Event Loader” button in MSO Plus.
2. Click on the Event you would like to load.
3. Click the “Load” button to load the Event.
Page 13
Edit an Event
You will be able to change Event Loading Type in Edit.
1. Click the “Event Loader” button in MSO Plus.
2. Click on the Event you would like to edit.
3. Click the “Edit” button to open the edit window.
4. Select Event Loading Type from drop-down menu and click OK to save
changes.
Page 14
MSO Plus
1.2.4
User Manual V1.12a
MSO Plus
User Manual V1.12a
Delete an Event
You may delete a Event if you no longer need it in the system.
1. Click the “Event Loader” button in MSO Plus.
2. Click on the Event you would like to delete.
3. Click the “Delete” button to delete the Event.
The management window contains client information including client MAC
address, client name, the group that the client belongs to, auto update time,
auto time sync time, client status*6, client’s time zone, client firmware version,
used disk space of client, and total disk space of client.
1.3.2
1.3
Client/Group Management
MSO Plus is very powerful in client and group management. You will be able
to:
¾ Create/Delete/Edit Clients and Groups
¾ Set Client Auto Update Time/Auto Time Sync Time
¾ View Client Status
¾ Set Client Time Zone
¾ Configure Client’s Network Setting
¾ Acquire Client/Group Playing Report
1.3.1
Management Window
1. Click the “Management” button in MSO Plus to bring up the management
window.
Page 15
New Group Creation
Every client needs to be assigned to a group. Follow the steps below if you
would like to create a new group
1. Click the "Add Group" button in Group Management area, then a dialog
with Program Name, Group Type, Output, Resolution, and Layout will pop up
on the screen.
2. Enter the program name*7.
3. Select the group type*8.
Network Player series
Group Type
MSS300
MSS300
MSS500
MSS500
MSS600
MSS600
Client status is either playing or sleep.
Group name can be ASCII and non-ASCII character.
8
You MUST choose the correct group type depends on your Network
Player device. The Media Update will fail if you assign a client to an
incorrect group type.
6
7
Page 16
MSO Plus
User Manual V1.12a
*9
4. Select the video output (DVI/S-Video).
5. Select the resolution, default resolution is 1024x768 60Hz.
10
6. Select the layout* .
7. Click OK to add a new group.
MSO Plus
User Manual V1.12a
MSO Plus with Portrait Mode (optional)
Landscape Mode Layout
Portrait Mode Layout
General Zone Size Description
Width * 80%
Width * 20%
Height – 60 pixels
If you choose S-Video as video output, you can only choose
PAL_BG or NTSC_M in Resolution.
10
The Portrait Mode Layout is only available in Portrait Mode MSO
Plus.
9
Page 17
60 pixels
Page 18
MSO Plus
User Manual V1.12a
MSO Plus
User Manual V1.12a
Output Resolution V.S Zone Size (in pixel)
Output Resolution
640 x 480
Video/Pic Zone
512 x 420
Pic Zone
128 x 420
Message Zone
640 x 60
800 x 600
640 x 540
160 x 540
800 x 60
1024 x 768
820 x 708
204 x 708
1024 x 60
1280 x 960
1024 x 900
256 x 900
1280 x 60
1280 x 1024
1024 x 964
256 x 964
1280 x 60
1088 x 708
272 x 708
1360 x 60
1360 x 768
MSO Plus
version
7. You can view group property in the bottom of MSO Plus main window.
Event
Height
Program size
Width * 50%
Database directory
Program resolution
Program directory
Program end time
Program start time
Width * 50% - 60 pixels
1.3.3
Group Edition
1. Click the “Edit Group” button in Group Management area to edit existent
group properties.
2. Choose a group from the pop-up window and click OK to bring up the
group setting window.
60 pixels
Landscape Mode Output Resolution V.S Zone Size (in pixel)
Output Resolution
Video/Pic Zone
Pic Zone
Message Zone
640 x 480
512 x 420
128 x 420
640 x 60
800 x 600
640 x 540
160 x 540
800 x 60
1024 x 768
820 x 708
204 x 708
1024 x 60
1280 x 960
1024 x 900
256 x 900
1280 x 60
1280 x 1024
1024 x 964
256 x 964
1280 x 60
1360 x 768
1088 x 708
272 x 708
1360 x 60
Page 19
Page 20
MSO Plus
User Manual V1.12a
MSO Plus
User Manual V1.12a
2. You will be able to change Output, Resolution, and Layout of a group.
1.3.5
Change a Client’s Name
The default name of every client is Un-assigned if you do not change it.
Follow the steps below if you would like to change a client’s name.
1. Highlight the MAC address of the client in Management window that you
would like to change its name.
2. Click the Client’s Name field in Single Client Configuration area.
3. Type in client’s name.
4. Click the “Set” button to apply the modification.
1.3.4
Group Deletion
1. Click the “Delete Group” button in Group Management area to delete an
existent group.
2. Choose a group from the pop-up window and click OK to confirm the
deletion.
Page 21
Page 22
MSO Plus
1.3.6
User Manual V1.12a
MSO Plus
User Manual V1.12a
Assign a Client to a Group
The default group of every client is Un-assigned if you do not change it.
Each client MUST belong to a group to retrieve media playlist. Follow the
steps below if you would like to assign a client to different group.
1. Highlight the MAC address of the client in Management window that you
would like to change its name.
2. Choose a group from the drop-down menu in Single Client
Configuration area.
3. Click the “Set” button to apply the modification.
1.3.8
Client Auto Time Sync. Time
You can make a client to synchronize its time clock with server in a predefined time. Note that the client and server must stay online to do time
synchronization.
1. The default Auto Time Sync Time is 00:00.
2. Click the Up/Down button in Auto Time Sync Time to set the auto
update time.
3. Click the “Set” button to apply the modification.
1.3.7
Client Auto Update Media Time Setup
In MSO Plus, you will be able to make a client to update media content from
server automatically in a pre-defined time. Note that the client and server
must stay online to have data transmission.
1. The default Auto Update Media Time is 00:00.
2. Click the Up/Down button in Auto Update Media Time to set the auto
update time.
3. Click the “Set” button to apply the modification.
Page 23
Page 24
MSO Plus
1.3.9
User Manual V1.12a
MSO Plus
User Manual V1.12a
Client Network Configuration
1. Highlight the client you would like to configure its network.
2. Click the “Network Config” button in Client Misc.
3. Make modifications in IP Mode* 11 /Client LAN Config* 12 /Client WLAN
Config* 13 /RS232 config/Auto Reboot Time/Boot Information* 14 /Remote
Control*15, then click “Set” button in each area.
The default IP mode is DHCP and it will automatically switch to
Fixed mode if no IP is assigned to Network Player unit.
12
LAN and WLAN ports are able to work simultaneously, however,
they should be in different subnet. If LAN and WLAN are in the same
subnet, the LAN's priority is higher than WLAN. In this case, WLAN is
inactive. Contact your system administrator for setting information.
13
The Network Player does not support Ad-hoc mode WLAN. You
should always use a WLAN AP to connect the Network Player unit.
14
The default boot mode is INSTALLATION mode, which will display
all client information such as IP, MAC address, subnet mask, server
IP, storage, and firmware version in boot-up screen. The NORMAL
mode will only show boot-up picture without displaying any sensitive
client information.
15
The remote control function is enabled by default. You can disable
the remote control function if uncheck the Enable checkbox.
11
Page 25
4. Click the “Time Sync” button to synchronize the client time with server
immediately.
5. Click the “Delete All Content” button to clear the internal storage of a
client.
6. If you ever use remote control to adjust volume of integrated Network
Player LCD, volume adjustment via network will be disabled after since. You
can click the “Volume Restore” button to restore default volume setting (50
out of 100 maximum) and gain the volume control back.
7. The “File System Repair” function allows the system to check disk and
auto repair broken segments.
8. Click the “Exit” button to exit the Client Network Configuration window.
1.3.10
Client Time Sync
1. Highlight the client you would like to synchronize its time clock.
Page 26
MSO Plus
4.
5.
6.
7.
User Manual V1.12a
MSO Plus
User Manual V1.12a
16
Select the Time Zone from the drop-down menu* .
Click the “Set” button to save the setting.
Click the “Network Config” button in Client Misc.
Click the “Time Sync” button to synchronize the system time.
1.3.11
Client Log Reports
The Get Log function is ideal for retrieving playing logs from clients/group.
MSO Plus generates three files for your convenience to view the client log.
1. Highlight the client you would like to generate its playing log
2. Click the “Playing Report” button in Client Misc. to bring up the Get Log
window.
3. Click on the drop-down menu to specify the start date and end date you
would like to view the log reports.
The default time zone is set as GMT+ 8 hrs. You will need to apply
the daylight saving by yourself.
16
Page 27
Page 28
MSO Plus
User Manual V1.12a
MSO Plus
1.3.12
User Manual V1.12a
Group Log Reports
The Get Log function is ideal for retrieving playing logs from clients/group.
MSO Plus generates three files for your convenience to view the client log.
1. Click “Playing Report” button in Group Management to get the log reports
of all clients within a group.
4. Click “Browse” to specify the destination you would like to save the log
reports.
5. Click “Get Log” to start downloading log files. Three files will be produced
for your convenience to view the client log.
2. Click on the drop-down menu to specify the start date and end date you
would like to view the log reports.
xxx.csv
Can be imported to EXCEL for statistics.
ClientBaseInfo.txt
Contains file name and total playback time based
on each client.
FileBaseInfo.txt
Contains client name and total playback time
based on each file.
6. Set Reserved Log Duration (optional)
The default client log duration is set to be 7 days. You can set the reserved
log duration from 1 to 30 days. Note that the more days you keep the log file,
the more storage space it occupies.
Page 29
Page 30
MSO Plus
User Manual V1.12a
MSO Plus
User Manual V1.12a
3. Click “Browse” to specify the destination you would like to save the log
reports.
4. Click “Get Log” to start downloading log files. Three files will be produced
for your convenience to view the client log.
xxx.csv
Can be imported to EXCEL for statistics.
ClientBaseInfo.txt
Contains file name and total playback time based
on each client.
FileBaseInfo.txt
Contains client name and total playback time
based on each file.
4. The test result will be shown in a pop-up window.
5. Click “OK” to save the Connection Test Report, otherwise click “Cancel”.
5. Set Reserved Log Duration (optional)
The default client log duration is set to be 7 days. You can set the reserved
log duration from 1 to 30 days. Note that the more days you keep the log file,
the more storage space it occupies.
1.3.13
Connection Test
You can do group Connection Test to be sure about the client network
connection before media transmission.
1. Click “Connection Test” in Group Management.
2. Highlight the group you would like to test.
3. Click “OK” to proceed the connection test.
6. Click “Test Report” in Group Management to view the saved connection
test report as the sample below.
Page 31
Page 32
MSO Plus
User Manual V1.12a
MSO Plus
1.3.15
User Manual V1.12a
Media Sync.
Use the “Media Sync” function if you would like to update play list
immediately according to current time. For instance, you have created Event
Wednesday and Event Thursday previously. Today is Wednesday and you
are working on Event Thursday to edit its play list. When you click the “Media
Sync” button, the clients will download play list in Event Wednesday instead
of the Event you are working on.
1. Click “Start” to in Media Sync. to initiate the media synchronization*17.
1.3.14
Unattached Clients
You can view clients that have ever connected to the server but currently not
online.
1. Click the Display Unattached Clients button in Management window to
view offline clients.
2. Click “Stop” to terminate media synchronization if you decide to do this
later on.
3. Click “Open Media Sync Log” to view all recorded Media Sync activities.
The sample log is shown below.
If in any circumstance the network is disconnected during Media
Sync. process, the Network Player will resume the Media Sync. when
the network is connected again.
17
Page 33
Page 34
MSO Plus
User Manual V1.12a
MSO Plus
User Manual V1.12a
2. Media file will be identified with a normalized ID when being added into the
"Media Database". This ID will be used to specify the file in the application
and as the filename while exported to an external storage device.
1.4
Media Collection
Video
1. Drag video file(s) from Windows Explorer and drop to the “Media
Database”. (Only valid files can be added in repository *18)
Graphics
1. Drag graphic file(s) from Windows Explorer and drop into the “Media
19
Database”. (Only valid files can be added in repository * )
Acceptable movie formats: MPEG-1, MPEG-2, MPEG-4
(.mpg, .vob, .mp4, .avi(divx)). Please refer to Appendix A for
supported video format.
18
Page 35
19
Acceptable graphic types: .jpg, .bmp
Page 36
MSO Plus
User Manual V1.12a
MSO Plus
1.
Text
1. Drag text files from Windows Explorer and drop into the “Media Database”.
20
(Only valid files can be added in repository * )
2. When adding text into the Media Database, a dialogue will pop up and the
user can select Back Color and Font. Changes can be previewed in the
window.
User Manual V1.12a
Right-click on “Play Schedule” (white bar area) and then select “Add”.
A dialog box with “Time Slot” will pop up on the screen.
2. Set Start Time and End Time for play list. (The time slot will change to pink
color)
3. Click "OK" to complete the text conversion.
1.5
3. Select the day(s) you would like the play list to be played. Orange color
indicates the days are selected; you may click on the days to de-select them.
From Sunday to Saturday are all selected by default.
Schedule Setting
Playback Schedule Setup
The default time slot of a play list is 24 hours/day. Note that if you would like
to have different schedule, you MUST set time slot before you drag media
files into play list.
Acceptable text type: ASCII text (.txt). You may use any text editor
to edit your message and save it as .txt file.
20
Page 37
Page 38
MSO Plus
User Manual V1.12a
MSO Plus
1.6
User Manual V1.12a
Play List Edition*22
1. Drag and drop media file(s) into the Play Lists. Only media files in the
23
repository with a valid format will be accepted* .
Drag media files into play list according
to their file type
Playback Schedule Deletion/Edition
1. To delete or edit, right-click on the time slot block to select “Delete” or
“Edit”*21.
2. Click "UP", "DOWN", and "X"(delete) button on the Play Lists field to
change the order of media files in Play Lists.
Remember always set time schedule before you drag media files
into play list.
23
For pictures displayed in Picture Zone should be smaller than
1024x768/2.
22
21
Time slots can not be overlapped.
Page 39
Page 40
MSO Plus
User Manual V1.12a
Buttons to change the order
of media files
1.7
MSO Plus
User Manual V1.12a
2. Click “Save” to save the setting.
3. Click “Transfer” to apply the setting.
Clock Display
The default setting of does not display the clock on screen. Follow the steps
below if you would like to clock displayed in the upper-left corner.
1.8
Media File Property
1.8.1
Video
Click on a video file from Video List.
View video property in Program Property area.
You will see file type, file duration, repeat time, and volume.
The default repeat time is 1 and the default volume is 50 *25.
10:11
1. Click the Clock check box to enable Clock Display in the top left corner of
Video/Pic zone.*24
The Clock Display function will be applied to all clients within a group.
The Repeat Time indicates the number of times it should play in the
play list. Volume can be set from 0 – 100(max.). Note that once you
ever use remote controller to adjust volume, the volume setting
from MSO will be ignored.
Page 41
Page 42
25
24
MSO Plus
User Manual V1.12a
MSO Plus
User Manual V1.12a
1. Click on a graphic file
1. Click on a video file
2. View file property
2. View file property
1.8.2
1.
2.
3.
4.
5.
Picture*26
1.8.3
Click on a graphic file.
View picture property in Program Property area.
You will see file display duration and be able to change it.
The default time is 10 sec.
There are 4 different transition effects (Full Screen, Blind Right/Left,
Blind Top/Bottom, and Blend) for you to choose.
1.
2.
3.
The duration of picture in Video/Picture zone should be greater
than 10 sec to allow graphic decoding.
27
26
Page 43
Text
Click on a text file.
View message property in Program Property area.
The default repeat time is 1 and default speed is 8 pixel*27.
From 1-15, 1 indicates the slowest speed and 15 indicates the
fastest speed.
Page 44
MSO Plus
User Manual V1.12a
MSO Plus
User Manual V1.12a
1. Click on a video file
Preview
window
4. You will be able to choose the appearance style of scrollable text message.
Five styles are available: Right->Left, Left->Right, Bottom->Top, Top>Bottom, Pop.
2. Click
Preview
button
1.9.2
1.
1.9
1.9.1
1.
2.
3.
4.
2.
Media Files Preview
Picture
Click on the picture you would like to preview (either in Media Database
or picture list).
The picture will be displayed in the preview window.
Video
Click on the video file you would like to preview (either in Media
Database or Video list).
Click Preview button.
The video content will be displayed in the preview window.
Use UP/DOWN key on the keyboard to move to other media files.
1. Click on a picture
Preview
window
2. Click3.
Preview
button
Page 45
From Media Database, you can rotate the picture by clicking
“Clockwise” or “Counterclockwise”.
Page 46
MSO Plus
4.
2.
3.
MSO Plus
User Manual V1.12a
Click “Confirm” to confirm the change.
1.9.3
1.
User Manual V1.12a
Message
Click on the text file you would like to preview (either in Media Database
or picture list).
Click “Preview“ button.
The message will be displayed in the preview window.
1. Click on a message
2.
Browse to the picture you would like to use as logo.*28
Preview
window
1.10.2
2. Click
Preview
button
RS232 Configuration (Optional)*29
RS232 is a channel that you can send pictures to be stored in Network
Player. When a correct RS232 command code is sent during operation,
Network Player will display a picture corresponding to the index.*30
1.10 Program Configuration
1.10.1
Application (Elevator)
Lift industry uses RS232 to display lift status or show company logo.
Boot-up Logo Setup
1. If you would like to change system boot-up logo, please click the "Config"
button, then click “Logo” button from pop-up window.
28
Acceptable picture type: jpeg. Resolution is limited no bigger than 720 x
480.
29
You will need a crossover RS232 cable (switch 2, 3 pin) if you would like
to use PC as simulation machine sending commands.
30
The picture should be displayed over video area. If you place the
picture over graphic area, the latter picture will cover your RS232
picture.
Page 47
Page 48
MSO Plus
User Manual V1.12a
MSO Plus
User Manual V1.12a
3.
4.
Enter the Client IP that you would like to connect.
Click “Connect” to establish connection.
z
Baud Rate, Client ID Setup
Picture called via RS232
command
1. If you would like to configure RS232 index, please click the "Config"
button, then click “RS232 Config” button from the pop-up window.
Page 49
Page 50
MSO Plus
User Manual V1.12a
MSO Plus
User Manual V1.12a
Baud rate indicates the number of bits per second is transmitted. Normally
five values can be chosen: 9600, 19200, 38400, 57600, and 115200. The
default baud rate of Network Player is 38400.
You can give each client a number as client ID for identification. The value is
limited and has to be 0~254.
1. Click “Set” after entering valid Baud Rate and Client ID.
2. Click “Exit” to exit setup.
Index Edition
The Index Editor is a tool where you can add, delete, and edit index.
Add
1. Click “Add” to start adding an Index.
1.
2.
3.
Select setting. In Simple Setting, you have choices to place the picture
in Top Left, Top Right, Bottom Left, or Bottom Right. If you choose
Custom Setting, you can specify the X-Position, Y-Position, Width, and
Height to start posting the picture.
4.
Alpha Blending indicates the degree of transparency. The value of Alpha
Blending is from 0 to 255, 0 as no transparency to black color and 255
as totally transparent.
Enter Index name.
Browse to the picture for this index.
Page 51
Page 52
MSO Plus
User Manual V1.12a
MSO Plus
User Manual V1.12a
Edit
1. Click the index that you would like to edit.
2. Click “Edit” to edit the index.
Delete
1. Click the index that you would like to delete.
2. Click “Delete” to delete the index.
3. Make modifications.
4. Click “Edit” to save changes.
Page 53
Page 54
MSO Plus
User Manual V1.12a
MSO Plus
User Manual V1.12a
6. Click “Exit” to exit RS232 Index Editor.
5. Click “Save” to save all the changes.
Sending RS232 Command
You will find a tool from installation CD to simulate RS232 command.
1. Double-click on MS_RS232.exe to execute the application.
Page 55
Page 56
MSO Plus
User Manual V1.12a
2. Choose Serial Port and Baud Rate*
Connect.
31
from drop-down menu and click
MSO Plus
User Manual V1.12a
“PLAY_BACKW”
Video backward
“CLOSE n”
Erase the pasted picture.
n is the index string
1.10.3
Password
1. If you would like to change password, please click the "Config" button,
then click “Change Password” button from the pop-up window.
2. Enter the old password.
3. Enter the new password, then re-enter the new password to confirm it.
4. Click “OK” to setup the new password.
3. If the connection is established, you will be able to type in Client ID and
Command. The Client ID is an identification number that you give each client
from MSO.
Available Command Table
Master command
Command description
“TEST”
Test a specify slave exist or not
“PASTE n”
Paste an index command.
The index file and parameters are specified in a
script file which is downloaded from master via
Ethernet.
n is the index string.
“PLAY_VIDEO”
Video start playing
“STOP_VIDEO”
Video stop playing
“PLAY_NEXT”
Video skip to next file
“PLAY_PREV”
Video skip to previous file
“PLAY_FORW”
Video forward
Baud rate indicates the number of bits per second is transmitted.
Normally five values can be chosen: 9600, 19200, 38400, 57600, and
115200. The default baud rate of Network Player is 38400.
1.10.4
Ever since a while, we add new features in MSO Plus to meet customer’s
requirement. You can fully utilize those features by updating the latest
firmware.
Check Firmware Version
Depends on the display size and the existent version of firmware in your
Network Player Unit, you can choose the most convenient way to upgrade
firmware. You will be able to check the firmware version of Network Player in
the beginning of system boot up.
31
Page 57
Firmware update
Firmware
Version
Active Mode Network Player
Server IP: 192.168.0.188
LAN
IP: 192.168.0.128
MAC: 00:00:00:01:01:01
IP Mode: Fixed
Mask: 255.255.255.0
WLAN
IP: N/A
MAC: N/A
IP Mode: N/A
Mask: N/A
WEP: Off
Default gateway
192.168.0.1
HW
Storage: 488 MB
FW version: 111IW
Page 58
MSO Plus
User Manual V1.12a
MSO Plus
User Manual V1.12a
Suggest Way of Firmware Update
FW version 1.03 or earlier
FW version 1.04 or later
7” Network Player
Not Applicable
LAN
Network Player
above 7”
Network Player
BOX
USB
USB / LAN
Please refer to Chapter 10 if you would like to update firmware via USB flash
drive.
1.10.5
Firmware Update via Ethernet
1. If you would like to update firmware via Ethernet, please click the "Config"
button, then click “FW Update” button from the pop-up window.
6. When the updating is complete, click “Exit” to close the Update Client
Firmware window.
1.10.6
Export Client Config to Local Drive
This function is really convenient for you to configure client settings without
using a crossover cable or a hub. Configurations you can make with this
function including the Server IP that the client should connect to, client LAN
settings, client WLAN settings, and client time zone.
2. Choose a group for updating.
3. Uncheck the “Format Storage Device” checkbox if you do not want to
format internal storage.*32
4. Click “Browse” to select the firmware (.tar) you would like to update.
5. Click “Start” to begin the firmware updating process.
1. Click the "Config" button, and then click the “Client Config Export” button
from the pop-up window.
2. Make setting changes.
3. Browse to the location (USB flash drive) you would like to save the files.
4. Click the “Save” button.
5. Click the “Exit” button.
32
Note that all media content will be deleted if you choose to format the
storage device.
Page 59
Page 60
MSO Plus
User Manual V1.12a
RSS
Feed
(Really
User Manual V1.12a
2. Choose a group from drop-down menu and the mode you would like to run
RSS. The RSS URL option can show RSS message from RSS site and the
Local File option can show message from the local PC.
3. Choose the Refresh Time to set up the frequency of message refresh
interval.
6. Take the USB flash drive and plug it into Network Player unit.
7. Reboot the Network Player unit to apply settings.
1.10.7
Real-Time
Syndication)
MSO Plus
Simple
RSS is a family of web feed formats used to publish frequently updated
content such as blog entries, news headlines or podcasts.
1. If you would like to show real-time RSS message, please click the "Config"
button, then click “RSS FEED” button from the pop-up window.
Page 61
Page 62
MSO Plus
User Manual V1.12a
MSO Plus
User Manual V1.12a
4. Choose message speed, scroll direction, background color, and text font
in Advanced Control area.
5. Click “Run” button to start real-time RSS message. The RSS message will
be running continuously until you click “Off” button.
1.11 Save Program
1. Click the "Save" button when you finish editing the Play List (All media
files are saved in the folder).
4. A pop-up window will inform you that the transfer is complete. Click the
“OK” button to close the transfer window*33.
1.12 Transfer
1.12.1
Single IP
1. Click the “Transfer” button.
2. Select the group you would like to send media content.
3. Click the “Transfer” button to initiate transferring.
If in any circumstance the network is disconnected during Media
Transfer process, the Network Player will automatically delete
incomplete playlist and media data in the beginning of boot-up
procedure. Network Player will then play the old playlist.
33
Page 63
Page 64
MSO Plus
1.12.2
User Manual V1.12a
MSO Plus
User Manual V1.12a
Local Drive(for Network Player BOX /
Integrated Display above 7”)
1. Click the “Transfer” button.
2. Browse to the USB flash drive plugged in your computer.
4. Click “Save” to save the program in your USB flash drive.*34
2. Drag message(s) to the Message List.
3. Click the “Save” button to save the change.
4. Click the “Transfer” button and choose transferring to single client, group,
or local drive (USB flash drive).
1.14 Exit
1.13 Instant Message
1.
Click the “Exit” button to exit MSO Plus.
In Instant Message Mode, the message can be updated independently.
However, the message will run from right side to left side only once, and then
it turns back to the original message.
1. Click on the drop-down menu and choose the Instant Message option.
The “Local Drive” is limited to USB Flash disk only. Take the USB
Flash disk with play list program saved and insert it to the USB slot of
Network Player. Network Player will clone the program in the USB
Flash drive into its IDE storage automatically after power on.
34
Page 65
Page 66
MSO Plus
User Manual V1.12a
MSO Plus
User Manual V1.12a
1. We suggest you download and install the “K-Lite code pack 2.50 Full” from
http://www.freecodecs.com/download/K_Lite_Codec_Pack.htm to your PC if you
APPENDIX
would like to see the CODEC information of your media file.
How to Get Codec
Information
A
2. After successfully install “K-Lite code pack 2.50 Full” application. Please
open the “GSpot Codec Information” application from Starts->Programs->KLite Codec Pack->Tools->GSpot Codec Information
Appendix A
.
The GSpot dialog will appear. Open the media file that you want to get
codec information from File->Open
Page 67
Page 68
MSO Plus
User Manual V1.12a
MSO Plus
User Manual V1.12a
APENDIX
The “GSpot” application will display the detail information about the media
file. You can get the audio and video codec information from “Audio” and
“Video” sections.
Appendix B
Page 69
Video Editing Tutorial
Page 70
B
MSO Plus
User Manual V1.12a
1.
Goals and Objectives
Video cut by some utilities doesn’t have very good compatibility with Network
Player series. In this document, we will introduce the utility that has been
tested and works well in Network Player series. The methods of splitter,
rotate and encode will be introduced step by step in the following sections.
MSO Plus
User Manual V1.12a
To understand what the codec the media is, you could use the “Gspot
codec information” utility. From “Start->Program->K-Lite codec Pack>Tools->Gspot codec information.”
1. Click “File->Open” to open the video file.
2. Then you could get the codec information about the video file.
2.
Utility
Before we start, please download the convert utilities “VirtualDub-Mpeg2”,
“VirtualDub” and necessary codec pack: “K-Lite code pack”.
2.1 What is virtualdub?
VirtualDub is a video capture/processing utility for 32-bit Windows platforms
(95/98/ME/NT4/2000/XP), licensed under the GNU General Public License
(GPL). It lacks the editing power of a general-purpose editor such as Adobe
Premiere, but is streamlined for fast linear operations over video. It has batchprocessing capabilities for processing large numbers of files and can be extended
with third-party video filters. VirtualDub is mainly geared toward processing AVI
files, although it can read (not write) MPEG-1 and also handle sets of BMP
images(From http://www.virtualdub.org/index)
Download utilities
VirtualDub
http://virtualdub.sourceforge.net/
VirtualDub-Mpeg2:
VirtualDub mod with MPEG2 (SVCD, DVD, VOB) import support.
http://www.free-codecs.com/download/VirtualDub-MPEG2.htm
2.2 What is K-Lite code pack?
K-Lite Codec Pack is a collection of codecs and related tools. Codecs are required to
encode and/or decode (play) audio and video. The K-Lite Codec Pack is designed as
a user-friendly solution for playing all your movie files. With the K-Lite Codec Pack
you should be able to play 99% of all the movies that you download from the interne
Download site : http://www.freecodecs.com/download/K_Lite_Codec_Pack.htm
3.
Video Editing
In this section, the split, rotate, and compression will be introduced. Video
splitter can help you split large file into smaller video clips, and you also
could get the part you want. The rotate function could let video rotate 90
degree to right or left, or rotate around by 180 degree. To let the size of video
become smaller and keep its quality, the Mpeg4(xvid) will be used.
3.2 Split and Cut Video
1. Execute the VirtualDub or VirtualDub Mpeg2 according to you video
type.
2. Then select “File-> Open video file” to open the video file.
3. Drag the slider below the panes to change the current position within
the video.
4. Drag the slider to start position, then press the
5. Drag the slider to end position, then press the
3.1 Codec Information
Page 71
Page 72
to mark start.
to mark end.
MSO Plus
User Manual V1.12a
MSO Plus
User Manual V1.12a
<Pic 3>
3.4 Compress Video
<Pic 1>
3.3 Rotate the Video
1.
2.
3.
4.
Video Setting
1.
Please select “Video-> Compression”, and then the “Select video
compression” dialog will appear (Pic4).
Select “Video->Filters”, and click “Add” button on the Filters dialog.
In “Add Filter” dialog (Pic2), please select “rotate”.
After click “OK” in the “Add Filter” dialog, the “Filter: rotate” dialog will
appear. (Pic3)
According to your need to select the rotate degree.
2.
3.
4.
<Pic 2>
Page 73
<Pic 4>
In the list on “Select video compression” dialog, please select “Xvid
MPEG-4 Codec”.
After click Configure button. The “Xvid Configuration” dialog
appears (pic5).
In the Encoding type, there are three types in the selection. We
suggest user select single pass or twopass.
Pass
Size
Compress time
quality
Single pass
Small
Shot
General
Twopass
big
long
good
Page 74
MSO Plus
User Manual V1.12a
5.
When select Twopass, it needs to compress the video two times;
Two pass -1st pass and then Two pass 2nd pass.
6.
Set Profile @ Level to Highdef, and Encoding type: to Twopass –
1st pass.
7.
8.
Then please follow the next section to set audio and save the file.
When 1st pass procedure has done, please do 2nd pass by setting
the Encoding type to 2nd pass, then save to avi again.
MSO Plus
User Manual V1.12a
Pic 5
Audio Setting
1.
Please select “ Audio->Full procession mode” (Pic6) .
2.
Then select “ Audio -> Compression” (Pic7).
<Pic6>
Page 75
<Pic7>
Page 76
MSO Plus
3.
4.
User Manual V1.12a
MSO Plus
User Manual V1.12a
After that, the “Select audio compression” dialog will appear.
We want use mp3 to our audio codec, so please select MPEG
Layer-3 in the left list.
In the right list, please select “128 kBit/s, 44,100Hz, Stereo
16KB/s”.
Then click “OK” to accept the setting and exit the configuration
dialog
5.
6.
.
<Pic9>
<Pic8>
3.5 Create Target File
Finally, we are going to create the target file.
1. Please select “File-> Save as AVI…”, and select the path where
the destination file will be put.
2. The Virtualdub will start to compress the video file according to
above setting.
3. You also could see the Status window when Virtualdub compress
the video (Pic9, Pic10)..
<Pic10>
Page 77
Page 78