1
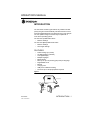
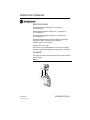
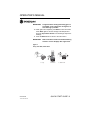
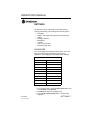
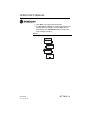
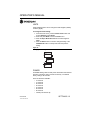
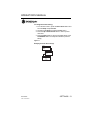
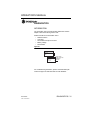
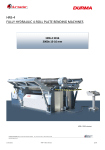
OPERATOR’S MANUAL
Introduction ........................................................... 1
Features .......................................................................
Specifications ...............................................................
Storage .........................................................................
Battery ..........................................................................
Switchpad Functions ....................................................
1
2
2
3
3
Quick Start Guide .................................................. 5
Selecting Grain ............................................................. 5
Grain Sample Testing ................................................... 5
Settings .................................................................. 7
Languages .................................................................... 7
Results .......................................................................... 9
Average ...................................................................... 10
Backlighting ................................................................ 10
Contrast ...................................................................... 11
Units ........................................................................... 12
Power ......................................................................... 12
Normal Operation ................................................ 15
Measuring Moisture ....................................................
Grain Sample Testing .................................................
Auto Ranging ..............................................................
Average ......................................................................
Bias .............................................................................
History ........................................................................
15
16
19
19
21
22
Updating Grain Calibrations ............................... 23
Accuracy .............................................................. 25
Condensing Samples ................................................. 25
High Moisture Grains .................................................. 25
Improving Grain Test Results ..................................... 26
Error Codes .......................................................... 27
Diagnostics .......................................................... 31
Information .................................................................. 31
mini GAC®
11001-1437-200701
/I
OPERATOR’S MANUAL
mini GAC®
11001-1437-200701
/ II
OPERATOR’S MANUAL
INTRODUCTION
The mini GAC® models of grain testers are portable units that
quickly test grain and automatically calculate moisture content
and test weight/bulk density (mini GAC plus only) of the sample.
The unit operates using four function keys coupled with a
menu-driven operating system.
The mini GAC portable tester offers:
•
Moisture readings
The mini GAC plus portable tester offers:
•
•
Moisture readings
Test weight readings
FEATURES
•
•
•
•
•
•
•
•
•
•
•
Plastic loading cup (Loader)
9V alkaline battery (included)
LCD digital display
Multiple languages
Backlit display
Memory for up to 20 product (grain) tests per language
English/Metric units
Belt clip
Carrying case
USB port for calibration loading
No screw cap or sample preparation required
Figure 1
mini GAC
Carrying Case
Loading
Base
Cup
Slider
Assembly
Belt Clip
Fill
Cup
mini GAC
Unit
Grain
Striker
mini GAC®
11001-1437-200701
INTRODUCTION / 1
OPERATOR’S MANUAL
SPECIFICATIONS
Operating Temperature Range: 40 - 113 degrees F,
(5 - 45 degrees C)
Validated Grain Temperature Range: 40 - 113 degrees F
(5 - 45 degrees C)
Operating Grain Temperature Range: 32 - 122 degrees F
(0 - 50 degrees C)
Recommended Maximum Temperature Difference (between
analyzer and grain): 36 degrees F (20 degrees C)
Humidity: 5-95%, noncondensing
Weight: 2 lbs 7 oz (1.1 Kg)
Power Source: A 9V alkaline battery is included. A low battery
indicator on display will identify when replacement is necessary.
STORAGE
The Loader should be turned upside down and placed inside the
unit for storage.
Figure 2
Loader/Unit Storage
Loader
mini GAC
Unit
mini GAC®
11001-1437-200701
INTRODUCTION / 2
OPERATOR’S MANUAL
BATTERY
Low Battery
Dead battery
A 9V alkaline battery is installed in the unit. A low battery
voltage menu will appear when battery life has almost reached
capacity. The unit is still capable of making accurate
measurements, but the battery should be replaced soon.
A dead battery warning displays when the battery has reached
its end of life and is no longer capable of making accurate
measurements. The unit will no longer perform any functions
other than to power off the device. If a dead battery warning
displays prior to saving some settings, the information could
potentially be lost.
Battery life can be prolonged by reducing the Power Down
setting of inactivity. The power down setting range is selectable
from 10 to 90 seconds. The default setting is 90 seconds.
SWITCHPAD FUNCTIONS
ON/OFF/HOME
on/off
home
The On/Off/Home button is pressed momentarily to power the
unit On and held for 2 seconds to power the unit Off.
Pressing the Home button on any page will discard any changes
and return to the Home menu.
ENTER
Enter button
The Enter button is pressed to start a measurement from the
Home menu. The Enter button is also used to make a menu
selection, and if applicable, save the selection and return to the
Home menu.
UP AND DOWN ARROW BUTTONS
UP
DOWN
The Up and Down Arrow buttons are used to scroll through the
items on the menu.
(Figure 3) illustrates the Switchpad area.
mini GAC®
11001-1437-200701
INTRODUCTION / 3
OPERATOR’S MANUAL
Figure 3
Switchpad
Current Product
ns
bea
Soy duct
o
Pr erage
Av
On/Off
Home
Display Screen
UP
ff
on/o me
ho
Up/Down
Arrow
Keys
WN
DO
Enter
mini GAC®
11001-1437-200701
INTRODUCTION / 4
OPERATOR’S MANUAL
QUICK START GUIDE
IMPORTANT:
The cell must be empty and the loading cup
removed before turning the unit ON and
during all testing (progress bar indicates
when testing).
SELECTING GRAIN
1. Press the On/Off/Home button to power on the unit.
2. To select a grain type, press the Down Arrow button to
position cursor at the product heading and press Enter.
3. Select a product (grain) using the Up or Down Arrow
button and press Enter.
4. The selected grain will appear at the top of the display.
GRAIN SAMPLE TESTING
1. Ensure Loader is removed from the top of the unit.
2. With the product name selected at the top of the display,
press the Enter button.
3. The cell must be empty, upright, and still to perform an
empty cell test. When the Empty Cell menu displays, press
the Enter button.
IMPORTANT:
The empty cell reference measurement is
used for all product testing until the unit is
powered off. It is critical that the cell be
clean and completely empty when the unit is
on. Keep the measurement cell opening
clear of hands or other objects during this
period.
4. After the empty cell test completes, the Fill Cell menu
displays.
5. With the slide closed, scoop or pour grain into the Loader
over the minimum fill line as shown in (Figure 13).
6. Place the Loader on top of the unit.
7. When secured, pull Loader slide out to dispense grain into
the unit.
8. Remove the Loader and use the level edge to strike
any excess grain from the unit.
9. Press Enter to begin the test.
mini GAC®
11001-1437-200701
QUICK START GUIDE / 5
OPERATOR’S MANUAL
IMPORTANT:
A slight tilt when holding and testing grain is
acceptable. If tilt is more than 10 degrees, an
error warning is possible.
10. When grain test completes, press Enter to store the results.
Press Enter again to see the average of all samples and
press the Up or Down Arrows to scroll through all previous
readings.
11. Press the Home button to return to the Home menu.
IMPORTANT:
Refer to the Error Codes and Troubleshooting
section if an error displays after a grain test.
Figure 4
Scoop, Pull Slide, Strike Grain
1. Scoop
mini GAC®
11001-1437-200701
2. Pull Slide
3. Strike Grain
QUICK START GUIDE / 6
OPERATOR’S MANUAL
SETTINGS
The mini GAC can be customized to user preferences by
changing the following control settings from the Setup menu:
•
•
•
•
•
•
•
•
Languages
Results - test weight and temperature (mini GAC plus)
Display
Average buffer size
Backlighting
Contrast
Units of measurement
Automatic power down
LANGUAGES
Up to 12 languages are supported in each version of the mini
GAC with each language conforming to its own set of
calibrations. Other languages will be added when available.
Languages
English US
Dutch
English UK
Polish
English AUS
Danish
French
Russian
French Canadian
Turkish
German
Czech/Slovak
Italian
Romanian
Spanish
Greek
Portuguese
Finish
Hungarian
Bosnian/Croation/Serbian
Bulgarian
To change the Language setting:
1. From the Home menu, press the Down Arrow button and
scroll to Setup and press Enter.
2. Press Enter to select the Language menu.
3. Press the Up or Down Arrow button to scroll through
languages.
mini GAC®
11001-1437-200701
SETTINGS / 7
OPERATOR’S MANUAL
4. Press Enter to accept the desired language.
5. Any Averages and History stored will be cleared when the
language setting is changed. Press the Enter button to
acknowledge or the On/Off/Home button to escape and
retain averages and history.
Figure 5
Modifying Language Settings
Corn
History
Setup
Setup
Language
Results
Language
English US
English UK
French
Italian
German
Averages and
History will be
cleared.
Continue?
mini GAC®
11001-1437-200701
SETTINGS / 8
OPERATOR’S MANUAL
RESULTS (MINI GAC PLUS ONLY)
The Results menu is only available on the mini GAC plus
testers. The Results menu controls the appearance of test
weight and product temperature results for each measurement
on the Test Results menu. The default is set to Show results.
To change the Results setting:
1. From the Home menu, press the Down Arrow button and
scroll to Setup and press Enter.
2. Scroll and press Enter to select the Results menu.
3. Select either Test Weight or Temperature.
4. Select either Show (to display results) or Hide (to disable
results).
5. Press the Enter button to save the changed setting or the
On/Off/Home button to escape and retain the previous
setting.
Figure 6
Modifying Results Setting (mini GAC plus only)
Corn
History
Setup
Setup
Language
Results
Results
Test Weight
Temperature
or
Test Weight
Show
Hide
Test Weight
Show
Hide
13.4%
56.3 lb/BU
70.5F
Corn
IMPORTANT:
mini GAC®
11001-1437-200701
Test
Results
Screen
13.4%
70.5F
Corn
Temperature can be
displayed or hidden
The mini GAC model does not have the
Results menu and automatically displays the
product temperature and cannot be
disabled. Test Weight is also not available.
SETTINGS / 9
OPERATOR’S MANUAL
AVERAGE
Averages for up to 20 products are stored in the unit. Individual
results correlate with a specific product, moisture result, product
temperature and/or test weight. The number of stored memories
that appear on the test results menu can be altered to show a
minimum of 2 up to a maximum of 10 memory readings. The
factory default setting is 3 stored memories, refer to (Figure 7).
To change the Memory Storage setting:
1. From the Home menu, press the Down Arrow button and
scroll to Setup and press Enter.
2. Scroll and press Enter to select the Average menu.
3. Press the Up or Down Arrow button to increase or decrease
the number of buffers to appear on the menu.
4. Press the Enter button to save the changed setting or the
On/Off/Home button to escape and retain the previous
setting.
Figure 7
Modifying the Average Buffers Setting
Corn
History
Setup
Setup
Results
Average
Stored
Memories
Average
8
BACKLIGHTING
Backlighting can be turned On or Off. The factory default setting is
backlighting Off. Turning on the backlighting can compensate for
low lit areas or can make the text appear sharper. Unnecessary
use of backlighting will decrease battery life.
To change the Backlight setting:
1. From the Home menu, press the Down Arrow button and
scroll to Setup and press Enter.
2. Scroll and press Enter to select the Backlight menu.
3. Press the Up or Down Arrow button to turn backlighting on
or off.
mini GAC®
11001-1437-200701
SETTINGS / 10
OPERATOR’S MANUAL
4. Press the Enter button to save the changed setting or the
On/Off/Home button to escape and retain the previous
setting.
Figure 8
Modifying Backlight Setting
Corn
History
Setup
Setup
Average
Backlight
Backlight
Backlight
or
OFF
ON
CONTRAST
The display menu contrast can be adjusted on a scale from 10 to
36; 36 being the most intense.
To change the Contrast setting:
1. From the Home menu, press the Down Arrow button and
scroll to Setup and press Enter.
2. Scroll and press Enter to select the Contrast menu.
3. Press the Up or Down Arrow button to change the
contrast of the display. The display will reflect the changes
as the number is altered.
4. Press the Enter button to save the changed setting or the
On/Off/Home button to escape and retain the previous
setting.
Figure 9
Modifying Display Contrast
Corn
History
Setup
Setup
Backlight
Contrast
Contrast
22
mini GAC®
11001-1437-200701
SETTINGS / 11
OPERATOR’S MANUAL
UNITS
Units of Measurement can be changed to either English (Lbs/Bu)
or Metric (Kg/HL).
To change the Units setting:
1. From the Home menu, press the Down Arrow button and
scroll to Setup and press Enter.
2. Scroll and press Enter to select the Units menu.
3. Press the Up or Down Arrow button to select English or
Metric.
4. Press the Enter button to save the changed setting or the
On/Off/Home button to escape and retain the previous
setting.
Figure 10
Modifying Units Setting
Corn
History
Setup
Setup
Units
Power
Units
English
Metric
POWER
The Power setting offers several power off durations that will shut
down the unit after so many seconds of inactivity. The default
factory setting is 90 seconds.
Power off durations available:
•
•
•
•
•
•
•
•
mini GAC®
11001-1437-200701
10 seconds
15 seconds
20 seconds
30 seconds
45 seconds
60 seconds
90 seconds
Infinite (manual shut off)
SETTINGS / 12
OPERATOR’S MANUAL
To change the Power setting:
1. From the Home menu, press the Down Arrow button and
scroll to Setup and press Enter.
2. Scroll and press Enter to select the Power menu.
3. Press the Up or Down Arrow button to select a power
down time.
4. Press the Enter button to save the changed setting or the
On/Off/Home button to escape and retain the previous
setting.
Figure 11
Modifying the Power Down Settings
Corn
History
Setup
Setup
Units
Power
Power
Off After
90
Seconds
mini GAC®
11001-1437-200701
SETTINGS / 13
OPERATOR’S MANUAL
mini GAC®
11001-1437-200701
SETTINGS / 14
OPERATOR’S MANUAL
NORMAL OPERATION
The Home menu will appear immediately after all startup self
tests successfully complete. This is the “Home” menu through
which all other menus are accessed.
MEASURING MOISTURE
In preparation for testing grain, the following conditions should
be observed.
1. The cell MUST be empty and clean prior to testing for
accurate, consistent measurements.
2. The Loader MUST be removed before turning the unit On
and during all testing (hour bar indicates when testing),
refer to (Figure 14).
IMPORTANT: The loader should only be in or on the unit
during storage and when grain is loaded.
The Home menu will display the active grain at the top of the
Home screen.
SELECTING GRAIN
To select a new grain:
1. Press the Down Arrow button to position the cursor at the
Product heading and press Enter.
2. Select a product (grain) using the Up or Down Arrow
button (to check a grain’s calibration constant, remain on a
selected grain for approximately 3 seconds and the
calibration constant menu will display. Pressing the Down
Arrow button will scroll to the next Constant menu and the
Bias menu) or immediately press the Enter or Home
button to save and change the selection.
After grain selection, the new product (grain) will display at the
top of the Home menu. The grain list on the grain selection menu
will be saved in a “last used” order.
IMPORTANT:
mini GAC®
11001-1437-200701
Periodic updates of the calibration constants
are recommended. Reference the Calibration
Grain Values section for additional
information.
NORMAL OPERATION / 15
OPERATOR’S MANUAL
Figure 12
Grain Selection Menus
Corn
Product
Average
Product
Corn
Soybeans
Remain
on product
for 3 seconds
Soybeans
050208N
K1 = 1783
K2 = 7205
K3 = 1488
K4 = 8155
Bias
1/3
Soybeans
K5 = 2455
K6 = 2074
K7 = 2606
K8 = 9916
K9 = 1087
Calibration
Constants
2/3
Soybeans
TWBias = x.x
MBias = x.x
3/3
Soybeans
Product
Average
Home
Menu
GRAIN SAMPLE TESTING
To begin Grain Test:
1. Ensure Loader is removed from the top of the unit.
2. With the product name selected at the top of the display,
press the Enter button.
3. The cell must be empty, upright, and still to perform an empty
cell test. When the Empty Cell menu displays, press the
Enter button.
IMPORTANT:
The empty cell reference measurement is used
for all product testing until the unit is powered
off. It is critical that the cell be clean and
completely empty when the unit is on. Keep
the measurement cell opening clear of hands
or other objects during this period.
4. After the empty cell test completes, the Fill Cell menu
displays.
5. With the slide closed, scoop or pour grain into the Loader
over the minimum fill line as shown in (Figure 13).
6. Place the Loader on top of the unit.
mini GAC®
11001-1437-200701
NORMAL OPERATION / 16
OPERATOR’S MANUAL
7. When secured, pull Loader slide out to dispense grain into
the unit.
8. Remove the Loader and use the level edge to strike
any excess grain from the unit.
9. Press Enter to begin the test.
IMPORTANT:
A slight tilt when holding and testing grain is
acceptable. If tilt is more than 10 degrees,
an error warning is possible.
10. When grain test completes, press Enter to store the
results. Press Enter again to see the average of all
samples and press the Up or Down Arrows to scroll
through all previous readings.
11. Press the Home button to return to the Home menu.
IMPORTANT:
Refer to the Error Codes and
Troubleshooting section if an error displays
after a grain test.
Figure 13
Scoop, Pull Slide, Strike Grain
1. Scoop
mini GAC®
11001-1437-200701
2. Pull Slide
3. Strike Grain
NORMAL OPERATION / 17
OPERATOR’S MANUAL
Figure 14
Testing Grain
Soybeans
Product
Average
Empty Cell
Hold Upright & Still
Testing
Loader Off
Unit
Soybeans
Fill Cell
Strike Cell
Hold Upright & Still
Testing
Press
Enter
to save
results
Loader Off
Unit
13.4%
56.3 lb/BU
70.5F
Soybeans
mini GAC plus
13.4%
70.5F
Soybeans
mini GAC results
Average
5.1%
18.8 lb/Bu
IMPORTANT:
mini GAC®
11001-1437-200701
Refer to the Accuracy section for improving
grain test results.
NORMAL OPERATION / 18
OPERATOR’S MANUAL
AUTO RANGING
Auto Ranging is an automatic feature that occurs when grain
tests out of the calibration limits (high or low) for the current grain
selection. If a product tests out of the moisture range of the
selected product, the mini GAC will look for a higher or lower
grain calibration and give the option to choose the correct
calibration. This typically occurs with corn.
A screen will automatically display to re-test the grain at the
correct calibration values (Figure 15). The new test will be saved
to the correct grain selection eliminating the need to dump the
grain and start a new test. All proceeding products will be tested
to the last grain selection unless the product tests out of that
range.
1. Press Enter at the Auto Range display to switch to the high
or low grain selection.
2. Press On/Off/Home button to reject the analysis.
Figure 15
Auto Ranging
Corn
Corn Hi
AVERAGE
Grain Test Results
The Average menu allows test results to be added, read, or
cleared from the unit. Up to 10 values can be stored for each
grain. If all memory indicators are full when adding new test
results, the test results in location 1 will be replaced with the new
test results. The factory default setting is 3 values (refer to
(Figure 16).
IMPORTANT: Changing the language will reset the
memory and all saved grain tests
results will be cleared.
mini GAC®
11001-1437-200701
NORMAL OPERATION / 19
OPERATOR’S MANUAL
To view the Average menu:
1. From the Home menu, press the Down Arrow button and
scroll to Average and press Enter.
2. Scroll and select desired function and press Enter to display
menu.
IMPORTANT:
Test Weight does not display on the mini GAC
model.
Add To
The Add To function manually enters the last test result to
memory.
New
Selecting the New function will clear all previous test results for the
product selected and place the new test result in the first position
of the new group of readings.
Read
The Read function displays the saved test results for the active
grain. Pressing the Up or Down Arrow button cycles through the
saved test results.
Clear
The Clear function removes all test results for the active grain.
Figure 16
Averages Menu
Corn
Product
Average
Average
Add to
New
Average
Read
Clear
Test result Average
13.1%
reading for
56.3 lb/Bu
the 5th memory
indicator
mini GAC®
11001-1437-200701
Memory
Indicator
NORMAL OPERATION / 20
OPERATOR’S MANUAL
BIAS
The mini GAC uses the same grain constants as the
DICKEY-john federal standard GAC2100 and is calibrated to
USDA certification.
In situations where moisture or test weight differences occur with
a local elevator, the Bias function allows entering of a correction
factor in moisture and test weight to compensate for those
differences.
IMPORTANT:
Test Weight does not display on the mini
GAC model.
To change the Moisture or Test Weight Bias setting:
1. From the Home menu, press the Down Arrow button and
scroll to Bias and press Enter.
2. Press the Up or Down Arrow button to select either
Moisture or Test Weight.
3. Press the Up or Down Arrow to increase/decrease the
bias percentage.
4. Press the Enter button to save the changed setting or the
On/Off/Home button to escape and retain the previous
setting.
Figure 17
Modifying Moisture or Test Weight Bias
Soybeans
Average
Bias
Moisture Bias
Bias Adjustment
+0.7%
Soybeans
mini GAC®
11001-1437-200701
NORMAL OPERATION / 21
OPERATOR’S MANUAL
HISTORY
The History menu displays the last 10 test grain result readings
from the unit regardless of the products selected.
Figure 18
History
Soybeans
Bias
History
History
Read
Clear
Corn Hi
20.8%
54.5 lb/Bu
mini GAC®
11001-1437-200701
NORMAL OPERATION / 22
OPERATOR’S MANUAL
GRAIN CALIBRATIONS
Grain calibration values are typically updated on an annual
basis. North American grain calibrations can be downloaded
from the DICKEY-john website by installing a PC application
software that can download calibrations to the mini GAC.
Visit www.dickey-john.com at the mini GAC product page to
download U.S. grain calibrations and PC application software.
Grain calibration values vary based on regions. Non-North
American calibrations should be obtained from a local distributor.
mini GAC®
11001-1437-200701
GRAIN CALIBRATIONS / 23
OPERATOR’S MANUAL
mini GAC®
11001-1437-200701
GRAIN CALIBRATIONS / 24
OPERATOR’S MANUAL
ACCURACY
Various factors can result in inaccurate grain readings. The
following techniques provide possible solutions to ensure the
most accurate readings.
CONDENSING SAMPLES (CORN DRYING)
When testing wet grain, moisture condensation can cling and
build up on the cell causing inconsistent and inaccurate
readings.
In between every measurement, use a soft cloth to wipe out
the cell using extreme care not to damage the thermistor at
the bottom of the cell.
Figure 19
Thermistor Position in Cell
Thermistor
HIGH MOISTURE GRAINS
High moisture grains can get stuck when pouring into the cell.
NOTE: The mini GAC Loader hole size is designed to meet the
US Federal Standard Quart Kettle Test Weight method.
To release grain:
1. Jiggle the slider back and forth to loosen the grain.
2. Poke the grain with a small object, such as a pencil to
release grain into the cell.
mini GAC®
11001-1437-200701
ACCURACY / 25
OPERATOR’S MANUAL
3. Directly pour the grain into the cell using the fill cup, not using
the loading base/slider. When using this technique, try to
pour the grain in dead center.
4. Pour the grain smoothly and complete the pour in
approximately 5 seconds.
IMPROVING GRAIN TEST RESULTS
For accurate test results, place the mini GAC on a level surface.
Use the loader/striker and take a minimum of 3 separate test
readings. Use the average of the results for greatest accuracy.
The difference between the grain temperature and analyzer should
not exceed 36 degrees F (20 degrees C).
mini GAC®
11001-1437-200701
ACCURACY / 26
OPERATOR’S MANUAL
ERROR CODES
Error codes display when an abnormal event occurs. An error
can be acknowledged by pressing the Enter button to return to
normal operation.
LOW BATTERY VOLTAGE
Low Battery voltage displays when the battery voltage falls
below 6.4V but is above 6.2V. When the battery voltage is low,
the unit is still capable of making accurate measurements, but
the battery should be replaced soon. Several warnings will
display before the dead battery screen appears.
DEAD BATTERY WARNING
Displays when the battery voltage falls below 6.2V. When the
battery voltage is lower than 6.2V, the unit is not capable of
making accurate measurements and the unit will no longer
operate other than to power off.
ERROR 10
Probable Cause
10
The measured temperature is below minimum. The unit
temperature is measured on start up and displays if the
temperature is below 32 degrees F (0 degrees C).
Corrective Action
1. Pressing the Enter button causes the unit temperature
measurement to repeat and operation will proceed if the
cell temperature is above the minimum, otherwise Error 10
displays again.
2. If unit temperature is still below the minimum, wait to test
until the temperature is greater than 32 degrees F (0
degrees C).
mini GAC®
11001-1437-200701
ERROR CODES / 27
OPERATOR’S MANUAL
ERROR 12
12
Probable Cause
The measured temperature is above maximum. The cell
temperature is measured on startup and Error 12 displays if the
temperature is above +158 degrees F (70 degrees C).
Corrective Action
1. Pressing the Enter button causes the cell temperature
measurement to repeat and operation will proceed if the cell
temperature is below the maximum, otherwise Error 12
displays again.
2. If cell temperature is still above maximum, wait to test until
unit temperature is less than 158 degrees F (70 degrees C).
20
ERROR 20
Probable Cause
Error 20 displays if the measured product moisture is below the
lower limit of the production calibration.
Corrective Action
1. Press Enter to show measured results.
Pressing the On/Off/Home button returns operation to the Home
menu.
ERROR 22
22
Probable Cause
Error 22 displays if the measured product moisture is above the
upper limit of the product calibration.
Corrective Action
1. Press Enter to show measured results.
Pressing the On/Off/Home button returns operation to the Home
menu.
ERROR 50
50
Probable Cause
Error 50 displays if the weight measurement during the Empty Cell
test indicates a mass that exceeds 35 grams.
mini GAC®
11001-1437-200701
ERROR CODES / 28
OPERATOR’S MANUAL
Corrective Action
1. Ensure the Loader cup is removed during the empty cell
test.
2. Make sure cell is empty prior to empty cell test.
Pressing the Enter button returns operation to the Home menu.
ERROR 56
Probable Cause
Error 56 displays when the measured average tilt angle exceeds
10 degrees after an Empty Cell and/or a Full Cell test phase.
Corrective Action
1. Hold mini GAC level while performing test or
2. Place on level surface to perform test.
Pressing the Enter button returns operation to the Home menu.
mini GAC®
11001-1437-200701
ERROR CODES / 29
OPERATOR’S MANUAL
mini GAC®
11001-1437-200701
ERROR CODES / 30
OPERATOR’S MANUAL
DIAGNOSTICS
INFORMATION
The Information menu provides system details that could be
helpful to technicians during service calls.
Details included on the Information menu:
•
•
•
•
•
Software version
Unit name
Technical Service phone number
Battery voltage
Part Number
Figure 20
Information Menu
Soybeans
Setup
Info
Press Down
button to access
additional
screens
Info
x46789-1000-00028
00.50
mini GAC plus
217-438-3371
1/5
For troubleshooting assistance, please contact DICKEY-john
technical support at 1-800-637-3302 or local distributor.
mini GAC®
11001-1437-200701
DIAGNOSTICS / 31
OPERATOR’S MANUAL
mini GAC®
11001-1437-200701
DIAGNOSTICS / 32
Dealers have the responsibility of calling to the attention of their
customers the following warranty prior to acceptance of an order
from their customer for any DICKEY-john product.
DICKEY-john® WARRANTY
DICKEY-john warrants to the original purchaser for use
that, if any part of the product proves to be defective in material or
workmanship within one year from date of original installation, and is
returned to DICKEY-john within 30 days after such defect is
discovered, DICKEY-john will (at our option) either replace or repair
said part. This warranty does not apply to damage resulting from
misuse, neglect, accident, or improper installation or maintenance.
Said part will not be considered defective if it substantially fulfills the
performance expectations.
THE FOREGOING WARRANTY IS
EXCLUSIVE AND IN LIEU OF ALL OTHER WARRANTIES OF
MERCHANTABILITY, FITNESS FOR PURPOSE, AND OF ANY
OTHER TYPE, WHETHER EXPRESS OR IMPLIED. DICKEY-john
neither assumes nor authorizes anyone to assume for it any other
obligation or liability in connection with said part and will not be liable
for consequential damages. Purchaser accepts these terms and
warranty limitations unless the product is returned within fifteen days
for full refund of purchase price.
For DICKEY- john Service Department, call 1-800-637-3302 in either
the U.S.A. or Canada
Headquarters:
5200 Dickey-john Road, Auburn, IL 62615
TEL: 217-438-3371, FAX: 217-438-6012, WEB: www.dickey-john.com
Europe:
DICKEY-john Europe S.A., 165, boulevard de Valmy, 92700 –
Columbes – France www.dickey-john.eu
TEL: 33 (0) 1 41 19 21 80, FAX: 33 (0) 1 47 86 00 07
Copyright 2007 DICKEY-john Corporation
Specifications subject to change without notice.