1
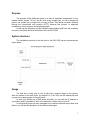
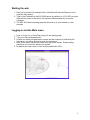
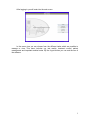
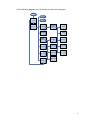
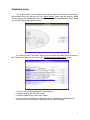
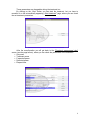
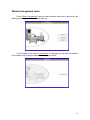
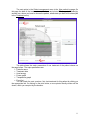
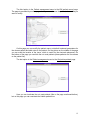
EHY - WEB BOX
User’s manual
Appendix to
V 5.0
October 2010
OncoTherm Kft., Hungary
© OncoTherm Kft.
Both the hardware and software are specially developed for the Oncotherm
systems.
© Copyrights belong to Oncotherm Kft. Hungary
All rights reserved.
This book is sold subject to the condition that it shall not by way of trade or otherwise, be lent, re-sold, hired out or otherwise circulated
without the Oncotherm prior consent in any form of binding or cover other than that in which it is published and without a similar condition including
this condition being imposed on the subsequent purchase.
Contents
Contents..............................................................................................................................2
Purpose ...............................................................................................................................3
System structure..................................................................................................................3
Usage ..................................................................................................................................3
Starting the web ..................................................................................................................4
Logging in and the Main menu............................................................................................4
Treatment menu ..................................................................................................................7
Treatment view ...................................................................................................................9
Patient management menu.................................................................................................10
Administration menu......................................................................................................... 13
Important notices ..............................................................................................................15
Important notes for the use of the software ........................................................................ 15
Supported browsers........................................................................................................... 15
Requested technical background........................................................................................16
Client browser...............................................................................................................16
Network ........................................................................................................................16
Alternative configuration............................................................................................... 16
2
Purpose
The purpose of this additional system is to have a “database management” in any
hospital owned system. Due to the fact that every hospital has its own management
system, our system has to support all (or most) of them. This facility has been achieved
through the conventional web protocol (HTTP) because this protocol is supported
nowadays by every computer and operating system.
In this way the physician and the hospital’s administration staff have the possibility
to control, check and download information from the EHY-2000.
System structure
The installation structure of the web box for the EHY-2000 can be represented as
shown below:
Usage
The web box is really easy to use. It looks like a common page on the internet.
Write the number of the web server (by default it is 10.0.0.235) into the address bar and
you get to the opening page of the web server.
In case your system has a DNS server internally, you can add the IP address to
your system and it is possible to refer to the device as a name and not as an IP.
In the following there are some examples how to achieve different major tasks, and
later on you will find the description of the different web pages
3
Starting the web
1. Start your web client (for example click on the Microsoft Internet Explorer icon) to
enter the web viewing.
2. Type in the IP address of the EHY-2000 device (by default it is 10.0.0.235) or select
the shortcut function to the device if it has been inserted earlier by our service
colleague.
3. The EHY-2010 device opening page should come up in your browser in a few
seconds
Logging in and the Main menu
1. Click on ‘Login’ (or on OncoTherm logo) on the opening page.
2. Type your name and password in.
3. In case your name and password is correct and the computer is certified by the
web server, you will be allowed to enter the main menu.
4. Note: Every device has its own frame color and Serial number. Please always
check that you control the device you wanted!
5. By default your user name is ‘User’ and the password is ‘EHY’.
4
After logging in you will enter into the main menu.
In the menu view you can choose from the different tasks which are possible to
manage or view. This menu includes e.g. test results, treatment control, patient
management and important medical notes. By the Logout button you can end the use of
the software.
5
On the following diagram you can see the structure of the program.
6
Treatment menu
The main function of the Treatment menu is the control of the device. Entering into
the treatment menu you will get onto the „Select patient” page. Here the patient’s name
can be set from the predefined list on this screen or add a new patient(this option leads
you into the Patient management menu).
By clicking on the “Set Name” button you can select the patient and by clicking to
the “Treatment” button you will enter to the “Treatment management view” screen.
•
•
•
Here you can set the parameters of the treatment:
treatment time by the „Set time” option
treatment power by the „Set power” option
turn on or off the modulation of the power by the „Modulation on/Modulation off”
button (the text of the button is depending on the current setting)
7
These parameters are changeable during the treatment too.
By clicking on the „Start” button you can start the treatment, but you have to
reconfirm it on the automatically appearing „Start treatment” page, where you can check
the set treatment parameters.
After the reconfirmation you will get back to the „Treatment management view”
screen (see the page before), where you can check the parameters of the treatment:
• Set power
• Treatment power
• Forwarded power
• Reflected power
• Elapsed time
8
If the „Treatment power” is much less than the „Forwarded power” (the Reflected
power is more than 25% of the „Forwarded power”), use the „Re-tune” button to tune the
device to the patient. If the re-tuning is not successful, please pause the treatment by the
„Pause” button, and check the correct placement of the bolus electrode. You can continue
the paused treatment by the „Start” button. To abort the running treatment you can use
the „Stop” button. On the appearing „Treatment stop” screen you can choose to view the
logged data of the treatment or get back to the Main menu.
Treatment view
The second option, which you can choose in the main menu, is the treatment view.
The „Treatment view” screen is very similar to the „Treatment management view”,
because you can monitor the same parameters, like on the another screen, but you can’t
modify the treatment parameters.
This function is useful if there is a central station – beside the physicians’ control –
where all devices can be monitored.
9
Patient management menu
In the Patient management menu all patient relevant tasks can be performed, like
adding new patients, viewing treatment data, etc.
The first option in the menu is Add patient. On this page you can add new patients
to the patient list by typing the patient name and date of birth.
10
The next option in the Patient management menu is the View patient log page. On
this page the data of the treatments can be shown and printed. The page is preceded by
another one, where you have to choose the patient, whose data you want to be shown(like
in the Treatment menu)
The table shows the major parameters of one treatment of the patient chosen on
the page before. The major parameters are:
• Patient’s name
• Treatment date
• Used energy
• Power graph
• Temperature graph
• Event list
You can check the next, previous, first, last treatment for this patient by clicking on
the appropriate link. Or clicking on the print button, a more printer friendly version will be
shown, which you can print by the browser.
11
The third option in the Patient management menu is the Edit patient record page.
The page is preceded by another page where you can choose the patient, whose data you
want to modify.
On this page you can modify the patient name, set default treatment parameters for
the chosen patient and add notes to the patient. On the picture on the middle of the page
you can mark the location of the tumor, which is useful for the electrode placement. On
the bottom of the page you can hide the not used patients (these patients won’t be shown
on the patient list).
The last option in the Patient management menu is the (Un)active patients page.
Here you can inactivate the not used patients (like on the page mentioned before),
but on this page you can reactivate the hidden patients too.
12
Administration menu
In the Administration menu you can find various support functions like treatment log
saving and recovering, user list editing and time and date setting.
The first option in the menu is the Edit user list option.
Here the new and old users can be managed. This is required for logging in into the
system. In case you edit your own login name and password, be careful, that you can log
out yourself for infinity.
The next options in the menu are Edit date and time and Patient list. The time and
date can be set easily by synchronizing the time and date of the device with the internet.
13
By the next three options in the menu (Save patient log, Save all patient’s log, Save
day’s log) the patient logs can be exported from the device in a text form. If the first of the
three options is used, you have to change the patient, whose data you want to export. The
exported data will appear in a new window (or tab) of the browser, from where you can
save it in a text form. The generated data text is coded, so it can’t be viewed separated
from the device. To recover data from the outsaved coded text, use the Display from log
option of the Administration menu.
To recover the patient logs from the outsaved data, please copy the outsaved
coded text into the dialog box and then press the “Show” button.
By choosing the Report options link in the Administration menu you can select what
kind of data will be printed in the Patient report. The first column shows the options, the
second: if it’s on/off, the third one: checkout box. After all the desired options are selected,
the settings must be accepted with the Save settings button.
14
Important notices
Choosing the Important notices link in the Main menu you can read the most
important notices and warnings about the use of the device.
Important notes for the use of the software
The following notices should be taken into consideration and followed when using
the web box.
• The treatment manager view can be used only on a computer from where the
patient is within sight.
• The patient should be monitored continuously not only through the web server but
in the room as well.
• All warnings mentioned in the EHY-2000 user’s manual are in force.
• The logged computers must be certified and linked on to the web server by service
technician.
• The treatment view shows the actual time on every new loaded page, this should
be checked every time the page is really new loaded or comes from cache.
• The device is matched with a color (and serial number). In case of every control the
web page color and the serial number written in the border should be checked if the
right device is controlled.
• After entering power or time, please check the treatment window again, if the
parameter is really set, and it is the parameter which is required.
Supported browsers
The used protocol is the primary HTTP protocol with cookies. This means that any
nowadays used common browsers should be able to view the pages supported by the
web processor.
The following browser has been tested with the web box:
• Microsoft Internet Explorer 7.0
• Mozilla firefox 5.0
15
•
Requested technical background
Client browser
Any kind of computer and browser is suitable which supports the HTTP protocol.
Our web box does not require any java or flash support but requires a cookie support.
Your computer also has to be identified by the web server to have a connection
allowance with the critical sites. This configuration can be set by our service technician.
Please note that depending on your browser, the look of the screens may differ
from each other. (Please check the supported browsers list.)
Network
You are requested to have a UTP network connection to your own network system.
It can be 10 or 100 Mb, half or full duplex connection. It is also requested to have your
network protected against unwanted intruders. (To have a correct firewall configured.)
Please note that the communication from/to the web processor is not secured. It
means that a prepared hacker can read all communication if your network is not protected
properly.
Alternative configuration
It is possible to have a sub local network configuration which enables it to connect
one (and only one) computer to the web server. In this case a direct contact will be
accomplished between the two systems.
Due to this configuration, no external intrusion is possible but the computer cannot
connect to the internet either.
16