1
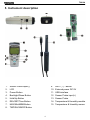
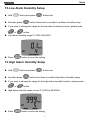
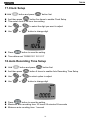
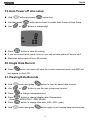
Precision Temperature Humidity Meter DTH184DL User’s Manual HB2TM1840000 1. 2. 3. 4. 5. 6. 7. 8. 9. 10. 11. 12. 13. 14. 15. 16. 17. 18. 19. 20. 21. 22. 23. 24. 25. 26. 27. 28. Table of Contents PREFACE ..........................................................................................................2 CHARACTERISTICS .........................................................................................2 GENERAL SPECIFICATIONS ...........................................................................3 ELECTRICAL SPECIFICATION ........................................................................3 INSTRUMENT DESCRIPTION...........................................................................4 LCD DESCRIPTION...........................................................................................5 MEASUREMENT PROCEDURES .....................................................................6 MAXIMUM/MINIMUM.........................................................................................6 AUTO POWER OFF...........................................................................................6 RELATIVE DEDUCTION VALUE(REL) .............................................................6 SETUP MODE....................................................................................................7 ENABLE ALARM SETUP ..................................................................................7 LOW ALARM TEMPERATURE SETUP ............................................................8 HIGH ALARM TEMPERATURE SETUP ............................................................8 LOW ALARM HUMIDITY SETUP ......................................................................9 HIGH ALARM HUMIDITY SETUP......................................................................9 CLOCK SETUP................................................................................................10 AUTO RECORDING TIME SETUP ..................................................................10 AUTO POWER OFF TIME SETUP ..................................................................11 SINGLE DATA RECORD .................................................................................11 VIEWING DATA RECORDS.............................................................................11 BATTERY REPLACEMENT.............................................................................12 EXTERNAL DC POWER..................................................................................12 SAFETY PRECAUTION...................................................................................12 COMPUTER GRADE .......................................................................................12 SOFTWARE INSTALLATION ..........................................................................13 MAINTENANCE ...............................................................................................16 END OF LIFE ...................................................................................................16 TM-184 1. PREFACE Thank you for your patronage, please read the operating instructions before you use this meter, so you will operate the meter correctly. WARNING Without following the operating instructions might damage the instrument or its component 2. CHARACTERISTICS LCD display. It shows both the value of temperature and humidity. The measurement of °C or °F. Real time data. Data Hold function. Alarm function. Back Light Auto Power Off DEW-POINT and WET-BULB temperature USB PC interface Low battery indication“ ”. Over load display “OL” 2 TM-184 3. General Specifications Display: Double row LCD, humidity display capability up to 999, and temperature display capability up to 1999. Temperature sensor: Diode. Humidity Sensor: Capacitor Sensor. Sampling: 1 time/second. Power: 9V battery、 NEDA 1604、IEC 6F22 or JIS 006P(Only data logger use), or AC to DC Adapter. (9V/300mA). Resolution:0.1%RH,0.1°C,0.1°F. Size: 5.1" x 2.2" x 1.5" (130x56 x38 mm)(LxWxH). Weight: 8.8oz(250g). Operating Temperature and Humidity: )WR)-20°C WR+60°C <95% RH.(Non-condensing). Storage Temperature and Humidity: )WR)-10 to 60°C, <70% RH. (Non-condensing). Consumption Current:≦10mA , WARNING Do not Touch Humidity Sensor Surfaces 4. Electrical Specification Measurement Range: Humidity: 5%~95%. Temprature:)WR)-20.0°&WR&~~. Temperature Accuracy: ±°)/±°& )WR)0.0°C WR40.0°C; other ±°) /°&. Humidity Accuracy: ±1.0%RH(at 25°C,15%RH~80%RH). ±2.5%RH(at 25°C,<15%RH,>80%RH). WARNING ,IXsLQJ this meter in high Dhumidity environment, please put the meter LQwarm and low humidity place for 24 hours after finishing measurement. WARNING I n order to ensure the accuracy of this meter, We strongly recommend send the meter back to original factory for maintenance every year 3 TM-184 5. Instrument description 1. 2. 3. 4. 5. 6. 7. 8. Sensor Probe input(-) LCD Power Button Backlight/Down Button Hold/Up Button REL/SET/Time Button MAX/Min/MEM Button TMP/RH/WB/DP Button 9. 10. 11. 12. 13. 14. 15. 4 REC/℃/℉ Button External power DC 9V USB interface Sensor Probe input(+) Sensor Probe Temperature & Humidity module Temperature & Humidity sensor TM-184 6. LCD description 1. 2. 3. 4. 5. 6. 7. 8. 9. 10. 11. Primary Display Secondary Display Temperature unit (℃) Temperature unit (℉) WET-BULB temperature DEW-POINT temperature Humidity unit Time unit (month: day) Time unit (hour: minute) Time unit (second) Low battery symbol 12. 13. 14. 15. 16. 17. 18. 19. 20. Auto power off symbol Memory reading symbol SET symbol REL symbol Hold symbol MAX symbol MIN symbol REC symbol High symbol 21. LO symbol 22. Alarm symbol 5 TM-184 7. Measurement Procedures Press “ meter. ” button to turn on the meter, press “ ” button and press “ Hold “ temperature unit ℃) ”button again to turn off the ”button to change temperature unit.(Deform Press “ ” button to change the display data. Humidity(%RH)→DEW-POINT(WET)→WET-BULB(DEW). Press “ unlock. ” button to lock display data on the LCD,press “ ” button again to 8. Maximum/Minimum Press“ ” button to enter MAX/MIN record mode and the LCD will display Maximum temperature data, and start to record maximum and minimum data, LCD secondary display shows that enter MAX/MIN record mode the time elapsed, when entering MAX/MIN record mode, The maximum storage is up to 99 minutes and 99seconds Press“ ” button to change Maximum or Minimum ” button to change the display data. Press “ (Temperature→Humidity(%RH)→DEW-POINT(WET)→WET-BULB) (DEW). Press “ ” button for more than 1 second to exit maximum/minimum mode. 9. Auto Power Off If you want disable auto power off, please hold “ ” button and press “ button, the auto power off symbol will not display on the LCD ” button and press “ If you want enable auto power off please hold “ button again the auto power off symbol will display on the LCD. Auto power off time is 30 minutes long ” ” 10. Relative Deduction Value(REL) Press “ ” button to save the current measured result, and then the current measured result will be subtracted by the next measured result, and the difference from the subtraction will appear on the LCD. Press “ mode. 6 ” button again to exit REL TM-184 11. Setup Mode Hold “ ” button and press “ ” button into the setup mode Press “ ” button to change the setup function. (Setup function see Note1) Push “ ” button to save setup data Note1: you can set up 7 different functions in setup mode 1. Enable or disable alarm 2. Low alarm temperature setup 3. High alarm temperature setup 4. Low alarm humidity setup 5. High alarm humidity setup 6. Clock setup 7. Auto recording time setup 8. Auto power off time setup 12. Enable Alarm Setup Hold “ ” button and press “ ” button to enable alarm setup If you want to enable alarm please press “ Alarm On. Press “ ” or “ ” button, LCD will display ” button to save the setting. When alarm sound action you can push “ ” button to stop alarm sound and this time to stop alarm mode,this time meter auto set alarm data to High Temperature(Humidity) 60.0℃;99.9%RH,Low Alarm Temperature(Humidity) –20.0℃;0.1%RH. 7 TM-184 13. Low Alarm Temperature Setup Hold “ ” button and press “ And then press“ ” button first ” button to enable Low Alarm Temperature setup If you want to set the range for the low alarm temperature function, please Pres “ ” or “ ” button Low alarm temperature range from –20.0℃to 60.0℃(-4.0℉~140.0℉) Press “ ” button to save the setting. 14. High Alarm Temperature Setup Hold “ ” button and press “ And then press “ ” button first ” button twice to enable High Alarm Temperature setup If you want to change the range for the high alarm temperature function, please ” or “ ” button press “ High alarm temperature range is from –20.0℃ to 60.0℃(-4.0℉~140.0℉) Push “ ” button to save the setting 8 TM-184 15. Low Alarm Humidity Setup Hold “ ” button and press “ And then press “ ” button first ” button three times to enable Low Alarm Humidity setup If you want to change the range for the low alarm humidity function, please push “ ” or “ ” button Low alarm humidity range 0.1%RH~99.9%RH Press “ ” button to save the setting. 16. High Alarm Humidity Setup Hold “ ” button and press “ And then press “ ” button first ” button four times to enable High Alarm Humidity setup If you want to change the range for the high alarm humidity function, please press “ ” or “ ” button High alarm humidity range is from 0.1%RH to 99.9%RH Press “ ” button to save the setting 9 TM-184 17. Clock Setup Hold “ ” button and press “ ” button first And then press “ ” button five times to enable Clock Setup This meter clock is 24 hour time setting. Use “ ” or “ Use “ ” or “ Press “ ” to select the digit you want to adjust ” button to change digit ” button to save the setting Time deform set “2008/01/01 12:12:12” 18. Auto Recording Time Setup Hold “ ” button and press “ ” button first And then press “ ” button 6 times to enable Auto Recording Time Setup Use “ ” or “ ” to select option to adjust Use “ ” or “ ” button to change digit Press “ ” button to save the setting Maximum auto recording time: 23 hours 59 minutes 59 seconds Minimum auto recoding time: 1 second 10 TM-184 19. Auto Power off time setup Hold “ ” button and press “ And then press “ Use “ Press“ ” or “ ” button first ” button seven times to enable Auto Power off time Setup ” button to change digit ” button to save the setting If you do not want auto power to be on, you can set auto power off time to be 0 Maximum auto power off time: 99 minutes 20. Single Data Record Press“ ”button, the meter will save the current measured result, and REC will also appear on the LCD. 21. Viewing Data Records Hold“ ”button and press“ Use “ ” or “ Press“ ”button to view the saved data records ” button to see the next or previous records ” to change temperature unit Press“ ” button to change display data (Temperature →Humidity→DEW-POINT→WET-BULB) Press “ Hold“ ” button to change time data (H:M→M:D→year) ”button and press“ ”button again to exit viewing data records mode 11 TM-184 22. Battery Replacement WARNING If the LCD display “ ” symbol, please replace the battery immediately Turn off the instrument. Open the battery cover and remove the battery. Replace with four-9V NEDA 1604, IEC 6F22 or JIS 006P size battery. Install the battery cover. WARNING If you will not use this meter for a long time, please remove the battery in order to protect the meter. 23. External DC Power External AC to DC adapter: Voltage 9VDC(8~14VDCMax) Socket:pin Positive, Ground Casing External Diameter 5.5mm internal Diameter 2.1 mm 24. Safety Precaution For cleaning the instrument, use a soft dry cloth. Never use a wet cloth, solvents or water, etc. Data logging capacity with Memory Size:30000 data sets Operation Altitude: Up to 2000M. Operating Environment: Indoors use only. This instrument has been designed for being used in an environment of pollution degree 2. 25. Computer Grade CPU:Pentium Ⅲ 1000MHZ RAM:SDRAM 256MB Hard Disk:200MB OS:Windows 2000, Windows XP Display: 800×600 256 cooler 12 TM-184 26. Software installation Please insert the CD into the PC to install the software first. Please select the USB driver to be installed, which is E:\TM-184\PL-2303 Driver Installer.exe (windows 2000 SP4/windows XP SP2), click twice on the left key of the mouse to install the USB driver. 13 TM-184 Select the SETUP.EXE i.e., E:\TM-184\SETUP.EXE and installs the desktop icon Tack out the CD from PC after completed the installation. 14 TM-184 Use the USB cable to connect the meter and the computer according to the drawing. Select the desktop icon (TM-185) and click twice on left key of the mouse to run the procedure. 15 TM-184 27. Maintenance Do not use the meter in an environment with severe change; do not store the unit in an environment with high temperature, high humidity, and high vibration Take battery out if the meter has not been used for a long period of time The Diode temperature probe is used to measure temperature and the capacitive humidity sensor is used to measure humidity The thermocouple and humidity sensor will start aging under the influence of oxidation, reduction, corrosion, pollution, vaporization, diffusion or other metallurgy. The aging process will affect its precision seriously. Cleaning and inspection of temperature probe: The smoke, coal, dust, grease attached on the protective tube of temperature probe will slow down the heat conduction of the thermocouple and cause measuring error. Therefore, it should be cleaned periodically. The metal coating of thin thermocouple should be replaced properly upon the occurrence of corrosion. Cleaning and inspection of humidity sensor: The smoke and dust attached on the humidity sensor will slow down the function of humidity sensor and cause measuring error. Therefore, it should be cleaned periodically. Blow off the dust with mild compressed air instead of water or alcohol. The aluminum plate inside the humidity sensor should be replaced upon the occurrence of corrosion. 28. End of life Caution: this symbol indicates that equipment and its accessories should be subject to a separate collection and correct disposal 16 TENMARS ELECTRONICS CO., LTD 6F, 586, RUI GUANG ROAD, NEIHU, TAIPEI 114, TAIWAN. E-mail: [email protected]