1
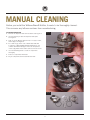
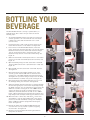
THE WILLIAMSWARN
bottler user manual
SAFETY INFORMATION
2
INTRODUCTION3
Manual cleaning
4
Installing the WilliamsWarn Bottler
5
Bottling your Beverage
6
Cleaning after bottling
7
© Copyright 2013 Nanobrewing Limited
SAFETY INFORMATION
These instructions for use outline general safety guidelines for the correct operation
of the WilliamsWarn® Bottler.
General Safety
1. It is the responsibility of the operator to read and
understand the manual and other (safety) information.
Always retain the manual as reference.
4. If for any reason the WilliamsWarn Bottler malfunctions,
please contact WilliamsWarn.
Cleaning and Maintenance
1. Always clean following the instructions in this manual and
the WilliamsWarn Personal Brewery User Manual.
2. Never use the WilliamsWarn Bottler for any purpose other
than the 'Intended Purpose'. Do not misuse, modify or force
the appliance in any way as damage may occur that may
create potential hazardous risks or situations.
2. We recommend the use of WilliamsWarn Brewery Detergent
and WilliamsWarn Sodium Percarbonate as the detergent
and sanitising agents respectively. If other products are used
they should be approved brands of dishwashing detergent
and approved brands of homebrewing sanitizer that are
available commercially for these purposes.
3. Don’t use the WilliamsWarn Bottler in uncovered outdoor
areas (without a canopy or overhang).
4. Always check if all the components of the WilliamsWarn
Bottler are in place before using the device.
3. Dispose of the WilliamsWarn Bottler packaging material in
the appropriate waste containers.
5. This device is not intended for use by persons (including
children) with reduced physical, sensory or mental
capabilities, or lack of experience and knowledge, unless
they have been given supervision or instruction concerning
use of the appliance by a person responsible for their safety.
4. When the WilliamsWarn Bottler reaches the end of its useful
life it must be disposed of in a responsible manner, thereby
ensuring the reuse of parts.
6. Use solely accessories recommended by the supplier.
The use of other accessories may result in damage to the
WilliamsWarn Bottler, thereby creating hazards for the user.
Important
The manufacturer isn’t responsible for any damage caused
through:
7. When the WilliamsWarn Bottler is not in use store it in
a dry place out of reach of children.
1. Improper handling and use for other purposes than the
WilliamsWarn Bottler’s intended purpose.
INTENDED PURPOSE
1. The intended purpose of the WilliamsWarn Bottler is to
bottle cold, clear, perfectly carbonated, professional quality
beverage.
2. Repairs executed by an unauthorized repairer.
3. The use of non-original components or accessories.
For further information or in case of problems not mentioned in
this manual you can see our website: www.williamswarn.com or
send an e-mail to [email protected]
COMPONENTS
1. The complete WilliamsWarn Bottler includes dispense valve,
frame, bottle filling tube, beverage and CO2 line, 4mm allen
key and six mounting screws.
INSTALLATION, STORAGE AND OPERATING CONDITIOn
1. Mount the WilliamsWarn Bottler upright on a vertical, flat
and stable surface. Make sure it doesn’t block a passage; it
should be able to stay on the same location for a long period
of time.
2. Use WilliamsWarn Bottler at an ambient temperature
between 5°C (41°F) and 40ºC (104°F).
3. The WilliamsWarn Bottler should only be used with product
intended for human consumption. Do not use with hazardous
or poisonous substance.
2
INTRODUCTION
The WilliamsWarn® Bottler enables you to bottle your own cold, clear, perfectly
carbonated, professional quality beverage in a fast and easy way. This bottler
is the ideal addition to your WilliamsWarn® Personal Brewery.
The Bottler can accomodate bottles up to approximately 370mm in height, allowing
a variety of bottle types to be used. The Bottler will allow you to fill the bottle with
CO2 before filling it up, making sure your beverage doesn’t lose its freshness and
carbonation when transferred to the bottle.
7
1
2
3
4
8
6
5
1. Beverage port
4.VARIABLE PRESSURE RELIEF VALVE (VPRV)
7. Beverage and CO2 line tubes
2.CO2 PORT
5. frame
3. dispense valve
6.bottle filling tubE, Beverage, and CO2 line tubes
8. 4MM ALLEN KEY AND SIX MOUNTING SCREWS
3
MANUAL CLEANING
Before you install the WilliamsWarn® Bottler, it needs to be thoroughly cleaned.
This removes any leftover residues from manufacturing.
cleaning procedure
A. Remove the dispense valve from the frame. See Figure 1.
Fig. 1
B. Use the Allen key to take the dispense valve apart.
See Figure 2.
C. Take out all the O-rings (there will be 7 in total; 5 small,
and 2 large). See Figure 3.
D. Fill a bowl or jug with 1 litre of warm water and add
1 teaspoon of WilliamsWarn Brewery Detergent or any
common dishwasher detergent. Place all components
in the soapy water and let them soak for a minute or two.
E. Use a dishwashing brush to clean all components
thoroughly.
F. Rinse all components with water.
Fig. 2
G. Dry all components and re-assemble the valve.
Fig. 3
4
Installing the
WilliamsWarn
Bottler
A. The WilliamsWarn Bottler needs to be installed upright
and well fastened to a rigid structure at a convenient height.
Fig. 4
Fig. 5
Fig. 6
Fig. 7
Fig. 8
Fig. 9
Install the WilliamsWarn bottler close to your brewery,
approximately 1-2 m’s away from the WilliamsWarn
Personal Brewery or where the brewery can be moved
to easily.
B. When the Frame is mounted and installed firmly, slide the
dispense valve in the slot of the frame. See Figure 4. Secure
it with the o-ring. See Figure 5.
C. Push the CO2 line (black line) into the fitting on the right
(front on, see Figure 6). Push the line down hard and then
pull back gently to ensure it is locked into place.
D. Push the Beverage line (clear line) into the fitting on the left
(front on, see Figure 7). Again, push the line down hard and
then pull back gently to ensure it is locked into place.
E. Connect the Beverage line (clear line) into the brewery filling
line valve at the back of the Draft Tap Font. See Figure 8.
F. In the same manner connect the CO2 line (black line) into
the CO2 line valve coming from the back of the Draft Tap
Font. See Figure 9.
5
Bottling your
Beverage
Fig. 10
Fig. 11
The WilliamsWarn Bottler is an easy to operate device, so
anybody will be able to bottle. All you need to do are the
following steps:
1. Set the WilliamsWarn Bottler to the right size for the type
of bottle you want to fill. The minimum size of the bottle
is 20cm (±8 inches) and the maximum size is 37cm
(±14.5 inches).
2. Cut the filler tube so that it ends up at the bottom of the
bottle when the bottle is in the bottler. See Figure 10.
Fig. 12
3. Place a bottle in the WilliamsWarn Bottler; ensure the
plastic bung seals the bottle entry well, to do this the bottler
bracket will need to be set smaller than the bottle height.
This will ensure that the flex in the bottom part of the
bracket will keep tension on the bottle and the bung. See
Figure 11.
Fig. 13
4. Make sure the handle of the dispense valve is in the neutral
position (in line with the variable pressure relief valve). See
Figure 12.
Fig. 14
5. Open the brewery filling line valve at the back of the Draft
Tap Font. Make sure the unit is pressurized (1-1.5 bar). See
Figure 13.
Fig. 15
6. Open the CO2 line valve at the back of the Draft Tap Font.
See Figure 14.
7. Move the dispense valve handle towards you for a few
seconds, you will hear the CO2 flow into the bottle and
escaping out of the VPRV (Variable Pressure Relief Valve).
See Figure 15. If you don't hear gas escape out of the VPRV,
turn the VPRV anti-clockwise until you do. See Figure 17.
Fig. 16
8. Move the dispense valve handle away from you, you’ll see
the beverage flowing into the bottle. See Figure 16.
Fig. 17
9. Adjust the variable pressure relief valve so that the beverage
fills the bottle gently. You can slow the fill speed by turning
the VPRV clockwise. You can speed the fill up by turning the
VPRV anti-clockwise. See Figure 17. For a 500mL bottle,
a typical fill speed, to ensure no foaming and no loss of
carbonation, would be about 45 seconds. So for a 330mL
bottle, a 30 second filling time would be about optimal. You
may find your own technique and filling time and that is fine.
Fig. 18
10.When the bottle is almost full, with about 1/3 of the neck
as headspace, close the valve handle back to the neutral
position (in line with the VPRV). Leaving some headspace
(which is CO2) will prevent spillage when removing the
bottle. See Figure 18.
Fig. 19
11.Remove the bottle from the WilliamsWarn Bottler and
close the lid as soon as possible to prevent air getting
into the bottle. See Figure 19.
12.Go back to step 3 and repeat the bottling procedure as
many times as need be.
6
Cleaning
after bottling
If you empty your WilliamsWarn Bottler by bottling all the
beverage you can clean the bottler as part of the brewery
clean. However it is optimal to first close the two valves on
the back of the draft tap font and dismantle the bottler valve
as described in the section "Manual Cleaning". Then give the
components a good rinse under running water. Then reassemble
the valve and reconnect the beverage and C02 lines to the
bottler valve and the brewery valves on the draft tap font ready
for the cleaning Stage 1, as described in the Personal Brewery
User Manual.
If you have only filled a few bottles and the brewery still
contains beverage and therefore cannot be cleaned, then
the bottler should be cleaned seperately.
hey ian, just rephrased this text in
the last section as it felt a little
disjointed in your notes. let me know
what you think. would have rung but
its quite late.
Close the brewery filling line valve and CO2 line valve at the back
of the brewery, then disconnect the CO2 and beverage tubing
from both the brewery and the bottler. You need to push the
connecting rings downward on the fittings whilst simultaneously
pulling the tubing out.
Next, follow the cleaning procedures outlined in the "Manual
Cleaning" section at the front of this manual. In addition to what
is described you will need to clean the CO2 and beverage tubing
with detergent and rinse them as well. Then reassemble the
bottler as per the instructions found in the section "Installing
the WilliamsWarn Bottler".
7