1
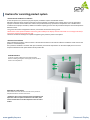
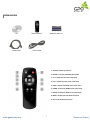
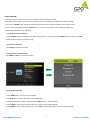
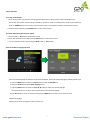
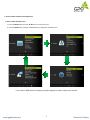
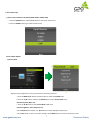
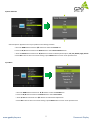
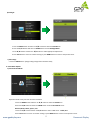
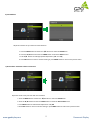
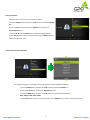
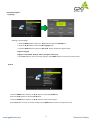
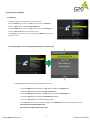
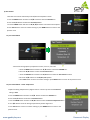
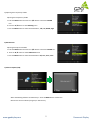
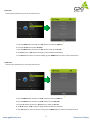
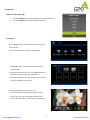
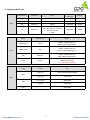
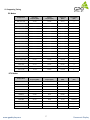
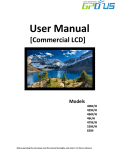
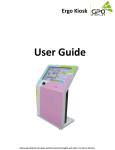
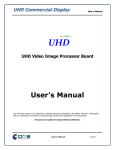
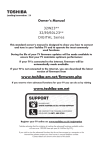
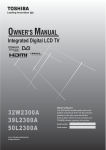
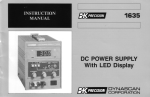
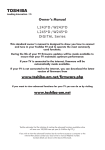
Panoramic Display User Guide Before operating the unit, please read this manual thoroughly, and retain it for future reference User manual Notice 1. When disconnecting the display from an electrical outlet, the plug must be pulled out from the socket. Do not remove power cord from outlet by pulling from the cord. Pull from the plug head. 2. WARNING – To reduce the risk of fire or electric shock, do not expose this appliance to rain or other forms of moisture. 3. Display must not be exposed to liquids via dripping or splashing. Please do not place liquid –filled items such as vases near the display. 4. Use only a properly grounded plug and receptacle. 5. CAUTION – These instructions are for use by qualified service personnel only. To reduce the risk of electric shock, do not perform any service other than that contained in the operating instructions unless you are qualified to do so. CAUTION RISK OF ELECTRIC SHOCK DO NOT OPEN CAUTION : TO REDUCE THE RISK OF ELECTRIC SHOCK, DO NOT REMOVE COVER (OR BACK). NO USER-SERVICEABLE PARTS INSIDE. REFER SERVICING TO QUALIFIED SERVICE PERSONNEL. This symbol is intended to alert the user to the presence of insulated “dangerous voltage” within the product’s enclosure that may be of sufficient magnitude to constitute a risk of electric shock to persons. This symbol is intended to alert the user to the presence of important operating and maintenance (servicing) instructions in the literature accompanying the product. www.gpodisplay.com 2 Panoramic Display User manual Important Safety Instructions 1. 2. 3. 4. 5. 6. 7. 8. Read these instructions. Keep these instructions. Heed all warnings. Follow all instructions. Do not use this product near water. Clean only with dry microfiber cloth. Do not block any ventilation openings. Install in accordance with the manufacturer’s instructions. Do not install near any heat sources such as radiators, heat registers, stoves, or other display (including amplifiers) that produce heat. 9. Do not remove ground prong from three-pronged plugs. If your outlet will not accept threepronged plugs, consult an electrician for replacement. 10. Protect the power cord from being walked on or pinched, particularly at plugs, convenience receptacles, and the point where they exit from the display. 11. Only use attachments/accessories specified by the manufacturer. 12. Use only with the cart, stand, tripod, bracket, or table specified by the manufacturer, or sold with the display. When a cart is used, exercise caution when moving the cart/display combination to avoid injury from tip-over. 13. Unplug this display during lightning storms or when unused for long periods of time. 14. Refer all servicing to qualified service personnel. Servicing is required when the display has been damaged in any way, such as power-supply cord or plug is damaged, liquid has been spilled or objects have fallen into the display, the display has been exposed to rain or moisture, does not operate normally, or has been dropped. 15. Do not expose this display to dripping or splashing and ensure that no objects filled with liquids, such as vases, are placed on the display. 16. To completely disconnect this display from the wall outlet, disconnect the power supply cord plug from the AC receptacle./wall socket 17. The mains plug of the power supply cord shall remain readily operable. 18. An display with CLASS I construction shall be connected to a wall socket outlet with a protective grounding connection. 19. Note: Prolonged use of headphones at a high volume may cause damage your ears. 20. Notice to users : This is a Class A digital device 21. This device is designed for commercial use and features safety certificates for electromagnetic interference (EMI). Users should be mindful of EMI issues. www.gpodisplay.com 3 Panoramic Display User manual Cautions for consisting product system •Environmental condition for installation As the LCD panel is very sensitive to physical impact, installation requires considerable caution. Minimum clearance (20cm) must be secured for smooth ventilation. Installation must avoid air tight or near air tight places. Improper ventilation causes malfunction and shortens product lifetime by rapid internal temperature rise. If Product has to installed at the improper ventilation, additional ventilation openings or fans must be provided to keep the internal temperature between 0~35℃. •For ground of Product and application devices, it should be connected as frame ground. •Please refer to the special installation instruction guide carefully if the display monitor shall install on not enough solid and/or unevenness surface wall and build into wall. •Ensure that electrical outlet(s) are capable of supporting this product’s power consumption •Clearance for Ventilation When installing the product, make sure there is at least 20cm clearance on all sides for effective ventilation and do not seal the product in an enclosed space. If the product is installed in a location with poor ventilation, the internal temperature can be raised rapidly and it can cause frequent malfunctions and rapid reduction of the product life Embedded Product In case of no space of 20cm from each side of the SET, make sure adding cooling fans at the upper part of the set to reduce inner temperature. 20cm 20cm 20cm 20cm Mounting on a wall surface Please secure minimum clearance as shown in the picture for adequate ventilation and technical service. •Ventilation space in front of Product must be furnished for heat dispersion. If the front space of Product has to be sealed, there must be consideration for the heat dispersion in the rear side of Product. www.gpodisplay.com 4 Panoramic Display User manual Accessories CD Remote Control HDMI Cable Power Cable Batteries (AAA x 2) 1. SOURCE : Selects Input Source 2. POWER : Turns the LCD Display On and Off 3. UP : Controls the UP cursor in the menu 4, LEFT : Controls the LEFT cursor in the menu 5. RIGHT : Controls the RIGHT cursor in the menu 6. DOWN : Controls the DOWN cursor in the menu 7. ENTER : Controls the ENTER cursor in the menu 8. MENU : Displays the main On-Screen menu 9. EXIT : Exits the On-Screen menu www.gpodisplay.com 5 Panoramic Display User manual 1. MENU OVERVIEW In this menu system, there are several ways to customize the menu settings provided. Most menus consist of three levels to set up the options, but some require greater depth for the variety of settings. If you press the MENU button, only the first and second level of the menu system will appear on the monitor screen. The third level can be displayed by pressing SELECT. If a menu has more than three levels, the pop-up dialogue box will be displayed as the fourth or fifth level. 1) To show and remove the Menu: Press the MENU button on the Remote Control to display the menu. A second press of the MENU button or a press of the EXIT button will take you back to monitor viewing. 2) To go to the next level: Press ENTER on the Remote Control. 3) To go back to the previous level: Press MENU (or EXIT) on the Remote Control. 4) Typical Menu Operation a. Press MENU button: The main menu will appear. b. Use ▲/▼ buttons to select the desired menu option (icon). c. While the desired menu option is selected, press ENTER to move to the second level. d. Press ENTER to move to the third level: Some menu options require additional steps. e. Press MENU to return to the previous menu or press EXIT on the Remote Control to return to monitor viewing. www.gpodisplay.com 6 Panoramic Display User manual 2. Basic Operation 1) Turning On the Monitor a. First, connect power cord and ensure the plug head is fully inserted. Flip the power switch located adjacent to the AC inlet. The monitor will then switch to standby or “power on” mode. In standby mode, in order to turn monitor on, press the POWER button on the remote control or power button in the OSD KEY located on the side of the monitor . b. Select the input source by using SOURCE button on the remote control. 2) Volume Adjustment (A/V extension option) a. Press the VOL+/- ◀/▶ button to adjust the volume. b. If you wish to switch the sound off, press the MUTE button on the remote control. c. You can cancel this function by pressing the MUTE or VOL+/- ◀/▶ button. 3) On Screen Menus Language Selection There are several languages in which the menus can be displayed. Select your desired language by following these steps: a. Press the MENU button and then use ▲/▼ button to select the OPTION icon. b. Press the ▲/▼ button to select Menu Language menu. c. Press the ENTER button and then use ▲/▼,◀/▶ button to select your desired language: From this point on, the on-screen menus will be shown in the selected language. d. Press EXIT button to return to monitor viewing or press MENU button to return to the previous menu. Supported Languages : English, French, Italian, Portuguese, Russian, Chinese, etc. www.gpodisplay.com 7 Panoramic Display User manual 3. On Screen Menus Selection and Adjustment 1) How to adjust the OSD screen a. Press the MENU button and then ◀/▶button to select each menu. b. Press the ENTER button and then use ▲/▼ button to display the available menus. • Your monitor's OSD (On Screen Display) may differ slightly from what is shown in this manual. www.gpodisplay.com 8 Panoramic Display User manual 4. Select Video Input 1) How to Select USB Source by OSD [PC-RGB, HDMI1, HDMI2, DMP] a. Press the SOURCE button and then ▲/▼ button to select each video source. b. Press the ENTER button to go to desired video source 5. Picture Menu Options 1) Picture Mode Adjust the picture appearance to suit your preference and viewing situations. a. Press the MENU ◀/▶ buttons and then button to select the PICTURE mode. b. Press the ◀/▶ buttons and then use ENTER button to select Picture Mode menu. Standard, Dynamic, Mild, User c. Press the ▲/▼ button to select Picture Mode - User menu Contrast, Brightness, Color, Sharpness, Tint. d. Press ENTER button and then use ◀/▶ buttons to make appropriate adjustments. e. Press EXIT button to return to monitor viewing or press MENU button to return to the previous menu. www.gpodisplay.com 9 Panoramic Display User manual 2) Color Temperature Control -Choose one of five automatic color adjustments. Set to Warm to enhance hotter colors such as red, or set to Cool to see less intense colors with more blue. a. Press the MENU button and then use ◀/▶ buttons to select the PICTURE icon. b. Press the ▲/▼ button and then use ENTER buttons to select Color Temperature menu. c. Press the ENTER button and then use ◀/▶ buttons to select desired option: User, Cool, Medium, Warm. d. Press the ▲/▼ buttons to select Picture Mode - User menu Red, Green, Blue e. Press EXIT button to return to monitor viewing or press MENU button to return to the previous menu. 3) Aspect Ratio Selects the screen format. a. Press the MENU button and then use ◀/▶ buttons to select the PICTURE icon. b. Press the ▲/▼ buttons and then use ENTER button to select Aspect Ratio menu. c. Press the ENTER button and then use ▲/▼ buttons to select desired option: Auto, 4:3, 16:9, Zoom1, Zoom2, Just Scan. d. Press EXIT button to return to monitor viewing or press MENU button to return to the previous menu. www.gpodisplay.com 10 Panoramic Display User manual 4) Noise Reduction Select the picture appearance to suit your preference and viewing situations. a. Press the MENU button and then ◀/▶ buttons to select the PICTURE icon. b. Press the ▲/▼ buttons and then use ENTER button to select Noise Reduction menu c. Press the ENTER button and then use ▲/▼ buttons to select the desired picture option; Off, Low, Middle, High, Default. d. Press EXIT button to return to monitor viewing or press MENU button to return to the previous menu. 5) PC Menu a. Press the MENU button and then use ◀/▶ buttons to select the PICTURE icon. b. Press the ▲/▼ buttons and then use ENTER button to select Screen Menu. c. Press ▲/▼ buttons and then use ◀/▶ buttons to make desired adjustments. d. Press EXIT button to return to monitor viewing or press MENU button to return to the previous menu. www.gpodisplay.com 11 Panoramic Display User manual 6) Backlight a. Press the MENU button and then use ◀/▶ buttons to select the PICTURE icon. b. Press the ▲/▼ buttons and then use ENTER button to select Backlight Menu. c. Press ▲/▼ buttons and then use ◀/▶ buttons to make appropriate adjustments. d. Press EXIT button to return to monitor viewing or press MENU button to return to the previous menu. 7) Color Range a. Press the ENTER button. [Range scaling changes from 16-234 to 0-255] 6. Sound Menu Options 1) Sound standard Mode Adjust the sound to suit your taste and room situations. a. Press the MENU button and then use ◀/▶ button to select the SOUND icon. b. Press the ▲/▼ button and then use ENTER button to select Sound Mode menu : Standard, Music, Movie, Sports, User. c. Press the ◀/▶ button and then use ▲/▼ button to select - User menu : Treble, Bass. d. Press EXIT button to return to monitor viewing or press MENU button to return to the previous menu. www.gpodisplay.com 12 Panoramic Display User manual 2) Sound Balance Adjust the sound to suit your taste and room situations. a. Press the MENU button and then use ◀/▶ buttons to select the SOUND icon. b. Press the ▲/▼ buttons and then use ENTER button to select the Balance menu. c. Press ◀/▶ buttons to make appropriate adjustments. [-50 ~ 0 ~ +50] d. Press EXIT button to return to monitor viewing or press MENU button to return to the previous menu. 3) Auto Volume- Automatic Volume Level Control Adjust the sound to suit your taste and room situations. a. Press the MENU button and then use ◀/▶ buttons to select the SOUND icon. b. Press the ▲/▼ buttons and then use ENTER button to select the Auto Volume menu. c. Press ENTER button to make desired adjustments : On, Off d. Press EXIT button to return to monitor viewing or press MENU button to return to the previous menu www.gpodisplay.com 13 Panoramic Display User manual 4) Surround Sound Adjust the sound to suit your taste and room situations. a. Press the MENU button and then use ◀/▶ buttons to select the SOUND icon. b. Press the ▲/▼ buttons and then use ENTER button to select the Surround Sound menu. c. Press the ▲/▼ buttons ENTER button to make desired adjustments : d. Press EXIT button to return to monitor viewing or press MENU button to return to the previous menu. 5) User Control for 5 Band Equalizer -f the Equalizer settings are changed, sound mode setting is switched to User automatically. a. Press the MENU button and then use ◀/▶ buttons to select the SOUND icon. b. Press the ▲/▼ buttons to select the EQ(Equalizer) menu. c. Press the ENTER button and then use ◀/▶ buttons to make desired adjustments; 20Hz, 500Hz, 1.5KHz, 5KHz, 10KHz. d. Press EXIT button to return to monitor viewing or press MENU button to return to the previous menu. www.gpodisplay.com 14 Panoramic Display User manual 7. Setup Menu Options 1) Language Selecting a menu language a. Press the MENU button and then use ◀/▶ buttons to select the OPTION icon. b. Press the ▲/▼ buttons to select the OSD Language menu. c. Press the ENTER button and then use ▲/▼,◀/▶ buttons to select the desired option: Supports Language English, French, Español, Deutsch, Italiano, Portugues, Chinese, etc. d. Press EXIT button to return to monitor viewing or press MENU button to return to the previous menu. 2) Set ID a. Press the MENU button and then use ◀/▶ buttons to select the OPTION icon. b. Press the ▲/▼ buttons to select the SET ID Menu. c. Press the ENTER button and then use ◀/▶ buttons to select SET ID options. d. Press EXIT button to return to monitor viewing or press MENU button to return to the previous menu. www.gpodisplay.com 15 Panoramic Display User manual 3) Slide Show Option) [ Option ] 3-1) Slide Show Option Menu – Show Time (Slide Show Time) a. Press the MENU button and then use ◀/▶ buttons to select the OPTION icon. b. Press the ▲/▼ buttons to select the Slide Show Option Menu. c. Press the ENTER button and then use ▲/▼ buttons to select the Show Time Menu. d. Press the ◀/▶ buttons to set Show Time options. e. Press EXIT button to return to monitor viewing or press MENU button to return to the previous menu. 3-2) Slide Show Option Menu – Show Time (Show Effect) a. Press the MENU button and then use ◀/▶ buttons to select the OPTION icon. b. Press the ▲/▼ buttons to select the Slide Show Option Menu. c. Press the ENTER button and then use ▲/▼ buttons to select the Show Effect Menu. d. Press the ◀/▶ buttons to set Show Effect options. e. Press EXIT button to return to monitor viewing or press MENU button to return to the previous menu. www.gpodisplay.com 16 Panoramic Display User manual 4) Dimming Control [Option] 4-1) Dimming -Automatic dimming controls by light sensor in Dimming menu. a. Press the MENU button and then use ◀/▶ buttons to select the OPTION icon. b. Press the ▲/▼ buttons to select the Dimm Control Menu. c. Press the ENTER button and then use ▲/▼ buttons to select the Dimming Menu. d. Press the ▲/▼,◀/▶ buttons to set Dimming options. e. Press EXIT button to return to monitor viewing or press MENU button to return to the previous menu. 4-1-1) Dimming Menu – Auto Dimming (Light Ambient Sensor Option only) -Enables/disables auto dimming control by light ambient sensor a. Press the MENU button and then use ◀/▶ buttons to select the OPTION icon. b. Press the ▲/▼ buttons to select the Dimm Control Menu. c. Press the ENTER button and then use ▲/▼ buttons to select the Dimming Menu. d. Press the ▲/▼ buttons to select the Auto Dimming functions. e. Press the ◀/▶ buttons to set Auto Dimming options. f. Press EXIT button to return to monitor viewing or press MENU button to return to the previous menu. ON : Dim level is adjusted by light sensor OFF : Dim level is adjusted by manual control www.gpodisplay.com 17 Panoramic Display User manual 4-1-2) Dim Level – Auto Dimming - off -Controls Inverter dimming level – Inverter brightness control. a. Press the MENU button and then use button to select the OPTION icon. b. Press the ▲/▼ buttons to select the Dimm Control Menu. c. Press the ENTER button and then use ◀/▶ buttons to select the Dimming Menu. d. Press the ▲/▼ buttons to select the Level functions. e. Press the ◀/▶ buttons to set Level functions. f. Press EXIT button to return to monitor viewing or press MENU button to return to the previous menu 4-1-3) Dimming Menu – MAX Ambient (Light Ambient Sensor Option only) -Adjusts detected light ambient to set the maximum dimming a. Press the MENU button and then use ◀/▶ buttons to select the OPTION icon. b. Press the ▲/▼ buttons to select the Dimm Control Menu. c. Press the ENTER button and then use ▲/▼ buttons to select the Dimming Menu. d. Press the ▲/▼ buttons to select the Max Ambient functions. e. Use ◀/▶ buttons to set detected light ambient value by LUX unit. f. Press EXIT button to return to monitor viewing or press MENU button to return to the previous menu. 4-1-4) Dimming Menu – MIN Ambient (Light Ambient Sensor Option only) ) -Adjusts detected ambient light level at which to set the minimum dimming value a. Press the MENU button and then use ◀/▶ buttons to select the OPTION icon. b. Press the ▲/▼ buttons to select the Dimm Control Menu. c. Press the ENTER button and then use ▲/▼ buttons to select the Dimming Menu. d. Press the ▲/▼ buttons to select the Min Ambient functions. e. Use ◀/▶ buttons to set detected light ambient value by LUX unit. f. Press EXIT button to return to monitor viewing or press MENU button to return to the previous menu. www.gpodisplay.com 18 Panoramic Display User manual 5) Heat Control -Automatic Fan controls activated by internal/external temperature sensor a. Press the MENU button and then use ◀/▶ buttons to select the OPTION icon. b. Press the ▲/▼ buttons to select the Fan Control Menu. c. Press the ENTER button and then use ▲/▼,◀/▶ buttons to set Heat Control options. d. Press EXIT button to return to monitor viewing or press MENU button to return to the previous menu 5-1) Fan Control Menu -Controls fan driving option by temperature sensor / force on / force off a. Press the MENU button and then use ◀/▶ buttons to select the OPTION icon. b. Press the ▲/▼ buttons to select the Fan Control Menu. c. Press the ENTER button and then use ▲/▼ buttons to select the Fan Control functions. d. Press the ◀/▶ buttons to set Off, On, Auto options. e. Press EXIT button to return to monitor viewing or press MENU button to return to the previous menu. 5-2) Fan Control Menu – Active Temperature -Adjusts fan driving temperature by degrees Celsius. It works only when the Fan Control setting is Auto. a. Press the MENU button and then use ◀/▶ buttons to select the OPTION icon. b. Press the ▲/▼ buttons to select the Fan Control Menu. c. Press the ENTER button and then use ▲/▼ buttons to select the Active Temperature Menu. d. Use ◀/▶ buttons to set fan driving temperature by Celsius degree unit. e. Press EXIT button to return to monitor viewing or press MENU button to return to the previous menu. www.gpodisplay.com 19 Panoramic Display User manual 5-3) Fan Control Menu – Hysteresis -Adjusts fan driving hysteresis temperature by degrees Celsius. a. Press the MENU button and then use ◀/▶ buttons to select the OPTION icon. b. Press the ▲/▼ buttons to select the Fan Control Menu.. c. Press the ENTER button and then use ▲/▼ buttons to select the Hysteresis Menu. d. Use ◀/▶ buttons to set fan driving hysteresis temperature by Celsius degree unit. e. Press EXIT button to return to monitor viewing or press MENU button to return to the previous menu. 5-4) Fan Control – Shutdown Temperature - Adjusts shutdown mode temperature by degrees Celsius. When current temperature reaches the shutdown temp, the monitor enters shutdown mode. a. Press the MENU button and then use ◀/▶ buttons to select the OPTION icon. b. Press the ▲/▼ button to select the Heat Control Menu.. c. Press the ENTER button and then use ▲/▼ buttons to select the Shutdown Temperature Menu. d. Use ◀/▶ buttons to set fan driving hysteresis temperature by degrees Celsius. e. Press EXIT button to return to monitor viewing or press MENU button to return to the previous menu. 5-5) Fan Control – Current temperature Displays current detected main sensor’s temperature and auxiliary sensor’s (option) temperature Read Only. 6) Reset Resets user setting values as default a. Press the MENU button and then use ◀/▶ buttons to select the OPTION icon. b. Press the ▲/▼ buttons to select Restore Factory Default menu c. Press the ENTER button and then use ▲/▼ button to make a selection in the Are you sure? menu. d. Press the ◀/▶ buttons and then monitor’s www.gpodisplay.com 20 Panoramic Display User manual 7) Adjusting the transparency of OSD Adjusting the transparency of OSD. a. Press the MENU button and then use ◀/▶ button to select the OPTION icon. b. Press the ▲/▼ button to select Blending menu c. Press the ENTER button to select the Details Menu. ; Off, Low, Middle, High 8) OSD Duration Adjusting the keep the time OSD. a. Press the MENU button and then use ◀/▶ button to select the OPTION icon. b. Press the ▲/▼ button to select OsdDuration menu c. Press the ENTER button to select the Details Menu : Off, 5sec, 10sec, 15sec 9) Software Update (USB) When downloading software via USB memory.a. Press the MENU button and then use Must be new version software (merge.bin) in USB memory www.gpodisplay.com 21 Panoramic Display User manual 8. Clock Menu 1) Time Settings Enables user to set up the clock information 1-1) Clock If current time setting is wrong, reset the clock manually a. Press the MENU button and then use ◀/▶ buttons to select the TIME icon. b. Press the ENTER button and then use ▲/▼ buttons to select Clock. c. Press the ▲/▼ buttons to select the Hour, Minute. d. Use ◀/▶ buttons to adjust clock. e. Press EXIT button to return to monitor viewing or press MENU button to return to the previous menu. www.gpodisplay.com 22 Panoramic Display User manual 2) On Timer Timer function operates only if current time has been set. a. Press the MENU button and then use ◀/▶ buttons to select the TIME icon. b. Press the ▲/▼ button to select On Timer. c. Press the ENTER button and then use ◀/▶ buttons to select the On, Off. d. Use ▲/▼ buttons, ◀/▶ buttons to adjust on time schedule and activation. e. Press EXIT button to return to monitor viewing or press MENU button to return to the previous menu. 3) Off Timer Timer function operates only if current time has been set. a. Press the MENU button and then use ◀/▶ buttons to select the TIME icon. b. Press the ENTER button and then use ▲/▼ buttons to select Off Timer. c. Press the ▶ button and then use ◀/▶ buttons to select the On, OFF. d. Use ▲/▼ buttons, ◀/▶ buttons to adjust off time schedule and activation. e. Press EXIT button to return to monitor viewing or press MENU button to return to the previous menu. www.gpodisplay.com 23 Panoramic Display User manual 9. Media Player 1) Select the input signal (USB) a. b. Press the SOURCE button and then ▲/▼ button to select USB source. b. Press the ENTER button to go to desired USB source 2) USB Menu a. Press ◀/▶ button to select the desired menu icon using remote control. b. After selecting the menu, press the ENTER button. c. Using ◀/▶ button in the remote control to select the content to play. d. To go back to the previous menu, press ◀/▶ button then select Return item and then press ENTER button. e. To exit from the Menu, press SOUTCE button in the remote control and change the input source. Press the ENTER button to see the Play menu. * The menu will be showed during playing the contents * To Auto play, save the content (Video & Photo) in the memory USB stick and turn power off and on the monitor. www.gpodisplay.com 24 Panoramic Display User manual 10 . Notes on Content Creation Update Content Guidelines using USB memory To use the USB Memory stick, make sure it is formatted. The USB memory stick should not have any other file except the files that will be played. If there are any unrelated files, there may be interruptions. If the content format is not supported by the media board, it will not play the content. This type is Recommended. X www.gpodisplay.com 25 Panoramic Display User manual 11. Supporting Media Spec Video File Extension Container Codec Maximum Resolution Bit rate dat, mpg, mpeg MPG, MPEG MPEG1,2 1080P 30fps 20M bit ts,trp,tp,m2ts MPEG2-TS MPEG2,H.264 1080P 30fps 20M bit vob MPEG2-PS MPEG2 1080P 30fps 20M bit AV(1.0,2.0) MPEG2,XviD 1.00, XviD 1.01, XviD 1.02, XviD 1.03, XviD 1.10-beta1/2 H.264 1080P 30fps 20M bit avi Audio Codec File Extension Bit rate MPEG1 Layer2 MP3 32Kbps ~ 448Kbps (Bit rate) 32KHz ~ 48KHz (Sampling rate) MPEG1 Layer3 MP3 32Kbps ~ 320Kbps (Bit rate) 32KHz ~ 48KHz (Sampling rate) AAC M4A/AAC 24Kbps ~ 384Kbps (Bit rate) 8KHz ~ 48KHz (Sampling rate) OGG Vorbis free format (Bit rate) ~48KHz (Sampling rate) only support stereo decoding Image Photo Size Base-line 15360 X 8704 (1920x8 X 1088x8) Progressive 1024 X 768 non-interlace 9600 X 6400 interlace 1200 X 800 . 9600 X 6400 JPEG Photo PNG BMP www.gpodisplay.com 26 Panoramic Display User manual 12. Supporting Timing PC Modes Display Mode Horizontal Frequency(KHz) Vertical Frequency(Hz) Pixel Clock (MHz) Sync Polarity (H/V) IBM, 640 x 480 31.469 59.940 25.175 -/- IBM, 720 x 400 31.469 70.087 28.322 -/- VESA, 640 x 480 37.861 72.809 31.500 -/- VESA, 640 x 480 37.500 75.000 31.500 -/- VESA, 640 x 480 43.269 85.008 36.000 -/- VESA, 800 x 600 35.156 56.250 36.000 +/+ VESA, 800 x 600 37.879 60.317 40.000 +/+ VESA, 800 x 600 48.077 72.188 50.000 +/+ VESA, 800 x 600 46.875 75.000 49.500 +/+ VESA, 800 x 600 53.674 85.061 56.250 +/+ VESA, 1024 x 768 48.363 60.004 65.000 -/- VESA, 1024 x 768 56.476 70.069 75.000 -/- VESA, 1024 x 768 60.023 75.029 78.750 +/+ VESA, 1152 x 864 67.500 75.000 108.000 +/+ VESA, 1280 x 960 60.000 60.000 108.000 +/+ VESA, 1280 x 1024 63.981 60.020 108.000 +/+ VESA, 1280 x 1024 79.976 75.025 135.000 +/+ 1366 x 768 47.712 60.015 85.500 +/+ 1920 x 1080 67.500 60.000 148.500 +/+ 1920 x 1200 74.000 60.000 154.000 +/- Display Mode Horizontal Frequency(KHz) Vertical Frequency(Hz) Pixel Clock (MHz) Sync Polarity (H/V) 720x480 15.735 59.94 13.500 Interlaced 720x576 15.735 50.00 13.595 Interlaced 720x480 31.469 59.94 25.175 720x576 31.250 50.00 26.566 1280x720 44.964 59.94 74.176 1280x720 37.500 50.00 60.466 1920x1080 33.750 60.00 74.25 Interlaced 1920x1080 28.125 50.00 70.723 Interlaced 1920x1080 31.250 50.00 72.000 Interlaced 1920x1080 67.500 60.00 148.500 Progressive 1920x1200 74.000 60.00 154.000 Progressive DTV Modes www.gpodisplay.com 27 Panoramic Display