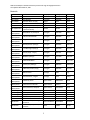
1
2010
Dual-Labeled Expression-Tiling Microarray
Protocol for Empirical Annotation of Genome
Sequences
Jacqueline A. Lopez & John K. Colbourne
CGB Technical Report 2010-02 doi:???/cgbtr-201002
CGB Technical Report 2010-02: Microarray Protocol for High-Throughput Genomics
Last updated: December 16, 2010
Introduction
The utilization of microarrays for empirical annotation of a genome and differential gene
expression analysis focuses on protein-encoding RNA of Prokaryote and Eukaryote systems.
Currently, our workflow measures gene expression, while simultaneously providing empirical
evidence for gene annotation, from test and reference samples of Eukaryote systems by dualcolor microarray hybridization. The workflow is designed to detect steady-state gene expression
levels from limited samples. Briefly, RNA is obtained from the biological source of interest and
processed to stable labeled targets for microarray hybridization, from which a high-resolution
image is recorded and signal intensities are extracted and documented for analysis. First, Total
RNA is extracted from the biological source with the use of organic solvents and purified with a
silica-based centrifugation column, coupled with on-column Dnase I treatment. Next, T7-based
RNA amplification technique allows for linear amplification of polyA+ RNA from the limited
sample. Then, double-stranded cDNA amplification technique converts the amplified RNA into a
suitable intermediate for random primer labeling. After that, NimbleGen Systems Hybridization
technique allows for uniform hybridization of the labeled targets to produce high interarray
correlations between replicate hybridizations. Subsequently, array scanning excites the
fluorescent dyes to record a high-resolution image file, from which NimbleScan Software
extracts quantifiable data for analysis. At the completion of the procedure, data is presented in a
format suitable for normalization and comparative analysis.
Precautions
Laboratory safety. It is assumed that users have a sound knowledge of molecular biology
techniques and safe laboratory practices. Before undertaking a new protocol or using unfamiliar
reagents, users should review relevant Material Safety Data Sheets to identify potential hazards
and recommended precautions. For background in general molecular biology please see
Molecular Cloning A Laboratory Manual, J. Sambrook and D. W. Russell. Cold Spring Harbor
Laboratory Press.
1
CGB Technical Report 2010-02: Microarray Protocol for High-Throughput Genomics
Last updated: December 16, 2010
Materials
Application
RNA Isolation
RNA Isolation
RNA Isolation
RNA Isolation
RNA Isolation
Item Name
Company
Chloroform
EMD Chemicals
TRIzol Reagent
Invitrogen
Rnase-free Dnase set (50)
Qiagen
Qiagen
RNeasy Mini Kit
Disposable pestles; 1.5mL, Plastic VWR
MessageAmp II aRNA Amplification
RNA amplification
Ambion
Kit (Part one & two)
Double-stranded
100mM dNTP set, 4x25µmol
Invitrogen
cDNA Synthesis
Double-stranded
5X Second Strand Buffer
Invitrogen
cDNA Synthesis
Double-stranded ChargeSwitch PCR Clean-Up Kit
Invitrogen
cDNA Synthesis
Double-stranded
DNA Polymerase I (10U/µl)
Invitrogen
cDNA Synthesis
Double-stranded
E. coli DNA Ligase (10U/µl)
Invitrogen
cDNA Synthesis
Double-stranded
Rnase H (2U/µl – 5U/µl)
Invitrogen
cDNA Synthesis
Double-stranded
RNASEOUT (40U/µl)
Invitrogen
cDNA Synthesis
Double-stranded
RT-PCR Grade Water
Invitrogen
cDNA Synthesis
Double-stranded
SuperScript II (200U/µl)
Invitrogen
cDNA Synthesis
Double-stranded
T4 DNA Polymerase (5U/µl)
Invitrogen
cDNA Synthesis
Double-stranded
Random Primer
Promega
cDNA Synthesis
Double-stranded
Rnase A Solution, 4 mg/ml
Promega
cDNA Synthesis
Double-stranded
0.5M EDTA, pH 8.0
Sigma-Aldrich
cDNA Synthesis
Double-stranded
7.5M Ammonium Acetate
Sigma-Aldrich
cDNA Synthesis
Double-stranded
Ethanol, Absolute, 200 proof
Sigma-Aldrich
cDNA Synthesis
DNA labeling
NimbleGen Dual-Color Labeling Kit Roche NimbleGen
DNA labeling
β-Mercaptoethanol
Sigma-Aldrich
DNA labeling
Isopropanol
Sigma-Aldrich
Hybridization
NimbleGen Hybridization Kit, LS
Roche NimbleGen
Hybridization
NimbleGen Wash Buffer Kit
Roche NimbleGen
NimbleGen Array Processing
Hybridization
Roche NimbleGen
Accessories
Microman Capillary Pistons, CP100,
Hybridization
Gilson
nonsterile
2
Catalog Number
CX1055-6
15596-026
79254
Unit Size
500 ml
100 ml
50 rxn
74104
50 rxn
KT749521-1590
100 Units
AM1751
20 rxn
10297-018
1000 µl
10812-014
500 µl
CS12000
100 rxn
18010-025
1000 Units
18052-019
100 Units
18021-071
120 Units
10777-019
5000 Units
AM9935
1.5 ml x 10
18064-014
10000 Units
18005-025
250 Units
C1181
20 µg
A7973
1000 µl
E7889-100mL
100 ml
A2706-1L
1 liter
E7023-500mL
500 ml
05223547001
M3148-25mL
I9516-500mL
05583934001
05584507001
20 rxn
25 ml
500 ml
40 slides
10 uses
05223539001
unlimited
F148412
192 tips
CGB Technical Report 2010-02: Microarray Protocol for High-Throughput Genomics
Last updated: December 16, 2010
Hybridization
Water, Reagent grade, ACS,
nonsterile, Type I
VWR
RC91505
Hybridization
Kimwipe
Cole-Parmer
EW-33670-04
Hybridization
QA
Supplies
Forceps
Multiple vendors
Agilent RNA 6000 Nano Kit
Agilent
Rnase Zap
Ambion
UltraPure Dnase/Rnase-Free
Invitrogen
Distilled water
PCR strip w/ cap (8 tubes/strip)
VWR
Premium Research Microcentrifuge
MIDSCI
tubes (1.5 ml)
Molecular
ART 10
BioProducts
Molecular
ART 20P
BioProducts
Molecular
ART 200
BioProducts
Molecular
ART 1000E
BioProducts
Supplies
Supplies
Supplies
Supplies
Supplies
Supplies
Supplies
3
20 L
--5067-1511
AM9780
280 x 60
boxes
--25 chips
250 mL
10977-015
500 mL
20170-004
125 strips
AVSS1700
1,000 Units
2139
960 Tips
2149P
960 Tips
2069
960 Tips
7029E
800 Tips
CGB Technical Report 2010-02: Microarray Protocol for High-Throughput Genomics
Last updated: December 16, 2010
Equipment
Application
Sample Processing
Sample Processing
Sample Processing
Sample Processing
Item Name
Mastercycler® gradient
Microcentrifuge 5424
Microcentrifuge 5415 R
Vacuum Centrifuge
Company
Eppendorf
Eppendorf
Eppendorf
Multiple vendors
Catalog Number
5331 000.010
22620401
5425 725.000
---
Sample Processing Microcentrifuge
Multiple vendors ---
Sample Processing
Sample Processing
Sample Processing
Hybridization
Hybridization
Multiple vendors
Multiple vendors
Invitrogen
Glison
Roche NimbleGen
Hybridization
Hybridization
Hybridization
Hybridization
QA
QA
QA
QA
Software
Software
Software
Software
Heat block
Water bath
MagnaRack Magnetic Rack
Microman M100 Pipette
Hybridization System 4 (110V)
Precision Mixer Alignment Tool
(PMAT)
Disassembly tool
Capacity /
Version
0.2ml x 96
1.5ml x 24
1.5ml x 24
1.5ml x 24
1.5ml x 8&
PCR strip
1.5ml x 24
20 L
1.5ml x 12
--4 slides
----CS15000
F148504
5223652001
Included with hyb
Roche NimbleGen
1 slide
system
Included with hyb
Roche NimbleGen
1 slide
systems
NimbleGen MS 200 Microarray
Roche NimbleGen
Scanner
Microarray High Speed Centrifuge ArrayIT
NanoDrop 1000
ThermoScientific
Bioanalyzer 2100
Agilent
Chip Priming Station
Agilent
IKA Vortex Chip Adapter
Agilent
NimbleGen MS 200 Data Collection
Roche NimbleGen
Software
NimbleScan
Roche NimbleGen
NanoDrop 1000 Software
ThermoScientific
Bioanalyzer Software
Agilent
4
05 394 341 001
48 slides
MHC110V
SID-10135606
G2938C
5065-4401
5065-9966
1 Slide
1 sample
1 chip
1 chip
1 chip
---
1.1
05 933 315 001- 2.6
--2.5
G2941AA
B.02.05
CGB Technical Report 2010-02: Microarray Protocol for High-Throughput Genomics
Last updated: December 16, 2010
Workflow
5
CGB Technical Report 2010-02: Microarray Protocol for High-Throughput Genomics
Last updated: December 16, 2010
Thermocycler Programs
MessageAmp II aRNA Amplification
1)
2)
3)
4)
70°C
42°C
16°C
37°C
for
for
for
for
10
60
60
60
minutes, lid temperature 105°C
minutes x 2, lid temperature 50°C
minutes x 2, heated-lid off
minutes x 6, lid temperature 105°C; 4°C Hold
Double-stranded cDNA Synthesis
1) 70°C for 10 minutes, lid temperature 105°C
2) 42°C for 60 minutes, lid temperature 50°C
3) 16°C for 60 minutes x 2, heated-lid off, then “Pause“, followed by 16°C for 5
minutes, heated-lid off, and finally 4°C Hold
4) 37°C for 10 minutes, lid temperature 105°C
Random Primer Labeling
1) 98°C for 10 minutes, lid temperature 105°C
2) 37°C for 60 minutes x 2, lid temperature 105°C
Quality Assessment (QA)
1) 70°C for 2 minutes, lid temperature 105°C
6
CGB Technical Report 2010-02: Microarray Protocol for High-Throughput Genomics
Last updated: December 16, 2010
References
1. (2003). Agilent 2100 Bioanalyzer. 2100 Expert User's Guide, Agilent. Publication Number:
G2946-90004
2. (2009). NimbleGen MS 200 Microarray Scanner Operator’s Manual, Roche NimbleGen
(http://www.nimblegen.com/lit/).
3. (2006). Agilent RNA 6000 Nano Kit Guide, Agilent. Publication Number: G2938-90034
4. (2006). MessageAmp II aRNA Amplification. Instruction Manual, Ambion.
5. (2006). RNeasy Mini Handbook. RNeasy Mini Kit, QIAGEN.
6. (2007). ND-1000 Spectrophotometer. V3.5 User's Manual, NanoDrop Technologies.
7. (2010). NimbleScan Software User's Guide, Roche NimbleGen (http://www.nimblegen.com/lit/).
8. (2007). TRIzol Reagent, Invitrogen.
9. (2010). NimbleGen Arrays User's Guide: CGH Analysis, Roche NimbleGen
(http://www.nimblegen.com/lit/).
10.(2008). SuperScript Double-stranded cDNA Synthesis Kit, Invitrogen.
11.(2010). NimbleGen Arrays User's Guide: Expression Analysis (http://www.nimblegen.com/lit/).
12.(2010). NimbleGen Hybridization Systems User's Guide, Roche NimbleGen
(http://www.nimblegen.com/lit/).
13.J. Sambrock and D.W. Russell. Molecular Cloning: A Laboratory Manual. Cold Spring Harbor
Laboratory Press.
14.Russell N. Van Gelder, M. E. V. Z., Andrea Yool, William C. Dement, Jack D. Barchas, and
James H. Ederwine (1990). "Amplified RNA synthesized from limited quantities of
heterogeneous cDNA." Biochemistry 87: 1663-1667.
Acknowledgements
This work was supported in part by the Indiana METACyt Initiative of Indiana University,
funded in part through a major grant from the Lilly Endowment, Inc.
Portions of the microarray processing and analysis protocols provided in this document are
courtesy of Roche NimbleGen, Inc. NimbleGen microarrays are intended for life science
research only and are not for use in diagnostic procedures. The protocol was developed by the
authors of this document and it is not standard for processing NimbleGen Catalog Gene
Expression microarrays.
We thank Tsetska Takova (Director, Global Marketing, Arrays and Reagents at Roche
NimbleGen, Inc.) and Kary Staples (Manager, Global Marketing Communications, at Roche
NimbleGen, Inc) for help in creating this training manual, and Jennifer Steinbachs (CGB) for
help with formatting.
7
CGB Technical Report 2010-02: Microarray Protocol for High-Throughput Genomics
Last updated: December 16, 2010
Total RNA Extraction and Purification
Introduction
The utilization of microarrays for gene expression analysis requires the extraction of RNA from
a biological source of interest, either from a Prokaryote or Eukaryote source. We describe this
procedure in detail along with RNA quality assessment measures. Briefly, Total RNA is
extracted from the biological source with the use of organic solvents. The extracted Total RNA is
purified with a silica-based centrifugation column. The addition of on-column based Dnase I
digestion facilitates the removal of genomic DNA contamination. At the completion of the
procedure, use of a spectrophotometer and microfluidic capillary electrophoresis assesses the
quality of the purified Total RNA.
Precautions
Laboratory safety. It is assumed that users have a sound knowledge of molecular biology
techniques and safe laboratory practices. Before undertaking a new protocol or using unfamiliar
reagents users should review relevant Material Safety Data Sheets to identify potential hazards
and recommended precautions. For background in general molecular biology please see
Molecular Cloning A Laboratory Manual, J. Sambrook and D. W. Russell. Cold Spring Harbor
Laboratory Press.
Caution. TRIzol Reagent, a phenol-based solution, is toxic when in contact with skin or if
swallowed. After contact with skin, wash the area immediately with plenty of detergent and
water. This solution should be handled with caution.
Prevent excessive Rnase exposure. As with all steps involved in RNA isolation, it is essential to
avoid latex glove. Use only powder-free nitrile gloves. It is likewise important to guard against
sources of dust and nucleases. We recommend using Dnase- and Rnase-free plastics, including
barrier pipette tips. In addition, decontaminate both workspaces and pipettes with RNase Zap,
according to manufacturer’s instructions.
Instrument Setup:
1. Chill a refrigerated centrifuge to 4°C.
2. Equilibrate TRIzol Reagent to room temperature for at least 1-hour prior to use.
Sample Preparation Setup:
1. For each sample,
1.1. Labeled 1 x 1.5ml Rnase-free microcentrifuge tube
1.2. Labeled 1 x 1.5ml RNeasy collection tube
1.3. Labeled 1 x RNeasy mini-spin column, plus an additional 2ml collection tube
1.4. Rnase-free Dnase Kit: Add 35μl of RDD Buffer to 5μl of Dnase I stock solution. Mix
by gently pipetting. Store at 4°C for up to one day.
2. Rnase-free Dnase Kit: Reconstitute lyophilized Dnase I as directed by manufacturer.
3. RNeasy Mini Kit: Add Ethanol, 100% Soln, to Buffer RPE as directed by manufacturer.
4. All centrifugation steps are at room temperature, unless otherwise noted.
5. Remove the frozen tissue samples from -80°C storage. Keep on dry ice until ready to perform
extraction procedure.
8
CGB Technical Report 2010-02: Microarray Protocol for High-Throughput Genomics
Last updated: December 16, 2010
Procedure
1. Add 500μl of TRIzol Reagent directly to the tube containing the frozen tissue sample.
Immediately homogenize tissue. Grind tissue using disposable blue pestle. After tissue has
been completely homogenized, add another 500μl of TRIzol Reagent to the tube containing
the homogenized tissue. Incubate mixture at least 5 minutes at room temperature to ensure
complete dissociation of nucleoprotein complexes. Repeat step 1 for the remaining frozen
tissue samples to be processed. Continue to step 2 after all tissue samples have been
homogenized.
2. Add 200μl of Chloroform to each sample. Vigorously shake the mixture for 15 seconds. Do
not vortex.
3. Centrifuge the mixture for 15 minutes at 4°C at 11,600 rcf (< 12,000 x g).
4. Transfer upper, aqueous phase (approx. 400μl) to labeled Rnase-free 1.5ml Rnase-free
microcentrifuge tube (supplied by user).
5. Precipitate RNA by adding 0.5 volume (approx. 200μl) of Absolute Ethanol, 100% Soln.
6. Gently pipette 4 times to mix, and flick tube 3 times. Transfer precipitated RNA from the
previous step to the labeled RNeasy mini-spin column. Proceed immediately. Degradation
and acidification of RNA can occur with prolonged expose at this point.
Maximum loading volume
700μl
Maximum binding capacity
100μg
7. Centrifuge the column for 30 seconds at 10,000 rcf. Discard flow through. Replace column
into same 2mL collection tube.
8. On-Column Dnase Treatment: Wash the column with 350μl of Buffer RW1. Centrifuge the
column for 30 seconds at 10,000 rcf. Discard flow through. Replace column into same 2mL
collection tube. Pipette the Dnase I/RDD Buffer mixture (40μl) directly onto the RNeasy
silica-gel membrane of the RNeasy column. Incubate for 10 minutes at room temperature.
Wash the column with another 350μl of Buffer RW1. Centrifuge the column for 30 seconds
at 10,000 rcf. Discard flow through. Replace column into same 2mL collection tube.
9. Wash the column with 500μl of Buffer RPE. Centrifuge the column for 30 seconds at 10,000
rcf. Discard flow through. Replace column into same 2mL collection tube.
10. Wash the column with another 500μl of Buffer RPE. Centrifuge the column for 30 seconds at
10,000 rcf. Discard flow through. Place column in a NEW 2mL collection tube.
11. Centrifuge for 2 minutes at 10,000 rcf. Transfer the column to the labeled 1.5ml collection
tube (supplied in Rneasy kit).
12. To elute, pipette 30μl of Rnase-free water directly onto silica-gel membrane of the column.
Incubate for 1 minute at room temperature.
13. Centrifuge the column for 1 minute at 10,000 rcf.
14. The elutate now contains purified Total RNA.
ST OP POI NT : Samples may be stored at -80°C until quality assessment is completed.
9
CGB Technical Report 2010-02: Microarray Protocol for High-Throughput Genomics
Last updated: December 16, 2010
15. Determine concentration with NanoDrop. See section NanoDrop Protocol for NimbleGen
Microarray.
16. Determine integrity using BioAnalyzer / RNA 6000 Nano kit. See section Bioanalyzer RNA
Protocol for NimbleGen Microarray.
ST OP POI NT : Samples may be stored at -80°C until ready for processing.
10
CGB Technical Report 2010-02: Microarray Protocol for High-Throughput Genomics
Last updated: December 16, 2010
MessageAmp II aRNA Amplification
Introduction
The utilization of microarrays for transcription analysis requires large amounts of RNA from a
biological source of interest. T7-based RNA Amplification technique, originally developed in the
laboratory of James Eberwine (Russell N. Van Gelder 1990), allows for linear amplification of
polyA+RNA from limited samples to produce enough material for microarray hybridizations.
Procedures have been adapted to be compatible with Prokaryote or Eukaryote systems. The
protocol described here was adapted from Ambion’s MessageAmp II Amplification kit for
amplification of polyA+RNA from Eukaryote systems. We describe this procedure in detail
along with RNA quality assessment measures. Briefly, Total RNA is reverse transcribed with a
T7 Oligo dT primer to synthesis first-strand cDNA. T7 promoter site is completed by second
strand cDNA synthesis. The RNA Polymerase driven in vitro transcription converts the doublestranded cDNA with T7 RNA Polymerase promoter site into the final product, amplifiedantisense RNA (aRNA). At the completion of the procedure, use of a spectrophotometer and
microfluidic capillary electrophoresis assesses the quality of the purified aRNA.
Precautions
Laboratory safety. It is assumed that users have a sound knowledge of molecular biology
techniques and safe laboratory practices. Before undertaking a new protocol or using unfamiliar
reagents users should review relevant Material Safety Data Sheets to identify potential hazards
and recommended precautions. For background in general molecular biology please see
Molecular Cloning A Laboratory Manual, J. Sambrook and D. W. Russell. Cold Spring Harbor
Laboratory Press.
Caution. Ambion’s aRNA binding Buffer, containing beta-mercaptoethanol, is toxic when in
contact with skin or if swallowed. After contact with skin, wash the area immediately with
copious amounts of water. This solution should be handled with caution.
Prevent excessive Rnase exposure. As per all steps involved in RNA amplification, it is essential
to avoid latex glove. Use only powder-free nitrile gloves. It is likewise important to guard
against sources of dust and nucleases. We recommend using Dnase- and Rnase-free plastics,
including barrier pipette tips. In addition, decontaminate both workspaces and pipettes with
RNase Zap, according to manufacturer’s instructions.
Instrument Setup:
Reverse Transcription to Synthesize First Strand cDNA
Instrument Setup
1. Program MasterCycler/Thermocycler
1.1. 70°C for 10 minutes, lid temperature 105°C
1.2. 42°C for 60 minutes x 2, lid temperature 50°C
11
CGB Technical Report 2010-02: Microarray Protocol for High-Throughput Genomics
Last updated: December 16, 2010
Sample Preparation Setup
1. Thaw the following reagents from MessageAmp II aRNA Amplification Kit (part two):
1.1. ON ICE: T7 Oligo dT Primer, dNTP mix
1.2. ROOM TEMP: 10X First Strand Buffer
2. Prepare
2.1. Labeled 1 x 1.5ml microcentrifuge tube for First Strand Master Mix
2.2. Labeled 0.2ml thin-walled PCR tube for each sample
3. All centrifugation steps are at room temperature, unless otherwise noted.
4. Remove the Total RNA samples from -80°C storage. Keep on dry ice until ready to proceed
with RNA amplification.
Procedure
1. Prepare first strand RNA/primer mixture in a 0.2ml PCR tube.
Component
Amount
Total RNA
0.25μg – 1.5μg
Primer
1.0μl
Nuclease-Free water
To final volume
Total Volume
12.0μl
2. Incubate RNA/Primer mixture for 10 minutes at 70°C. Immediately, remove the RNA/primer
mixture from the thermocycler and chill for 2 minutes in an ice-bath. Centrifuge briefly.
Keep on ice.
MasterCycler
70°C 10min
3. At room temperature, prepare first strand master mix in a 1.5ml microcentrifuge tube labeled
First Strand Master Mix.
Component provided in kit
part 2
10X First Strand Buffer
Amountplus 0.05% for
error
2.10μl
dNTP Mix
4.20μl
RNase Inhibitor
1.05μl
ArrayScript
1.05μl
Total Volume
8.40μl
4. Gently pipette the First Strand Master Mix 4 times and flick 3 times to mix. Centrifuge
briefly. Keep at room temperature.
5. Transfer RNA/primer mixture to room temperature. Add 8μl first stand master mix to each
tube (20μl total volume). Gently pipette the reaction 4 times and flick 3 times to mix.
Centrifuge briefly.
6. Incubate for 2 hours at 42°C, lid temperature 50°C.
12
CGB Technical Report 2010-02: Microarray Protocol for High-Throughput Genomics
Last updated: December 16, 2010
MasterCycler
42°C, 2hr
7. Remove the reaction from the thermocycler. Centrifuge briefly. Place reaction on ice.
Immediately proceed to second strand cDNA synthesis.
Second Strand cDNA Synthesis
Instrument Setup
1. Program MasterCycler/Thermocycler
1.1. 16°C for 60 minutes x 2, heated-lid off
Sample Preparation Setup
1. Thaw the following reagents from MessageAmp II aRNA Amplification Kit (part two):
1.1. ON ICE: Nuclease-free water, 10X Second Strand Buffer, dNTP mix
2. Prepare
2.1. Labeled 1x 1.5ml microcentrifuge tube for Second Strand Master Mix
3. All centrifugation steps are at room temperature, unless otherwise noted.
Procedure
1. Prepare second strand master mix on ice in a 1.5ml microcentrifuge tube labeled Second
Strand Master Mix.
Component provided in kit
part 2
Amount plus 0.05% for
error
Nuclease Free water
66.15μl
10X Second Strand Buffer
10.50μl
dNTP Mix
4.20μl
DNA Polymerase
2.10μl
RNase H
1.05μl
Total
84.0μl
2. Gently pipette the Second Strand Master Mix 4 times and flick 3 times to mix. Centrifuge
briefly. Keep on ice.
3. Add 80μl second strand master mix to the reaction (100μ l total volume). Gently pipette the
reaction 4 times and flick 3 times to mix. Centrifuge briefly.
4. Incubate for 2 hours at 16°C, heated lid off.
MasterCycler
16°C, 2hr
5. Remove the reaction from thermocycler. Centrifuge briefly. Place the reaction on ice.
ST OP POI NT : Reaction may be stored at -20°C overnight; however, it is better to complete the
cDNA purification before stopping.
13
CGB Technical Report 2010-02: Microarray Protocol for High-Throughput Genomics
Last updated: December 16, 2010
cDNA Purification
Instrument Setup
1. Heat block, 53°C
Sample Preparation Setup
1. MessageAmpII aRNA Amplification Kit (part one):
1.1. cDNA Binding Buffer
1.2. Wash Buffer (ethanol added, as directed by manufacturer)
1.3. Nuclease-free water
1.4. Labeled 1 x 2ml cDNA filter cartridge with cDNA collection tube per sample
1.5. Labeled 1 x 2ml cDNA collection tube per sample
2. If a precipitate is visible in the cDNA Binding Buffer, warm solution to 37°C for up to 10
minutes. Cool to room temperature before use.
3. Prepare
3.1. Labeled 1 x 1.5ml microcentrifuge tube per reaction for precipitation
4. All centrifugation steps are at room temperature, unless otherwise noted.
Procedure
1. Preheat Nuclease-free water to 53°C for at least 10 minutes.
2. Assemble cDNA Filter Cartridges and 2ml cDNA collection tubes.
3. Transfer cDNA reaction to labeled 1.5ml microcentrifuge tube for precipitation.
4. If necessary, adjust cDNA reaction volume to 100μl with Nuclease-free water.
5. Add 250μl of cDNA Binding buffer to cDNA reaction.
6. Pipette the precipitation mixture 4 times to mix, and transfer to the cDNA Filter Cartridge.
Centrifuge for 1 minute at 10,000 rcf. Discard the flow-through. Replace the cDNA Filter
Cartridge in the same collection tube.
7. Wash the column with 500μl Wash Buffer. Centrifuge for 1 minute at 10,000 rcf. Discard the
flow-through. Replace the cDNA Filter Cartridge in the same collection tube.
8. Centrifuge for 1 minute at 10,000 rcf to remove trace amounts of wash buffer. Transfer
cDNA Filter Cartridge to labeled 2ml cDNA collection tube for elution.
9. Add 18μl of Nuclease-free Water (preheated to 53°C) to the center of the filter in the cDNA
Filter Cartridge.
10. Incubate for 2 min at 53°C. Centrifuge for 1.5 minutes at 10,000 rcf.
11. The elutate now contains purified double-stranded cDNA with T7 promoter site.
ST OP POI NT : Samples may be stored at -20°C overnight; however, it is better to proceed to In
Vitro Transcription before stopping.
14
CGB Technical Report 2010-02: Microarray Protocol for High-Throughput Genomics
Last updated: December 16, 2010
In Vitro Transcription
Instrument Setup
1. Program MasterCycler/Thermocycler
1.1. 37°C for 60 minutes x 6, lid temperature 105°C; 4°C Hold
Sample Preparation Setup
1. Thaw the following reagents from MessageAmp II aRNA Amplification Kit (part two):
1.1. ON ICE: T7 ATP Soln, T7 CTP Soln, T7 GTP Soln, T7 UTP Soln
1.2. ROOM TEMP: 10X Reaction Buffer
2. Prepare
2.1. Labeled 1 x 1.5ml microcentrifuge tube for In Vitro Transcription Master Mix
2.2. 0.2ml thin-walled PCR tube for each sample
3. All centrifugation steps are at room temperature, unless otherwise noted.
Procedure
1. Transfer the 16μl ds cDNA with T7 promoter site from previous section to 0.2ml PCR tube.
Centrifuge briefly. Place on ice.
2. Assemble the in vitro transcription master mix in 1.5ml microcentrifuge tube labeled In Vitro
Transcription Master Mix at room temp in the order shown:
Componentprovided in kit
part 2
Amountplus 0.05%
for error
T7 ATP Soln (75mM)
4.2μl
T7 CTP Soln (75mM)
4.2μl
T7 GTP Soln (75mM)
4.2μl
T7 UTP Soln (75mM)
4.2μl
T7 10X Reaction Buffer
4.2μl
T7 Enzyme Mix
4.2μl
Total
25.2μl
3. Transfer ds cDNA with T7 promoter site to room temperature. Add 24μl of in vitro
transcription master mix to each reaction (40μl total volume). Gently pipette the reaction 4 times
and flick 3 times to mix. Centrifuge briefly.
4. Incubate for 6 hours at 37°C, followed by 4°C hold overnight.
MasterCycler
37°C 6hr; 4°C HOLD
5. Remove from thermocycler. Centrifuge briefly. Add 60μl Nuclease-free water to the reaction
(100μl total volume). Flick the reaction 3 times to mix. Centrifuge briefly.
STOP POINT: Reaction may be stored at -80°C overnight until purification; however, it is better
to proceed to aRNA purification before stopping.
15
CGB Technical Report 2010-02: Microarray Protocol for High-Throughput Genomics
Last updated: December 16, 2010
aRNA Purification
Instrument Setup
1. Heat block, 55°C
Sample Preparation Setup
2. MessageAmpII aRNA Amplification Kit (part one):
2.1. aRNA Binding Buffer
2.2. Wash Buffer (ethanol added, as directed by manufacturer)
2.3. Nuclease-free water
2.4. Labeled 1 x 2ml aRNA filter cartridge with collection tube per sample
2.5. Labeled 1 x 2ml aRNA collection tube per sample
3. Prepare
3.1. Labeled 1 x 1.5ml microcentrifuge tube per reaction for precipitation
3.2. Absolute Ethanol, 100% Soln
4. All centrifugation steps are at room temperature, unless otherwise noted.
Procedure
1. Preheat Nuclease-free water to 55°C.
2. Assemble aRNA Filter Cartridges and aRNA collection tubes.
3. Transfer the in vitro transcription reaction to labeled 1.5ml microcentrifuge tube for
precipitation.
4. Add 350μl aRNA Binding Buffer to reaction.
5. Add 250μl Absolute Ethanol, 100% Soln, to reaction. Proceed immediately to the next step.
6. Pipette the precipitation mixture 4 times to mix, and transfer to aRNA Filter Cartridge.
Centrifuge for 1 minute at 10,000 rcf. Discard the flow-through. Replace the aRNA Filter
Cartridge into the same aRNA Collection tube.
7. Wash column with 650μl Wash Buffer. Centrifuge for 1 minute at 10,000 rcf. Discard the
flow-through. Replace the aRNA Filter Cartridge in the same aRNA Collection tube.
8. Centrifuge for 1 minute at 10,000 rcf to remove trace amounts of wash buffer.
9. Transfer aRNA Filter Cartridges to labeled 2ml aRNA Collection tube for elution.
10. Add 100μl Nuclease-Free Water (preheated to 55°C) to the center of the filter of the aRNA
Filter Cartridge.
11. Incubate for 2 minutes at 55°C, and then centrifuge for 1.5 minutes at 10,000 rcf.
12. The elutate now contains purified aRNA.
ST OP POI NT : Samples may be stored at -80°C until quality assessment.
13. Determine concentration with NanoDrop. See section NanoDrop Protocol for NimbleGen
Microarray.
14. Determine integrity using BioAnalyzer / RNA 6000 Nano kit. See section Bioanalyzer RNA
Protocol for NimbleGen Microarray.
ST OP POI NT : Samples may be stored at -80°C until proceeding to next step.
16
CGB Technical Report 2010-02: Microarray Protocol for High-Throughput Genomics
Last updated: December 16, 2010
Double-stranded cDNA Synthesis
Introduction
Double-stranded cDNA Synthesis technique allows for amplification of RNA to produce enough
material suitable for random primer labeling. The protocol described here was adapted from
Invitrogen’s SuperScript Double-Stranded cDNA Synthesis Kit for amplification of aRNA
derived from Eukaryote systems. We describe this procedure in detail along with RNA quality
assessment measures. Briefly, aRNA is primed with random hexamer primer in a reverse
transcription reaction to synthesize first strand cDNA. Second strand cDNA synthesis completes
the strand to produce double-stranded cDNA. In the presence of T4 DNA Polymerase, the
double-stranded cDNA is modified to generate the final product, blunt end double-stranded
cDNA (ds cDNA). At the completion of the procedure, use of a spectrophotometer and
microfluidic capillary electrophoresis assesses the quality of the purified ds cDNA.
Precautions
Laboratory safety. It is assumed that users have a sound knowledge of molecular biology
techniques and safe laboratory practices. Before undertaking a new protocol or using unfamiliar
reagents users should review relevant Material Safety Data Sheets to identify potential hazards
and recommended precautions. For background in general molecular biology please see
Molecular Cloning A Laboratory Manual, J. Sambrook and D. W. Russell. Cold Spring Harbor
Laboratory Press.
Prevent excessive Rnase exposure. As per all steps involved in RNA amplification, it is essential
to avoid latex glove. Use only powder-free nitrile gloves. It is likewise important to guard
against sources of dust and nucleases. We recommend using Dnase- and Rnase-free plastics,
including barrier pipette tips. In addition, decontaminate both workspaces and pipettes with
RNase Zap, according to manufacturer’s instructions.
Reverse Transcription to Synthesize First Strand cDNA
Instrument Setup
1. Program MasterCycler/Thermocycler
1.1. 70°C for 10 minutes. lid temperature 105°C
1.2. 42°C for 60 minutes, lid temperature 50°C
Reagent Setup
1. Prepare 10mM dNTP mix.
1.1. Combine 100μl of each dNTP (dATP, dCTP, dGTP, and dTTP) and bring to a final
volume of 1000μl with Nuclease-free water.
1.2. Store at -20°C for up to 6 months.
Sample Preparation Setup
1. Thaw the following reagents from Invitrogen, unless otherwise noted:
1.1. ON ICE: Random Hexamer Primer (Promega), 0.1M DTT Soln, 10mM dNTP mix
1.2. ROOM TEMP: 5X First Strand Buffer
2. Prepare
2.1. 1 x 1.5ml microcentrifuge tube labeled First Strand Master Mix
2.2. 0.2ml thin-walled PCR tube for each sample
3. All centrifugation steps are at room temperature, unless otherwise noted.
17
CGB Technical Report 2010-02: Microarray Protocol for High-Throughput Genomics
Last updated: December 16, 2010
4. Remove the aRNA samples from -80°C storage. Keep on dry ice until ready to proceed with
double-stranded cDNA synthesis.
Procedure
1. Prepare aRNA/primer mixture in 0.2mL PCR tube.
Component
Amount
aRNA
10.0μg
Random Primer
1.0μl
Nuclease-Free water
To final volume
Total Volume
11.0μl
2. Incubate aRNA/primer mixture for 10 minutes at 70°C. Immediately, remove the
RNA/primer mixture from the thermocycler, centrifuge briefly, and chill for 5 minutes in an
ice-bath.
MasterCycler
70°C 10min
3. At room temperature, prepare first strand master mix in a 1.5ml microcentrifuge tube labeled
First Strand Master Mix.
Component
Amount plus
0.05% for error
5X First Strand Buffer
4.20μl
0.1M DTT Solution
2.10μl
dNTP Mix (10mM)
1.05μl
RNaseOUT (40U/μl)
0.525μl
SuperScript II (200U/μl)
2.10μl
Total Volume
9.975μl
4. Transfer aRNA/primer mixture to room temperature. Add 9.5μl First Strand Master Mix to
aRNA/primer mixture (20.5μl total volume). Gently pipette the reaction 4 times and flick 3
times to mix. Centrifuge briefly.
5. Incubate for 60 minutes at 42°C, lid temperature 50°C.
MasterCycler
42°C, 60min
6. Remove the reaction from the thermocycler. Centrifuge briefly. Place the reaction on ice.
Proceed immediately to second strand cDNA synthesis.
18
CGB Technical Report 2010-02: Microarray Protocol for High-Throughput Genomics
Last updated: December 16, 2010
Second Strand cDNA Synthesis
Instrument Setup
1. Program MasterCycler/Thermocycler
1.1. 16°C for 60 minutes x 2, heated-lid off, then “Pause”, followed by 16°C for 5
minutes, heated-lid off, and finally 4°C Hold
Sample Preparation Setup
1. Thaw the following reagents from Invitrogen, unless otherwise noted:
1.1. ON ICE: Nuclease-free water, 5X Second Strand Buffer, dNTP mix
2. Prepare
2.1. Labeled 1 x 1.5ml microcentrifuge tube for Second Strand Master Mix
3. All centrifugation steps are at room temperature, unless otherwise noted.
Procedure
1. Prepare second strand master mix on ice in a 1.5ml microcentrifuge tube labeled Second
Strand Master Mix.
Component
Amountplus
0.05% for error
Nuclease Free water
95.55μl
5X Second Strand Buffer
31.50μl
dNTP Mix (10mM)
3.15μl
E.coli DNA Ligase (10U/μl)
1.05μl
E.coli DNA Polymerase (10U/μl)
4.20μl
E.coli Rnase H (2U/μl)
1.05μl
Total
136.5μl
2. Add 130μl Second Strand Master Mix to reaction (150.5μl total volume). Gently pipette the
reaction 4 times and flick 3 times to mix. Centrifuge briefly.
3. Incubate or 2 hours at 16°C, heated lid off.
MasterCycler
16°C, 2hr
4. At the pause in the cycle, add 2μl E.coli T4 DNA Polymerase to reaction (152.5μl total
volume). Gently pipette 4 times to mix.
Component
Amount
E.coli T4 DNA Polymerase (5U/μl)
2.0μl
Total
152.5μl
5. Resume thermocycler program. Incubate for 5 minutes at 16°C, heated lid off.
MasterCycler
16°C, 5min
19
CGB Technical Report 2010-02: Microarray Protocol for High-Throughput Genomics
Last updated: December 16, 2010
6. Remove the reaction from the thermocycler. Centrifuge briefly. Add 10μl of 0.5M EDTA,
pH 8.0. Flick tube 3 times to mix. Centrifuge briefly.
Component
Amount
0.5M EDTA, pH 8.0
10.0μl
Total
162.5μl
ST OP POI NT : Samples may be stored at -20°C overnight, however it is better to complete the
cDNA purification before stopping.
Rnase A Treatment and Clean-Up
Instrument Setup
1. Program MasterCycler/Thermocycler
1.1. 37°C for 10 minutes, lid temperature 105°C
Sample Preparation Setup
1. Prepare
1.1. Labeled 2 x 1.5ml microcentrifuge tube per reaction
2. ChargeSwitch PCR Clean-Up Kit
3. MagnaRack Magnetic Rack
4. All centrifugation steps are at room temperature, unless otherwise noted.
Procedure
1. Add 1μl of 4mg/ml RNase A Solution to the reaction. Gently pipette the reaction 4 times, and
flick 3 times to mix. Centrifuge briefly.
1.1. Important: Use caution when working with RNase A. Use RNase ZAP to clean work
area surfaces, if necessary.
Component
Amount
Rnase A (4mg/ml)
1.0μl
Total
163.5μl
2. Incubate for 10 minutes at 37°C, lid temperature 105°C.
MasterCycler
37°C, 10min
3. During the 10 minute incubation,
3.1. add 163μl ChargeSwitch Purification Buffer (N5) to the first labeled 1.5ml
microcentrifuge tube, and then set aside.
Component
Amount
Purification Buffer (N5)
163.0μl
4. Remove the reaction from the thermocycler. Centrifuge briefly. Transfer the reaction to the
tube containing 163μl ChargeSwitch Purification Buffer (N5). Aspirate to mix.
20
CGB Technical Report 2010-02: Microarray Protocol for High-Throughput Genomics
Last updated: December 16, 2010
5. Add 20μl ChargeSwitch Magnetic Beads to the Purification Buffer (N5)/reaction mixture
Aspirate to mix without forming bubbles. Incubate at room temperature for 1 minute.
6. Place the sample on the MagnaRack for 1 minute until the beads form a pellet.
7. Without removing the tube from the MagnaRack, carefully aspirate the supernatant without
distributing the bead pellet.
8. Remove tube from the MagnaRack. Add 460μl Wash Buffer (W12). Aspirate to resuspend
the bead pellet without forming bubbles.
9. Place the sample on the MagnaRack for 1 minute until the beads form a pellet.
10. Without removing the tube from the MagnaRack, carefully aspirate the supernatant without
distributing the bead pellet.
11. Repeat Wash Procedure once more: Remove tube from the MagnaRack. Add 460μl Wash
Buffer (W12). Aspirate to resuspend the bead pellet without forming bubbles. Place the
sample on the MagnaRack for 1 minute until the beads form a pellet. Without removing the
tube from the MagnaRack, carefully aspirate the supernatant without distributing the bead
pellet.
12. Remove tube from the MagnaRack. Add 20μl Elution Buffer (E5). Aspirate to resuspend the
bead pellet without forming bubbles. Incubate at room temperature for 1 minute.
13. Place the sample on the MagnaRack for 1 minute until the beads form a pellet.
14. Without removing the tube from the MagnaRack, carefully transfer the supernatant
containing the purified DNA to the second 1.5ml microcentrifuge tube without distributing
the bead pellet.
ST OP POI NT : Samples may be stored at -20°C until quality assessment.
15. Determine concentration with NanoDrop. See section NanoDrop Protocol for NimbleGen
Microarray.
16. Determine integrity using BioAnalyzer / RNA 6000 Nano kit. See section Bioanalyzer RNA
Protocol for NimbleGen Microarray.
ST OP POI NT : Samples may be stored at -20°C until proceeding to next step.
21
CGB Technical Report 2010-02: Microarray Protocol for High-Throughput Genomics
Last updated: December 16, 2010
Random Primer Labeling
Introduction
Random Primer Labeling technique allows for amplification of ds DNA to produce enough
material for microarray hybridization. Procedures have been adapted to be compatible with
genomic DNA and ds cDNA. The protocol described here was adapted from Roche
NimbleGen’s Dual-Color DNA Labeling Kit for amplification of ds cDNA derived from
amplified RNA of Eukaryote systems. We describe this procedure in detail along with DNA
quality assessment measures. Briefly, ds cDNA is primed with CY-labeled random nonamer and
the addition of Klenow (exo-) enzyme synthesizes 5’ Cy-labeled cDNA. At the completion of the
procedure, use of a spectrophotometer assesses the quality of the purified 5’ Cy-labeled cDNA.
Precautions
Laboratory safety. It is assumed that users have a sound knowledge of molecular biology
techniques and safe laboratory practices. Before undertaking a new protocol or using unfamiliar
reagents users should review relevant Material Safety Data Sheets to identify potential hazards
and recommended precautions. For background in general molecular biology please see
Molecular Cloning A Laboratory Manual, J. Sambrook and D. W. Russell. Cold Spring Harbor
Laboratory Press.
Caution. Random Primer Buffer, containing beta-mercaptoethanol after preparation, is toxic in
contact with skin and if swallowed. After contact with skin, wash the area immediately with
copious amounts of water. This solution should be handled with caution.
Prevent excessive light exposure. Cy-labeled Random Primer reagent and subsequent Cy-labeled
cDNA is light sensitive and should not be exposed to any unnecessary light. When working with
the labeled components turn off all lights and close the blinds to the windows.
Prevent excessive ozone and humidity exposure. Minimize ozone exposure and avoid humidity
levels above 40% as this leads to oxidation of the cyanine dyes. Use of desiccant materials or a
dehumidifier should be considered.
22
CGB Technical Report 2010-02: Microarray Protocol for High-Throughput Genomics
Last updated: December 16, 2010
Sample Preparation Setup
1. Thaw the following reagents from Roche NimbleGen Dual Color Labeling Kit, unless
otherwise noted:
1.1. ON ICE: Random Primer Buffer
2. Prepare
2.1. 50 x 0.2ml thin-walled PCR tube
3. All centrifugation steps are at room temperature, unless otherwise noted.
Procedure
1. Prepare Random Primer Buffer.
Component
Amount
Random Primer Buffer
998.25μl
β-Mercaptoethanol
1.75μl
Total Volume
1000.0μl
2. Centrifuge briefly Cy3- and Cy5-Random Nonamer. Dilute each Cy-primer with 462μl of
Random Primer Buffer with β-Mercaptoethanol.
Component
Amount
Cy-Random Nonamer
11 O.D.
Random Primer Buffer with βMercaptoethanol
462.0μl
Total Volume
462.0μl
3. Aliquot 42μl individual reaction volumes in 0.2 ml thin-walled PCR tubes. Store at -20°C,
protect from light. Yields approximately 11 individual reactions for each dye.
ST OP POI NT : Diluted Cy-Ramdon Nonamer may be stored for up to 4 months at -20°C until
proceeding to next step. Avoid freeze thaw cycles.
Assemble labeling reaction
Instrument Setup
1. Program MasterCycler/Thermocycler
1.1. 98°C for 10 minutes, lid temperature 105°C
1.2. 37°C for 60 minutes x 2, lid temperature 105°C
Sample Preparation Setup
1. Thaw the following reagents from Roche NimbleGen's Dual Color Labeling Kit, unless
otherwise noted:
1.1. ON ICE: Diluted Cy-Random Nonamers, 10mM dNTP mix, Nuclease-free water
1.2.
Room temperature: Stop Solution and 5M NaCl solution (heat and vortex if
precipitate is visible)
2. Prepare
2.1. 0.2ml thin-walled PCR tube for each sample
23
CGB Technical Report 2010-02: Microarray Protocol for High-Throughput Genomics
Last updated: December 16, 2010
2.2. Labeled 1 x 1.5ml microcentrifuge tube for Klenow Master Mix
2.3. Labeled 1 x 1.5ml microcentrifuge tube per sample
2.4. Labeled 1 x 1.5ml centrifuge tube per hybridization
2.5. Ethanol, 80% Soln
3. All centrifugation steps are at room temperature, unless otherwise noted.
Procedure
15. Prepare the test and reference samples each in triplicate in separate 0.2ml thin-walled PCR
tubes. Dye assignment can be switched, if desired.
Component
Test x 3
Reference x 3
ds cDNA
1.0μg
1.0μg
Diluted Cy3-Random Nonamers
42μl
---
Diluted Cy5-Random Nonamers
---
42μl
Nuclease-free water
To volume (80μl)
To volume (80μl)
Total
80.0μl
80.0μl
16. Incubate cDNA/primer mixture for 10 minutes at 98°C.
MasterCycler
98°C, 10min
17. Remove the reaction from the thermocycler. Immediately transfer to an ice-water bath and
chill for 10 minutes. Centrifuge briefly. Return to ice bath.
18. Prepare the Klenow master mix on ice in 1.5ml microcentrifuge tube labeled Klenow Master
Mix.
Component
Amountplus 0.05%
for error
10mM dNTP Mix
10.5μl
Nuclease Free water
8.4μl
Klenow Fragment (3’-5’ exo-) 50U/μl
2.1μl
Total
21.0μl
19. Add 20μl Klenow master mix to reaction (100μl total volume). Gently pipette the reaction 10
times to mix. Centrifuge briefly.
Component
Amount
dNTP/Klenow Mix
20.0μl
Total
100.0μl
20. Incubate for 2 hours at 37°C, lid temperature 105°C.
MasterCycler
37°C, 2hr
21. During incubation, add 44μl of Isopropanol to labeled 1.5ml microcentrifuge tube, and then
set aside.
24
CGB Technical Report 2010-02: Microarray Protocol for High-Throughput Genomics
Last updated: December 16, 2010
22. Remove the reaction from the thermocycler. Centrifuge briefly.
23. Add 10.0μl of Stop Solution (0.5M EDTA, pH 8.0) to the reaction.
Component
Amount
Stop Solution
10.0μl
Total
110.0μl
24. Add 11.5μl of 5M NaCl to the reaction. Vortex to mix, and centrifuge briefly.
Component
Amount
5M NaCl
11.5μl
Total
121.5μl
25. Transfer the reaction to labeled 1.5ml microcentrifuge tube containing 110μl of Isopropanol
for precipitation. Vortex well.
Component
Amount
Isopropanol
110.0μl
Total
231.5μl
26. Incubate for 10 minutes at room temperature, protected from light. Centrifuge for 10 minutes
at 12,000 rcf. Decant supernatant.
27. Wash pellet with 500μl of 80% Ethanol Solution (v/v). Centrifuge for 2 minutes at 12,000
rcf. Decant supernatant.
28. SpeedVac the pellet on low heat for 5 minutes to remove traces of wash buffer.
ST OP POI NT : Labeled pellet may be stored at -20°C for up to 5 days, protected from light,
until proceeding to next step.
29. Centrifuge briefly before opening. Rehydrate pellet with 25μl of Nuclease-free water.
Incubate at room temperature, protected from light, for 5 minutes. Gently vortex and
centrifuge briefly. Combine replicates into a single pool.
30. Determine concentration with NanoDrop. See section NanoDrop Protocol for NimbleGen
Microarray.
31. Based on the concentration, calculate the volume of the test sample and reference sample
required per hybridization for the array set based on the following table. Combine both test
and reference samples into labeled 1.5ml microcentrifuge tube for hybridization.
Sample Requirement
2.1M Array
2.1M 2-Array Set 2.1M 3-Array Set
2.1M 4-Array Set
Test Sample
18.0 μg
36.0 μg
54.0 μg
72.0 μg
Reference Sample
18.0 μg
36.0 μg
54.0 μg
72.0 μg
32. SpeedVac on low heat, protected from light, until all the Nuclease-free water is removed, and
the pooled labeled cDNA for hybridization is reduced to a pellet.
25
CGB Technical Report 2010-02: Microarray Protocol for High-Throughput Genomics
Last updated: December 16, 2010
ST OP POI NT : Labeled cDNA pellet may be stored at -20°C, protected from light, until
proceeding to next step.
26
CGB Technical Report 2010-02: Microarray Protocol for High-Throughput Genomics
Last updated: December 16, 2010
NimbleGen Systems Hybridization
Introduction
NimbleGen Systems Hybridization technique allows for uniform hybridization of labeled DNA
to produce high interarray correlations between replicate hybridizations. The protocol described
here was adapted from Roche NimbleGen User’s Guide for Expression Analysis for Cy-labeled
cDNA derived from Eukaryote systems. We describe this procedure in detail for dual-color
competitive hybridization of 2.1M Array Set format. Briefly, Cy-labeled cDNA is hybridized to
high-density, long oligonucleotide microarray using custom microarray slide mixer and
specialized hybridization system. At the completion of the procedure, the hybridized microarray
is ready for data collection.
Precautions
Laboratory safety. It is assumed that users have a sound knowledge of molecular biology
techniques and safe laboratory practices. Before undertaking a new protocol or using unfamiliar
reagents users should review relevant Material Safety Data Sheets to identify potential hazards
and recommended precautions. For background in general molecular biology please see
Molecular Cloning A Laboratory Manual, J. Sambrook and D. W. Russell. Cold Spring Harbor
Laboratory Press.
Caution. Hybridization Component A, containing formamide, is toxic in contact with skin and if
swallowed. After contact with skin, wash the area immediately with copious amounts of water.
This solution should be handled with caution.
Prevent excessive light exposure. Cy-labeled cDNA is light sensitive and should not be exposed
to any unnecessary light. When working with this component turn off all lights and close the
blinds to the windows.
Prevent excessive ozone and humidity exposure. Minimize ozone exposure and increased
humidity levels as this leads to oxidation of the cyanine dyes. Use of desiccant materials or a
dehumidifier should be considered.
Instrument Setup
1. Heat block, 95°C
2. Heat block, 42°C
3. NimbleGen Hybridization System, 42°C
Sample Preparation Setup
1. Thaw on ice from the NimbleGen Hybridization Kit,:
1.1. 2X Hybridization Buffer
1.2. Hybridization Component A
1.3. Alignment Oligo Soln
2. Prepare
2.1. Labeled 1 x 1.5ml microcentrifuge tube for Hybridization Master Mix
3. All centrifugation steps are at room temperature, unless otherwise noted.
27
CGB Technical Report 2010-02: Microarray Protocol for High-Throughput Genomics
Last updated: December 16, 2010
Procedure
1. Set the Hybridization System to 42°C. With the cover closed, allow at least 3 hours for the
temperature to stabilize. Set one heat block to 95°C, and a second heat block to 42°C, allow
at least 3 hours for the temperature to stabilize.
1.1. For single array platforms, resuspend the dried labeled pellet with Nuclease-free
water.
Component
2.1M Array
2.1M 2-Array Set
2.1M 3-Array Set
2.1M 4-Array Set
Nuclease-free water
12.3μl
24.6μl
36.9μl
49.2μl
1. Using components from the NimbleGen Hybridization Kit, prepare the Hybridization master
mix according to the following table. The amounts listed in the table provide a sufficient
volume (1.25x volumes) to hybridize all arrays of a single slide. When processing multiple
slides, adjust the amounts for the number and type of array.
Component
2X Hybridization Buffer
Hybridization Component A
2.1M Array
29.5μl
11.8μl
2.1M 2-Array Set
59.0μl
23.6μl
2.1M 3-Array Set
88.5μl
35.4μl
2.1M 4-Array Set
118.0μl
47.2μl
Alignment Oligo
1.2μl
2.4μl
3.6μl
4.8μl
Total
42.5μl
85.0μl
127.5μl
170.0μl
2. Add the appropriate amount of hybridization master mix to each rehydrated labeled cDNA
according to the following table.
Component
Pooled labeled cDNA in
Nuclease-free water
Hybridization Master Mix
2.1M Array
2.1M 2-Array Set
2.1M 3-Array Set
2.1M 4-Array Set
12.3μl
24.6μl
36.9μl
49.2μl
31.7μl
63.4μl
95.1μl
126.8μl
Total Volume
44.0μl
88.0μl
132.0μl
176.0μl
3. Vortex well for 15 seconds, and centrifuge briefly.
4. Incubate the hybridization mixture for 5 minutes at 95°C, protected from light.
5. Incubate the hybridization mixture for 5 minutes at 42°C, protected from light, and maintain
at 42°C until ready for sample loading. Vortex well for 15 seconds, and centrifuge prior to
sample loading.
Prepare Mixer/Slide assembly for hybridization
Instrument Setup
1. NimbleGen Precision Mixer Alignment Tool (PMAT)
2. NimbleGen Mixer Brayer
3. Forceps
4. NimbleGen Hybridization System, 42°C
28
CGB Technical Report 2010-02: Microarray Protocol for High-Throughput Genomics
Last updated: December 16, 2010
Sample Preparation Setup
1. NimbleGen Array Mixer
2. NimbleChip Microarray Slide
Procedure
1. Remove the appropriate mixer from its package. Handle the mixer by the Tab with the
NimbleGen barcode. (Avoid touching the body of the mixer because this will transfer
unwanted fingerprints and other residues, which may compromise array hybridization.)
Array Format
Mixer
2.1M Array
HX1 Mixer
2. Position the Precision Mixer Alignment Tool (PMAT) so the hinge is on the left, and then
open it.
3. Snap the mixer onto the two alignment pins on the lid of the PMAT, with the tab end of the
mixer toward the inside hinge and the mixer’s adhesive gasket facing outward.
4. Carefully unpack the slide, and set aside its blue cassette (for use at a later time). While
pushing back the PMAT’s plastic spring with your thumb, place the slide in the base of the
PMAT so that the barcode is on the right, farthest from the PMAT hinge, and the corner of
the slide sits against the plastic spring. The NimbleGen logo and barcode number should be
readable. Remove your thumb and make sure the spring is pushing the corner of the slide so
that the entire slide is touching the edge of the PMAT closest to you. In addition, be sure that
the slide is lying flat against the PMAT.
5. Using forceps, remove the protective backing from the mixer’s adhesive and close the PMAT
so that the mixer’s adhesive makes contact with the slide.
6. Lift the lid by grasping the long edges of the PMAT while simultaneously applying pressure
with a finger through the window in the lid of the PMAT to free the Mixer/Slide assembly
from the pins of the PMAT. Be careful to avoid the arrays when applying pressure through
the window.
7. Remove the Mixer/Slide assembly from the PMAT. Place the Mixer/Slide assembly on a
42°C heating block for 1 minute to facilitate adhesion of the mixer to the slide.
8. Rub the Mixer Brayer over the mixer with moderate evenly distributed pressure to adhere the
mixer and remove any bubbles between the adhesive and slide’s surface. For HX1 mixers,
start in the center of the array and rub outwards. The adhesive will become clear when fully
adhered to the slide’s surface.
9. Place the Mixer/Slide assembly in the hybridization bay of the Hybridization System.
Load and hybridize samples to array
Instrument Setup
1. Microman Capillary Piston Pipette, CP100
2. Microman Capillary Piston Pipette Tips, CP100
29
CGB Technical Report 2010-02: Microarray Protocol for High-Throughput Genomics
Last updated: December 16, 2010
Sample Preparation Setup
1. NimbleChip Microarray Mixer/Slide Assembly
2. Mixer Seals
3. Forceps
4. KimWipes
Procedure
1. At this point, the hybridization reaction and Mixer/Slide assembly are ready for sample
loading.
2. Using the appropriate Gilson Microman pipette and tip, draw up the designated loading
volume; inspect the pipette tip for bubbles. Discharge and reload the pipette tip if there is a
bubble. It is recommended to have residual hybridization reaction in the tube to avoid
introducing bubbles into the array. When ready, slowly dispense the appropriate loading
volume into the fill port until the hybridization reaction starts to leak out of the array’s
corresponding vent port. Using a KimWipe, carefully to remove residual hybridization
reaction surrounding the fill port and vent port. Adhered the mixer seal over the fill port and
vent port. Close the hybridization system’s bay clamp.
Component
2.1M Array
Loading Volume
41.0μl
Pipette & Tip
CP100
3. Be sure all slides have been processed: hybridization reactions loaded, mixer seals applied,
and hybridization bay clamps closed. Turn on the mixing panel of the Hybridization System,
with the mix mode set to Mode B.
4. Confirm the Hybridization System recognizes the slide in each occupied bay (indicator light
becomes green when hybridization bay is in-use).
5. Hybridize for 16 – 20 hours at 42°C, mix Mode B.
30
CGB Technical Report 2010-02: Microarray Protocol for High-Throughput Genomics
Last updated: December 16, 2010
Wash Hybridized Slides
Instrument Setup
1. Water bath, 48°C
2. Shallow dish (P1000 tip box lid, 500ml capacity)
3. NimbleGen Array Processing Containers
4. NimbleGen Disassembly Tool
5. ArrayIT High Speed Microarray Centrifuge
Sample Preparation Setup
1. 1X NimbleGen Wash Buffer I, 42°C & RT
2. 1X NimbleGen Wash Buffer II
3. 1X NimbleGen Wash Buffer III
4. All centrifugation steps are at room temperature, unless otherwise noted.
Procedure
1. IMPORTANT for ALL Washing Steps:
1.1. Wash one slide at a time since the ArrayIT High Speed Microarray Centrifuge
accommodates only one slide at a time. Restart washing protocol when each
microarray slide is dry.
1.2. Handle the slide from the barcode edge with a firm grip; do not use forceps. Barcode
edge is at the far end of the Mixer Disassembly Tool; so the slide will have to be
turned around (180 degrees) before inserting into wash containers. When transferring
the slides into the next wash buffer, minimize the amount of wash buffer carryover by
tapping the edge of the slide gently on a Kimwipe.
2. Setup ArrayIT High Speed Microarray Centrifuge with slide carriage.
3. Prepare NimbleGen Hybridization Wash Buffers,
3.1. Pre-warm overnight 300ml of 1X Wash Buffer I in a water bath set to 48°C.
3.2. Prepare 1X NimbleGen Wash Buffers in NimbleGen Array Processing containers.
3.2.1. For the centrifuge tube with blue cap, final volume is 30ml.
SMALL SCALE (1 slide)
Component
Wash I
Wash I
Wash II
Wash III
VWR water, Type I
270 ml
27 ml
27 ml
27 ml
10X NimbleGen Wash Buffer
30 ml
3 ml
3 ml
3 ml
1M DTT Soln
30 μl
3 μl
3 μl
3 μl
Total
300 ml
30 ml
30 ml
30 ml
Temperature
42°C
RT
RT
RT
4. Pour Wash Buffer I (48°C) into Shallow dish (P1000 tip box lid, 500ml capacity) with
Disassembly Tool. Measure the temperature and wait until it reaches 42°C, then proceed
immediately with slide washing. Heat Wash Buffer I if temperature is below 42°C.
Microwave may be used to adjust wash buffer temperature.
31
CGB Technical Report 2010-02: Microarray Protocol for High-Throughput Genomics
Last updated: December 16, 2010
5.
Remove the Mixer/Slide assembly from the Hybridization System and immediately load it
into the Disassembly Tool. Submerge the loaded Disassembly Tool into the Shallow dish
containing warm Wash I (42°C). Do not allow the slide to cool.
6. With the Mixer/Slide assembly submerged, carefully peel the mixer off the slide. Discard the
mixer. While submerged in Wash Buffer I, carefully remove the slide from the Disassembly
Tool. Gently agitate the slide for 10 seconds, and quickly transfer the slide to Wash I, RT.
6.2. It is important to agitate the slide in the warm Wash Buffer I (42°C). This will
facilitate the removal of hybridization reaction from the surface of the slide. Failure to
do so leads to poor washing results.
7. Wash Buffer I: Incubate for 2 minutes at RT with vigorous, constant agitation.
Wash Buffer I, RT
2 min
8. Transfer slide to Wash Buffer II.
9. Wash Buffer II: Incubate for 1 minute at RT with vigorous, constant agitation.
Wash Buffer II, RT
1 min
10. Transfer slide to Wash Buffer III.
11. Wash Buffer III: Incubate for 15 seconds at RT with vigorous, constant agitation.
Wash Buffer III, RT
15 sec
12. Remove the slide from Wash III. Load it, active side up, into the ArrayIT High Speed
Microarray Centrifuge. Centrifuge the slide for 1 minute.
13. Remove the slide from the carriage, and return the dry hybridized slide to its cassette.
14. Proceed immediately to scanning.
32
CGB Technical Report 2010-02: Microarray Protocol for High-Throughput Genomics
Last updated: December 16, 2010
Two-color Array Scanning
Introduction
Array scanning technique allows for imaging of fluorescently labeled DNA to produce
biologically relevant data from microarray hybridizations. Lasers excite the fluorescent dyes
while photomultipler tubes record the illuminated pixels as a high-resolution image file. The
protocol described here was adapted from Roche NimbleGen Array User’s Guide for CGH and
CNV Arrays. The microarray is scanned using the NimbleGen MS 200 Microarray Scanner with
resolution down to 2μm. Photomultipler tube (PMT) Gain is automatically adjusted by the Data
Collection software to achieve consistent, reproducible experimental results. After image
acquisition, single-tiff images are ready to load into NimbleScan 2.6 Software to grid images for
data extraction.
Precautions
Laboratory safety. It is assumed that users have a sound knowledge of molecular biology
techniques and safe laboratory practices. Before undertaking a new protocol or using unfamiliar
reagents users should review relevant Material Safety Data Sheets to identify potential hazards
and recommended precautions. For background in general molecular biology please see
Molecular Cloning A Laboratory Manual, J. Sambrook and D. W. Russell. Cold Spring Harbor
Laboratory Press.
Prevent excessive light exposure. Hybridized Cy-labeled cDNA is light sensitive and should not
be exposed to any unnecessary light. When working with this reagent turn off all lights and close
the blinds to the windows.
Prevent excessive ozone and humidity exposure. Minimize ozone exposure and increased
humidity levels as this leads to oxidation of the cyanine dyes. Use of desiccant materials or a
dehumidifier should be considered.
Prevent loss of data. After image is saved, it is recommended to copy the files to a secondary
independent data storage device or location.
Instrument Setup
1. NimbleGen MS 200 Microarray Scanner
2. NimbleGen MS 200 Data Collection Software
Procedure
1. Start the control unit and log into your user account as msOperator or other account as set up by
your system administrators.
Account: msOperator
Password: 1-msOperator
2. Turn on the scanner using the power switch on the left side.
3. Insert slides into the Slide Magazine as described in Figure 1. Numbered slots provide spacing
for inserting slides.
33
CGB Technical Report 2010-02: Microarray Protocol for High-Throughput Genomics
Last updated: December 16, 2010
Figure 1: Inserting Slides into the Slide Magazine
4. Press the insert/eject magazine button on the scanner to open the stacker cover. Insert the slide
magazine with loaded slides, aligning the slot on the slide magazine’s side to join with the rail
profile inside the scanner. The lowering of the slide magazine is interrupted by a mechanical
hold point. Apply gentle pressure to complete insertion. Press the insert/eject magazine button to
close the stacker cover (Figure 2). The initialization process starts, checking the slide magazine
to determine which slots are occupied.
Figure 2: Inserting the Slide Magazine into the Scanner
5. Double-click the NimbleGen MS200 icon to launch the MS 200 Data Collection Software. Make
sure that the software has completely loaded before continuing.
6. Click the Green Laser and Red Laser buttons in the Laser Control (Figure 3) to switch on the
lasers. Allow lasers to warm for 10 minutes.
Figure 3: Top of Data Collection Workspace, showing Scan Control, Laser Control, and Image Control
7.
Review the Magazine Control (Figure 4) in the Data Collection Software. Ensure that a green
box appears in the Slide Present field for each slide loaded into the slide magazine.
34
CGB Technical Report 2010-02: Microarray Protocol for High-Throughput Genomics
Last updated: December 16, 2010
Figure 4: Magazine Control, Parameter Control, and File Setting Control
8. Use the Parameter Control (Figure 4) to set the parameters to use when scanning:
a.
To open the Parameter Control if not displayed, go to the row of a slide to scan in the Magazine
Control and click its Open Parameter Control button ( ) to display the Parameter Control.
b.Do not adjust the following default parameters:
•
•
•
•
Slide type
Channel 1 and Channel 2
Laser Intensity 1 and Laser Intensity 2
for slide nr: 2 cycle: 1 only
c.Adjust the following default parameters if necessary:
•
•
•
Resolution
Speed/Sensitivity
Autogain
d. To save any changes to the settings, click Apply.
e.
(Optional) Click Save to save settings to a parameters file, which allows the settings to be applied to
other slides.
(Optional) To process the slide multiple times using the same or different parameters, create up to
12 cycles. To create a cycle, close the Parameter Control by clicking the Close Parameter Control
button ( ). Go to the slide row in the Magazine Control, right-click, and select Add Cycle. Open the
Parameter Control. Then specify and save parameters for the cycle as described above (8b - 8e).
9. Use the File Settings Control (Figure 4) to specify image file settings:
35
CGB Technical Report 2010-02: Microarray Protocol for High-Throughput Genomics
Last updated: December 16, 2010
a.
To open the File Settings Control if not displayed, go to the row of a slide to scan in the Magazine
Control and click its Open Parameter Control button ( ) (Figure 4). In the Parameter Control, click
the Open/Close File Settings button ( ) to open the File Settings Control.
b. Choose the Single-TIFF option button to generate one image file in Tagged Image File Format (TIFF,
.tif) per channel.
c.
If necessary, change the path to which the images files will be saved. The default path is
E:\Data\NimbleGen MS 200. To change the path, click Browse to open a dialog box to specify a
location in the directory and click OK to confirm.
d. Use the annotation list to add or change annotations to include in file names. Click an annotation in
the left list box and then click the right arrow button ( ) to add to the right list box.
If you will be using NimbleScan software for data analysis, specify and order the annotations as
follows:
<Barcode>_<User Text>_<Laser WL>.tif
where “WL” means wavelength. To change the order of the annotations, select the annotation and
click the Up or Down button. For “User Text,” make sure to type the text in the User Text field.
e.
f.
The Filename Preview text box of the Parameter Control displays the entire naming convention of the
image file (.tif).
Click Apply to confirm settings.
(Optional) To save the file settings to a file, click Save in the Parameters Control (Figure 4).
10. Use the Area Definition Control (Figure 5; denoted as Scan Areas in the software interface) to
set scan, barcode, and autogain areas.
a.
To open the Area Definition Control if not displayed, in the Parameter Control, click the Open/Close
Area Definition Control button ( ) (shown on the right side of Figure 4 above the Scan Areas label
in the software interface). Figure 5 shows the components of the Area Definition Control.
36
CGB Technical Report 2010-02: Microarray Protocol for High-Throughput Genomics
Last updated: December 16, 2010
Figure 5: Components of the Area Definition Control
b. Ensure the following are selected:
•
•
•
c.
Barcode area checkbox
Autogain area checkbox, if the Autogain checkbox was selected in the Parameter Control (Figure
4)
Single Area option - this is the preferred option when scanning single and multiplex NimbleGen
arrays. For multiplex arrays, you will use NimbleScan software’s burst functionality to create
individual image files for multiplex arrays.
Review and if necessary adjust the scan area:
•
•
•
For NimbleGen 2.1M, 3x720K, and 12x135K arrays, use the default selection for the scan area.
(Optional) For NimbleGen 385K and 4x72K arrays, reduce the scan area, which will reduce the
scan time. To define the scan area, download and use area files available at
www.nimblegen.com/scanner/ under Download. These files identify scan areas that are specific
for NimbleGen 385K or 4x72K arrays. For instructions on how to use area files or how to
manually adjust the scan area, refer to the NimbleGen MS 200 Microarray Scanner Operator’s
Manual.
If desired, click Save to save settings to an area file for future use.
d. Review and if necessary adjust the autogain area.
37
CGB Technical Report 2010-02: Microarray Protocol for High-Throughput Genomics
Last updated: December 16, 2010
To adjust the autogain area, position the mouse pointer inside the respective rectangle and click to
enable the move cursor. Drag the rectangle to the desired array location and about 10 mm from the
edge of the default scan area. Size the rectangle by dragging the side and corner handles (3 mm x 3
mm to 22 mm x 22 mm). Click Apply to confirm your settings.
Figure 6: Example of Autogain Areas for NimbleGen Arrays
11. Repeat the instructions above for each slide to process during the experiment.
If you saved parameter file(s) and area file(s), click Load in the Parameter Control or Area Definition
Control, respectively, to select a file and then click Apply to confirm your selection.
12. Click the Start/Stop Scan button ( ) in the Scan Control (Figure 7).
13. When prompted, specify the folder and file naming to save the session file.
The scan process is then initiated. The Parameter Control and Area Definition Control close. The Image
View, Slide View, and Spot View open (Figure 7), and the Scan Control shows the current task that is
being performed above the progress bar.
38
CGB Technical Report 2010-02: Microarray Protocol for High-Throughput Genomics
Last updated: December 16, 2010
Figure 7: Example of a Run Time Window
14. (Optional) To manually adjust the PMT gain while scanning at 5 µm or higher resolution:
a.
Use the Gain 1 and Gain 2 spin boxes that appear in the Scan Control (Figure 7) to adjust the gain.
b. Click Show Histogram in the Image Control (Figure 7) to view the histogram. Use the zoom feature
(magenta box in the Slide View, Error! Reference source not found.Figure 9), to select where to
view the histogram.
The best data are achieved when the red and green curves are superimposed or as close as
possible to one another. If the red curve is above the green curve, lower the red curve (Channel
2). The curves should level out near 3 log10.
Figure 8: Histogram Window
c.
Record the final gain settings to use to scan the slide again.
15. After the scanning experiment is completed, the light in the upper-left corner of the insert/eject
39
CGB Technical Report 2010-02: Microarray Protocol for High-Throughput Genomics
Last updated: December 16, 2010
magazine button on the scanner becomes green. The scanner unlocks its stacker cover, and you
can remove the slide magazine.
16. Once the scan of a slide is completed, a blue Displays Images button ( ) appears in the Display
Images field of the Magazine Control (Figure 4). Move the mouse pointer over the button to
display the directory location and file name of the acquired image. Click the blue Displays
Images button ( ) to display the image (both images) in the Image View.
17. To view a small region of the array and to select where to view the histogram (Figure 9), reduce
the size of the magenta box that outlines the slide image in the Slide View so that the magenta
box surrounds the area of interest. The area of interest will appear in the Image View. Click
Show/Hide Histogram to display the histogram.
Figure 9: Example Window Showing Magenta Box in the Side View, Show/Hide Histogram Button, and Histogram Window
18. Adjust contrast and brightness using the Image Control (Figure 10) to provide an improved view
of features on the image. Adjusting these settings allows faint features to be more easily seen.
Figure 10: Image Control
40
CGB Technical Report 2010-02: Microarray Protocol for High-Throughput Genomics
Last updated: December 16, 2010
Data Processing of Images
Introduction
NimbleScan Software allows for automated gridding of microarray image files to produce
quantifiable data for analysis. The protocol described here was adapted from Roche NimbleGen
User’s Guide for Expression analysis. Briefly, a tif image is uploaded into NimbleScan along
with NimbleGen design files, which describe both probe identities and locations, to generate a
tab-delimited report with probe identities and feature signal intensities. At the completion of the
procedure, data is presented in an appropriate format for normalization and comparative analysis.
Precautions
Prevent loss of data. After raw data is saved, it is recommended to copy the files to a secondary
independent data storage device or location.
Instrument Setup
1. Launch NimbleScan 2.6 Software.
Procedure
1. If the slide image is a multiplex array (4x72K or 12x135K), follow the steps below to
separate each subarray into a separate image file. Otherwise, proceed to step 2.
1.1. Select FILE > BURST MULTIPLEX IMAGE. The burst image dialog box appears.
To choose the .tif files, click ADD IMAGES. Select the slide image of the same
design. Click ADD TO BATCH. Browse to select the correct multiplex description
file (.ncd). Browse to select the desired output file destination in the OUTPUT
BURST IMAGES TO field.
1.2. Click BURST. NimbleScan creates one file for each array of the slide, and each array
designation for each burst image is appended to the original file name.
1.3. Example: Barcode#A01_wavelength.tif
1.4. Repeat steps 1 for each set of multiplex images of different designs.
2. Select FILE > OPEN. The open an alignment dialog box appears. Select a single array image.
Select the design file (.ndf). Select the gene description file, if available. Click OPEN.
3. Once the image has loaded, the data is ready to match signal intensities with probe locations.
Select the AUTO ALIGN TOOL (Ctrl + A). Zoom into the top corner of the array (Ctrl + G,
then Ctrl + 7). Verify all fiducial controls line up correctly with the grid by shifting to each
corner (Ctrl + 9, Ctrl +3, and Ctrl + 1).
4. Click FILE > SAVE to save the gridded image.
5. Confirm Experimental Integrity (STC report) for multiplex array formats only: Select
ANALYZE > SAMPLE TRACKING. Click ADD FILES. Browse to select all 532nm
gridded images of the multiplex array to be analyzed. Click ADD TO LIST. Click BROWSE
to select destination of output file. Save outfile with extension .xls to review the STC report
in MicroSoft Excel. Open the file. Ensure that a “PRESENT” call is reported for only the
unique STC added to the hybridization reaction. If more than one “PRESENT” call is report,
there may be contamination between hybridizations.
6. Create Pair Reports: Select ANALYZE > PAIR. Click ADD IMAGES to choose the files for
analysis. Select the design file (.ndf). Browse to select the desired output file destination in
41
CGB Technical Report 2010-02: Microarray Protocol for High-Throughput Genomics
Last updated: December 16, 2010
the Choose the destination folder field. Click REPORT. NimbleScan creates one PAIR report
(.pair) for each image file.
6.1. For 385K and 4x72K array formats, select local alignment.
6.2. For 12x135K array formats, deselect local alignment.
7. The PAIR report is the raw data of the array hybridization. Other reports may be created. For
more information see, NimbleScan Software User’s Guide on http://www.nimblegen.com >
Products > Software > literature.
42
CGB Technical Report 2010-02: Microarray Protocol for High-Throughput Genomics
Last updated: December 16, 2010
NanoDrop Protocol for NimbleGen Microarray
Introduction
The NanoDrop ND-1000 utilizes UV/Vis spectroscopy to measures nucleic acid concentration.
The ND-1000 is a micro-scale spectrophotometer that measures RNA or DNA concentration
without dilution. With a pre-loaded application, Nucleic Acid, absorbance is measured across a
broad wavelength range 190 – 840nm. Values for 260nm absorbance determines nucleic acid
concentration, while 230nm and 280nm absorbance are used to calculate purity.
Precautions
Prevent loss of data. After report is generated, it is recommended to save the report and copy the
files to a secondary independent data storage device or location.
Instrument Setup
1. Launch Nanodrop software to start application and adjust setting:
2.1. Select assay “Nucleic Acid”.
3. A prompt will appear. Following the instructions from the prompt:
3.1. With a KimWipe, gently buff the top and bottom pedestal 5 times.
3.2. Load 1.5μl of nuclease-free water to pedestal. Gently, lower arm and click “OK”.
Procedure
1. Select “Sample Type” from drop-down menu displayed at the top left of the measurement
window.
1.1. For Total RNA and aRNA quantification,
1.1.1. Select Sample type “RNA – 40” for extinction coefficient = 40
1.2. For DNA quantification (i.e. ds cDNA and Cy-labeled cDNA),
1.2.1. Select Sample type “DNA – 50” for extinction coefficient = 50
2. Buff top and bottom of pedestal to remove the nuclease-free water.
3. To BLANK, apply to the pedestal 1.5μl of elution buffer in which the nucleic acid is
dissolved. Click BLANK to calibrate the instrument.
3.1. To make sure the blank is calibrated properly, apply 1.5μl of Elution buffer and click
Measure. Reading should be close to zero.
4. Instrument is now ready to measure concentration of the nucleic acid sample. Be sure to enter
a “Sample Name” for each measurement.
5. To quantify sample, apply 1.5μl of the nucleic acid sample to the pedestal and click Measure.
5.1.
For Total RNA and aRNA,
5.1.1. 260/280 ratio of > 2.0
5.1.1.1. If the ratio is lower, this may indicate the presence of protein, phenol
or other contaminants that absorb at or near 280 nm.
5.1.2. 260/230 ratio range of 1.8 – 2.2
5.1.2.1. If the ratio is low, this may indicate the presence of co-purified
contaminants (e.g. Mg2+, salts, or other wash buffers).
5.1.3. Spectrophotometer graph shows smooth curve.
43
CGB Technical Report 2010-02: Microarray Protocol for High-Throughput Genomics
Last updated: December 16, 2010
5.2.
For ds cDNA and Cy-labeled cDNA
5.2.1. 260/280 ratio of > 2.0
5.2.1.1. If the ratio is lower, this may indicate the presence of protein, phenol
or other contaminants that absorb at or near 280 nm.
5.2.2. 260/230 ratio range of 1.8 – 2.2
5.2.2.1. If the ratio is low, this may indicate the presence of co-purified
contaminants (e.g. Mg2+, salts, or other wash buffers).
6. Save Report:
6.1. From Menu Bar at top of window, select REPORTS and click Save Report.
6.1.1. Select Export Table (Option 2) for a tab-delimited text file.
6.1.1.1. This file can be viewed in MS Excel application.
6.1.2. Select Full Report for a NanoDrop formatted file.
6.1.2.1. This file can be viewed in the NanoDrop software only. In addition,
the report can be loaded at the start of the next session, if a single
continuous record / file is desired.
6.1.2.2. To load previous full report, select REPORTS and click Load Report.
Browse for the desired report, select it, and click OK to load it. Once
loaded, measurements taken during the new session will add to the
report. At the end of the session, Save the Full Report.
6.1.3. Browse for the file destination and enter an appropriate file name. Click OK.
44
CGB Technical Report 2010-02: Microarray Protocol for High-Throughput Genomics
Last updated: December 16, 2010
7. Trouble shooting:
7.1.
7.2.
7.3.
7.4.
7.5.
7.6.
Make sure sample pedestal is clean. Use 2.0μl of deionized water to wash pedestal
and wipe dry with a KimWipe.
Redo the calibratation with nuclease-free water step presented at the start of the
software setup.
Redo the blank setup. If blank measurement is not done properly, strange results will
occur.
Nucleic acid sample may not be homogenized. Gently mixing the nucleic acid sample
by finger-flicking the micro-centrifuge tube prior to measuring the concentration is
recommended. Re-measure the sample.
Use a 1.5 – 2.0μl sample size when measuring. Strange results occur when the liquid
sample column is not completely formed during the measurement. While making a
measurement, visually confirm the water column is completely formed.
If this does not resolve the issue, the nucleic acid sample may need to be re-purified.
Recommend Microcon YM-30 Centrifugal Filter Unit (See Manufacturer’s Manual).
45
CGB Technical Report 2010-02: Microarray Protocol for High-Throughput Genomics
Last updated: December 16, 2010
Bioanalyzer RNA Protocol for NimbleGen Microarray
Introduction
Agilent Bioanalyzer system and reagent kits are designed to analysis limited samples by
microfluidic capillary electrophoresis. By replacing ethidium bromide with fluorescent dye, the
system is a safer alternative for nucleic acid analysis. Standardized analysis applications,
included with the analysis software, provide reliable data, which can be compared between
independent chip runs.
Precautions
Laboratory safety. It is assumed that users have a sound knowledge of molecular biology
techniques and safe laboratory practices. Before undertaking a new protocol or using unfamiliar
reagents users should review relevant Material Safety Data Sheets to identify potential hazards
and recommended precautions. For background in general molecular biology please see
Molecular Cloning A Laboratory Manual, J. Sambrook and D. W. Russell. Cold Spring Harbor
Laboratory Press.
Caution. RNA 6000 dye concentrate contains DMSO, a molecule that facilitates chemical
absorption into cells. All materials should be handled with caution.
Prevent loss of data. After report is generated, it is recommended to save the report and copy the
files to a secondary independent data storage device or location.
Instrument Setup
1. Confirm the electrophoresis cartridge is installed in the Bioanalyzer 2100 System.
1.1. Electrophoresis cartridge is 1.
2. Switch ON the Bioanalyzer 2100 System.
2.1. Green Light: ON and ready for measurement
2.2. Green Blinking: Measuring
2.3. Orange Blinking: Busy, not measuring
2.4. Red Light: Not ready
3. Switch ON the computer system operating the Bioanalyzer 2100 System and Bioanalyzer
2100 Expert Software.
4. Launch Bioanalyzer 2100 Expert Software.
5. After the software opens, the Instrument control panel will appear.
6. Make sure the Bioanalyzer 2100 System has been detected.
6.1. From instrument control panel, select the instrument.
7. Click on METHODS, select the method for measurement.
7.1. Eukaryote Total RNA Nano
7.1.1. Evaluates 18S and 28S based Eukaryote RNA
7.2. Prokaryote Total RNA Nano
7.2.1. Evaluates 16S and 23S based Prokaryote RNA
7.3. mRNA Nano
7.3.1. Evaluates distribution of nucleic acid molecule to detect ribosomal RNA
contamination for amplified RNA (aRNA) and double-stranded (ds) cDNA
46
CGB Technical Report 2010-02: Microarray Protocol for High-Throughput Genomics
Last updated: December 16, 2010
8. Input Chip Information.
8.1. Sample Name
8.2. Sample Comments
8.3. Chip Lot Number
8.4. Kit Lot Number
8.5. Comments
9. Wash the electrode pins and allow drying for 10 minutes.
9.1. Obtain electrode-cleansers from the Bioanalzyer Kit, label one RnaseZap and label
the other Nuclease-free water.
9.2. Slowly fill the first with RnaseZap (350μl) and the second with nuclease free water
(350μl).
9.3. Open the lid and place the electrode cleanser with RnaseZap into the Agilent 2100
Bioanalyzer. Close the lid and leave it for 1 minute. Open the lid and remove the
electrode cleanser chip from the Agilent 2100 Bioanalyzer.
9.4. Open the lid and place the electrode cleanser with nuclease-free water into the
Agilent 2100 Bioanalyzer. Close the lid and leave it for 10 seconds. Open the lid and
remove the electrode cleanser chip from the Agilent 2100 Bioanalzyer. Keep the lid
open for 10 seconds then close the lid.
10. Setup Chip Priming Station.
10.1. Replace the syringe.
10.1.1. Replace the syringe with each new kit or after 25 chips have been processed.
10.1.1.1. Unscrew the old syringe from the lid of the chip priming station.
10.1.1.2. Release the old syringe from the clip. Discard the old syringe.
10.1.1.3. Remove the plastic cap of the new syringe and insert it into the clip.
10.1.1.4. Slide it into the hole of the luer lock adapter and screw it tightly to the
chip priming station.
10.2. Adjust the base plate.
10.2.1. Open the chip priming station by pulling the latch.
10.2.2. Lift the base plate and insert it again in position C.
10.3. Adjust the syringe clip.
10.3.1. Release the lever of the clip and slide it up to the top position.
11. Proceed with Sample Preparation.
Sample Preparation Setup
1. Prepare Nucleic Acid sample(s) to a final concentration of 100ng/μl - 400ng/μl.
1.1. Total RNA
1.1.1. 150ng per 1.5μl of nuclease-free water in a 0.2mL micro-centrifuge tube. Mix by
gently pipetting. Centrifuge briefly to collect the contents.
1.2. Amplified RNA (aRNA)
1.2.1. 400ng per 1.5μl of nuclease-free water in a 0.2mL micro-centrifuge tube. Mix by
gently pipetting. Centrifuge briefly to collect the contents.
1.3. Double-stranded cDNA
1.3.1. 100ng per 1.5μl of nuclease-free water in a 0.2mL micro-centrifuge tube. Mix by
gently pipetting. Centrifuge briefly to collect the contents.
47
CGB Technical Report 2010-02: Microarray Protocol for High-Throughput Genomics
Last updated: December 16, 2010
2. Prepare Nucleic Acid standard.
2.1. RNA 6000 Ladder, Agilent
2.1.1. Transfer 1.3μl to a 0.2mL micro-centrifuge tube. Mix by gently pipetting.
Centrifuge briefly to collect contents.
3. Heat-denature Nucleic Acid sample(s) and Nucleic Acid standard.
3.1. 70°C for 2 minutes
3.2. Immediately chill in ice bath.
4. Keep Nucleic Acid sample(s) and Nucleic Acid standard on ice until ready to analyze.
4.1. Analyze within 30 minutes. Otherwise return samples to the freezer (-20°C) until
ready to process.
Procedure
1. Allow all reagents from Bioanalyzer kit to equilibrate to room temperature protected from
light for 30 minutes before use.
1.1. RNA 6000 Nano Marker (Green)
1.2. RNA 6000 Nano dye concentrate (Blue)
1.3. RNA 6000 Gel Matrix
1.3.1. If filtered Gel Matrix is available, equilibrate to room temperature for 30 minutes
and skip “prepare gel matrix”.
1.3.2. RNA 6000 Nano Gel Matrix (Red)
2. Prepare gel matrix. (Skip if filtered gel matrix is available.)
2.3. Place 550μl of Agilent 6000 Nano gel matrix into the top receptacle of a spin filter
(provided).
2.4. Place the spin filter in a microcentrifuge and spin for 10 minutes at 1500 rpm.
2.5. Aliquot 65μl filtered gel into 0.5ml Rnase-free tubes (provided). Store unused
aliquots at 4°C and use within one month of preparation.
3. Prepare gel-dye mix.
3.3. Vortex RNA 6000 Nano dye concentrate for 10 seconds and centrifuge briefly.
3.4. Add 1μl of RNA 6000 Nano dye concentrate to 65μl aliquot of filtered gel. Vortex
well. Centrifuge for 10 minutes at room temperate at 14000 rpm.
3.5. Use gel-dye mix immediately. Otherwise store at 4°C for up one day. Equilibrate to
room temperature for 30 minutes. Centrifuge gel-dye mix for 10 minutes at 14,000
rpm prior to use.
4. Load gel-dye mix.
4.3. Take a new RNA Nano chip out of its sealed bag.
4.4. Place the chip on the priming station.
4.5. Pipette 9.0μl of the gel-dye mix from the upper layer of the 0.5ml microcentrifuge
tube and dispense into the bottom of the well marked with the dark encircled G of the
RNA Nano chip.
4.5.1. When pipetting the gel-dye mix from the 0.5ml microcentrifuge tube, make sure
not to draw up particles from the bottom of the gel-dye mix tube. Insert the tip of
the pipette to the bottom of the chip well when dispensing. This prevents a large
air bubble forming under the gel-dye mix. Placing the pipette at the edge of the
well may lead to poor results.
48
CGB Technical Report 2010-02: Microarray Protocol for High-Throughput Genomics
Last updated: December 16, 2010
4.6.
Set the plunger is positioned at 1 ml and then close the chip priming station. Depress
the plunger to luer clamp. Hold in place for 30 seconds. Release the plunger clip.
Wait 5 seconds. Return the plunger to 1ml position. Open the Priming Station.
5. Load RNA 6000 Nano Marker.
5.3. Pipette 5μl of the RNA 6000 Nano marker into the well marked with the ladder
symbol and each of the sample wells to be used. For unused sample wells, pipette 6μl
of the RNA 6000 Nano marker.
5.3.1. Do not leave any wells empty or the chip will not run properly. Unused wells
must be filled with 6μl of the RNA 6000 Nano marker.
6. Load Ladder and Samples.
6.3. Pipette 1μl of the RNA ladder into the well marked with the ladder symbol.
6.4. Pipette 1μl of each sample into a separate sample wells.
7. Vortex the chip.
7.3. Place the chip horizontally in the adapter of the IKA vortex mixer and secure the chip
to the carriage. Vortex the chip for 1 minutes at 2400 rpm. Remove the chip from the
vortex and remove any spilled liquid with a Kimwipe.
8. Insert Chip in the Agilent 2100 Bioanalyzer.
8.3. Open the lid to the Agilent 2100 Bioanalzyer.
8.4. Place the chip into the station.
8.5. Gently close the lid to the Agilent 2100 Bioanalzyer.
Instrument Operation
1. Clicking START to begin the Chip Run.
1.1.
1.2.
1.3.
Ensure the appropriate assay has been selected.
Adjust the wells to be measured setting if necessary.
The runtime is approximately 25 minutes (7 minutes to warm plus 1.5 minutes per
well measurement).
2. At the completion of the Chip Run, clean the instrument and dispose of the used chip from
the run.
2.1.
Open the lid and remove the used chip from the Agilent 2100 Bioanalyzer. Place the
electrode cleanser with fresh nuclease-free water into the Agilent 2100 Bioanalyzer.
Close the lid and leave it for 10 seconds. Open the lid and remove the electrode
cleanser chip from the Agilent 2100 Bioanalzyer. Keep the lid open for 10 seconds
then close the lid.
Results / Interpretations
1. Moderate to High Quality Total RNA Profile
1.1. Distinct 18S and 28S peaks
1.2. Low noise between peaks
1.3. Minimal low-molecular weight contamination
1.4. Minimal high-molecular weight contamination.
1.5. High molecular weight contamination may indicate the presence of a contaminant
(i.e. DNA).
49
CGB Technical Report 2010-02: Microarray Protocol for High-Throughput Genomics
Last updated: December 16, 2010
Figur e 1 Electr ophr ogr am of T otal R NA
50
CGB Technical Report 2010-02: Microarray Protocol for High-Throughput Genomics
Last updated: December 16, 2010
2. High Quality amplified RNA (aRNA) Profile
2.1. One marker peak
2.2. Broad distribution (medial-molecular weight molecules)
2.3. Minimal low-molecular weight molecules
2.4. Minimal ribosomal RNA contamination (< 5%)
Figur e 2 Electr ophr ogr am of aR NA
3. High Quality ds cDNA Profile
3.1. One marker peak
3.2. Broad distribution (medial-molecular weight molecules)
3.3. Minimal low-molecular weight molecules
3.4. Minimal ribosomal RNA contamination (< 5%)
Figur e 3 Electophr ogr am of ds cDNA
51