1
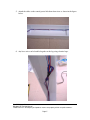
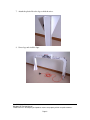
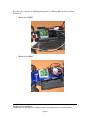
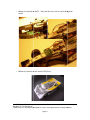
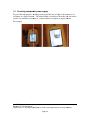
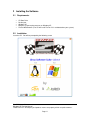
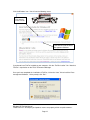
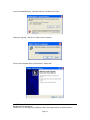
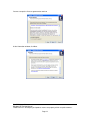
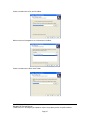
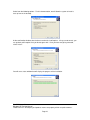
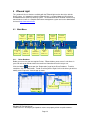
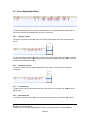
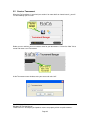
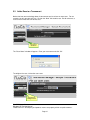
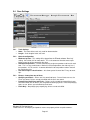
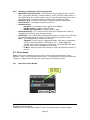
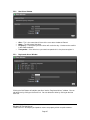
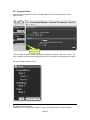
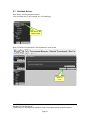
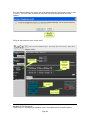
GiroZ Software Suite for Windows XP
User manual
Version 1.1
1 ASSEMBLING THE BRIDGE .................................................................................................. 2
1.1
Inspect the components .................................................................................................................... 2
1.2
Putting it all together........................................................................................................................ 3
1.3
Installing transponders .................................................................................................................... 7
1.4
Checking transponder power supply .............................................................................................10
2 INSTALLING THE SOFTWARE ............................................................................................ 11
2.1
Requirements ...................................................................................................................................11
2.2
Installation .......................................................................................................................................11
3
OVERVIEW OF RACE MANAGEMENT SOFTWARE .......................................................... 18
4 ZROUND LIGHT .................................................................................................................... 19
4.1
Main Menu .......................................................................................................................................19
4.1.1
Driver Database .........................................................................................................................19
4.1.2
Save Race Configuration ...........................................................................................................20
4.1.3
Open Race Configuration File ...................................................................................................21
4.1.4
Configuration Options ...............................................................................................................21
4.1.5
Print Classifications ...................................................................................................................23
4.1.6
Training Mode ...........................................................................................................................23
4.1.7
Start/Finish Race........................................................................................................................23
4.1.8
Show/Hide Events .....................................................................................................................24
4.1.9
Show/Hide Race Parameters......................................................................................................24
4.1.10 About .........................................................................................................................................24
4.1.11 Hardware connectivity warning .................................................................................................24
4.1.12 Pause a Race/Training Session ..................................................................................................24
4.2
Race Parameters ..............................................................................................................................24
4.3
Driver Registration Panel ...............................................................................................................26
4.3.1
Register a driver.........................................................................................................................26
4.3.2
Unregister a driver .....................................................................................................................26
4.3.3
Increment Lap ............................................................................................................................26
4.3.4
Decrement Lap ..........................................................................................................................26
4.3.5
Start Position Order Up / Down.................................................................................................27
4.3.6
Check for conflicts.....................................................................................................................27
4.3.7
Properties ...................................................................................................................................27
4.4
Race Events ......................................................................................................................................28
4.5
Quick Start Guide – Run a single event.........................................................................................28
5 FLACO CHAMPIONSHIP MANAGER .................................................................................. 29
5.1
Championship Concepts .................................................................................................................29
5.2
Create a Tournament ......................................................................................................................30
5.3
Add a Race to a Tournament..........................................................................................................31
5.4
Race Settings ....................................................................................................................................32
5.4.1
Track Settings ............................................................................................................................32
5.4.2
General configuration ................................................................................................................32
5.4.3
Format - choose from one of three: ...........................................................................................32
5.4.4
Qualifying, Prequalifying, and Finals parameters .....................................................................34
5.5
Driver Setup .....................................................................................................................................34
5.5.1
Open Driver Setup Window ......................................................................................................34
5.5.2
New Driver Window .................................................................................................................35
5.5.3
Registered drivers Window .......................................................................................................35
5.6
Generate Heats.................................................................................................................................36
5.7
Distribute Drivers ............................................................................................................................37
5.8
Distribute Transponders .................................................................................................................38
5.9
5.10
Running a Race ................................................................................................................................39
Conclusion ........................................................................................................................................41
Welcome
Thank you for your purchase of the GiroZ lap counting system. We hope you find our system
easy to setup and use.
The GiroZ system ships with a CD containing software for Unix as well as Windows XP. This
manual will only deal with the Windows XP software suite.
This manual will explain how to assemble the bridge, install and test transponders, install the
software and finally how to manage and run a race. The software is simple to use but we
recommend reading through the entire manual before attempting to run a race.
Giro-Z Software Suite
Windows XP Training Manual
LEGAL NOTICE: All company and products names are property of their respective owners.
Page 1
1 Assembling the Bridge
1.1
Inspectt the components
First: inspect the box of parts to insure that everything has been included to assemble the
bridge.
Contents:
•
•
•
•
•
•
•
•
•
•
•
•
Bridge structure
o Two sides with corners (Left and Right)
o Once Top Center
o Two Legs
Two Logos
Decorative stickers
Screws
IR receptor PCBs (3)
IR Receptor Holders (3) (“L” shaped plastic parts)
Distributing PCB with connectors for IR receptors and RJ45 wire
Wires to connect Distributing PCB and IR receptors
300CM (120IN) UTP Wire Cable to connect bridge and PC
RJ45-DSUB25
DSUB25 adapter to connect to the PC parallel port
Free Lap Counter () software
Assembly guide
Giro-Z Software Suite
Windows XP Training Manual
LEGAL
L NOTICE: All company and products names are property of their respective owners.
Page 2
1.2
Putting it all together
1. Put stickers in the bridge parts.
2. Attach the two side posts to the top post using the screws that have been provided.
Giro-Z Software Suite
Windows XP Training Manual
LEGAL NOTICE: All company and products names are property of their respective owners.
Page 3
3. Attach the IR receptor PCBs to the receptor holders (“L” shaped plastic part) with
the receptor facing down. Then attach the receptor holders to the bridge as shown
in the picture below. For best coverage, mark the center of the bridge and ensure
that the IR pickup is in the exact center of the bridge. The receptors should be 10
inches apart. Make sure you measure from the IR Pickup (the two little black
“eyes”on the IR receiver)
4. Connect the cables to the IR picups – Note that the cables are three different
lengths short, med, and long. Then connect the other end of each cable to the
distributing PCB. Next connect the distributing PCB to the leg of the bridge that
contains a pre-cut hole for the RJ45 female connector.
Giro-Z Software Suite
Windows XP Training Manual
LEGAL NOTICE: All company and products names are property of their respective owners.
Page 4
5. Attach the cables to the central part to hide them from view as shown in the figure
below.
6. Any loose wire can be bundled together at the leg using electrical tape.
Giro-Z Software Suite
Windows XP Training Manual
LEGAL NOTICE: All company and products names are property of their respective owners.
Page 5
7. Attach the plastic lid to the legs to hide the wires.
8. Screw legs and stick the logo.
Giro-Z Software Suite
Windows XP Training Manual
LEGAL NOTICE: All company and products names are property of their respective owners.
Page 6
1.3
Installing transponders
GiroZ transponders emit an infrared light that is read by receptors placed in the bridge.
The transponder must be attached to the car with the emitter facing up so that the emitter
can be read by the receptor in the bridge. The receptor must have clear line of site to the
emitter. With that said, it is possible to place the transponder inside the car with the
emitter showing thru the windscreen. But it is important to remember that a dirty
window, a scratched window, or decals on the window may cause the system to miss
laps.
The transponder must be connected to the power supply of your MiniZ and can be easily
plugged and unplugged thanks to the provided connectors. The power consumption is
very low and the transponder is able to work with only two AAA batteries.
WARNING!!! If the transponder is plugged in and batteries are in the car then the
transponder is working. The transponder is not turned off when the switch on the car is
turned off. Leaving the transponder plugged in for extended periods can damage the
transponder. To avoid damage to the transponder, unplug it or remove the batteries from
the car when not in use.
Giro-Z Software Suite
Windows XP Training Manual
LEGAL NOTICE: All company and products names are property of their respective owners.
Page 7
Here are a few examples of mounting transponders to different Mini-Z chassis, bodies
and models:
•
Mounted in a MR01:
•
Mounted in a MR02:
Giro-Z Software Suite
Windows XP Training Manual
LEGAL NOTICE: All company and products names are property of their respective owners.
Page 8
•
Mounted externally
rnally on the F1.. Note that the wires can be routed through the
nozzle.
•
Mounted externally on the Atomic VDS body:
Giro-Z Software Suite
Windows XP Training Manual
LEGAL
L NOTICE: All company and products names are property of their respective owners.
Page 9
1.4
Checking transponder power supply
To test if the transponder is working correctly and has line of sight to the receiver use a
cell phone
one or a digital camera. The infrared light is invisible to the naked eye, but can be
clearly seen from the viewfinder of a camera enabled cell phone or digital camera.
For example:
Giro-Z Software Suite
Windows XP Training Manual
LEGAL
L NOTICE: All company and products names are property of their respective owners.
Page 10
2 Installing the Software
2.1
Requirements
•
•
•
•
•
2.2
CD Rom Drive
Parallel port
Windows XP
Minimum system requirements to run Windows XP
FireFox Web Browser (The CD will install FireFox if it is not detected on your system)
Installation
Insert the CD. You will be prompted by the following screen
Giro-Z Software Suite
Windows XP Training Manual
LEGAL NOTICE: All company and products names are property of their respective owners.
Page 11
Click the Windows Icon. You will see the following screen
Click here to
install FireFox
Click here to install the Race
Management Software
If you do not have FireFox installed on your computer, click the “FireFox installer” link. Note that
FireFox is required to run the FlaCo Tournament Manager.
Once you have completed the installation of FireFox, click on the “here” link to install the Race
management Software. At the prompt, click “Run”.
Giro-Z Software Suite
Windows XP Training Manual
LEGAL NOTICE: All company and products names are property of their respective owners.
Page 12
If you are prompted with the “Unknown Publisher” window, select “Run”.
Select you language – We will use English for this example.
You are now prompted with the install wizard – Select Next
Giro-Z Software Suite
Windows XP Training Manual
LEGAL NOTICE: All company and products names are property of their respective owners.
Page 13
You must accept the License agreement to continue
At the information window, click Next
Giro-Z Software Suite
Windows XP Training Manual
LEGAL NOTICE: All company and products names are property of their respective owners.
Page 14
Select a location for the files and click Next
Make sure that all components are selected and click Next
Select a location for the Start menu Folder
Giro-Z Software Suite
Windows XP Training Manual
LEGAL NOTICE: All company and products names are property of their respective owners.
Page 15
Select from the following options. For this demonstration, we will allow the system to install a
start up icon on the desktop.
At the confirmation window, take the time to review the install options. If they are not correct, you
can go back and fix options that you do not agree with. Once you have everything corrected,
select “Install”.
You will see a status window that will display the progress of the installation.
Giro-Z Software Suite
Windows XP Training Manual
LEGAL NOTICE: All company and products names are property of their respective owners.
Page 16
That’s it – your new timing system has been installed. Note that the install program will
automatically open ZRound Light. For more information on ZRound Light see section 4.
Giro-Z Software Suite
Windows XP Training Manual
LEGAL NOTICE: All company and products names are property of their respective owners.
Page 17
3 Overview of Race Management Software
The GiroZ system ships with two components. It is important to understand what each
component does and does not do as well as how they work together.
On the desktop you will see two Icons (or under the start menu if you did not install to the
desktop)
•
ZRound/Light – This software is responsible for counting laps.
o
Note that this is a stripped down version of the ZRound Race management
system. Several of the features from the full product have been disabled. The
light version does not include tournament management. The full version can be
downloaded at http://www.zround.com/news.php. For more information on this
software see section 4.
o
FlaCo Championship manager – This software maintains a separate driver
database and manages heats and mains. This software will invoke ZRound light
to run each heat and each main. This software does not count laps, it is only
responsible for managing the heat data for each race in the tournament as well
as calculating points. Once a heat has completed, ZRound is closed and the
data is transferred to FlaCo. FlaCo then uses the information to sort the next
round of heats or mains. For more information on this software see section 5.
If you do not wish to track data from one heat to another, then you can start with the Zround
software. However, if you wish to run a tournament with more than one heat and then generate
Mains based on the heat data, you will need to run the FlagCo software.
It is important to remember that the FlagCo software is setting up heat information and passing
that information to the ZRound software. There are several configuration issues that must be set
up on the ZRound software before the FlagCo software will work correctly. It is a good idea to
read thru both Section 4 and Section 5 to get a good idea of how the two systems work together.
Giro-Z Software Suite
Windows XP Training Manual
LEGAL NOTICE: All company and products names are property of their respective owners.
Page 18
4 ZRound Light
This section will discuss features available with the ZRound Light version that ships with the
GiroZ system. It is important to note that ZRound Light is a stripped down version built to be
distributed with the GiroZ lap counting system. The standard version of ZRound includes many
more features as well as a complete tournament management system and can be downloaded
for free at http://www.zround.com
4.1
Main Menu
Save Lap
Times
Section 4.1.2
Open Config
File
Section 4.1.3
4.1.1
Config
Options
Section 4.1.4
Driver
Database
Section 4.1.1
Training Mode
Section 4.1.6
Print
Clasifications
Section 4.1.5
Start/End
Race
Section 4.1.7
Show/Hide
Events
Section 4.1.8
Information
Section 4.1.10
Show/Hide
Parameters
Section 4.1.9
Hardware
Warning
Section 4.1.11
Driver Database
Before you run a race you must register Drivers. ZRound allows you to save a list of drivers in
your club so that you do not need to re enter driver information for each heat you run.
Click the Helmet
icon to open the “Registration” page for the Driver Database. To add a
new driver, click the “Add” button. To edit an existing driver “Right Click” on the driver you wish to
modify select “Properties” from the pop-up menu.
Giro-Z Software Suite
Windows XP Training Manual
LEGAL NOTICE: All company and products names are property of their respective owners.
Page 19
Changes to the driver information are made on the “Car properties” page. Select “Cancel” to
ignore your changes, or select “Accept” to save your changes to the database.
4.1.1.1
•
•
•
•
•
•
•
•
4.1.2
Driver Database Fields
Id This field is assigned by the system. This is a unique identification for the driver
Dorsal - A number that can be assigned to each driver in a competition (usually the same
number as a sticker on the car) This can make it easy to identify the car for manual lap
counting
KEY – F0 relates to an F-Key assigned to the driver for manual counting. It is a good
idea to set the dorsal to this number for easy reference. Ex: F1 = Dorsal 1, F2 = Dorsal
2, F3 = Dorsal 3, etc…
Name - The full name of the driver
Nick – A nick name for the driver. The nick name will appear on the race output screen.
Club – Drivers Club, if any.
Tx The Transponder ID. For the GiroZ this is the small printed number on the
transponder. This value will be used to identify any conflicts before the heat is run.
Freq - The Freq that the driver is using. This must be a whole number, so 27.255 would
be entered as 27255. This value will be used to identify any conflicts before the heat is
run.
Save Race Configuration
Before a race can be run, you must save your configuration settings to a Race Configuration File
or *.rcf file. A file with the same name but extension .dat is saved with lap times. When you
attempt to run a race, if no file has been selected, ZRound will prompt you for a file name.
To save the file manually click the Save
Icon.
Note that for Training sessions, a file is automatically created with lap times for each driver in the
folder “Entrenamientos\YYYY\MM\DD” under the ZRound installation path (Y=year; M=month;
D=day) saving training session files by driver an day.
Giro-Z Software Suite
Windows XP Training Manual
LEGAL NOTICE: All company and products names are property of their respective owners.
Page 20
4.1.3
Open Race Configuration File
Past race information can be reloaded into the system by clicking the Open
section 4.1.2 for a description of the file system and how to find race data.
4.1.4
Icon. See
Configuration Options
To open the configuration panel, click the Configuration
icon. Note that information will not
be applied unless the new values are saved to the Zround.ini file, and then re-loaded.
The configuration panel has four tabs:
4.1.4.1
•
•
•
•
•
Display Options
Show hour in total time - toggle hour display on and off
Show all race events – Check this box to show all events detected in the “Race Events”
window.
Show time lags – When on, this option will display
Language – Select language for all labels in the application
Time to remove car registration from training – Set in min. Set this option to ensure that
all cars are on the track that have been registered to race. Before you run the race, run a
short training session (see section 4.1.6). Cars that are not detected during training will
be removed from the race. This value is the amount of time the system will wait during
training to remove the car from the race if it is not detected during training.
Giro-Z Software Suite
Windows XP Training Manual
LEGAL NOTICE: All company and products names are property of their respective owners.
Page 21
4.1.4.2
•
•
•
•
•
•
•
•
•
•
4.1.4.3
Sound Options
Suspected reading – Played when system detects an invalid lap. For example: a driver
passes under the bridge to quickly, or a transponder that is not registered for the race.
Finish Line Pass – Played when a car is detected under the bridge.
Best own Time – Played when a driver beats his/her best lap time
Race finished Driver - Played when
Best lap - Played when a driver beats the current fastest lap setting for the race.
Race start - Played to signal the start of the race (usually a horn)
End of race - Played when the time has elapsed or the a driver has completed the total
number of laps for the race.
First rank - Played when the lead changes from one driver to another.
Lights – Played for each item in the countdown. For example: A countdown of 3 would
sound (beep, beep, beep – Horn)
Staggered starts – When staggered mode is selected, this is the sound to signal each
driver to start.
Colors
This tab allows you to change the colors for the application.
Giro-Z Software Suite
Windows XP Training Manual
LEGAL NOTICE: All company and products names are property of their respective owners.
Page 22
4.1.4.4
•
•
•
4.1.5
GiroZ hardware settings
Activate GiroZ – This must be clicked for the GiroZ hardware to be detected
Enable alarm detection – toggle alarms on and off
Enable error detection – toggle errors on and off – for example a bad read of a
transponder.
Print Classifications
To print out the final results of the race click the Print
4.1.6
Icon.
Training Mode
To begin a training session, click on the training
icon. To stop training, click the Stop
Icon. Note that the stop icon will only appear after a race or training session has started.
Training mode will allow you to test if all cars registered for the race have the correct transponder
and are being detected by the bridge.
Training mode can also be used to register cars to race. If a car passes under the bridge during
training mode, the system will look up the transponder in the driver database (see section 4.1.1).
If a match is found, the driver will be registered for the race. For this feature to work properly
there must not be more than one driver record with the same transponder Id.
4.1.7
Start/Finish Race
Press the Start Icon to start a race. Note that you must first register drivers for the race (see
section 4.3) Once drivers have been registered for the race click the Start
race. To stop the race, click the Stop
race or training session has started.
Icon to start the
Icon. Note that the stop icon will only appear after a
Giro-Z Software Suite
Windows XP Training Manual
LEGAL NOTICE: All company and products names are property of their respective owners.
Page 23
4.1.8
Show/Hide Events
The Show/Hide events
4.1.9
icon will toggle the Race Events screen on and off.
Show/Hide Race Parameters
The Show/Hide race parameters
icon will toggle off the race parameters panel. See section
4.2 for more details on race parameters.
4.1.10 About
The About
icon will display the ZRound splash screen.
4.1.11 Hardware connectivity warning
The Hardware connectivity warning displays the current status of the bridge. If the system is
detecting the bridge then a green light will show, if not a red light will displ
display.
4.1.12 Pause a Race/Training Session
To pause a race or training session, click the Pause
Icon. To restart the race, click the
Resume
Icon. Note that the pause and resume icons will only appear after a race or training
session has started.
4.2
Race Parameters
The race parameters panel allows you to set up how a race will be run. All race parameter
information is saved in the race configuration file.
•
Qualifying – This setting will determine how a race is won
o Laps – The race will run for the amount o
off time specified in the “Race Time”
Time
setting.. The driver with the highest lap count wins. In the event of a tie, the
driver with the lowest time wins.
o Best Time – The race will run until a driver completes the number of laps set in
the Laps setting. The first driver to complete the specified number of laps wins.
•
Start – This setting determines how the race will start.
o Staggered – Drivers line up in staggered formation. Each driver is prompted to
start at an interval specified in “Time between cars”. When staggered is
selected, each driver is running on a unique clock. The driver clock starts when
the driver passes under the bridge for the first time.
Giro-Z Software Suite
Windows XP Training Manual
LEGAL
L NOTICE: All company and products names are property of their respective owners.
Page 24
o
Le Mans – All drivers start at the same time. There is one clock for all drivers in
the race.
•
Initialize after first finishing line pass – This option only appears when Le Mans has been
selected as the value for Start. When this option is checked, the clock will start once the
first car passes under the bridge. If this option is left unchecked, the clock starts when
the horn is sounded to start the race.
•
Best Lap – Or minimum lap time. This is the amount of time that must expire before a
new lap will be counted for the driver. This value is used to prevent a driver from being
accidentally counted more than once. For example: If the best possible time that a driver
can complete a lap is 10 seconds. Then a good setting would be 8 seconds. If a driver
crashes under the bridge, the system will wait 8 seconds to count the car a second time.
This gives the driver time to recover and be well away from the bridge before the
minimum lap time expires.
•
Race Time (H:M:S) – This option only displays when the value for Qualifying is set to
Laps. This is the amount of time in Hours: Minutes: Seconds that the race will run.
•
Race Time (Laps) – This option only displays when the value for Qualifying is set to Best
Time. This is the number of laps that must be completed before the race is complete.
•
Countdown Time – the amount of seconds that will pass before from the time the start
icon is pressed until the race starts. For example, if the value is set to 3, the drivers will
here 3 beeps, and then a start horn.
•
Call to start – Not supported
•
Time to Finish – The time allotted for a driver to finish his or her last lap after the race has
completed. Usually a value three times greater then the mimumum lap time is sufficient.
•
Time between cars – This value is only used with a staggered start. This is the amount
of time that will elapse before the next driver in the formation is promted to start.
Giro-Z Software Suite
Windows XP Training Manual
LEGAL NOTICE: All company and products names are property of their respective owners.
Page 25
4.3
Driver Registration Panel
The driver registration panel is used to show what drivers are registered for the race as well as
the current statistics for the driver while the race is under way.
4.3.1
Register a driver
To register a driver for a heat, right click on the Driver Registration Panel and select “Register
Driver”
The Driver Database window will appear. Double click a driver from the Driver Database window
to add the driver to the race. Notice that the Driver database window only shows drivers that are
not already registered for this race.
4.3.2
Unregister a driver
To remove a driver from the Driver Registration Panel, Right Click on the driver and select
“Unregister”.
4.3.3
Increment Lap
To add a lap for a driver, right
ight click on the driver and select the “Increment Lap” option from the
popup menu
4.3.4
Decrement Lap
To remove a lap from a driver, right click on the driver and select the “Decrement Lap” option.
Giro-Z Software Suite
Windows XP Training Manual
LEGAL
L NOTICE: All company and products names are property of their respective owners.
Page 26
4.3.5
Start Position Order Up / Down
To order drivers in the window by starting order, right click and select “Start Position Order”. To
move a driver up the list, Right Click on the driver and select Up. To move a driver down the list,
right click on the driver and select “Down”.
4.3.6
Check for conflicts
Once all drivers have been added, you can check for frequency conflicts and transponder
conflicts by selecting the “Check” option from the right click menu.
4.3.7
Properties
Driver information can be viewed and modified by right clicking on the driver and selecting
“Properties” from the menu. This will open the “Car Properties” window.
Notice that the F? key has now been assigned. This F? key assignment can be used to manually
count a lap for the driver in the event that the timing hardware misses the lap or is not functioning.
Giro-Z Software Suite
Windows XP Training Manual
LEGAL NOTICE: All company and products names are property of their respective owners.
Page 27
4.4
Race Events
The race events window shows all race events as they happen in real time. For example, every
time the hardware detects a car passing under the bridge the event window shows the event.
4.5
Quick Start Guide – Run a single event
Now that you have read thru all of the basic features for the Zround Light software, it is time to put
it all together and run a single race.
Follow these simple steps:
1.
2.
3.
4.
5.
6.
Start Zround – See section 3
Register drivers in Zround Driver Database – See section 4.1.1
Register Drivers to race – See section 4.3.
Set up Race Parameters - See section 4.2
Save the race configuration file – See section 4.1.2
Start the race – See Section 4.1.7
Giro-Z Software Suite
Windows XP Training Manual
LEGAL NOTICE: All company and products names are property of their respective owners.
Page 28
5 FlaCo Championship Manager
This section will discuss features available with the FlaCo Championship Manager. If you want to
run more than one race then this is the place to start. It is important to remember that the FlaCo
software will not count the laps. The FlaCo software will setup all information for the heat, when
you select “Run” to run the heat, the ZRound software will be invoked. For this reason it is a
good idea to read thru section 4 (ZRound Light) to get a good understanding of how heats are
run.
5.1
Championship Concepts
Before we continue you will need to have an understanding of a few race concepts and
terminology used by the FlaCo system.
•
•
•
•
•
•
•
Tournament: A set of races run over a period of time. A tournament can consist
of one or more Races
Race: A Race in the FlaCo terminology is a set of heats
Heat: Heats are a collection of rounds. There are three types of heats outlined
below.
Prequalifing Heat: Results from a prequalifier heat are used to sort drivers into
qualifier heats
Qualifier Heat: Results from a qualifier heat are used to sort drivers in to the
Finals (sometimes called Mains)
Final Heats: The final round of heats. This is often called mains in R/C racing.
FlaCo sorts A, B, and C mains in to Final 1, Final 2, Final 3, etc. Points are
calculated for Finals.
Rounds: This is where the rubber hits the road and races run.
Giro-Z Software Suite
Windows XP Training Manual
LEGAL NOTICE: All company and products names are property of their respective owners.
Page 29
5.2
Create a Tournament
When the FlaCo software is launched (see section 3 for more details on how to launch) you will
see the following splash screen:
Before you can continue you must create a name for your tournament. Click on the “New” link to
create and name a new Tournament.
At the Tournament name window, enter your name and select “ok”.
Giro-Z Software Suite
Windows XP Training Manual
LEGAL NOTICE: All company and products names are property of their respective owners.
Page 30
5.3
Add a Race to a Tournament
Notice that from our terminology above: A tournament consists of one or more races. For our
example, we will start with one race. Click on the “New” link to add a race. But for reference, a
race can be all heats that run for that class.
Click here to
add Races
The “Race Name” window will appear. Enter your race name and click “Ok”.
To configure the race, click on the race name.
Click here to
configure race
Giro-Z Software Suite
Windows XP Training Manual
LEGAL NOTICE: All company and products names are property of their respective owners.
Page 31
5.4
Race Settings
5.4.1
Track Settings
•
•
5.4.2
•
•
•
5.4.3
•
•
•
Name - The name of the track, only used for documentation
Length – Linier length of track, not used
General configuration
Minimum lap time – This setting will be pluged into the ZRound software “Best Lap”
setting. See section 4.2 for more details. This is the amount of time that must expire
before a new lap will be counted for the driver.
Available transponders – Used to automatically assign transponders to drivers for each
heat. This is a very useful feature. Not that in the example above, the club only has 4
transponders: 4,5,22, and 23. A comma delimited list of transponder numbers that will
be used for the race.
Use manual laps in classifications – this allows you to hit one of the F? keys to count
laps.
Format - choose from one of three:
Qualifying and Finals – Drivers are first sorted into heats. Once all heats are run, the
Finals are sorted. Drivers are not reshuffled until the finals are sorted.
Prequalifying, Qualifying, and Finals – Drivers are first sorted into prequalifying heats,
once these heats are run drivers are reshuffled into Qualifying heats. Once the qualifying
heats are run, drivers are reshuffled into Final heats.
Finals Only – No qualifying or prequalifying, drivers are not reshuffled.
Giro-Z Software Suite
Windows XP Training Manual
LEGAL NOTICE: All company and products names are property of their respective owners.
Page 32
Example of Qualifying and Finals
Example of Prequalifying, Qualifying and Finals
Example of Finals only
Giro-Z Software Suite
Windows XP Training Manual
LEGAL NOTICE: All company and products names are property of their respective owners.
Page 33
5.4.4
•
•
•
•
•
•
•
5.5
Qualifying, Prequalifying, and Finals parameters
Max number of drivers per heat – FlaCo will only sort this number of drivers into any
heat. If you register 10 drivers, and this number is set to 5, FlaCo will create 2 heats. If
you register 10 drivers, and this number is set to 3, Flaco will create three heats. Heat1
will contain 3 drivers, Heat2 will contain 3 drivers, Heat 3 will contain 2 drivers.
Rounds per heat – For each heat of drivers, FlaCo will create this many rounds.
Round Duration – The amount of time the race will run.
Distribute Drivers
o Por Orden – in the order the drivers appear in the database
o Random by Freq – randomly select the order
o Random by Transponder – randomly select the order
Round Qualified by – This is how the winner of the round is determined. Points are
awarded by Best lap time, or by most laps counted.
Qualified by – This is how FlaCo will decide to advance drivers into the next set of heats.
By a total count of points for all rounds in a Heat, or by the best round in the heat.
Start – This setting determines how the race will start.
o Staggered – Drivers line up in staggered formation. Each driver is prompted to
start at an interval specified in “Time between cars”. When staggered is
selected, each driver is running on a unique clock. The driver clock starts when
the driver passes under the bridge for the first time.
o Le Mans – All drivers start at the same time. There is one clock for all drivers in
the race.
Driver Setup
Before heats can be sorted and races can be run, drivers must be entered into the FlaCo
database. Drivers must be entered into each Race. If a championship is to span more then one
race day, it is important to enter the driver name exactly the same for each race.
5.5.1
Open Driver Setup Window
Giro-Z Software Suite
Windows XP Training Manual
LEGAL NOTICE: All company and products names are property of their respective owners.
Page 34
5.5.2
•
•
•
•
5.5.3
New Driver Window
Alias – This is the name that will show in the race status window of zRound
Name – The full name of the driver
Frequency – The frequency that this driver will use for the day. Used to resolve conflict
in the zRound software
Transponder – If the driver has a personal transponder this is the place to register it.
Registered drivers Window
Clicking the “Add” button will add the new driver into the “Registered drivers” window. You can
edit the driver by clicking on the Pensil link. You can delete the driver by clicking on the blue
trash can.
Giro-Z Software Suite
Windows XP Training Manual
LEGAL NOTICE: All company and products names are property of their respective owners.
Page 35
5.6
Generate Heats
After the race configuration has been selected and drivers have been entered it is time to
generate heats.
Click here to
Generate heats
In our example, we have selected Prequalifying, Qualifying, and Finals. We have 3 drivers. We
have selected 2 rounds for the prequalifying heats and 1 round for the qualifying and Final heats.
Our heat window now looks like this:
Giro-Z Software Suite
Windows XP Training Manual
LEGAL NOTICE: All company and products names are property of their respective owners.
Page 36
5.7
Distribute Drivers
Next, drivers must be placed into rounds.
Click on the top level, in our example, this is Prequalifying.
Click here to set
up the rounds
Next Click on the Distribute drivers link to add drivers to the round.
Click here to put
drivers into
rounds
Giro-Z Software Suite
Windows XP Training Manual
LEGAL NOTICE: All company and products names are property of their respective owners.
Page 37
5.8
Distribute Transponders
The transponders numbers entered into the driver screen will be displayed. Red will indicate a
conflict. If you have more drivers then transponders, use the “Distribute Transponders” feature to
automatically assign transponders to drivers. With this feature, you can run a race with 50 or
more drivers with only 4 transponders. You only need enough transpondors for the number of
drivers on the track at any one time.
Transponders
will be placed
from the value
entered into the
driver screen
Click here to
automatically
assign
transponders
Giro-Z Software Suite
Windows XP Training Manual
LEGAL NOTICE: All company and products names are property of their respective owners.
Page 38
5.9
Running a Race
The drivers are entered, the heats are sorted, transponders have been assigned, it’s time to
RACE!!!
Click here
launch the
zRound
software and
run the race
Click here to
select the first
round
Once you click the “Run” link the ZRound software will start.
DO NOT CLOSE THE FlaCo WINDOW!!!
Run the race as outlined in Section 4.
Giro-Z Software Suite
Windows XP Training Manual
LEGAL NOTICE: All company and products names are property of their respective owners.
Page 39
Once the zRound software has closed, you will be prompted by the FireFox browser that a script
is running. You must select “Continue” for race times to be transferred back to the FlaCo
software.
FlaCo will now show the results for the round.
The round is
marked as run
Notice that
points are
awarded and
drivers are
ranked
Race times are
recorded
Laps can be
split or dropped
Giro-Z Software Suite
Windows XP Training Manual
LEGAL NOTICE: All company and products names are property of their respective owners.
Page 40
5.10 Conclusion
Continue to follow the steps outlined in section 5.9 for each round in each heat. Once all rounds
are run for a heat, click on the next heat to assign drivers and transponders.
Giro-Z Software Suite
Windows XP Training Manual
LEGAL NOTICE: All company and products names are property of their respective owners.
Page 41