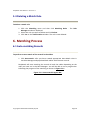
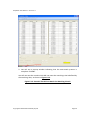
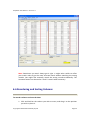
1
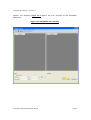
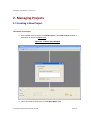
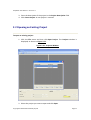
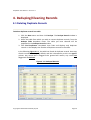
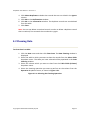
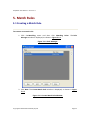
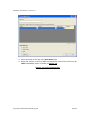
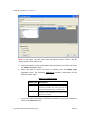
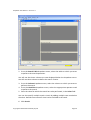
EasyMatch
User Manual
EasyMatch User Manual - Version 1.0
Table of contents
1. GETTING STARTED
4
1.1 INTRODUCTION TO EASYMATCH
1.2 INSTALLING EASYMATCH
1.3 MATCHING WITH EASYMATCH
1.4 RUNNING EASYMATCH FOR THE FIRST TIME
1.5 EASYMATCH USER INTERFACE
4
4
7
7
8
2. MANAGING PROJECTS
10
2.1 CREATING A NEW PROJECT
2.2 OPENING AN EXISTING PROJECT
2.3 DELETING A PROJECT
2.4 MODIFYING EXISTING PROJECT DETAILS
10
11
12
12
3. IMPORTING DATA
14
3.1 IMPORTING DATA INTO EITHER OF THE TABLES
3.2 IMPORT DATA FILE TYPES
3.3 SETTING COLUMN NAMES AND DATA TYPES
14
15
18
4. DEDUPING/CLEANING RECORDS
20
4.1 DELETING DUPLICATE RECORDS
4.2 CLEANING DATA
20
21
5. MATCH RULES
23
5.1 CREATING A MATCH RULE
5.2 EDITING A MATCH RULE
5.3 THE MANUAL MATCH RULE
5.4 DELETING A MATCH RULE
23
27
27
28
6. MATCHING PROCESS
28
6.1 AUTO-MATCHING RECORDS
6.2 MANUALLY MATCHING RECORDS
6.3 FILTERING RECORDS IN A TABLE
6.4 SELECTING/UNSELECTING ALL RECORDS
6.5 UNMATCHING RECORDS
28
31
32
32
33
Copyright © 2010-2012 Youbewdy Pty Ltd
Page 2
EasyMatch User Manual - Version 1.0
6.6 REORDERING AND SORTING COLUMNS
34
7. REPORTING
35
7.1 SEARCHING RECORDS
7.2 EXPORTING SEARCH RESULTS
35
39
Copyright © 2010-2012 Youbewdy Pty Ltd
Page 3
EasyMatch User Manual - Version 1.0
1. Getting Started
1.1 Introduction to EasyMatch
EasyMatch is a software application designed to match records between two sets of
data. This software can be used to match the records in any two documents (CSV files or
spreadsheets) or databases.
The software is designed to provide you with a quick and easy way to match large
numbers of records from multiple sources. The software also provides the functionality
to manually match the records in addition to the automatic matching.
Typical uses for EasyMatch are:
•
•
•
•
•
•
•
•
•
General Ledger reconciliations, including:
o Bank reconciliations
o Pending report/GRIR reconciliations
o Unpresented checks
o Method of Payment reconciliations
Match purchase orders to deliveries
Match products received to supplier invoices
Match payable invoices to supplier statements
Match stock deliveries to inventory systems
Match customer payments to debtors
Match payroll data, including:
o Duplicate pays
o Duplicate employees
o Ghost employees
Match emails to mailing lists
Duplicate data removal
1.2 Installing EasyMatch
The pre-requisites to install EasyMatch are:
Copyright © 2010-2012 Youbewdy Pty Ltd
Page 4
EasyMatch User Manual - Version 1.0
•
•
Microsoft .NET Framework version 4
SQLite - relational database management system
These are also a part of the EasyMatch installation process. If you have not installed
Microsoft .NET Framework version 4 and SQLite prior to installing EasyMatch, these will
be installed during the installation.
To install the EasyMatch application:
1. Download the EasyMatch.exe file to your computer.
2. Double-click the EasyMatch.exe file.
The EasyMatch installation wizard is displayed.
3. Click Next on the Welcome to the EasyMatch Setup Wizard window.
4. Click the checkbox next to I accept the terms of the agreement option and
click Next, as shown in Figure 1.2.1.
Figure 1.2.1: Accepting the Terms of the Agreement
Copyright © 2010-2012 Youbewdy Pty Ltd
Page 5
EasyMatch User Manual - Version 1.0
5. Click Install Now in the Choose the installation you want window.
6. Click Browse to change the location where EasyMatch will be installed and
click Next.
7. Click Install in the Begin installation of EasyMatch window.
The EasyMatch installation will display a progress bar indicating the progress of
the installation.
8. Click Close when the installation is complete.
Copyright © 2010-2012 Youbewdy Pty Ltd
Page 6
EasyMatch User Manual - Version 1.0
1.3 Matching with EasyMatch
EasyMatch uses deterministic matching to match records. Deterministic matching uses a
combination of algorithms and business rules to determine when two or more records
match.
Specifying how EasyMatch will match your data revolves around matching rules. In a
matching rule you specify which columns or fields EasyMatch will match on, and the
type of match you want. The two types of matches in EasyMatch are:
a.
One to One match: For each record in the first table, one matching record is sought
in the second table. If the sought record meets the criteria of the current matching
rule, both records are matched together.
•
Many to Many match: For each record in the first table, many matching records are
sought in both tables. If all records meet the criteria of the current matching rule,
they are all matched together.
1.4 Running EasyMatch for the First Time
When you open EasyMatch for the first time after its installation, a license file and serial
key should be entered to unlock the application. To do so:
1. Open the application from Start > All Programs > EasyMatch.
The License pop-up window is displayed, as shown in Figure 1.4.1 .
Figure 1.4.1: License Pop-up Window
Copyright © 2010-2012 Youbewdy Pty Ltd
Page 7
EasyMatch User Manual - Version 1.0
2. Browse through the computer and provide the path to the license file that you
received when you purchased the software and click Import .
If the license file is correct, the Serial Key pop-up window is displayed.
3. Enter the serial key that you received via email in the Serial Key field and click
OK.
1.5 EasyMatch User Interface
EasyMatch provides two methods of navigation. The first method is provided by the
menu bar on the top-most section of the application window. The second method of
navigation is provided by the tool bar icons below the menu bar. The main matching
window where the records are matched also provides filtering, selecting, and matching
Copyright © 2010-2012 Youbewdy Pty Ltd
Page 8
EasyMatch User Manual - Version 1.0
options. The following Figure 1.5.1 depicts the user interface of the EasyMatch
application.
Figure 1.5.1: EasyMatch User Interface
Copyright © 2010-2012 Youbewdy Pty Ltd
Page 9
EasyMatch User Manual - Version 1.0
2. Managing Projects
2.1 Creating a New Project
To create a new project:
1. Click the File menu and then click New Project. The Create Project window is
displayed, as shown in Figure 2.1.1 .
Figure 2.1.1: New Project Window
2. Enter the name of the project in the Project Name field.
Copyright © 2010-2012 Youbewdy Pty Ltd
Page 10
EasyMatch User Manual - Version 1.0
3. Enter the description of the project in the Project Description field.
4. Click Create Project. A new project is created.
2.2 Opening an Existing Project
To open an existing project:
1. Click the File menu and then click Open Project. The Projects window is
displayed, as shown in Figure 2.2.1 .
Figure 2.2.1: Projects Window
2. Select the project you want to open and click Open.
Copyright © 2010-2012 Youbewdy Pty Ltd
Page 11
EasyMatch User Manual - Version 1.0
You can also browse to a project file to open a project from the local computer.
To open a project file from the local computer:
3. Click Browse on the Projects window. The Browse Project window is
displayed.
4. Enter the project name in the Project Name field.
5. Browse the project database file from the Project File field. The project
database file should be the one with a .db extension.
6. Click Open.
2.3 Deleting a Project
To delete an existing project:
1. Click the File menu and then click Open Project. The Projects window
is displayed.
2. Select the project you want to delete and click Delete.
Note: You cannot delete a project that is currently in use by the
application. If you try to delete a project that is in use by the application,
a pop-up window alerts you that you are trying to delete a project in use.
Open another project and try again.
2.4 Modifying Existing Project Details
To modify the details of an existing project:
1. Click the File menu and then click Open Project. The Projects window is
displayed.
2. Select the project you want to edit and click Edit. The Update
Project window is displayed.
3. Modify the project name and/or project description.
4. Click Update. A pop-up message is displayed indicating that the project
details are modified.
Copyright © 2010-2012 Youbewdy Pty Ltd
Page 12
EasyMatch User Manual - Version 1.0
5. Click OK and then click Close.
Copyright © 2010-2012 Youbewdy Pty Ltd
Page 13
EasyMatch User Manual - Version 1.0
3. Importing Data
3.1 Importing Data into Either of the Tables
To import data into either of the tables:
1. Click the Import menu and then click Import First Set or Import Second Set
depending on the table to which you want to import data. The Import Data
window is displayed. This window has two sections which include the
Import options and the Table description section, as shown in Figure 3.1.1 .
Figure 3.1.1: Import Data Window
Copyright © 2010-2012 Youbewdy Pty Ltd
Page 14
EasyMatch User Manual - Version 1.0
3.2 Import Data File Types
You can import the following data types into the table:
1. Comma-Separated Values (CSV)
2. Excel Files
3. Microsoft Access Database
Copyright © 2010-2012 Youbewdy Pty Ltd
Page 15
EasyMatch User Manual - Version 1.0
Note: If you are importing data into an EasyMatch table that already contains data, the
previously imported data will be overwritten. Also, if you are importing data into an
EasyMatch table that already contains matched data, the import will fail – You will need
to unmatch all records before overwriting the data with a new import.
Note: You will need to ensure that you have the appropriate ODBC drivers for imports.
These will typically be installed on your computer by default but you may need to
troubleshoot if problems arise.
To import CSV data:
a. Select Comma-Separated Values (CSV) from the Data Import Type
dropdown menu.
b. Uncheck the First row as header checkbox if you do not want the first row of
the imported data to be the header. This checkbox is ticked by default.
c. Click the Browse button next to the File Path field.
d. Browse to the CSV file. The path of the CSV file is shown in the File Path field.
e. Click Connect. The Table description section of the Import Data window
displays the column headers of the CSV file you want to import, as shown in
Figure 3.2.1 .
Figure 3.2.1: The Import Data Window Displays the Column Headers of the CSV File
Copyright © 2010-2012 Youbewdy Pty Ltd
Page 16
EasyMatch User Manual - Version 1.0
To import Excel spreadsheet data:
1. Select Excel File from the Data Import Type dropdown menu.
2. Uncheck the First row as header checkbox if you do not want the first row of
the imported data to be the header. This checkbox is checked by default.
3. Click the Browse button next to the File Path field.
4. Browse to the Excel file. The path of the Excel file is shown in the File Path
field.
5. Click Connect. The Table description section of the Import Data window
displays the column headers of the Excel file you want to import.
Copyright © 2010-2012 Youbewdy Pty Ltd
Page 17
EasyMatch User Manual - Version 1.0
6. Select the sheet in the Excel file from which you want to export the data, in
the Sheet Name dropdown menu.
To import Microsoft® Access Database data:
a. Select Microsoft Access Database from the Data Import Type dropdown
menu.
b. Browse to the MS Access database from the computer. The path of the MS
Access database is shown in the File Path field.
c. If the Access database has a workgroup file with username and password,
check the checkbox next to the MS Access Workgroup field. This activates
the User name and Password fields.
d. Enter the user name in the User name field.
e. Enter the password in the Password field.
f. If the database has an encryption password, check the checkbox next to the
MS Access Encryption Password field. This activates the Encryption
Password field.
g. Enter the encryption password in the Encryption Password field.
h. Click Connect.
i. Select the table you wish to import from the Table Name dropdown menu.
Note: You can use either the workgroup file username and password or the
encryption password to successfully import an Access Database into the
EasyMatch application, you cannot use both. This is a limitation of the current
version of EasyMatch.
3.3 Setting Column Names and Data Types
The Table description section displays the column headers' details in three distinct
columns. The Field Name column displays the name of the column. The Field Type
column displays the type of data (Text, Number, or Date/Time) in the respective column.
The Import column allows you to either import or not import the column.
Note: If you have unchecked the First row as header checkbox earlier, the Field Name
values will default to Field1, Field2, etc.
If you want to modify the Field Name column, Field Type column, or the Import
column, do so by changing the values. If you choose to uncheck some field names from
importing, those columns will not be imported.
Copyright © 2010-2012 Youbewdy Pty Ltd
Page 18
EasyMatch User Manual - Version 1.0
When data is imported, the columns you have chosen for import are displayed in the
first table of the main matching window. The EasyMatch application also adds two new
columns as the first two columns in the table. The first column is labeled as ID and it
contains ID numbers from 1 to n where n is the number of rows in the CSV file. The
second column is labeled as Match No. This column contains the match number. Each
record in a unique match receives a match number which identifies all records in a
match. Unmatched records have a value of 0 in this column, as shown in Figure 3.3.1.
Figure 3.3.2: Data Imported and Displayed in the First table
Copyright © 2010-2012 Youbewdy Pty Ltd
Page 19
EasyMatch User Manual - Version 1.0
4. Deduping/Cleaning Records
4.1 Deleting Duplicate Records
To delete duplicate records in a table:
1. Click the Data menu and then click Dedupe. The Dedupe Record window is
displayed.
2. Select the table from which you wish to remove duplicate records, from the
Dedupe Table dropdown menu. The table you have selected will be
populated in the Dedupe Record window.
3. Click Find Duplicates. EasyMatch then finds and displays only duplicate
records. It also displays the number of duplicate records in the table.
In the following Figure 4.1.1 , the table has found 41 duplicate records. One copy
of each record will be kept by default, and this is denoted by a tick in the Ignore
column. Any record that is flagged to be ignored will remain; any record not
flagged will be deleted .
Figure 4.1.1: Deduped Records
Copyright © 2010-2012 Youbewdy Pty Ltd
Page 20
EasyMatch User Manual - Version 1.0
4. Click Delete Duplicates to delete the records that are not ticked in the Ignore
column.
5. Click OK on the Confirmation window.
6. Click OK on the Information window. The duplicate records are now deleted
from the table.
7. Click Close .
Note: You can not delete a matched record. In order to delete a duplicate record
that is matched, first unmatch the record and try again.
4.2 Cleaning Data
To clean data in a table:
1. Click the Data menu and then click Clean Data. The Data Cleaning window is
displayed.
2. Select the table in which you want to clean the records from the Select Table
dropdown menu. The table you have selected will be populated in the Data
Cleaning window.
3. Select the column which you want to clean from the Table Fields (Column)
dropdown menu.
4. Select the cleaning operation you want to perform on the column from the
Operation dropdown menu, as shown in Figure 4.2.1 .
Figure 4.2.1: Selecting the Cleaning Operation
Copyright © 2010-2012 Youbewdy Pty Ltd
Page 21
EasyMatch User Manual - Version 1.0
The EasyMatch application allows you to perform the following cleaning operations
depending on the type of the field you have chosen in the Table Fields (Column)
dropdown menu. The following Table 4.2.1 illustrates the cleaning operations.
Table 4.2.1: Cleaning Operations
Field Type
Text
Numbers
Cleaning Operation
Upper Case
Lower Case
Proper Case
Negative to Positive
Positive to Negative
Flip Sign
Date
NA
Description
Converts all text in the column to upper case.
Converts all text in the column to lower case.
Converts all text in the column to sentence case.
Negative numbers will be changed to positive. Positive
numbers are unchanged.
Positive numbers will be changed to negative. Negative
numbers are unchanged.
Positive numbers are changed to negative. Negative numbers
are changed to positive.
When the Field tupe is a date, no cleaning operation can be
performed.
5. Click Process. The cleaning operation is performed and the column in the
table will change according to the cleaning operation performed.
Copyright © 2010-2012 Youbewdy Pty Ltd
Page 22
EasyMatch User Manual - Version 1.0
5. Match Rules
5.1 Creating a Match Rule
To create a new match rule:
1. Click the Matching menu and then click Matching Rules. The Rule
Manager window is displayed, as shown in Figure 5.1.1 .
Figure 5.1.1: Rule Manager
2. Click New. The Create Match Rule window is displayed, as shown in Figure
5.1.2.
Figure 5.1.2: Create Match Rule Window
Copyright © 2010-2012 Youbewdy Pty Ltd
Page 23
EasyMatch User Manual - Version 1.0
3. Enter the name of the rule in the Rule Name field.
4. Select the column in the first table that should be a part of the rule from the
Table 1 dropdown menu, as shown in Figure 5.1.3 .
Figure 5.1.3: Create a Match Rule
Copyright © 2010-2012 Youbewdy Pty Ltd
Page 24
EasyMatch User Manual - Version 1.0
Note: In this figure, you will notice that the Amount field in Table 1 will be
chosen as part of the match rule.
5. Select the column in the second table that should be a part of the rule from
the Table 2 dropdown menu.
6. Select the type of match you want to perform from the Match Type
dropdown menu. The following Table 5.1.1 provides a description of the
different match types.
Table 5.1.1: Match Types
Match Type
Description
EQUAL
WITHIN
The values in both must match exactly.
The values in both fields must match +/- the
tolerance provided. This match type can be
used only with date/time or numeric fields.
The sum of the field values comes to 0 +/- the
tolerance. This match type can only be used
with numeric values.
CONTRA
7. If you have selected WITHIN or CONTRA as the Match Type, enter a tolerance
value in the Tolerance field.
Copyright © 2010-2012 Youbewdy Pty Ltd
Page 25
EasyMatch User Manual - Version 1.0
Note: You must ensure that you select fields of the same type (text, number or
date/time) to create a match rule. For example, you cannot select a Text field in
Table 1 and Number field in Table 2 to create the match rule.
Once a rule is added successfully, a new row is added below the rule you have
just created. You can add as many fields to the match rule as you like using Step
4 to Step 8.
8. Select the type of rule in the Match Rule Type section. The following
Table 5.1.2 provides a description of the rule types.
Table 5.1.2: Matching Rule Types
Type of Rule
Description
One to One
For each record in the first table, one matching
record is sought in the second table. If the
sought record meets the criteria in the
matching algorithm, both records are matched
together.
For each record in the first table, many
matching records are sought in both tables. If
all records meet the criteria in the matching
algorithm, they are all matched together.
For each record in the first table, match One to
One first and, if no match is found, match Many
to Many.
Many to Many
Both
9. Click Save. The new rule is created and this rule will be used to match the
records in table 1 and table 2 during the matching process.
Note: You can create as many match rules as required to get the most accurate
match. EasyMatch will try each match rule in sequence to try to match your data.
You can control the order EasyMatch tries each match rule by reordering the
match rules in the Rule Manager .
Note: The topmost match rule in the Rule Manager is the Manual Match rule.
This is a special rule used to control the Manual Match process and is ignored
when the Auto-Match function is performed. You cannot reorder or delete the
Manual Match rule; it always remains at the top of the Rule Manager.
Copyright © 2010-2012 Youbewdy Pty Ltd
Page 26
EasyMatch User Manual - Version 1.0
5.2 Editing a Match Rule
To edit a match rule:
1. Click the Matching menu and then click Matching Rules. The Rule
Manager window is displayed.
2. Select the rule you want to edit and click Edit. The Match Rule window is
displayed.
3. Select the rule you want to edit and make the modifications.
4. Click Update.
5.3 The Manual Match Rule
The first rule in the Rule Manager is the Manual Match rule. This rule governs how
records are matched manually, and it cannot be reordered or deleted.
You edit the Manual Match Rule the same way you do any other rule, except that you
cannot change the name.
The rule will be checked when you perform a manual match, and if the records you have
selected to match do not meet the criteria of the rule, an error message will be
displayed.
Map columns with the Contra Match Type in the Manual Match Rule and EasyMatch will
use the values in those columns to calculate the variance when you select records to be
matched.
Copyright © 2010-2012 Youbewdy Pty Ltd
Page 27
EasyMatch User Manual - Version 1.0
5.4 Deleting a Match Rule
To delete a match rule:
1. Click the Matching menu and then click Matching Rules . The Rule
Manager window is displayed.
2. Select the rule you want to delete and click Delete.
3. Click Yes on the Confirmation window. The rule is now deleted.
6. Matching Process
6.1 Auto-matching Records
To perform an auto-match of the records in the tables:
1. Click Auto-match after you have created appropriate Auto-Match rules in
the Rule Manager and populated both tables with relevant records.
EasyMatch will start matching the records in both the tables depending on the
rules you have set in the Rule Manager. You will be able to see a progress bar
indicating the progress of the matching as shown in Figure 6.1.1 .
Figure 6.1.1: Auto-match Progress Bar
Copyright © 2010-2012 Youbewdy Pty Ltd
Page 28
EasyMatch User Manual - Version 1.0
2. You will see a pop-up window indicating that the auto-match process is
complete. Click OK .
You will now see the records which did not meet the matching criteria defined by
the matching rules, as shown in Figure 6.1.2 .
Figure 6.1.2: Records That did not Match the Matching Criteria
Copyright © 2010-2012 Youbewdy Pty Ltd
Page 29
EasyMatch User Manual - Version 1.0
3. If you wish to view both matched and unmatched records, click the checkbox
next to Show All Records .
All the matched records in both the tables will be displayed now. You will also
notice that the matching process allocates a match number to the matched
records. Match No. is a new column that EasyMatch inserts in both tables, as
shown in Figure 6.1.3 . Notice in the following figure that the last columns in
both tables are Match No columns with match numbers assigned for each
matched record. For example, in this case we used a One to One rule to match
the "DESC2" column in table 1 to "CHQ NO#" column in table 2. Since the value
in the "DESC2" column in the sixth record in table 1 matched with the value of
the "CHQ NO#" column in the second row in table 2, both are assigned the
same match number, i.e. 6. Also notice the match number 9 highlighted in the
following figure.
Figure 6.1.3: Match Numbers
Copyright © 2010-2012 Youbewdy Pty Ltd
Page 30
EasyMatch User Manual - Version 1.0
6.2 Manually Matching Records
To perform a manual match of the records in the tables:
1. Select the two records on which you want to perform a manual match and
click Manual Match.
The two records which you have chosen for the manual match process will be
assigned the same match number. You will also notice that these records will not
be shown in tables once manual match is performed, as by default EasyMatch
shows only unmatched records .
Copyright © 2010-2012 Youbewdy Pty Ltd
Page 31
EasyMatch User Manual - Version 1.0
Manual match can usually be usually performed after an auto-match process to
minimize the involvement in matching all records manually. Manually matching
records after the auto-match process can help you match any of the records
that were not matched during the auto-match process.
2. If you wish to view both matched and unmatched records, click the checkbox
next to Show All Records.
All records (both matched and unmatched) in both the tables will be displayed
now. By default, only unmatched records are displayed.
6.3 Filtering Records in a Table
To filter the records in the table:
1. Select the field that you want to filter in the first or second table by choosing
the field from the appropriate dropdown menu.
2. Enter the filtering criteron in the adjacent field.
3. Click Filter. You will see that the records in the field you have chosen for
filtering will be filtered according to the filtering criterion.
You can choose to remove the filter on the field by clicking the Remove Filter
button.
6.4 Selecting/Unselecting All Records
To quickly and conveniently select and unselect all records in a table:
1. Click the Select All button beneath either table to select all records.
2. Click the Unselect All button beneath either table to unselect all records.
Note: When used in conjunction with the manual match rule, the variance box,
and the filters, you can quickly match records manually and perform analysis on
the data using the Select/Unselect All buttons.
Copyright © 2010-2012 Youbewdy Pty Ltd
Page 32
EasyMatch User Manual - Version 1.0
6.5 Unmatching Records
To unmatch a record after matching:
1. Select the record you wish to unmatch. You only need to select one record in
a match, even though there are two or more.
2. Click the Matching menu and then click Unmatch .
3. Click Yes on the Confirmation pop-up window.
4. Click OK on the Information pop-up window.
All records in the match are now unmatched and returned to the state when
they were first imported. You may also notice that the match numbers are now
set to "0", as shown in Figure 6.5.1 .
Figure 6.5.1: Matched Records After Unmatching
Copyright © 2010-2012 Youbewdy Pty Ltd
Page 33
EasyMatch User Manual - Version 1.0
Note: Sometimes you won’t always get it right. It might take a while to refine
your match rules to get the most accurate match without matching the wrong
records. You might also manually match the wrong records accidentally. The
Unmatch feature can be used to “undo” a match when necessary.
6.6 Reordering and Sorting Columns
To reorder columns and sort the data:
1. Click and hold on the column you wish to move, and drag it to the position
you wish to place it.
Copyright © 2010-2012 Youbewdy Pty Ltd
Page 34
EasyMatch User Manual - Version 1.0
2. You can also click on the column without dragging it to reorder the table in
ascending or descending order.
7. Reporting
7.1 Searching Records
To search for specific records in a table:
1. Click Reporting and then click Open Query.
The Report window is displayed, as shown in Figure 7.1.1.
Figure 7.1.1: Reporting Window
Copyright © 2010-2012 Youbewdy Pty Ltd
Page 35
EasyMatch User Manual - Version 1.0
2. From the Search Table dropdown menu, select the table on which you want
to perform the search operations.
You will see that three columns are now displayed below the dropdown menu.
You will use these columns to define the search criteria.
3. From the Column dropdown menu, select the column on which you want to
perform the search.
4. From the Condition dropdown menu, select the appropriate operator used
to perform the search.
5. Enter the value for which the search has to be performed, in the Value field.
You can also specify multiple search criteria by adding multiple rows one below
the other. Records must meet all criteria to be included in the result.
6. Click Search.
Copyright © 2010-2012 Youbewdy Pty Ltd
Page 36
EasyMatch User Manual - Version 1.0
The Search Result section on the right displays all records in the chosen table
that match all the search criteria, as shown in Figure 7.1.2.
Figure 7.1.2: Search Result
Note: If you are performing the search operations after performing the matching
process, you can use the Reporting feature to report on matched and unmatched
records.
Note: If you wish to display all records of a table in the query, enter ID > 0 in
your criteria. If you wish to display all matched records, enter Match No > 0 in
your criteria. If you wish to display all unmatched records, enter Match No = 0 in
your criteria.
7. Select the record that you want to investigate in the matched records and
click Show Matches.
Copyright © 2010-2012 Youbewdy Pty Ltd
Page 37
EasyMatch User Manual - Version 1.0
The Match record from First Table and Match record from Second Table show
the records involved in the match of the selected record, as shown in Figure
7.1.3.
Figure 7.1.3: Records Matching the Search Results in Table 1 and Table 2
Note: You can click the Remove Criteria button to remove a criteria row.
Copyright © 2010-2012 Youbewdy Pty Ltd
Page 38
EasyMatch User Manual - Version 1.0
7.2 Exporting Search Results
To export search results:
1. In the Export to CSV section, click Search Results to download all the records
from the Search Result section, in CSV format.
2. Navigate to the appropriate location on the local computer and click Save.
3. If you want to save the records in the Match Record from First Table section,
click Table 1 Matches and save the CSV file on the computer.
4. If you want to save the records in the Match Record from Second Table
section, click Table 2 Matches and save the CSV file on the computer.
The following Figure 7.2.1 shows the buttons used to export the search results.
Figure 7.2.1: Exporting Search Results
Copyright © 2010-2012 Youbewdy Pty Ltd
Page 39