1
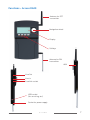
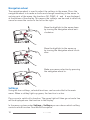
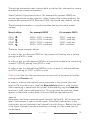
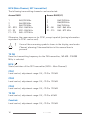
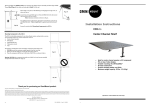
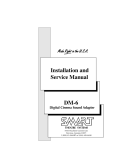
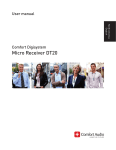
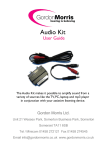
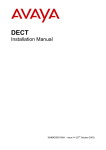
Comfort Digisystem User Manual Access DA20 English User Manual Table of Contents Page Introduction to the Comfort Digisystem 3 Presentation of Access DA20 4 Functions – Access DA20 7 Assembly wall bracket/fitting Access DA20 in wall bracket 8 Navigation wheel 10 Menu summary 11 Menu structure 12 Menu description 14 Channel planning 19 Inputs and outputs 20 SST receiver 21 Radio transmitter 21 Technical data 22 Service and warranty 23 Important safety instructions 24 2 Access DA20 Introduction to the Comfort Digisystem Thank you for choosing Comfort Digisystem. The products are easy to use, irrespective of whether or not you have a hearing aid. Before using the product, please read through the User Manual. Comfort Digisystem is fitted with SST – SecureStream Technology – a type of digital technology allowing interception-secure radio transfer in real time. Access DA20 3 Presentation of Access DA20 Access DA20 is a digital multi-channel diversity receiver and transmitter. It handles all the sound functions (such as levels, mixing and outputs) required in the classroom. It contains three SST radio receivers with full diversity, with the option of mixing sound together with sound sources connected by cable. Full diversity and the SST technology always guarantee the best possible dynamics and sound quality. Access DA20 contains an SST transmitter and an FM transmitter with low deviation. All the functions and settings are accessible via the menu system in the display. The navigation wheel can be used to scroll through the menu and select options. The four softkeys can be assigned functions of your choice. It is thus possible to customise Access DA20 for each individual need. Students/teachers can easily choose which sounds are to be mixed on each individual occasion. It is possible to connect ComLink microphones via an adapter and separate power pack to DA20. Access DA20 can easily be configured using the menu to set up Comfort Digisystem microphones and receivers. Loop amplifiers can be connected, and it is also possible to listen using an FM receiver via the built-in FM transmitter. Signal sources such as TV/Video/Multimedia can be connected to Access DA20. Active speakers (with a built-in amplifier) can be connected to provide extra benefit from the system for both teachers and students. Access DA20 can easily be paired with other Comfort Digisystem units to be used in the system. A unique code key can be created in order to obtain interception-secure operation (does not apply to FM or Teleloop). Access DA20 is particularly useful together with Microphone DM30, which has both a transmitter and a receiver. DM30 receives on MCH (Main Channel) and transmits on any CCH (Connecting Channel) and therefore functions as both a push-to-talk microphone and a receiver for students. There are a few examples of systems on the following pages. 4 Access DA20 H MC H CC 2 Line In Line Out AUX Out/In CCH1 Teacher 2 DM-30 with neckloop Teacher 1 DM-30 with neckloop MultiMedia DVD/VIDEO RADIO TV CC H H Access DA20 MC Loop Amplifier MCH CCH1 MCH CCH1 MCH CCH1 Student Microphones DM-30 Push To Talk FCR with neckloop 1 CC H FM Unbalanced or Balanced Input MCH 5 3 Student with FM Receiver + Microphone DM-10 Push To Talk FCR Selecta R20 FM receiver 6 Access DA20 Teacher 2 DM-10 Teacher 1 DM-10 MultiMedia DVD/VIDEO RADIO TV Amplified Speaker H2 CC Line In Line Out AUX Out/In CCH1 CCH1 CCH1 Student Microphones DM-10 Push To Talk CCH1 CC H 3 1 CC H CCH 1 Loop Amplifier MCH Student using DE-10 receiver and DM-10 Push To Talk Student using telecoil loop and DM-10 Push To Talk Amplified Speaker Functions – Access DA20 Antenna for SST transmitter Navigation wheel Display Softkeys Antenna for FM transmitter AUX Line Out Line in ComLink socket USB socket (for servicing, etc.) Socket for power supply Access DA20 7 Assembly wall bracket/fitting Access DA20 in wall bracket DA20 comes with a sturdy wall bracket. It is important that the wall bracket is correctly fitted. It should be fitted on a flat surface, preferably a wall, using four screws. Suitable screws should be selected based on the wall material. Rawlplugs may be required for some types of wall. The screw should have a countersunk head with a maximum height of 3.2 mm. Fitting DA20 to the wall bracket: 1) Take a firm hold with both hands high up on both sides or the top of the unit. Do NOT hold the antennas. 2) Position the bottom of DA20 slightly angled to the “fork” of the wall bracket. 3) Then angle the top of DA20 so that it touches the top of the wall bracket and push firmly (quick lock). 4) It is possible to lock DA20 to the wall bracket using the accompanying screw. Fit the unit to the wall bracket as per the description above and make sure that it is centred. Then screw in the screw through the hole in the top of the wall bracket until it touches the bottom. 8 Access DA20 Removing DA20 from the wall bracket: 1) Remove any locking screws in the top of the wall bracket if these are fitted. 2) Take a firm hold with both hands high up on both sides or the top of the unit. Do NOT hold the antennas. 3) Press DA20 down slightly while carefully angling the top out and past the top of the wall bracket. Do not angle DA20 out too quickly/hard, as this may damage the bottom of the product. Comfort Audio's warranties do not cover defects caused by incorrect handling. 4) Lift up DA20 from the wall bracket. Please note: - Do not try to remove Access from the wall bracket once the locking screw is fitted, as this may damage the product. - Never lift the product by the antennas. Access DA20 9 Navigation wheel The navigation wheel is used to adjust the settings in the menu. Press the navigation wheel in to make a choice and change something in the menu. In certain parts of the menu, the functions OK, CANC, and are displayed at the bottom of the display. This means the softkeys can be used to select ok, cancel or move the cursor to the left or the right. Move the highlight in the menu down by turning the navigation wheel anticlockwise. Move the highlight in the menu up by turning the navigation wheel clockwise. Make your menu selection by pressing the navigation wheel in. Softkeys Using the four softkeys, selected functions can be controlled in the main menu. When a softkey lights up green, the function is active. Press once to switch off a function. The green light will then go out and a line will be displayed over the function in the display. In the menu system under Settings – Softkeys you can choose which softkey controls which function. See Menu Description. 10 Access DA20 Menu summary CCH1 CCH2 CCH3 MCH TX FM MCH CCH1 CCH2 CCH3 TX FM ComLink AUX in Line in AUX out Out Settings Locks Settings for the SST receiver Connecting channel 1 Settings for the SST receiver Connecting channel 2 Settings for the SST receiver Connecting channel 3 Settings for the SST transmitter (MCH – Main Channel) Settings for FM transmission Starts/switches off the SST transmitter (MCH – Main Channel) Level setting for Connecting channel 1 Level setting for Connecting channel 2 Level setting for Connecting channel 3 Level setting for FM transmission Level setting for connected ComLink microphones Level setting for AUX input Level setting for Line in Level setting for AUX output Level setting for Line out Settings for Softkeys, PIN Code, Remote control, Language Lock settings Access DA20 11 Menu structure All functions are controlled by turning and pressing the navigation wheel. (The functions are explained in Menu description.) CCH1 Back Channel Back Extended FFC FFC dB Pair Send info New code key Squelch CCH2 Back Channel Back Extended FFC FFC dB Pair Send info New code key Squelch CCH3 Back Channel Back Extended FFC FFC dB Pair Send info New code key Squelch 12 Access DA20 MCH Back Channel Back 1. 863.250 2. 864.000 3. 864.750 Extended FFC FFC dB Pair Send info New code key TX FM MCH CCH1 CCH2 CCH3 TX FM ComLink AUX in Line in AUX out Out Settings Back Softkeys PIN Code Change code Hide PINentry Remote control Enabled Pair Language About... Locks Back Enter code Enter PUK Access DA20 13 Menu description Back (valid for all submenus) Here you can choose to back through the menu, and to go back to the main menu. CCH1, CCH2 and CCH3 (Connecting channels 1, 2 and 3, SST receiver) In the main menu, the display shows the squelch setting, signal strength and selected connecting channel. The menu options CCH1, CCH2 and CCH3 contain the following selections: Channel - Extended The required channel is selected here, A13 - A55 (768.000 - 784.800 MHz) or E46-E74 (824,000 - 835,600 MHz) depending on the model. - FFC FFC (Free Frequency Check) shows using the text Ok which frequencies are suitable for use with each channel where the unit is fitted. Please note: Switch off your other Digisystem transmitters for the correct result. - FFC dB FFC dB indicates the noise level in dB for the relevant channel. The higher the (-)value, the less interference there should be. ! ! If one of these warning symbols shows in the display, read under Channel planning / Intermodulation in this manual how to proceed. Pair Pairing Comfort Digisystem units to Access DA20 (this is only necessary if interception-secure operation is required in the system. Otherwise, it is sufficient to set channels for the transmitter and receiver). This requires a factory reset of products where a new code key has been used. If necessary, contact the distributor. Access DA20 can only transmit pairing information. Pairing information for the receiver channels CCH1, CCH2 and CCH3 and the transmitter channel MCH can be sent from the menu or via softkeys (selected under Settings – Softkeys in the menu). 14 Access DA20 The pairing information sent contains both a code key (for interception-secure operation) and channel information. Some Comfort Digisystem products (for example Microphone DM30) can receive information on two channels, other Comfort Digisystem products (for example Microphone DM10, Receiver DH10) can receive one channel setting. The following information is transferred when pairing from each menu/ softkey: Menu/softkey For example DM30 For example DM10 CCH1 CCH2 CCH3 MCH MCH + CCH1 + code key MCH + CCH2 + code key MCH + CCH3 + code key MCH + CCH1 + code key CCH1 + code key CCH2 + code key CCH3 + code key MCH + code key There are three examples below: In order to pair in a Receiver DE10 for the purpose of listening into a system, pairing from MCH is used. In order to pair in a Microphone DM10 as a teacher microphone on connecting channel 2 (CCH2), pairing from CCH2 is used. In order to pair in a Microphone DM30 for use as a push-to-talk microphone on CCH1, pairing for CCH1 or MCH is used. Please note: See also the user manuals for each unit to be paired to find the pairing mode Receive info. In order to achieve interception-secure operation in the system (does not apply to FM transmission or loop) the New code key option is used the first time something is paired with the system. Subsequently, only the Send info function is used to pair additional units. This is because the code key saved applies to the whole system (both in Access DA20 and portable units). Squelch Determines the lowest received signal strength. Optional 0 - 40. Increase this level if the receiver is open to radio signals from other transmitters in the vicinity that are not intended to be listened to via this Access. Reduce the level if the signal strength from the transmitter is strong, but the sound can still not be heard. Access DA20 15 MCH (Main Channel, SST transmitter) The following transmitting channels can be selected: Access DA20 Access DA20 (f1) 1 2 3 B1 - B23 E1 - E5 F1 - F15 1 2 3 B1 - B4 F1 - F15 863,250 MHz 864,000 MHz 864,750 MHz 854 - 863 MHz 852 - 854 MHz 865 - 872 MHz 863,250 MHz 864,000 MHz 864,750 MHz 862 - 863 MHz 865 - 872 MHz Otherwise, the same menu as for CCH1, except squelch (pairing information equivalent to CCH1 can be sent). ! ! If one of these warning symbols shows in the display, read under Channel planning / Intermodulation in this manual how to proceed. TX FM Here the transmitting frequency for the FM transmitter, 169.400 - 218.000 MHz, is selected. MCH Starts/switches off the SST transmitter (MCH – Main Channel). CCH1 Level control, adjustment range: Off, -12.0 to 12.0 dB CCH2 Level control, adjustment range: Off, -12.0 to 12.0 dB CCH3 Level control, adjustment range: Off, -12.0 to 12.0 dB TX FM Level control, adjustment range: Off, -12.0 to 6.0 dB ComLink Level control, adjustment range: Off, -12.0 to 12.0 dB 16 Access DA20 AUX in Level control, adjustment range: Off, -18.0 to 18.0 dB Line in Level control, adjustment range: Off, -18.0 to 18.0 dB AUX out Level control, adjustment range: Off, 0.0 to 40.0 dB Out Level control, adjustment range: From, 0.0 to 40.0 dB Settings Back Select back to return to the main menu. Softkeys Use the softkeys and the navigation wheel to determine which softkey controls which function. The following choices can be made: Nothing swtiches off the softkey function CCH1 activates/deactivates the receiver for CCH1 CCH2 activates/deactivates the receiver for CCH2 CCH3 activates/deactivates the receiver for CCH3 TX FM activates/deactivates FM transmission ComLink activates/deactivates the ComLink socket AUX in activates/deactivates the AUX input AUX out activates/deactivates the AUX output Line in activates/deactivates Line in Out activates/deactivates Line out switches off/starts Access DA20 MCH transmits pairing information (MCH + CCH1 and code key) CCH1 transmits pairing information (MCH + CCH1 and code key) CCH2 transmits pairing information (MCH + CCH2 and code key) CCH3 transmits pairing information (MCH + CCH3 and code key) PIN Code - Change code: It is possible to change the PIN code here. Enter the current PIN code. A new PIN code can then be entered. It is now possible to go in under Locks which is in the main menu. Access DA20 17 If you have lost your PIN code, it is possible to get a PUK code from the distributor. - Hide PINentry: When selecting this function, the unit can only be unlocked using a PIN code within 10 seconds of the unit starting. Remote control (accessory) Activate the remote control by selecting Enabled. Choose Pair and press one of the buttons on the remote control DA-05 to be able to remotely control the softkeys. Language Here you can select the language for the menu. About Here there is information about the software installed on the unit. You can also perform a factory reset on the unit here by pressing and holding the outer softkeys (see display). Locks Back Select back to return to the main menu. Enter code If the code is given, it is possible to lock functions by navigating using the navigation wheel. Press the wheel to lock/unlock the function. On delivery, the lock code is 1234. Tip! Change the code when you start using Access DA20. Enter PUK This is only used to unlock the unit when the PIN code has been lost. Contact the distributor. 18 Access DA20 Channel planning When using several radio transmitters in the same or adjacent rooms, mixing frequencies may occur, so called intermodulation. In order for these not to cause interference, it is important to plan channels. If necessary, contact the distributor. Intermodulation For the receivers and transmitters in the DA20 to work perfectly, the transmitter’s channel (Main Channel MCH) has a separate frequency to the receivers’ channels (Connecting Channels CCH1/CCH2/CCH3). Intermodulation may occur between different frequencies in the system. This can cause disturbances or a shorter range. To avoid this, the DA20 is equipped with a function which, depending on the channels selected, warns of unsuitable channel combinations. ! Channels which may cause intermodulation are indicated in the channel selection menus with this warning symbol. The main channel has priority, which means that: In the menu Main Channel (MCH), channels with this symbol can be selected. But this channel or the connecting channels which can cause intermodulation problems may be deactivated and must be reselected. In the menu Connecting Channels (CCH1/CCH2/CCH3), channels with this symbol cannot be selected. ! In the menu Connecting Channels (CCH1/CCH2/CCH3), the channels which might cause intermodulation problems with other connecting channels are indicated by this warning symbol. Channels with this symbol can be chosen, but it might be necessary to change one of the other connecting channels. Access DA20 19 Inputs and outputs AUX The AUX contact contains an electrically balanced input, pins 1 and 3. There is also an unbalanced output, pin 4. The level of the signals (AUX In and AUX Out) can be adjusted via the menu system. Pin 2 is earth. The contact is a 4-pin MiniDIN type. Line In 3.5 mm telejack. The input is integrating and has an input impedance of 22 k Ω. This provides sound from both the right and left channel, for instance when connecting to scart. The level of the signal can be adjusted via the menu system. Out 3.5 mm telejack. The signal can be connected to a balanced or unbalanced input. See diagram. The output has a low ohm level and can power a pair of headphones, for instance. The level of the signal can be adjusted via the menu system. Connection to balanced input stage Connection to unbalanced input stage If any of the inputs are not used, it is best to turn the level control for this input to Off. The input is then switched off completely. This eliminates the risk of ‘power hum’. ComLink Inputs and outputs for ComLink microphones, 4/4 modular. Note that the ComLink microphones must be connected via an adapter with a branch to the ComLink microphones’ power unit. The level control for the ComLink microphones should be switched off when the socket is not used. 20 Access DA20 SST receiver (CCH1, CCH2, CCH3) (Connecting channel 1, 2 and 3) Access DA20 has three SST receivers, all with full diversity. Each SST receiver has two receivers with different antenna locations that detect the same frequency. Diversity means that the SST receiver uses the internal receiver that has the best reception at that time. The receivers' antennas are built into Access DA20. The frequencies are set using the menu system. Each receiver is equipped with squelch adjustment that can also be set using the menu system. If any of the receivers are not used, it is best to turn the level control for this channel to Off. The receiver is then switched off. Radio transmitter SST transmitter (MCH) (Main Channel) Access DA20 is equipped with an SST transmitter. This is used to send sound directly to the listeners’ receivers. The required channel is set in the menu on Access DA20. The transmitter can be switched off when the level is not being used FM transmitter (FM TX) DA20 has an internal FM radio transmitter that is used to send sound directly to the listeners' receivers. The channel can be freely set anywhere within the 169.4 - 218 MHz frequency band. The transmitter is PLL-controlled and can be switched off so that it does not disturb the surroundings when not in use. The transmitter can transmit in two output modes. These are set by having the antenna pushed in or pulled out (see diagram). P = 5 mW Access DA20 P = 20 mW 21 Technical data General Power supply: Dimensions: Weight: Range: Wall fitting: External power unit, 5V 252 x 155 x 36 incl. antenna 252 x 130 x 36 excl. antenna 500 g Approx. 30 m 4 attachment points. Inputs AUX: Line in: ComLink socket: 4 pol. Mini DIN Zin = 47 kΩ Balanced input 3.5 mm telejack Zin = 22 kΩ Integrating right and left channel 4/4 modular Input for ComLink microphones. Note that the ComLink microphones must be connected via an adapter with a branch to the power unit. Available as an accessory. Outputs AUX: Out: 500 mA Unbalanced output Balanced output. Can be connected to loop amplifier or operate headphones/neckloop, equipped with volume control. For further information, see the user manual for connection to balanced and unbalanced input. SST receiver, with full diversity Type: SST receiver, full diversity, adjustable channels via menu Antennas: Built-in antennas for receivers. Frequency range DA20: Frequency range DA20 (f1): 22 768 - 784.8 MHz, 43 channels 824,0 - 835,6 MHz, 30 channels Access DA20 SST transmitter Frequency range DA20: 852 - 871.6 MHz, 46 channels Frequency range DA20 (f1): 861,6 - 871,6 MHz, 22 channels Antenna: External antennas for SMA connection. FM transmitter Type: Deviation: Frequency range: Channels: Antenna: Output: Frequency modulated, synthesis controlled. +/- 7 kHz 169.400 - 218.000 MHz Adjustable channels within entire band Telescopic with SMA connection Type value NP=5mW, HP=20 mW Accessory Remote DA05, a remote control for the four softkeys. Service and warranty Comfort Audio AB provides a limited warranty for two years from the date of delivery. This covers all defects of manufacture and materials. Defects caused by careless handling or intervention inside the product or its accessories are not covered by the warranty. With normal use battery lifetime is up to five years. Contact your point of purchase once it is time to change the battery. You are always welcome to contact us at Comfort Audio if you have any questions. ! Access DA20 23 Important Safety Instructions Read these before using your product 1) Read these instructions. 2) Retain these instructions. 3) Observe all warnings. 4) Follow all the instructions. 5) Do not use the product near water. 6) Clean using a dry cloth only. 7) Do not use the product near sources of heat such as elements, ovens or other appliances (incl. amplifiers) that generate heat. 8) Do not destroy the safety function in the polarising or earthed plug. A polarised plug has two flat pins and a third, earthed pin. The broad pin or tip is there for your own safety. If the plug supplied does not fit your socket, contact an electrician to replace the old electric plug (only applies to power packs with polarised plugs). 9) Protect the electric cable from being trodden on or trapped, especially near the plug, in the storage area and where the cable enters the product. 10) Only use original accessories from Comfort Audio AB. 11) Disconnect the plug from the wall socket when there is a thunderstorm or when the product will not be used for a prolonged period. 12) Servicing may only be performed by a service provider approved by Comfort Audio AB. Servicing is required when the product has been damaged in any way, e.g. the plug or cable has broken, liquid has been spilt on the product or something has fallen on the product, if the product has been exposed to rain or moisture, is not working normally or if the product has been dropped. 13) Start listening at low volume. 24 Access DA20 14) Too high a volume can seriously damage your hearing. 15) The product must not be dismantled. 16) If the product is opened because of damage, servicing must be performed by a service provider approved by Comfort Audio AB. 17) Never use a transmitter or receiver tuned to a non-permitted frequency. Check with the frequency assignment authority in the country where the equipment is to be used. 18) Remember that sound transferred via FM can be heard through receivers other than your own. 19) Only use one transmitter on the same channel/frequency at a time. 20) The product contains sensitive electronic equipment and must be handled carefully. 21) The product must not be exposed to extreme heat such as sunlight, fire, etc. 22) The products contain a radio transmitter. Do not use the products in locations where the use of electronic equipment is forbidden, e.g. on a plane. 23) WARNING! Try to avoid eye injuries when adjusting antennas. Subject to change Access DA20 25 26 Access DA20 Access DA20 27 Comfort Audio AB Box 154, SE-301 05 Halmstad, Sweden Tel. +46 (0)35 260 16 00 Fax +46 (0)35 260 16 50 [email protected] www.comfortaudio.com MA0326 Ver 1.07 Rev B 120704 Manufactured by: