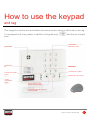
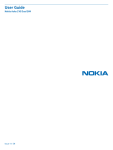
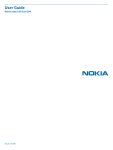
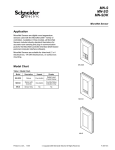
1
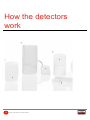
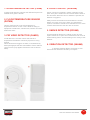
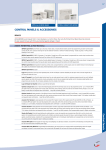
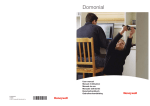
User Manual Domonial Your Sector Alarm Thank you for choosing an alarm from Sector Alarm AS. This user manual will help in your everyday use of the alarm system. Please take time to read through it, as it can give you important information and some good tips about using the system. We hope you will have the pleasure of using your alarm system for many years to come and that it will keep you, your loved ones and your home secure when you need it. The first pages explain the normal use of the system and how to test it. You can also contact our customer services at any time if you should have any questions about use of or routines for the alarm. If the alarm is triggered: If the alarm is triggered, the control centre will telephone your home and available mobile numbers to check your status. If they make contact, passwords are exchanged. The control centre will always give its password first, to verify who is calling. If nobody answers or we are given an incorrect password, we will immediately requisition a security guard to check and re-establish security. If detectors with cameras are fitted, images will be transferred to our control centre immediately the alarm signal has been transferred. The first week after installation is considered to be a registration and test period. No call-outs are therefore made during this period. If you require call-outs from day one, you must inform the technician of this during installation. 2 YOUR SECTOR ALARM Customer service and maintenance: The alarm system will normally inform you itself if any fault occurs, but it is still important to regularly test all functions. If any questions should arise, you can simply contact customer service, who will help you over the telephone or send a technician. Note: all our technicians have uniforms and visible ID badges with photographs to prove that they work for Sector Alarm AS. Procedure for transferred images: Where camera detectors are fitted, images that are transferred will be handled according to the following procedure: The images are used as a basis for deciding on action by Sector Alarm AS. The images are processed by authorised technicians at our control centre. All images received remain accessible for up to 7 days. On the 8th day after receipt, images are routinely deleted. The images cannot be passed on to any third party other than the police. Photography within your home and handling of these images is in accordance with requirements set by the authorities. SECTOR ALARM AS Vitaminveien 1A PB 113 GREFSEN 0409 OSLO Telephone 03033 Fax 23399401 E-mail: [email protected] Contents Presentation of the alarm system P.4 How to use the keypad P.5 How to use the remote control P.12 How the detectors work* P.14 Maintenance and recommendations P.16 Notes P.17 * Your system may include one or more control units and/or one or more detectors. CONTENTS 3 Presentation of the alarm system The Domonial control panel is the brain of your alarm system. It exchanges information with the wireless components that are connected. The control panel collects data that is sent by the detectors, registers arming and disarming and communicates with Sector Alarm AS. PROPERTIES ALARM TRANSMISSION RADIO Built-in alarm transmitter Transmission is monitored using periodical testing Narrow band FM, 868 MHZ Unique identification for every component in the system (interference from neighbouring systems is not possible) Protection against interference System monitoring of detectors and sirens ELECTRICS 230 V with battery back-up Built in surge protection Monitoring of power supply 4 PRESENTATION OF THE ALARM SYSTEM FUNCTIONS Up to 3 secured areas: Away, Home and Annex Up to 30 detectors Up to 10 users Alert functions Control panel and detectors are protected against opening. How to use the keypad and tag This keypad is used to arm and disarm the alarm system using a valid code or the tag. It is equipped with a tag reader in addition to keypad entry siren. and has an integral TAG READER DETECTION AREA PIEZO SIREN LOUDSPEAK ER PANIC PANICKEYS KEYS SYSTEM FAULT (LED2) SYSTEM ACTIVATED (LED1) SABOTAGE ALERT (LED3) ALARM TRIGGERED (LED4) ACTIVATION KEY FOR WHOLE SYSTEM (AWAY) ACTIVATION KEY FOR PART OF SYSTEM (HOME) TAG HOW TO USE THE KEYPAD 5 ACTIVATION USING YOUR CODE OR TAG Press an activation button on the keypad and enter the code, or present a registered tag 4 figure code/tag ---------------------------------------------- Arms the entire system (Away) 4 figure code/tag --------------------------------------------- Arms part of system (Home) 4 figure code/tag ------------------------------------ Arms Annex (the keypad must be connected to Total + Annex) If the keypad is only connected to annex, the "Away" button will arm Annex and the "Home" button is disconnected. Activation can be done with or without code/tag, depending on the configuration of the system. The keypad gives an activation tone, followed by the delay tones for exit. If a perimeter fault is indicated on activation, the system must be disarmed, to check doors and windows equipped with door contacts. Activation of Home or Annex is completed automatically at the end of the delay period (depending on the system's configuration). NOTE: Always ensure that activation is followed by the activation tone. Activation is not reversed by continuing to hold the tag in front of the keypad. 6 HOW TO USE THE KEYPAD ACTIVATION IF THERE IS A FAULT If the system detects a fault on activation, you will not be able to arm the alarm. Faults include system faults, sabotage and activation of detectors. The keypad emits a fault tone after activation instead of the activation tone. Check that all doors and windows equipped with door contacts are closed. You can override activation faults by activating again within two minutes. This overrides all faults. Activation starts again: the keypad gives an activation tone, followed by the delay tones for exit. At the end of the delay, activation is completed. Depending on how the system is configured, this will disarm part or all of the system. In the case of the latter, Annex must be armed again if relevant. RESETTING THE SYSTEM AFTER AN ALARM If one of the LEDs on the panel, 1, 2, 3 or 4, is blinking slowly, this means that an alarm has been triggered (see page 9 for more details about the LEDs). If there is an alarm in the memory, the system cannot be armed until it has been reset. In order to reset the system, all you need to do is disarm it by using a valid code or registered tag. If there is more than one alarm in the memory, repeat this for every alarm until lamps 1, 2, 3 and 4 have all stopped blinking slowly. DISARMING USING YOUR CODE OR TAG PROTECTION AGAINST USE OF THE WRONG CODE So that you can use the keypad without triggering an alarm, the installation technician will have programmed in an entry delay. How to disarm the system: If you enter the wrong code 5 times in succession or use non-registered tags 5 times in succession, the keypad is locked for 5 minutes and a sound alarm is triggered* Enter a valid code or use a registered tag. A green light on the panel confirms that the code is valid. The panel gives a disarmed tone. *This function is optional and can be configured during installation If the system is disarmed, the sirens are also disarmed if an alarm is triggered. EVEN IF THE SIREN IS TURNED OFF, THIS DOES NOT STOP THE TRANSMISSION OF THE ALARM TO SECTOR ALARM AS. NOTE: Always ensure that disarming is followed by the disarmed tone. Always turn the system off when you enter your home. The status is not reversed by continuing to hold the tag in front of the keypad. HOW TO USE THE KEYPAD 7 PANIC EXAMPLE: If you wish to adjust the beep tone level for You can activate a panic alarm at any time, even if the system is not armed: unit 2: press the Press and hold down time. and at the same button twice. Unit 2 gives a beep to confirm that it has been selected. LEDs 1, 2, 3 and 4 start to blink. The siren sounds (depending on configuration, this function can be deactivated). Press a button from to tone level (1 = min., 7 = max.) An alarm is sent to the control centre. to select the beep The selected unit gives a beep to confirm the beep tone level. Exit programming mode. PROGRAMMABLE FUNCTIONS WARNING: the system goes out of programming mode after 20 seconds if you do not press any keys during this time, and the red light goes off. If this happens, you must repeat all the steps. In programming mode, the user can alter the beep tone level for all units connected to the system (only for units with beep function) and configure the signal bell function. Enter programming mode: Press and hold down time. and at the same Exit programming mode: twice. A double beep sounds and LEDs 1, 2, 3 and 4 stop blinking. Adjust beep tone level: Enter programming mode. Press Away activation button x times to choose the unit you wish to adjust the beep tone level of (each unit gives a beep as soon as it is selected). 8 Enter programming mode. Press the Home activation button. LEDs 1, 2, 3 and 4 start to blink and there is a long beep. Press to turn the signal bell on or the signal bell off. A double beep sounds and LEDs 1, 2, 3 and 4 start blinking. Press Turning the signal bell on/off: HOW TO USE THE KEYPAD to turn There is a long beep. Exit programming mode. The keypad can have up to 10 users configured. To add, remove or configure users, please contact Sector Alarm AS. INDICATOR LAMPS The keypad has indicator lamps to show the status of the alarm system. INDICATOR 1 INDICATOR 2 INDICATOR 4 INDICATOR 3 Lamps 2, 3 and 4 indicate faults that are in the memory for one system at a time. The lamps are only active when the system is not active and during the arming and disarming phases. When the system is armed, the indicator lamps go off after a few seconds. INDICATOR 1 "SYSTEM ARMED" ALIGHT: The whole system is armed. BLINKING SLOWLY: Home is armed. BLINKING RAPIDLY: Annex is armed. OFF: System is disarmed. INDICATOR 2 "SYSTEM FAULT" ALIGHT: There is a fault in the system. Faults include battery or power failure, monitoring failure, GSM/GPRS failure or jamming. If this indicator stays on, contact Sector Alarm AS. BLINKING SLOWLY: There is a fault registered in the system's memory that must be reset. OFF: No fault. INDICATOR 3 "SABOTAGE WARNING" ALIGHT: There is a sabotage alarm on the system. BLINKING SLOWLY: There is a sabotage message in the system's memory that must be reset. OFF: No sabotage message. INDICATOR 4 "ALARM TRIGGERED" ALIGHT: The alarm has been triggered or a detector in the system has been triggered. This includes opening a door contact, a motion sensor or a smoke detector. BLINKING SLOWLY: There is an alarm registered in the system's memory that must be reset. OFF: No alarm triggered. HOW TO USE THE KEYPAD 9 KEYPAD TONES ACTIVATION COMPLETED ACTIVATION OF THE ENTIRE SYSTEM After the last door is closed, three rapid beeps Sequence of 3 modulated tones Confirms that the system is armed when the outer door is closed. Duration: 4 seconds When activating the entire system, this confirms that the system has received a valid code or a valid tag has been used and that the entire system is preparing to be armed. ENTRY DELAY On entry...one beep per second ACTIVATION OF HOME ACTIVATION OF ANNEX Sequence of 2 modulated tones Duration: 2.5 seconds When activating part of the system, this confirms that the control panel has received a valid code or a valid tag has been used and that part of the system is preparing to be armed. This entry tone continues for 30 seconds* after you have opened the outer door. You must disarm the system during this time. DISARMING Long, continuous beep Duration: 2.5 seconds EXIT DELAY Confirms that the system has been properly disarmed. On activation...one beep per second FAULT 7 rapid beeps followed by 7 more Activation of the entire system: the beeps continue until the outer door is closed. Activation of the Home function: the beeps continue for 30 seconds* until the system is armed. This indicates a fault in the system. ALERT 4 beeps in the event of alert ...sent via the keypad Confirms the transmission of an alarm to Sector Alarm AS. *Defined by the user on installation 10 HOW TO USE THE KEYPAD INFORMATION AND MAINTENANCE CLEANING THE KEYPAD Use only a dry cloth (no cleaning products) to clean the keypad/control panel. SAFETY WHEN REPLACING AND HANDLING BATTERIES Risk of fire, explosion and burns; the battery must not be recharged, dismantled, heated over 100 °C or incinerated. It is normally safe to remove the battery by hand, but ensure that the battery poles are not shortcircuited and the battery is not damaged when it is removed. Discharged batteries must be disposed of in accordance with national and local regulations. If the battery is damaged, it must be removed immediately using personal protective equipment and disposed of in a safe manner (see the battery manufacturer's specifications for such situations). HOW TO USE THE KEYPAD 11 Using the remote control with 3 indicator lamps The remote control can be used to arm or disarm the alarm system, or to trigger an audible or silent alarm. The remote control is an optional extra, but from 1 to 10 remote controls of this type can be used on the system. It has a loop that can be fastened to a normal keyring. ACTIVATING ALL OR PART OF THE SYSTEM ACTIVATING ANNEX If the system has an annex: Note that when using this remote control, activation occurs immediately. Only arm the system when you are outside the area to be secured. To activate annex, press and at the same time. Activating all or part of the system: To disarm the system, press and at the same time. Press the Activation button for All or Part of the system. DISARMING The associated lamp blinks while communicating with the control panel and then remains lit for 3 seconds to confirm that the system is armed. To disarm all or part of the system, press the disarm The activation tone is given by the control panel. The associated lamp blinks while communicating with the control panel and then remains lit for 3 seconds to confirm the instruction. The disarmed tone is given by the control panel. button . DISARMING ALSO STOPS THE SIREN, BUT DOES NOT STOP TRANSMISSION TO SECTOR ALARM AS 12 USING THE REMOTE CONTROL DISARMING AFTER AN ALARM HAS BEEN TRIGGERED PANIC ALARM If an alarm has been triggered during your absence: Hold down the buttons and When you press the disarm button blink slowly. You can activate a panic alarm at any time, even if the system is not armed: The system is not disarmed at the first attempt, so as to avoid beep tones that might attract an intruder's attention. To confirm disarming, press the button once again. at the same time for 2 seconds. , all three lamps The associated lamp blinks rapidly while communicating with the control panel and then remains lit for 3 seconds to confirm disarming. Depending on how it is configured, the siren on the panel may be triggered. An alarm is sent to Sector Alarm AS. CHANGING THE BATTERY IN THE REMOTE CONTROL As the battery begins to lose its charge, the LEDs gradually become fainter. CHECKING THE STATUS OF YOUR SYSTEM Insert a small screwdriver into the opening on the back of the cover. Lever the screwdriver upwards and the front of the cover will loosen. To check the status of your system, hold down the Use the screwdriver to gently push the old battery out of its holder and insert a new battery. control button for 2 seconds All three LEDs light several times in succession, then the LED that indicates armed or disarmed stays lit for 3 seconds. To close the cover, first insert the lower part of the front and then push the upper part into place until it clicks. WARNING: IF THE WRONG BATTERY IS USED THERE IS A RISK OF EXPLOSION. ONLY USE TYPE CR2032 (PANASONIC ELLER GP). USING THE REMOTE CONTROL 13 How the detectors work 14 HOW THE DETECTORS WORK 1. GLASS BREAK DETECTOR (FG8M) 4. DOOR CONTACT (DO800M) A glass break detector analyses the different frequencies emitted when glass is broken. A door contact is a magnetic contact consisting of two parts. One part is fixed to the door frame and the other to the door itself. When the door or window is opened, the detector is triggered. 2. FLOOD/TEMPERATURE SENSOR (DET8M) Can be configured to act as a flood detector or temperature sensor or both. This is ideal for fitting on equipment in bathrooms, washrooms, kitchens and other areas with water. 3. PIR VIDEO DETECTOR (CAMIR) A PIR detector is a motion sensor that reacts to temperature fluctuations caused by a person moving around. When this detector triggers an alarm, it simultaneously takes photographs that are transmitted to Sector Alarm's control centre (only applies if the device has a camera fitted). Always ensure that all doors and windows are closed before you leave your home. When you activate the system, activation of a detector is indicated if one or more contacts other than the exit door are not closed. 5. SMOKE DETECTOR (DFS8M) A smoke detector fitted in the ceiling covers up to 50 square metres in an open area. The detector can react to steam/cooking fumes. Avoid smoking in the vicinity of this detector. 6. VIBRATION DETECTOR (SKH8M) A vibration detector fitted to a window or door frame senses vibrations caused by an impact. HOW THE DETECTORS WORK 15 Maintenance and recommendations Check your system every three months. Avoid impacts to the components and ensure especially that you do not drop the wireless remote control. Must not be immersed in water. Only use a damp cloth to clean components (not cleaning products). Keep clean and dry at room temperature. Used batteries should be disposed of in containers for the purpose. Avoid prolonged exposure to the sound of the siren. Do not hide motion sensors behind curtains, furniture etc. Components must not be painted or papered over. Do not try to open or move components. They are protected against sabotage and some of them could cause electric shock. TESTING TRANSMISSION TO THE CONTROL CENTRE The best way to test this is not to disarm the alarm when entering the home when the alarm is activated. REMEMBER: The control centre must always be advised in advance by telephoning 03033 so that no security guards are sent out. 16 MAINTENANCE AND RECOMMENDATIONS Notes _______________________________________________________________________________________________ _______________________________________________________________________________________________ _______________________________________________________________________________________________ _______________________________________________________________________________________________ _______________________________________________________________________________________________ _______________________________________________________________________________________________ _______________________________________________________________________________________________ _______________________________________________________________________________________________ _______________________________________________________________________________________________ _______________________________________________________________________________________________ _______________________________________________________________________________________________ _______________________________________________________________________________________________ _______________________________________________________________________________________________ _______________________________________________________________________________________________ _______________________________________________________________________________________________ _______________________________________________________________________________________________ _______________________________________________________________________________________________ _______________________________________________________________________________________________ NOTES 17 Notes _______________________________________________________________________________________________ _______________________________________________________________________________________________ _______________________________________________________________________________________________ _______________________________________________________________________________________________ _______________________________________________________________________________________________ _______________________________________________________________________________________________ _______________________________________________________________________________________________ _______________________________________________________________________________________________ _______________________________________________________________________________________________ _______________________________________________________________________________________________ _______________________________________________________________________________________________ _______________________________________________________________________________________________ _______________________________________________________________________________________________ _______________________________________________________________________________________________ _______________________________________________________________________________________________ _______________________________________________________________________________________________ _______________________________________________________________________________________________ _______________________________________________________________________________________________ 18 NOTES Notes _______________________________________________________________________________________________ _______________________________________________________________________________________________ _______________________________________________________________________________________________ _______________________________________________________________________________________________ _______________________________________________________________________________________________ _______________________________________________________________________________________________ _______________________________________________________________________________________________ _______________________________________________________________________________________________ _______________________________________________________________________________________________ _______________________________________________________________________________________________ _______________________________________________________________________________________________ _______________________________________________________________________________________________ _______________________________________________________________________________________________ _______________________________________________________________________________________________ _______________________________________________________________________________________________ _______________________________________________________________________________________________ _______________________________________________________________________________________________ _______________________________________________________________________________________________ NOTES 19 Domonial User Manual Sector Alarm AS Vitaminveien 1A, PB 113 GREFSEN, 0409 OSLO Telephone 03033 Fax 23399401 E-mail [email protected] P/N Z-21001-0 Rev0 2008 www.sectoralarm.no